How to set up an Active Directory
The following guide is about to explain how you can create and set up a new Active Directory service and configure a new Domain in that service. Then, you will be able to learn about how you can add and configure a new Active Directory user. The document contains a step by step guide with each step having a short description and a screenshot to show you what you need to do next. The guide does not require any specific knowledge and can be completed within ten to fifteen minutes. So, let's get started.
Step 1 - Open Server Manager and add Active Directory
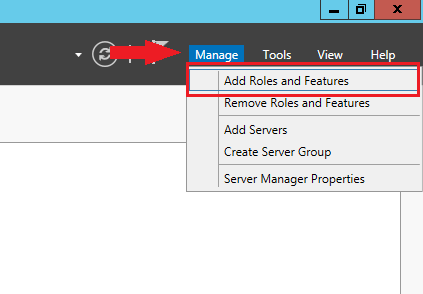
The first step of this guide is to open the Server Manager application in Windows Server. After you opened the Server Manager, you need to select the Manage menu as you can see it in Figure 1. From the drop-down list, you just need to click on the 'Add Roles and Features' option.
Step 2 - Select installation type
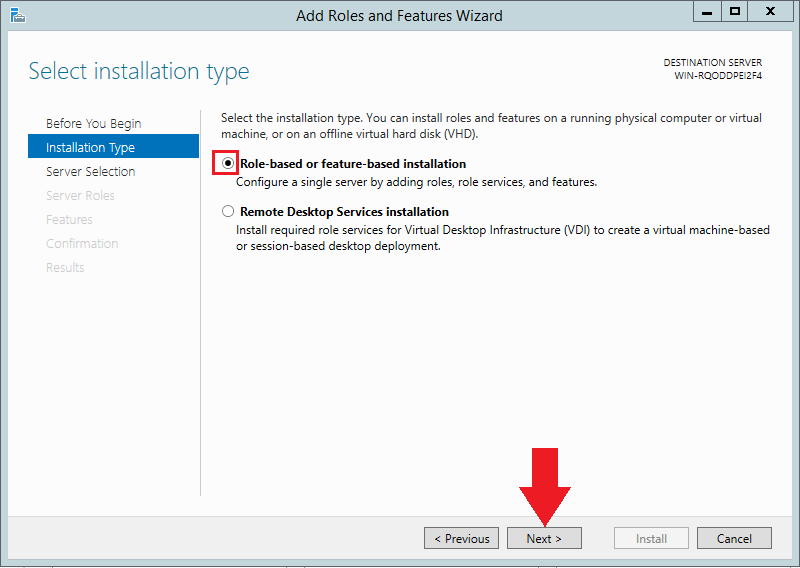
The next window that show up for you is the installation wizard of the Active Directory. This window is going to guide you through the configuration of the Active Directory. The first step here is to select the installation type. As Figure 2 demonstrates it, please select the 'Role-based and feature-based installation' and click on the Next button.
Step 3 - Select a server
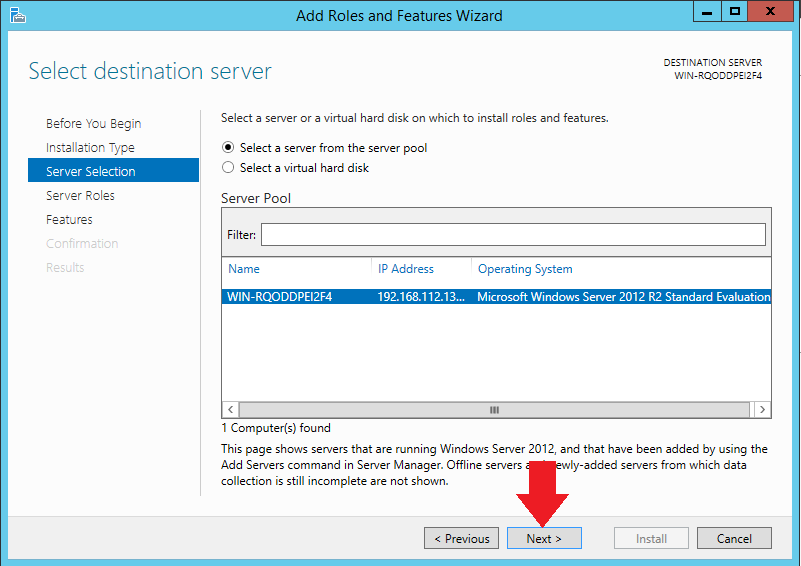
The next step of the installation wizard is to select a server for Active Directory. Here, you can select a server from the server pool or select a virtual hard disk. At this point, you need to select the Windows Server from the list as you can see it in Figure 3 and click on Next.
Step 4 - Setup server roles and features
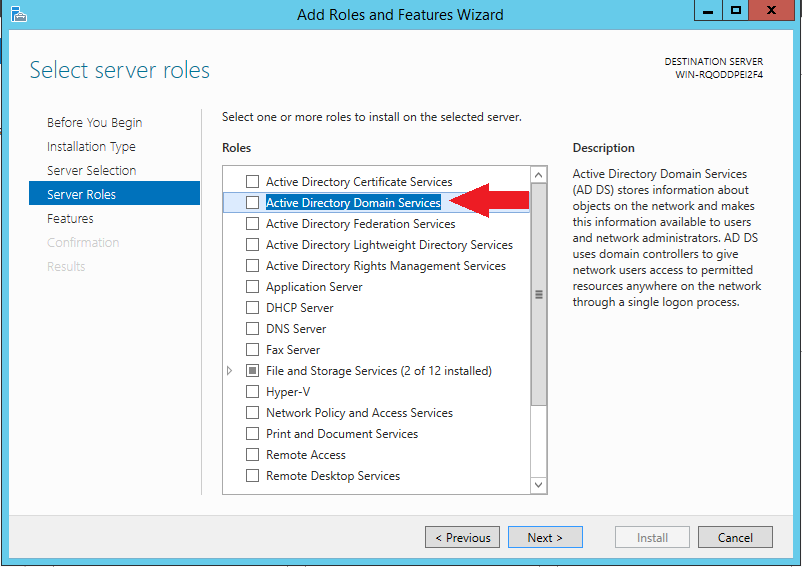
The next menu of the installation wizard is where you can select the server roles. The Roles menu contains a list of the available server roles. Here, you need to select the 'Active Directory Domain Server' option as Figure 4 shows that.
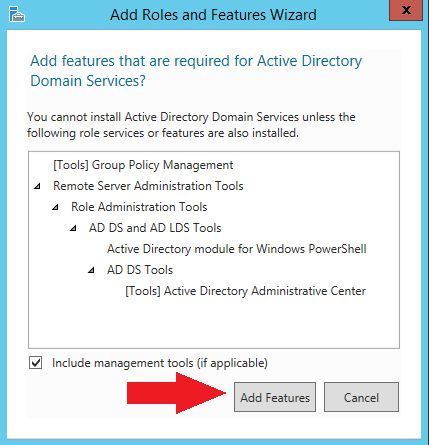
After you selected the server role, a pop-up window appears which lists all the features that required for the Active Directory Domain Server server role. Here you just have to click on the 'Add features' button (Figure 5) to add these features to the selected server role. Lastly, just click on 'Next' to move to the next step.
Step 5 - Confirm the settings and install Active Directory
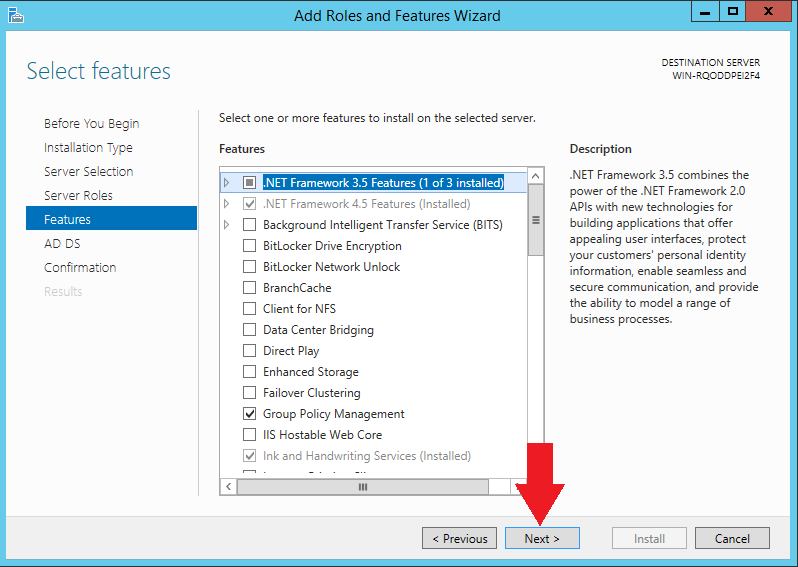
To finish the creation of the Active Directory, you just need to perform some final configuration. In the next menu, which is called 'Features', you can select the additional features that you would like to install with the Active Directory. Here, like in Figure 6, you can leave the selected features as default and click on 'Next'.
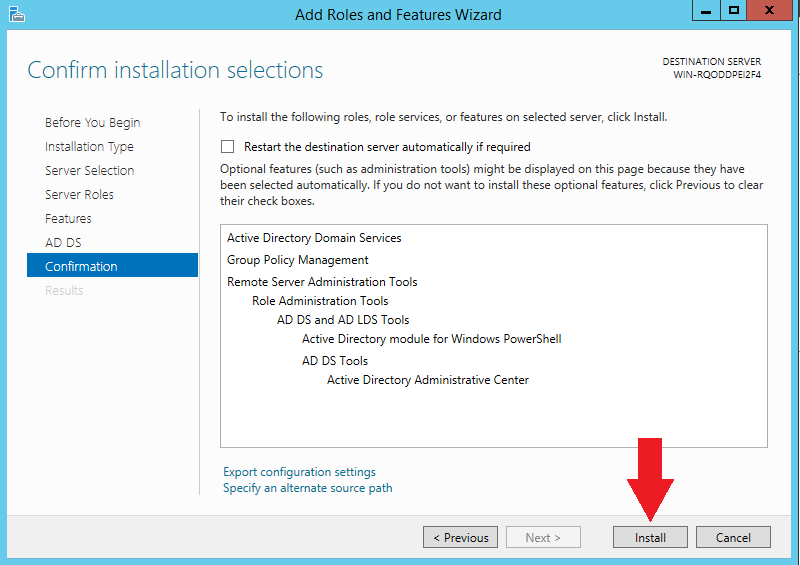
The next, AD DS window is a description page about the Active Directory Domain Services. After you read it, you can click on 'Next'. After that, you will receive a confirmation window, where you can see the details of the Active Directory that you are about to create. If you find everything right, you can click on 'Install' to install the Active Directory as Figure 7 shows it.
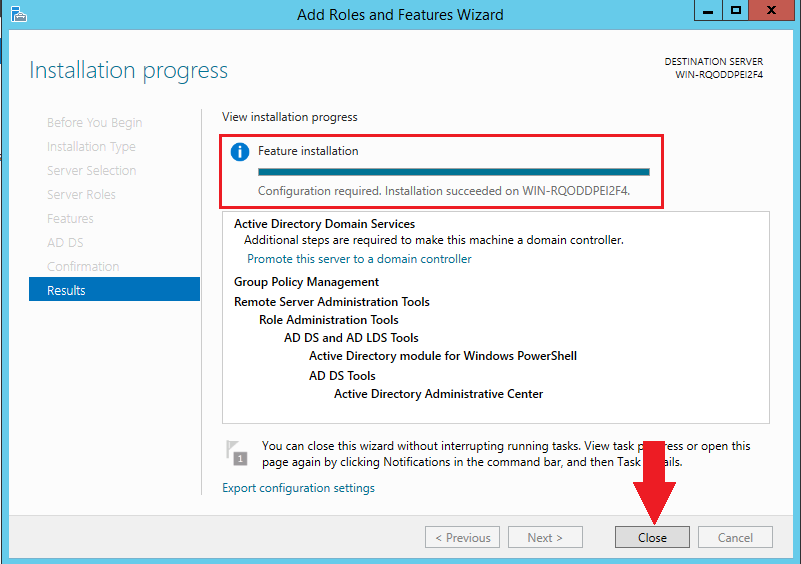
As soon as you clicked on Install, the installation of the Active Directory starts and you will be able to see the progress in the 'Results' window. If the installation finished, as you can see it in Figure 8, you can click on the Close button to close the Installation Wizard.
Step 6 - Promote the server to a domain controller
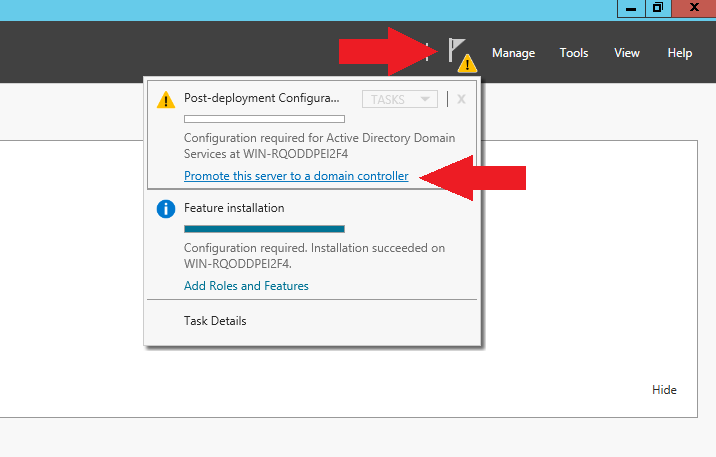
At this point, you have just installed the Active Directory. The next thing that you have to perform is to promote the newly created server to a domain controller. To do that, open the Server Manager application, and click on the flag icon as Figure 9 shows that. After that, from the drop-down menu, select the 'Promote this server to a domain controller' option.
Step 7 - Configure deployment and domain options
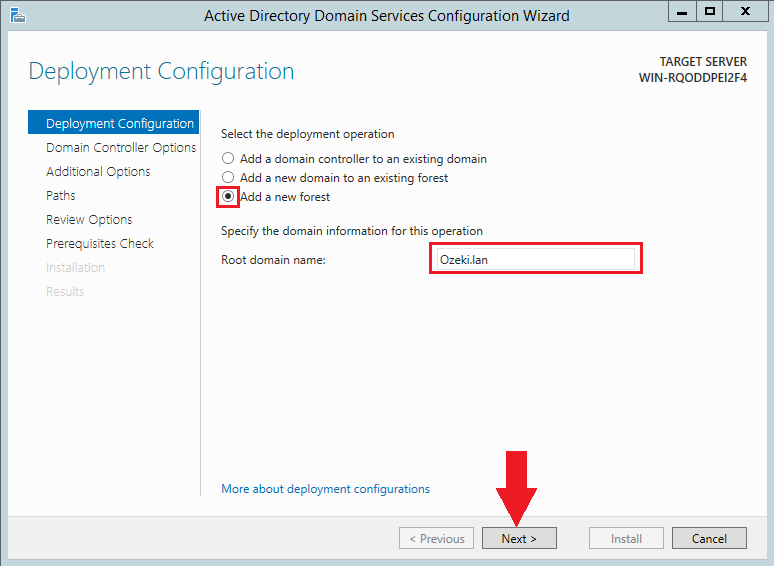
The first step of the configuration here is to set up the deployment operation. Here, please select the 'Add a new forest' option from the list of deployment operations. Then, you need to specify the name of the root domain as you can see it in Figure 10. If you have done these settings, you can click on 'Next'.
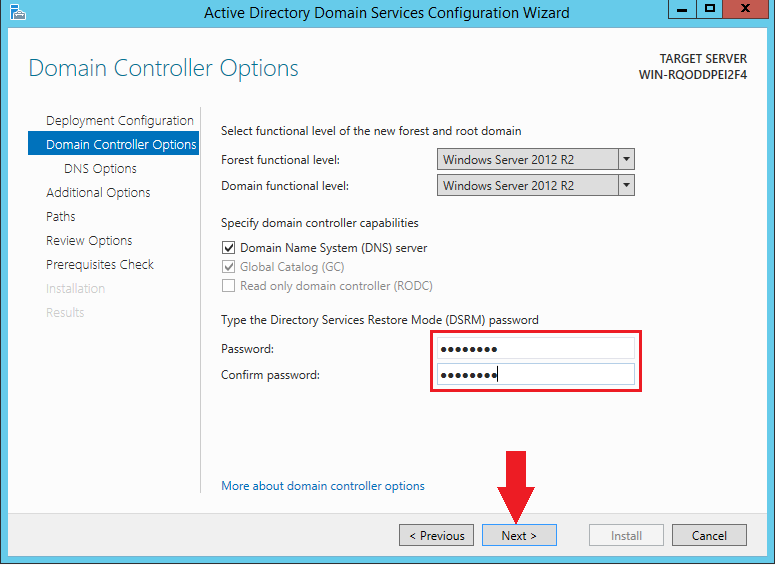
After you specified the settings of the deployment, you need to set some domain controller option in the next window. Here, you can select the forest and the domain functional level. These settings can be left as default. As Figure 11 shows that, you need to enter the password for the Directory Services Restore Mode (DSRM). By setting the password for the DSRM, the domain controller allows you to repair or restore an Active Directory database. If you set the password, you can just click on the 'Next' button to continue.
Step 8 - Configure additional options
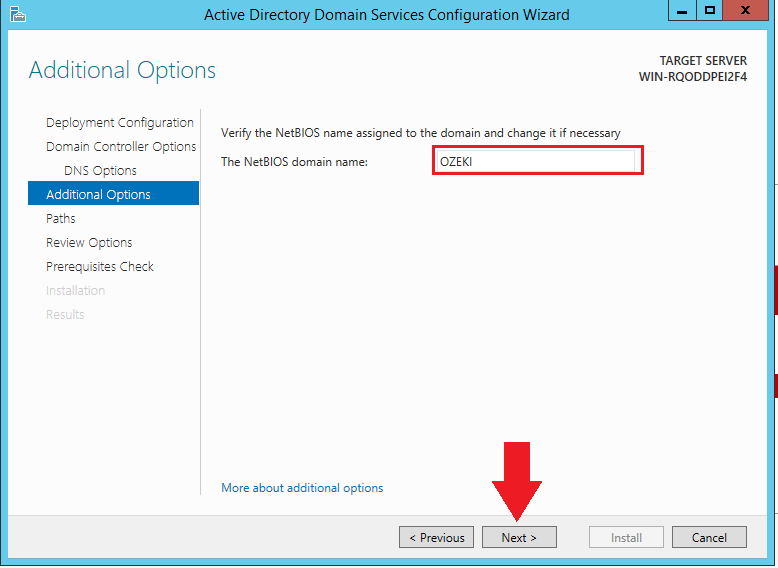
After setting the domain controller option, now, you need to configure some additional settings too. In the Additional options menu, you need to specify the domain name of NetBIOS as you can see it in Figure 12.
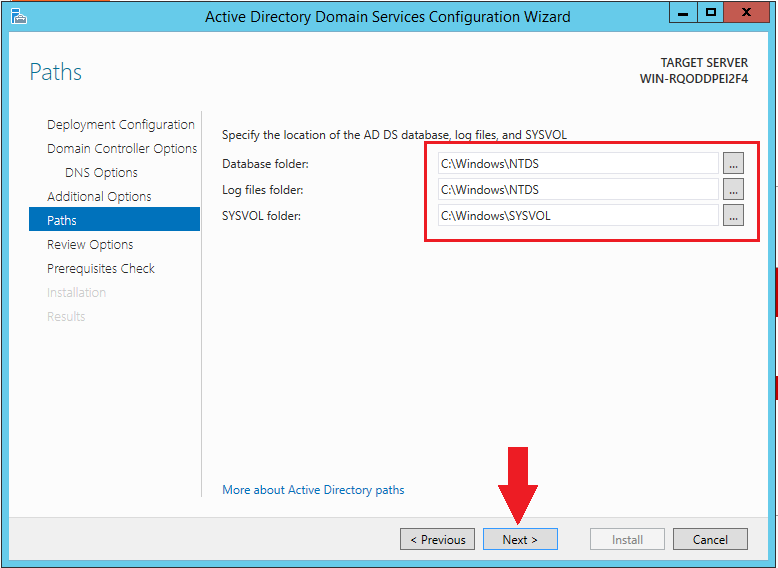
The next configuration window allows you to specify the paths for the database, log files, and for the SYSVOL as well. As Figure 13 demonstrates that, you can enter or browse a location for these files. If you have done that, you can click 'Next'.
Step 9 - Review and install domain controller
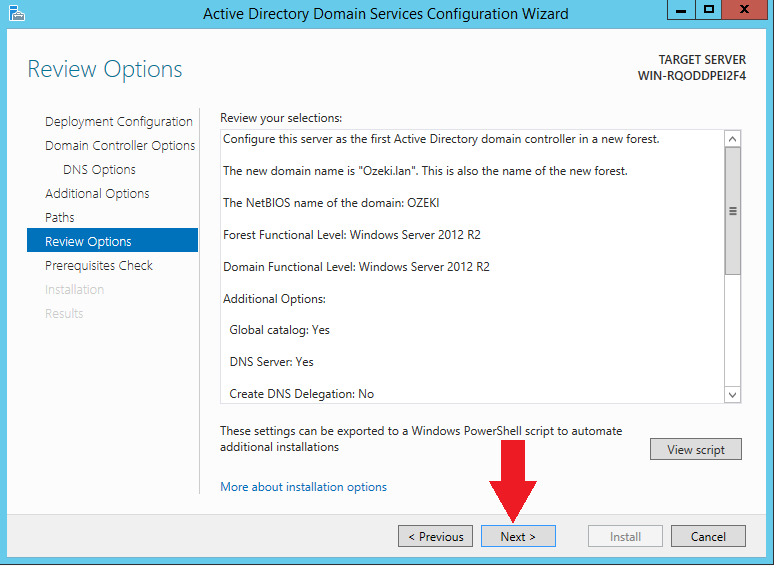
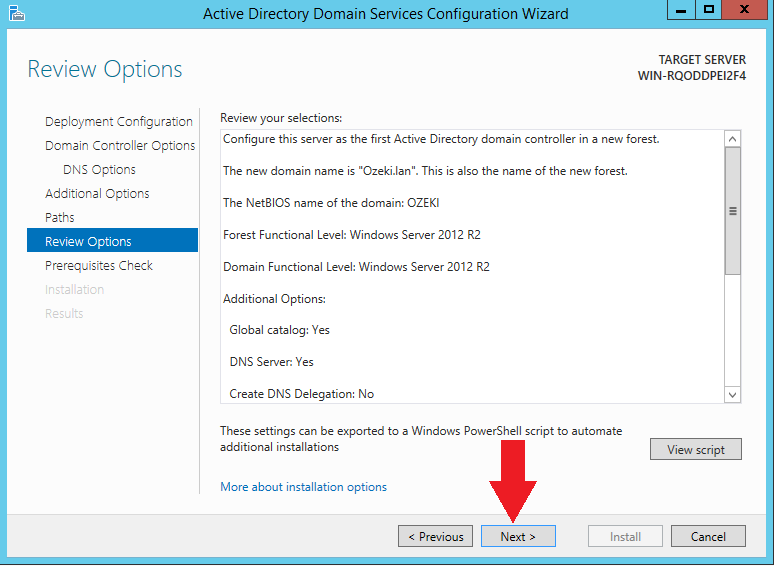
After you configured every detail of the domain controller, you will be able to see a Review menu, where you can see the review of the settings of your domain controller as Figure 14 shows that. If you find the configuration right, you can move to the next page by clicking on the 'Next' button.
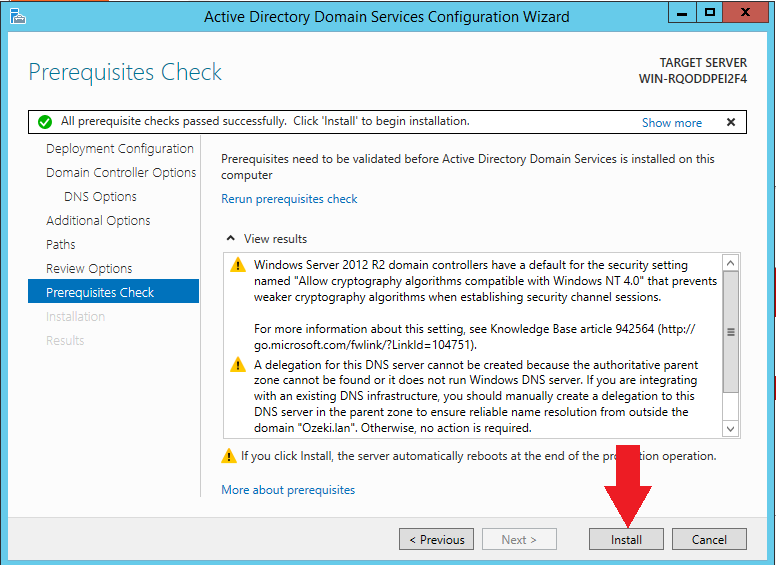
After reviewing your configuration, the system checks the prerequisites for the domain controller. If it finds everything right, it will print a message on the top of the menu like in Figure 15. The last thing that you have to do is to click on the 'Install' button to start the installation of the domain controller.
Step 10 - Create new user
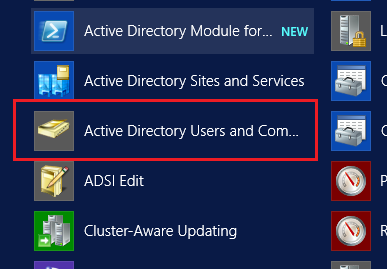
At this point, you have created and configured an Active Directory and promoted it to a domain controller. The next step is to create a user for the Active Directory. To do this, first, you need to open the 'Active Directory Users and Computers'. You can search for it in the start menu as Figure 16 shows that, and click on its icon to start it.
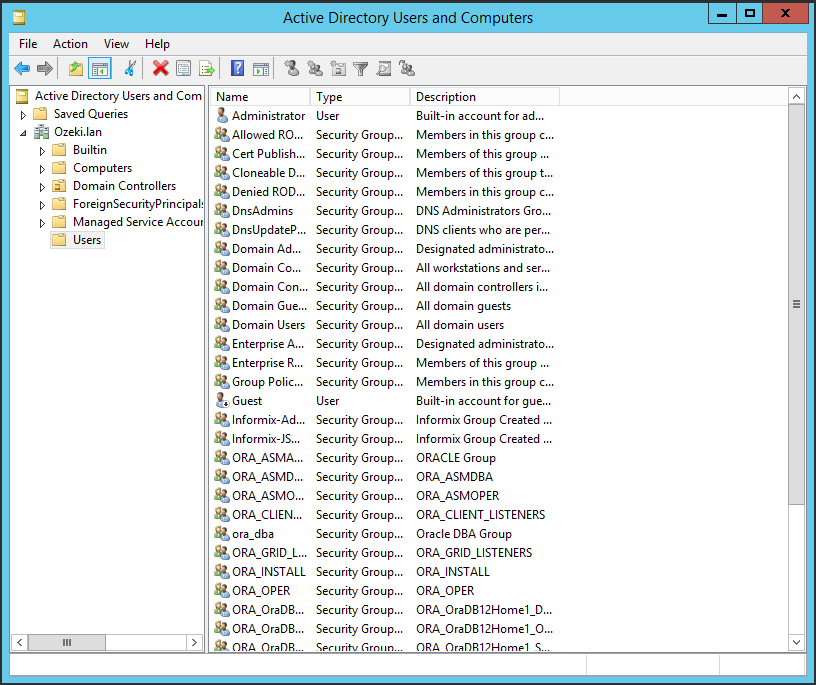
The Active Directory Users and Computers application is actually a container that lists all the users and groups attached to the domain. Figure 17 demonstrates the default list of users and groups.
In this container, you can create a new user. To do this, you need to right-click somewhere in the container, and as Figure 18 shows that, select 'New' from the options, and then, click on 'User'.
Step 11 - Configure the new user
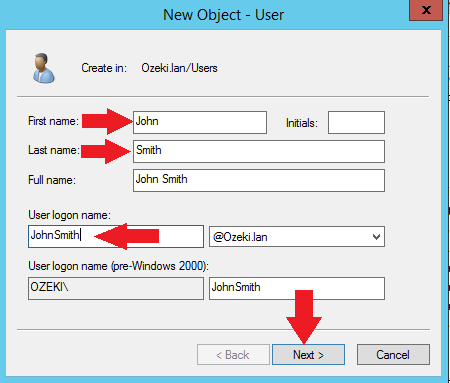
After you decided to create a new user, a pop-up window shows up, where you have to specify the details of the user. In the first menu, you need to enter a first and a last name for the user. As you can see it in Figure 19, you need to type a user logon name as well. If you entered every required detail, you can move to the next menu by clicking on 'Next'.
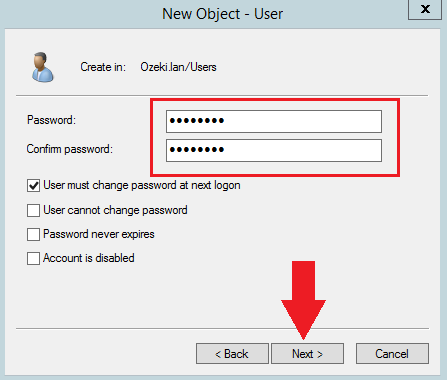
The next window is where you need to specify a password for the user. Here, as Figure 20 demonstrates that, you need to enter a password and confirming it by reentering it. In this menu, you can set some other options as well. If you finished with these, click 'Next' to continue.
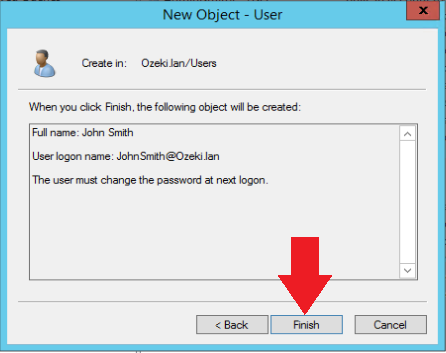
The last menu of user creation is a summarizing window, where you will be able to see the main details of the user like in Figure 21. If you find everything right, you can click on 'Finish' to create the new user.
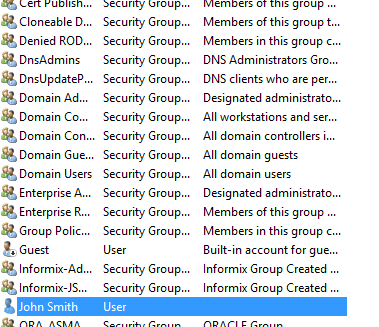
After you created the new user, it will appear in the list of users and groups of the Active Directory. Figure 22 demonstrates that after you created the new user, you will be able to find it in that list.
