Send Bulk SMS messages with Android Client
Ozeki Bulk Messenger software can send bulk SMS messages with an Android phone. In the following article you get more detailed information about sms system setup, installation and sms software download.
How does it work
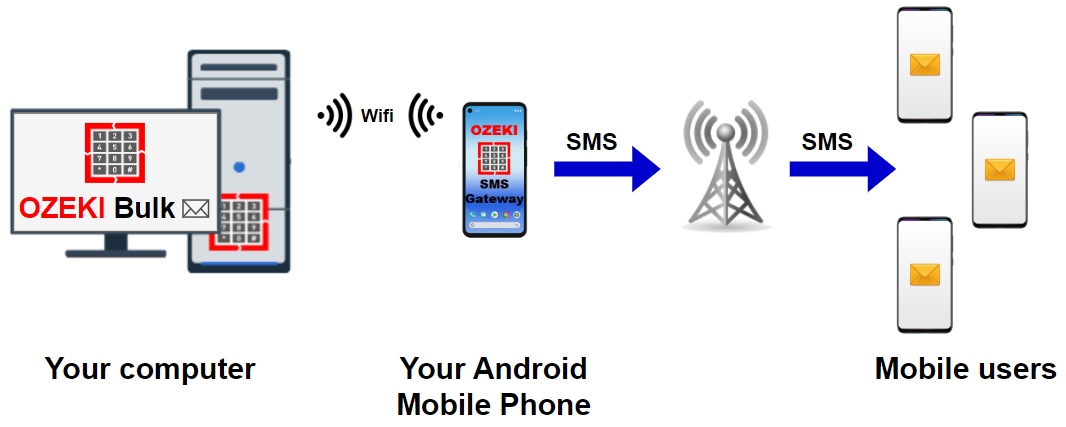
How to install the Ozeki SMS Client on Android
The following video tutorial takes you through the steps of Installing the Android SMS Client software on your Android mobile. Note, that you will need to download the Android SMS app from android-sms-gateway.com. After installation make sure you set the Ozeki app as the default SMS handler. (You may set the default SMS handler back to the original Android SMS client manually or by uninstalling the Ozeki SMS app). This will enable the app to run seamlessly in the background (Video 1).
Installation steps
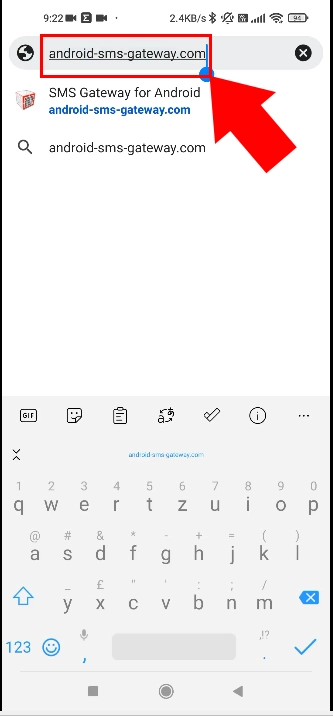
The first step of the installation is to open android-sms-gateway.com in your browser on your Android mobile (Figure 2). On this website navigate to the download page and find the link to the latest version of the hu.ozeki.smsclient_2.1-release.apk package.
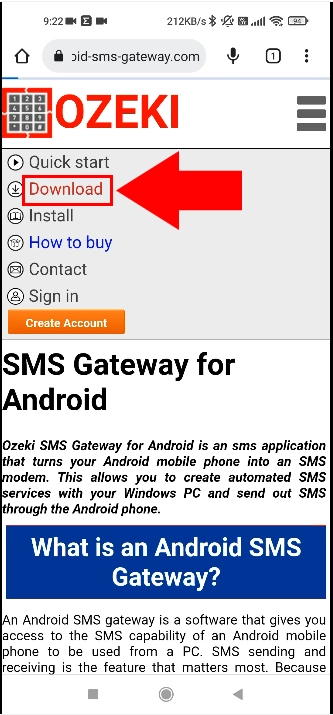
The link to the download page can be found in the top menu just below the link to the Quick start guide (Figure 3). The link's color is red. To open the download page, simply click on this link.
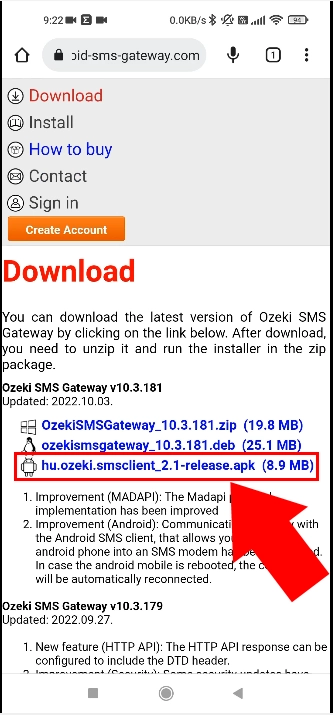
On the download page find the android logo, and click on the package name that follows the logo (Figure 4). The package name will be similar to this: hu.ozeki.smsclient_2.1-release.apk. The version number might be different.
Installation of the .apk package
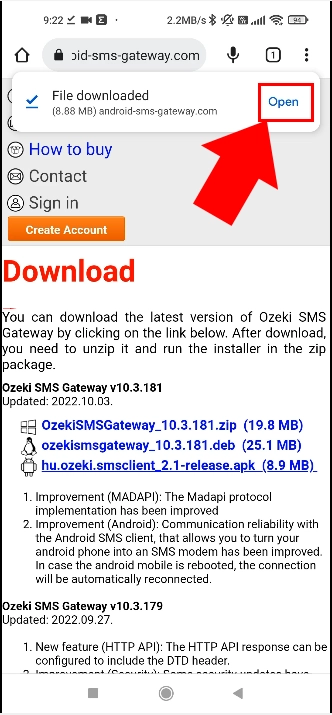
Once the installation package (.apk file) has been downloaded, you need to install it. You can do this by locating the file in your download list and clicking on it (Figure 5). Some browsers will automatically offer installation. You might receive a warning message prompting you to allow installation from a different source. You can safely allow the installation.
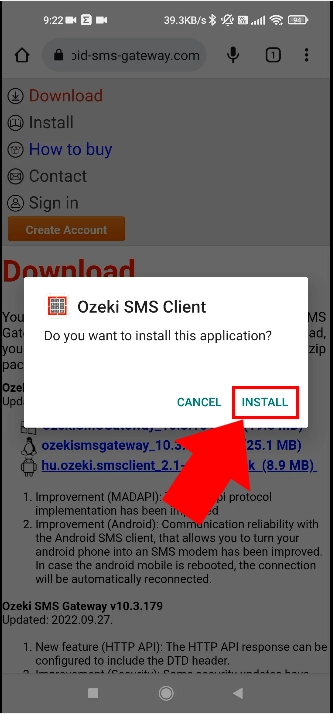
After the installation starts, you will be prompted with a dialog asking for confirmation. Simply click install in this dialog. The installation will create an icon on your home screen that will allow you to launch the Ozeki SMS client app (Figure 6).
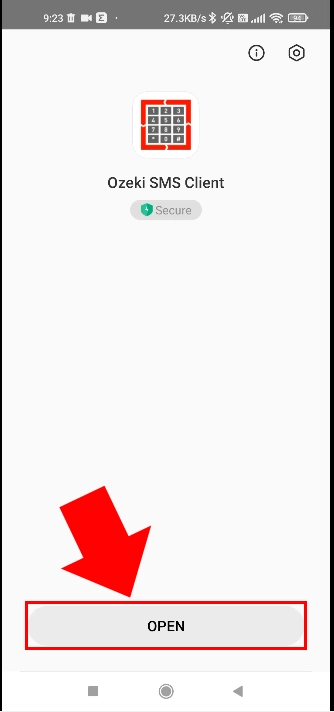
You can also launch the Ozeki SMS client app by clicking on the Open button after the installation completes (Figure 7).
Set the Ozeki SMS Client app to become your default SMS handler
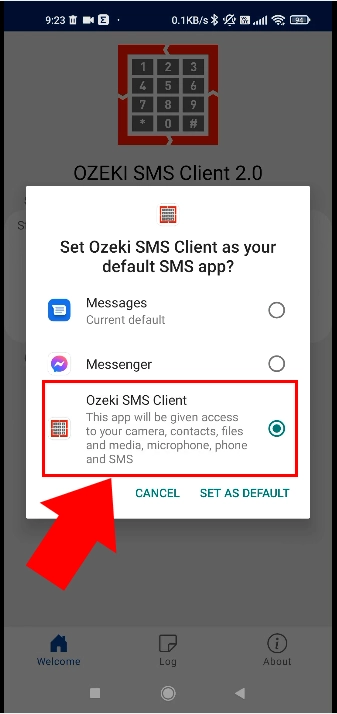
In order for the Ozeki SMS client app to operate seamlessly it must be set as the default SMS handler (Figure 8). This is a very important step. The Android OS puts apps that are not opened by the user regularly into sleep or deep sleep to save battery power. It also often removes the permissions granted to apps when they are put into deep sleep. By setting the Ozeki SMS client as your default SMS handler you can prevent it from being disabled by Android. This is required to be able to provide a reliable sms gateway service for your PC, that is able to operate for months and years without interruption.
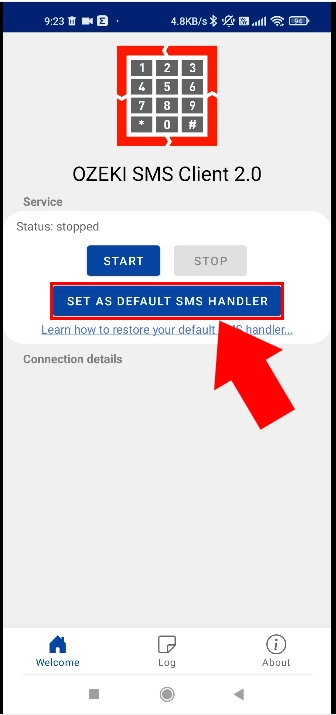
By setting the Ozeki SMS Client app as your default SMS handler, you instruct your android phone to forward all incoming sms messages to it, and you allow this app to send sms messages from your phone. This is your desired operation if you want to use your android phone as an SMS gateway (Figure 9).(You an set the SMS functionality back by uninstalling the Ozeki SMS Client from your phone, or by following the instructions in the how to configure the default sms handler in your android device guide).
Grant permissions
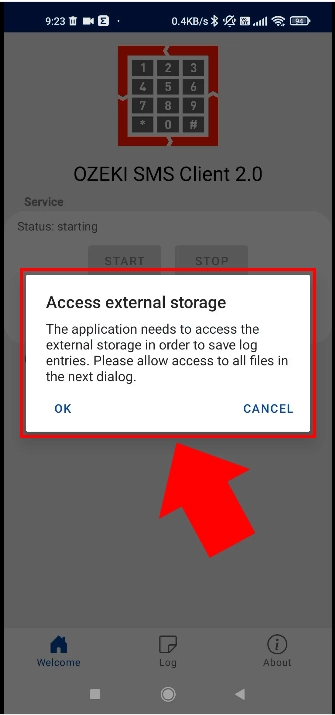
After you set the Ozeki SMS Client as your default SMS handler, you may click on the Start button to start the Gateway service. On the first attempt, the app will request various permissions to operate properly. First it will require permission for external storage (Figure 10). External storage is used for storing log files and configuration information. External storage is used in order to make it possible for you do download log files and backup configuration. This is required by most business customers.
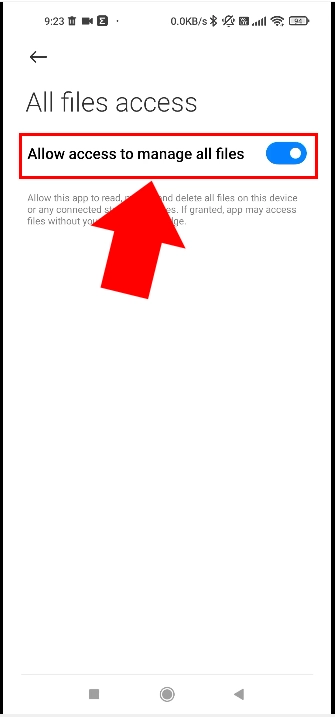
To save the logs file access permission is also mandatory (Figure 11).
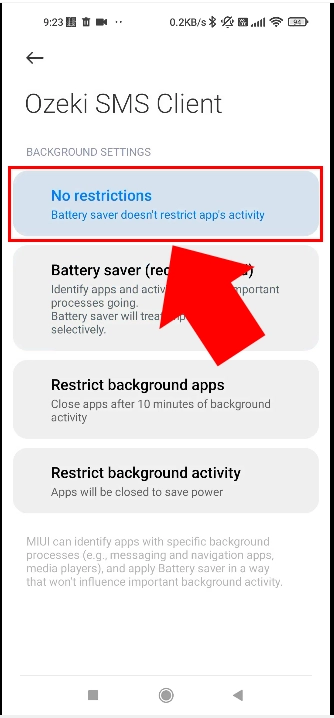
Android phones usually operate from a battery. Battery optimization allows android to disable apps to save battery power. In order to provide a reliable SMS gateway functionality your phone should always be connected to the charger. You should also disable battery optimization on the phone for the Ozeki SMS Client app (Figue 12). This will allow the Ozeki app to operate continuously without interruptions.
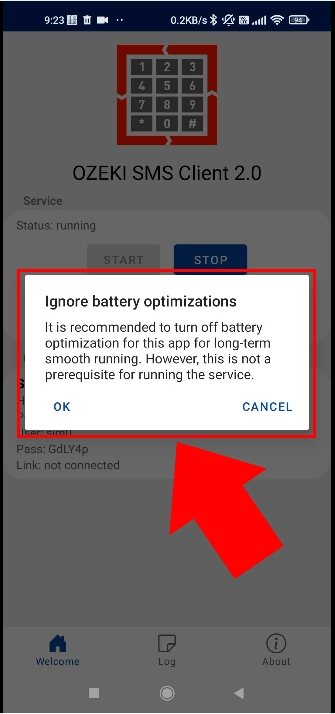
From the battery optimization menu, select no restrictions (Figure 13). This will allow your SMS service to operate reliably.
Success! Your Ozeki SMS Client is started.
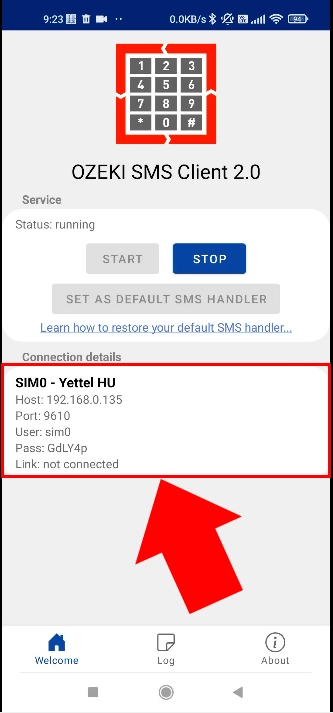
If you have completed all the steps above, your Ozeki SMS Client on your Android device is started (Figure 14). This means that your pone is now setup as an SMS gateway. It is ready to forward SMS messages coming from your PC to the mobile network. It is also ready to forward incoming SMS from the mobile network to your PC.
How to connect Android SMS Gateway to Bulk Messenger (Video)
In the following video, you can learn how to install Bulk messenger. You will learn how to connect Android SMS Gateway to Bulk messenger. At the end of the video, you will be shown how to create new messages and how to send them to recipients (Video 2).
How to connect Android SMS Gateway to Bulk Messenger (Quick Steps)
- Browse the ozeki.hu website
- Unzip the file and run the installer
- Click on 'Next' to continue
- Accept license agreement
- Installation finished, click on the 'Finish' sign
- Open Bulk Messenger app and click on 'Get started'.
- Create address book
- Click on 'Create new address book' and choose the type 'standard'
- Define address book name
- Add contact to address book and provide personal information about the contact
- Create new text message
- Define text message and press 'OK'
- Create new sms connection
- Select the Android SMS sending method
- Configure connection details (host, port, username, password)
- Switch the 'Status' button on to establish the connection
- Create delivery job and provide job details
- Start message send
- Messages sent successfull
How to connect Android SMS Gateway to Bulk Messenger (Screenshots)
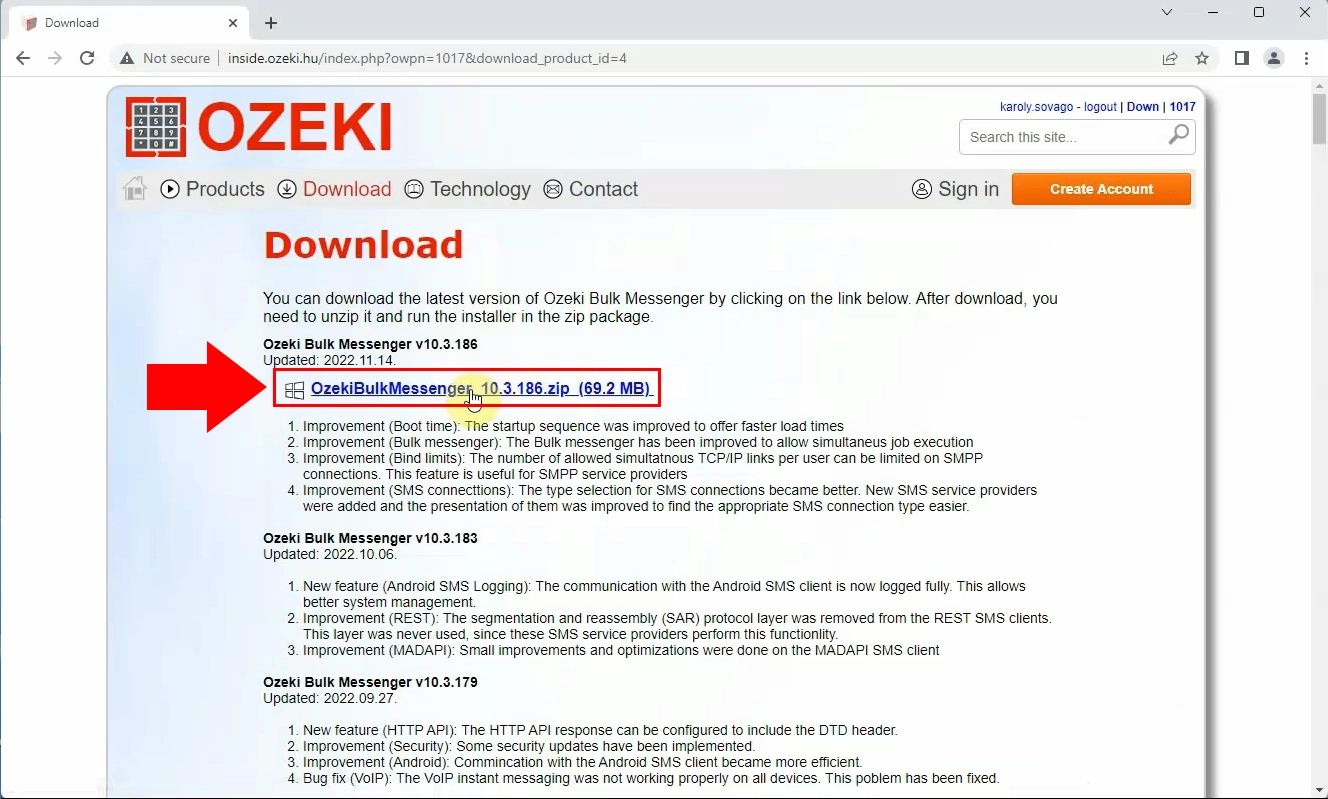
The very first step you need to take is to browse ozeki.hu. Once you are on the website you need to download the latest version of the Ozeki Bulk Messenger by clicking on the link (Figure 15). Always make sure to download the updated version of the software.
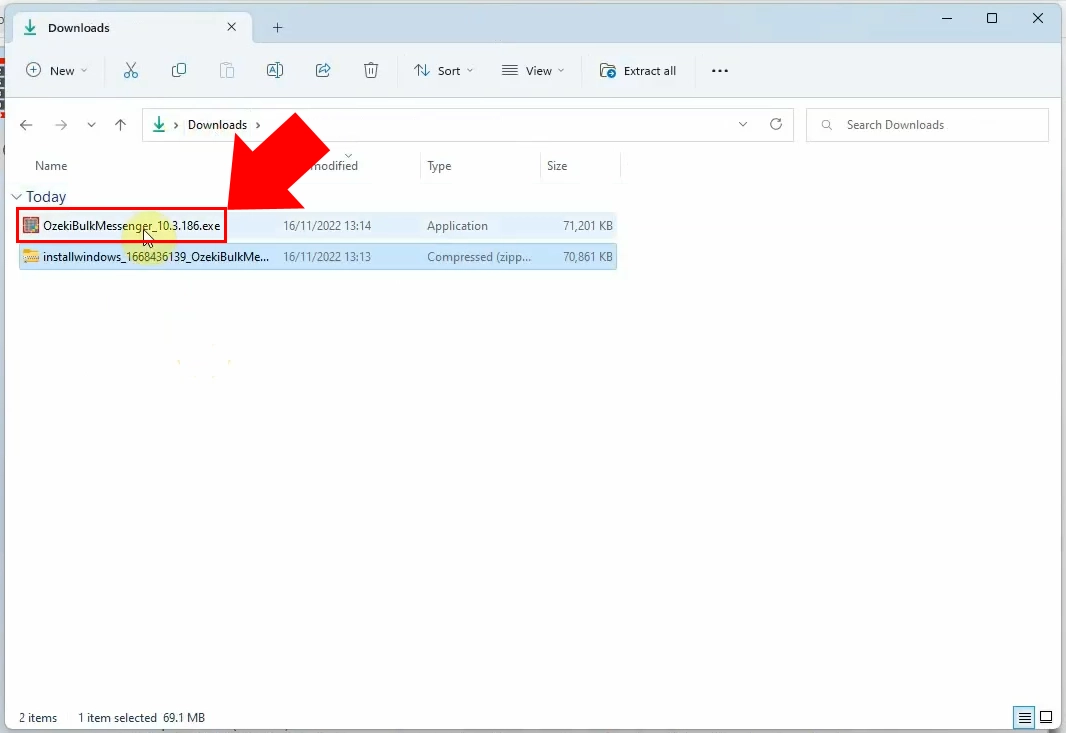
After the download you need to unzip the file and run the installer in the zip package (Figure 16).
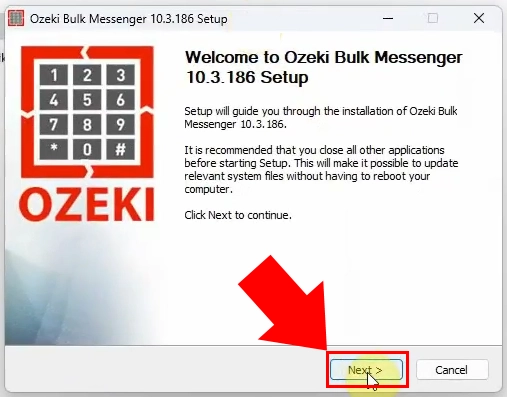
If you run the file a 'Welcome to Ozeki Bulk Messenger setup' window will pop up on your screen (Figure 17). To continue the process click on 'Next' and move on to the next step.
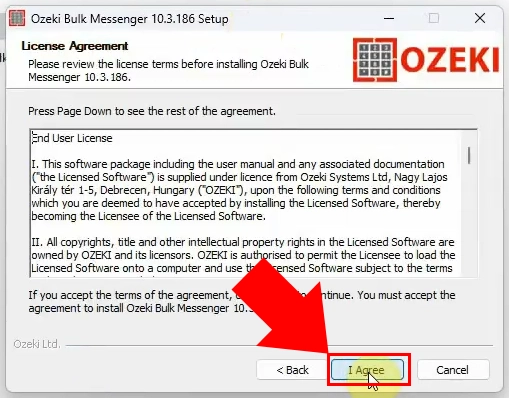
You need to accept license agreement to install Ozeki Bulk Messenger (Figure 18). Click on the 'I agree' button and move along with the process.
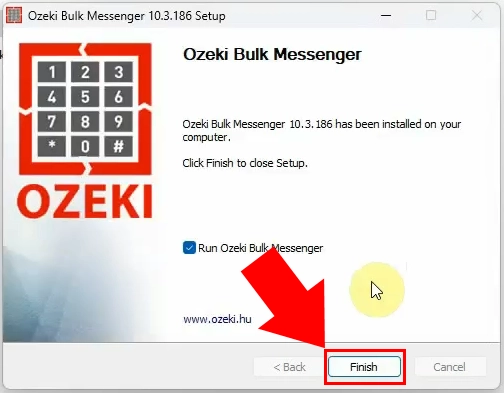
If you have previously accecpted the license aggreement your installation is finished. Click on 'Finish' and start using Ozeki Bulk Messenger (Figure 19).
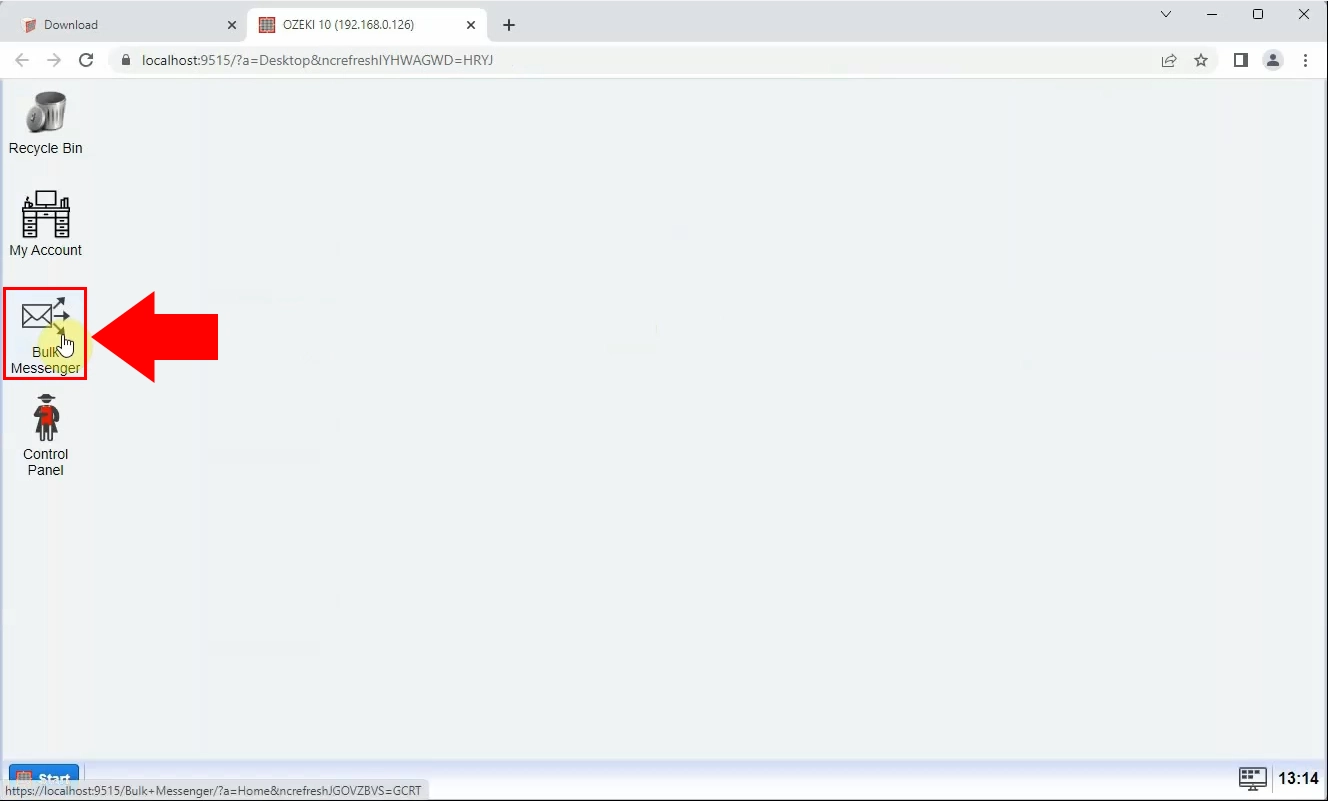
Open Bulk Messenger application. Click on 'Get started' (Figure 20).
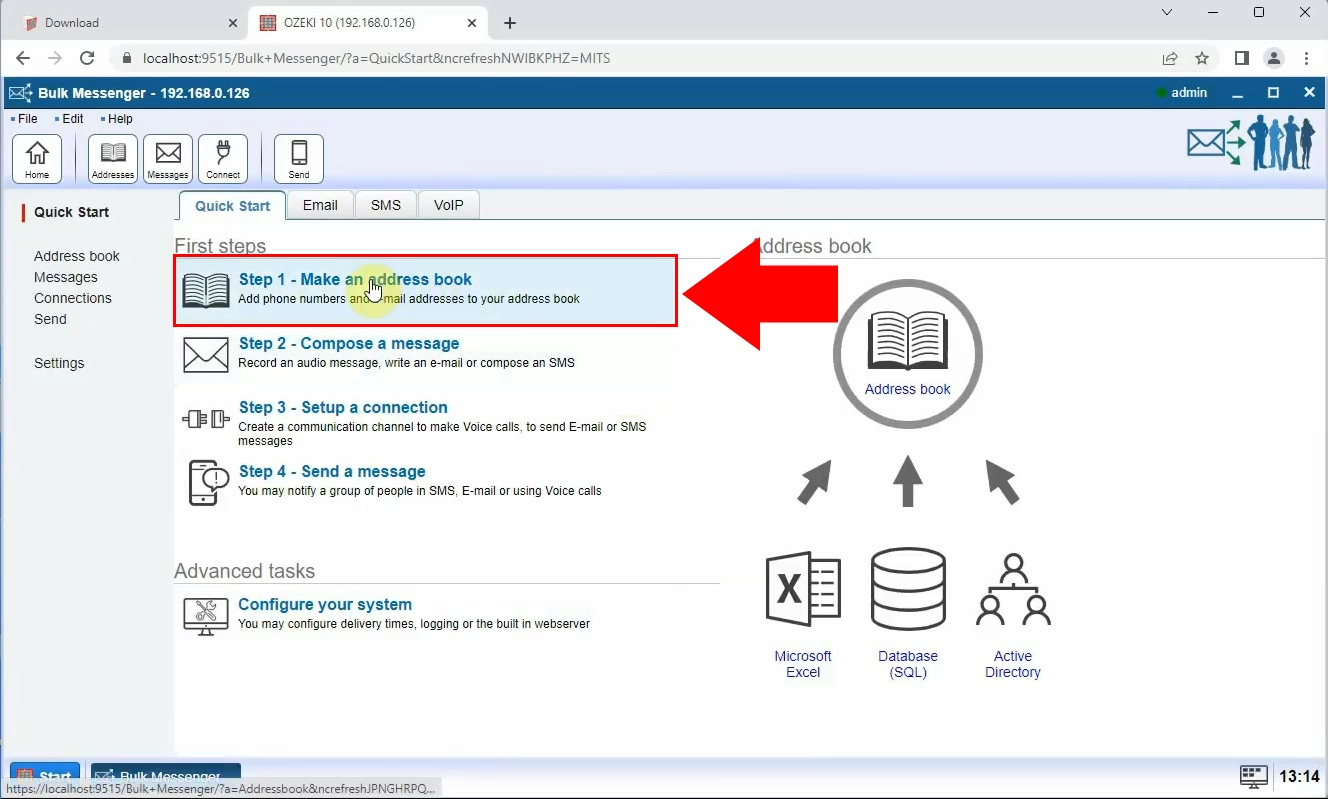
The next is creating a new address book (Figure 21).
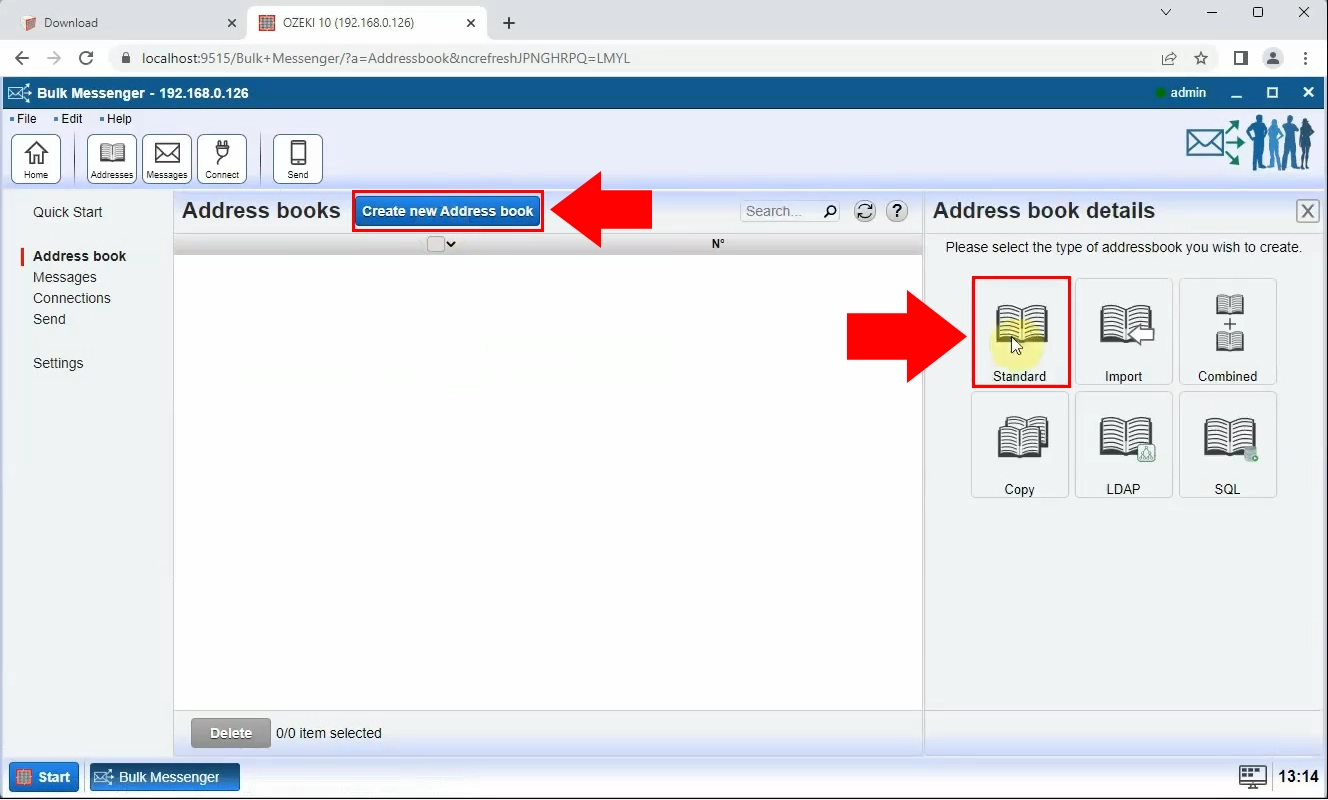
Click on 'Create a new Address book' and then choose the type 'Standard' to create a new standard Address book (Figure 22).
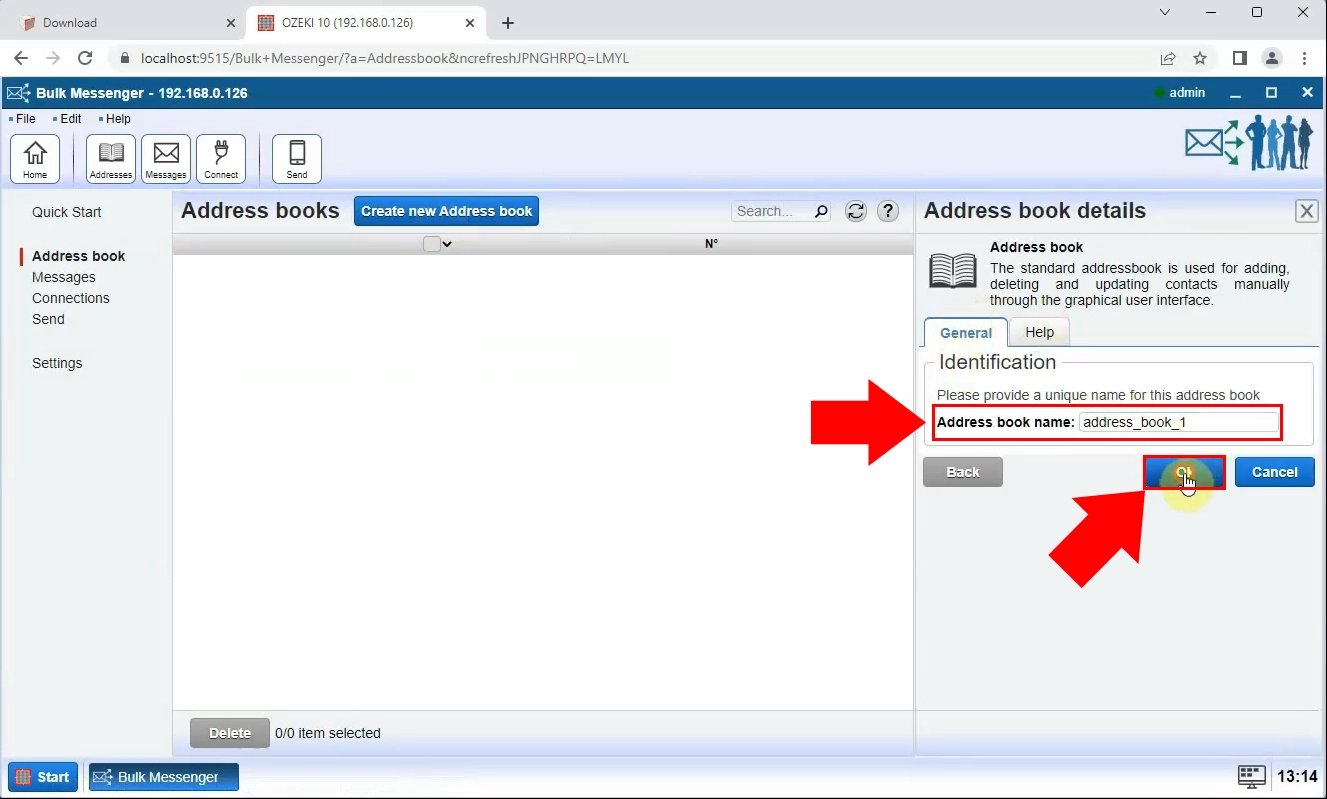
In this step you need to provide details about your newly created standard address book. You will be asked to give a name to your address book. Once you are ready click on 'Ok' to confirm this step (Figure 23).
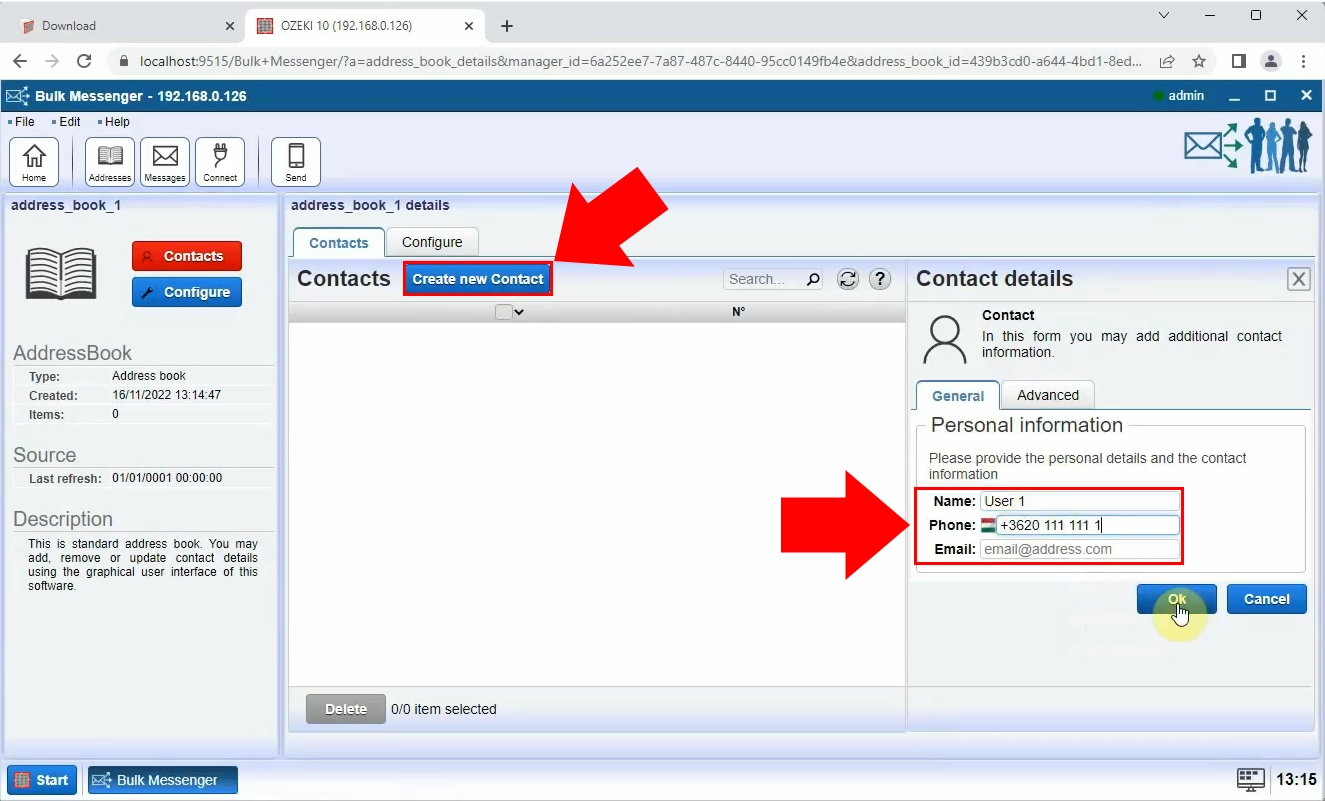
Creating a new contact is one of the most important steps in this guide. Do this by clicking on 'Create new Contact' (Figure 24). You will be required to fill out a form on contact information detail. You will have to provide a name, a valid phone number and E-mail address. If you would like to add more contacts you have to repeat this step using the correct contact details.
The next step is creating a new sms text message. Do this by clicking on the 'Create new connection' and then select the type 'text' in the connection details window (Figure 25).
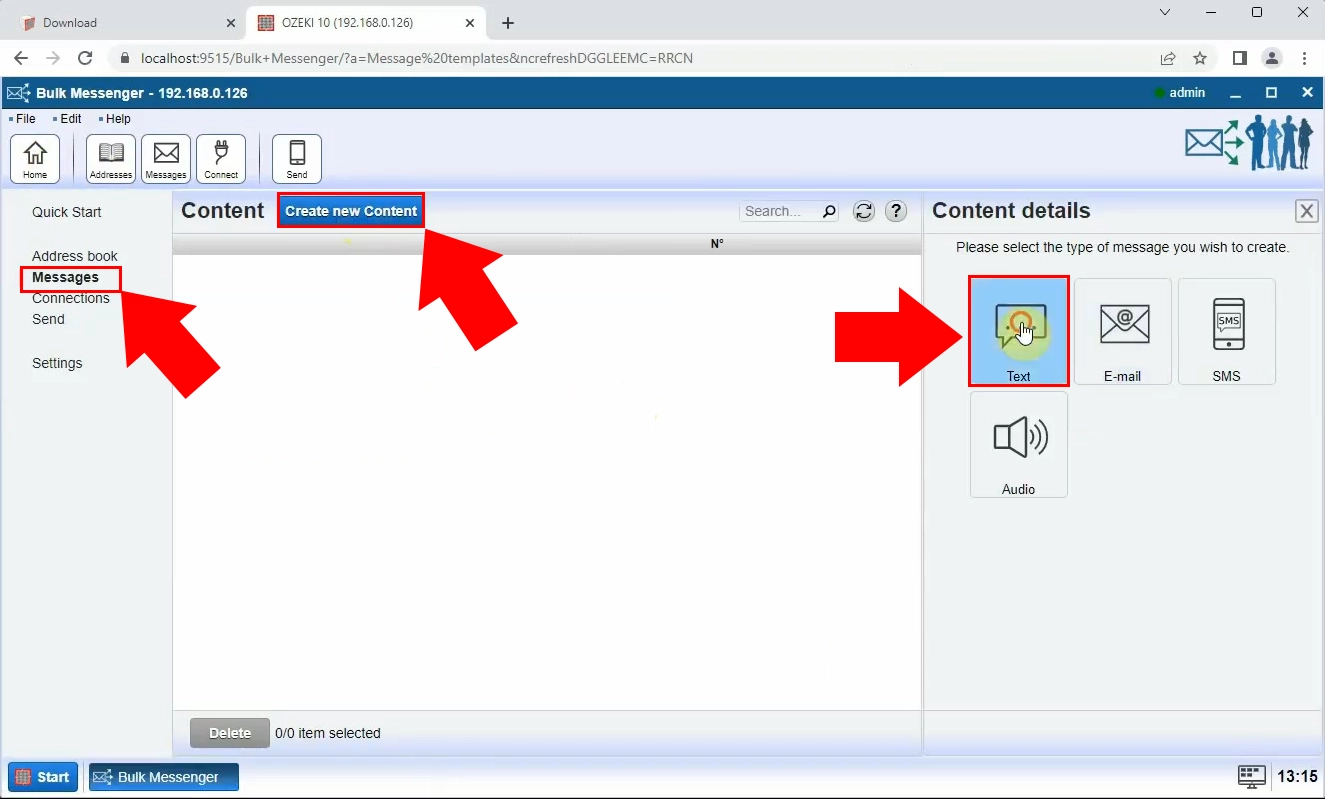
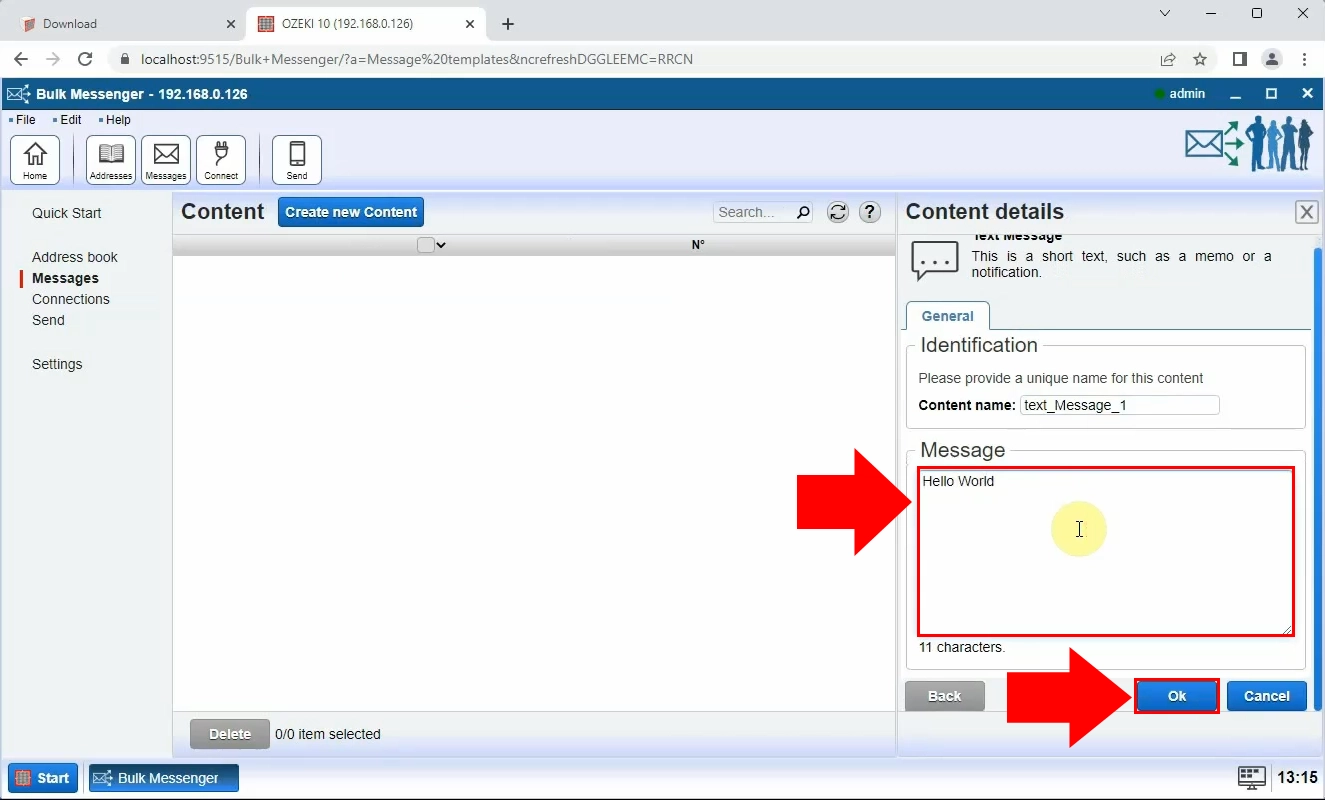
After clicking on the type 'text' you will be given the option to write and define your first text using Ozeki SMS Messenger (Figure 26).
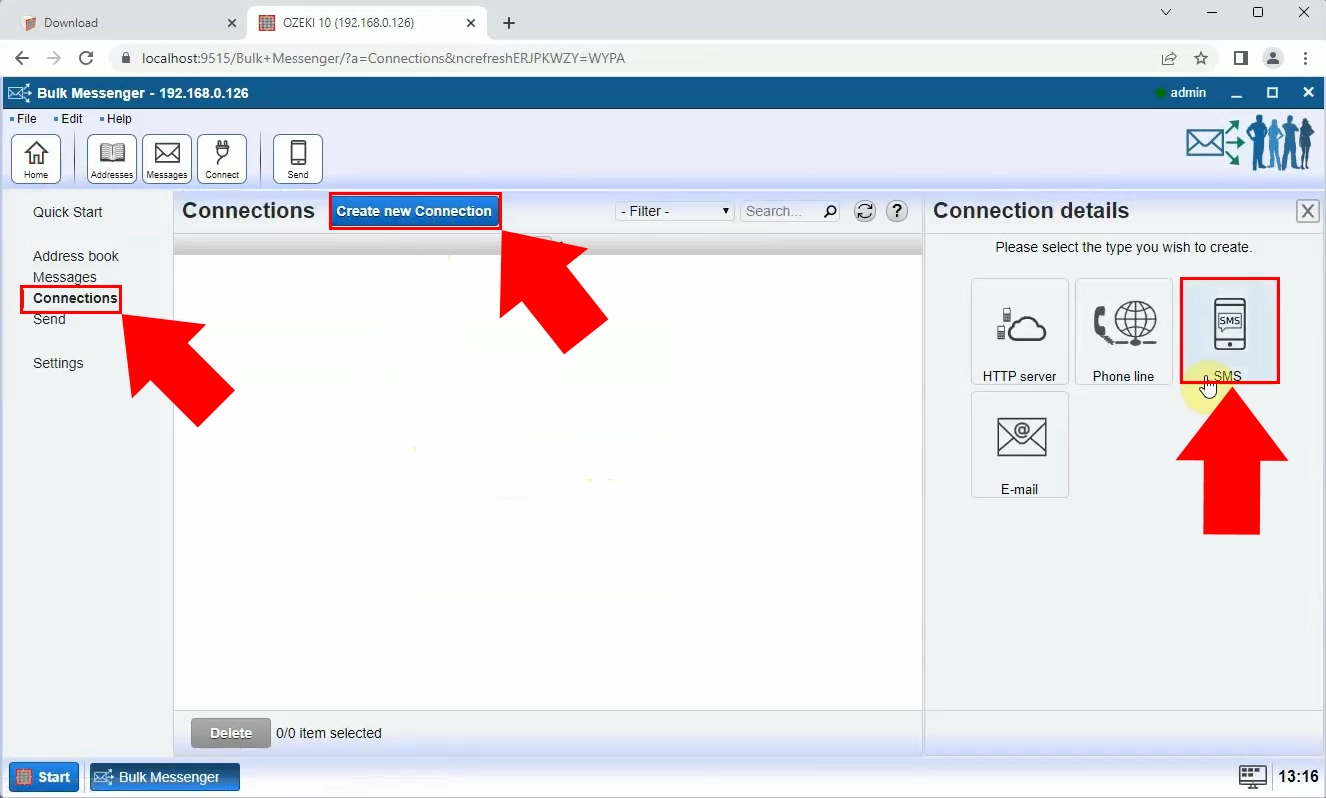
Creating a new SMS connection is the next important step (Figure 27). This step is quite similar to the previous. The only difference is that instead of the type 'Text' you need to choose the type 'SMS'.
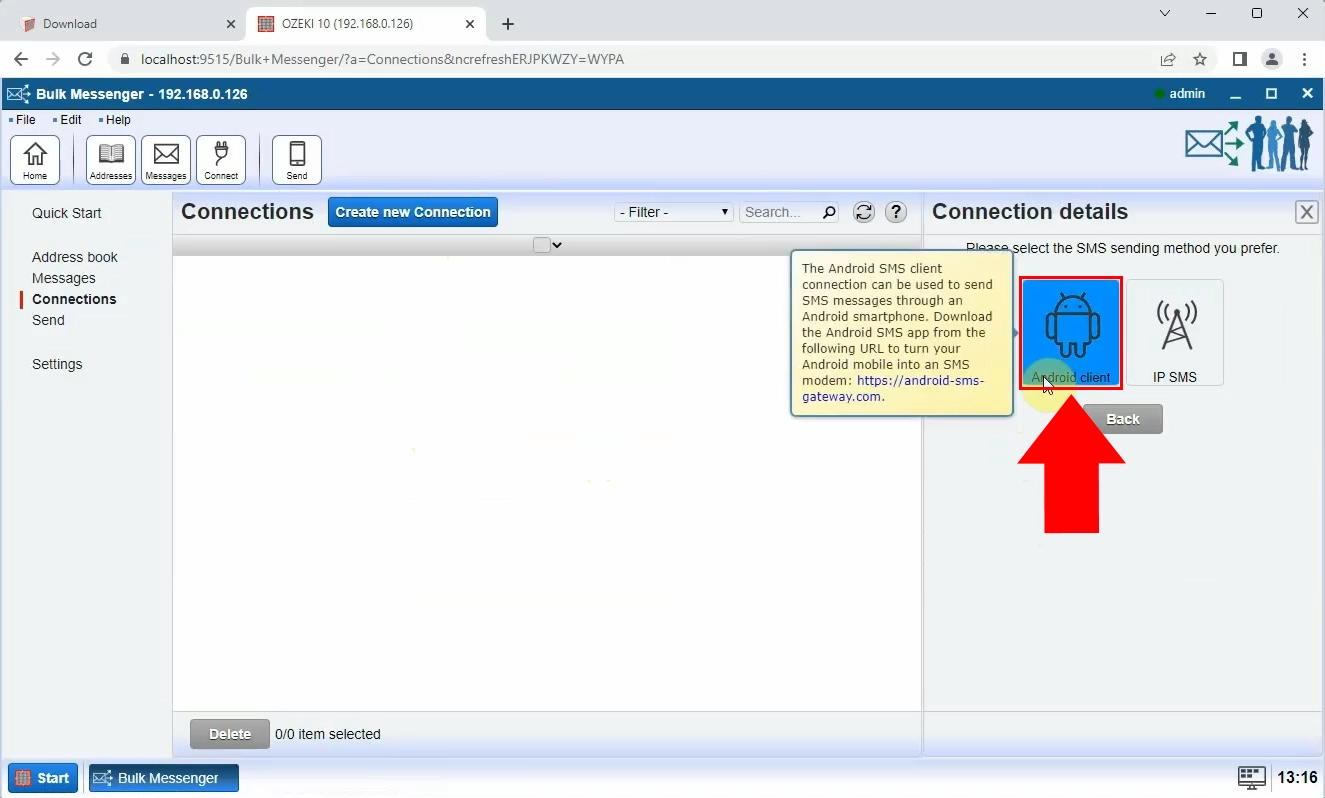
After choosing the right type you need to select the SMS sending method you would prefer. In this case select the 'Android client' method (Figure 28).
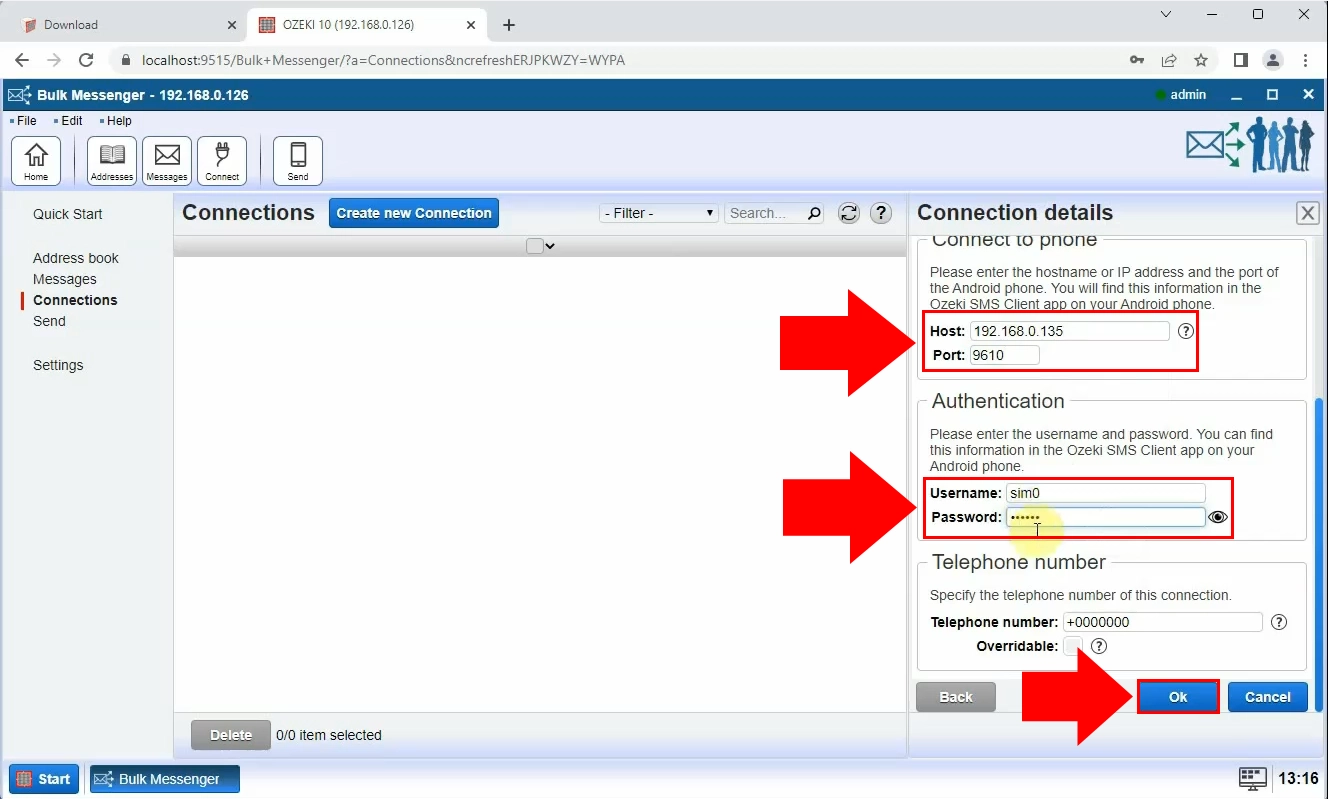
Once you are done with the previous step you can move along to this one. You will be asked to enter the hostname or IP address and the port of your Android phone (Figure 29). Furthermore you will have to enter your username and password. You can find information about these connection details in the Ozeki SMS Client application on your Android mobile device. Press the 'OK' button when you are ready.
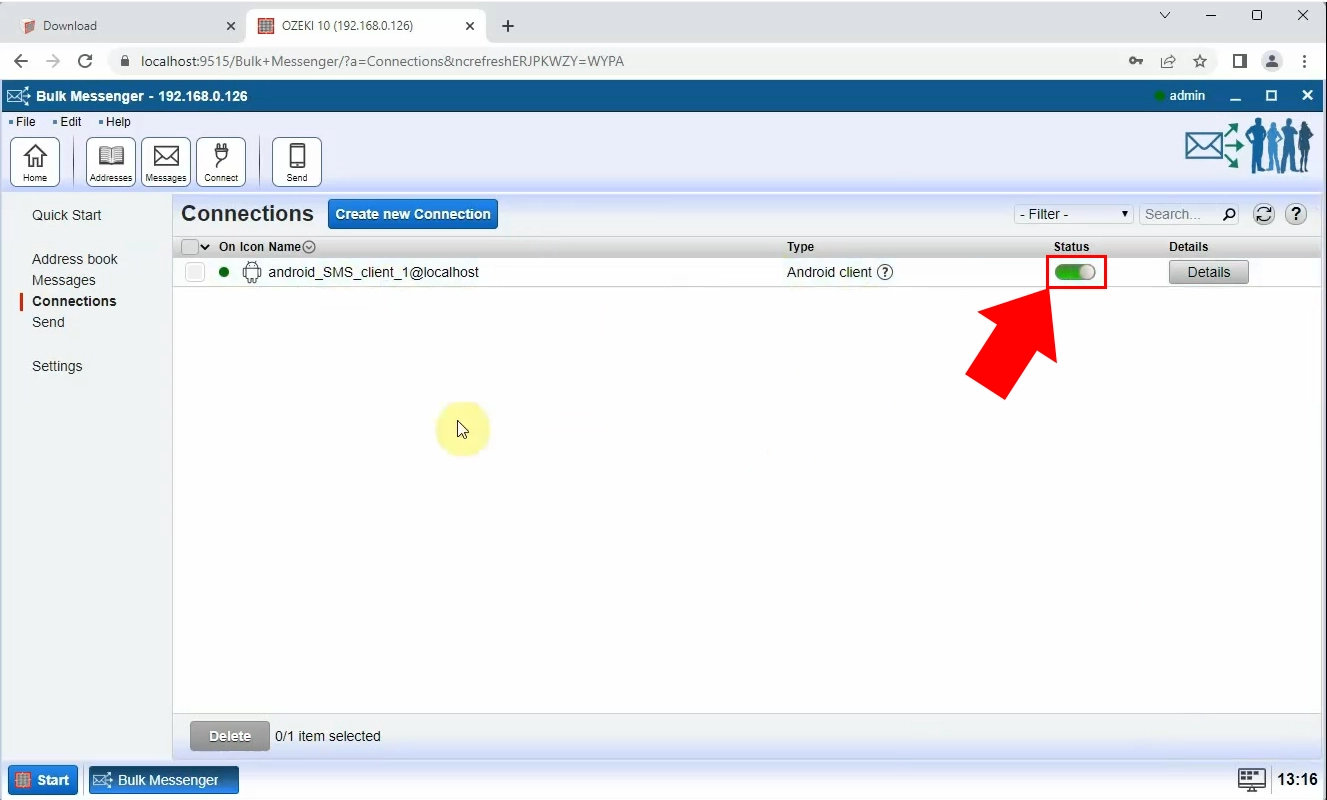
After you have set up everything according to this guide, the newly created connection will appear among your 'Connections'. Switch the 'Status' on to establish the connection (Figure 30). It will turn green once you have done it.
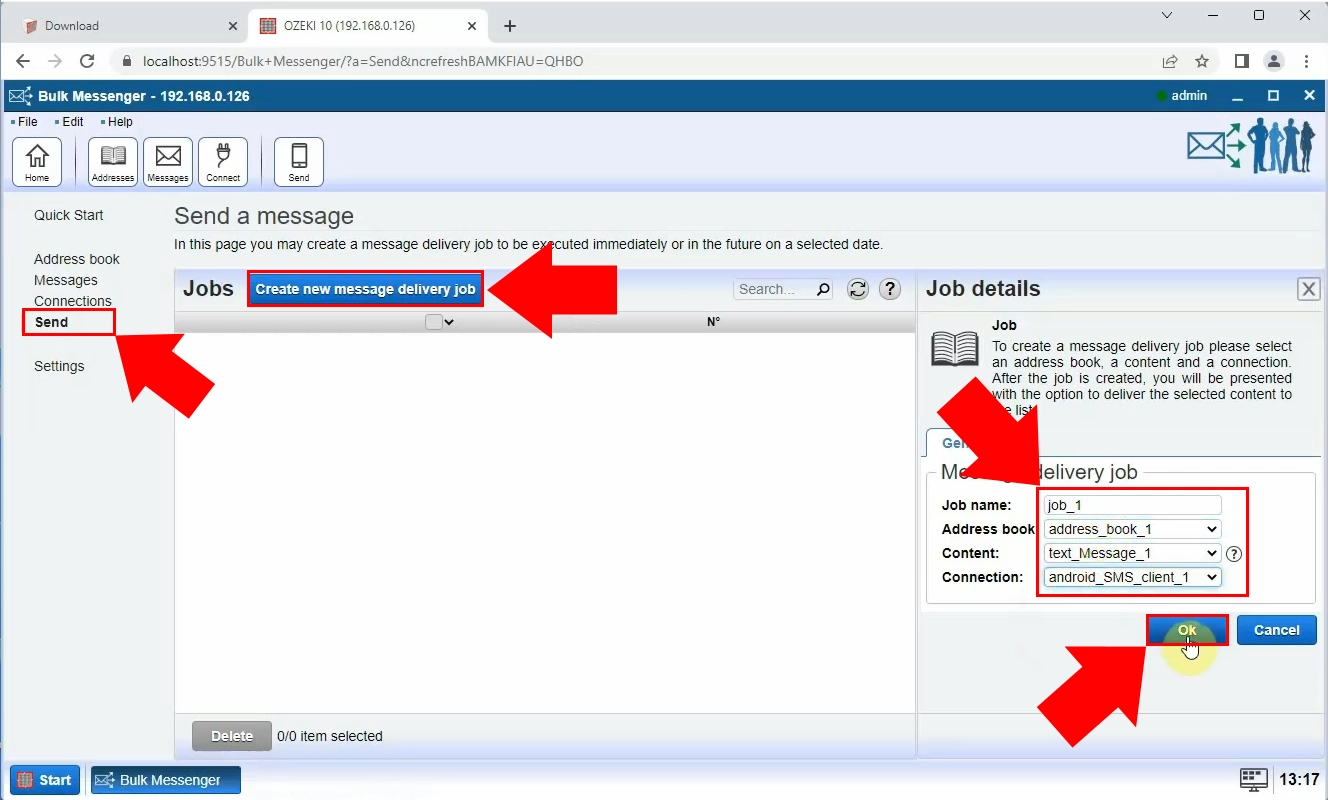
In order to continue the process you need to create a delivery job (Figure 31). Click on 'Send' within the Quick start menu and click on the 'Create new message delivery job' sign. To successfully create a delivery job you will be asked to select an address book, a content and a connection. Also, do not forgot to give your delivery joba a name. Click on the 'OK' button once you are ready.
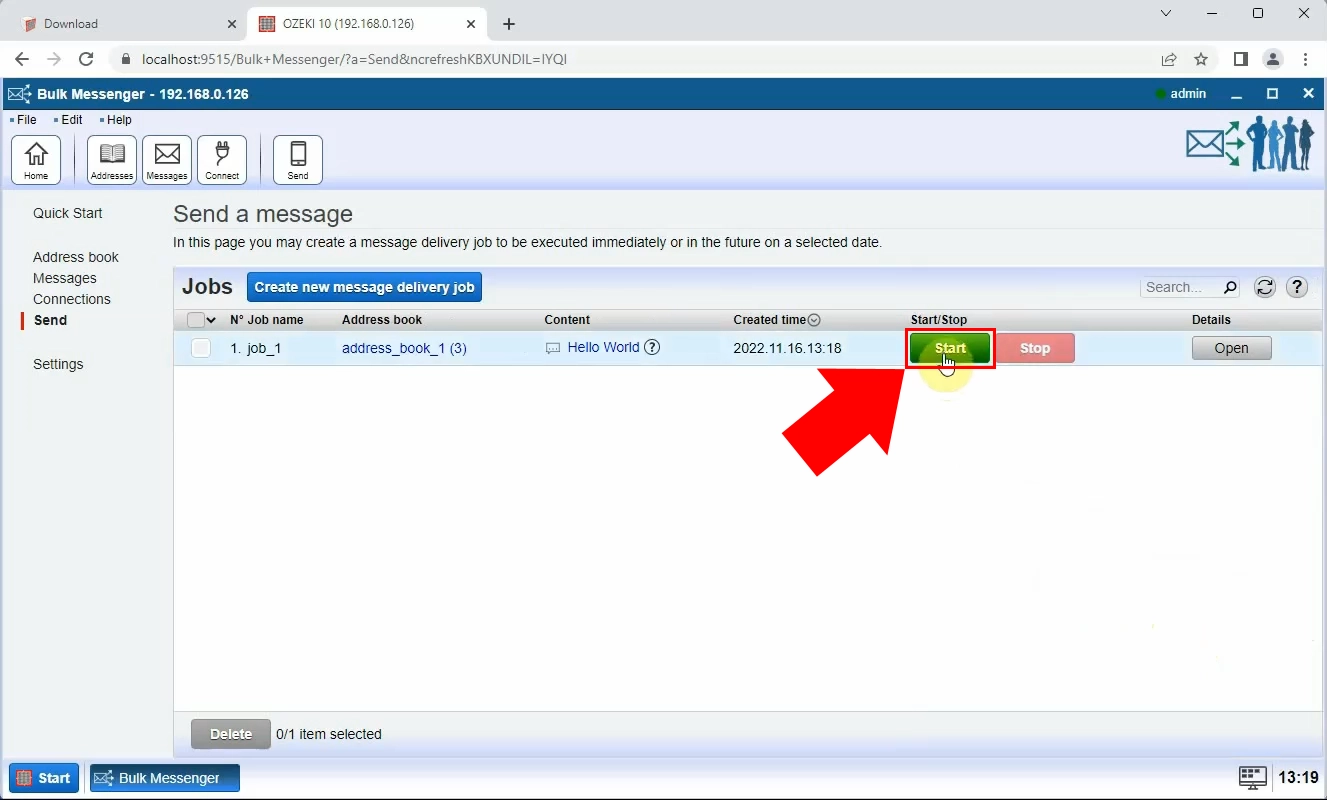
The freshly created delivery job will now appear among you 'Jobs' and you can finally start sending a message. Click on the 'Start' button in the green square, shown by the red arrow (Figure 32). A window will pop on your screen stating that the 'Message Delivery Started'.
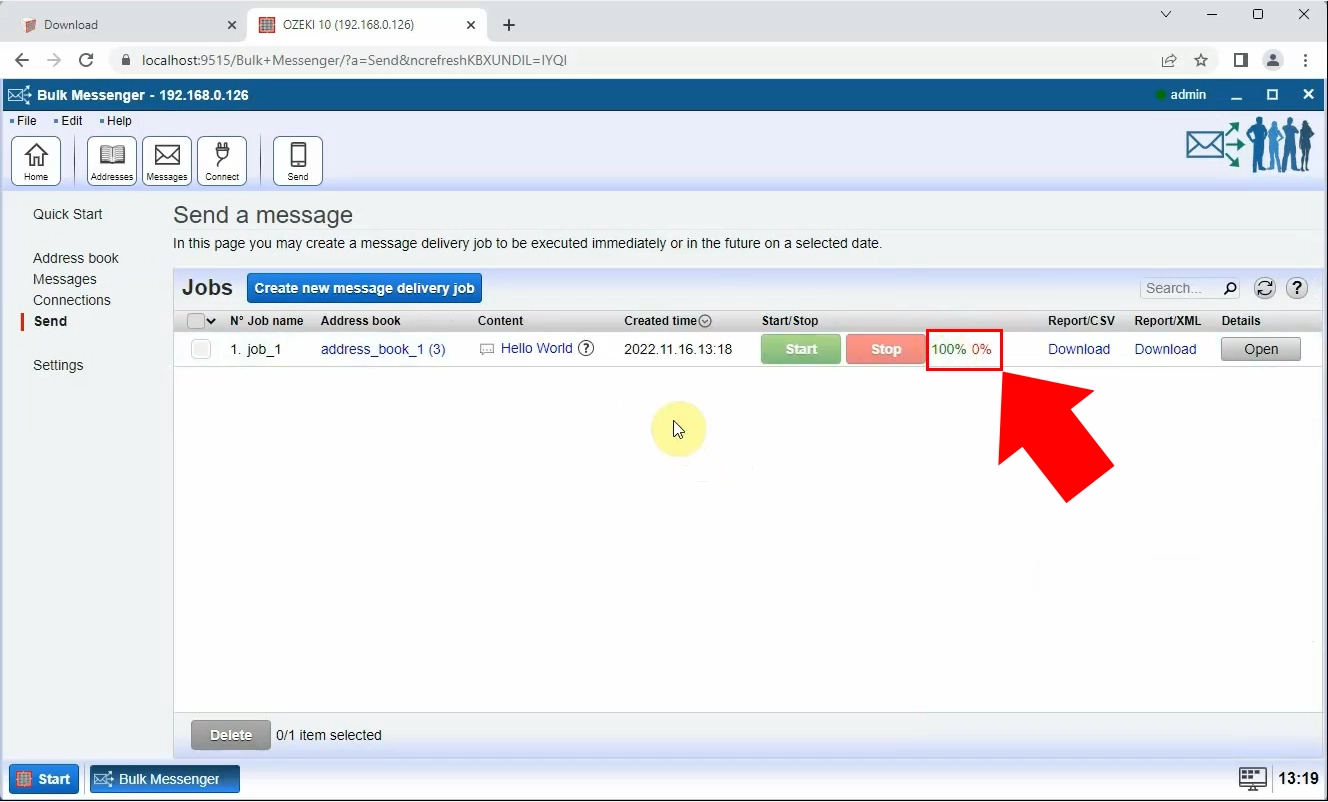
You can see a percentage next to 'Stop' sign shown in the picture. If it shows a 100% that means your message has been successfully sent to the recipients (Figure 33).
Summary
Bulk Messenger is a powerful and easy-to-use tool that allows you to send bulk SMS messages with an Android phone. It integrates smoothly with Android devices, ensuring effortless message delivery and high delivery rates. Its user-friendly interface streamlines message creation and sending, making it accessible to businesses of all sizes. The installation involves downloading the Ozeki SMS Client APK file from the Android SMS Gateway website and installing it on your Android phone. The connection setup is straightforward through the Bulk Messenger software, allowing users to create address books, establish SMS connections with Android clients, and initiate delivery jobs smoothly.
The Ozeki Bulk Messenger proves to be an invaluable tool for appointment reminders, and event announcements. It effectively reaches target audiences and achieves marketing goals.
