How to send your first SMS with Ozeki Bulk Messenger
This tutorial shows you step by step how to send SMS with Ozeki Bulk Messenger. In the following example we will use an OZEKI SMPP SMS Gateway installed on an Android smartphone to send out the SMS. First we will create an addressbook then we will show you how to create the SMS content, setup the connection and start the SMS job.
Get started
Ozeki Bulk Messenger runs on Windows, Linux and Android Smart phones. To start using it, you need to download and install it. Installation is straightforward. The software can be downloaded by clicking on the following link:

| Ozeki Bulk Messenger Server opening the download page: Download Bulk SMS Server! |
Step 1 - Make an address book
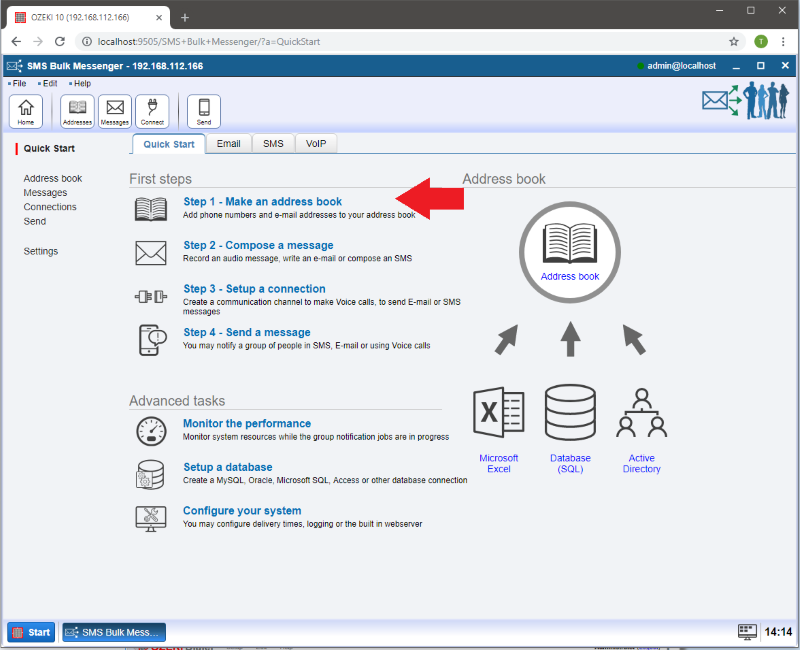
On the Quick Start tab please select 'Step 1 - Make an address book' (Figure 1).
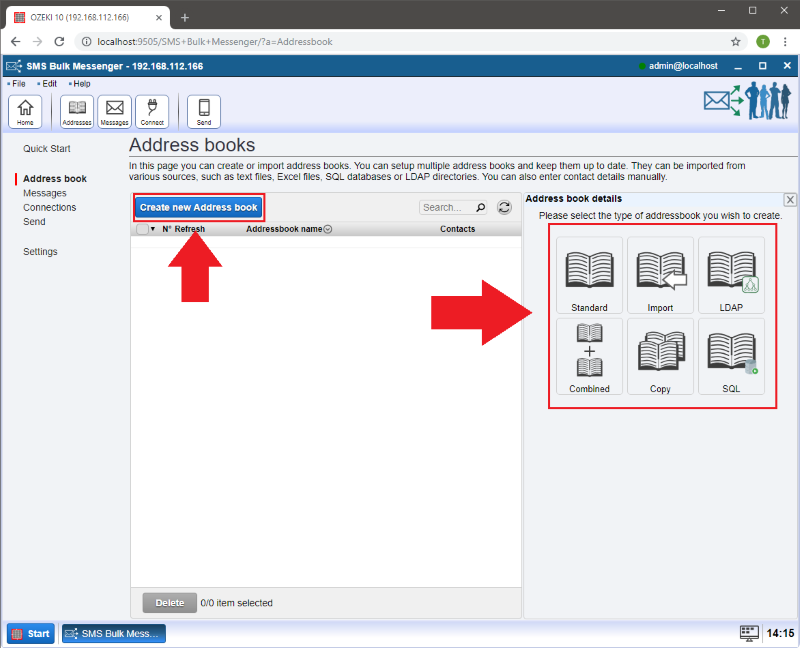
After the new page has appeared, please select 'Create new Address book' (Figure 2).
You can choose between different types of address books to handle your contacts. In this example we will create a Standard address book (Figure 3).
But you can import an address book from external sources like an Excel spreadsheet (.XLSX, .CSV), txt file or from an online database (SQL or LDAP).
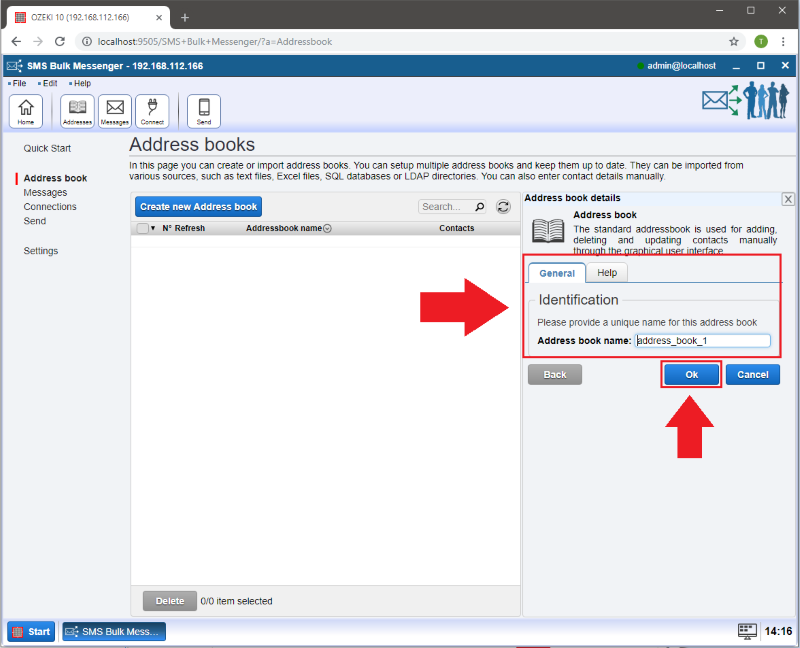
After you have selected a standard address book type or another, you can enter a name for your first address book. Then click 'Ok'.
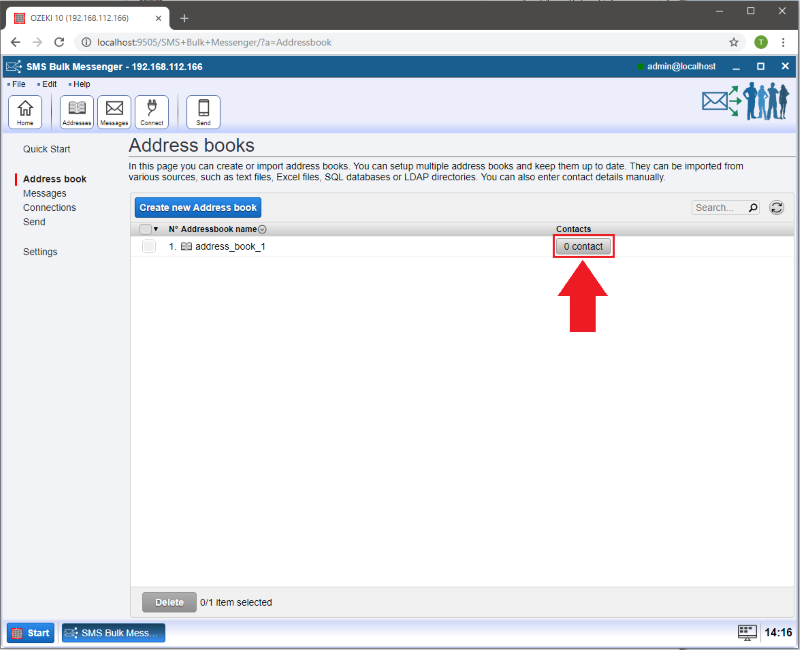
After that you can see that 'address book #1' has appeared in the list! Now click on 'Contacts' in order to add contacts to your addressbook and provide information about them.
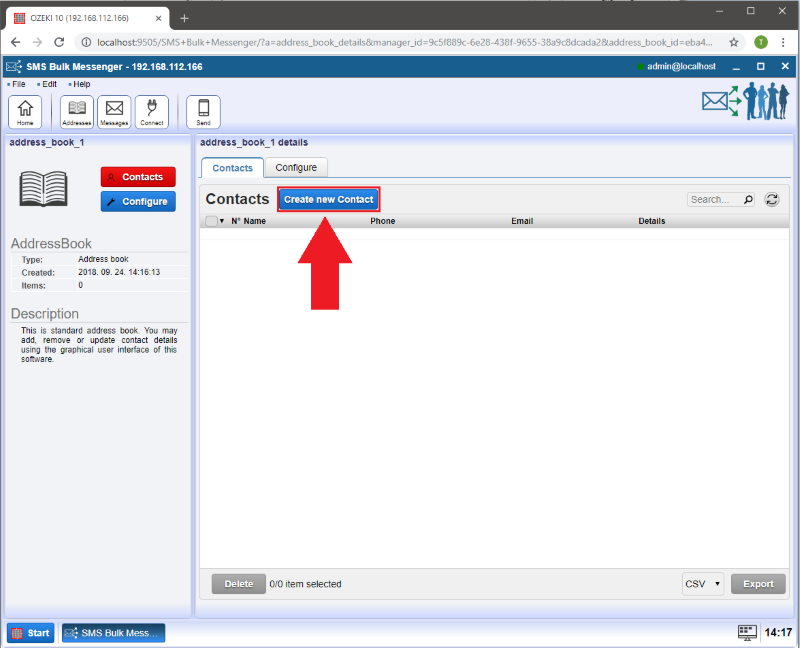
Select 'Create new Contact' to add your contact to the address book.
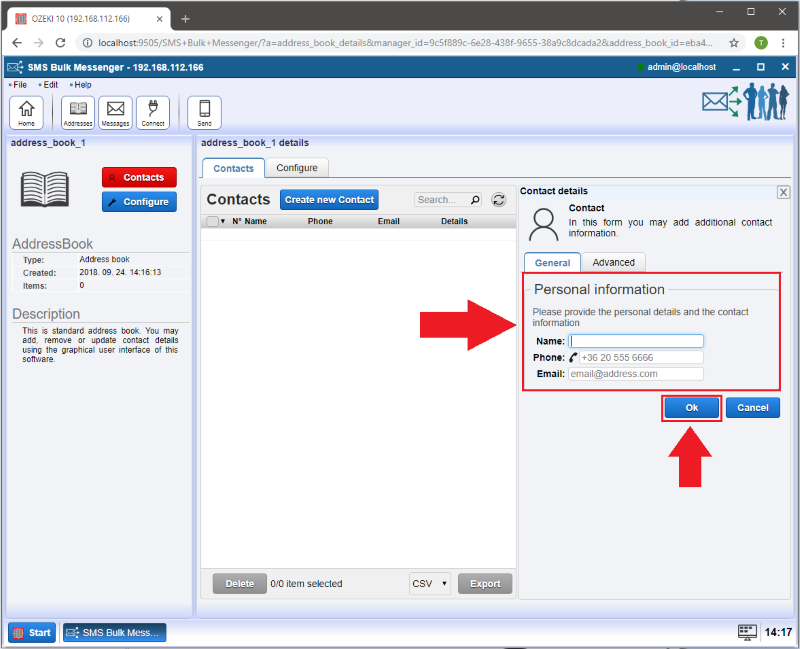
On the right side you will see a 'Contact details' window where you can add detailed information about the contact.
If finished, click 'Ok'.
Step 2 - Compose your message
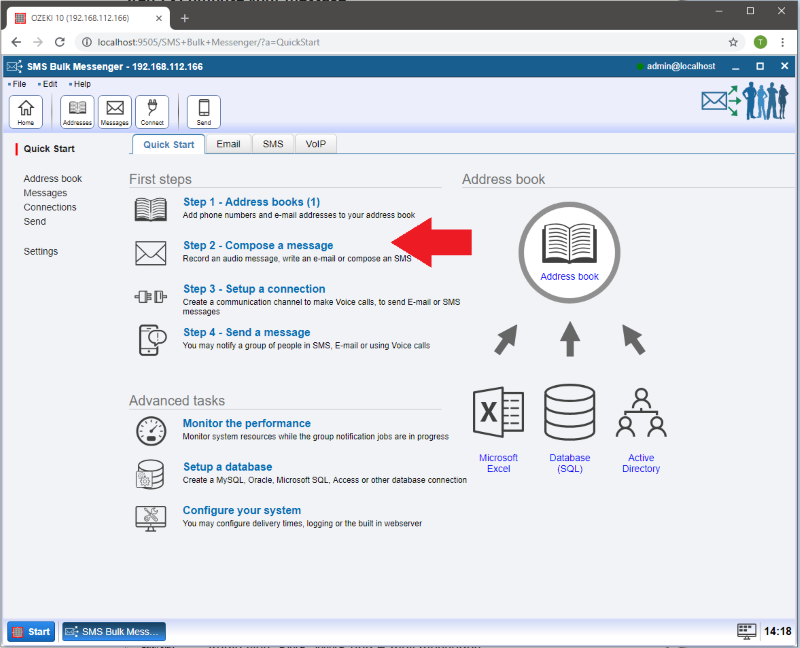
Select 'Step 2 - Compose a message' (Figure 7).
On the new page you need to select 'Create new Audio, SMS or E-mail message' and then in the 'Audio, SMS or E-mail message details' window you can choose between 'E-mail', 'SMS' and 'Audio' type of content.
Select 'SMS' to create an SMS/MMS message (Figure 8) .
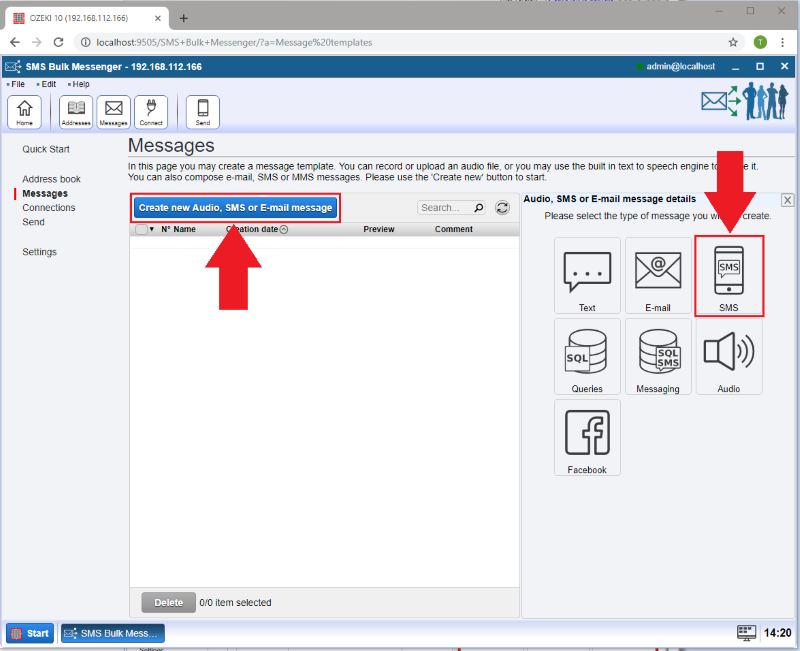
After that several SMS content types will appear. This option helps you to personalize your SMS/MMS. Select the one you would like to create (Figure 9).
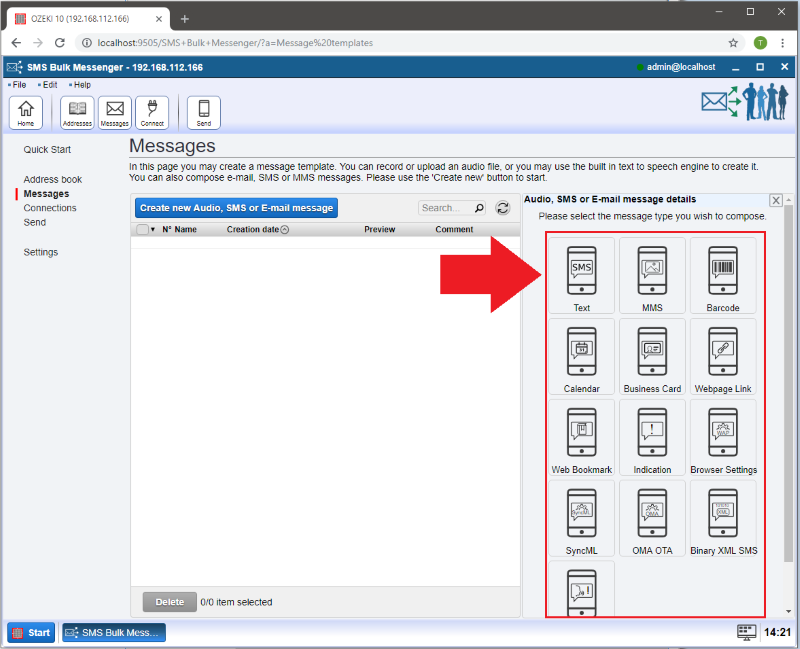
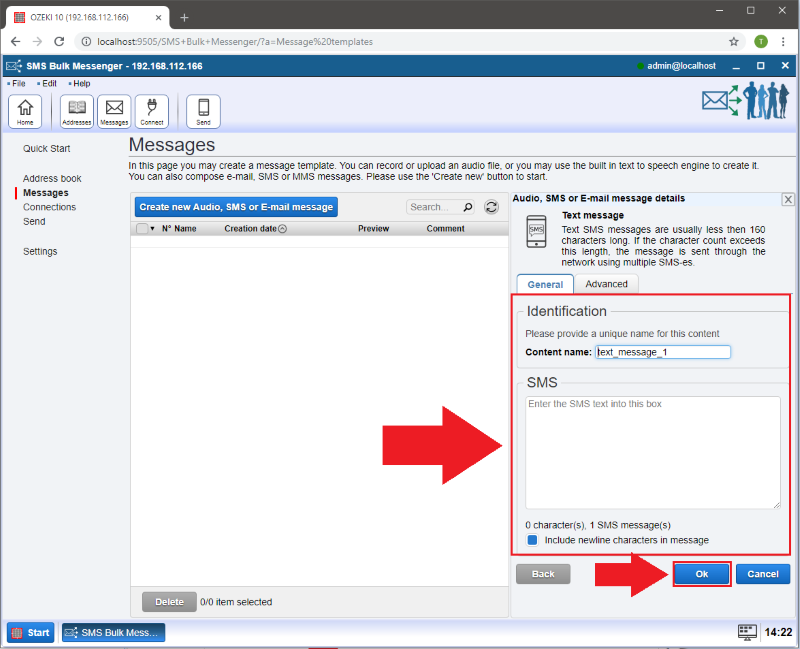
In case you selected the simple 'Text' type you can see the below:
Add a name for this content and then type the SMS text into the box then press 'Ok'.
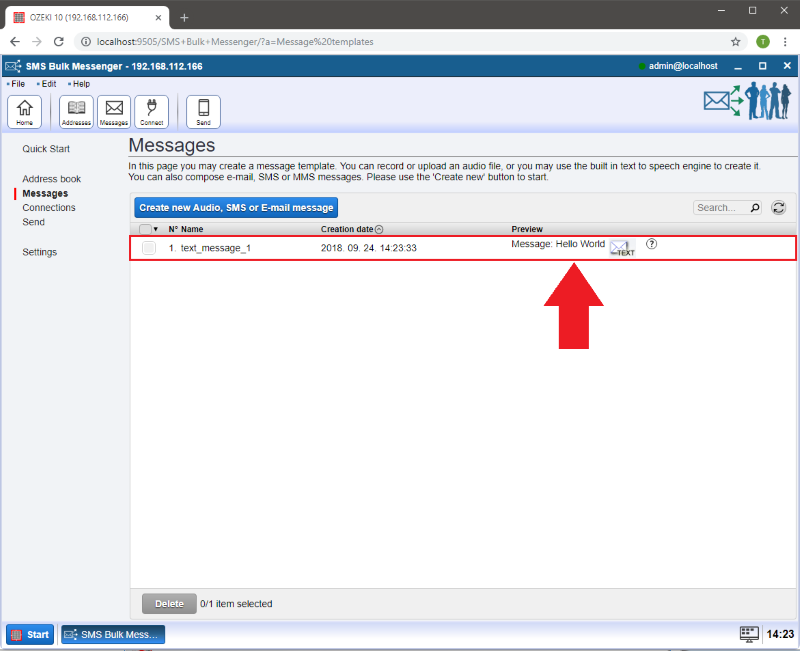
Your created 'text message #1' content will appear in the list (Figure 11).
Step 3 - Setup connection
After the successful creation of SMS message content, now it is time to create setup a new connection.
Select 'Step 3 - Setup a connection' on the Quick Start tab. (Figure 12)
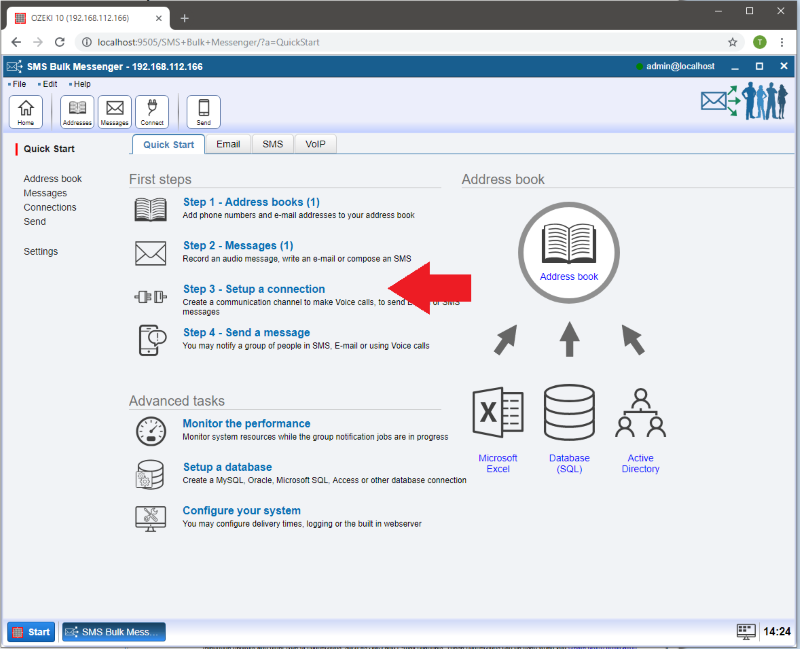
On the new page please click 'Create new Connection' then select 'SMS' (Figure 13).
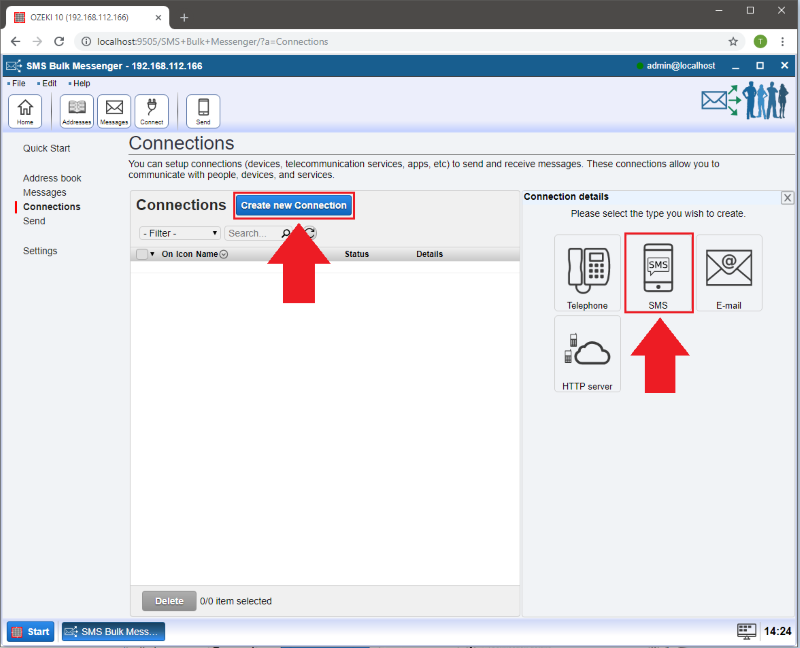
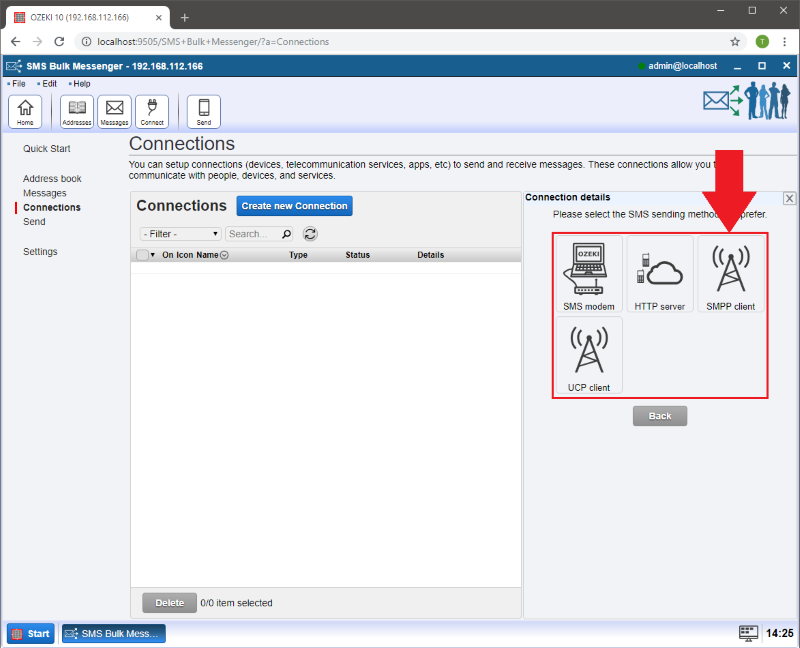
Select a suitable connection (SMS modem or SMPP) and configure it. The configuration guide is available here:
How to configure different types of connections.
In this step by step guide we are going to install and run OZEKI SMPP SMS Gateway on an Android smartphone, so we need to choose the SMPP connection (Figure 14).
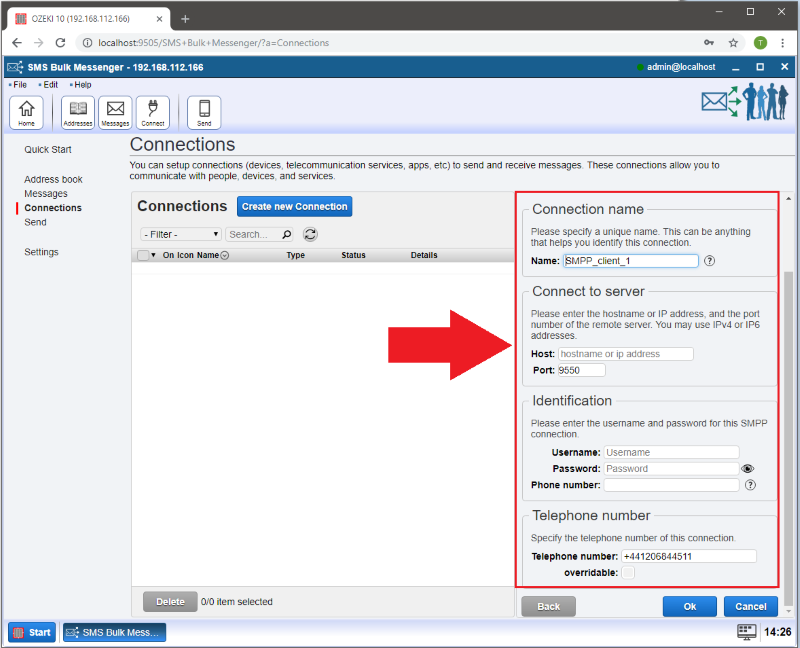
Next we need to fill in an empty SMPP registration form. (Figure 15). To find out the missing information we need to create an SMPP server.
The easiest way to create an SMPP server is to install the OZEKI SMPP SMS Gateway on a smartphone. You may download it from the Google Play Store. (Figure 16)

Type 'OZEKI SMPP' in the search field of the Play Store (Figure 17)
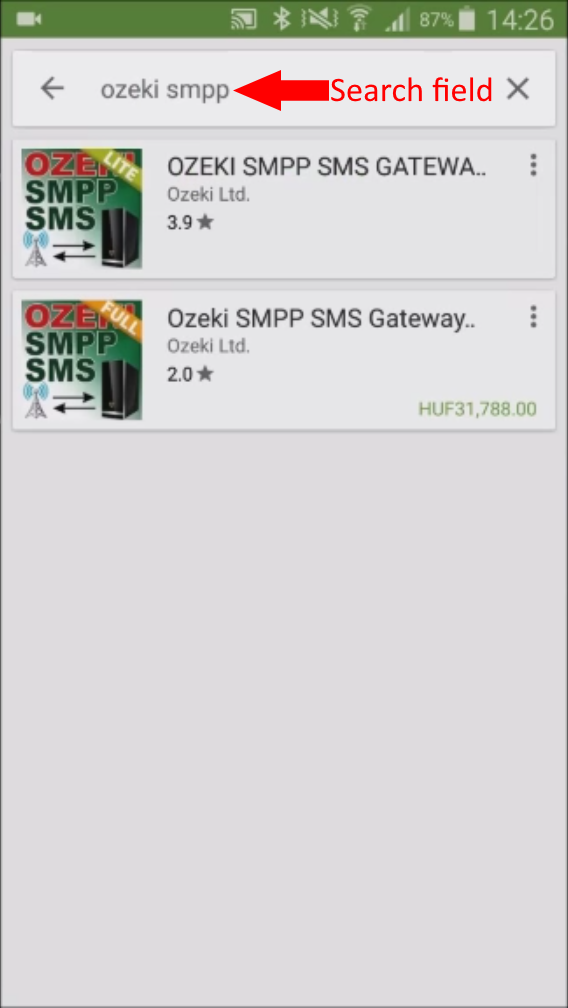
Click install to setup OZEKI SMPP SMS Gateway. (Figure 18)
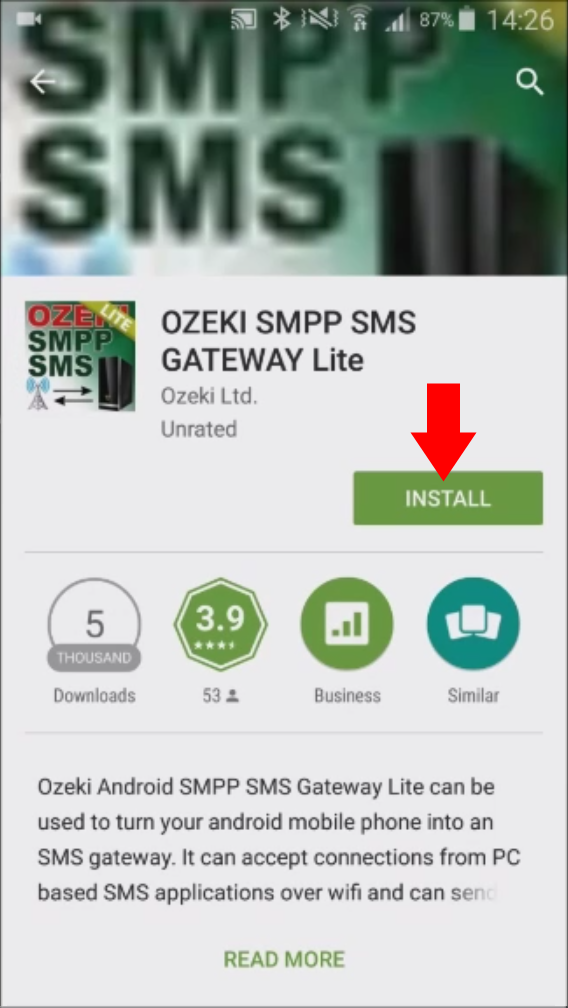
When the installation is complete open the application. (Figure 19)
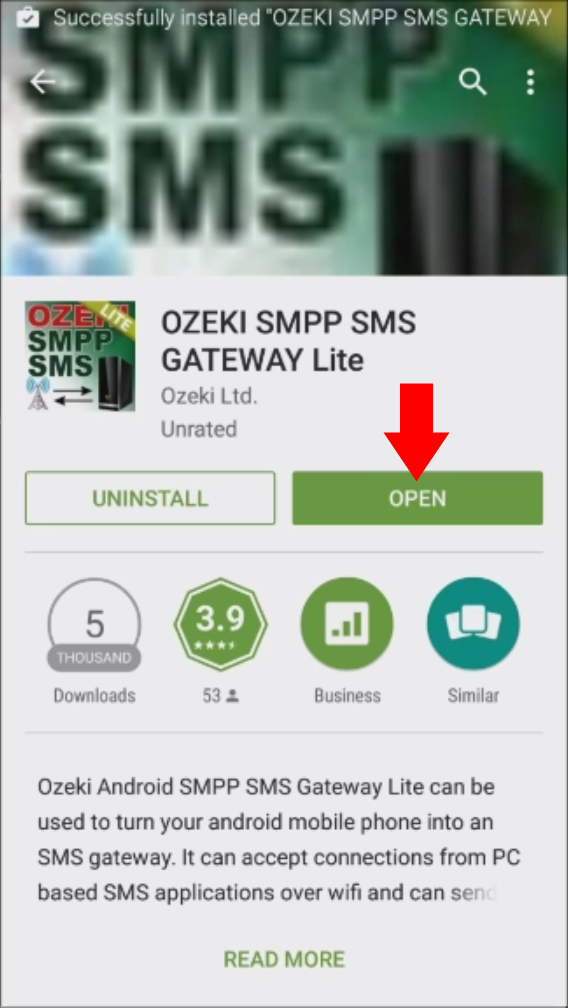
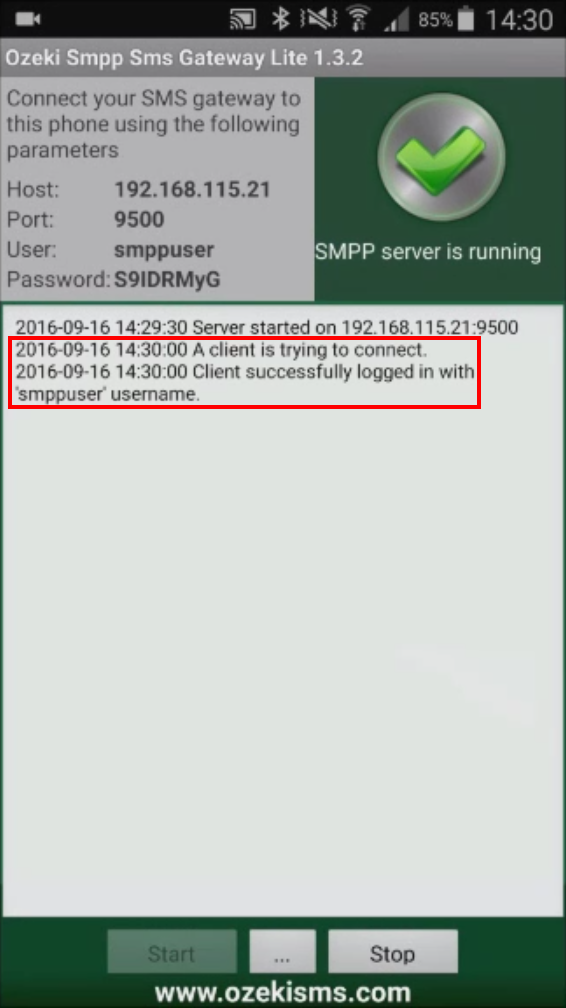
When you start the application it automatically starts the server. You can read the login details on the main screen. (Figure 20)
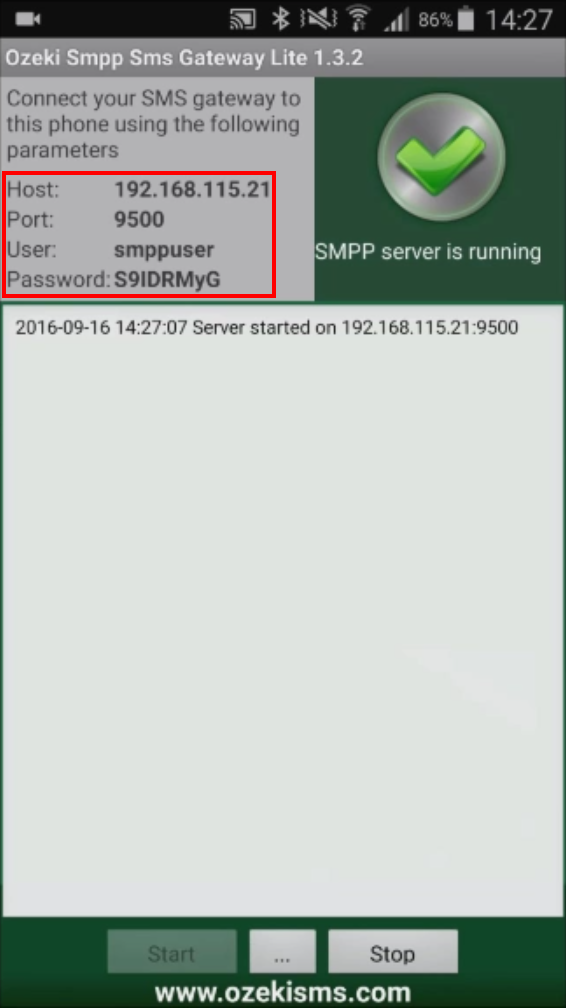
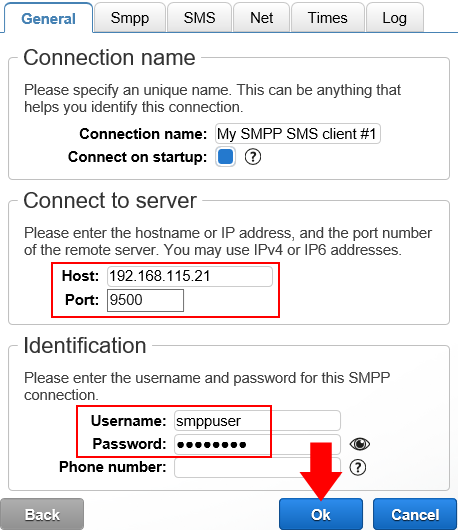
Now you can go back to Ozeki Bulk Messenger and type the server login details in the form. If you think the details are correct then click 'Ok'. (Figure 21)
You will know if the connection was successfully established by watching the main screen of OZEKI SMPP SMS Gateway. If everything went as expected you will see "Client succesfully logged in with 'smppuser' username." written on the screen (Figure 22).
Now it is time to send an SMS from Ozeki Bulk Messenger.
Step 4 - Send a message
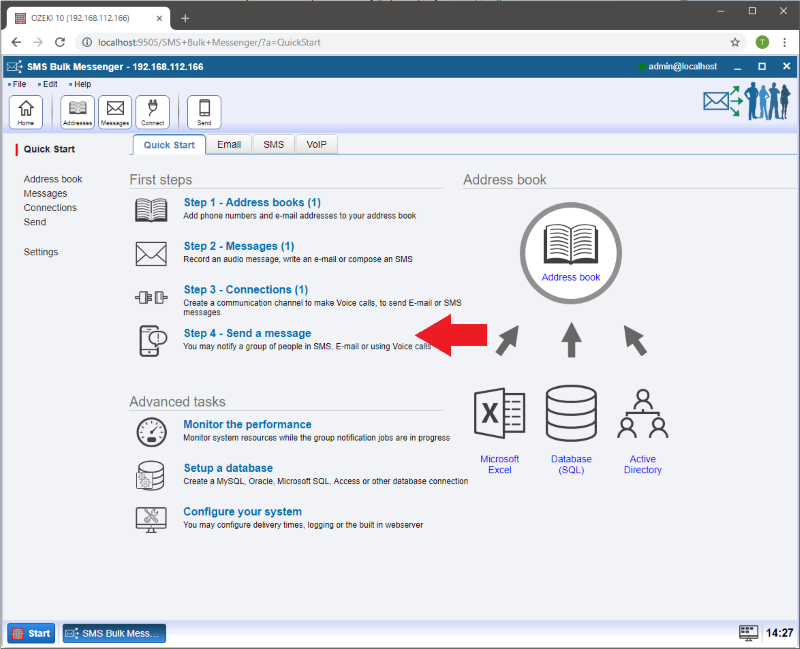
At first, you need to create a delivery job to send SMS/MMS to your contacts. Select 'Step 4 - Send a message' option (Figure 23).
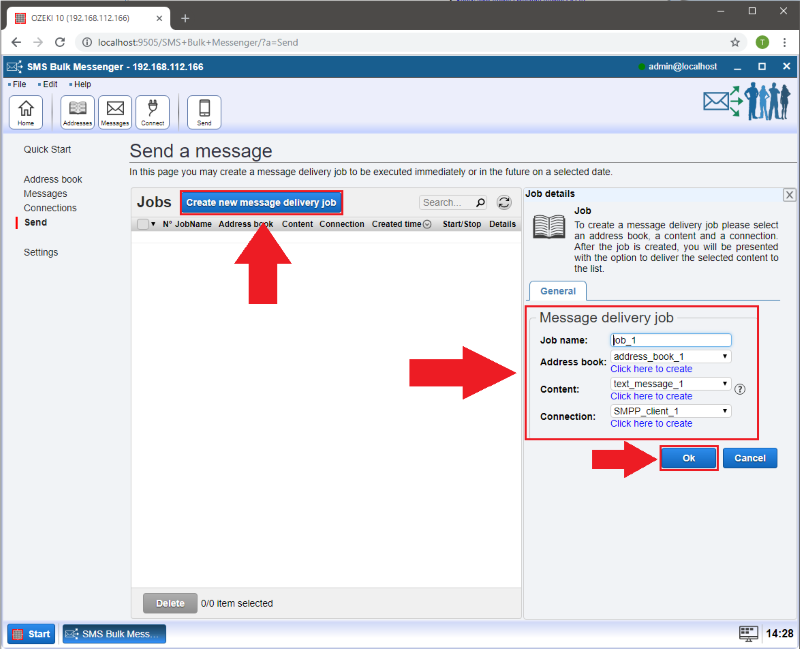
On the next page press the 'Create new message delivery job' button and combine an address book, a content and a connection to create a full job. When you are finished, click 'Ok' (Figure 24).
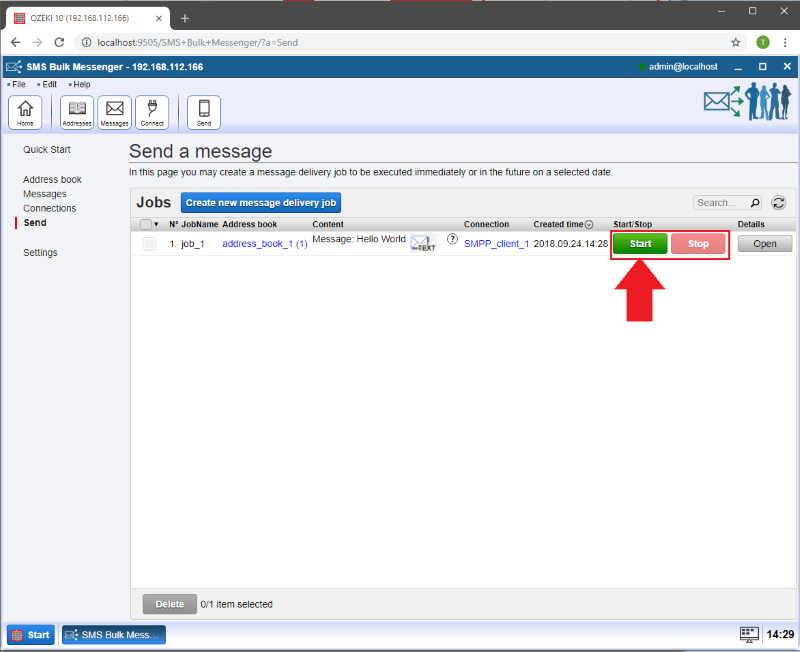
Then you can see your job in the list. Finally, press the green 'Start' button (Figure 25) to deliver your SMS/MMS messages to your contacts.
After the delivery is completed you can see the result of your messaging (Figure 26).

