This quick start guide takes you through the steps of installing
Ozeki SMS Gateway on Windows and sending SMS messages through an
Android Mobile phone. In order for the Android phone to work with
Ozeki SMS Gateway, the Ozeki SMS App needs to be installed on it. In this
guide, you will learn how to pair your Android phone with the Windows Ozeki
SMS Gateway system using a QR code scan.
Overview
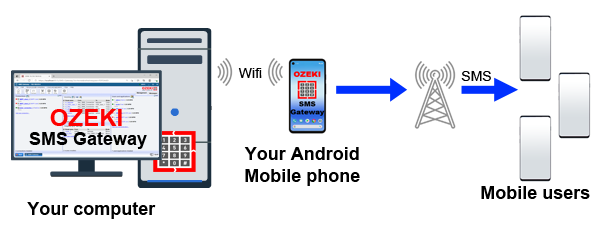
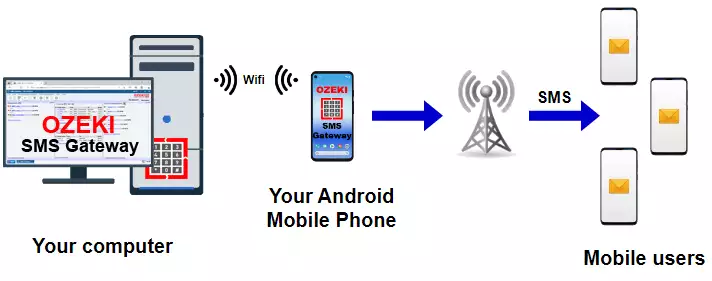
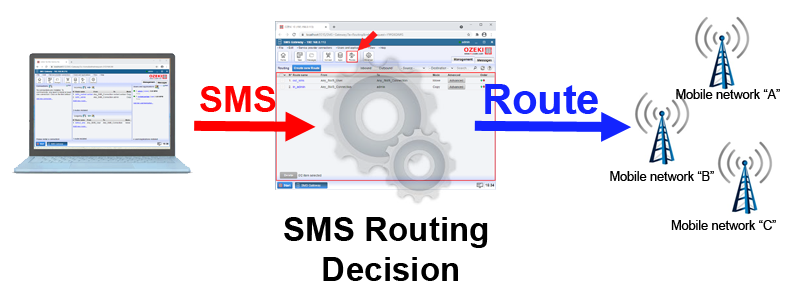
The quickest way to send SMS is to hook up an Android mobile phone to your
PC and send an SMS. In this quick start guide, this is what we are going to
present. If you wish to send SMS using other methods, such as SMPP,
HTTP, GSM modems,
check out the "How to connect to mobile networks" guide.
To send SMS from your PC using an Android mobile read on:
Prerequisites
Windows PC
Android mobile phone*
*We recommend you to use a dedicated Android phone for production
systems, because in order for the Ozeki Android SMS App to operate
well it should be set as the Default SMS handler on the mobile device,
and it should always be connected to your Windows SMS Gateway system.
Quick steps
Step 1 - Download and Install Ozeki 10 SMS Gateway for Windows
Step 2 - Download and Install Ozeki SMS App for Android
Step 3 - Connect the Android by scanning a QR code
Step 4 - Send a test SMS from Windows
Step 1 - Setup Ozeki SMS Gateway on your Windows PC
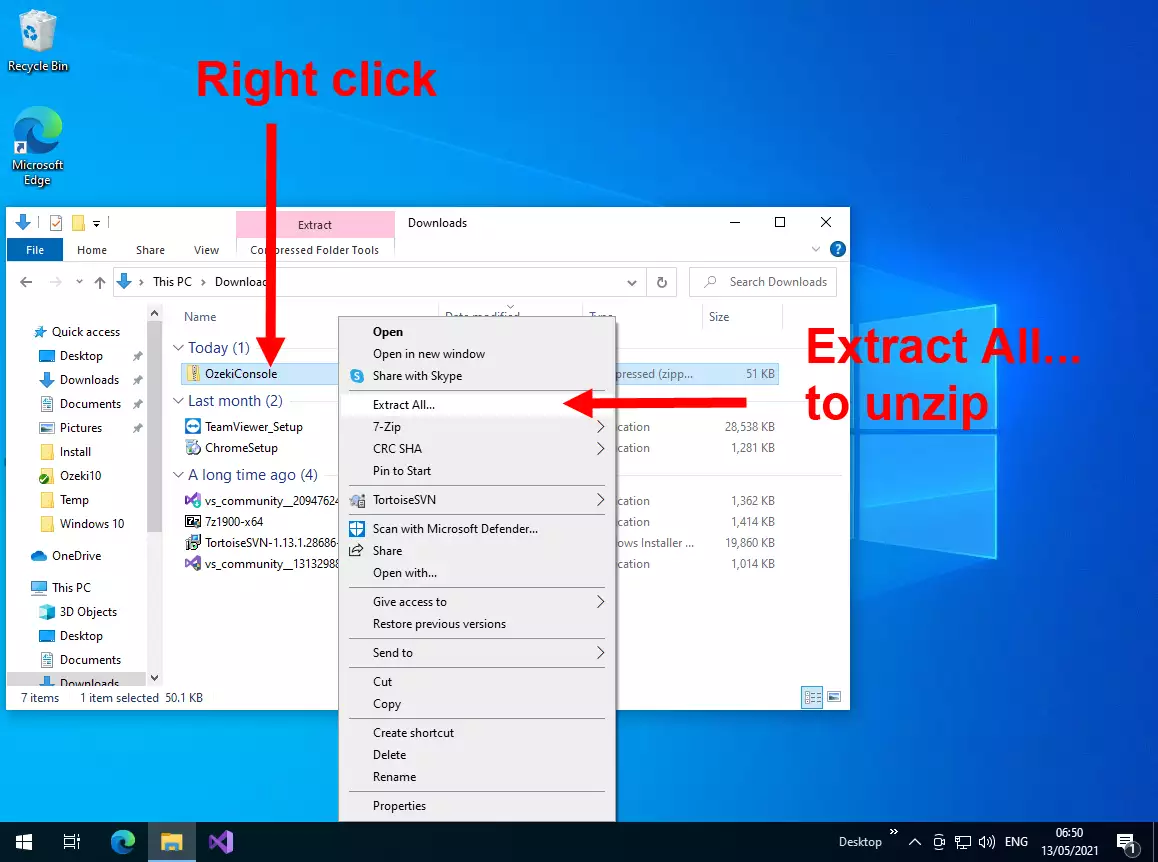
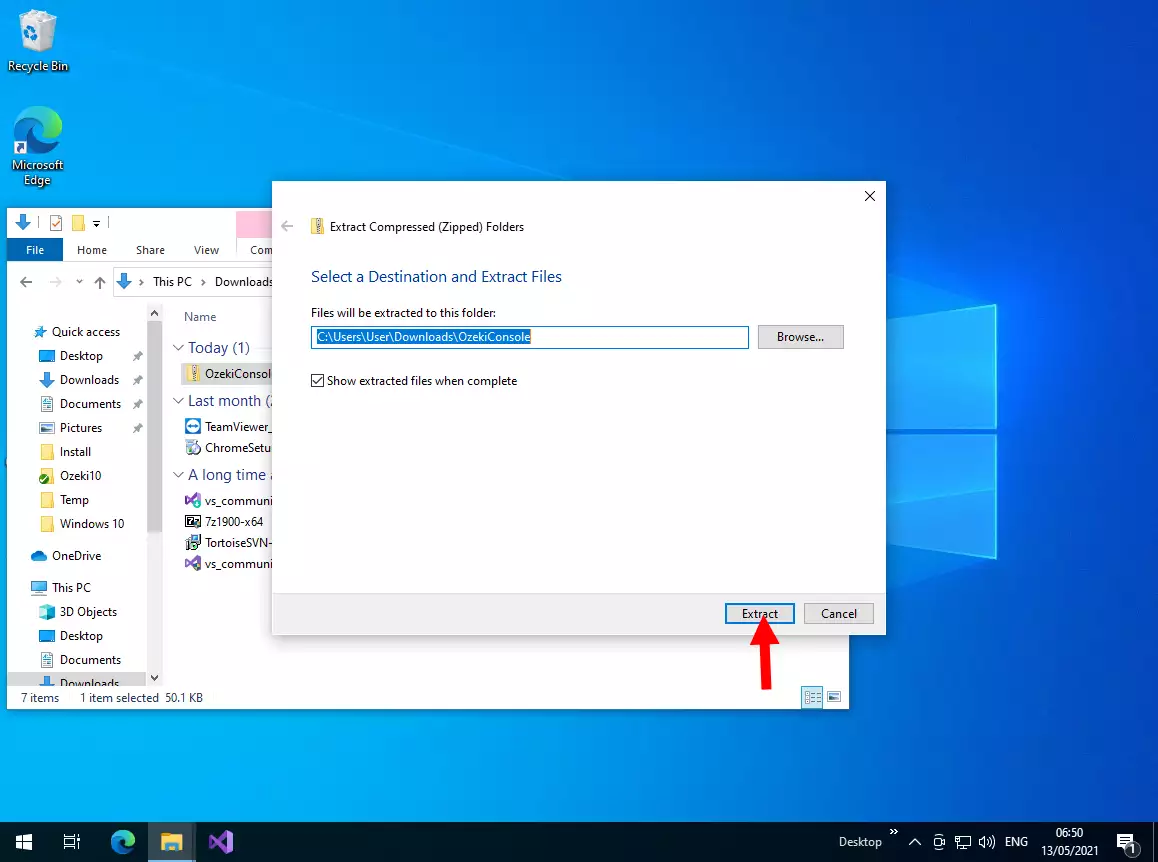
To install the Ozeki SMS Gateway on Windows, download the .zip file from the
Download page, extract it, run the .exe installer,
and follow the on-screen instructions. Open the SMS Gateway within Ozeki 10 following
installation.
The following video shows you how you can download and install Ozeki SMS Gateway on Windows.
Step 2 - Install the Android App on your mobile phone
You can install the Android app by scanning the following QR code or by clicking on the
link below it. You can also take a look at the video that shows how you can
setup the Ozeki Android app, and how you can configure it by scanning a QR code shown
in Ozeki SMS Gateway. The video also shows how to send a message to ensure the connection is successfully
established.
Android App installation QR code:
Scan this QR code to install the
Ozeki Android SMS App on your Android mobile
(use Android 9 or newer).
How to install the Android App on your Android mobile.
Step 3 - Connect the Android by scanning a QR code
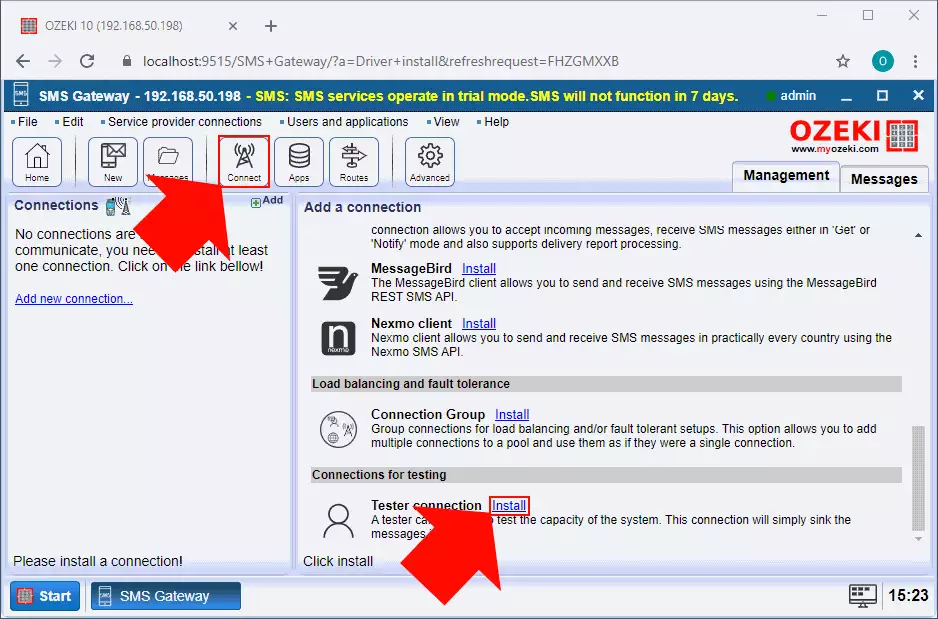
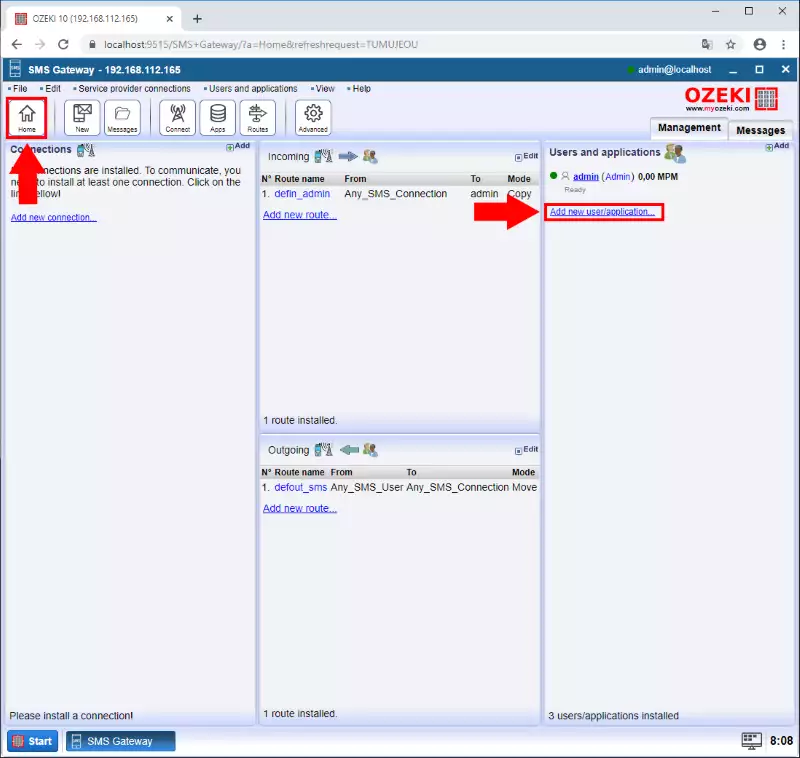
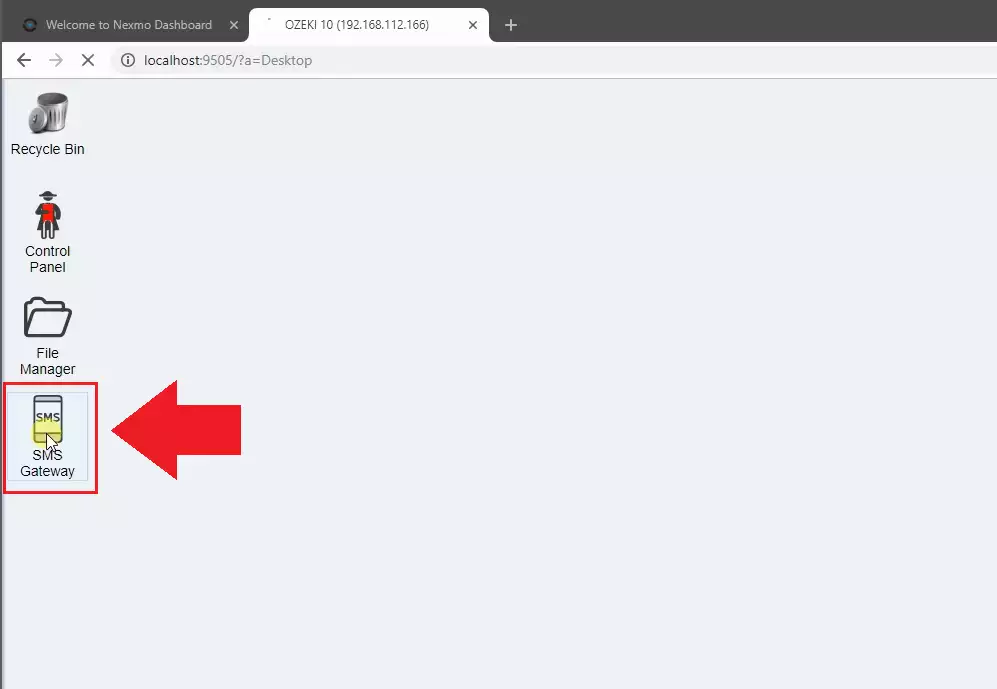
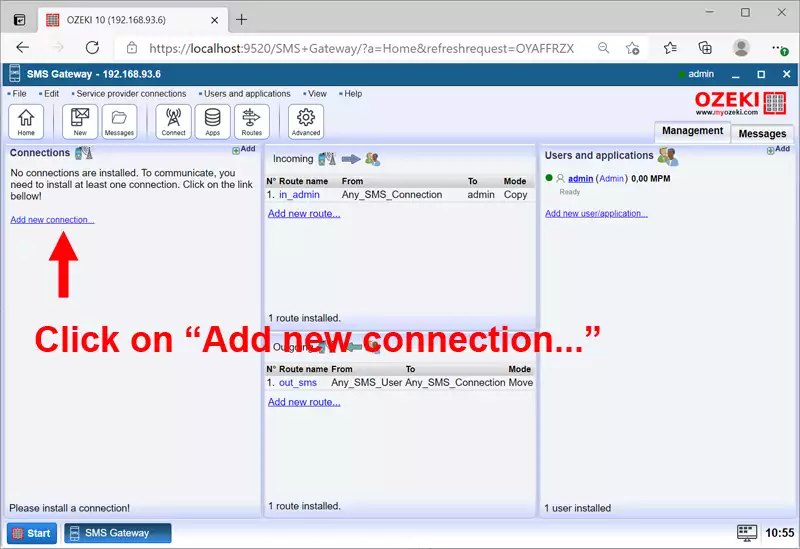
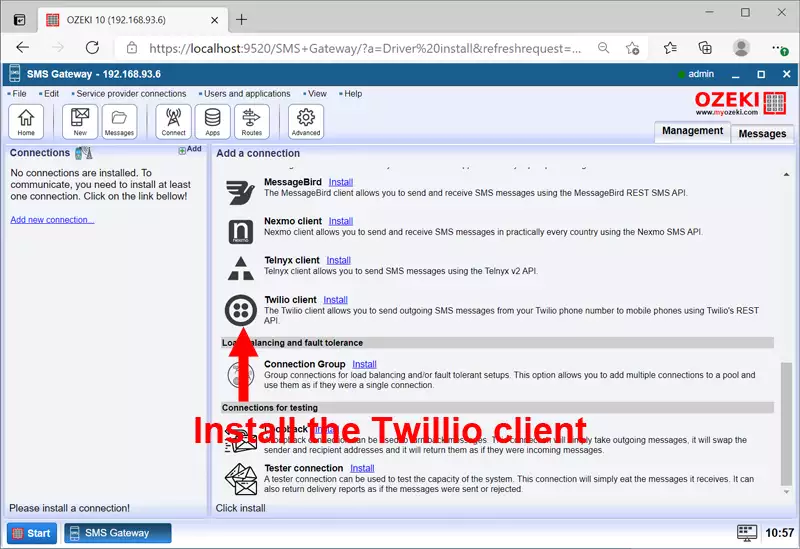
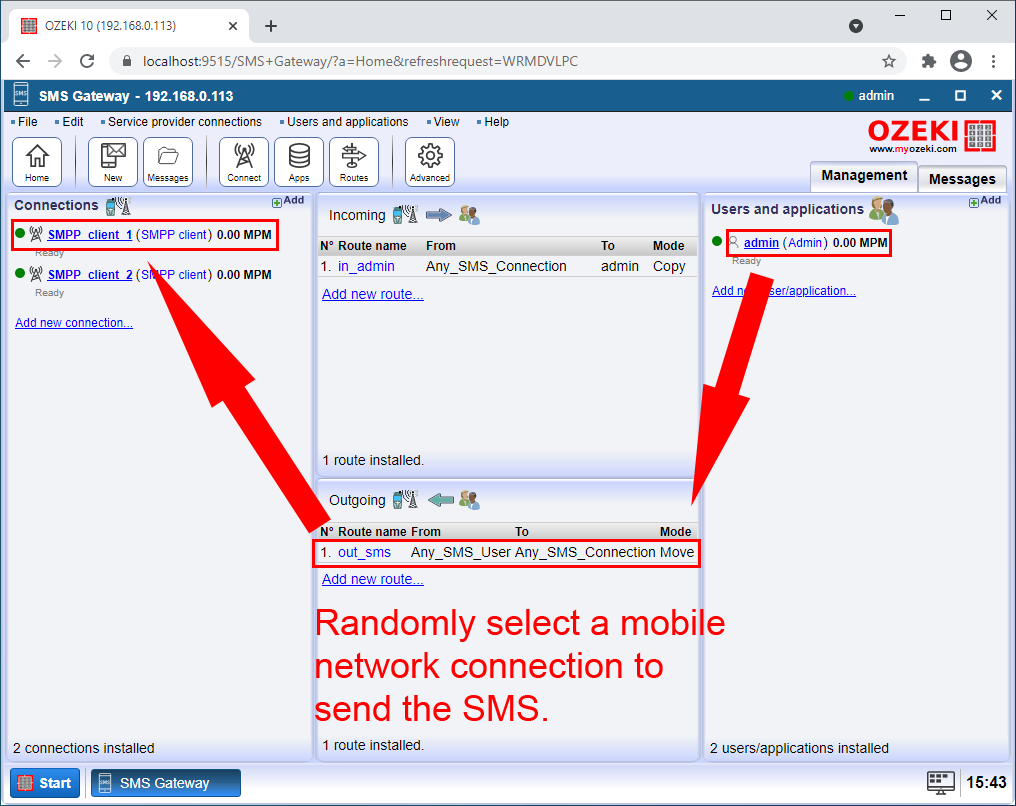
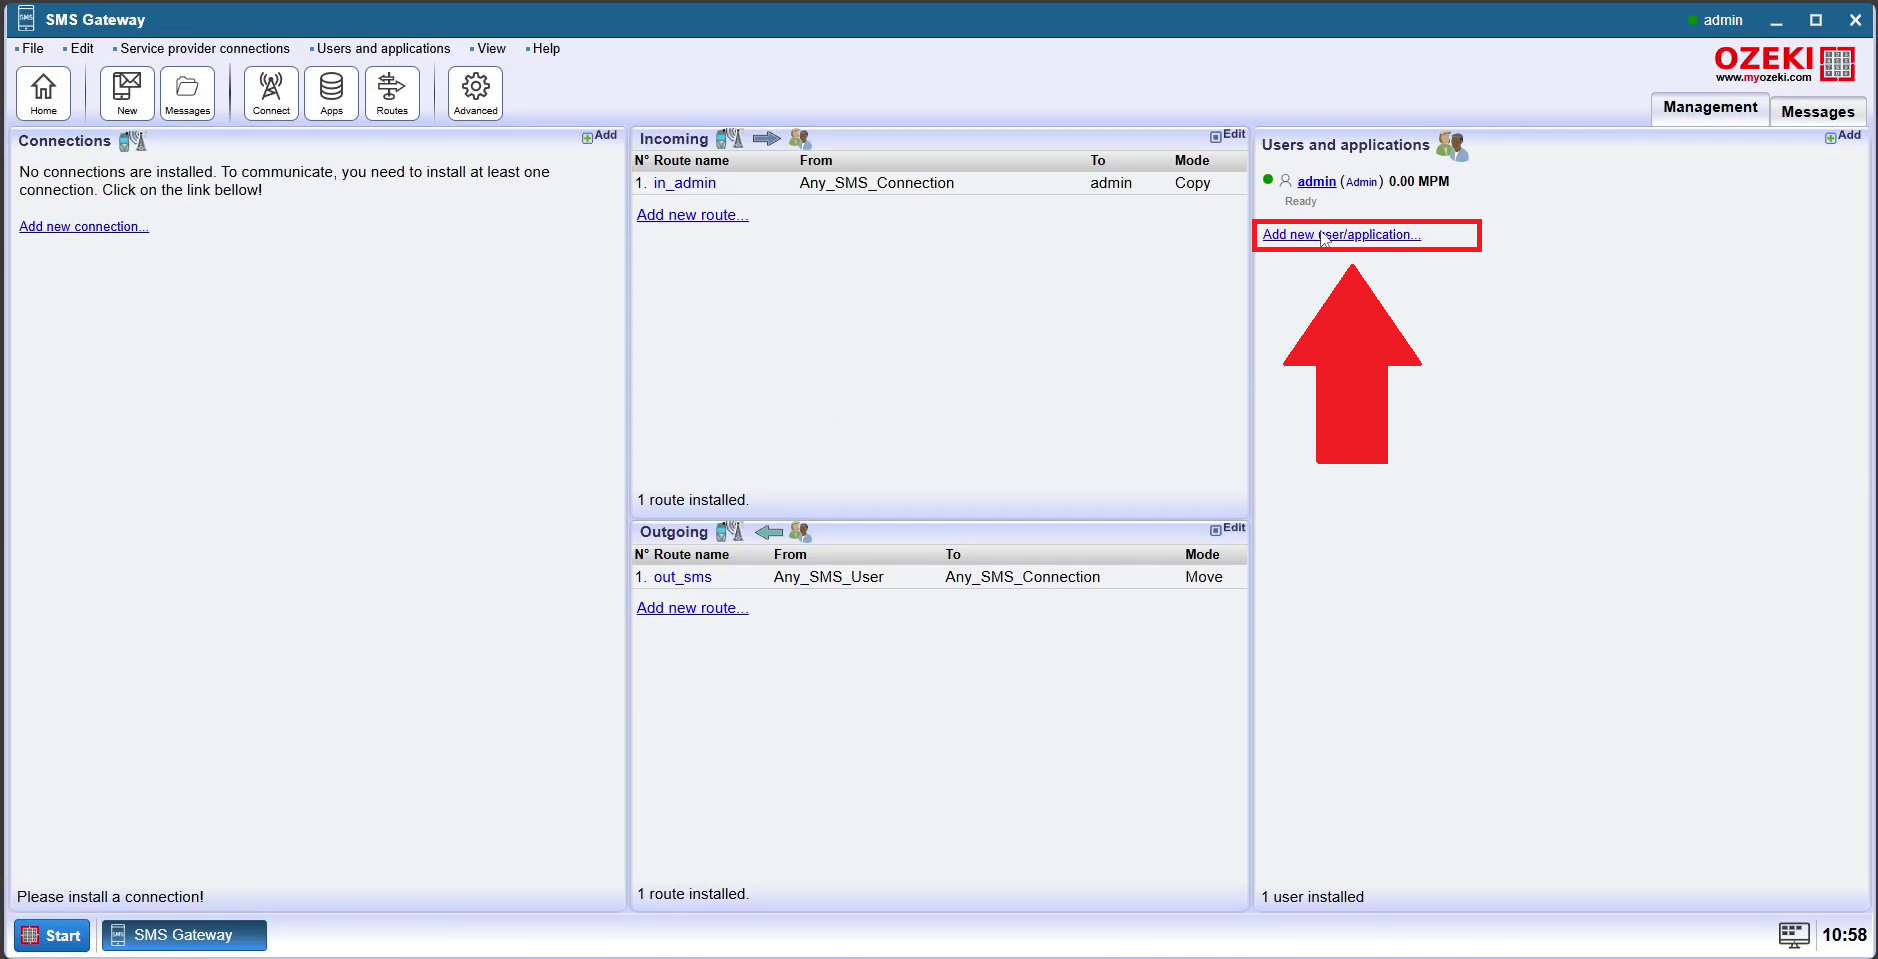
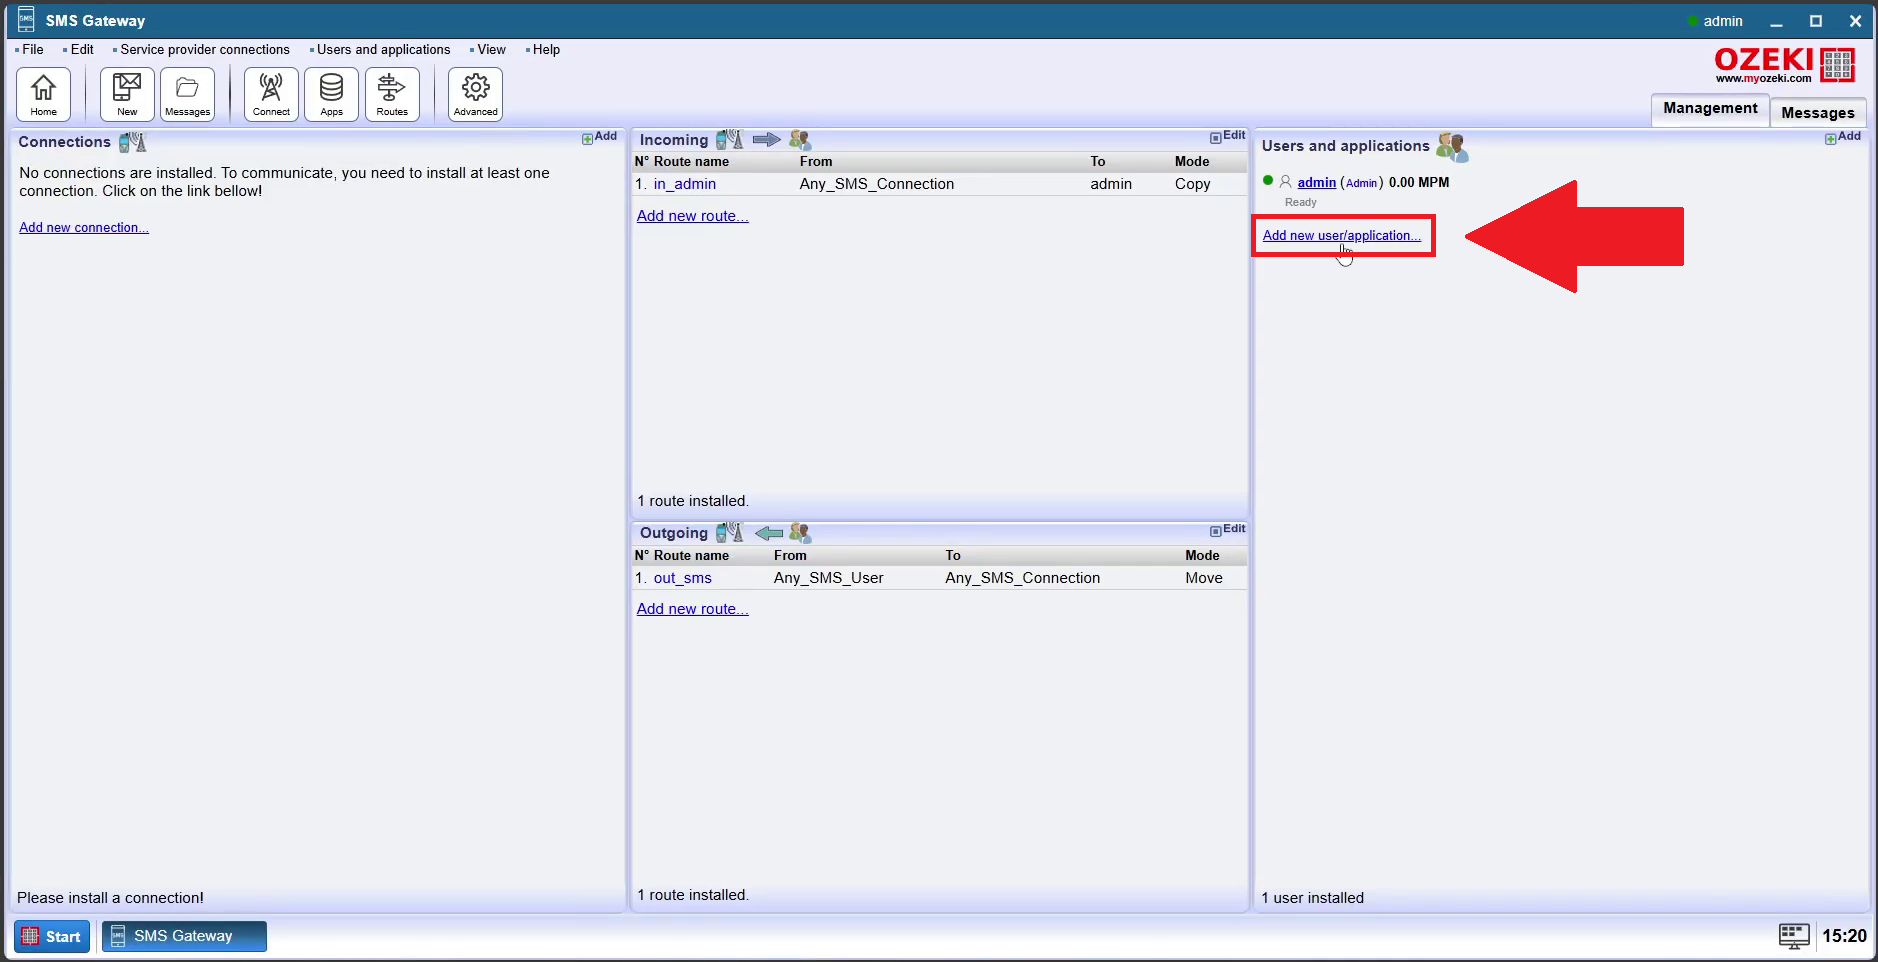
Once Ozeki SMS Gateway is installed on Windows, click Add new connection on the left panel
of the main page, as illustrated in Figure 1.
Figure 1 - Add a new connection
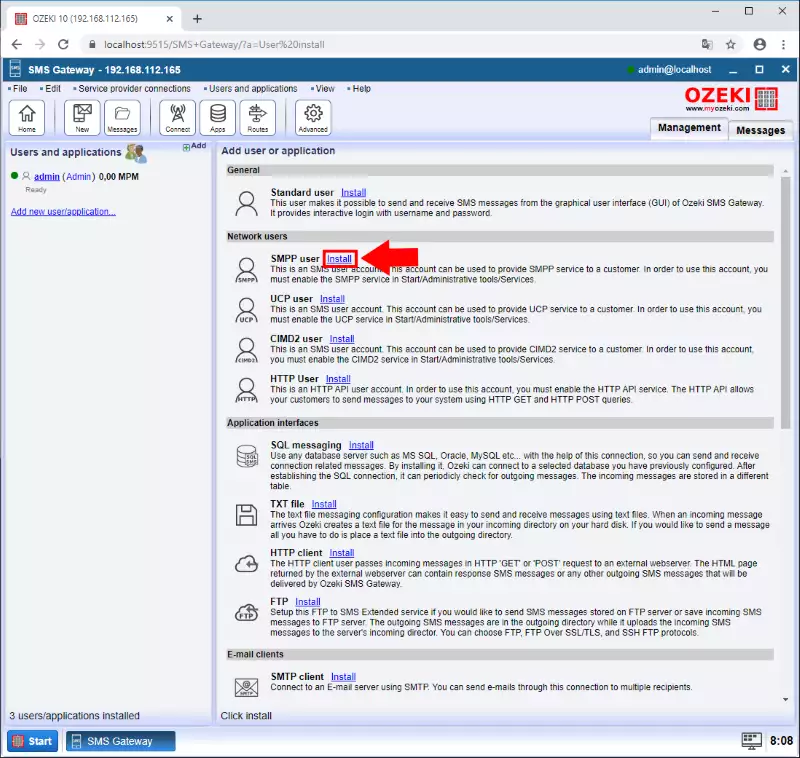
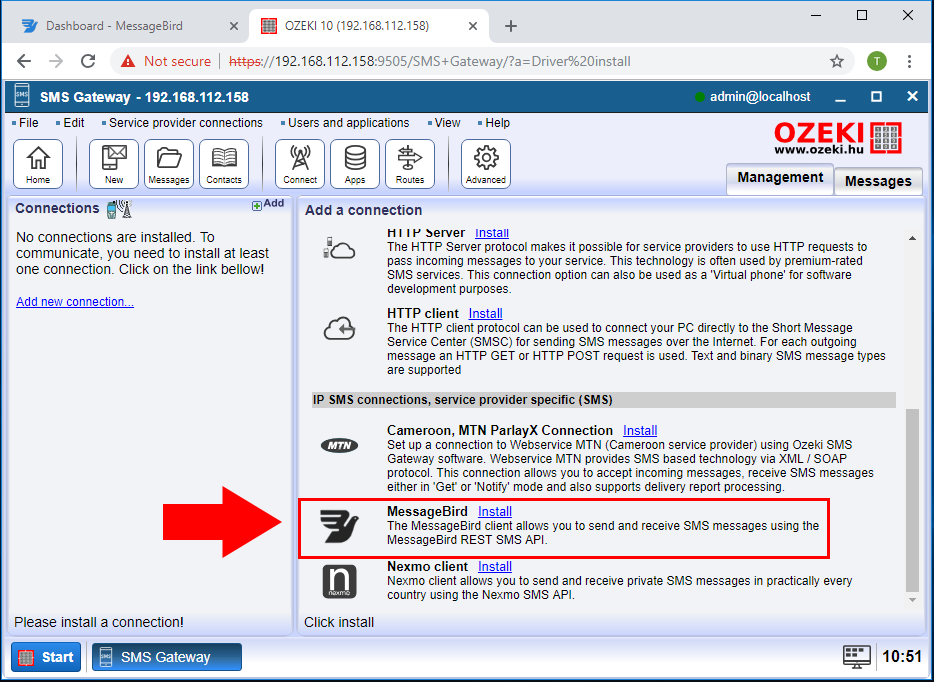
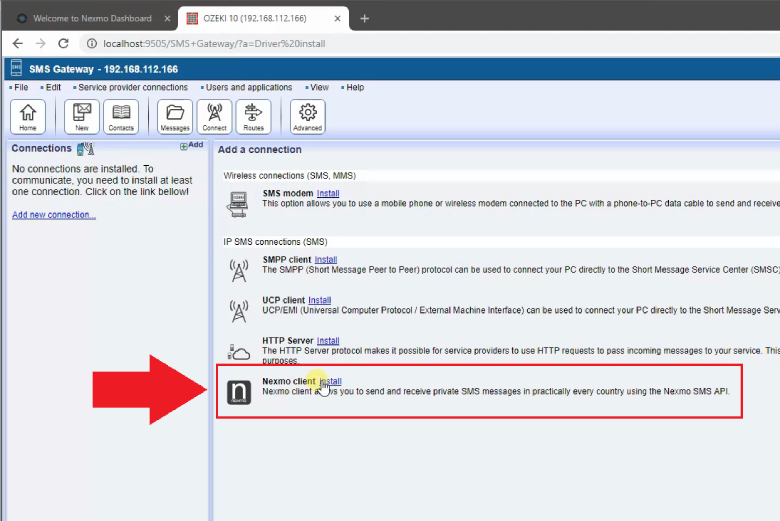
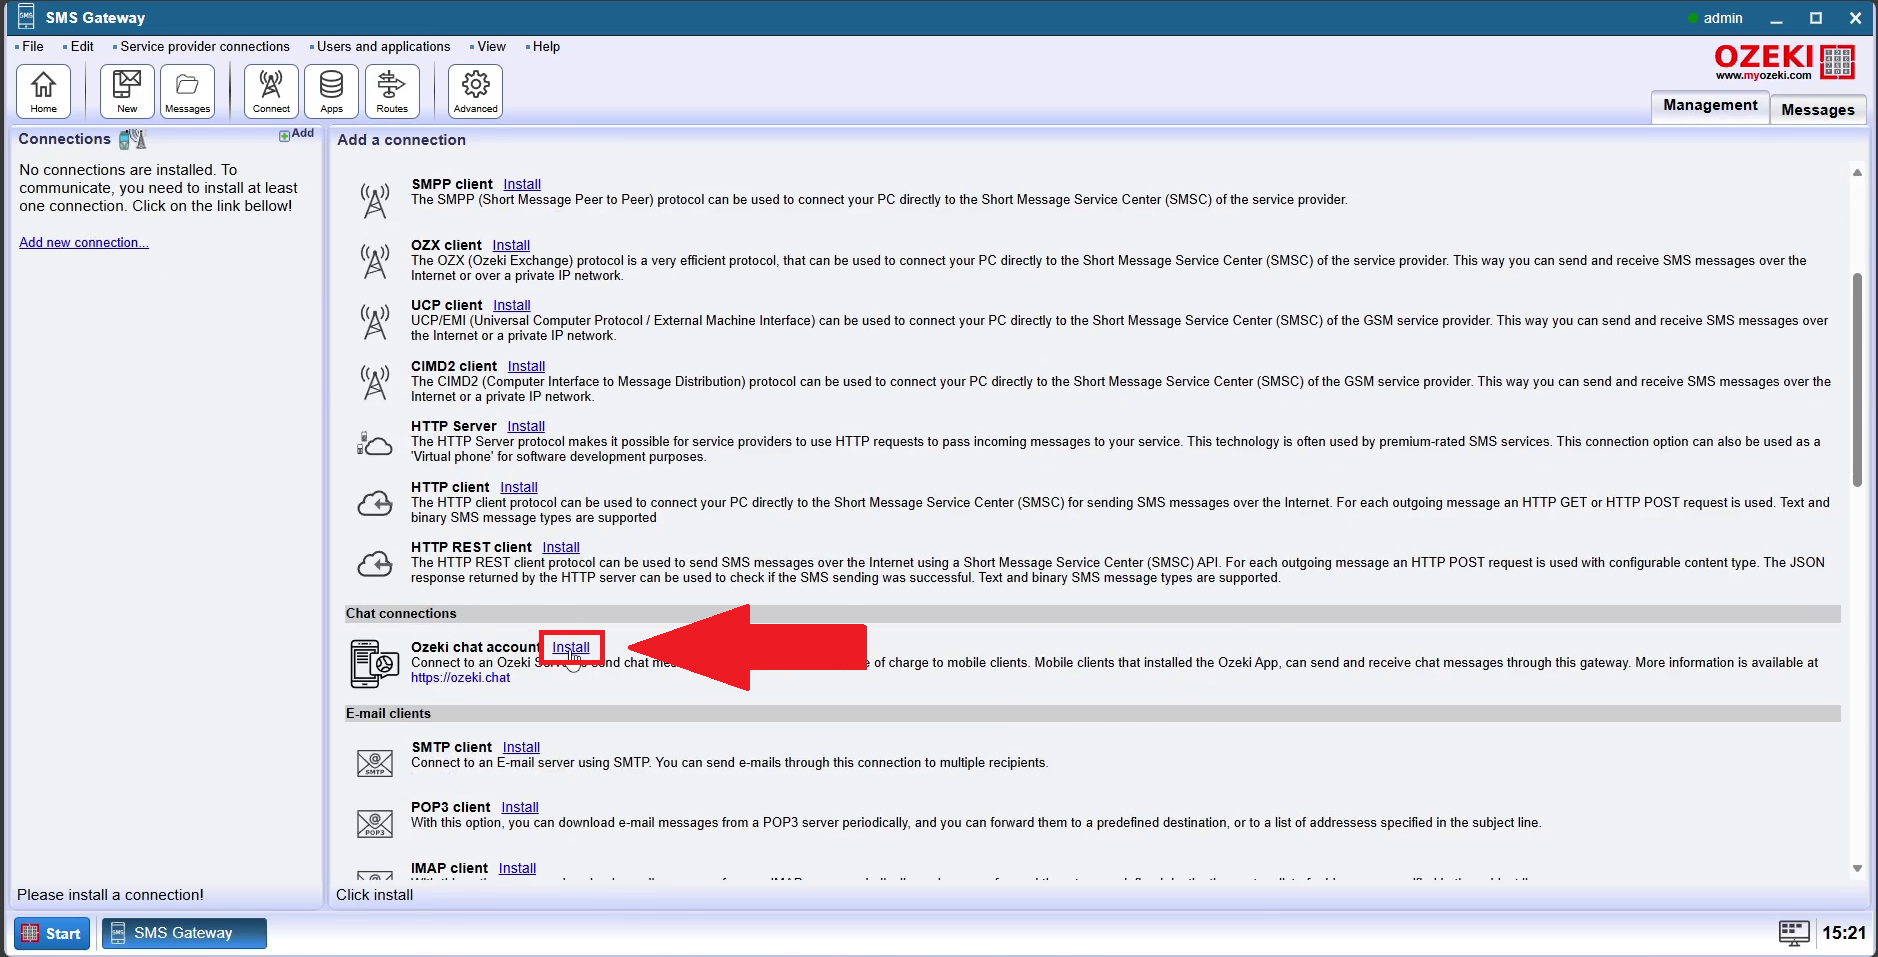
Next, click on Install next to Android SMS QR, highlighted in red in Figure 2.
Figure 2 - Install Android SMS QR connection
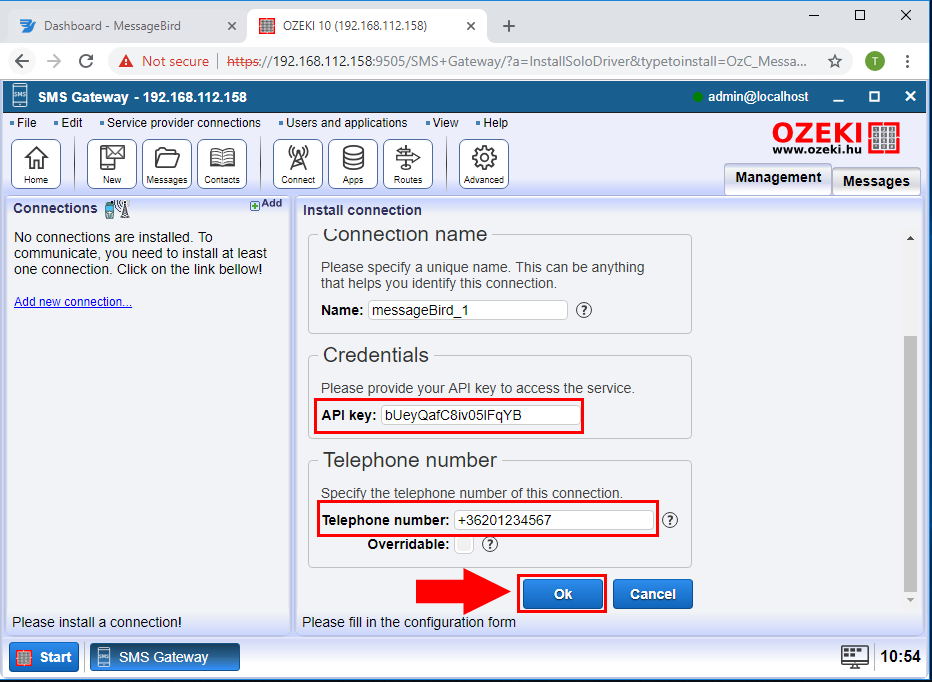
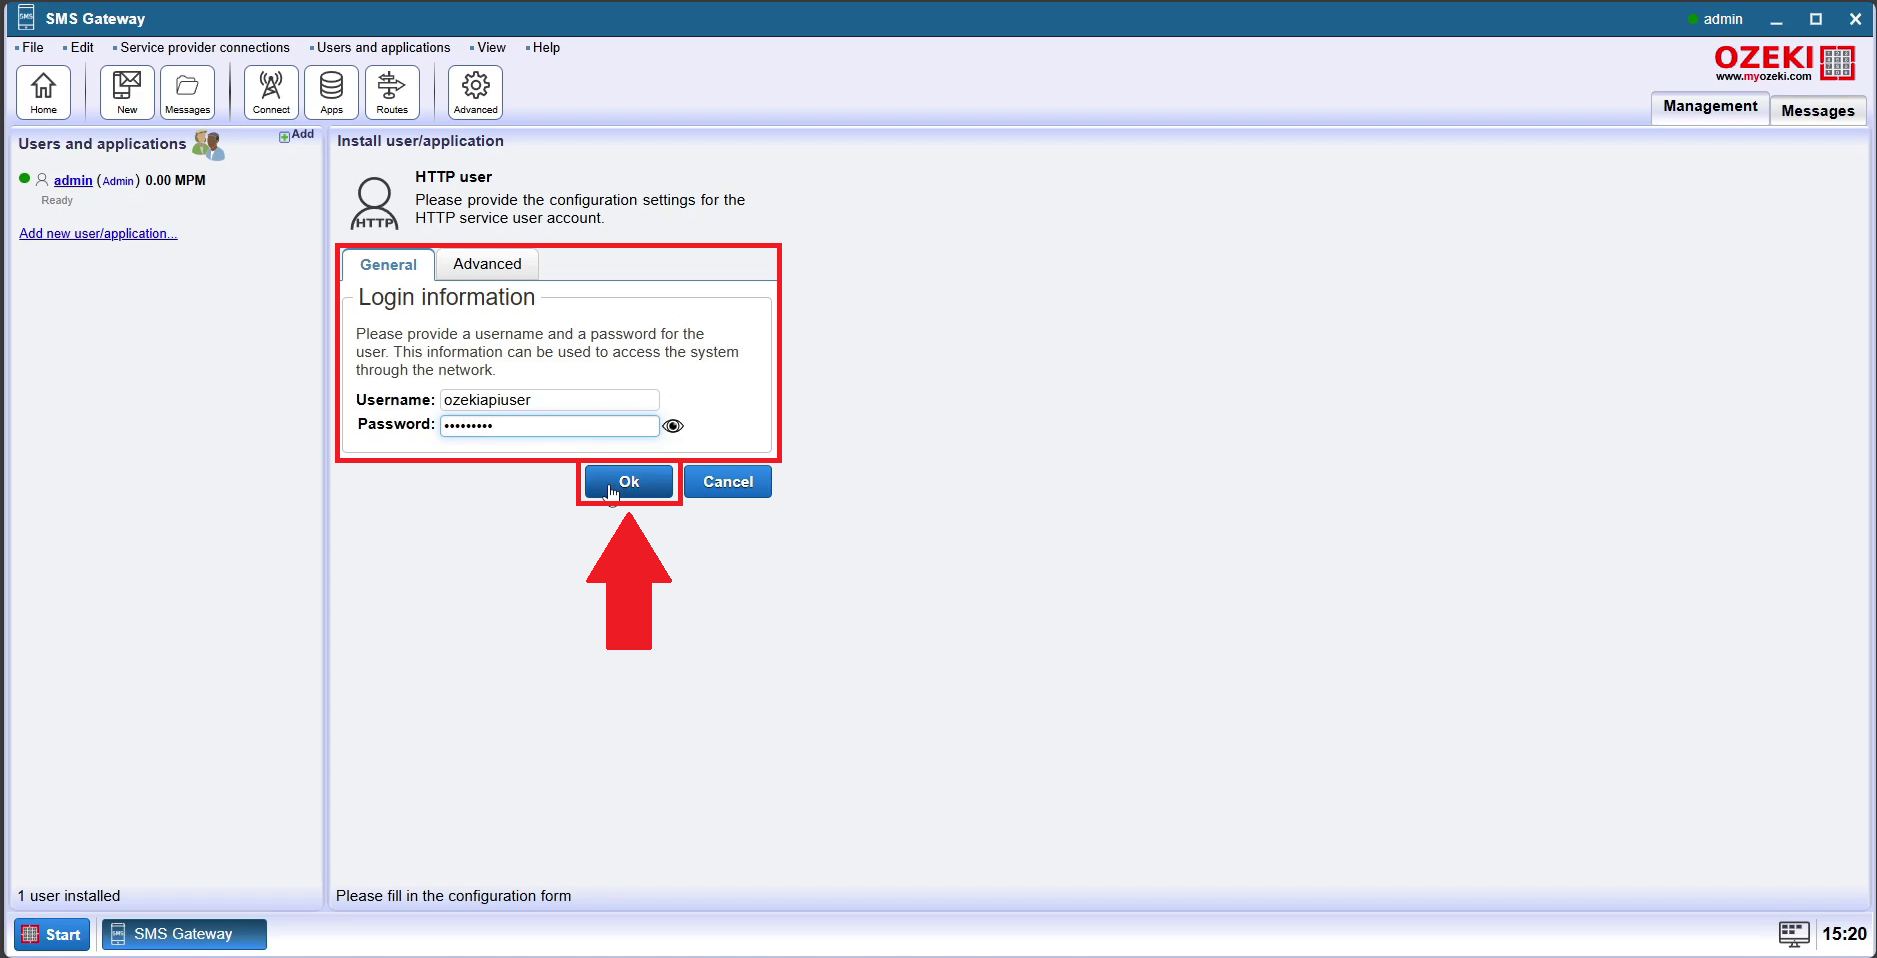
Enter the phone number of your Android phone into the corresponding
textbox, then hit OK, as shown in Figure 3.
Figure 3 - Configure phone number
If you have not already done so, this is the time to install the Ozeki Android App
on your mobile phone. (If QR code installation does not work, you can install the
Android app manually by downloading the installation file (APK) from the
android-sms-gateway.com website,
enable 'Unknown sources' in device settings, use a file manager to locate and
tap the APK, then follow on-screen instructions to complete installation
and grant necessary permissions.)
Scan this QR code to install the
Ozeki Android SMS App on your Android mobile
(use Android 9 or newer).
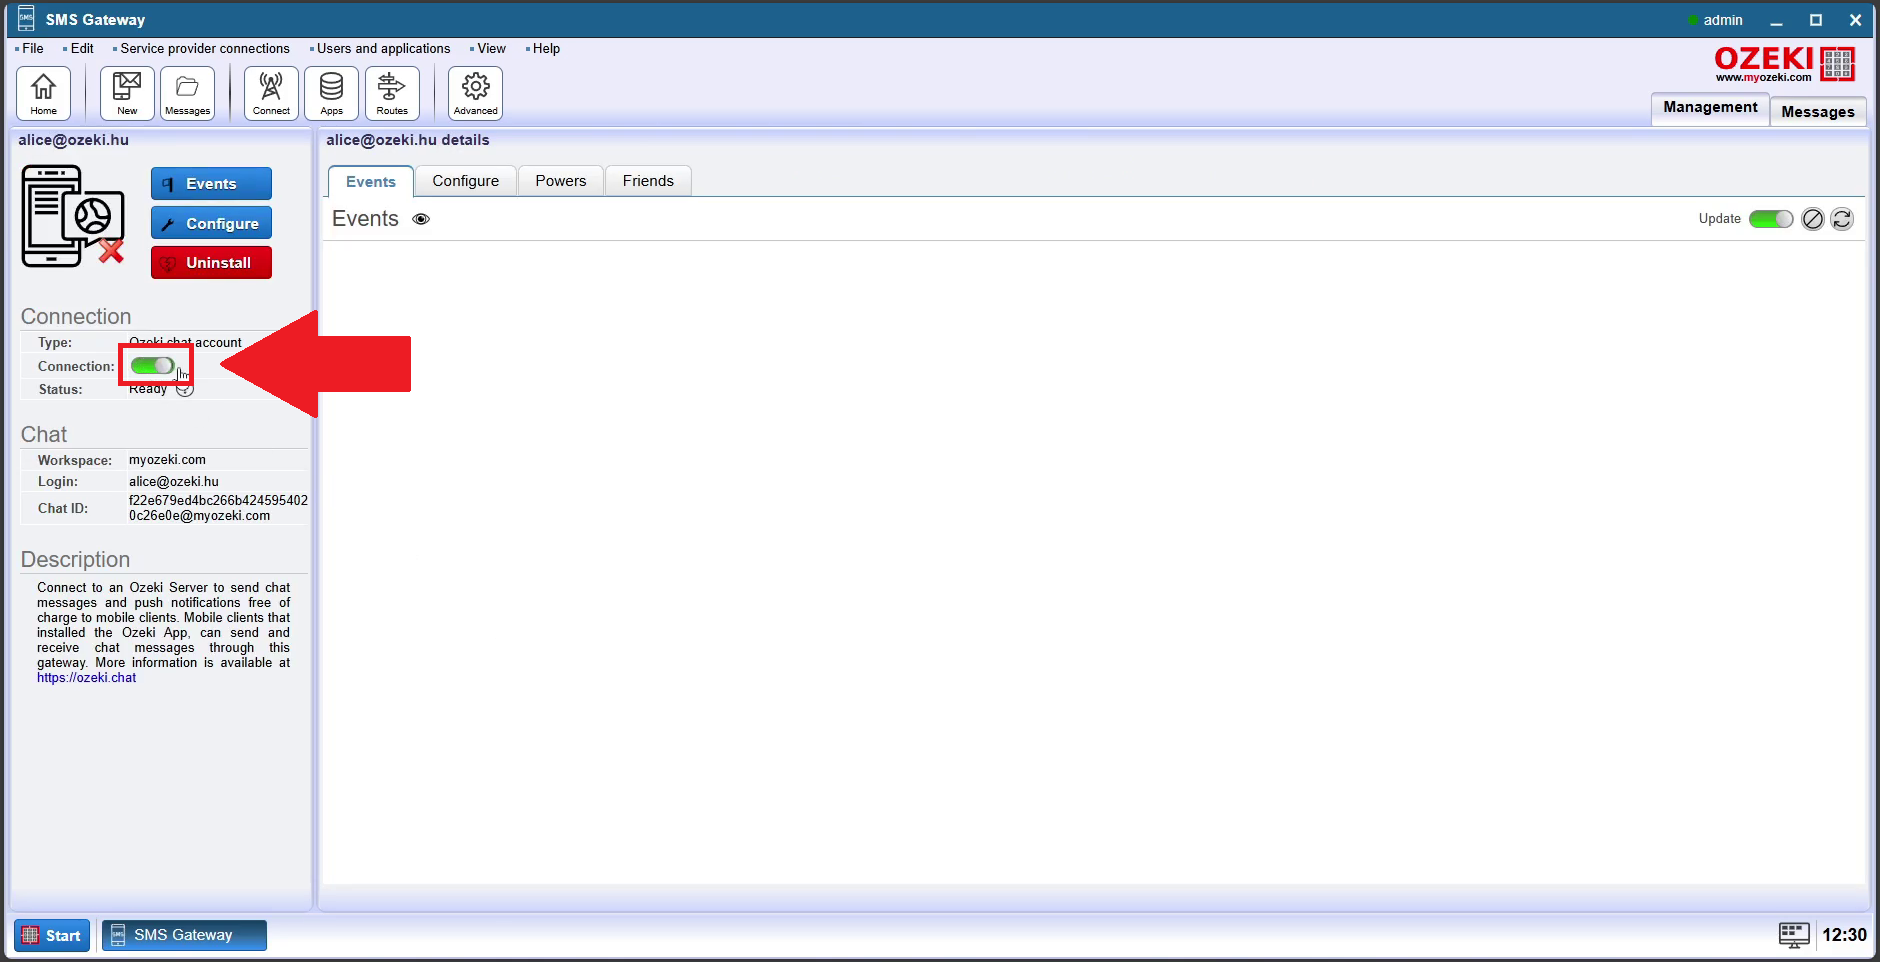
Once the Ozeki App is running on the Android phone, you need to connect
the phone to your Windows PC. In Windows, click on the QR code
tab located near the middle in the upper half of the screen of
your Android QR connection's details page. You should see a QR
code similar to the one in Figure 4.
Figure 4 - Scan QR Code
Video tutorial:
The next short video takes you through the steps of starting the Ozeki SMS App
by connecting it to the SMS Gateway by scanning the QR code.
In order for the Ozeki SMS client app to operate seamlessly, it must be set as
the default SMS handler (see Figure 5 and 6).
This is a very important step. The Android OS puts apps that are not opened by
the user regularly into sleep or deep sleep
to save battery power. It also often removes the permissions granted to apps
when they are put into deep sleep.
By setting the Ozeki SMS client as your default SMS handler,
you can prevent it from being disabled by Android.
This is required to be able to provide a reliable SMS gateway service for your PC,
that is able to operate for months and years without interruption.
Figure 5 - Set as default sms handler
Figure 6 - Select Ozeki SMS Client
Inside the Android app, tap the Start button, like in Figure 7.
Figure 7 - Start Service
Then, tap on the link that says Scan QR code. It is highlighted in
Figure 8.
Figure 8 - Open Scan QR code option
The camera should open. Point it at the QR code on your screen to scan it,
similar to Figure 9.
Figure 9 - Scan QR code
If done correctly, the row that previously said 'Link: not connected', should
have turned to 'Link: Connected.' in the Android SMS Client (Figure 10).
Figure 10 - Connected to the SMS Gateway
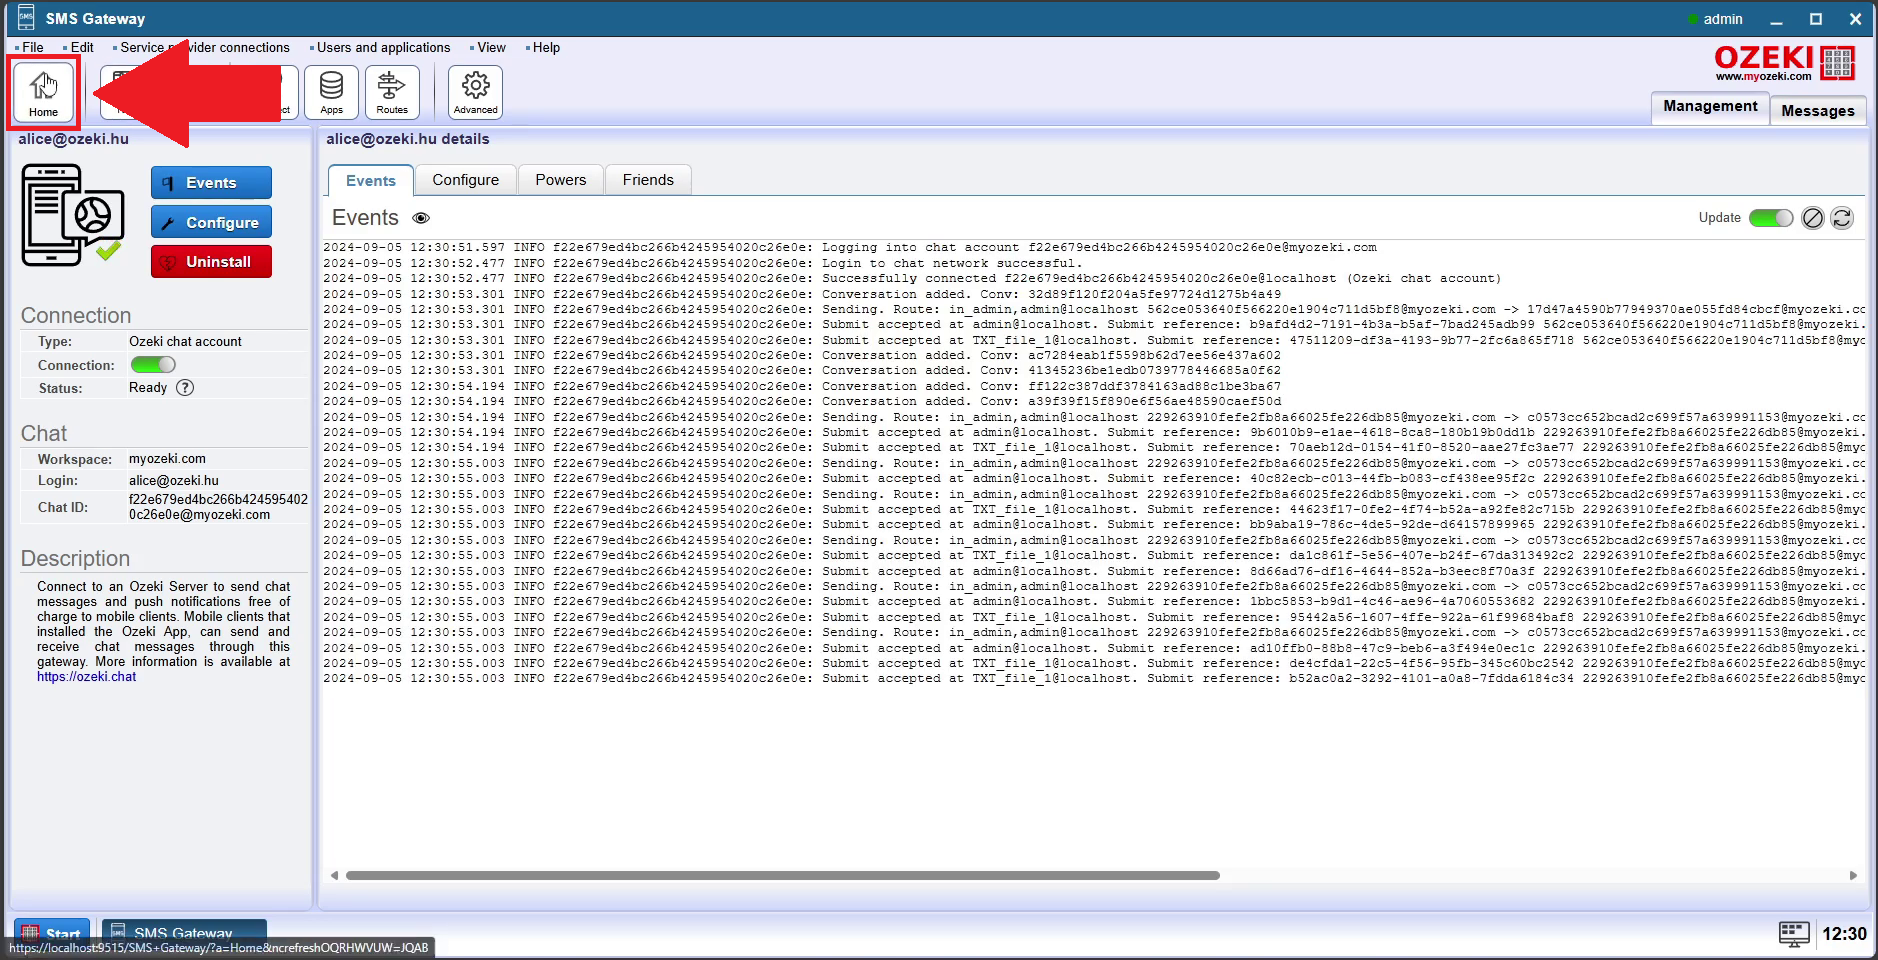
The Events tab of the freshly created connection should also tell you that the
connection was successful, as seen in Figure 11.
Figure 11 - Client connected
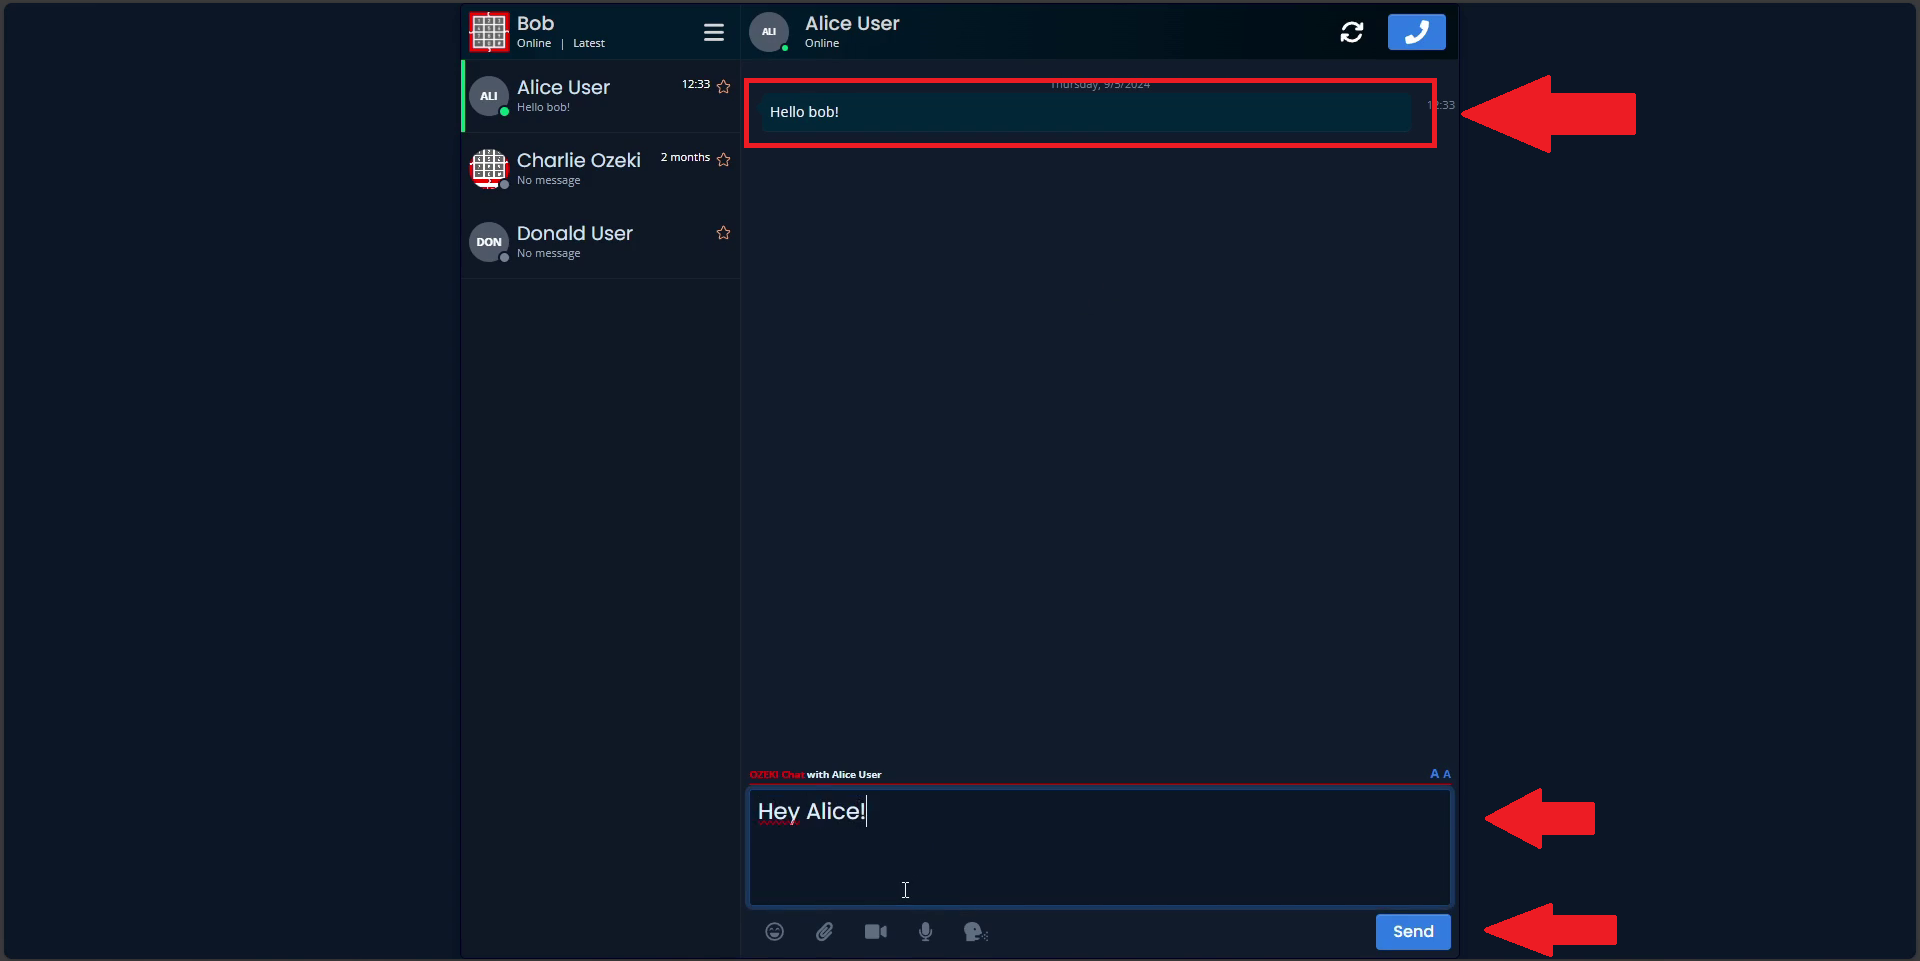
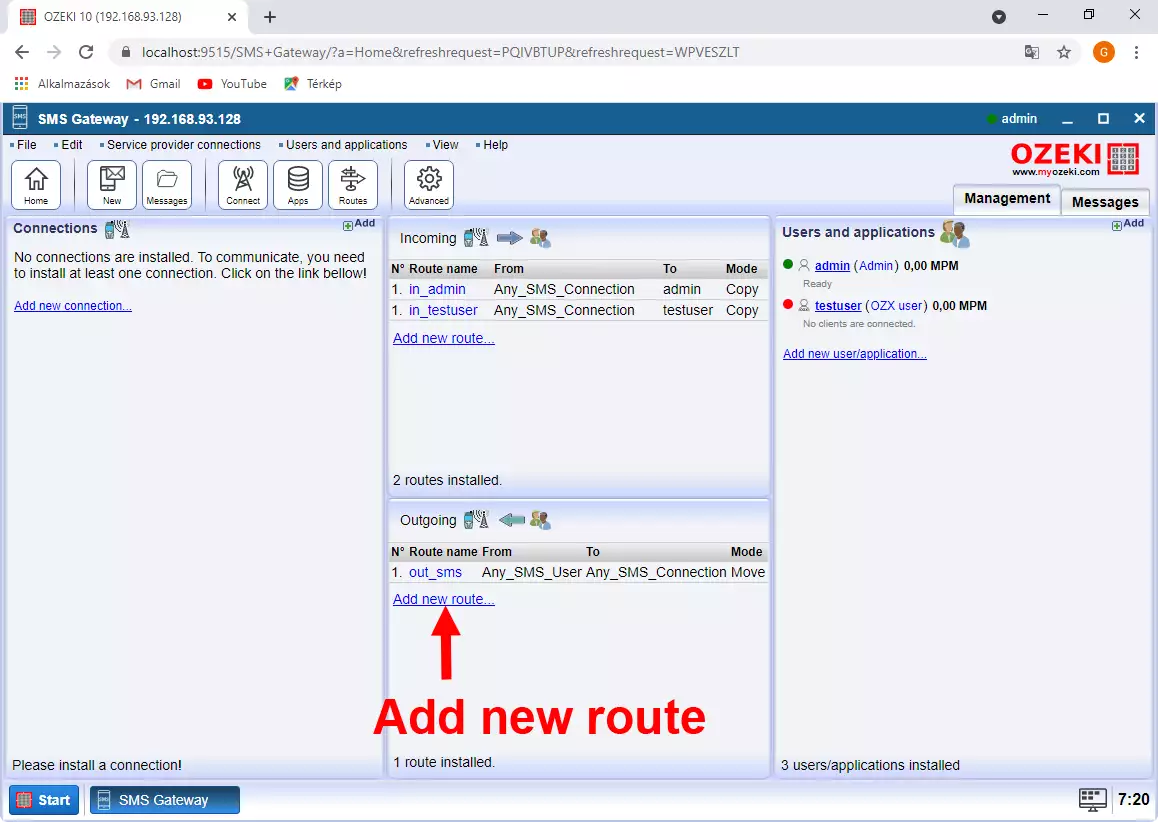
Step 4 - Send your first SMS
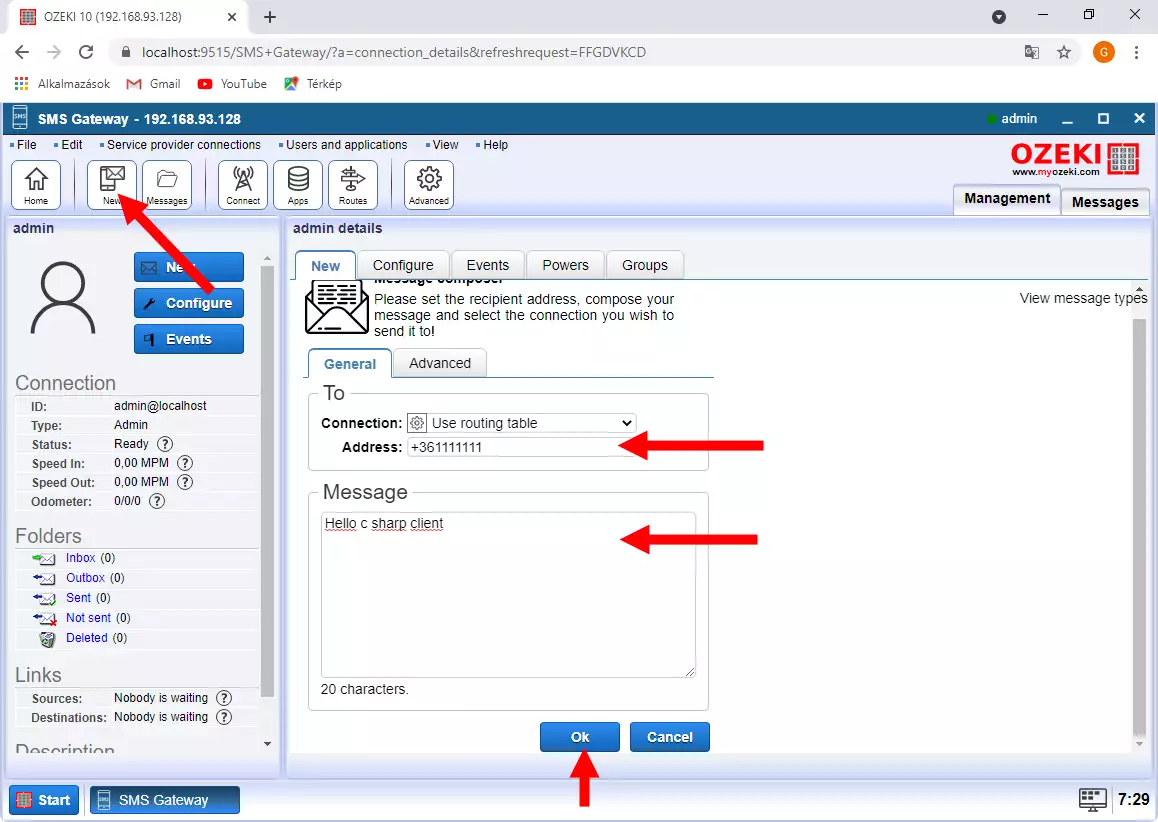
Now that everything is setup you are ready to send a test SMS. Click on New in
the toolbar. This will take you to the message composer page (Figure 12). Enter a
phone number and your message text and hit Ok to send it.
Figure 12 - Send message
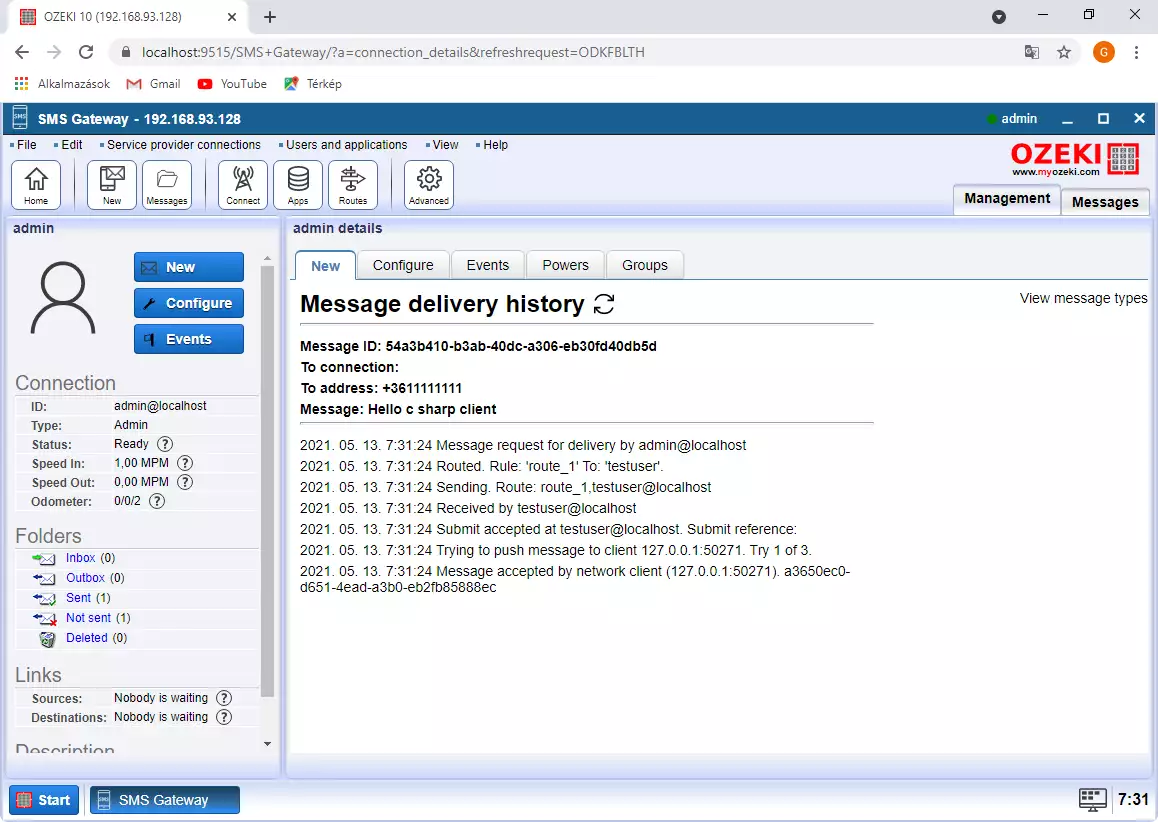
If successful, both the web GUI and the Android app should tell you the message
was sent out (Figure 13).
Figure 13 - Message sent
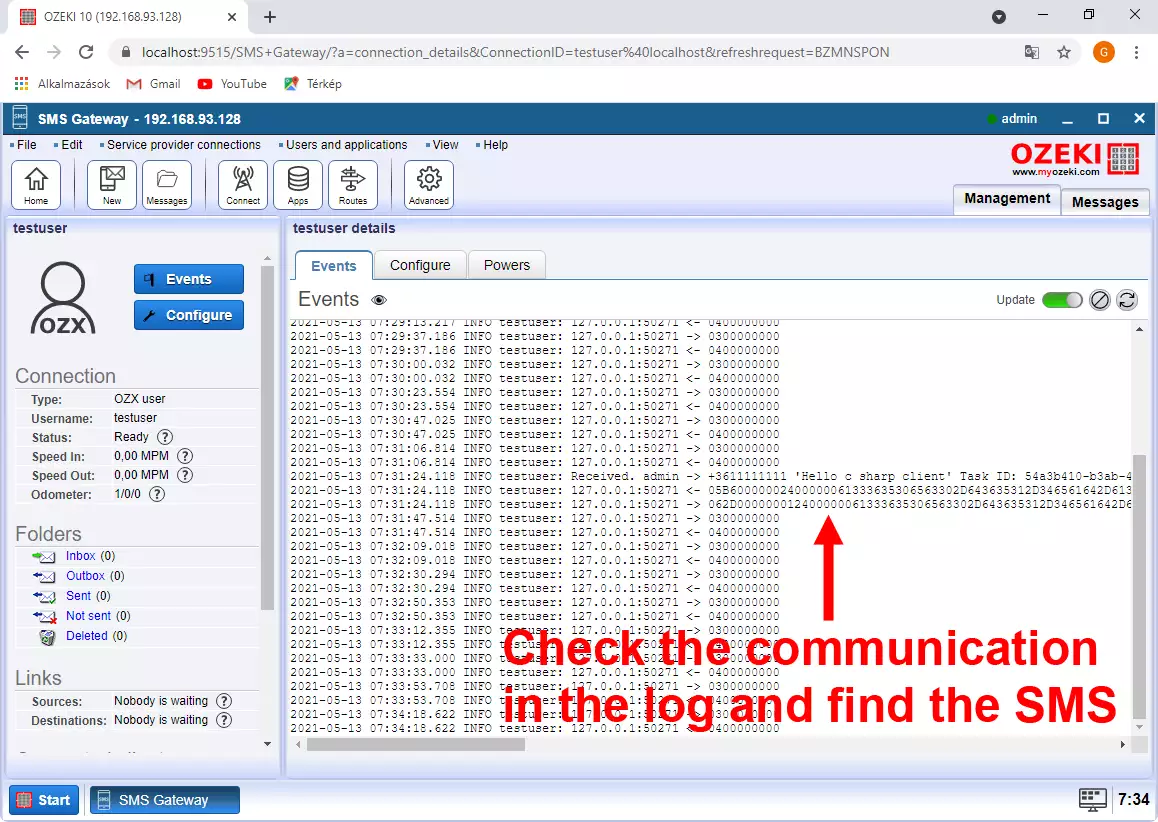
To make sure you have done everything correctly, head to the new connection's
Events page, where you should see logs similar to Figure 14.
Figure 14 - Message sent log
Are there other ways to connect my Android phone and my PC?
Get started
If you haven't decided yet whether you need a private SMS gateway system, read this article.
It will give you some insights and will help you make an informed decision. How to get started with a private SMS Gateway
Features
Ozeki SMS Gateway is a powerful messaging platform that enables businesses to send and manage SMS communications reliably and at scale.
It supports various mobile network connections—including modems, SMPP, and Android devices—offering flexibility in message delivery.
Advanced features like least-cost and backup routing optimize efficiency, while strong security measures protect data.
The system also integrates easily with databases and directories, making it ideal for bulk messaging, automation, and system integration. Ozeki SMS Gateway Features
Screenshots
See Ozeki SMS Gateway in action! Explore screenshots of the Ozeki SMS Gateway login process,
SMS desktop interface, menu navigation, and SMS gateway key features. Get a visual overview of how the SMS gateway
works and discover its powerful capabilities. Ozeki SMS Gateway's Screenshots
Technical Datasheet
On this page you can find all the technical related information about Ozeki SMS Gateway.
The supported connection types and message types are listed here, as well as other details
that are needed to build an efficient and well-functioning SMS system based on this SMS gateway. Ozeki SMS Gateway's Technical Datashee
Technology
An SMS gateway is a software that allows you to send and receive SMS messages from your applications.
It can also be used to provide SMS services. An SMS gateway is often referred to as an SMS Server. It is a self-hosted SMS gateway. SMS Gateway Technology
If you haven't decided yet whether you need a private SMS gateway system, read this
article. It will give you some insights and will help you make an informed decision.
What is a private SMS gateway?
A private SMS gateway is a software platform. It serves as a dedicated solution
exclusively designed for sending and receiving SMS messages within a company. Unlike on-line services,
a private SMS gateway provides a secure environment for organization who want
to keep their phone number lists and their customer communication private.
When using a private SMS Gateway, such as Ozeki SMS Gateway, the messaging infrastructure
is solely used by the organization owning the system. This dedicated nature enhances
security, as sensitive communications remain confidential within a controlled environment.
Additionally, a private SMS gateway grants organizations simultaneous access to
multiple mobile network, and more control over messaging processes and configurations.
A private SMS gateway allows the user to create tailored solutions that meet
specific business needs. This autonomy results in improved efficiency and seamless
integration with existing workflows and the business system. By opting for a private SMS gateway,
enterprises benefit from heightened security measures, greater operational control,
and a customized messaging solution, contributing to an optimized and secure
communication ecosystem.
What are the benefits of the private SMS gateway:
1. Increased security: Your contact lists and messages are not shared with others, providing a more
secure communication channel. With a private SMS gateway, your messages remain
exclusive to your organization, eliminating the risks associated with shared
services. Your phone number lists will also stay private. This exclusivity ensures
a more secure communication procedures, safeguarding sensitive information
from potential breaches.
2. Full control: You have complete control over messaging processes and
configurations. You can decide which mobile network operator to use, which phone
number to use for your operations. You can connect to multiple mobile networks
simultaneously. You can see, control, modify, redirect, log all the SMS messages
that go through your system. You can configure user accounts, admin accounts
and control which roles users can take while sending SMS. This level of
customization empowers enterprises to establish and enforce their messaging
policies, ensuring alignment with strategic objectives and compliance standards.
3. Cost savings: On-line SMS services will become very expensive over the
long run. Creating your SMS service can result in significant cost savings
compared to third-party services. Compared to relying on third-party services,
establishing your SMS gateway minimizes external expenses. You will not pay a monthly
fee for standby and often you will be able to send and receive SMS free of charge (subject
to mobile network service plan). This financial advantage, coupled with increased
security and control, makes a private SMS gateway an economically sound and
operationally efficient choice for businesses seeking a robust and tailored messaging solution.
Private SMS Gateway Deployment steps
1. Download the Ozeki SMS Gateway software:Download the Ozeki SMS Gateway software on a Windows computer. This can be a
server or desktop device. This software serves as the core component, providing the
necessary tools and features for managing and controlling the SMS gateway. The software
installation after download is similar to the installation of any other Windows
software.
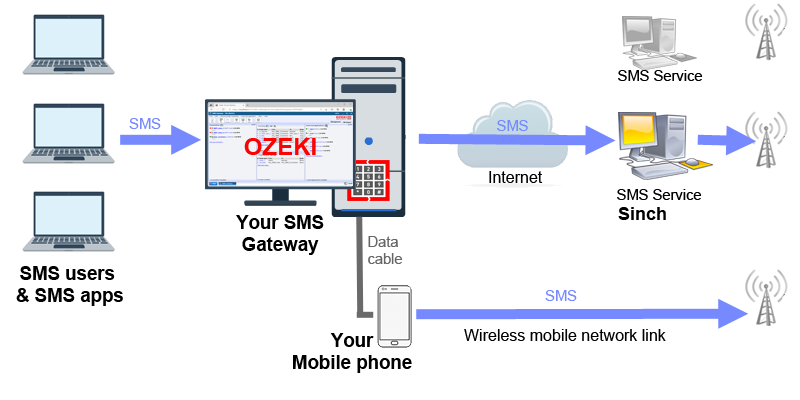
2. Choose how to connect to the mobile network: To send SMS messages to mobile
phones, you need to connect to the mobile network. You can use a wireless
connection or a connection over the Internet. The most popular wireless connection
uses an Android mobile phone. The Android mobile
device is connected to the Windows computer over Wi-Fi and is responsible for
forwarding the SMS messages to the mobile network. If connection to the
mobile network is through the Internet, the best option is to connect
directly to the Short Message Service Center (SMSC) of a mobile network operator.
This last option is called IP SMS connection.
3. Configure your SMS system (create user accounts, and connect services):After your SMS gateway is connected to the mobile network.
This next step is to create user accounts, and to connect IT systems that can do
automated SMS messaging to improve your business operations.
4. Purchase a license to remove limitations: Once your system is ready
to go, you can purchase an Ozeki SMS Gateway license to remove speed limitations
and restrictions from your system. Click on the following link to get pricing
information?:
In summary, creating and deploying a private SMS Gateway through Ozeki presents
a strategic opportunity for organizations seeking enhanced communication
capabilities. The dedicated nature of a private SMS Gateway ensures exclusive
access to messaging infrastructure, promoting heightened security by keeping
sensitive communications confidential within the controlled environment. The
platform also offers unparalleled control over messaging processes, allowing for
tailored solutions that seamlessly integrate with existing workflows. This
customization empowers enterprises to enforce messaging policies, aligning
communication strategies with strategic objectives and compliance standards.
Furthermore, the potential for significant cost savings distinguishes a private
SMS Gateway as an economically sound choice compared to third-party services.
SMS modem:
You can attach an SMS modem to your computer with a USB cable to send and
receive wirelessly over the mobile network. In this case you don't need to
sign up for an Internet SMS service. All you need to do is purchase a SIM
card and put it into your SMS modem.
SMS modem pools:
If you wish to operate several modems to increase capacity, or you wish to
have several phone numbers, you can connect an SMS modem pool to Ozeki SMS
gateway. Ozeki will handle each modem in the pool as an independent SMS
connection, and you can use Ozeki's advanced routing capabilities to decide
which modem to use for sending. The SMS modem pool is usually connected to
your computer with a USB cable. If you use an SMS modem pool, you will have
to purchase a SIM card for every modem in the pool. For example,
if you use a modem pool with 8 modems, you need 8 SIM cards and you will
have 8 phone numbers to use.
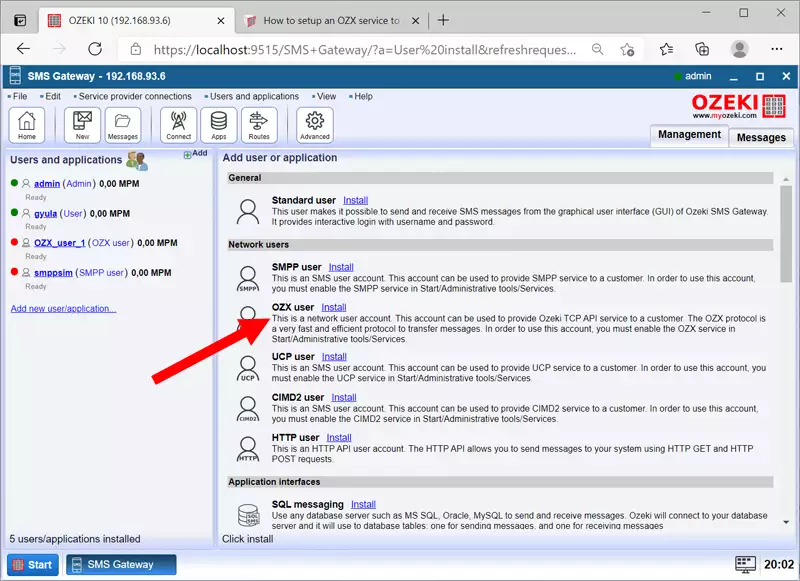
OZX client:
The OZX (Ozeki Exchange) protocol is a very efficient protocol, that can be
used to connect your PC directly to the Short Message Service Centre (SMSC)
of the service provider. This way you can send and receive SMS messages over
the Internet or over a private IP network.
Android SMS connection:
You can connect to an Android mobile phone over Wifi and install the Ozeki
Android SMPP gateway app to send and receive SMS messages from your computer.
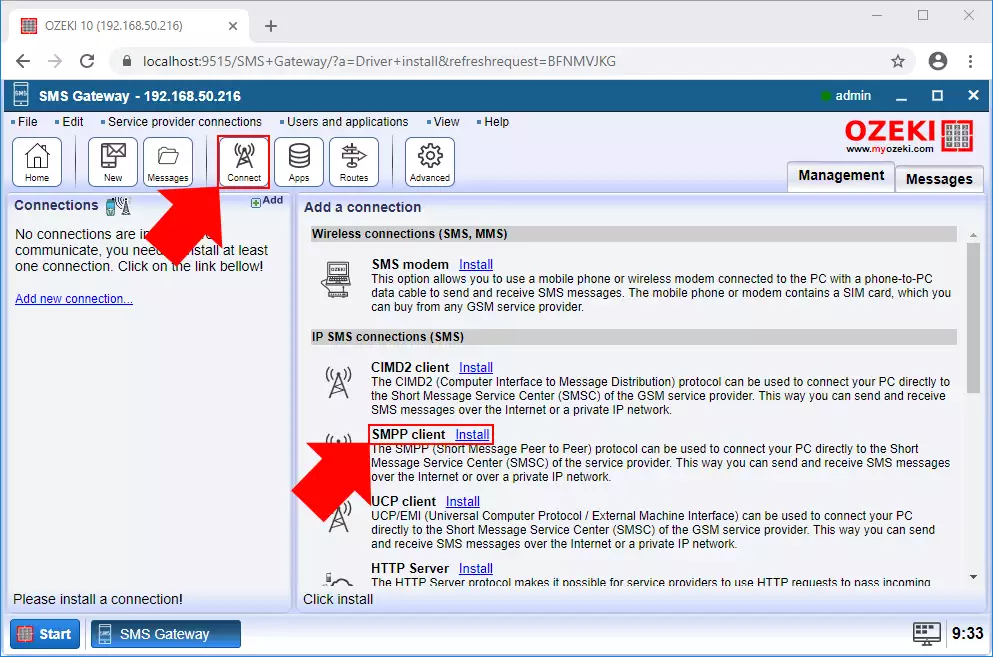
SMPP SMS connection:
You can connect to an IP SMS service using the Short Message Peer to Peer
(SMPP) protocol. Ozeki SMS gateway supports SMPP version 3.3, 3.4, 5.0. This
protocol is used by Mobile network operators to exchange SMS messages. You
can connect directly to an SMS Service Centre (SMSC) using SMPP.
UCP SMS connection:
You can connect to an IP SMS service using the Universal Computer Protocol
/ External Machine Interface (UCP/EMI) protocol, version 3.5 or higher, to
connect to an SMSC over the internet or other private TCP/IP network. Some
mobile operators provide UCP connections for higher volumes of SMS traffic.
CIMD2 SMS connection:
You can connect to an IP SMS service using the Computer Interface to Machine
Distribution (CIMD2) protocol, version 2 or higher to connect to an SMSC over
the internet or other private TCP/IP network. This protocol is implemented
by Nokia SMSCs.
HTTP client SMS connection:
You can connect to an
IP SMS service using the HyperText Transfer Protocol (HTTP).
This is a customizable connection type, that allows you to use HTTP or HTTPS.
For HTTP SMS you can set client certificate and validate server certificates.
By creating an appropriate HTML template, you can connect to virtually an HTTP
SMS service provider.
WhatsApp SMS Connection:
Businesses can use WhatsApp to communicate with customers and clients in a
personal and convenient way and they can send messages directly to their
mobile phone. One way to use WhatsApp for business is to set up a WhatsApp
SMS connection. This allows businesses to send and receive WhatsApp messages
through their Ozeki SMS Gateway.
SMS routing features
Least cost SMS routing:
Pre-route SMS messages based on phone number prefix or route costs to ensure
optimum delivery costs.
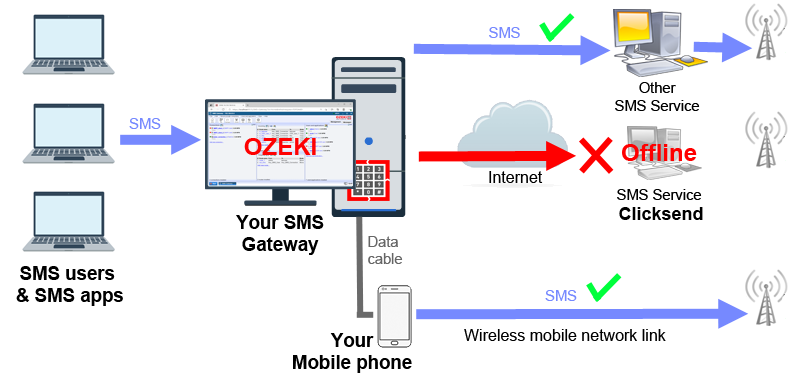
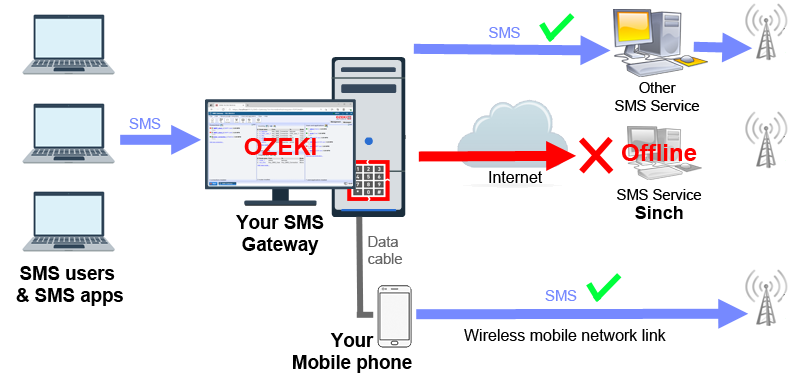
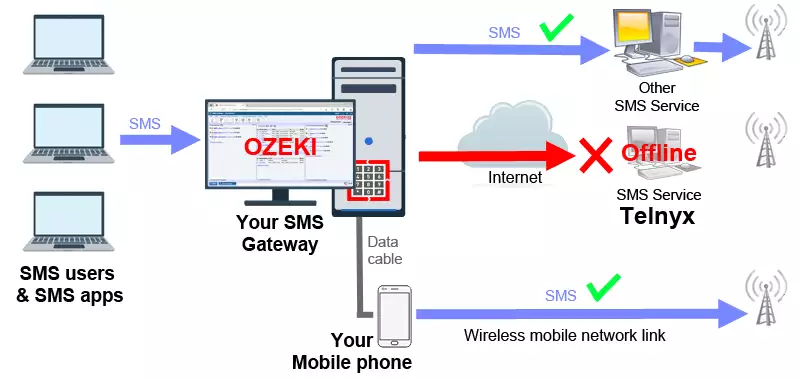
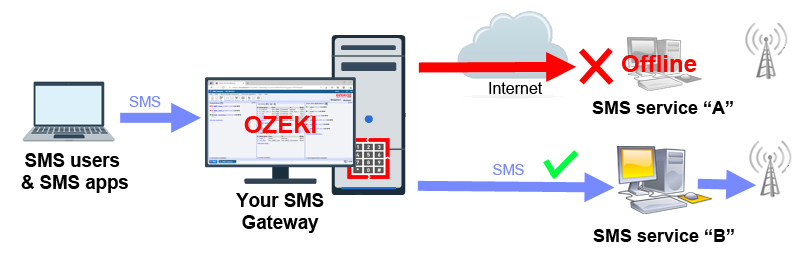
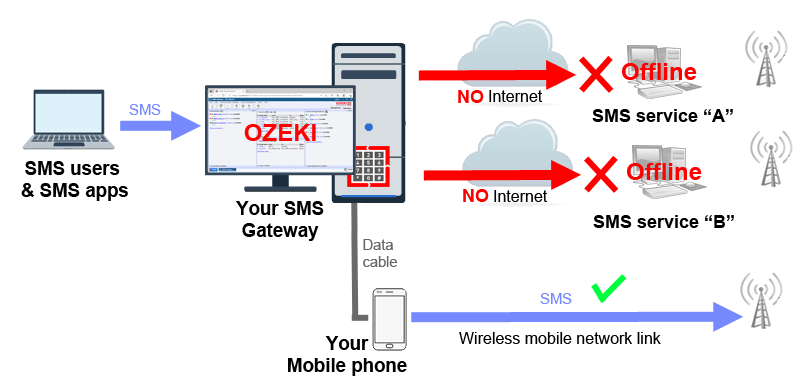
Backup SMS routing:
You can route a message to different connection in case the primary connection
is not functioning. For example, if the Internet fails, or your primary Internet
based SMS service provider fails, you can automatically route the messages to a
wireless connection (e.g. an SMS modem connected to your server with a data cable).
Of course, you can route the messages to other Internet based SMS service providers.
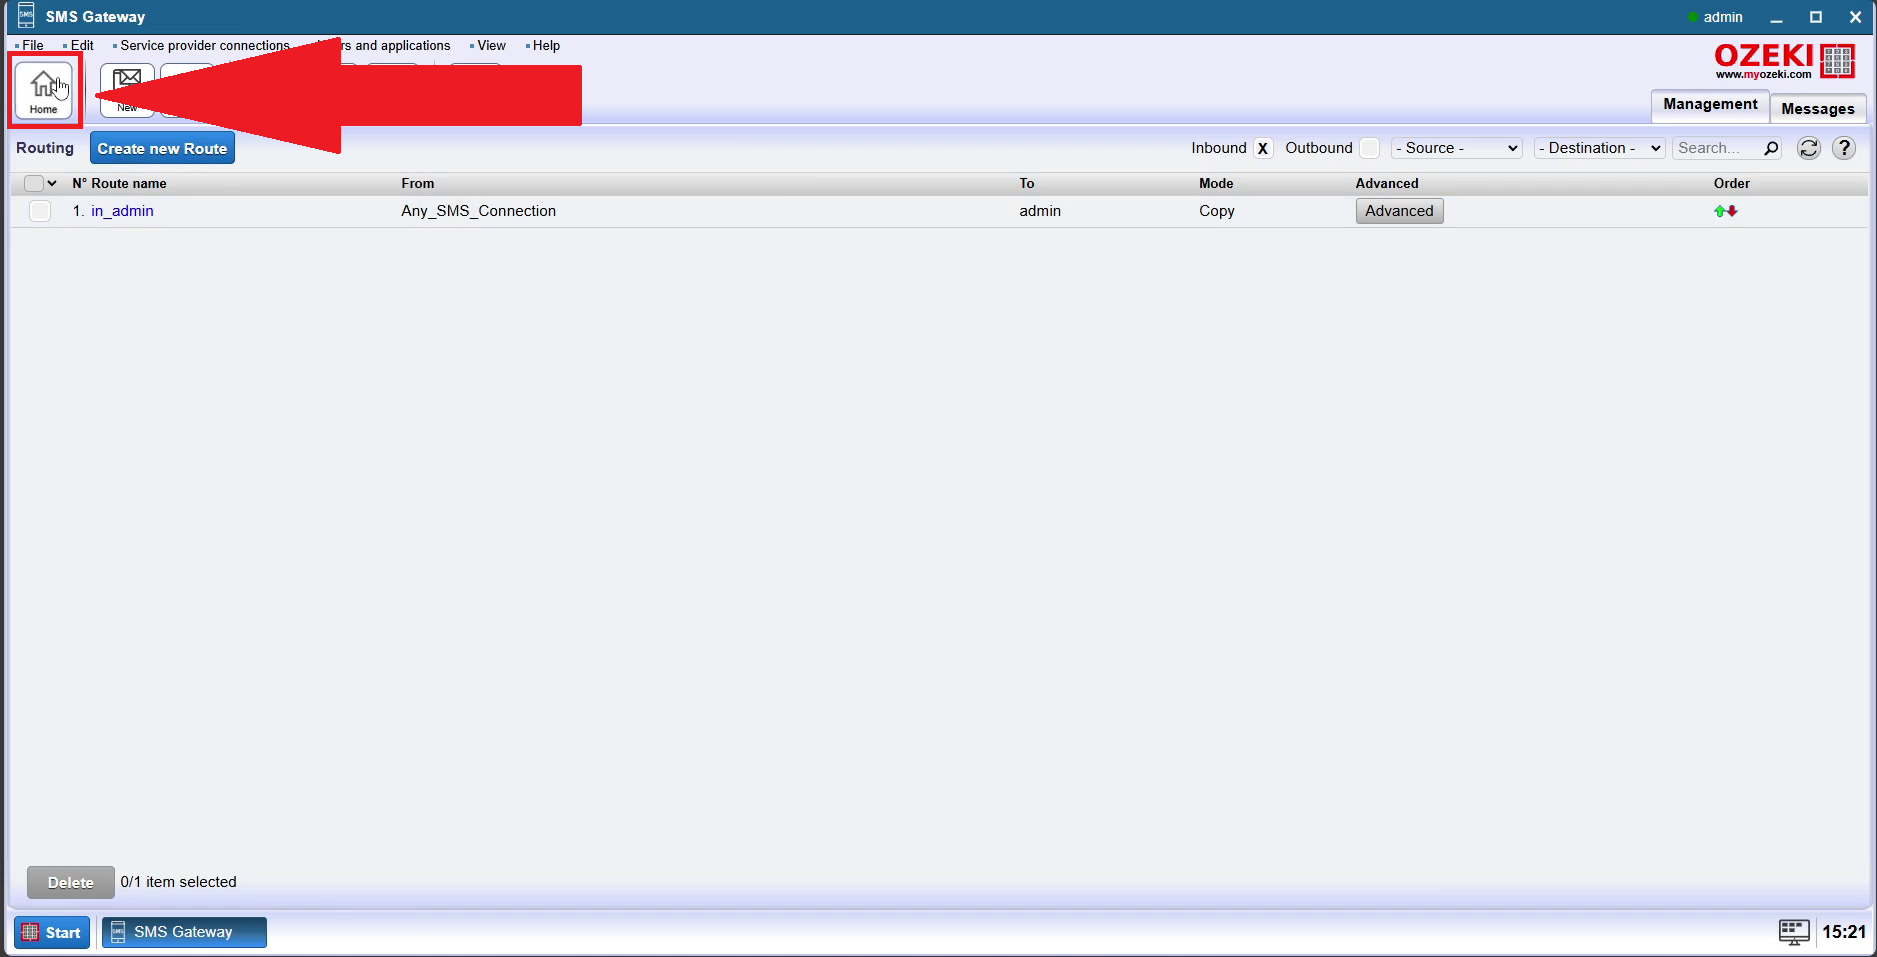
Copy messages: You can copy each message going
through your system and forward it to a database for logging or to any SMS
connection. You can make one or more copies and route them to your preferred
destination, which can be a phone number, an email address a database or any
application.
SMS routing to multiple networks:
For cost efficiency reasons, you have the option to connect your SMS system to
multiple mobile networks. You can select the mobile network you wish to route
your message to anytime in the Ozeki SMS Gateway.
SMS Modification:
With Ozeki SMS Routing, you have the chance to modify the details of the sms
like the recipient or the content.
Encrypt SMS messages:
To have a safe and encrypted conversation with your chat partner, you can setup
an encryption and decryption function to any connection. This way only the
individual with the selected password have access to your messages.
Delayed SMS message:
Experience the advantage of composing messages in advance and ensuring
they reach your recipients precisely when they need to and optimize your
personal and professional interactions.
Sender number pools:
You can pick a number randomly from a list and use it as the sender ID in your
SMS message. This is great if you wish to operate a modem pool.
Recipient number modification:
You can change the recipient phone number. You can use this to reroute a message
if somebody's phone number changes, or you can correct invalid recipient phone
numbers by fixing the phone number prefix
Message text replacement:
You can change the SMS message text on the fly by simply rewriting it.
Append text to the message:
You can change the SMS message text by appending an advertisement to the end of
each SMS message, e.g. "Hello world - Sent by mycompany.
Word filtering: You can filter out unwanted words and replace their content
to stars (****) or you can drop messages containing such words
SMS Templates:
Using SMS templates can provide several marketing benefits for businesses
and organizations. By leveraging these benefits, businesses can enhance
their SMS marketing strategies, engage with their audience more
effectively, and drive better results from their marketing campaigns. It
can greatly streamline your workflow and enhance the overall aesthetic
appeal of your documents.
Multipart SMS encoding:
Messages longer than 160 characters (if the 7 bit SMS alphabet is used) or if
they are longer than 70 characters (if the unicode character set is used)
are split into multiple segments and are sent through the network according to
the multipart SMS specification standards. The Ozeki SMS gateway does the
multipart segmentation and reassembly.
Unicode character encoding:
You can send Chinese, Arabic, Hebrew and any other character supported by the
unicode alphabet. Ozeki implements the unicode character encoding.
Binary message encoding:
You can send 140 bytes of binary data in binary SMS messages. With Ozeki you can
set all SMS attributes, so you can specify the binary message flag to set such data.
Application port numbers:
Application port numbers can be used if SMS messages are sent through the mobile
network. Both sender and recipient port numbers are supported. Port numbers are
sent in the User Data Header (UDH) according to
the SMS standard. To send a message to a port number specify the phone number
in the following format: +36201234657:7777 where 7777 is the port number (you
can change 7777 to any port number you like). This format applies to both the
sender and recipient numbers. Port
numbers are often used if mobile applications running on Android or iOS mobile
phones communicate with PC based services using Ozeki SMS Gateway.
Special message types:
Ozeki natively supports WAP Push, SyncML, Voicemail notification, vCard,
vCalendar and other native SMS message formats used in mobile networks.
Message encoding policies:
You can set "don't transform", "best match" and "enforce charset" replacement
policies, to do character set transformation. These are very useful because it
gives you total control over which character sets
are used when your SMS messages are encoded.
Application connectivity features
SMS API's for Developers:
The Ozeki SMS Gateway allows for sms developers to use sms api
software for short message sending and receiving. You can use it
to integrate and quickly deploy SMS messaging solutions.
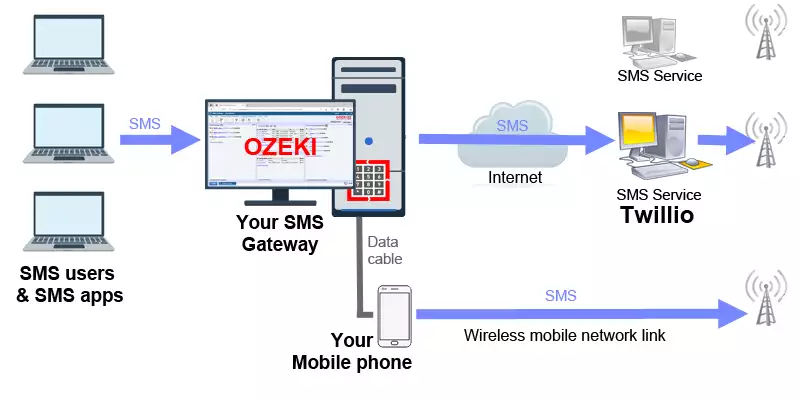
SMS service providers:
The Ozeki SMS Gateway offers connectivity to several on-line SMS service
providers. You do not need to buy the hardware, just subscribe to their
service online to have an SMS Gateway.
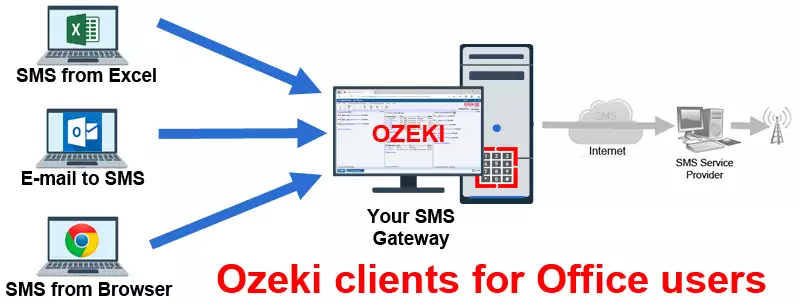
Excel SMS:
You can use Microsoft Excel or a compatible word processor to send messages to a
list of phone numbers
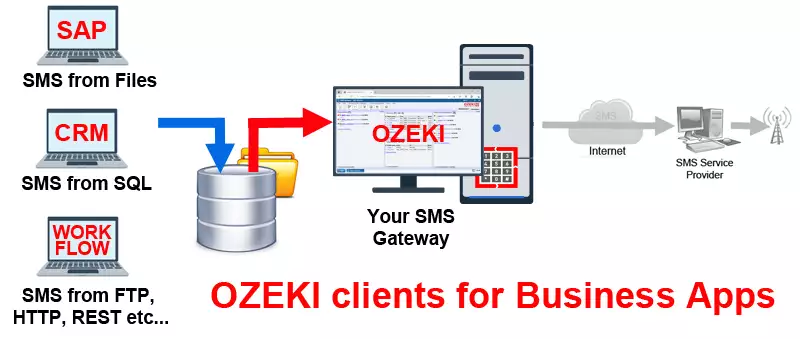
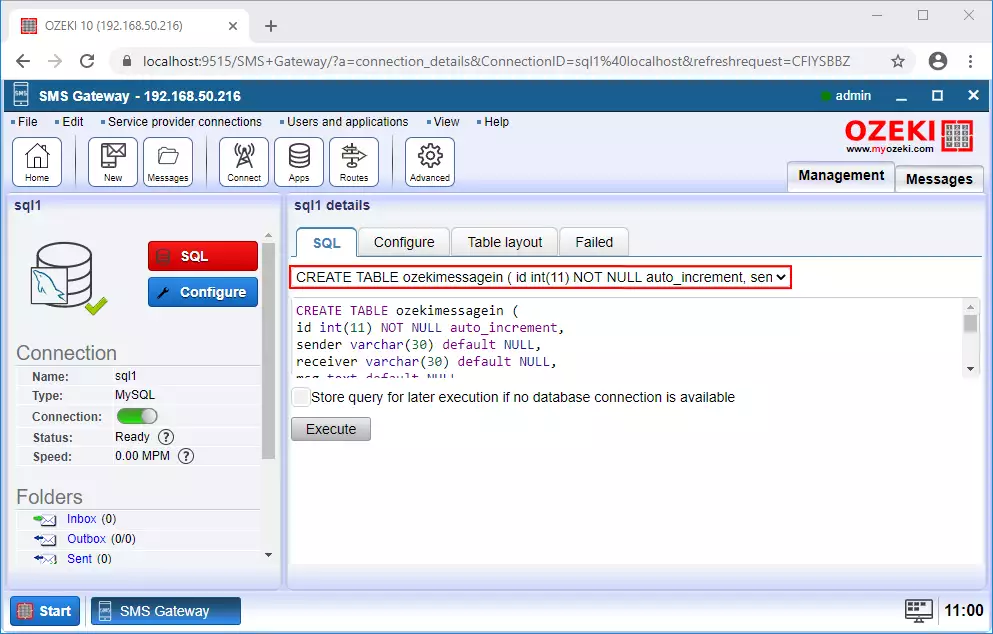
SQL messaging:
Send and receive SMS messages from a database.
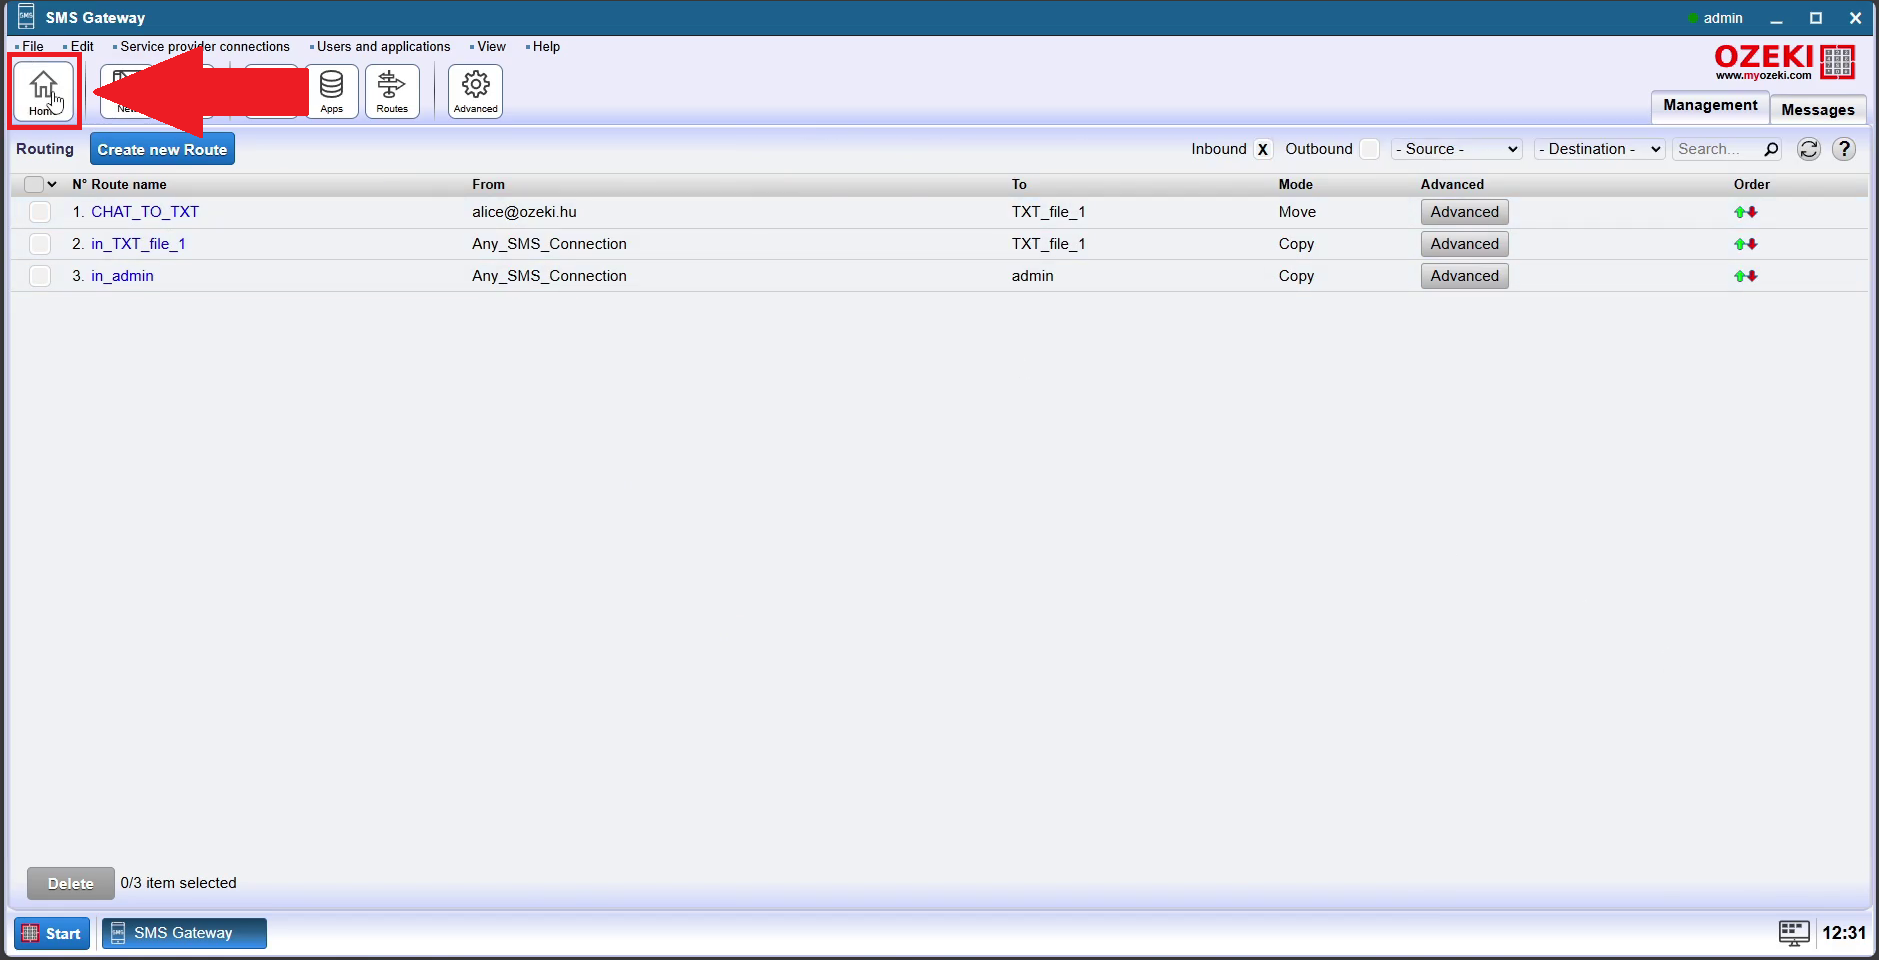
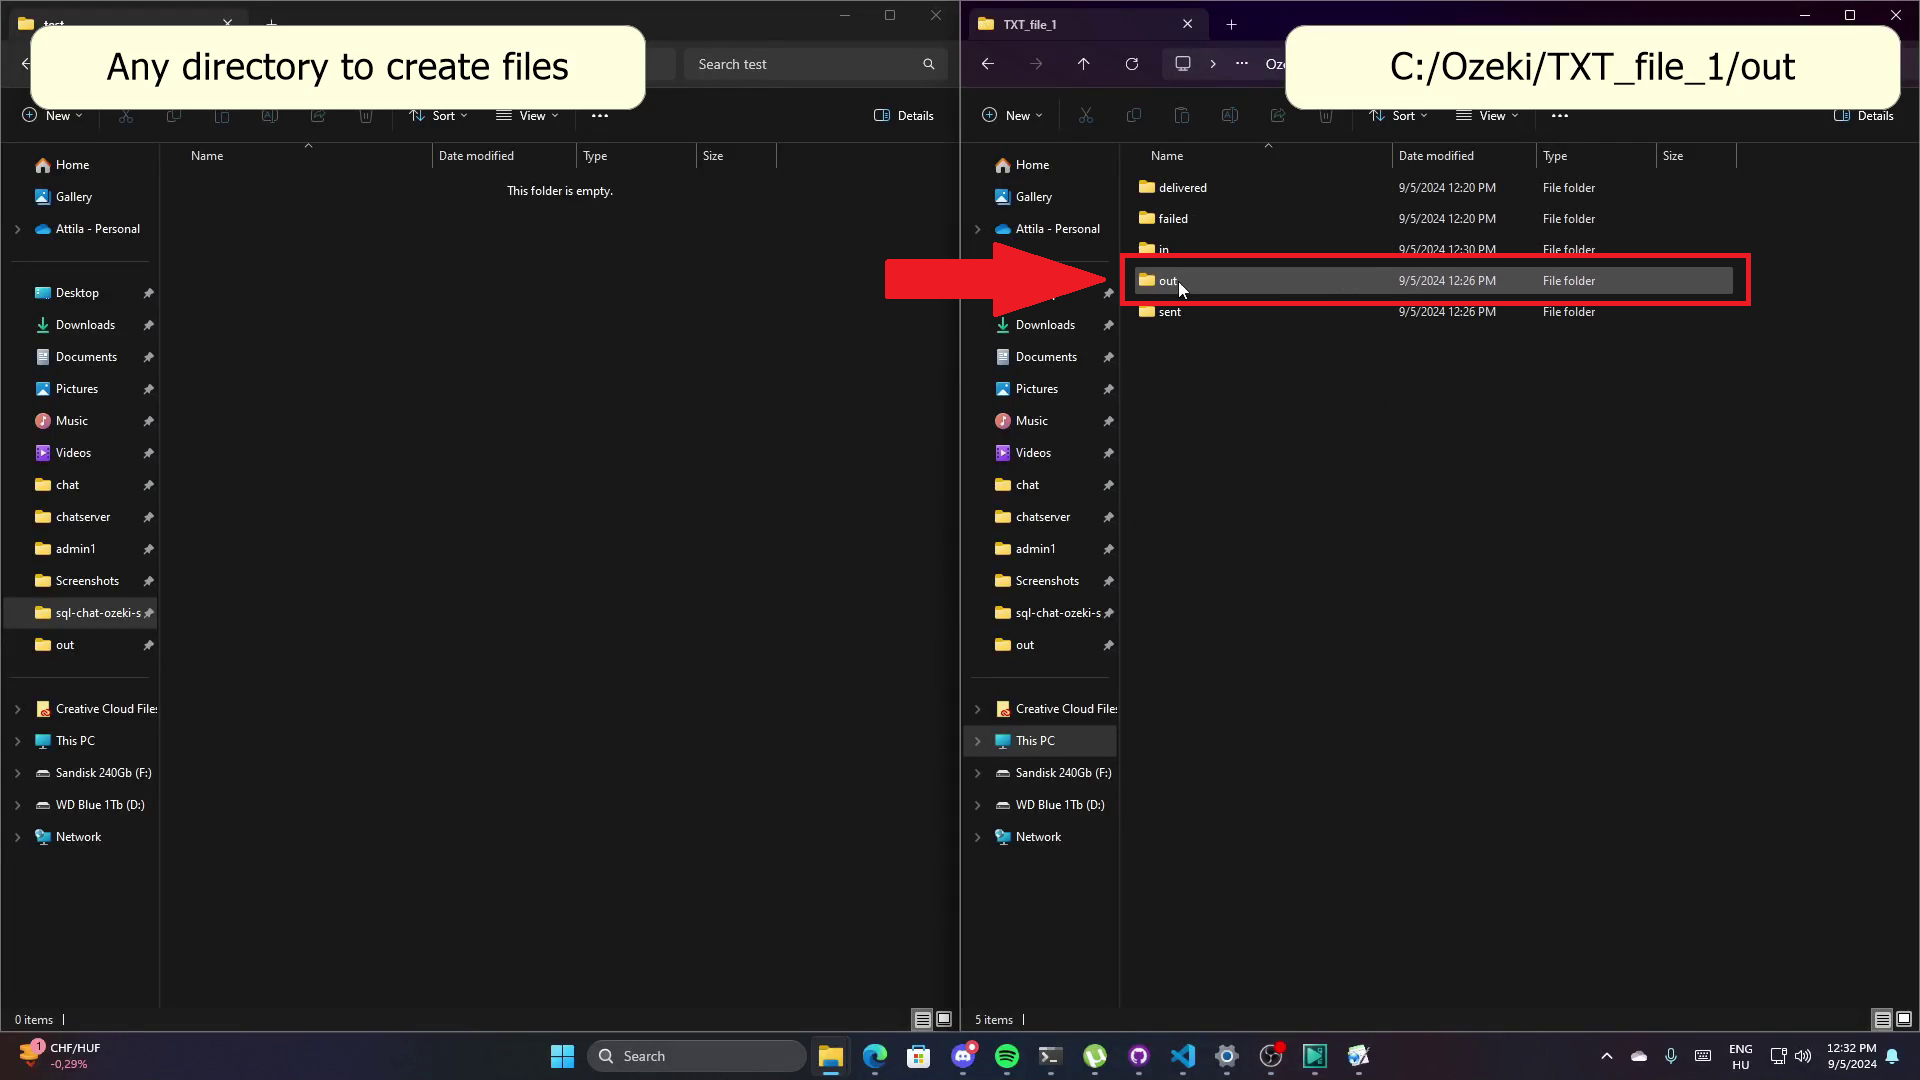
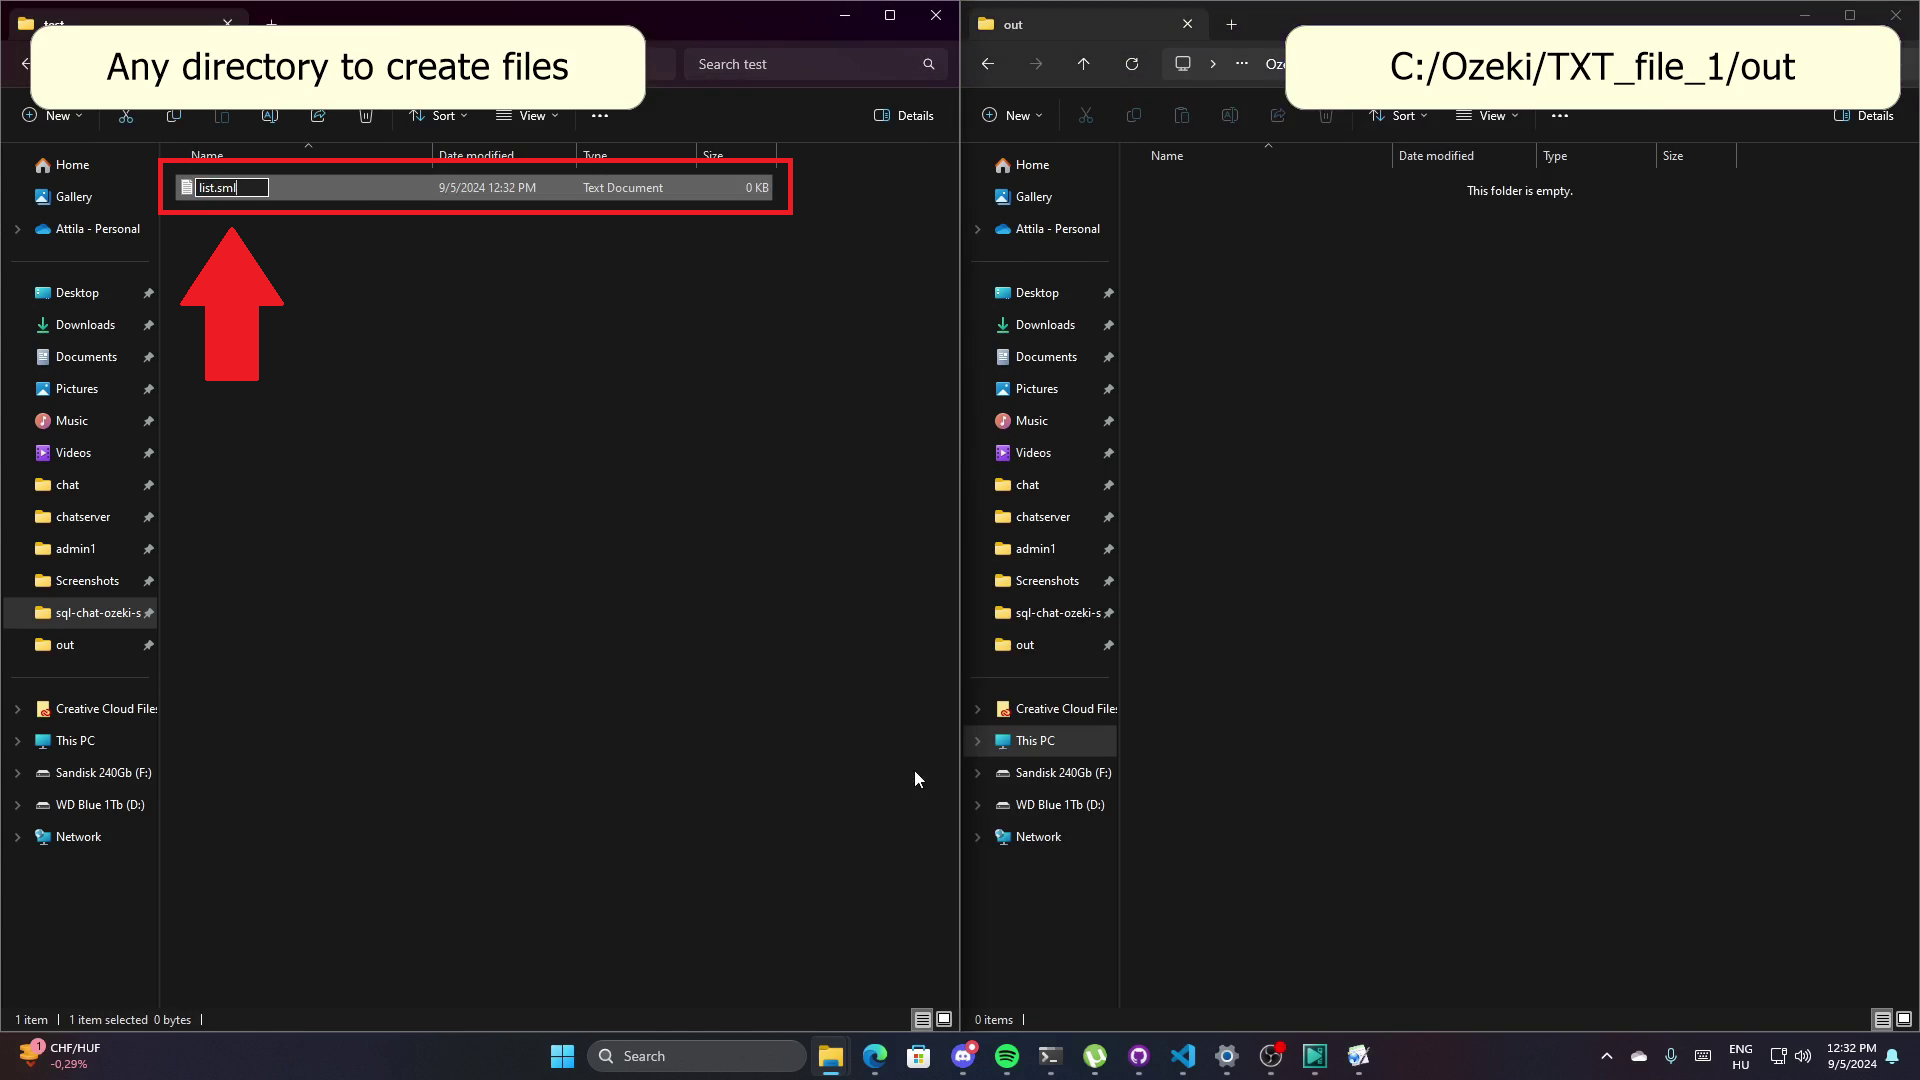
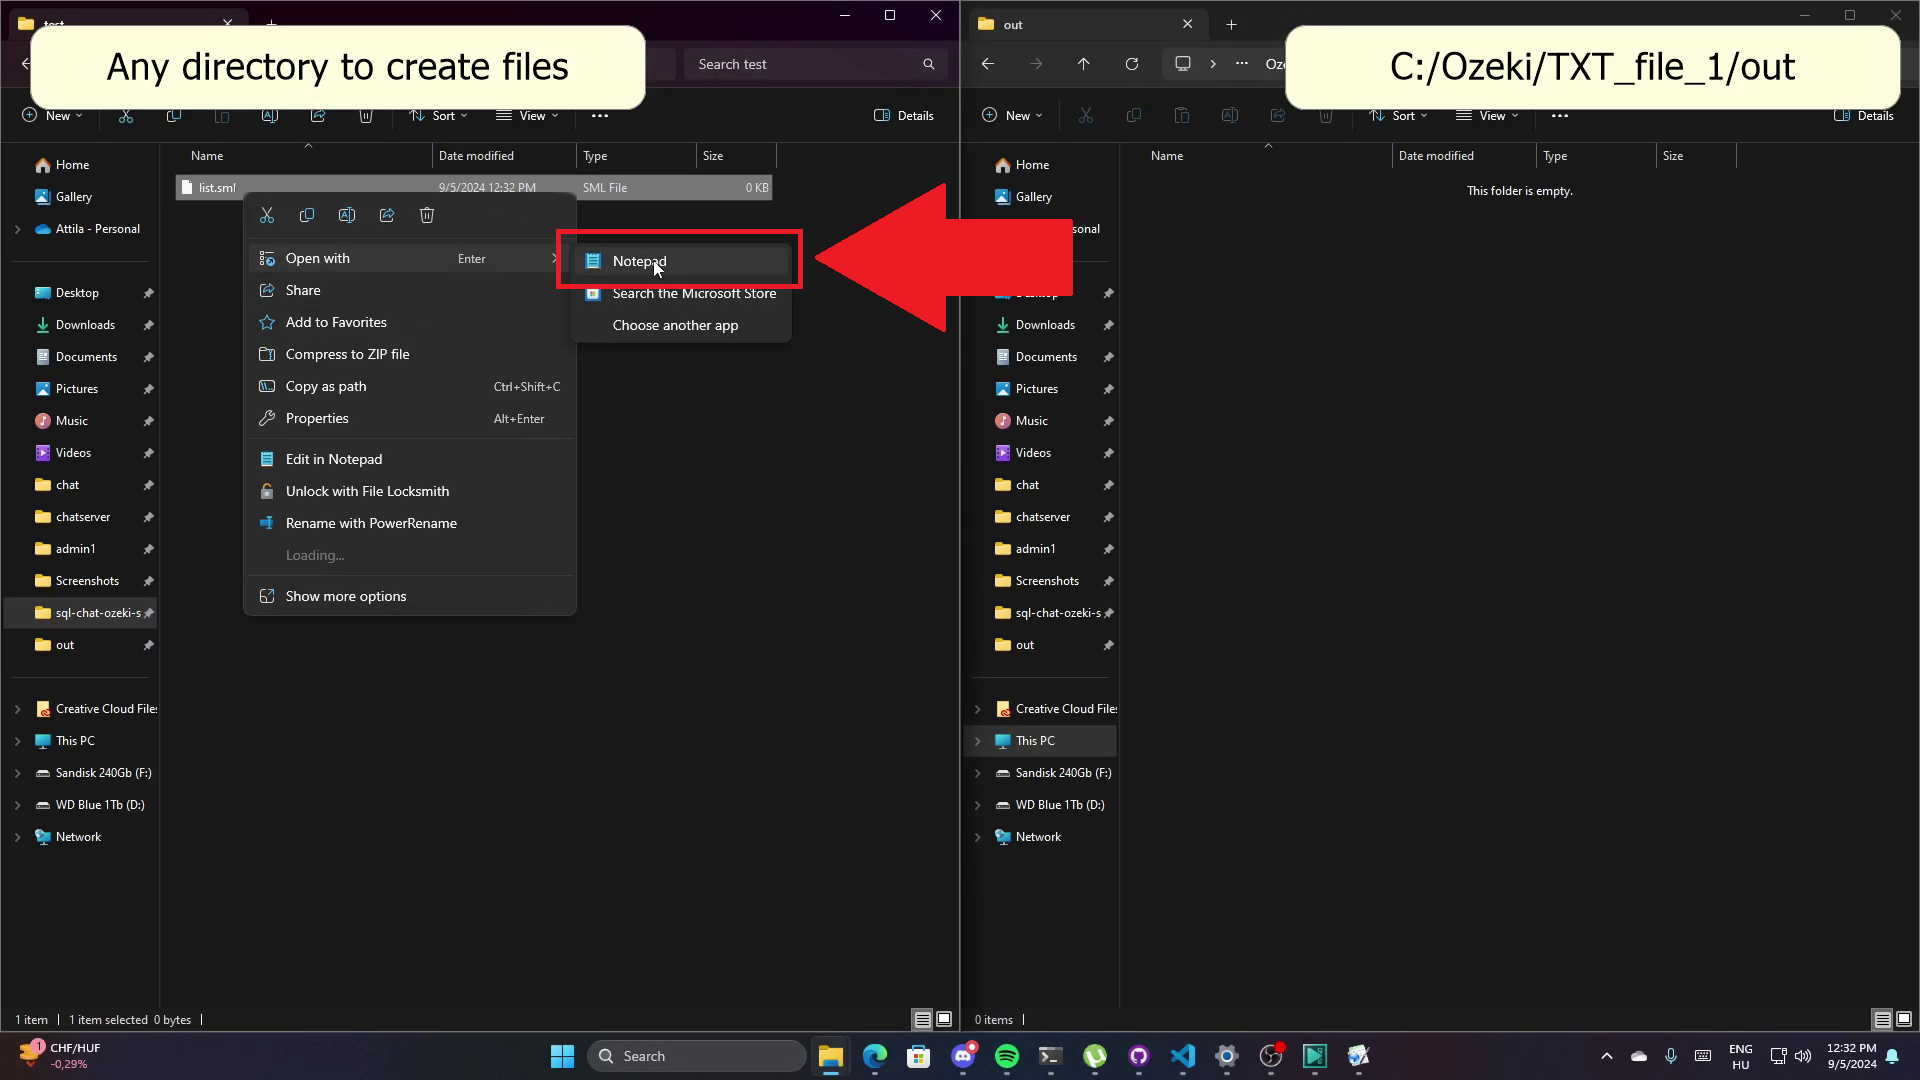
Text file messaging:
Send and receive SMS messages by creating text files in a directory
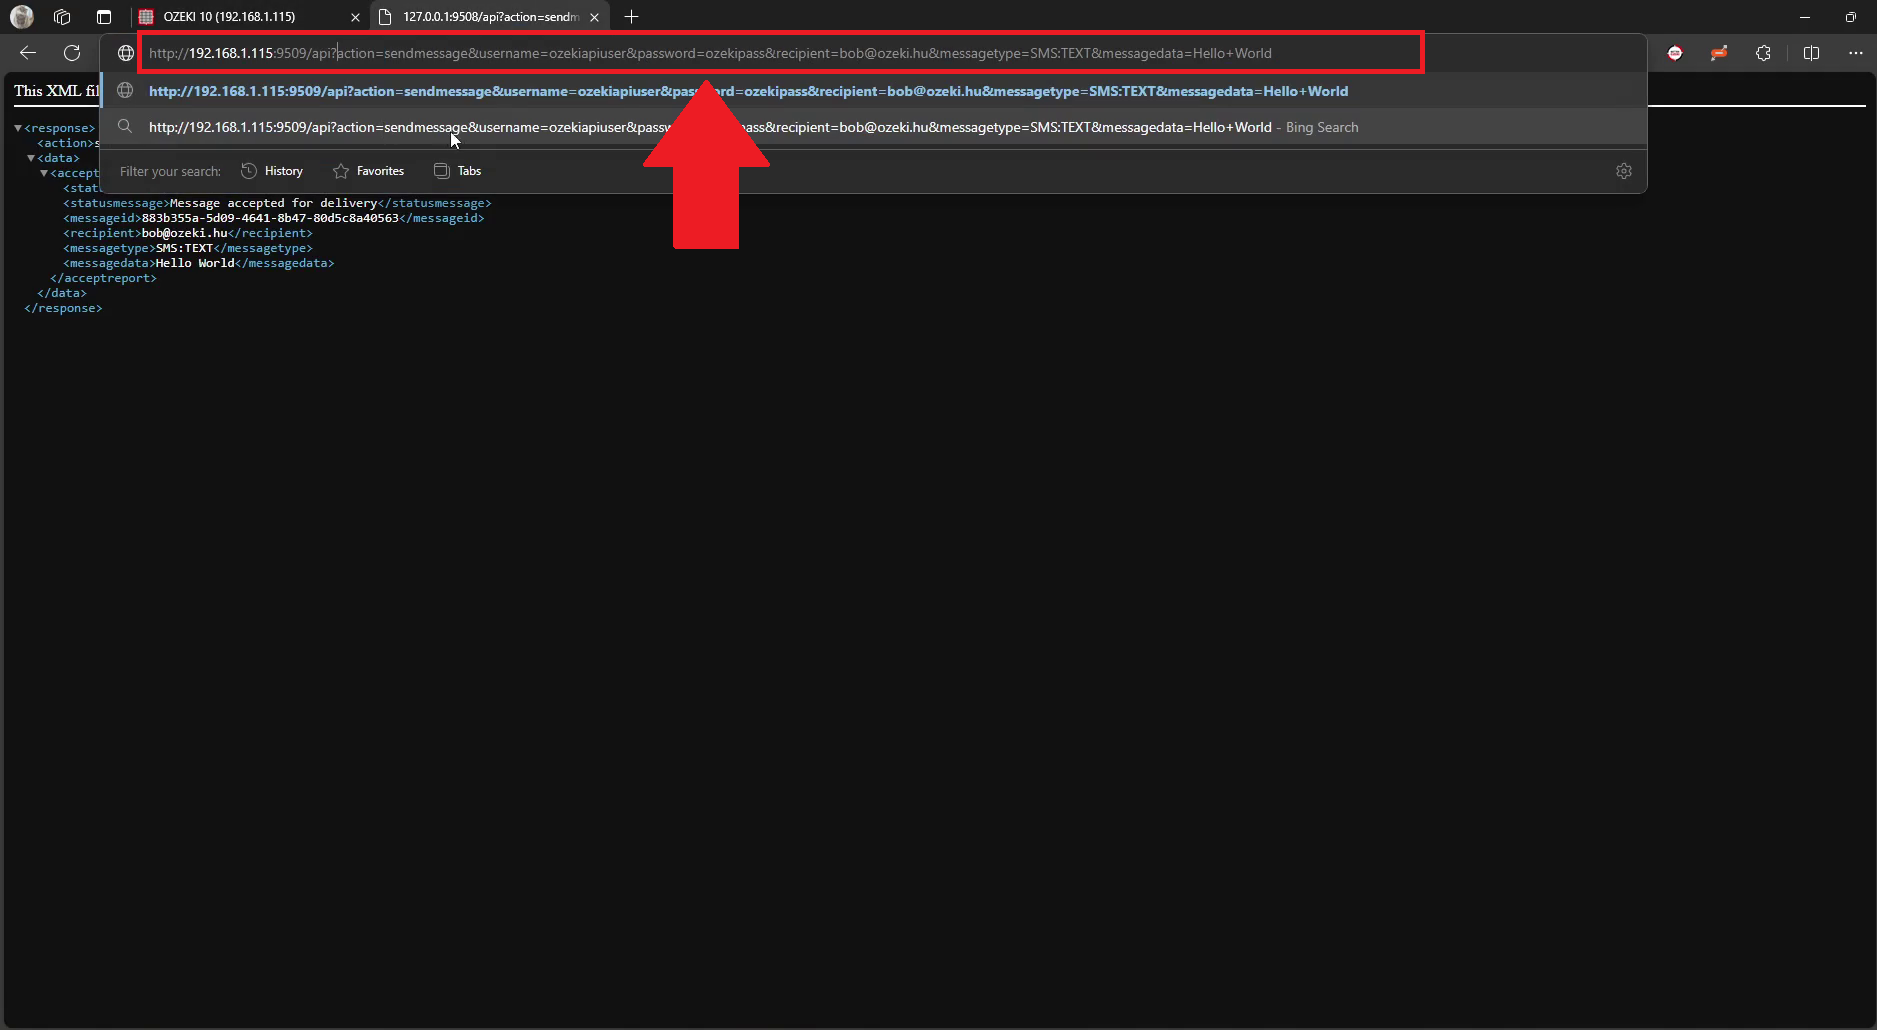
Http SMS messaging:
You can use the HTTP API of Ozeki SMS gateway to send and receive SMS messages
Standard User:
With Ozeki SMS Gateway Standard user you can log in to the graphical user
interface and you are able to send SMS. And you can investigate the details of
the delivery of the message.
Autoreply SMS:
Ozeki SMS Gateway has 3 type of Autoreply Users which are used for automatically
replying SMS messages or forwarding them to any recipient. These users can work
in 3 simple ways. You will see how to install and configure these users on Ozeki
SMS Gateway to serve your needs.
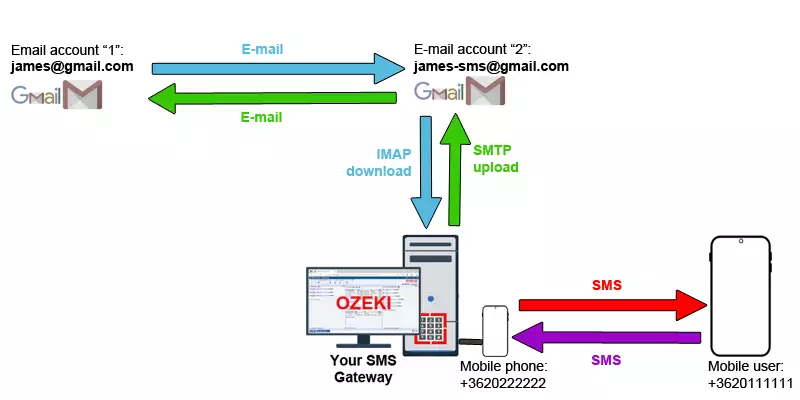
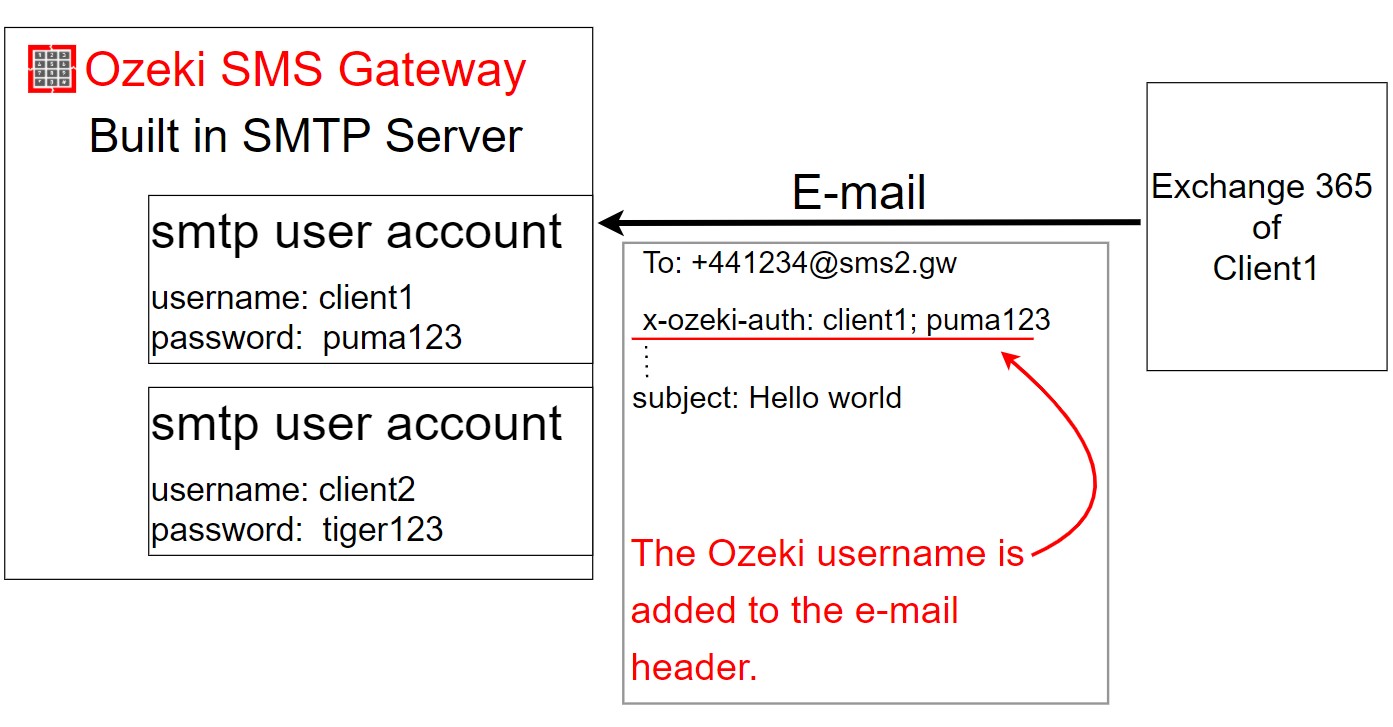
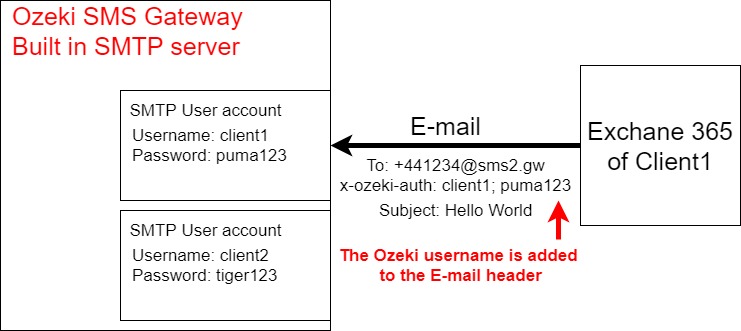
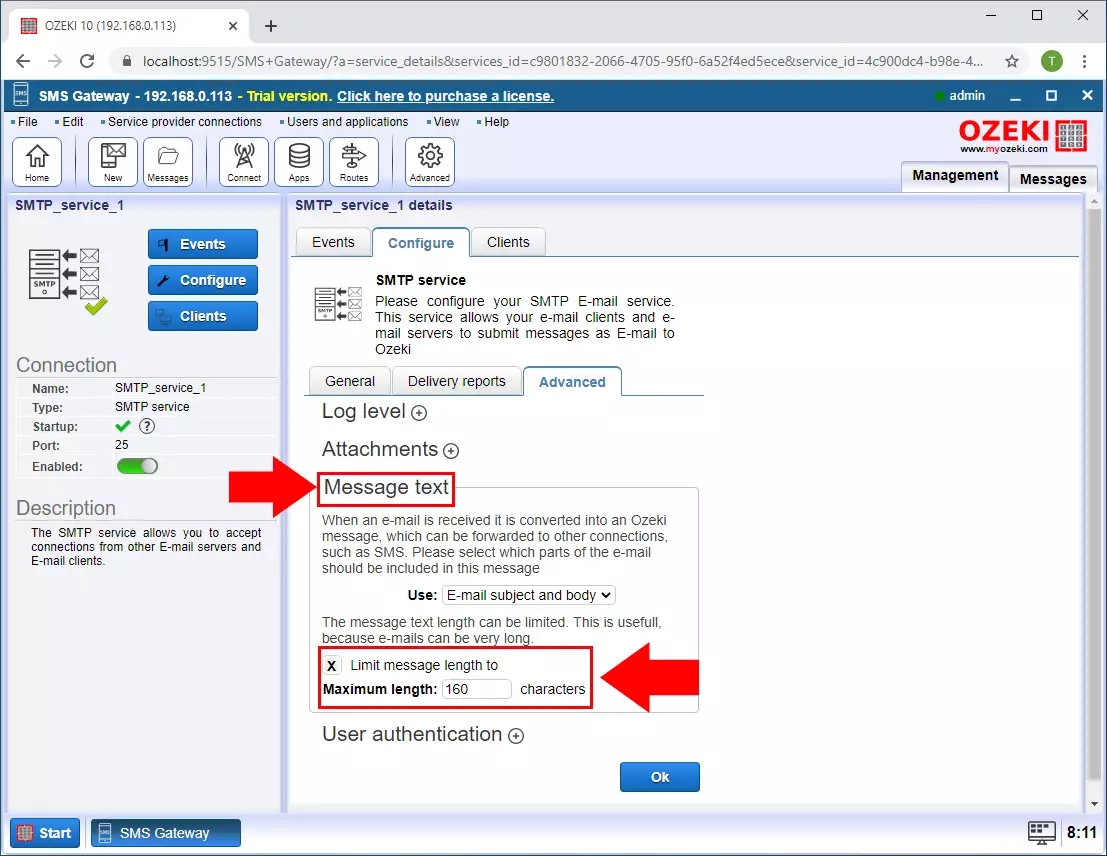
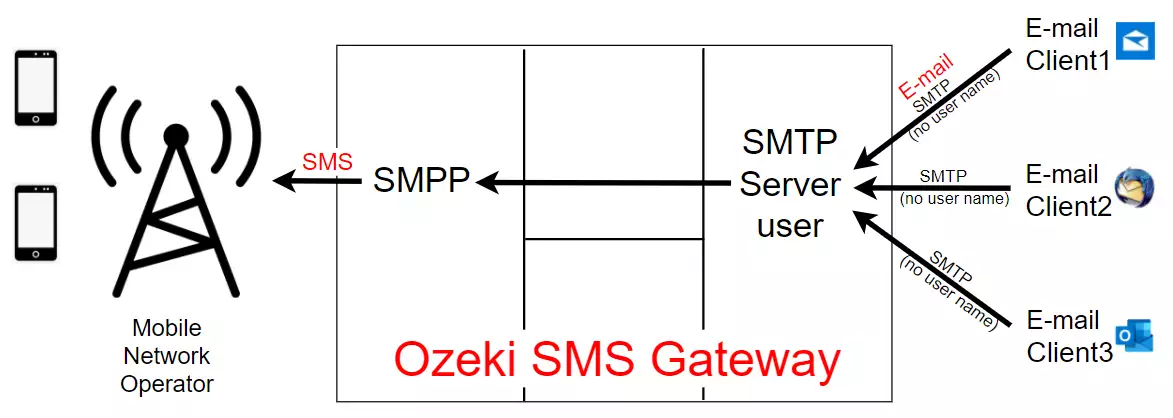
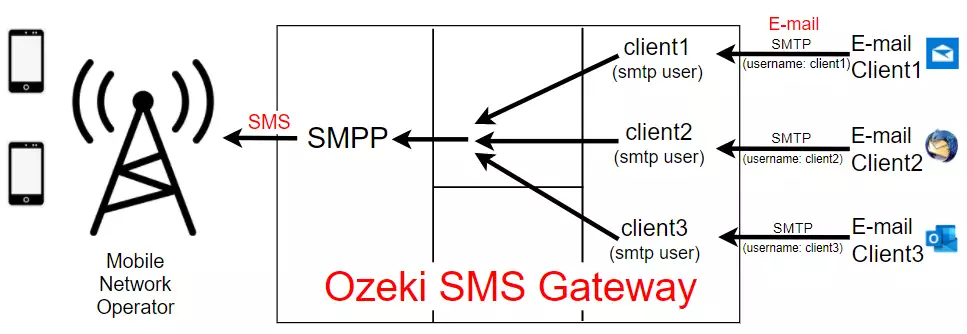
E-mail to SMS:
Ozeki SMS Gateway offers various methods to setup E-mail to SMS functionality.
You can use IMAP, POP3 or SMTP to send and receive E-mails and convert them to
and from SMS messages. You can put the phone number(s) into the subject line of
the e-mails, or you may send an e-mail to an address containing the phone number,
such as +441234657 @ smsgw.yourcompany.com
SMS from/to Email through your Email Account:
Ozeki SMS Gateway's E-mail User can be used for sending or downloading emails
from a mailbox. For sending emails it should connect to your email account's
SMTP server. For downloading emails from a mailbox, it should connect to the POP3
server through your email account.
SMS from/to File:
Ozeki SMS Gateway's File User is capable to send and receive SMS messages in
different file formats. Simple, Text, Verbose, List, CSV, XML, SAP, ATF and KAL
file formats are supported by the Ozeki SMS Gateway's File User. Your application
can place these files in proper directories to send SMS messages.
SMS from/to FTP:
Ozeki SMS Gateway's FTP to SMS Extended User can synchronize directories with
SMS Gateway through standard FTP, FTPS or SFTP protocols. Incoming SMS messages
will be uploaded, and outgoing SMS messages will be downloaded from the FTP server.
You can also look at the accepted file formats.
Start your Applications with SMS:
Ozeki SMS Gateway's Application Starter User can run any process or application
in case an SMS message arrives. You simply need to provide the file path. You can
also fetch parameters from received SMS messages to use them as process
parameters or command line arguments.
High performance features
Load balancing:
You can setup SMS connection groups for load balancing. This means you
can create multiple SMS network connections to IP SMS services or through
wireless connections. If you include these
connections in a group, and you route messages to this group, sending
will be done using load balancing. In load balancing configuration messages
are distributed among sending links according to the link's capacity.
Fail safe messaging:
By creating SMS connection groups your messages will be sent even if a
one or more members in the connection group fails. For example, if you
have 4 mobile network connections to
4 different SMS service centres (SMSCs), and any 3 of them fails, all
your messages will still be delivered through the remaining last one.
Memory queues:
The system stores message queues in memory for performance and keeps these
queues in sync with the hard drive. Batches of 1000 messages are loaded
into memory for sending cycles. This makes
high performance messaging possible.
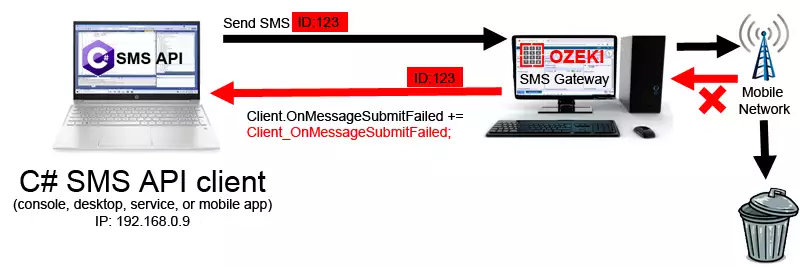
Resend failed SMS:
Sometimes, SMS messages may fail to be delivered on the first attempt due
to various reasons such as network issues, recipient phone issues, or
temporary service disruptions. Ozeki SMS Gateway provides a mechanism to
handle these situations and increase the chances of successful message
delivery.
If a message encounters an error during the delivery process, Ozeki SMS
Gateway can be configured to automatically attempt to resend the message
after a specified interval. This feature is particularly useful in cases
where the initial delivery fails due to a temporary issue.
SMS modem pools:
If you wish to increase capacity by operating several modems or if you
need multiple phone numbers, you can connect an SMS modem pool to Ozeki
SMS gateway. Ozeki treats each modem in the pool as an independent SMS
connection, and you can utilize Ozeki's advanced routing capabilities to
determine the modem to use for sending. The SMS modem pool is typically
connected to your computer via a USB cable. Using an SMS modem pool
requires purchasing a SIM card for each modem in the pool. For instance,
if you employ an 8-modem pool, you will need 8 SIM cards, providing you
with 8 phone numbers to use.
Reporting features
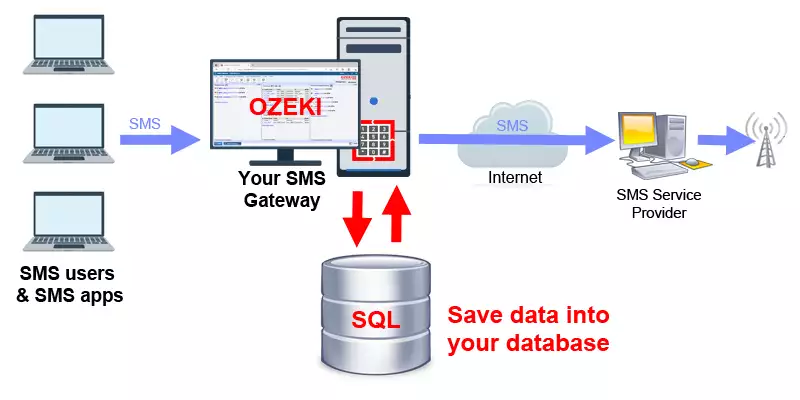
Reporting database:
You can save all SMS messaging going through your system into a reporting
database. In your database a database table will be created and updated.
You have will have detailed
information about all event related to each SMS that goes through the
system. You can use Microsoft SQL Server, Oracle, MySQL, Postgres and
many other database server systems.
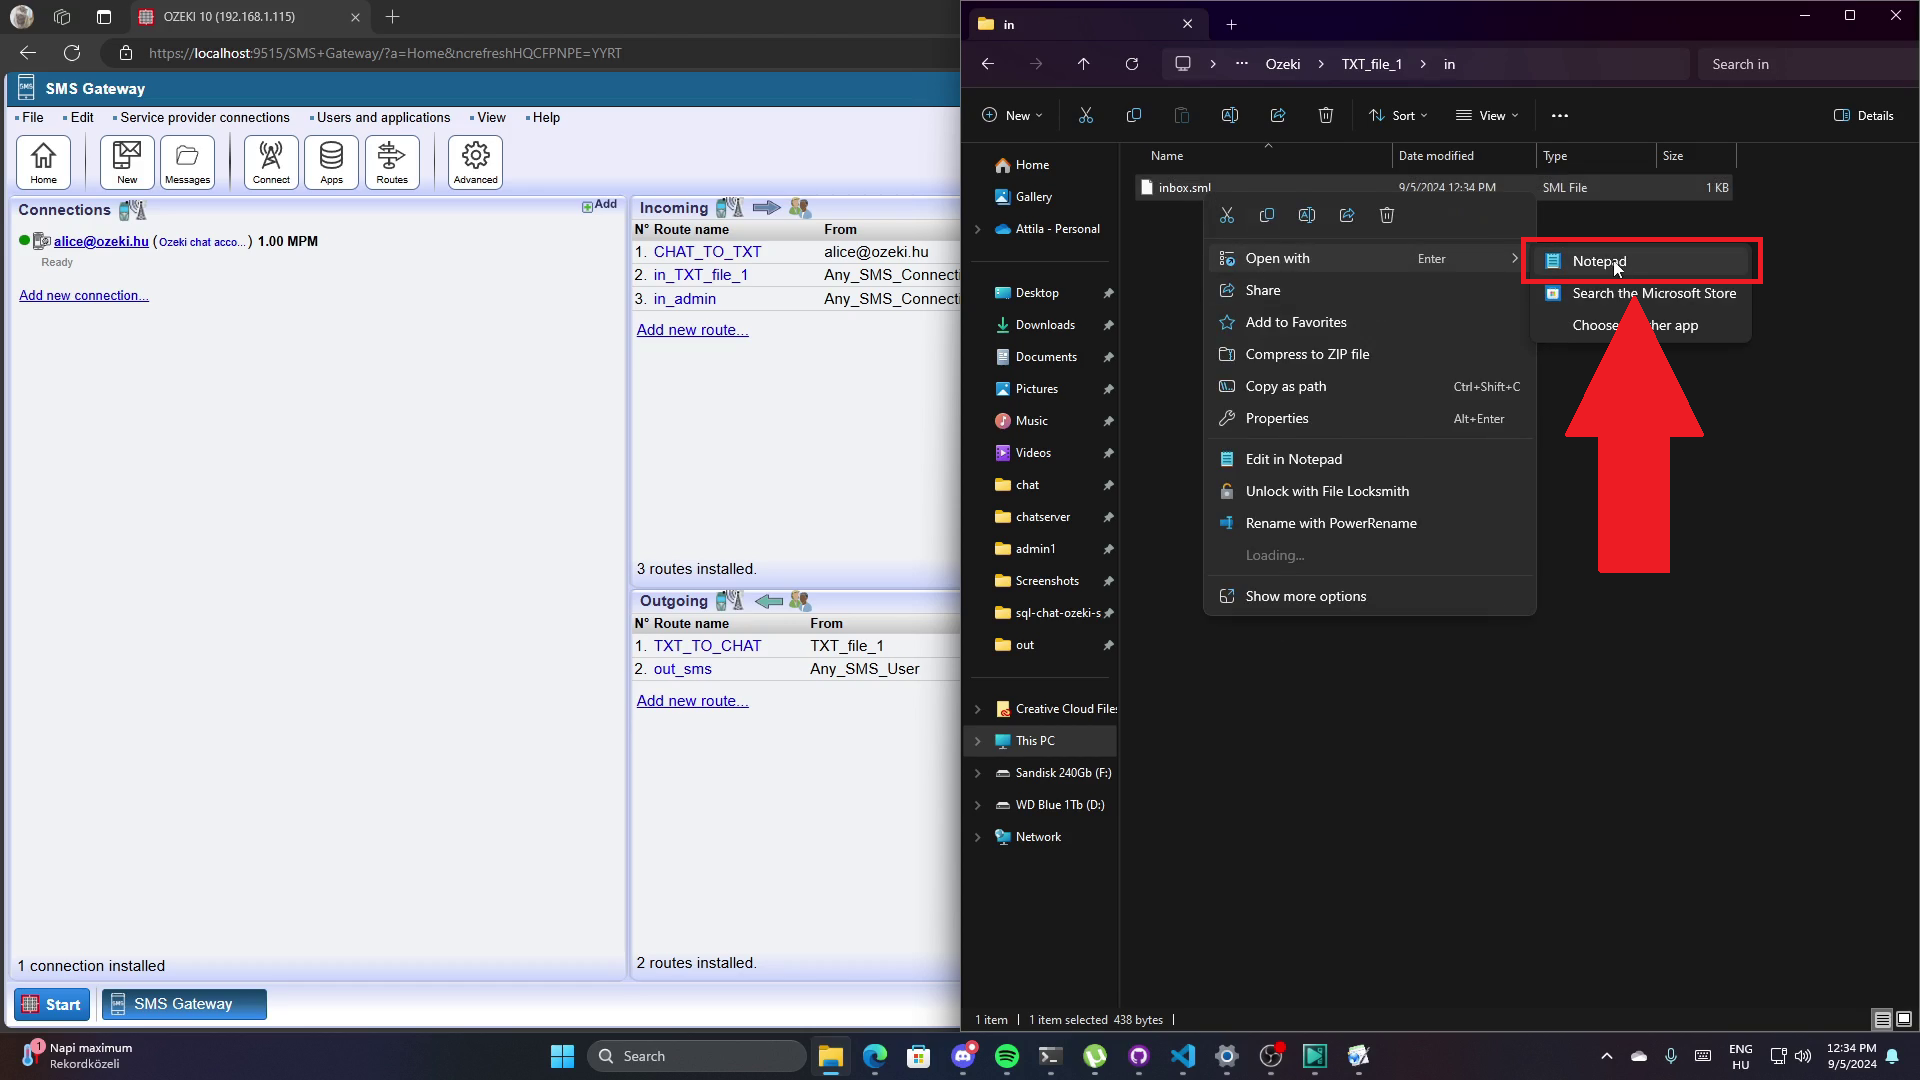
Reporting into TXT
When dealing with high message volumes, such as several hundreds of
messages per second, storing them in a database for logging purposes
can be challenging due to speed constraints. Ozeki SMS Gateway offers an
alternative solution by supporting text file logging. In this approach,
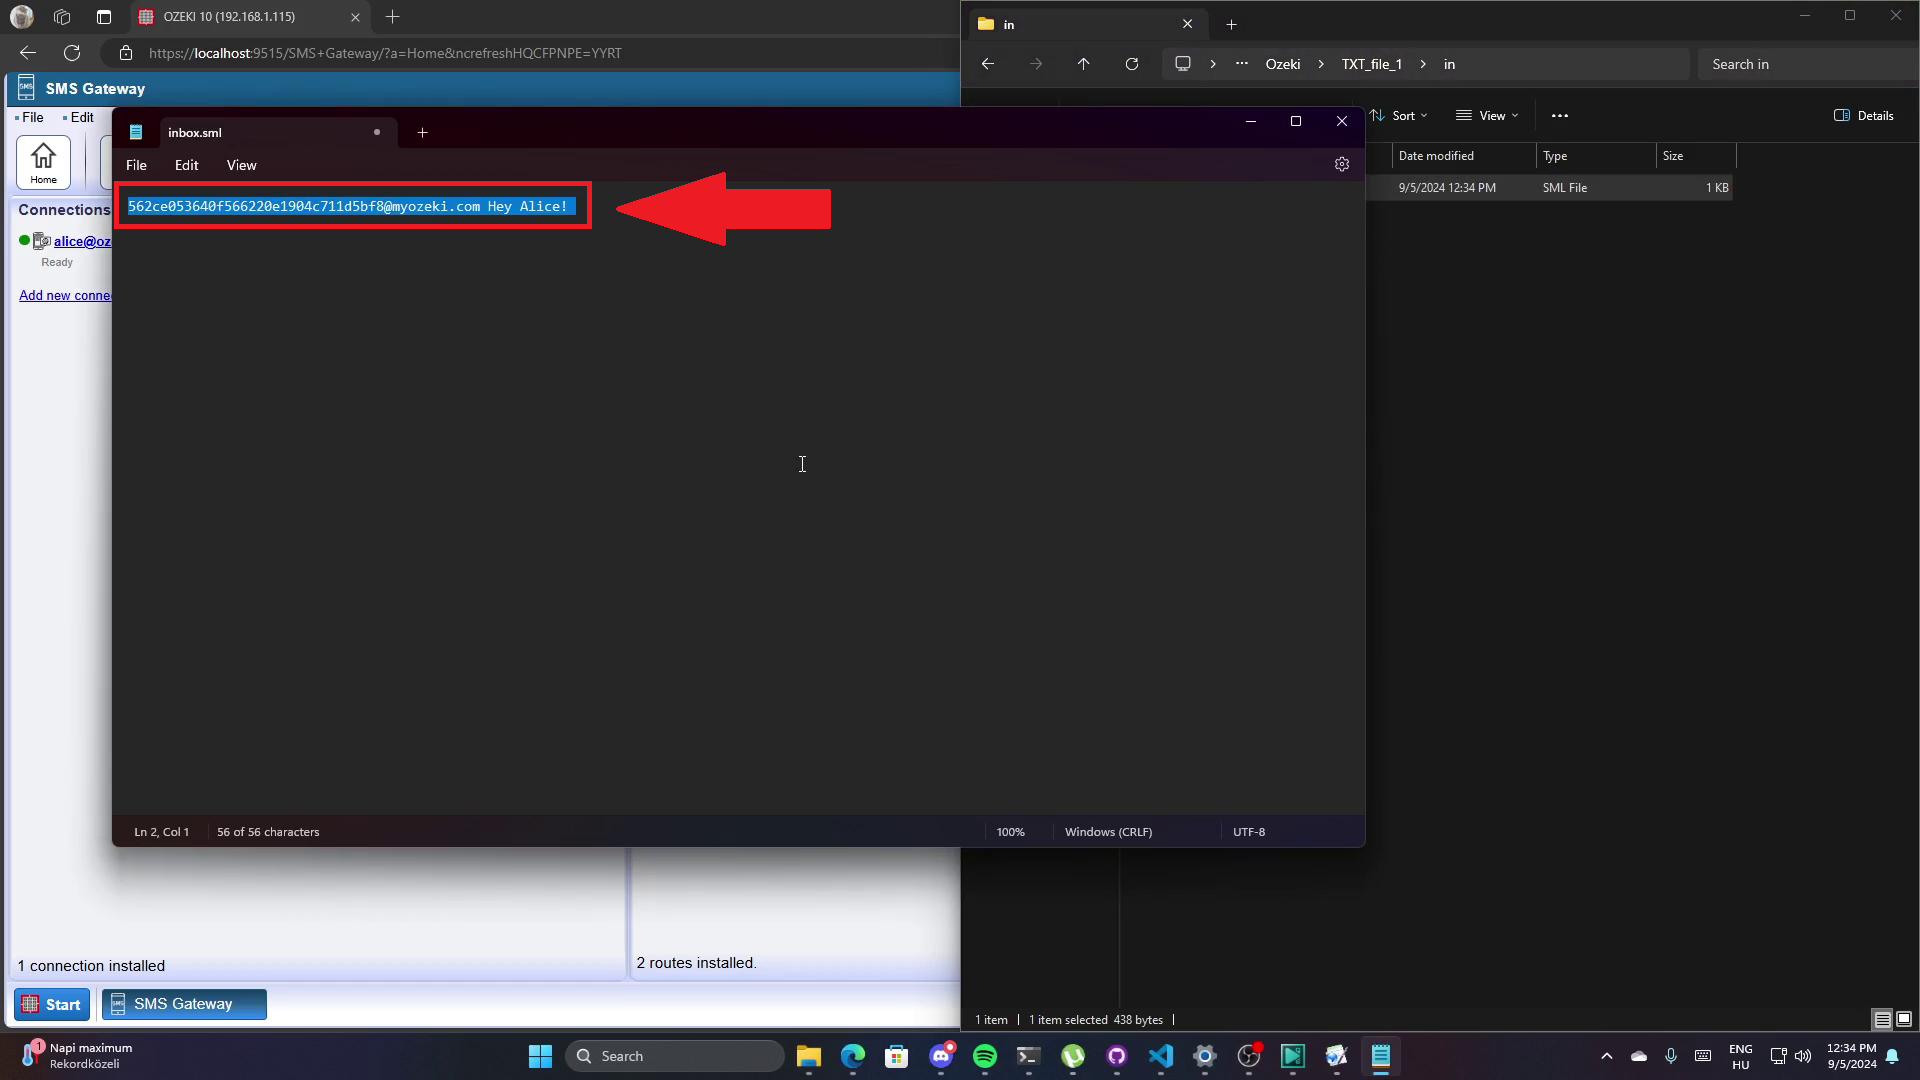
the messages are logged into text files, allowing for faster storage.
These messages logged in text files can later be efficiently inserted
into the database as needed. This approach helps manage and log high
message volumes effectively while accommodating the speed requirements.
Multipart SMS logging
The reporting system of Ozeki 10 SMS Gateway provides the capability to
save the PDU (Protocol Data Unit) count for multiple messages into the
reporting database. This feature allows you to keep track of the PDU
count associated with each message and store this information in the
reporting database for later analysis and reference.
Failed SQL Queries
When utilizing database reporting in Ozeki 10 SMS Gateway to maintain a
log of each message's journey through the system, it's important to ensure
that all SQL commands were executed correctly in your database. Ozeki 10
offers an SQL reporting feature that includes a user interface, allowing
you to review the status of records that are awaiting execution as well
as those that have failed. This functionality helps you monitor and
manage the execution of SQL commands in the reporting process, providing
visibility into the success or failure of each action.
No loss reporting:
This feature makes it possible to not lose a single record. If your
reporting database goes offline for whatever reason, the Ozeki SMS
software will store messages in a text file
on the local hard drive until the reporting database comes back online.
When the reporting database becomes available again it will push these
messages to the database.
Low level logging:
All connections provide detailed logging down to the protocol layer. You
can check the exact protocol data units (PDUs) sent through the
connections. This is very helpful in finding problems or
figuring out why a certain message was sent in a certain way. It is also
great in dispute resolution with customers and service providers.
Resend failed SMS:
Ozeki SMS Gateway provides a valuable opportunity to address any errors
that may occur during the SMS delivery process. In some cases, certain
SMS messages may not be successfully sent on the first try. However,
Ozeki offers the capability to resend these messages, enabling better
management of delivery issues. This process enhances the potential
for successful message transmission and ensures a more reliable SMS
delivery system.
Setting up logging:
Gaining insight into the low-level communication of connections, users,
or applications proves to be extremely valuable when you seek to observe
every single event that occurred during the process of sending a message.
The logging of low-level communication offers a window into understanding
the intricate mechanics of how a message is successfully delivered to
its intended recipient. Moreover, in instances where a failure occurs,
this feature serves as a tool for understanding the underlying cause by
carefully analysing the log of low-level communication interactions.
Address book features
SMS from address book:
You can have a pre-defined address book with numbers inside and use that
to send the text messages. Really useful feature for automated, personalized
messages.
Address book builder:
You can setup routing rules to automatically register sender and/or recipient
phone numbers into an address book automatically. You can also define conditions,
such as keyword filter to decide which phone number to record. This
address book can later be used to send group messages
Address book export:
You can export address book in various formats, such as Microsoft Excel xlsx,
csv, text files, json files, etc.
Database address book:
You can setup database tables to use as address books. Ozeki can SELECT and
INSERT address book records into these tables, and you can use them as you
would use any other address book on the user interface. Microsoft SQL
Server, Oracle, MySQL and several other database servers are supported.
LDAP address book:
You can use LDAP directories, such as Microsoft Active Directory to
lookup contacts
Authentication features
Standard system users:
You can create user accounts on the Graphical user interface (GUI) of Ozeki
LDAP authentication:
You can authenticate users using an LDAP server, such as Microsoft Active Directory.
RADIUS authentication:
You can authenticate users using RADIUS
HTTP/HTTPS authentication:
You can authenticate users using HTTP or HTTPS request. This allows you to
authenticate your users using web services.
SQL authentication:
You can connect Ozeki to a user database, and ozeki can lookup user accounts
in the database using customizable SQL queries. Microsoft SQL
Server, Oracle, MySQL and several other database servers are supported.
Security features
HTTPS:
Https is supported for the Graphical User Interface (GUI), for the HTTP API, and for sending SMS messages to HTTP SMS service providers
On this page you can find all the technical
related information about Ozeki SMS Gateway. The supported connection types
and message types are listed here, as well as other details that are needed to
build an efficient and well-functioning SMS system based on this SMS gateway.
Technology
Underlying technology
C# (.NET 4.8)
User interface
Web based
Operation mode
Windows service, Linux Service
Application type
.NET application (requires .NET framework 4.8)
Connectivity
Service provider connectivity
More than one service providers
can be connected to the SMS gateway at the same time by using GSM modems or IP
SMS connections. Inbound SMS/MMS routing and outbound SMS/MMS routing improve
control.
Service provider protocols
It supports all the major communication protocols:
Excel SMS,
Outlook SMS Plugin,
Ozeki SMS Client,
Standard E-mail client (Outlook Express, Outlook, etc),
WhatsApp
Connection management
The software provides automatic reconnection on service provider link failures,
on wireless link failures and on application/user link failures (Database
connection, HTTP connection, etc)
E-mail connectivity
Ozeki SMS Gateway offers SMS-to-email
and Email-to-SMS functions, and it connects to mail servers via SMTP and POP3.
Engine features
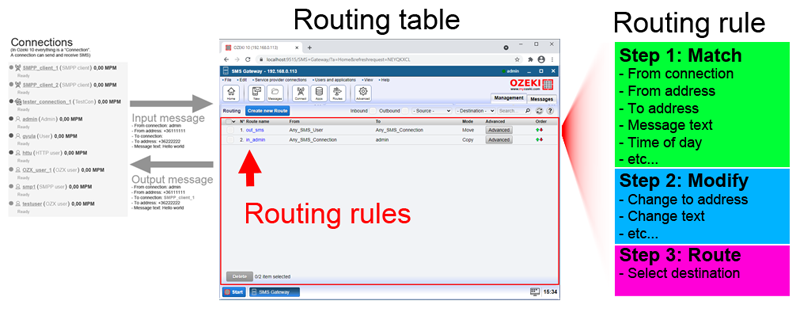
Message routing
If you use multiple GSM device and SMSC/MMSC
connections to make your system more stable, the message routing function of the
SMS gateway helps determine which user or application will receive an incoming
message or which service provider connection is used to send the message. A
routing table is used for this function.
Supported character sets
GSM 7bit
UCS2 (unicode) policy:
manual selection
automatic selection
automatic conversion from all major character sets:
UTF8 - Unicode International
UTF16 - Unicode International
ISO 8859-1 Latin-1 Western Europe
ISO 8859-2 Latin-2 Central Europe
ISO 8859-3 Latin-3 Southern Europe
ISO 8859-4 Latin-4 Northern Europe
ISO 8859-5 Latin/Cyril
ISO 8859-6 Arabic
ISO 8859-7 Greek
ISO 8859-8 Hebrew
ISO 8859-9 Turkish
ISO 8859-10 Latin-6 Northern
ISO 8859-11 Latin/Thai
ISO 8859-13 Latin-7
ISO 8859-14 Latin-8 Celtic
ISO 8859-15
etc.
Supported message types
GSM Text SMS
Unicode Text SMS
Multipart (Concatenated) SMS messages
Flash SMS
Group graphics
Operator logos
Ring tones
WAP push messages
Screensavers
Business card (VCard)
Calendar entry (VCalendar)
Bookmarks
Animations
EMS
Binary messages
Voice Message Indication
Fax Message Indication
E-Mail Message Indication
Video Message Indication
Combined Message Indication(s)
WAP OTA
WAP Browser settings for GPRS connection
WAP Browser settings for GSM/CSD connection
WAP Browser settings for GSM/SMS connection
WAP Browser settings for GSM/USSD connection
WAP Browser settings for IS-136/CSD connection
WAP OTA SyncML settings
OMA OTA GPRS connection settings
OMA OTA GPRS GSM-CSD connection
Multimedia messages (MMS).
Accounting, credit limits
Credit limits can be set for each
user and can be updated manually or automatically. Moreover, one time or Yearly,
Monthly, Weekly and Daily credit limit can be set. Message cost can be specified
in the routing table, and all accounting information is available.
Logging
There are independent log files for server events,
users/applications, service provider connections. There is also SQL logging
option.
Message handling policy
The SMS gateway stores and forwards
your messages and retries sending/processing in case of any failure.
Message priorities / resource management
Each user has an
independent message queue but users share resources with equal priority.
Round Robin algorithm is used to distribute resources. The unused resources
are assigned to active users.
Feedback / delivery reports
Delivery reports are sent if the message is:
Accepted for delivery
Delivered to network
Delivered to destination
Failed delivery
Message reference (callback id returned by the service provider)
Delivery times
Numbering
Supported phone number formats:
International number format (+44yyyxxxxxxx)
Local number format (06xxxxxxx)
Recipient address assignment options
Specify recipient address for each message
Sender address assignment options
Sender address needs to be specified for each message, for service provider
connection, and for user /
application
Backup/Restore policy
Backup:
Save data directory
Restore:
Install software
Stop service
Restore data directory
Start service
GUI features
GUI Layout
Web browser based (Microsoft Edge and Google Chrome)
Message folders
Message lists (sorting with sorting)
Message management (forward, reply, delete)
Message preview
Message composer
GUI Connectivity
On the same computer (local)
In the company LAN (network)
Internet (network), if allowed on the corporate firewall
An SMS gateway is a software that allows you to send and receive SMS messages from your applications.
It can also be used to provide SMS services. An SMS gateway is often referred to
as an SMS Server. It is a self-hosted SMS gateway.
You may install an SMS Gateway on an Android phone or on a Windows or Linux computer.
Ozeki 10 SMS Gateway is an outstanding SMS Gateway software with several unmatched advantages.
Use cases
An SMS gateway is ideal for lots of simple to complex scenarios. Some of which are:
Provide SMS service to customers
Act as a central hub for SMS services
Provide SMS service for SMS applications
Provide SMS aggregator service
SMS routing
Use as a reporting gateway to keep track of all SMS messages
Use as a protocol converter
Forward SMS messages to mobile networks and 3rd party SMS service providers
Figure 1 - SMS Gateway technology
What is the best SMS Gateway in 2025
In 2025 the best SMS gateway for a company is either an Android SMS Gateway
installed on a high-end mobile phone, or a self-hosted SMS gateway installed on a Windows computer
or an SMS gateway installed on a Linux server. The first option of running an SMS
gateway on an Android mobile is best if the number of SMS messages stays below a few thousand SMS per day or
if the SMS service is still in pilot or development phase. The second option of
self-hosting an SMS gateway is recommended if you consider building an important communication
infrastructure for your business. Self-hosting can be done in virtual server hosting facilities,
such as Amazon Web Services or Microsoft Azure Cloud, or it can be hosted in your own server room if data security and
operational reliability is crucial.
What are the benefits of a self-hosted SMS Gateway in 2025
Operational reliability: With a self-hosted SMS gateway system, you can
connect to multiple SMS services over the Internet, and you may even connect to the mobile
network wirelessly. You can setup backup servers and backup SMS routes to avoid
a single point of failure. The possibility of intervention, monitoring and
alerting capabilities is also a huge plus and it allows you to increase the operational
reliability of your SMS infrastructure. We should also mention the possibility of
automated backup and easy restore options when you have your SMS infrastructure in
your own hands.
Service provider independence: It is beneficial to be independent of a
single SMS service provider. It gives you freedom in terms of negotiating business
conditions and prices if you know you can easily switch providers without the
need to rewrite your software. It is also great to be able to send SMS messages
through different networks and to do least cost SMS routing, load balancing and
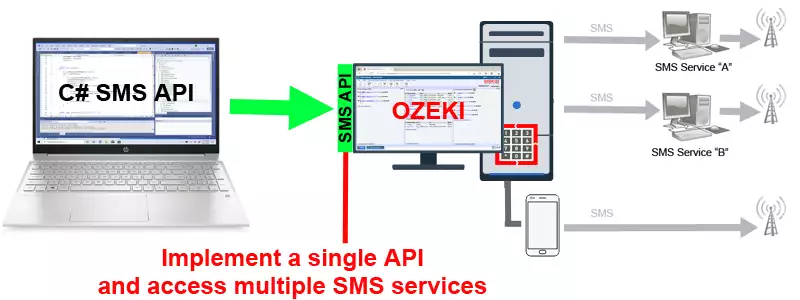
fail over routing. If you write your code to an Ozeki API, for example using
the Ozeki C# SMS API, you can be sure that you will
always have a chance to switch to another SMPP SMS service provider or you can
take advantage of a new player's offerings by simply configuring their service
in the Ozeki HTTP/REST SMS client connection.
Data security: One of the most important aspects of operating content services
and marketing businesses is to be able to keep your contact list and data safe.
If you want to make sure that nobody else has access to the phone numbers
of your valuable client list, it is a good idea to operate your own SMS gateway.
This way you don't have to upload your contact list to an unknown third party,
who can sell or use your contact list. It is also much easier to comply with EU
GDPR regulations if your data is residing on your own servers.
Operational costs: With your own SMS gateway cost optimization can be
done using least cost routing and relying on SMS credit limit management
offered by Ozeki SMS gateway. Since you can connect to multiple networks you are in a better
position to negotiable tariffs and to take advantage of bulk message buying
offered by provider for certain destinations. In most cases when you connect
to mobile network's short message service centres (SMSC) directly you will
not be charged for incoming SMS messages.
International business: If you operate an International business, or you
plan to expand Internationally, it is important for you to be able to connect
to local mobile network operators from your central IT data centre over the Internet.
Local mobile network operators can give you better terms and conditions then International
SMS service providers. Since they often operate their own mobile network you can
expect better delivery times, better reliability and compliance with local legal
regulations. Your local SMS messages will not be rejected as international spam
and have a higher priority in delivery over International SMS. If you connect
Ozeki SMS Gateway to local national networks, you will have access to local phone
numbering schemes and local short codes. You won't have to use the international
country code prefix to send and receive SMS in those remote networks.
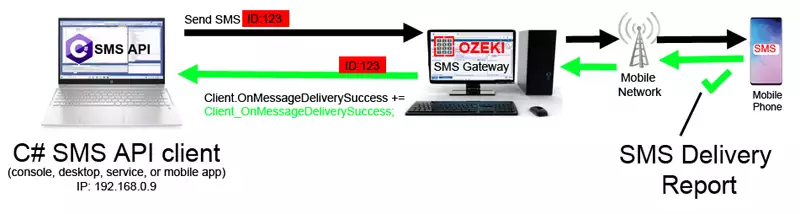
Better reporting: Ozeki SMS gateway can be configured to log every
SMS into a database. It can use Microsoft SQL Server, MySQL, Oracle or virtually
any other SQL database system to provide you with a log of all your SMS traffic.
You will have information about when a message was sent by who, through which network
at what cost, and you will know that message submission and delivery timestamps,
status codes and error messages. Most important of all incoming SMS delivery reports
are also matched to each submitted SMS, to let you know whether an SMS as delivered
or not successfully to the recipient handset and when did the recipient receive
the SMS.
Higher performance: There are to key aspects of SMS system performance. One
is to have an in-memory operation, that gives you outstanding computing speeds. The
other is to have a load balancing system, that is able to distribute the
load between multiple mobile network and multiple SMS service provider connections.
Ozeki SMS Gateway provides both of these elements. It can reach delivery speeds
of up to 1000 SMS per second per server computer thanks
to it's in memory computing approach, and it can distribute SMS traffic among
connection for both incoming and outgoing links.
SMS gateway performance
SMS gateway performance matters. One of the most common business mistakes we
have seen was businesses making a small initial investment in their
SMS infrastructure instead of investing into a high-performance SMS gateway
system in the beginning. This mistake became very costly later.
If your business grows, your SMS volume will grow. The number of software
you build, that send and receive SMS messages will grow, and sooner or later
you will send SMS marketing campaigns, one-time passwords, notifications,
alerts and other SMS content. Eventually your SMS traffic can reach a point when an SMS service provider
might not be able to keep up with your demands. This is when it will start to become very
costly if you cannot add a second or third provider without rewriting your
codes and when you won't be able to switch to load balancing, backup routing,
and to clustered redundant infrastructure. (Note that Ozeki SMS gateway offers
these options.)
This statement might sound absurd to you now, but without a high-performance
SMS gateway infrastructure it is dangerous to use SMS in your business.
Here at Ozeki we have met many cases where SMS aggregators, and on-line SMS service providers
using their own custom-made platforms could not keep up with growing SMS volume.
We have experienced unacceptable delays, lost messages, delivery reports
mixed up, messages dropped to name a few events. (And we are not talking about
"no name" small providers. Think about NYSE listed and highly advertised
services.) Serving lots of messages at a steady rate is demanding, and many
providers are not up to the challenge. Ozeki SMS Gateway is currently one of the
(or probably is the) highest performance platforms out there. Check out its
performance demonstrated in a speed test delivering 1 000 000 messages.
Running an SMS gateway on a physical server
Operate your SMS server on a physical computer is beneficial because it gives
you full control over the hardware and software aspects. This option gives you
the highest possible performance. You get direct access to the memory, the CPU,
the hard disk and the network resources, and all the processing of multi-threading
CPUs are there to serve your SMS infrastructure. Ozeki 10 SMS gateway thrives
when it is running in a multi-core multi-thread rich environment. It will give you
unbeatable performance.
The drawbacks to using a physical server is that hardware upgrades are
difficult, because you have to reinstall configure everything. Backing up
and restoring a virtual machine is much more straightforward.
Running the sms gateway on a virtual machine
Although an SMS gateway performs better on a real server, there are numerous
benefits to using a virtual machine (often referred to as Virtual Private Server or VPS).
Many users vote for this possibility when they use an SMS gateway. Maybe the
biggest incentive to using a virtual machine
is that it can be hosted in a server hosting facility. Amazon AWS, IBM cloud hosting
and Microsoft Azure are popular choices among the companies we work with. If the
SMS gateway is hosted at such a company, you don't have to take care of hardware issues.
If you operate your own virtual machine environment, you will like the fact that
this technology allows easier management of backups and restores. It is also great
that running multiple virtual machines on a single physical server can save money.
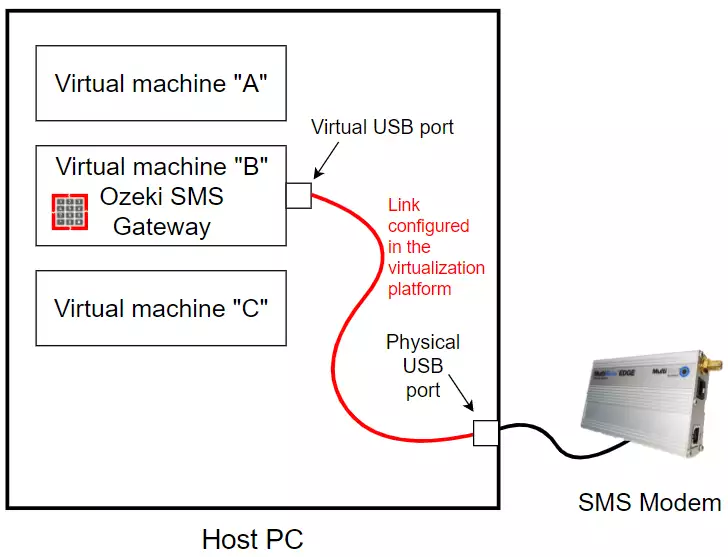
A weak point to using a virtual machine is that direct access to hardware resources
become difficult. For example, if you want to attach a GSM modem through an USB cable,
you might have a hard time assigning the physical USB port to the appropriate virtual machine.
If you run the SMS gateway on a virtual environment, make sure you assign sufficient
virtual hardware resources to the system. This is necessary, because you want to make
sure, that you don't miss out on performance. Also make sure that the virtual network for
the smpp gateway is set up properly.
While talking about virtual machines, we must tell, that Ozeki 10 SMS gateway is
known to work reliably in the following virtual environments: Windows Virtual PC,
Microsoft Hyper-V, Solarwinds Virtualization Manager, Parallels Desktop,
VMware Workstation Player, Citrix Hypervisor, QEMU, Xen Project.
If the SMS volume your business requires is below 10 000 SMS per day,
an Android mobile phone might be the option you need. An Android phone has
one or two SIM cards and will provide you the means to send and receive
SMS messages instantly. It can run the same Ozeki SMS Gateway software
that you can install on Windows or Linux, and will provide all the API'S
and connection options, that are provided by a desktop or server-based
SMS gateway system.
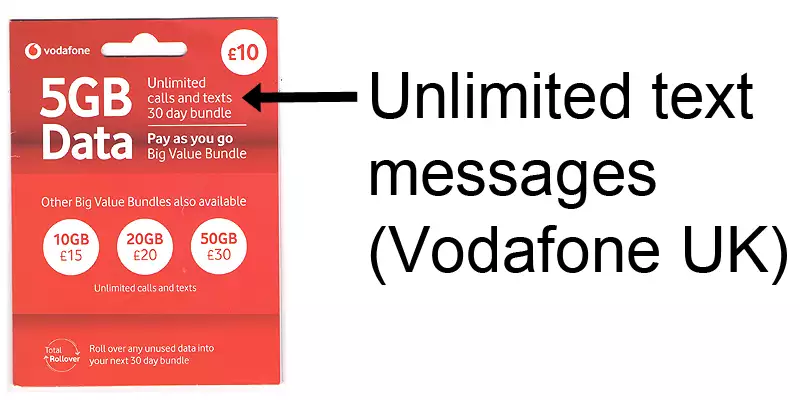
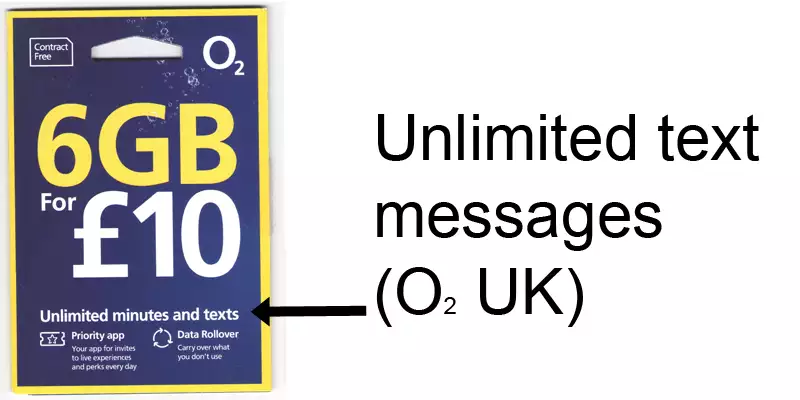
One advantage to using an Android SMS Gateway comes from the SMS tariffs included
in mobile phone subscription plans. The SMS tariffs are often very convincing, because
many mobile network operators advertise unlimited
SMS messages free of charge. If you run your SMS gateway on an Android
phone you can take advantage of such offerings, and you can send SMS messages
from your desktop and business applications free of charge.
There are three scenarios when you should definitely consider and Android SMS Gateway: First,
when you want to try, test and evaluate an SMS solution. Second, if you don't
intend to send or receive more then 10 000 SMS messages per day. Third, if
you already operate a PC based SMS gateway system and you would like to
give an identical platform with SMS capability to developers for testing.
Other scenarios might also make an Android SMS Gateway a viable choice:
If you need access to a particular mobile network through a local phone
number, you may setup a local Android Mobile phone connected to that
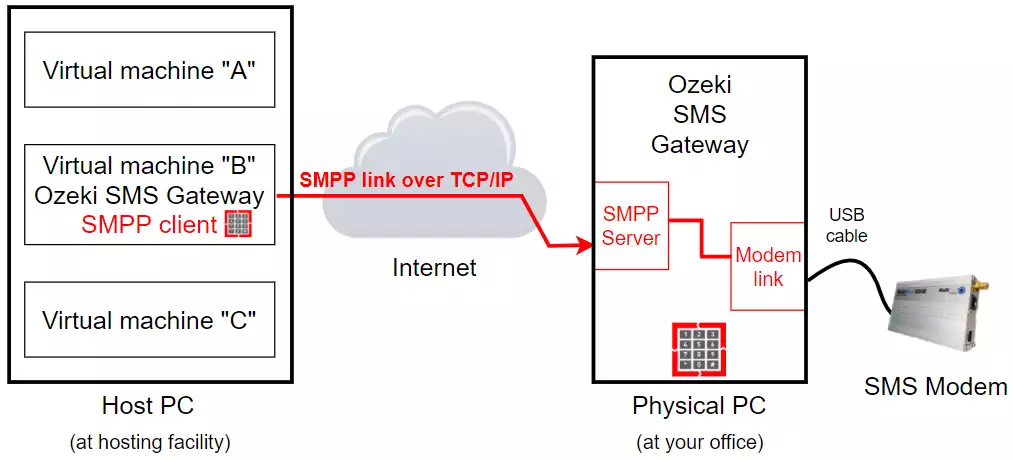
network wirelessly, and you may connect to the Android mobile through SMPP
and use it as a local SMS service provider.
You may use several Android mobile phones to provide you a pool of
telephone numbers. Each Android mobile phone comes with one or two
SIM cards, so each can give you one or two local phone numbers to
use for SMS messaging. These Android phones can be connected to a central
SMS gateway through the SMPP protocol or the
OZX protocol and can give you a powerful
service that can offer several phone numbers for communication. Having access
to many mobile phone numbers is an advantage if you wish to isolate the
traffic of certain users and applications. You can assign an individual
phone number to each user or application.
Finally, we should mention that the built in battery of an Android phone
is also an advantage. Even if the power goes down, your SMS gateway will operate. It can send
SMS alerts about the power outage itself,
It can notify you in an SMS if your webserver goes down or it can
send you an SMS if your E-mail server is not accessible because
the UPS battery is drained. It can come very handy to be able to notify relevant people
automatically in critical no power scenarios.
FAQs
What kind of number formats are available for SMS?
Short Code
Local Number Format
International Number Format
Long Code
Alphanumeric Number format
What is a short code?
A 4- or 5-digit number, e.g.: 1544
Short codes are memorable, 5- or 6-digit numbers used by businesses and
organizations for SMS communication. Here's what makes them tick:
Simplicity at its Finest: Short codes are easy to remember and dial, making
them ideal for widely advertised SMS services like contests or discount programs.
Network Specificity: They typically function within a single mobile operator's
network or a specific country (if operators collaborate). Think of them as
internal shortcuts for a particular service provider.
However, short codes have limitations:
No International Reach: Unlike phone numbers, short codes cannot be used to
send SMS messages internationally. They operate within a specific network or
region.
Limited Mobility Operator Support: While some operators share short codes
across networks within a country, this isn't always the case. A short code
might only work with a particular mobile provider.
This clarifies the benefits and drawbacks of short codes, emphasizing their
simplicity and limitations regarding network reach and international use.
What is the local number format?
A number that does not start with a country code, e.g.: 06201234567
Local number formats are the familiar phone numbers you use for regular calls
within your region. When it comes to SMS, here's what they offer:
Simple and Familiar: Local numbers consist only of digits, without a plus
sign or country code. They're easy to remember and use for sending SMS
messages to someone within your country.
Network Specific: Local numbers often include a network prefix that identifies
the mobile operator (e.g., Verizon, AT&T). This prefix helps route the message
within the specific network.
Staying Local: Local number formats are strictly for domestic use. You cannot
send SMS messages internationally using a local number.
Essentially, local number formats are for sending SMS messages to people within
your own country using their familiar phone numbers. They offer simplicity but
lack the international reach needed for messages across borders.
What is international number format?
The most widely used telephone number format. It starts with a plus sign and a
country code, that is followed by a network prefix and the phone number itself.
e.g.: +36201234567
The international number format is your key to sending SMS messages across borders.
It ensures your message reaches any mobile phone worldwide, as long as the number
is correctly specified. Here's how it works:
Universal Reach: The international format includes all the necessary
components to route a message internationally. It combines the country code
(identifies the nation), network prefix (specific mobile operator), and the
phone number itself.
Example Breakdown: Let's say you're sending an SMS to a US number from abroad.
You would use the format +12143500649, where:
+1 - Country code for the United States
214 - Network prefix (e.g., Verizon, AT&T)
3500649 - The recipient's phone number
Avoiding Common Pitfalls: People in regions where international calling is
commonplace might be more familiar with the full international format. However,
it's a good reminder that including the country code is essential for successful
international SMS delivery. Forgetting the country code (+1 in the US example)
can lead to failed messages and frustration.
By following the international number format, you can ensure your SMS messages
travel the globe and reach their intended recipients.
What is a long code number?
Long code means that the telephone number is longer than the standard phone number
length in the network. e.g.: +36201234567111111
While not universally available, some networks offer a feature called a postfix
for long codes. This is a freely defined set of digits appended to the standard
long code number.
Unlocking Possibilities: Postfixes can be incredibly useful for applications,
acting like unique message IDs. Here's an example:
Imagine a long code +36201234567. By adding a postfix like 111111 (resulting in
+36201234567111111), an application can identify and process the message content
based on that specific postfix, enabling more dynamic interactions.
Network Specificity: It's important to note that postfixes are not supported by
all networks. They typically work only with IP SMS connections like SMPP, UCP, or
CIMD2.
GSM Modem Limitations: Traditional GSM modem technology doesn't allow for
postfixes. If you're using a GSM modem, you can only receive messages on the
standard long code number (MSISDN) itself.
This clarifies the concept of postfixes and their limitations, highlighting
network compatibility and the restrictions of GSM modems.
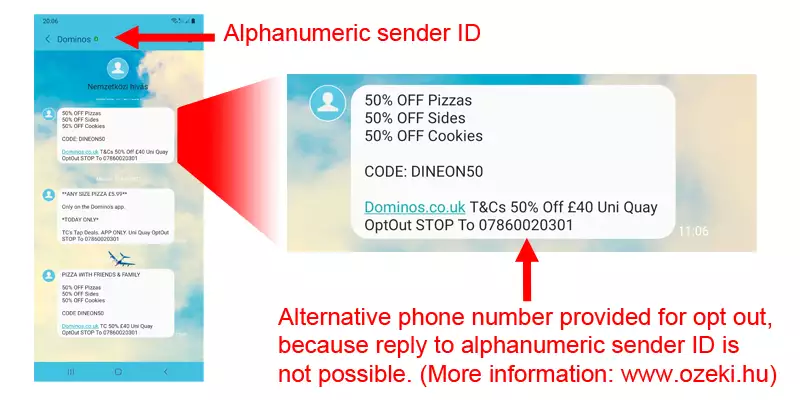
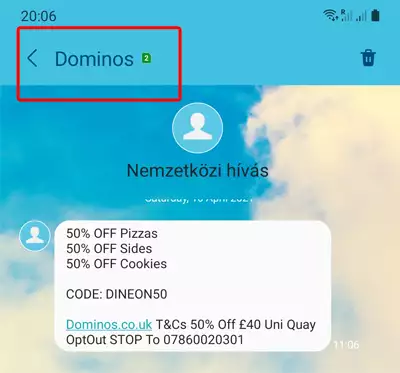
What is the alphanumeric number format?
When sending SMS messages via an IP SMS connection (like SMPP, UCP, or CIMD2),
you have more control over your sender address. It's not limited to just phone
numbers:
Say Goodbye to Just Numbers: Embrace a more personalized touch! You can
define a text sender address instead of, or in addition to, a phone number.
This allows you to display your nickname, company name, or any other relevant
identifier when sending the message.
Keeping it Short and Sweet: There's a limit of 11 characters for alphanumeric
sender IDs. This ensures clarity and avoids overwhelming the recipient.
Latin Character Focus: For readability purposes, alphanumeric sender IDs
currently support only Latin characters (A-Z and 0-9)
A Word on Replies: While alphanumeric sender IDs offer customization, it's
important to note that recipients might not be able to reply directly to messages
sent with them. This is a technical limitation you should consider when choosing
your sender address strategy.
This clarifies the benefits and limitations of using alphanumeric sender addresses
for IP SMS connections.
If my Android device supports two sim cards - can I receive SMS messages on
both of the SIM cards? Which of the sim cards is the one, that will send the
SMS message to a mobile phone?
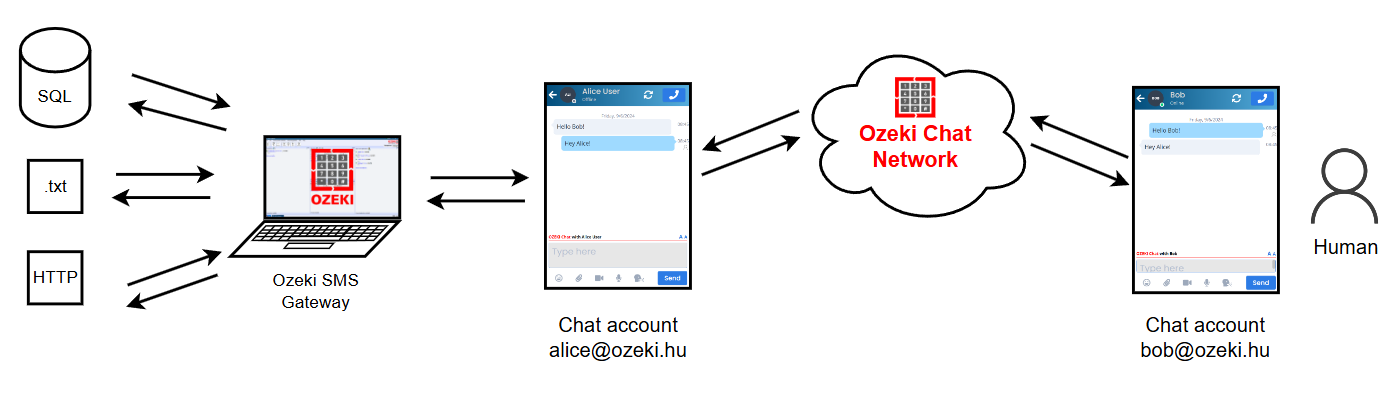
The Ozeki Android SMPP SMS Gateway acts as a bridge between your Android phone's
SIM cards and Ozeki SMS Gateway software on your computer. It facilitates
two-way SMS communication through the following functionalities:
Inbound Message Forwarding: Any SMS message received on any SIM card within
your Android phone is automatically forwarded to Ozeki SMS Gateway. This
allows you to centrally manage and process incoming messages on your computer.
Outbound Message Delivery: When you initiate an SMS message through Ozeki
SMS Gateway, the software identifies the recipient's phone number and
selects the appropriate SIM card based on pre-configured settings. The
message is then transmitted through the chosen SIM card to the recipient's
phone, provided it's in an active state on your network.
In essence, Ozeki Android SMPP SMS Gateway enables you to leverage your Android
phone's SIM cards for sending and receiving SMS messages through Ozeki SMS
Gateway on your PC.
Can I see the phone number of sender's service centre?
Ozeki cannot display the sender's service centre phone number.
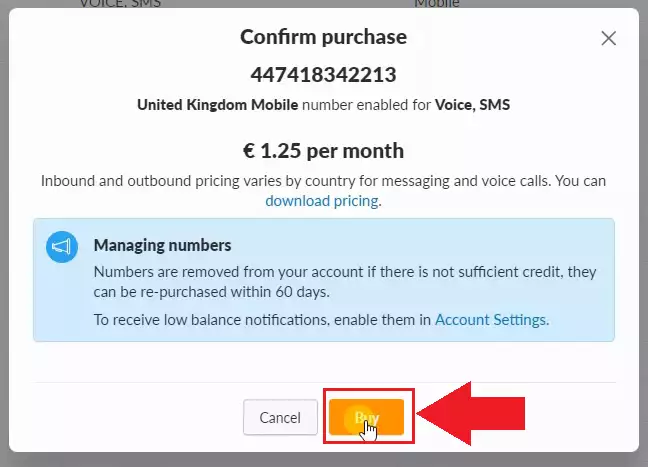
I have installed and SMPP connection then set the sender address of my admin user,
but it does not appear on the destination phone. Could you help me?
The issue might be related to the configuration of your service provider
connection in Ozeki SMS Gateway. Here's how to check:
Access the configuration form for the service provider connection used for
sending SMS messages.
Locate the section for "Telephone number" (or a similar field).
Look for a checkbox labelled "Overridable" or similar. Ensure this checkbox
is enabled.
By enabling the "Overridable" option, you grant Ozeki the ability to use a
sender number you specify when sending messages, overriding the default settings
from the service provider.
This guide outlines the hardware requirements of Ozeki SMS Gateway. You will first
find the basic definitions and the recommended hardware configurations. You will
find information about the supported operating systems, and the recommended hardware
setup for your system.
What is an SMS gateway hardware
An sms gateway hardware is a device to send and receive text messages. An sms
gateway hardware provide sms functionality for applications and allow the transfer
of text messages amongst the organization or individuals.
Terms and definitions
Connection:
A connection is typically defined as a link to the outside world. For example,
a link to a mobile network or a link to a database server would be a connection.
Connections are able to receive and send messages. Hardware requirements depend
on the number of connections you wish to setup.
Message throughput:
The number of messages that travel through the system. It is measured in Messages
per Second (MPS) or for lower capacity systems in terms of Messages per Minute (MPM).
The message engine in Ozeki was designed to handle a maximum of 1000 messages per
second on a single computer. Higher throughput can be achieved using multiple
computers.
CPU:
Bursts of high message throughput require higher single core performance. A high
number of connections require higher number of thread processing capabilities.
When choosing a CPU hierarchy for your system consider how you wish to
use Ozeki. For best performance we recommend top of the line Multi core Intel CPU's.
AMD CPUs are supported based on their equivalence to the suggested Intel CPUs.
Memory:
For increased performance, Ozeki caches message queues in memory. Make sure to
put as much RAM into your system as possible, since this will greatly improve
your system's performance.
Network:
Ozeki can operate on lower network speeds, but a 1Gb LAN network connectivity is
recommended. Depending on the number of simultaneous connections
and the message throughput the network bandwidth can be a limiting factor.
Supported operating systems
Ozeki SMS Gateway supports the following operating systems. All
operating systems must be installed in their x64 version. 32-bit versions are not
compatible with Ozeki. Full Windows and Linux updates are also mandatory to be
applied to ensure compatibility with Ozeki.
Windows 11
Windows 10
Windows 7, 8
Windows Server 2022
Windows Server 2019
Windows Server 2016
Ubuntu LTS 20.04 or above
Raspbian Stretch
Cloud SMS Gateway
Ozeki SMS Gateway can be hosted on any of the following cloud platforms:
Small system:
The number of connections is up to 10.
The message throughput is up to 1 MPS (message per second).
Medium system:
The number of connections is up to 20.
The message throughput is up to 25 MPS (message per second).
Large system:
The number of connections is up to 50.
The message throughput is up to 100 MPS (message per second).
Enterprise system:
The number of connections is up to 100.
The message throughput is up to 500 MPS (message per second).
Enterprise+ system:
The number of connections is up to 200.
The message throughput is up to 1000 MPS (message per second).
Hardware variants
Ozeki supports and was tested on both bare metal systems and virtual machines.
All systems (hardware CPUs and virtual CPUs) must offer the 64bit instruction set.
Supported virtual machine platforms:
VMware vSphere Hypervisor (ESXi) 6.X and above
Microsoft Hyper-V Server 2012 and above
Hyper-V on Windows Server 2012 and above
Citrix XenServer 8.0 and above
KVM 2.6 and up.
Ozeki system size
The Ozeki Hardware Variants are grouped by system size.
Small
Ozeki SMS Gateway
Linux Debian-based
Windows-based
CPU Family
Intel i3 (Gen.8) or equivalent
vCPUs
1
2
Memory
1
2
Storage
30 GB SSD based storage
Medium
Ozeki SMS Gateway
Linux Debian-based
Windows-based
CPU Family
Intel i5 (Gen.8) or equivalent
vCPUs
4
6
Memory
4
6
Storage
100 GB SSD based storage
Large
Ozeki SMS Gateway
Linux Debian-based
Windows-based
CPU Family
Intel i7 (Gen.8) or equivalent
vCPUs
6
8
Memory
8
10
Storage
300 GB SSD based storage
Enterprise
Ozeki SMS Gateway
Linux Debian-based
Windows-based
CPU Family
Intel Xeon E5 v4 or equivalent
vCPUs
8
10
Memory
16
18
Storage
500 GB SSD based storage
Enterprise +
Ozeki SMS Gateway
Linux Debian-based
Windows-based
CPU Family
Intel Xeon E7 v4 or equivalent
vCPUs
8+
10+
Memory
32+
34+
Storage
500+ GB SSD based storage
ARM-Based
Raspberry Pi 3B+ (Debian9)
Ozeki 10
Extensions
up to 16
SIM Calls (SC)
up to 8
SD Card
minimum 32GB Class 10 Micro SD
Required
Heat sink housing and Raspberry Pi-compatible 2.5 Amp Micro USB power supply.
What is the minimum hardware requirement for the PC I will use to run the
software?
CPU: Intel Pentium III, 450 Mhz
RAM: 512 Mb
Hard disk space: 50 Mb
Ports: RS232 and/or USB (if you use a GSM modem)
Network: Internet connection (if you use IP SMS connection)
With an RS232 to USB converter, you can bridge the gap and connect your serial
modem to a USB port on your computer. This converter acts like an adapter,
allowing you to use your preferred modem despite the missing serial port.
What is the recommended hardware for the PC I will use to run the software?
CPU: Intel P4D, 3Ghz
RAM: 2 GB
Hard disk space: 500 Mb (SATA or SCSI)
Ports: RS232 and/or USB (if you use a GSM modem)
Network: Internet connection (if you use IP SMS connection)
An RS232 to USB converter acts like a bridge, allowing you to connect your serial
modem to a USB port on your computer. This converter essentially translates the
signal from the older serial port format to the newer USB format, making them
compatible. With this setup, you can expect your SMS Gateway to function
smoothly, handling up to 30 messages per minute between your system and the mobile
network through an IP SMS service provider.
This configuration is a great option for basic needs. However, if you require a
higher message throughput to handle a larger volume of texts, there are other
solutions available. For recommendations on hardware that can tackle heavier
loads, check out our resource demand page (link not provided). This page will
provide guidance on choosing the right equipment to meet your specific SMS sending
needs.
Other operating systems, such as Windows 10, Windows 2022 Server, Windows 2019 Server, Windows
2016 Server, Windows 2012 Server are also supported.
Does Ozeki support 64bit operating systems?
Yes, it does.
This software can run on a 64-bit (x64) operating system, allowing it to benefit
from features like handling large amounts of RAM for potentially improved
performance.
What are the software requirements?
OS: Windows 11, Windows 2025 Server, Windows 2022 Server, Windows 2019 Server, Windows 2016 Server, Windows 10
Supported software: .NET Framework 8.0
Is there any additional software required?
No, there is not any additional software requirement.
Once you complete your purchase, you'll be ready to use it immediately. No need
to wait for downloads, configurations, or activations – it's quick and easy to
get started, allowing you to dive right in and experience the benefits as soon
as you become a proud owner.
Do I need a dedicated server?
No, you do not.
The beauty of this SMS Gateway is that it plays nicely with others! You can
install it alongside other applications on the same hardware without any conflicts.
It runs smoothly in the background as a Windows service, ensuring it doesn't
interfere with your other programs. This allows you to maximize the use of your
existing hardware while adding powerful SMS functionalities.
Ozeki supports and was tested on both bare metal systems and virtual machines.
All systems (hardware CPUs and virtual CPUs) must offer the 64bit instruction set.
Supported virtual machine platforms:
VMware vSphere Hypervisor (ESXi) 6.X and above
Microsoft Hyper-V Server 2012 and above
Hyper-V on Windows Server 2012 and above
Citrix XenServer 8.0 and above
KVM 2.6 and up.
Ozeki system size
The Ozeki Hardware Variants are grouped by system size.
Small
Ozeki SMS Gateway
Linux Debian-based
Windows-based
CPU Family
Intel i3 (Gen.8) or equivalent
vCPUs
1
2
Memory
1
2
Storage
30 GB SSD based storage
Medium
Ozeki SMS Gateway
Linux Debian-based
Windows-based
CPU Family
Intel i5 (Gen.8) or equivalent
vCPUs
4
6
Memory
4
6
Storage
100 GB SSD based storage
Large
Ozeki SMS Gateway
Linux Debian-based
Windows-based
CPU Family
Intel i7 (Gen.8) or equivalent
vCPUs
6
8
Memory
8
10
Storage
300 GB SSD based storage
Enterprise
Ozeki SMS Gateway
Linux Debian-based
Windows-based
CPU Family
Intel Xeon E5 v4 or equivalent
vCPUs
8
10
Memory
16
18
Storage
500 GB SSD based storage
Enterprise +
Ozeki SMS Gateway
Linux Debian-based
Windows-based
CPU Family
Intel Xeon E7 v4 or equivalent
vCPUs
8+
10+
Memory
32+
34+
Storage
500+ GB SSD based storage
ARM-Based
Raspberry Pi 3B+ (Debian9)
Ozeki 10
Extensions
up to 16
SIM Calls (SC)
up to 8
SD Card
minimum 32GB Class 10 Micro SD
Required
Heat sink housing and Raspberry Pi-compatible 2.5 Amp Micro USB power supply.
Ozeki SMS Gateway supports the following operating systems. All
operating systems must be installed in their x64 version. 32-bit versions are not
compatible with Ozeki. Full Windows and Linux updates are also mandatory to be
applied to ensure compatibility with Ozeki.
Windows 11
Windows 10
Windows 7, 8
Windows Server 2022
Windows Server 2019
Windows Server 2016
Ubuntu LTS 20.04 or above
Raspbian Stretch
Connection:
A connection is typically defined as a link to the outside world. For example,
a link to a mobile network or a link to a database server would be a connection.
Connections are able to receive and send messages. Hardware requirements depend
on the number of connections you wish to setup.
Message throughput:
The number of messages that travel through the system. It is measured in Messages
per Second (MPS) or for lower capacity systems in terms of Messages per Minute (MPM).
The message engine in Ozeki was designed to handle a maximum of 1000 messages per
second on a single computer. Higher throughput can be achieved using multiple
computers.
CPU:
Bursts of high message throughput require higher single core performance. A high
number of connections require higher number of thread processing capabilities.
When choosing a CPU hierarchy for your system consider how you wish to
use Ozeki. For best performance we recommend top of the line Multi core Intel CPU's.
AMD CPUs are supported based on their equivalence to the suggested Intel CPUs.
Memory:
For increased performance, Ozeki caches message queues in memory. Make sure to
put as much RAM into your system as possible, since this will greatly improve
your system's performance.
Network:
Ozeki can operate on lower network speeds, but a 1Gb LAN network connectivity is
recommended. Depending on the number of simultaneous connections
and the message throughput the network bandwidth can be a limiting factor.
The following page points you to the most relevant pages
when it comes to Ozeki SMS Gateway Installation. It shows the operating systems
on which Ozeki SMS Gateway can be installed, and some common steps you will
likely do after installation. You will notice, that Ozeki can be installed on
Windows, Linux and Android operating systems. You can choose to install them
on virtual servers locally or in the cloud. Of course,
you will find information on how to install Ozeki SMS Gateway on physical Windows
or Linux computers. Go through the list and select the topic you are looking for.
Most common setup
Ozeki SMS Gateway Installation on Windows
Ozeki SMS Gateway is compatible with Windows 11, Windows 10, Windows 8, Windows 7 and Windows Server 20xx systems.
Our step-by-step guide will show you exactly how to install it on any of them.
It does not require any specific knowledge. It will take you about 5-10 minutes to complete. Download and install Ozeki SMS Gateway for Windows
Common tasks related to Installation
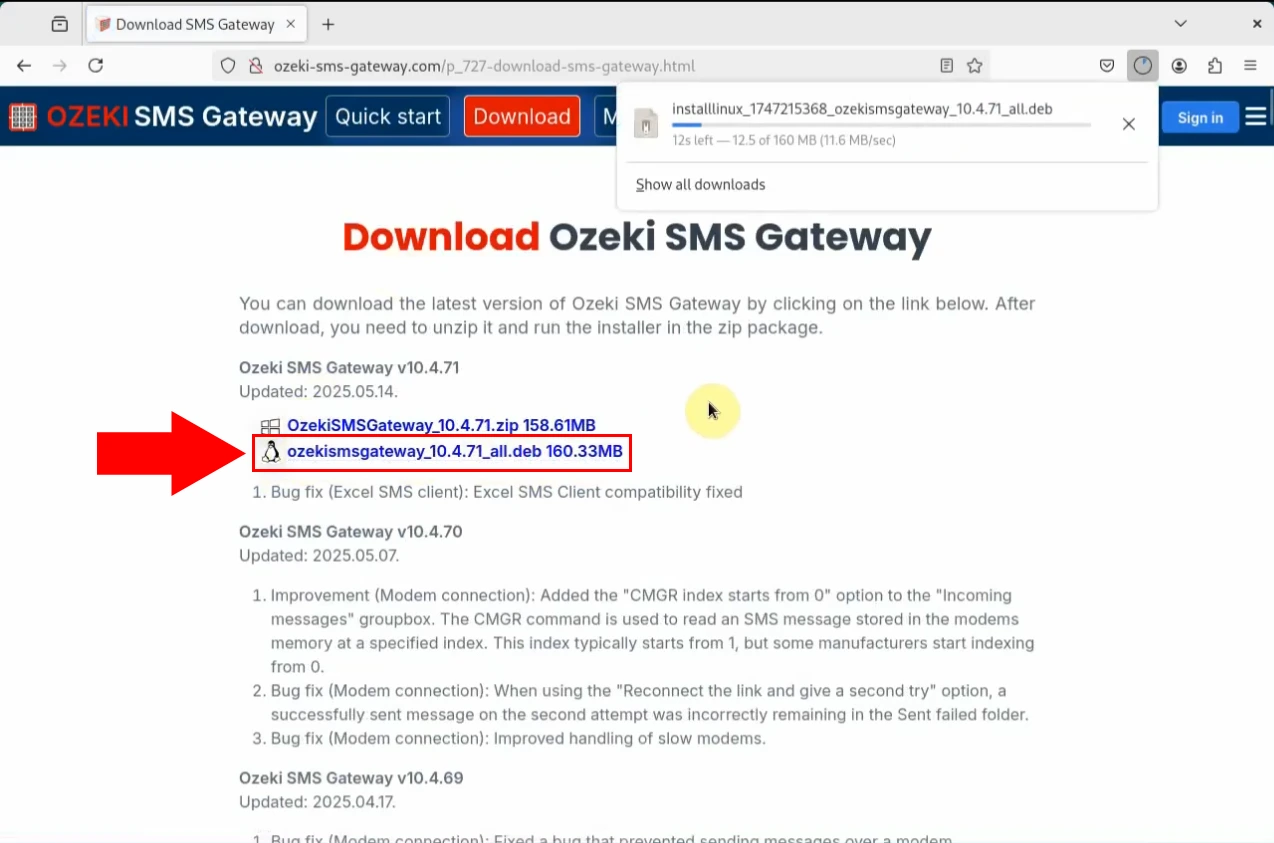
Download Ozeki SMS Gateway
This page shows how you can download Ozeki SMS Gateway to your Windows computer and how you can extract the
contents of the downloaded ZIP file. It starts by opening the www.ozeki-sms-gateway.com website, and ends with
locating the ZIP file in your downloads folder and extracting its contents. Download Ozeki SMS Gateway
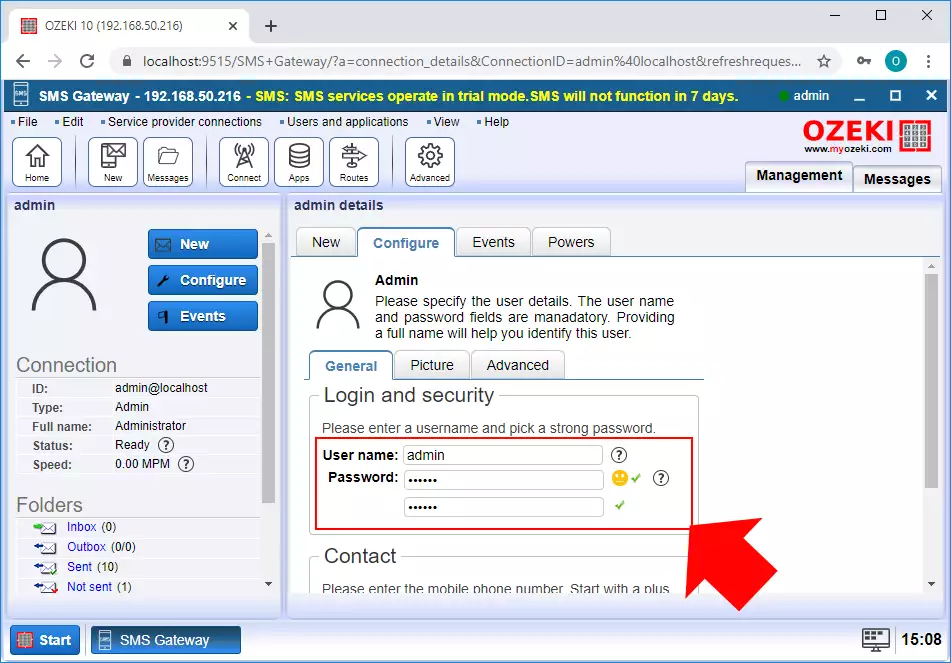
Change the admin password
The documentation on this page is about to give you a brief description of how easily you can change the password
of your Ozeki account. This operation is really crucial to keep your account safe from unwanted actions.
Changing your password takes just about 2 minutes and does not require any further technological knowledge.
You just need to follow the simple instructions on this page. So, let's get started!
Change the admin password
Change the user password
After you install Ozeki SMS Gateway, you will create user accounts. These user accounts will be listed in the
right-hand panel of the SMS gateway management form. This guide explains how you can change the user password.
The steps will be shown for the admin user. The steps are similar to other user accounts.
Change the user password
Activate your Ozeki SMS Gateway license
This page explains how you can activate your purchased license after you have
completed your free trial period. To be able to use Ozeki with full functionality,
you need to purchase a license, and you need to and activate it. During the purchase procedure you will receive a
serial number from Ozeki in e-mail. Without activation, you can only use the software in trial mode for 7 days.
Activate an Ozeki software product
Installation on non-Windows platforms
How to install Ozeki SMS Gateway to be used with Android
Ozeki SMS Gateway can be used to send SMS messages through an Android mobile.
Our step-by-step guide will show you exactly how to install the necessary tool for your mobile
and how to complete the setup in Ozeki SMS Gateway. It is very easy to complete these steps. It
will take you about 5-10 minutes to send your first SMS. Download and install Ozeki SMS gateway for Android
How to install Ozeki SMS Gateway on Linux
The next guide is about to demonstrate how you can set up Ozeki Installer on your Linux operating system.
This product is a great app store that allows you to get any Ozeki product that you want by just one click.
The installation process will take about 10 minutes. The guide contains four steps with clean instructions.
The setup procedure does not require any further Linux knowledge. This document contains each command that you have to use
during the installation. You just need to copy-paste them. Download and install Ozeki SMS Gateway for Linux
How to install Ozeki SMS Gateway on Ubuntu Linux
This article is a detailed guide on how to install Ozeki SMS Gateway on Ubuntu Linux.
In this tutorial we are going to be going over every step required to complete the installation successfully.
This process requires the Ubuntu operating system to be installed on your device.
Mainly, we are going to install dependencies in the Ubuntu terminal, then download the install for
Ozeki SMS Gateway and install it. We hope this article is helpful and informative to you. Install Ozeki SMS Gateway on Ubuntu Linux
How to install Ozeki SMS Gateway on Raspberry PI
If you have an ARM based PC, such as Raspberry PI, the Ozeki SMS Gateway can also be installed on it.
You don't need any specific knowledge of ARM based PCs to install our product,
because it is done in a graphical user interface, and it is presented by a step-by-step guide.
You will need the Mono Framework in order to use our product. Download and install Ozeki SMS Gateway for Rasberry Pi
How to install Ozeki SMS Gateway in Docker
This guide explains how you can setup Ozeki SMS Gateway using Docker in Ubuntu.
The tutorial below presents all the steps and the necessary information to help you complete this procedure with ease.
Ozeki SMS Gateway is a great tool that makes it possible to create great solutions in various environments.
Download and install Ozeki SMS Gateway for Docker
This guide gives you the installation steps of Ozeki SMS Gateway. This information
is useful if you wish to install the software into an environment
where you don't have Internet access, or your corporate firewall policy prevents
software to communicate with the Internet. This installation procedure has to be
used on Windows 11 as well. The offline installation is quite simple:
you need to download the installation package and follow the instructions on the
screen. It is similar to a classic Next...Next...Next... Windows installation procedure.
Windows 11 support
If you are running a Windows 11 computer, you can also follow this guide, as the
steps are the same and there shouldn't be any change in the process. Ozeki SMS gateway supports to create windows sms service.
How to install Ozeki SMS Gateway (Quick steps)
To install Ozeki SMS Gateway:
Download the Ozeki SMS Gateway .zip file
Choose Extract All from context menu
Run the .exe file from the created folder
Click Next to complete the installation
Open the SMS Gateway App
Add new SMPP connection
Enter the SMPP server details
Send test SMS message from the Test tab
Check the logs of the connection
Download Ozeki SMS Gateway (Video tutorial)
In this video, you will discover the process of downloading and installing Ozeki
SMS Gateway software. You will be guided to the SMS software download page on the
https://ozeki-sms-gateway.com site and learn how to
extract the SMS software zip file. Subsequently, you will unzip the SMS gateway,
preparing it for the installation process. Upon completion of the installation,
you will launch Ozeki SMS Gateway and gain access to the user-friendly Dashboard.
Now you are, ready to start your SMS management journey.
Step 1 - Download Ozeki SMS Gateway
The latest release of Ozeki SMS Gateway can be downloaded from the
Ozeki SMS Gateway download page.
To download the installer in compressed format, you need to click on the first
OzekiSMSGateway_x.x.xx.zip link as Figure 1 shows below.
We recommend you to always download the latest version. This version always
contains all the currently available features and improvements.
Figure 1 - Downloading Ozeki SMS Gateway
Step 2 - Extract the downloaded file
When the download finished, you have to extract the compressed file to be able to
run the installer of the software. For that, please open the Downloads folder
on your computer. Then, as you can see it on Figure 2, right click on the
file and select Extract All.... By doing this, you will get the executable
installer of Ozeki Installer.
Figure 2 - Extract installer
Step 3 - Run the installer
After you extracted the .zip file, please open the newly created folder,
and just like in Figure 3, just click on the executable file to start the
installation process.
Figure 3 - Start installation
Step 4 - Install Ozeki SMS Gateway
As soon as you clicked on the .exe file, the installer starts with a welcome
screen (Figure 4). All you have to do here is to click Next
to continue the installation.
Figure 4 - Welcome to SMS Gateway
To install Ozeki SMS Gateway on your computer, you must accept the terms of
the License Agreement. Please review them then as Figure 5 demonstrates,
click 'I Agree' button to continue.
Figure 5 - Accept license agreement
After the installation process is finished the Ozeki SMS Gateway service
will start automatically in the background. To run Ozeki SMS Gateway on your web
browser, just check Run Ozeki SMS Gateway as you can see it on Figure 6 and click Finish.
Figure 6 - Installation successful
Step 5 - Ozeki SMS Gateway desktop
The home page of Ozeki SMS Gateway is a desktop,
where you can find the SMS Gateway application's icon as Figure 7 shows it.
Click on the Icon to open the application.
Figure 7 - Ozeki SMS Gateway desktop
Step 6 - Connect to the mobile network
SMS messages are sent through the mobile network, so the next step in
the procedure, is to select a method to connect your computer to the mobile network.
There are various options to setup this connection. You can connect using a GSM modem,
for higher capacity you can connect an SMS modem pool. You can also connect through
an Android mobile phone. If you operate an Internet SMS service, you want to connect directly to the Short Message Service Centre (SMSC)
of a mobile network operator over the Internet. In this case you would setup an
SMPP connection, an UCP connection
a CIMD2 connection or an HTTP SMS connection.
The most popular choice is to setup an SMPP connection over the Internet.
To install and configure an SMPP connection, please click on the Add new connection in the SMS Gateway's Home page (Figure 8).
Figure 8 - Add new connection
Step 7 - Install SMPP Client
Then click the Install button next to the SMPP client in the list. (Figure 9).
Figure 9 - Install SMPP Client
Step 8 - Provide SMPP client information
After it please enter the host name, the port number, a username and a password.
This information is provided by the service provider whose service you have subscribed to (Figure 10).
Figure 10 - Provide SMPP client information
Step 9 - Send test message
In the Test tab you can send a test SMS message. Please provide the
phone number and the message text, then click on the Send button (Figure 11).
Figure 11 - Send test message
Step 10 - SMS sent successfully
You can see that the SMS was sent successfully (Figure 12).
This page shows how you can download Ozeki SMS Gateway to your Windows computer
and how you can extract the contents of the downloaded ZIP file. It starts by opening
the ozeki-sms-gateway.com website and ends with locating the ZIP file in your
downloads folder and extracting its contents.
What is Ozeki SMS Gateway?
Ozeki SMS Gateway is a powerful software that enables you to send
and receive SMS messages from your PC through mobile networks. It supports various
messaging protocols and can be integrated with applications, databases, and APIs.
It’s ideal for businesses, developers, and system integrators who need reliable
and automated SMS communication.
Click the Download button to get the latest version
Go to your Downloads folder
Extract the downloaded ZIP file
Locate the .exe installer and double-click to run it
How to download Ozeki SMS Gateway (Video tutorial)
In this video, you will see how to download the Ozeki SMS Gateway from the official
website. The tutorial guides you through opening your browser, navigating to
ozeki-sms-gateway.com, clicking the
download button, locating the downloaded ZIP file, and extracting it. Once extracted,
you’ll find the installer file ready to run. This step is the first toward
setting up your SMS messaging system.
Step 1 - Open ozeki-sms-gateway.com
Open your web browser and go to ozeki-sms-gateway.com.
This is the official site where you can download the software (Figure 1).
Figure 1 - Open ozeki-sms-gateway.com
Step 2 - Download latest SMS Gateway version
On the website, locate and click the Download
button to get the latest version of the SMS Gateway in ZIP format (Figure 2).
Figure 2 - Download latest SMS Gateway version
Step 3 - Open download folder
After downloading, go to your Downloads folder on your computer to find the
downloaded ZIP file (Figure 3).
Figure 3 - Open download folder
Step 4 - Extract SMS Gateway installer
Right-click the ZIP file and choose Extract All... or use your ZIP tool to
unpack the contents into a new folder (Figure 4).
Figure 4 - Extract SMS Gateway installer
Step 5 - SMS Gateway installer exe
Inside the extracted folder, you will see the installer file (e.g., OzekiSMSGateway-x.x.x.exe).
Double-click this file to begin installation (Figure 5).
Keep your Ozeki SMS Gateway secure! This quick guide shows you how to
change your admin password in just minutes. Step-by-step instructions,
screenshots, and a video tutorial make the process simple,
even for non-technical users. Learn how to protect your
SMS Gateway, Chat system,
AI Server or other software on the Ozeki 10 system
with a strong, updated password.
This operation is really crucial to keep your account safe from unwanted actions.
Changing your password takes just about 2 minutes.
How to change the admin password (Quick steps)
To change the admin password:
Launch Ozeki to get to the home page
Open Ozeki Start menu from the taskbar
Choose the Help menu item
Select Change password option
Enter your current password
Enter your new password
Save the modifications to change the password
Login with your new password to Ozeki
How to change the admin password (Video tutorial)
This video shows you how to change the admin password in the Ozeki software.
It starts with opening the password changing page and ends when the password is
changed and the user is logged in with the new password.
This process should not take more than 1 minute, and it needs no IT knowledge.
You will learn what page you need to open and where to type in the admin password.
All Ozeki software products have a very intuitive graphical interface,
so you will have no problem following this tutorial.
Open the change password page
The changing of your password can be easily done in its dedicated menu. You
can reach this 'Change Password' form simply from the desktop. As you can see it
in Figure 1, just click on the Start menu, here select the 'Help' menu, and
finally, just click on the 'Change password' option.
Figure 1 - Go to Change Password from the Desktop
Change the admin password
After you selected the 'Change password' option, the following form shows up
(Figure 2). This is the menu, where you can change and store a new password.
For that, just type your current password in the first field, then type the
new password in the second field and retype it in the third field as well.
To save the modifications, just click on 'Save'.
Figure 2 - Change the password of your account
Login with your new admin password
After saving a new password for your account, the application logs you out to
log in again but now using your new password. All you have to do here is to
enter your username and the changed password in the fields of the login form
(Figure 3) and just click on 'OK'.
Figure 3 - Log in using the new password
Conclusion
Now, you can pause and relax a bit. We hope you didn’t get lost in the explanations.
We did our very best to make it simple and to walk you through all the details as lucid as possible.
By following the above directions, you can achieve the desired result in a few minutes. Now you can start using the product.
After you install Ozeki SMS Gateway, you will create user accounts. These
user accounts will be listed in the right-hand panel of the SMS gateway
management form. This guide explains how you can change the user password.
The steps will be shown for the admin user. The steps are similar to other
user accounts.
How to change a user password (Quick steps)
To change a user password:
Launch Ozeki SMS Gateway
Select user from the Users and applications panel
Open the Configure tab page in the user's Details page
Go to the General tab
Find the Login and security group box
Enter the user username
Enter the new user password twice
Click Ok to save the modifications
How to change a user password (Video tutorial)
This video presents you how you could change the password of a user account.
It will start with opening the login and security page and will end with logging in with your new login credentials.
You will learn what page to open to access the password changing page.
This process will not take more than 2 minutes and the Ozeki SMS Gateway has a very intuitive graphical user interface.
So, you will have no problem following the tutorial. You will learn what page to open to access the password changing page.
Step 1 - Open the details page of the user account
To reach the configuration setting of the user account, first you have to select
it in the SMS Gateway Management page. On this page, simply click on
the name of the user (Figure 1) in the Users and application panel.
Figure 1 - Select the user
Step 2 - Open the Configure tab
This will bring up the details page of the selected user, you will notice that the main
panel of the user account is the Message composer, so later you can use it
to send SMS messages. To change the password, click on the Configure tab (Figure 2).
This will bring you to the user's configuration form.
Figure 2 - Message composer form
Step 3 - Change the password
In the Configuration form, you can update the account details of the
user (Figure 3). You can change the username and you can change the
password. The password needs to be the combination of letters and digits and it should
contain at least six characters to improve security.
Figure 3 - Configure the account details
Conclusion
Finally, you can take your hand off the keyboard.
We hope you didn’t get lost in the explanations.
To sum up the above steps briefly we can conclude, that to change the user password is quite easy.
If you have already completed the steps, I am sure, if you let your partner know, you will be rewarded.
If you would like to pick up more useful insights about the benefits of other
similar solutions, please open ozeki-sms-gateway.com.
I hope this article will be useful to all the readers and especially to beginners.
This page explains how you can activate your purchased license.
To be able to use Ozeki with full functionality, you need to purchase a
license, and you need to and activate it. During the purchase procedure
you will receive a serial number from Ozeki in e-mail. Without activation,
you can only use the software in trial mode for 7 days. (The trial mode does
not require activation.)
What is product activation?
Product activation is a license verification process that some software programs require.
Product activation protects the software owner from unauthorized usage of the software.
Product activation gives you access to the software.
What is serial number?
Serial number is a unique identifier that is assigned to an item.
Serial number can contain letters and other typographic symbols, or it can
consist entirely of strings.
Serial number is what you get when you purchase a license for a product.
What is activation code?
Activation code is a code composed of letters and numbers often separated to segments with hyphens.
Activation code is used to gain limitation free access to a software.
You get unique activation code when you activate a license.
How to activate an Ozeki software product (Clear steps)
To activate an Ozeki software product:
Launch Ozeki
Select the My Account icon
Click the green button labelled Add license code
Login or Create your Ozeki account
Use your Ozeki account to Sign in
Enter your serial number to Activate product
Continue if your product activation code has been accepted
Check your activated license
Go to My account option
To start the activation procedure, click on the "My Account" icon. If you already have an existing user,
log in Sign-In window. This allows you to check your licenses. (Figure 1)
Figure 1 - My account
Add your license code
If you can log in into your account, select the Licenses and Subscriptions panel, then click the green "Add license code" button.
This allows you to use the verification credentials (you got them from Ozeki). (Figure 2)
Figure 2 - Add license code
Create a new Account
If you do not have an Ozeki account yet you have to click on
"Create your Ozeki account" button in the Sign-In window.
This leads you to the registration form where you can register
your account in order to verify your license. (Highlighted in Figure 3)
Figure 3 - Create new Account
Give new user credentials
In order to register a new user, you have to enter your Name, Email address,
Password and Mobile number, then click on "OK".
Make sure that your password is strong enough to register and do not forget
that your email address will be your login name later.
Your mobile number is important because if you forget your password, you can
recover it using your phone. (All highlighted in Figure 4)
Figure 4 - New User
Check the registration outcome
Your new Ozeki Account is created when the Create Account window says so.
Your next step is to sign in with the Sign in... link below. (Figure 5)
Figure 5 - Account Created
Sign in
In the E-mail or phone textbox you have to give your e-mail address or your phone number to continue the login process. You can recover
your forgot password here by clicking the Forgot password option. Signing in means you agree to Ozeki's Conditions of
Use & Sale. (All highlighted in Figure 6)
Figure 6 - Login with your Ozeki account.
Provide your serial number
On the next page you need to provide your serial number into the
Serial No.: textbox then click on the "Activate" button.
(Highlighted in Figure 7)
Figure 7 - Provide your serial number
Make sure that the activation code is accepted
If you have provided your serial number correctly you will see that your
activation code has been accepted and you can use the
full version of the product without limitations. By clicking the Continue
button you can finish the activation procedure.
(Highlighted in Figure 8)
Figure 8 - Activation code accepted
Check your licenses
In the Home page, by selecting the Licenses and Subscriptions panel, you can see your License codes. You can check the serial number,
the date until the license is valid and other details by clicking the Details button. (Figure 9)
Figure 9 - My License codes
To sum it up
Successfully activating your Ozeki SMS Gateway,
Ozeki Chat, Ozeki Ai Server
license unlocks its full potential. By following these simple steps, including
the helpful video tutorial, you can quickly activate your purchase and begin
leveraging all of Ozeki's powerful features. With your license activated,
you're ready to experience company communication with AI integration.
Installing your Ozeki SMS gateway System into the cloud, like Amazon AWS,
Microsoft Azure, or Google Cloud, offers numerous benefits. First, it ensures
high availability and scalability, as these platforms can handle varying
workloads and provide redundancy. Additionally, cloud-based SMS gateways
simplify management and reduce hardware costs. They allow for seamless
integration with other cloud services and APIs, enabling businesses to
automate messaging and streamline communication processes. This page
lists the installation instruction for some of the most widely known
cloud infrastructure as a service provider.
How to install Ozeki SMS Gateway on Amazon AWS
If you use the Amazon Web Services as a cloud platform, then Ozeki 10 can be installed in the cloud.
You don’t need a specific knowledge of the cloud platform because the
installation is performed with the help of a graphical user interface as you can see in this step-by-step guide. Ozeki SMS Gateway in Amazon AWS
How to install Ozeki SMS Gateway on Microsoft Azure
If you have account on the Microsoft Azure portal and manage applications with this cloud solution, you can install Ozeki 10 SMS Gateway software on it.
We explain how you can install the SMS gateway with this step-by-step tutorial. You don't need any deep knowledge.
The installation process is presented with a graphical user interface. Ozeki SMS Gateway in Microsoft Azure
How to install Ozeki SMS Gateway on Google Cloud
The next guide helps you to install and use effectively Google Cloud with Ozeki SMS Gateway.
Ozeki SMS Gateway is an on-premise SMS server software that makes possible to send and receive bulk messages.
The SMS system can be used to create high capacity SMS Marketing System or provide advanced IT solutions,
such as one time passwords, product delivery notifications or payment reminders and to keep in touch with customers and employees.
Ozeki SMS Gateway in Google Cloud
How to install Ozeki SMS Gateway on Alibaba Cloud
Cloud computing makes data storage and backup easier and cheaper. It ensures disaster recovery
and business continuity as data can be mirrored across multiple
redundant locations in the cloud provider's network. To install your
Ozeki SMS Gateway in Alibaba Cloud is a good choice if you have other
software services running at Alibaba
Ozeki SMS Gateway in Alibaba Cloud
How to install Ozeki SMS Gateway in Microsoft Azure
This guide explains how you can setup Ozeki SMS Gateway inside Microsoft Azure's virtual machine service.
The tutorial below presents all the steps and the necessary information to help you complete this procedure with ease.
Ozeki SMS Gateway is a great program that makes it possible to create great solutions in various environments.
It can be used for a variety of different tasks. For example, to keep in touch with customers and employees.
In this article, you will find out how to launch an Azure instance, install Ozeki SMS Gateway on a Virtual Machine and access it remotely.
You will be provided step by step instructions. We hope you find this article informative and helpful.
Let's get it started!
What is Microsoft Azure
Microsoft Azure is a public cloud computing platform.
It allows the users to run instances of virtual Windows computers remotely on Microsoft's servers.
This has the benefit of being able to use more computing power without actually having to own the hardware.
You can use an Azure instance of a virtual machine just like a regular computer running Windows.
In this article, we use it to run Ozeki SMS Gateway.
What is Ozeki SMS Gateway
Ozeki SMS Gateway is a communication software that routes messages between real world entities.
It allows you to build up simple communication between shared hardware and software resources of your system.
It offers real time information and provides various configuration options to route messages.
How to install Ozeki SMS Gateway on Microsoft Azure (Quick steps)
To install Ozeki SMS Gateway in Microsoft Azure:
Create new virtual machine in Microsoft Azure
Open virtual machine in Remote Desktop Connection
Download Ozeki SMS Gateway .zip file
Extract the downloaded .zip file
Start Ozeki SMS Gateway installer
Click on the Next button to continue
Add inbound port rule in MS Azure
Provide new inbound rule in Windows Firewall
Connect remotely to the SMS Gateway
Change default admin password
Optimize SMS Communication with Microsoft Azure and Ozeki SMS Gateway
Microsoft Azure offers an efficient solution for improving SMS communication
through the integration of Ozeki SMS Gateway. Users may effectively manage SMS
communication by setting up the Ozeki SMS Gateway on Microsoft Azure and creating
connections to various service providers using API credentials. As the gateway
successfully installed and connected, businesses can streamline SMS management.
Combining these tools optimizes messaging for marketing, notifications, and
emergencies, ensuring highly effective communication with your audience.
With the Ozeki SMS Gateway deployed on Microsoft Azure, businesses can optimize
their SMS communication strategies, making it an ideal solution for a wide range
of applications.
Figure 1 - Microsoft Azure - SMS Gateway architecture
How to install Ozeki 10 on Microsoft Azure (video tutorial)
This video tutorial will show you the steps on how to launch a Microsoft Azure virtual machine,
as well as how to install Ozeki SMS Gateway on the virtual machine and access it remotely.
Select virtual machine service
First, go to the Home page on portal.azure.com.
To select a virtual machine, click the Virtual machines icon located under Azure services (Figure 2).
Selecting this option will forward you to the next page where you can add a new virtual machine to your account.
Figure 2 - Select Virtual Machine service
Add new virtual machine
Once you are on the Virtual machines page you can create a new one.
Do this by clicking the blue "+" icon where it says "Add" in the virtual machine toolbar (Figure 3).
This brings up a dropdown menu.
In this menu select Virtual machine by clicking on it.
Selecting it brings you to the "Create a virtual machine" page, where you can configure the details of the instance.
Figure 3 - Add new virtual machine
Configure instance details
On the "Create a virtual machine" page you need to configure the details of your instance.
Select your desired options from the combo boxes to configure your setup (Figure 4).
In this tutorial, we select Free trial as the type of subscription.
You can also name your virtual machine by typing a name into the textbox next to "Virtual machine name".
We have also selected East US as the region and Windows 10 pro for the image.
The image is the operating system that gets installed on your virtual machine.
We selected "Standard_Ds1_v2" as Size. This is the hardware specification of your virtual machine.
Scroll down to Administrator account details when done.
Figure 4 - Configure instance details
Enter administrator account details
In the Administrator account section, you need to specify a username and a password (Figure 5).
These are used to log into your virtual machine using remote access.
Type the username you wish to create into the textbox next to "Username".
Then, type your desired password into the next textbox below.
Confirm your password by entering it again into the third textbox.
Scroll down to the Licensing section when done.
Figure 5 - Provide Administrator account details
Review virtual machine
To be able to review and create your virtual machine you first need to accept the licensing agreement.
This way you confirm that you have an eligible Windows 10 license with multi-tenant hosting rights.
Confirm the licensing agreement by clicking on the checkbox (Figure 6).
Finally, click on the blue Review + Create button at the bottom.
You will then be forwarded to the review page.
Figure 6 - Review virtual machine
Create virtual machine
On the review page, you can make sure that all of the details you have provided are correct.
If you find that something is not correct, you can go back and edit your settings by clicking on the "Previous" button at the bottom.
Click on the blue Create button at the bottom to create your virtual machine (Figure 7).
Figure 7 - Create virtual machine
Your deployment is complete
After you have clicked create, Microsoft Azure will take a short amount of time to deploy your virtual machine.
Once it has finished creating your virtual machine your deployment is successful.
You are going to see a message that reads "Your deployment is complete" with a green checkmark next to it (Figure 8).
Click on the blue Go to resource button at the bottom to view the properties of your newly created virtual machine.
Figure 8 - Deployment is completed
Open virtual machine in Remote Desktop Connection
First, open the Remote Desktop Connection application on your computer.
Next, find the Public IP address of your virtual machine (Figure 9). It is located under Networking.
Copy the Public IP address (In our case this is 40.117.138.82).
Paste the address into the textbox in Remote Desktop Connection.
Click on the Connect button at the bottom of the window to connect to your instance.
Figure 9 - Open virtual machine in remote desktop
Enter username and password
After you clicked on connect, a Windows Security window will pop up.
This window will ask for your administrator account credentials which you have previously created in Microsoft Azure.
Enter the username into the first textbox, then enter the password into the second textbox (Figure 10).
Click on OK at the bottom of the window to log in.
Figure 10 - Provide username and password
Virtual machine started
After successfully logging into your virtual machine, you will be booted into Windows 10 remotely (Figure 11).
Figure 11 - Virtual machine started
Download Ozeki SMS Gateway
Now that you are in the virtual machine, open any browser (The default browser installed is Microsoft Edge).
Type ozeki-sms-gateway.com into the URL bar of your browser, then press enter.
Click on the Download button in the toolbar on the top of the page. This brings you to the download page (Figure 12).
Click on OZEKI_SMS_GATEWAY.zip highlighted in blue with a Windows icon next to it.
This will download the Ozeki SMS Gateway installer on to your computer.
The file will appear in the default download location specified by your browser.
Figure 12 - Download Ozeki SMS Gateway
Extract downloaded zip file
After you have downloaded the Ozeki SMS Gateway installer you need to extract it.
First, go to your Downloads folder and locate OZEKI_SMS_GATEWAY.zip.
Next, right click on it.
Then, click on the "Extract all" option from the dropdown menu (Figure 13).
This will extract the zip file to its current location.
Figure 13 - Extract downloaded zip file
Start SMS Gateway installer
Double click on the Ozeki SMS Gateway installer you have previously extracted (Figure 14).
By opening it you will start the installation process.
Figure 14 - Start SMS Gateway installer
Installer welcome screen
On the welcome screen, click on the Next button to proceed with the installation (Figure 15).
Figure 15 - Installer welcome
Accept license agreement
In order to be able to use this program you need to accept the license agreement.
Do this by simply clicking on the I Agree button (Figure 16).
The program will install after you have done so.
A progress bar will indicate the status of the installation.
Once it is done, you will be forwarded to the final screen.
Figure 16 - Accept license agreement
Finish installation
Finish the installation by clicking on the Finish button (Figure 17).
You can also launch the program immediately after it is installed.
Start it by putting a checkmark into the checkbox that reads "Run Ozeki SMS Gateway".
Figure 17 - Finish installation
SMS Gateway started
Once you have successfully installed and launched the program, Ozeki SMS Gateway will launch inside your browser.
After the program is launched, you are entered into the desktop.
On the desktop click on the SMS Gateway icon at the left side of the screen.
This brings you to the Ozeki SMS Gateway management window (Figure 18).
Figure 18 - SMS Gateway started
Add inbound port rule in Azure
After you opened Ozeki SMS Gateway, switch back to your computer outside of the virtual machine.
Click on Networking in the menu on the left (Figure 19).
This takes you to the networking settings of your virtual machine.
Click on the blue Add inbound port rule button on the right to add a new rule.
Figure 19 - Add inbound port rule in Azure
Configure inbound rule
After you clicked the Add inbound port rule button a menu appears.
In this menu, leave the first 4 options as default.
First enter 9515-9516 into the textbox below "Destination port ranges".
Then, set the Protocol to TCP by clicking on the checkbox next to it.
(Figure 20)
Figure 20 - Configure inbound rule
Define rule name and create rule
Scroll down to the bottom of the menu.
Give your inbound port rule a name by typing it into the textbox below "Name" (Figure 21).
When done, click on the blue Add button to add a new inbound port rule.
Figure 21 - Define rule name and create rule
Open Windows firewall settings
Start by typing "firewall" into the search bar on your taskbar (Figure 22).
The search bar is located on the left side of your taskbar at the bottom left of your screen.
The search results will return with the Windows Firewall program.
Now find the first option the search has given.
Click on the Windows Defender Firewall application icon to launch the program.
Figure 22 - Open Windows firewall settings
Open firewall advanced settings
Inside the Windows Defender Firewall application.
Navigate to the menu on the left side of the window.
Click on Advanced settings highlighted in blue (Figure 23).
This will bring up a new window where you are able to add a new inbound rule.
Figure 23 - Open firewall advanced settings
Add new Windows Firewall inbound rule
In Advanced Settings click on Inbound rules inside the menu on the left (Figure 24).
Next, navigate to the Inbound rules menu which appeared on the right.
In this menu click on New rule.
By clicking this option, a new window will pop up which lets you create a new rule.
Figure 24 - Add new Windows firewall inbound rule
Select inbound rule type
Select the inbound rule type in the New rule window.
Under the text which reads "What type of rule would you like to create", find the Port option (Figure 25).
Click on the checkbox next to it to select the Port option.
Click the Next button at the bottom right of the window to continue.
You will be brought to the Protocols and Ports section.
Figure 25 - Select inbound rule type
Define ports
Define your ports by entering the previously selected port range.
(In our case, this was 9515-9516)
Enter this port range once again separated by a "-" into the textbox (Figure 26).
This textbox is located next to a text which reads "Specific local ports".
(Make sure that TCP and "Specific local ports" are both selected).
To proceed, click the Next button at the bottom right of the window.
Figure 26 - Define ports
Allow connection
After defining your ports, you are brought to the Action section.
Allow connection by clicking on the checkbox next to the text that reads "Allow Connection" (Figure 27).
Once selected, click on Next again to continue.
You will then be brought to the Name section.
Figure 27 - Allow connection
Specify inbound rule name
The last step of creating a new rule is to give it a name.
In the Name section, type your desired name into the first textbox (Figure 28).
This textbox is located below the text that reads "Name:" in the middle of the window.
Click the Finish button found at the bottom right of the window to create the rule.
Figure 28 - Specify inbound rule name
Connect remotely to the SMS Gateway
First, open your browser once again outside of the Remote Desktop Connection application.
Then, copy the IP address provided in Microsoft Azure again. In our case this is 40.117.138.82.
Paste this into the url bar of your browser, then add a port to it in your port range followed by ":".
For our example, this is :9515.
The final address looks like this 40.117.138.82:9515 (Figure 29).
To access it, hit the enter key.
Figure 29 - Remote connect to the SMS Gateway
Remote access not allowed screen
With the current settings remote access will not yet be allowed.
You are then shown a screen displaying "Remote Access is Not Allowed" (Figure 30).
Figure 30 - Remote access not allowed
Change default admin password
First, go back to the SMS Gateway application inside the Remote Desktop Connection application.
Next, click on the Start button at the bottom left of your screen (Figure 31).
A menu then pops up where you need to hover your cursor over Help.
Then another menu pops up where you need to click on Change password.
Clicking on this option will bring you to another page where you are able to change your admin password.
Figure 31 - Change default admin password
Create new admin password
On the create a new password screen you are able to assign a new password to admin access.
Type your desired password into both of the textboxes shown in the middle of the screen (Figure 32).
Make sure the passwords you have entered are the same. This is to assure that the user is not able to enter their password incorrectly.
When you have entered your password click on the blue Save button below the textboxes.
You will be brought to a login screen, but you can continue from your browser outside of the Remote Desktop Connection application.
Figure 32 - Create new admin password
Remote login to SMS Gateway
Now that you have created a new admin password you can log into the SMS Gateway from outside of the Remote Desktop Connection program.
Start by typing the address followed by the port into the URL bar of your browser.
In our example it is 40.117.138.82:9515.
Then hit the Enter key.
You are then shown a login screen with two textboxes in the middle of the screen (Figure 33).
Type "admin" into the first textbox.
Then type your newly created admin password into the second textbox.
Click on OK to log in.
Figure 33 - Remote login to SMS Gateway
SMS Gateway GUI is now accessible
After successfully logging in you are able to access the SMS Gateway GUI from your browser (Figure 34).
Figure 34 - SMS Gateway GUI accessible
Summary
As you could see in the guide, Microsoft Azure provides you a virtual machine with Windows OS without owning an actual new device.
This public cloud computing platform allows you to use the Microsoft servers in order to create a new working system. We showed
you how to use Ozeki SMS Gateway with this innovation.
Now you can install and use Ozeki SMS Gateway in virtual machines and the
resources are provided by Microsoft, so you don't have to buy expensive hardwares to be up-to-date, you only need a Microsoft Azure
account and to pay the subscription of the virtual machine.
Setting up the SMS Gateway on Windows inside Amazon AWS takes about 15 minutes.
This document presents instructions and the necessary information to help you complete this procedure efficiently.
We will use Ozeki SMS Gateway.
It is an incredible tool that allows you to create great solutions in various environments.
For example, it can be used to create advanced IT solutions, such as one-time
passwords, product delivery notifications, or payment reminders and to keep in touch with customers and employees.
This guide requires common knowledge of SMS technology.
You will be presented with some useful information and well-structured step-by-step instructions.
We hope you will find the presented instructions beneficial.
What are Amazon AWS?
Amazon AWS (Amazon Web Services) is a safe cloud-based platform where you find a collection of services offered by Amazon.com.
Amazon AWS offers data transmission, database storage, very large computing capacity, and other functionality to assist your business is growth.
Install Ozeki SMS Gateway in Amazon AWS (Simple commands)
To install Ozeki SMS Gateway in Amazon AWS:
Launch new EC2 instance
Select an Amazon Machine Image
Choose an Instance Type
Review Instance Launch
Create a new key pair
Save private key
Connect to the instance with private key
Decrypt the generated password
Connect to the instance through remote desktop
Provide username and password
Setup Ozeki SMS Gateway
Add new security group rule
Define new Windows firewall inbound rule
Check remote access connection
Change the admin password to get SMS Gateway GUI accessible
Seamless SMS Communication with Ozeki SMS Gateway integrated with Amazon AWS
Ozeki SMS Gateway, integrated with Amazon AWS, provides an efficient SMS communication
solution. Users can install Ozeki SMS Gateway on Amazon AWS and establish connections
to various service providers using API credentials. The system provides an
easy-to-use SMS client program to simplify text message processing. Businesses
may access capabilities that are specifically designed to fit their needs by
utilizing the business SMS APIs offered by Amazon AWS. Once configured, the gateway
makes it simple to send and receive SMS messages, which makes it ideal for sharing
promotional information, notifications, and urgent warnings. Businesses can
effectively manage large SMS campaigns and ensure timely message delivery
worldwide thanks to Amazon AWS's flexibility and reliability.
Figure 1 - Amazon AWS - SMS Gateway architecture
How to install Ozeki SMS Gateway software in Amazon AWS (Video tutorial)
This video tutorial will show you the steps on how to install the Ozeki SMS Gateway
in Amazon AWS. In the following video, you will find examples on how to launch a
Windows instance in Amazon AWS, create a private key, as well as installing and
launching Ozeki SMS Gateway. It will also show you how to access the SMS Gateway
remotely from your browser. This 14-minute video is great since it contains all
the necessary steps of this procedure in order.
Launch a new EC2 instance
First, navigate to the EC2 Management Dashboard on console.aws.amazon.com.
Next, find the Launch instance button and click on it (Figure 2).
When clicked on, it brings up a combo box (dropdown menu). In the combo box you
need to click launch instance again.
This will bring you to Step 2, where you are able to choose an Amazon Machine Image.
Figure 2 - Launch new EC2 instance
Select the Windows image
Find the Microsoft Windows Server 2019 Base option (Figure 3).
It is located under the "Step 1 - Choose an Amazon Machine Image" section.
Click the blue button labelled Select next to it. This will select the Windows image, which is "Microsoft Windows Server 2019 Base".
Note that you will have to scroll down to find this option.
Once you selected it, it will forward you to Step 3.
Figure 3 - Select a Windows image
Choose an instance type
Step 3 is choosing what type of instance you wish to launch.
On this page, you will find a spreadsheet containing different types of instances.
Find the second option.
It has "t2.micro" written under the "Type" column.
Click on the checkbox next to it on the left side of the screen to select it (Figure 4).
(This option may be selected already by default).
Then, click on the blue button labelled "Review and Launch" at the bottom right of the screen.
Figure 4 - Select instance type
Review and launch instance
After you have clicked "Review and Launch", you will be forwarded to Step 7.
On this page, you are able to review the options you have previously selected.
This page contains details about your chosen options, so you can make sure that you have selected the right ones.
If everything is correct, click on the blue Launch button at the bottom right of your screen (Figure 5).
Figure 5 - Review and launch instance
Create new key pair
After you have launched your instance, a new window will pop up.
Here, you will be asked to select an existing key pair or create a new key pair.
Click on the combo box in the middle of the window (Figure 6).
Select the "Create new key pair" option.
Give your key pair a name by entering the name in the textbox below.
Next, click on the "Download key pair" button at the bottom right of the window.
This will download the newly created keypair on to your computer.
Figure 6 - Create new key pair for login
Save private key
Once you have downloaded the private key, it will be located in your default download location.
This is usually specified in your browser settings.
The file will show up at the bottom left of your browser when downloaded.
Move the file into a desired directory on your computer.
This can be done by dragging and dropping the file from the browser's download popup to your location of choice (Figure 7).
After you have saved your key, click on the blue Launch instance button located at the bottom right of the window.
Figure 7 - Save private key
Open the running instance
After you have clicked the launch button, you will need to wait a few seconds for the instance to launch.
Once it's completed, you will be shown the Launch Status screen.
If you see a green checkmark followed by the statement "Your instances are launching" you can continue.
Next, click Services on the top left of the screen.
From the Services menu, click on EC2 (It will appear under "Recently viewed").
Then, click on "Instances in the Resources menu.
Finally, click on the Instance ID highlighted in blue (Figure 8).
Figure 8 - Open running instance
Connect to the instance
Once you have opened the instance you are going to see an instance summary.
In this instance summary, locate the Connect button (Figure 9).
The Connect button is found on the top right of the instance summary.
This will bring you to a screen named "Connect to instance".
Here you can generate an Administrator password.
Figure 9 - Connect to the instance to generate Administrator password
Get Administrator password
To get an Administrator password, you need to be on the "Connect to instance" screen.
First, click on the RDP client tab on the top of the panel (Figure 10).
This brings you to RDP client section.
At the bottom of this section, click on "Get password".
This will bring you to another panel titled "Get Windows password".
Figure 10 - Get Administrator password
Browse your private key
To decrypt the Windows password, you need to upload your private key to the website.
You have previously saved this file to your computer.
Make sure you put the file in an easy to find directory which you will be able to find in the file browser.
To browse your key pair, click the Browse button with an upload icon next to it (Figure 11).
This will bring up the file browser.
Figure 11 - Browse private key
Open your private key
Open your private key by navigating to the private key file you have previously saved.
Find the private key in the file explorer in the directory you saved it to.
Select the private key file by clicking on it.
Click Open at the bottom right of the window (Figure 12).
This will upload your private key to the website.
Figure 12 - Open private key
Decrypt password
If you see a green checkmark with your private key's file name next to it, then it was uploaded successfully.
This can be checked below the "Browse" button.
Decrypt your password by clicking on the orange Decrypt Password button at the bottom of the panel (Figure 13).
This will then bring you once again to the "Connect to instance" section.
In the RDP client tab, you will your password at the bottom of the screen.
Figure 13 - Decrypt password
Connect to instance with Remote Desktop
Start by opening the Remote Desktop Connection application.
Copy the Public IP address from the website (Figure 14).
In our case it's 54.211.123.51.
Paste it into the Remote Desktop Connection application into the textbox next to "Computer:".
Click on Connect once you have entered the IP address.
Figure 14 - Connect to the instance through remote desktop
Enter username and password
After you have connected following a short loading screen, a login screen pops up (Figure 15).
On the website you will find a username and the password.
Copy and paste the username into the first textbox.
Do the same for the password into the second textbox.
(You can also click "Remember me", if you wish for your login details to be filled automatically)
When you entered both, click OK.
Figure 15 - Provide username and password
Connected to the remote Windows instance
After a short amount of loading, you will be connected to the remote Windows instance. (Figure 16)
Figure 16 - Connected to the remote Windows instance
Download SMS Gateway
Once you're connected to the Windows instance open any browser (Internet Explorer in our case).
(Note that you may have to enable downloads. This can be done by going to Settings > Internet options > Security > Custom level > Click Enable checkbox under "File download" and "Font download").
Next, type ozeki-sms-gateway.com into your URL bar, then hit enter (sms.ozeki.hu also redirects you to the same page).
Then click on Download on the top of the page.
This will bring you to the downloads page.
Finally, click on OZEKI_SMS_GATEWAY.zip highlighted in blue with a Windows icon next to it (Figure 17).
Figure 17 - Download SMS Gateway installer
Extract the zip file
After you have downloaded the Ozeki SMS Gateway installer you need to extract it.
First go to your Downloads folder and locate OZEKI_SMS_GATEWAY.zip.
Next, right click on it.
Then, click on the "Extract all" option from the dropdown menu (Figure 18).
This will extract the zip file to its current location.
Figure 18 - Extract zip file
Start SMS Gateway installer
Double click on the Ozeki SMS Gateway installer you have previously extracted (Figure 19).
By opening it you will start the installation process.
Figure 19 - Start SMS Gateway installer
Install Ozeki SMS Gateway
On the welcome screen, click on the Next button to proceed with the installation (Figure 20).
Figure 20 - Welcome to SMS Gateway
Accept license agreement.
In order to be able to use this program you need to accept the license agreement.
Do this by simply clicking on the I Agree button (Figure 21).
The program will install after you have done so.
A progress bar will indicate the status of the installation.
Once it is done, you will be forwarded to the final screen.
Figure 21 - Accept license agreement
Finish the Installation
Finish the installation by clicking on the Finish button (Figure 22).
You can also launch the program immediately after it installed.
To started it, put a checkmark into the checkbox that reads "Run Ozeki SMS Gateway".
Figure 22 - installation successful
Ozeki SMS Gateway management
Once you have successfully installed and launched the program, Ozeki SMS Gateway will launch inside your browser.
After the program launched you are entered into the desktop.
On the desktop click on the SMS Gateway icon at the left side of the screen.
This brings you to the Ozeki SMS Gateway management window (Figure 23).
Figure 23 - Ozeki SMS Gateway management page
Open security group
Open the security group by once again returning to the Amazon AWS console outside of the Remote Desktop Connection application.
Do this by entering console.aws.amazon.com into the URL bar of your browser in case you have closed it.
Open the menu on the left by clicking on it.
Scroll down and click on the option named Security groups.
In the Security Group panel click on the Security tab (Figure 24).
Next, click on the link highlighted in blue below "Security groups".
This will bring you to the details of your security group.
Figure 24 - Open security group
Edit inbound rules
To edit inbound rules, you need to be on the details page of your security group.
Click on the Edit inbound rules button to be able to edit them (Figure 25).
By clicking on this button, you are brought to a configuration screen for inbound rules.
Figure 25 - Edit inbound rules
Add a new rule for GUI access
First, click on the Add rule button in the Edit inbound rules panel (Figure 26).
Next, proceed to enter a port range separated by a "-" into the textbox below "Port Range" (We have used 9515-9516).
Then, click on the combo box with the search icon and select the first option (which is: 0.0.0.0/0).
You can also give it a name under the Description column. (We have named it "sms gateway GUI access").
When done, click on the orange Save rule button at the bottom right.
Figure 26 - Add new security group rule for GUI access
Open Windows firewall
Start by typing "firewall" into the search bar on your taskbar (Figure 27).
The search bar is located on the left side of your taskbar at the bottom left of your screen.
The search results will return with the Windows Firewall program.
Now find the first option the search has given.
Click on the Windows Defender Firewall with Advanced Security application icon to launch the program.
Figure 27 - Open Windows firewall
Add a new Windows Firewall inbound rule
Inside the Windows Defender Firewall application click on Inbound rules inside the menu on the left (Figure 28).
Next, navigate to the Inbound rules menu which appeared on the right.
In this menu click on New rule.
By clicking this option, a new window will pop up which lets you create a new rule.
Figure 28 - Add new Windows firewall inbound rule
Select inbound rule type
Select the inbound rule type in the New rule window.
Under the text which reads "What type of rule would you like to create", find the Port option (Figure 29).
Click on the checkbox next to it to select the Port option.
Click the Next button at the bottom right of the window to continue.
You will be brought to the Protocols and Ports section.
Figure 29 - Select inbound rule type
Define ports
Define your ports by entering the previously selected port range.
(In our case, this was 9515-9516)
Enter this port range once again separated by a "-" into the textbox (Figure 30).
This textbox is located next to a text which reads "Specific local ports".
(Make sure that TCP and "Specific local ports" are both selected).
To proceed, click the Next button at the bottom right of the window.
Figure 30 - Define ports
Allow the connection
After defining your ports, you are brought to the Action section.
Allow connection by clicking on the checkbox next to the text that reads "Allow Connection" (Figure 31).
Once selected, click on Next again to continue.
You will then be brought to the Name section.
Figure 31 - Allow connection
Specify the name of the inbound rule
The last step of creating a new rule is to give it a name.
In the Name section, type your desired name into the first textbox (Figure 32).
This textbox is located below the text that reads "Name:" in the middle of the window.
Click the Finish button found at the bottom right of the window to create the rule.
Figure 32 - Specify inbound rule name
Connect remotely to the SMS Gateway
First, open your browser once again outside of the Remote Desktop Connection application.
Then, copy the IP address provided in Amazon AWS again. In our case this was 54.211.123.51.
Paste this into the URL bar of your browser, then add a port to it in your port range followed by ":".
For our example, this is :9515.
The final address looks like this 54.211.123.51:9515 (Figure 33).
To access it, hit enter.
Figure 33 - Remote connect to the SMS Gateway
Remote access is not allowed screen
With the current settings remote access will not yet be allowed.
You are then shown a screen displaying "Remote Access is Not Allowed" (Figure 34).
Figure 34 - Remote access not allowed
Change default admin password
First, go back to the SMS Gateway application inside the Remote Desktop Connection application.
Next, click on the Start button at the bottom left of your screen (Figure 35).
A menu then pops up where you need to hover your cursor over Help.
Then another menu pops up where you need to click on Change password.
Clicking on this option will bring you to another page where you are able to change your admin password.
Figure 35 - Change default admin password
Create a new admin password
On the create a new password screen you are able to assign a new password to admin access.
Type your desired password into both of the textboxes shown in the middle of the screen (Figure 36).
Make sure the passwords you have entered are the same. This is to assure that the user is not able to enter their password incorrectly.
When you have entered your password click on the blue Save button below the textboxes.
You will be brought to a login screen, but you can continue from your browser outside of the Remote Desktop Connection application.
Figure 36 - Create new admin password
Log in remotely to the SMS Gateway
Now that you have created a new admin password you can log into the SMS Gateway from outside of the Remote Desktop Connection program.
Start by typing the address followed by the port into the URL bar of your browser.
In our example it was 54.211.123.51:9515.
Then hit the Enter key.
You are then shown a login screen with two textboxes in the middle of the screen (Figure 37).
Type "admin" into the first textbox.
Then type your newly created admin password into the second textbox.
Click on OK to log in.
Figure 37 - Remote login to SMS Gateway
SMS Gateway GUI is now accessible
After successfully logging in you are able to access the SMS Gateway GUI from your browser (Figure 38).
Figure 38 - SMS Gateway GUI accessible
Final thoughts
Now, you can pause and catch your breath.
We did our very best to make it simple and to walk you through all the details as painlessly as possible.
If you have followed the tutorial steps closely, you should be able to send sms using the Amazon AWS with Ozeki SMS Gateway without problems.
If you have already completed the steps, you can enjoy a well-deserved latte or some other treat you have in mind.
If you would like to discover more useful insights about the advantages of other similar solutions, please open ozeki-sms-gateway.com.
I hope this tutorial will be helpful to all the readers and especially to beginners.
The next guide helps you to install and use effectively Google Cloud with Ozeki
SMS Gateway. Ozeki SMS Gateway is an on-premise SMS server software that makes it
possible to send and receive bulk messages. The SMS system can be used to create
high-capacity SMS Marketing System or provide advanced IT solutions,
such as one-time passwords, product delivery notifications, or payment reminders
and to keep in touch with customers and employees. Using Ozeki SMS Gateway
enables enterprises to improve customer experience through SMS technology.
Google Cloud allows organizations to scale faster and more efficiently their
SMS service. The setup procedure does not require any further digital knowledge.
What is Google Cloud?
Google Cloud is the on-demand availability of computing resources as
services over the internet. It eliminates the need for enterprises to procure,
configure, or manage resources themselves. Cloud computing uses a network
(most often, the internet) to connect users to a cloud platform where they
request and access rented computing services. A central server handles all the
communication between client devices and servers to facilitate the exchange
of data. Security and privacy features are common components to keep
this information secure and safe.
How to install Ozeki SMS Gateway on Google Cloud (Quick steps)
To install Ozeki SMS Gateway on Google Cloud:
Open https://cloud.google.com/
Create new virtual machine in Google Cloud
Open virtual machine details
Connect to the virtual machine and login
Download and install Ozeki SMS Gateway
Open the Ozeki SMS Gateway software
Change the default admin password in the Ozeki SMS Gateway
Add new Windows Firewall inbound rule
Create new VPC firewall rule
Open virtual machine details
Copy the external IP address
Login SMS Gateway remotely
Enhance SMS Communication with Ozeki SMS Gateway on Google Cloud
Improving SMS Communication with Ozeki SMS Gateway on Google Cloud provides an
effective solution for managing SMS communication. The process involves the
deployment of Ozeki SMS Gateway on Google Cloud, which includes setting up the
gateway and configuring connections to various service providers using API credentials
provided by Google Cloud. Once the gateway is successfully installed and connected,
users can leverage user-friendly SMS client software to streamline text message
management. Businesses may access services specifically suited to their requirements
by integrating with Google Cloud's business SMS APIs, improving their SMS
communication capabilities. The Ozeki SMS Gateway makes it simple to send and
receive SMS messages on Google Cloud, which makes it an excellent choice for
distributing marketing materials, notifications, and urgent warnings.
Figure 1 - Google Cloud - SMS Gateway architecture
To initiate the process, you must begin by accessing the URL https://cloud.google.com/
on your web browser, and subsequently, opt for the "Console" button situated at
the upper right corner of the webpage.
Figure 2 - Open Google Cloud console
It will bring up a Welcome page, where you can start the process of creating a
virtual machine. Your task is to click on the "Create a VM" option from the
enumeration of functions.
Figure 3 - Create new virtual machine
In the following section, it is required to enter some essential information.
You need to type the name (for example: ozekismsgateway), then by scrolling down
on the page, you need to change the boot disk data.
Figure 4 - Set instance name
Find the "Change" button on the Boost disk section of the page, then fill out the
boxes with the necessary details.
Figure 5 - Change boot disk
At the Operating System box choose the "Windows Server" option. At the Version box
choose the "Windows Server 2022 Datacentre" option then click on the "Select"
button, at the bottom of the page, highlighted in blue.
Figure 6 - Select Windows disk
Now, click on the "Create" button at the bottom of the page in order to finish
the process.
Figure 7 - Create virtual machine
You need to make sure that the Virtual Machine is running, by checking the status
of that. If the status of your machine turns green, it means that it is running.
Figure 8 - Virtual machine running
Now, open the Virtual Machine's details, by clicking on its name link.
Figure 9 - Open virtual machine details
In order to run the machine as intended, you need to set up a Windows password.
Click on the "SET WINDOWS PASSWORD" link to set these data.
Figure 10 - Set Windows password
By clicking on the "SET WINDOWS PASSWORD" link, a pop-up window will bring up,
where you have to enter the password to your machine. Before entering the password,
the system generates a username. Click on the "SET" button, then type the password.
After that copy on the clipboard the new password, by clicking on the copy icon
next to the password.
You can also accept the automatically generated password.
If you are ready, choose the "Close" button.
Figure 11 - Copy the new password
The following stage is to download the RDP file. Find the "RDP" button and choose the
"Download the RDP file" option from the drop-down list.
Figure 12 - Download the RDP file
Now, open the RDP file from your downloads, at the upper right corner of your
browser.
Figure 13 - Open RDP file
Click on the downloaded file. A window will show up. There you need to choose the
"Connect" button at the bottom, in order to connect your Virtual Machine.
Figure 14 - Connect to virtual machine
When it is ready, a Windows Security window will show up, where you need to enter the
password that has been set previously. If it is done, click on the "OK" button.
To the verification, you need to accept the facts that shown on the window that
shows up. Click on the "Yes" option.
Figure 15 - Enter login details
The following part of the process, you need to wait to load the Virtual Machine
on your computer. If it is done, a server manager page will appear that you can
close. Now, load the ozeki-sms-gateway.com page in your browser and download the
Ozeki SMS Gateway. Choose the download option from the enumeration of headlines.
Then click on the " OzekiSMSGateway" link for Windows.
Figure 16 - Download SMS Gateway
To start the Ozeki SMS Gateway installation, open your downloads folder.
At the folder extract the compressed .zip file then run the Ozeki SMS Gateway
application.
Figure 17 - Start SMS Gateway installation
For finishing the installation, allow the terms about changes by clicking on the
"Yes" button. The Welcome page of the Ozeki SMS Gateway will show up. There, you
need to click on the "Next" button.
Figure 18 - Installer welcome page
Accept the terms and policies by clicking on the "I Agree" button at the bottom
of the window.
Figure 19 - Accept license
Finish the process of installation by clicking on the "Finish" button. When the
installation is ready, the Ozeki SMS Gateway starts to run. (https://localhost:9515)
Figure 20 - Installation finished
To get started, choose the SMS Gateway icon from the desktop.
Figure 21 - SMS Gateway started
The Ozeki SMS Gateway home screen will appear. There you must change your password.
At the Ozeki Start Menu choose the "Change Password" option from the "Help" menu
item.
Figure 22 - Change default password
It is needed to create a password for your user profile. Enter a unique password
that is hard to figure out. In order to make sure that it is correct, you need to
confirm the new password. If you are ready with entering it, click on the "Save"
button.
Now, you need to log in to your Ozeki SMS Gateway account, by using the name and
password that has been set previously.
Figure 23 - Create new admin password
In the following step, you need to open the Server Manager on your PC. There, you
need to choose the "Windows Defender Firewall".
Figure 24 - Open Windows firewall
Select "Advanced Settings" from the control panel.
Figure 25 - Select advanced settings
Choose the "Inbound Rules" option from the control panel, then select the "New Rule"
option that can be found at the upper right side of the page.
Figure 26 - Create new inbound rule
Create new inbound rule the following part you need to load the Google Cloud Virtual Machine, where you have
to find the "VPC network" item in the control panel. Then select the "Firewall" option
from the drop-down list.
Figure 27 - Open VPC network firewall
Now, choose "CREATE A FIREWALL RULE" option.
Figure 28 - Create new rule
Under the firewall rules control, you have to add a name, "ozekismsgatewayfw".
Then scroll down to the Target tags part of the page.
Figure 29 - Define rule name
At the Target tags part, you need to define target tag, that is "smsgateway".
Figure 30 - Define target Tag
Set source IPv4 ranges, by entering at the "Source IPv4 ranges" box: "0.0.0.0/0"
Figure 31 - Set source IP
Define protocol and ports by ticking the TCP option and writing to the "Ports"
box: "9515-9516".
Figure 32 - Define protocol and ports
When you are ready with them, click on the "Create" button to run with these rules.
Figure 33 - Create rule
At the end of the process, you can see that the firewall rule has been
created successfully.
Figure 34 - New firewall rule created
Now, you need to open the "VM instances" from the drop-down list, that can be
found under the "Compute Engine" item of the Google Cloud control panel.
Click on the "ozekismsgateway" named link to show the details.
Figure 35 - Open virtual machine details
It is possible to make changes at the Virtual Machine by choosing the "EDIT"
option from the headlines.
Figure 36 - Edit virtual machine
Under the Edit option, you have to scroll down the page and enter a network tag:
"smsgateway" to the "Network tags" box.
Figure 37 - Add network tag
When you are ready, click on the "Save" button at the bottom of the page,
highlighted in blue.
Figure 38 - Save virtual machine
Scroll down at the details page to the Network Interfaces part and copy the
external IP address to the clipboard.
Figure 39 - Copy external IP address
Log in the Ozeki SMS Gateway remotely, by pasting into your browser's search
field the copied external IP address. Then enter in front of it the "https://"
expression and after the ":9515" numeric code. Click on the "Advanced" option then
the "Continue" link to the Ozeki SMS Gateway.
After that, log into your Ozeki SMS Gateway account using your unique data.
Figure 40 - Login SMS Gateway remotely
Finally, as you log into your account remotely, you will see that the SMS Gateway
page is accessible for you.
Figure 41 - SMS Gateway GUI accessible
Conclusion
The guide demonstrates the installation and utilization of Ozeki SMS Gateway with
Google Cloud to enhance SMS communication. Google Cloud is explained as an on-demand
computing resource platform over the internet. The installation process is briefly outlined,
including creating a virtual machine, installing Ozeki SMS Gateway, and configuring
firewall rules. The guide provides step-by-step instructions for each stage of
the installation process.
Overall, it serves as a comprehensive guide to help businesses improve their SMS
communication capabilities with Ozeki SMS Gateway on Google Cloud.
Installing Ozeki SMS Gateway in Alibaba Cloud offers businesses efficient SMS
communication capabilities, allowing them to send and receive messages seamlessly.
Businesses may gain high availability by utilizing Alibaba Cloud's cloud-based
infrastructure, providing dependable SMS services. Alibaba Cloud's extensive global
presence enables businesses to connect with a diverse audience and efficiently
deliver SMS messages to multiple countries. Ozeki SMS Gateway is a convenient
choice that boosts client interaction and simplifies communication thanks to its
simple to use interface and integration capabilities.
What is Alibaba Cloud
Cloud computing makes data storage and backup easier and cheaper. It ensures
disaster recovery and business continuity as data can be mirrored across multiple
redundant locations in the cloud provider's network.
Install Ozeki SMS Gateway in Alibaba Cloud (Easy to follow)
To install Ozeki SMS Gateway in Alibaba Cloud:
Start new Alibaba Cloud instance
Set up an Instance Type
Select an Alibaba Cloud Image
Look over Instance Launch
Create an admin user
Save private key
Connect to the instance with private key
Decrypt the generated password
Connect to the instance through remote desktop
Provide username and password
Setup Ozeki SMS Gateway
Add new security group rule
Define new Windows firewall inbound rule
Check remote access connection
Change the admin password to get SMS Gateway GUI accessible
Enhancing SMS Communication with Ozeki SMS Gateway on Alibaba Cloud
Improving SMS Communication with Ozeki SMS Gateway on Alibaba Cloud provides an
effective solution for managing SMS communication. The process involves installing
Ozeki SMS Gateway on Alibaba Cloud and configuring connections to various service
providers using API credentials provided by Alibaba. Users can connect to different
service providers and utilize user-friendly SMS client software to streamline text
message management. By interfacing with Alibaba Cloud's business SMS APIs, businesses
can access specific features to cater to their needs. Once properly set up and
configured, the Ozeki SMS Gateway enables easy sending and receiving of SMS
messages on Alibaba Cloud, making it ideal for promotional content, notifications,
and critical alerts.
For the first of all steps, load the Alibaba.com
on your PC's browser and log into your account. If you do not have any Elastic
Compute Service, then you have the possibility to create one by following the
instructions.
Click on the "Create ECS Instance" button to start the process.
Figure 2 - Create ECS Instance
Now, it is needed to submit some data that is required. You need to choose a billing
method from the given ones. You can choose a subscription fee which means you pay
the same amount of money during the period of enrolment. There is a pay-as-you-go
option within you pay only when you use the service. Preemptible instances are
a sort of demand occurrences that are advertised at low cost compared to
pay-as-you-go instances, you can pay hourly with this option, so it may save you
a lot of money.
Set up your region, in order to avoid network delays.
Figure 3 - Set billing method and region
You need to choose instance type, choose from "General Purpose Type g6" family
the "ecs.g6.large" Instance type. This instance type typically offers a balance
of compute, memory, and networking capabilities.
Figure 4 - Select instance type
Now, set OS image and storage, by scrolling down on the page. In the Image section,
you need to select the "Windows Server" as Public Image, "2022. Datacentre 64-bit
(English)" as the Custom Image from the drop-down list.
At the Storage section you need to choose "Enhanced SSD (ESSD)" "40 GB" and
"PL0,(up to 10000 IOPS per disk)" options. Then click on the "Next" button.
Figure 5 - Set OS image and storage
Just double-click the Security Group to have access to more networking information.
Before continuing, carefully check the accuracy of each detail displayed on the page.
When you have checked the data, click on the "Next" button to proceed.
Figure 6 - Networking page
It is required to enter a unique password to your username. The password must be
at least 8 characters long and three types of characters. Confirm the password,
then click on the "Next" button.
Figure 7 - Set Admin password
At the Grouping page you need to type nothing, so click on the "Next" button.
Figure 8 - Grouping page
At the Preview page you can see the main details about the ECS that is created.
If you accept the conditions, click on the "Create Instance" button, at the
bottom right corner.
After that, choose "Sign and Purchase" if you do not want any changes. Your
Instance is created, so select the "Console" option from the given ones.
Figure 9 - Create instance
By clicking on the "Console" option, the Instance start to run if the setup
was successful. If it is not do it automatically, then you can start with the
refresh icon at the right side of the page. If it works well, the status of the
Instance turns into green. At the beginning of the array, you can see the ID of the
Instance.
Figure 10 - Instance running
Click on the Instance ID, so the basic information will appear. There, find the
"Connect" button, highlighted in blue.
Figure 11 - Connect to the instance
Click on the "Download as RDP file" link then check your PC's downloads map.
Figure 12 - Download RDP file
Open the file and click on the "Connect" button.
Figure 13 - Connect via remote desktop
Enter your login information into the certain box then click on "OK".
Allow all the stipulations and set up the connection. you need to wait to load the
ECS on at your PC.
Figure 14 - Login as admin user
The following part of the process, load the ozeki-sms-gateway.com page at your
browser and download the Ozeki SMS Gateway. Choose the download option from the
enumeration of headlines. Then click on the "OzekiSMSGateway" link for Windows.
Figure 15 - Download SMS Gateway
To start the Ozeki SMS Gateway installation, open your downloads folder. At the
folder extract the compressed .zip file then run the Ozeki SMS Gateway application.
Figure 16 - Start installer
For finishing the installation, allow the terms about changes by clicking on the
"Yes" button. The Welcome page of the Ozeki SMS Gateway will show up. There, you
need to click on the "Next" button.
Figure 17 - Installer welcome page
Accept the terms and policies by clicking on the "I Agree" button at the bottom
of the window.
Figure 18 - Accept license
Finish the process of installation by clicking on the "Finish" button. When the
installation is ready, the Ozeki SMS Gateway starts to run.
(https://localhost:9515)
Figure 19 - Run SMS Gateway
To get started, choose the SMS Gateway icon from the desktop.
Figure 20 - SMS Gateway started
The Ozeki SMS Gateway home screen will appear. There you must change your
password. At the Ozeki Start Menu choose the "Change Password" option from the
"Help" menu item.
Figure 21 - Change the default password
It is needed to create a password to your user profile. Enter a unique password
that is hard to figure out. In order to make sure that it is correct, you need
to confirm the new password. If you are ready with entering it, click on the
"Save" button.
Now, you need to log in to your Ozeki SMS Gateway account, by using the name and
password that has been set previously.
Figure 22 - Create new admin password
In the following part of the process, you need to load your Alibaba ECS profile.
There you must to find the Security Groups option from the control panel at the
left side of the page.
In this menu, click on the Instance ID, in order to load all the basic information.
Figure 23 - Edit security group
There, you must add new rule for SMS Gateway. Scroll down and click on the
"Add Rule" button, highlighted in blue. Customize the SMS Gateway following these
parameters: Protocol Type: "Custom TCP", Port range: "9515/9516", Authorization
object: "0.0.0.0/0". Then click on "Save" button at the right.
Figure 24 - Add new rule for SMS Gateway
Find the Instances from the control panel at left side, then click on the Instance
ID at the page that has been showed up.
Copy the Public IP Address then paste into the browser's search field.
Enter in front of it the "https://" expression and after the ":9515" numeric code.
Click on the "Advanced" option then the "Continue" link to the Ozeki SMS Gateway.
After that, log into your Ozeki SMS Gateway account using your admin login
information.
Figure 25 - Login to SMS Gateway remotely
Finally, when you log into your account you will see that you can access the Ozeki
SMS Gateway page.
Figure 26 - SMS Gateway GUI accessible
Final thoughts
The attached step-by-step guide provides comprehensive instructions to install Ozeki
SMS Gateway on Alibaba Cloud, and different configurations of connections to various
service providers using API credentials. Ozeki SMS Gateway on Alibaba Cloud enable
businesses to connect with a diverse audience and efficiently deliver SMS messages
to multiple countries. The integration with different service providers through
APIs enables businesses to cater to their specific needs, making them ideal for
promotional content, notifications, and critical alerts. These instructions provide
valuable assistance to businesses seeking to enhance their SMS communication in
Ozeki SMS Gateway via Alibaba Cloud.
This article is a detailed guide on how to install Ozeki SMS Gateway on Ubuntu Linux.
In this tutorial we are going to be going over every step required to complete the installation successfully.
This process requires the Ubuntu operating system to be installed on your device.
Mainly, we are going to install dependencies in the Ubuntu terminal, then download the install for Ozeki SMS Gateway and install it.
We hope this article is helpful and informative to you.
Now let's get started!
What is Ubuntu?
Ubuntu is a free desktop operating system.
It's based on Linux, a massive project that enables user around the world to run machines powered by
free and open software on all kinds of devices.
Ubuntu is considered a good distribution for beginners.
The operating system was intended primarily for personal computers (PCs) but it can also be used on servers.
Prerequisite
Before you can install the Ozeki SMS gateway, you need to install .Net Runtime 8.0 on your Ubuntu Linux system.
What is .Net?
.Net is a free, open-source, and cross-platform framework developed by Microsoft
that supports the development and execution of applications across various platforms,
including Windows, Linux, and macOS. It provides a powerful runtime environment,
libraries, and tools for building web, desktop, cloud, and mobile applications.
How to setup .Net on Ubuntu Linux (Quick Steps)
Update Repositories
Install .Net 8.0 Dependencies
Install .Net 8.0 Runtime
Check Installed Runtimes
How to setup .Net on Ubuntu Linux (Video tutorial)
In this video tutorial, you will learn how to install .Net 8.0 on Ubuntu Linux
by following a simple, step-by-step process. The tutorial will cover updating
your system’s repositories, installing the necessary dependencies, and setting
up the .Net runtime environment. By the end of the video, you will be able to
successfully run .Net applications on your Ubuntu Linux system.
Step 1 - Update repositories
Before installing .Net, it’s essential to make sure your system’s package list
is up-to-date. To do this, open your terminal and run the following command:
sudo apt-get update
This command fetches the latest package lists from the repositories,
ensuring that your system will install the most recent versions of all
dependencies (Figure 1).
Figure 1 - Update repositories
Step 2 - Install .Net 8.0 dependencies
To install .Net 8.0, certain dependencies are required to ensure compatibility
and proper functioning. Run the following command to install them:
This command installs all necessary libraries and packages, which provide
essential components required by .Net to function correctly (Figure 2).
Figure 2 - Install .Net 8.0 dependencies
Step 3 - Install .Net 8.0 runtime
After installing the dependencies, you can proceed to install the .Net 8.0 runtime by running the following command:
sudo apt-get install -y dotnet-runtime-8.0
This command downloads and installs the .Net runtime on your system, allowing
you to run .Net applications smoothly. The -y flag ensures automatic approval of
installation prompts (Figure 3).
Figure 3 - Install .Net 8.0 runtime
Step 4 - Check installed runtimes
To verify that the installation was successful and to see all installed .Net
runtimes on your system, use the following command:
sudo dotnet --list-runtimes
This command will display a list of all installed .Net runtimes, including their
version numbers. If the installation was successful, you should see
dotnet-runtime-8.0 listed (Figure 4).
Figure 4 - Check installed runtimes
What is Ozeki SMS Gateway?
Ozeki SMS Gateway is a powerful SMS Gateway software you can download and
install on your Windows or Linux computer or to your Android mobile phone.
It provides an HTTP SMS API, that allows you to connect to it from local or remote programs.
The reason why companies use Ozeki SMS Gateway as their first point of access to the mobile network,
is because it provides service provider independence. When you use Ozeki, the SMS contact lists and sms data is safe,
because Ozeki is installed in their own computer (physical or virtual),
and Ozeki provides direct access to the mobile network through wireless connections.
How to install Ozeki SMS Gateway on Ubuntu Linux (video tutorial)
In this video tutorial you will learn how to install Ozeki SMS Gateway on Ubuntu Linux.
Before installing the software itself, you need to install the dependencies.
This is all done in the terminal. Then, you can download the Ozeki SMS Gateway installer.
Now run the installer and wait for it to complete.
When the installation is complete, you may now open Ozeki SMS Gateway.
Installing dependencies is also required before installing Ozeki SMS Gateway.
This is also done in the terminal (Figure 5).
Open the terminal and enter the following command:
"sudo apt install libturbojpeg libportaudio2 xvfb libspeexdsp1 libspeex1 fonts-symbola libnss3-tools".
This command will install all dependencies on your Ubuntu device.
Figure 5 - Install dependencies
Download SMS Gateway installer
After installing the dependencies in the terminal, you may now download the Ozeki SMS Gateway installer (Figure 6).
Open your browser and visit this link: Download Ozeki SMS Gateway.
Click on Download in the menu on top.
Click the Linux download link to start downloading the installer.
When the download is complete, the installer will be located in the default download directory specified in your browser's settings.
Figure 6 - Download SMS Gateway installer
Install SMS Gateway
After you have successfully downloaded the installer, you may install the software via terminal (Figure 7).
Type in the following command: "sudo dpkg -i installlinux_1639460807_ozekismsgateway_10.3.144_all.deb",
then press enter.
This will begin installing Ozeki SMS Gateway to your Ubuntu device.
After the installation process is complete, you get the message:
"INFO installation completed." in the terminal (Figure 8).
Figure 8 - Installation completed
Open SMS Gateway GUI
After successfully installing Ozeki SMS Gateway, it is now accessible in your browser (Figure 9).
Figure 9 - Open SMS Gateway GUI
Note:
If you are using a modem, in order for the SMS Gateway to reach the modem, the ModemManager service must be disabled. You can do this with the command below.
After a successful installation,
everything is properly set up for you to successfully use Ozeki SMS Gateway on Ubuntu Linux.
We hope you found this article helpful in completing this process.
This software can be installed on different kinds of devices too.
Check out our other guides for more information on Ozeki SMS Gateway.
This article acts as a tutorial on how to access the Ozeki SMS Gateway GUI remotely.
Requirements are very basic; all you need is an internet connection and Ubuntu OS installed on your device.
In this tutorial we create an Ip table rule, configure remote access privileges in PuTTy, and then log in
remotely to Ozeki SMS Gateway. You will also learn how to change the admin password.
We hope this guide will be helpful to you.
Now let's get started.
What is Ubuntu?
Ubuntu is a free desktop operating system.
It's based on Linux, a massive project that enables user around the world to
run machines powered by free and open software on all kinds of devices.
Ubuntu is considered a good distribution for beginners.
The operating system was intended primarily for personal computers (PCs) but it can also be used on servers.
What is Ozeki SMS Gateway?
Ozeki SMS Gateway is a powerful SMS Gateway software you can
download and install on your Windows or Linux computer or to your Android mobile phone.
It provides an HTTP SMS API, that allows you to connect to it from local or remote programs.
The reason why companies use Ozeki SMS Gateway as their first point of access to the mobile network,
is because it provides service provider independence. When you use Ozeki, the SMS contact lists and sms data is safe,
because Ozeki is installed in their own computer (physical or virtual),
and Ozeki provides direct access to the mobile network through wireless connections.
How to access the Ozeki SMS Gateway GUI remotely (video tutorial)
This video tutorial demonstrates how to access the Ozeki SMS Gateway GUI remotely.
First you need to open the Ubuntu terminal and create an Ip table rule.
Then, configure remote access settings in PuTTy and log in.
Finally, you're able to remotely access Ozeki SMS Gateway.
Create IP table rule
To create an IP table rule, you first need to open the Ubuntu terminal (Figure 1).
Type the following commands and hit enter.
Now type in your password and hit enter.
This will create the IP table rule.
Now you can move on to configuring remote access for Ozeki SMS Gateway.
Figure 1 - Create IP table rule
Remote access not allowed
If you try to access Ozeki SMS Gateway remotely without any preparation, it will not let you.
A Remote access does not allow the message to appear, indicating that your device is not yet eligible to access Ozeki SMS Gateway yet (Figure 2).
Figure 2 - Remote access not allowed
Add new SSH tunnel forwarded ports
In order to access Ozeki SMS Gateway remotely, you need to add new SSH tunnel forwarded ports.
This process is done in PuTTy.
Start by opening PuTTy (Figure 3).
Open SSH inside the menu on the left by clicking on the + SSH.
From SSH click on Tunnels.
Enter your Port next to Source port, then enter your Ip address next to destination.
Click on Add to add these settings.
Figure 3 - Add new SSH tunnel forwarded ports
Open SSH connection
After adding the address, you need to open the SSH connection.
Click on Session in the menu on the right (Figure 4).
Enter your Ip address into the menu on top.
(In our case this is 192.168.0.166)
Click on Open to connect.
Figure 4 - Open SSH connection
Login to remote PC
After you clicked Open in PuTTy, a new terminal window will pop up (Figure 5).
First you need to type in your username and hit enter.
Then you need to enter your password.
After you provided your login details you will be logged in to the remote pc.
Figure 5 - Login to remote PC
Open SMS Gateway in browser
When all configurations are set up, you may now open Ozeki SMS Gateway in your browser (Figure 6).
Figure 6 - Open SMS Gateway in browser
Open change password menu
In order to change your password, you first need to go to the Ozeki Desktop (Figure 7).
Click on Start, then Help, and Change password.
Figure 7 - Open change password menu
Change admin password
On this screen you are able to change the admin password (Figure 8).
Type the new password into both textboxes.
Click Save to save the new admin password.
Figure 8 - Change admin password
Login remotely
You can now log in remotely to Ozeki SMS Gateway from your browser (Figure 9).
Figure 9 - Login remotely
Summary
If you have followed along all the steps in this tutorial, you will have already completed the task by this point.
Everything is now set up for you to be able to log into Ozeki SMS Gateway remotely.
Thank you for your attention, and make sure to check out our other guides for more information on Ozeki SMS Gateway.
Our software has various other incredibly useful solutions and multi-platform versions for the easiest possible accessibility.
FAQs
What kind of communication ports and protocols are used? Should I open any ports
on my firewall?
Ozeki SMS Gateway utilizes TCP ports 9500-9503 for communication.
TCP Port 9500 (protocol SMPP), provides SMPP client connectivity
TCP Port 9501 (protocol HTTP), is used for Administration (HTTP interface for
web browsers)
TCP Port 9502 (protocol TCP/HTTP), is used by .NET Remoting client
connectivity
TCP Port 9503 (protocol HTTP), is used by ParlayX webservice client
connectivity
Does the SMS gateway require a fixed IP address or is there any way dynamic
address can be used and how?
The need for a fixed IP address for your Ozeki SMS Gateway depends on the
chosen method for integrating SMS functionality into your website. Here's a
breakdown of the three popular methods and their IP address requirements:
1. SQL to SMS Gateway Configuration:
Ideal for: Websites with databases.
Functionality: Ozeki connects to your website's database to enable sending
and/or receiving SMS messages directly.
IP Address Requirement: No fixed IP address required.
2. HTTPClient User:
Functionality: Incoming SMS messages are forwarded to your website via a
predefined URL. Ozeki can periodically download a webpage to check for
outgoing messages.
IP Address Requirement: No fixed IP address required.
3. HTTP Server with SMS API:
Functionality: Websites can send SMS messages through HTTP requests using
Ozeki's built-in HTTP SMS API.
IP Address Requirement: Fixed IP address required if using the API over the
internet.
In summary, if your website integration method doesn't involve sending SMS
messages through Ozeki's HTTP SMS API over the internet, you won't need a fixed
IP address for the SMS Gateway.
Ozeki SMS Gateway uses the http://127.0.0.1:9501 address. Can I change this to
my IP address?
Yes, you can change the 127.0.0.1 to point to your LAN or public IP address.
The IP address 127.0.0.1:9501 you encountered refers to your computer's local
loopback address. This address always points back to the machine you're currently
using. Every computer has two relevant IP addresses:
Local Loopback Address (127.0.0.1): This internal address allows software to
communicate with itself on the same machine.
Public IP Address: This unique address identifies your computer on the broader
internet.
The good news is that you can access your Ozeki SMS Gateway service using
both these IP addresses, assuming it's installed on your local computer. Here's
how:
Using the Local Loopback Address: This method works because you're directly
accessing the software on the same machine. You can use http://127.0.0.1:9501
in your web browser to reach the Ozeki interface.
Using the Public IP Address (if applicable): If your computer has a public
IP address (often the case for directly connected home internet users), you
can access Ozeki remotely from another device on the same network. Simply
replace 127.0.0.1 with your computer's public IP address (e.g.,
http://192.168.1.100:9501) in the browser address bar.
Important Note: Exposing Ozeki to the public internet through your computer's
public IP address might require additional security measures like firewalls and
proper configuration. It's generally recommended to access Ozeki locally using
127.0.0.1 unless you have a specific need for remote access.
Is it possible to reach Ozeki SMS Gateway from the Internet?
By enabling port forwarding on your router, you can access Ozeki SMS
Gateway on your computer even if you're outside your local network. Port
forwarding directs external traffic on a specific port (in this case, 9501) to
the computer running Ozeki NG SMS Gateway within your network.
Can I configure Ozeki SMS gateway Without Internet? How is it working?
On your local network, any computer can access Ozeki SMS Gateway. Just open
a web browser and enter the IP address of the Ozeki SMS Gateway followed by
the port number 9501 (like this: IP_ADDRESS:9501). After installation, you can
manage users and service provider connections easily. (Remember to replace
IP_ADDRESS with the actual IP address of your Ozeki SMS Gateway).
How to access the Ozeki SMS Gateway GUI remotely with SSH port forwarding
This article is a detailed guide on how to access the Ozeki SMS Gateway GUI remotely with SSH port forwarding.
Requirements are very basic; all you need is an internet connection and Ubuntu OS installed on your device.
In this tutorial we create an Ip table rule, configure remote access privileges in Windows PowerShell,
and then log in remotely to Ozeki SMS Gateway. You will also learn how to change the admin password.
We hope this guide will be helpful to you. Now let's get started.
What is SSH port forwarding?
SSH tunnelling, or SSH port forwarding,
is a method of transporting arbitrary data over an encrypted SSH connection.
SSH tunnels allow connections made to a local port (that is, to a port on your own desktop)
to be forwarded to a remote machine via a secure channel.
What is Ubuntu?
Ubuntu is a free desktop operating system.
It's based on Linux, a massive project that enables user around the world to run machines powered by
free and open software on all kinds of devices. Ubuntu is considered a good distribution for beginners.
The operating system was intended primarily for personal computers (PCs) but it can also be used on servers.
What is Ozeki SMS Gateway?
Ozeki SMS Gateway is a powerful SMS Gateway software you can download and install
on your Windows or Linux computer or to your Android mobile phone.
It provides an HTTP SMS API, that allows you to connect to it from local or remote programs.
The reason why companies use Ozeki SMS Gateway as their first point of access to the mobile network,
is because it provides service provider independence. When you use Ozeki, the SMS contact lists and sms data is safe,
because Ozeki is installed in their own computer (physical or virtual),
and Ozeki provides direct access to the mobile network through wireless connections.
How to access the Ozeki SMS Gateway GUI remotely with SSH port forwarding (video tutorial)
In this video tutorial you will learn how to access the Ozeki SMS Gateway GUI remotely.
First you need to open the Ubuntu terminal and create an Ip table rule.
Then, configure remote access settings in Windows PowerShell and log in.
Finally, you're able to remotely access Ozeki SMS Gateway
In order to create an IP table rule, you first need to open the Ubuntu terminal (Figure 1).
Type the following commands and hit enter. Now type in your password and hit enter.
This will create the IP table rule. Now you can move on to configuring remote access for Ozeki SMS Gateway.
Figure 1 - Create IP table rule
Remote access not allowed
If you try to access Ozeki SMS Gateway remotely without any preparation, it will not let you.
A Remote access does not allow the message to appear, indicating that your device is not yet eligible to access Ozeki SMS Gateway yet (Figure 2).
Figure 2 - Remote access not allowed
Open SSH tunnel
The next step in enabling remote access, is opening an SSH tunnel.
Open Windows PowerShell and enter the following command:
"ssh -L 127.0.0.1:9300:remote_ip:9515 user@remote_ip".
This will open an SSH tunnel.
Now you may move on to logging into Ozeki SMS Gateway.
When all configurations are set up, you may now open Ozeki SMS Gateway in your browser (Figure 6).
Figure 4 - Open SMS Gateway in browser
Open change password menu
In order to change your password, you first need to go to the Ozeki Desktop (Figure 7). Click on Start, then Help, and Change password.
Figure 5 - Open change password menu
Change admin password
On this screen you are able to change the admin password (Figure 8). Type the new password into both textboxes. Click Save to save the new admin password.
Figure 6 - Change admin password
Login remotely
You can now log in remotely to Ozeki SMS Gateway from your browser (Figure 9).
Figure 7 - Login remotely
Summary
If you have followed along all the steps in this tutorial, you will have already completed the task by this point.
Everything is now set up for you to be able to log into Ozeki SMS Gateway remotely.
Thank you for your attention, and make sure to check out our other guides for more information on Ozeki SMS Gateway.
Our software has various other incredibly useful solutions and multi-platform versions for the easiest possible accessibility.
The next guide is about to demonstrate how you can set up Ozeki Installer
on your Linux operating system. This product is a great app store that allows
you to get any Ozeki product that you want by just one click. The installation process
will take about 10 minutes. The guide contains four steps with clean instructions.
The setup procedure does not require any further Linux knowledge. This document
contains each command that you have to use during the installation. You just need to copy-paste
them. Let's get started!
How to install Ozeki on Linux (Quick commands)
To install Ozeki on Linux:
Open a terminal on your Linux host
Add Mono repository to your system
Install Mono
Download the Ozeki Installer .deb file
Move to the folder where .deb file is
Install Ozeki Installer
Browse to https://localhost:9545
Choose SMS Gateway application to Install
Run the install-password.sh script
Enable the ports on your Linux firewall
Step 1 - Open a terminal
To perform the following installation steps, you need to open a terminal on your
Linux host. To open a terminal window, you can use the Ctrl + Alt + T
shortcut key (demonstrated in Figure 1).
Figure 1 - Open a terminal
Step 2 - Install all prerequisites
Add the Mono repository to your system
To install Ozeki Installer first, you need to get some dependencies to perform
the installation. The first one is the Mono, which is an open-source implementation of Microsoft's
.NET Framework. This product is crucial for running Ozeki Installer. To get the
latest version of Mono, you have to add the repository to your system as you
can see it on Figure 2 below. These commands can be found on the
official Mono website:
https://www.mono-project.com/download/stable/#download-lin-ubuntu
Figure 2 - Adding the Mono repository to your system
Install mono
The next step is to install Mono on your computer. This operation can be
done by a single command as Figure 3 demonstrates it.
sudo apt install mono-complete
Figure 3 - Installing of Mono
Install other required dependencies
The last step of the preparation is to install the other dependencies that
needed for running Ozeki Installer properly. Figure 4 shows the
command that you have to type to install these prerequisites.
The very first step of getting Ozeki installer on your Linux operating system is
to download is from www.ozeki.hu. The latest Ozeki products can be downloaded
from the following Downloads page:
https://send-bulk-sms.com/p_213-download-bulk-messenger.html page.
Now, on this page, as Figure 5 shows, click on the .deb file of the Ozeki
Installer to start downloading it.
The browser usually asks for how to download the file. It can be opened by a selected
software or just downloaded to the designated download folder. In the case of Ozeki Installer
just check Save file and click on OK just as Figure 6 demonstrates it.
Figure 6 - Save Ozeki Installer .deb file
Step 3 - Install Ozeki Installer
The next step is the main part of this guide by showing the procedure of installing
Ozeki Installer to Linux operating system. To do that, first open Terminal.
The first thing that you have to perform in Terminal, is to move to the folder where
the .deb file was downloaded. In that case, it is the Downloads folder, so as you
can see it on Figure 7, with the cd command followed by the name of the directory
navigate the control to that folder.
cd Downloads
Figure 7 - Move to Downloads folder
On Linux operating system, .deb files can be installed by using the dpkg
command. To perform an installation, add -i option after the command and type
the name of the downloaded .deb file. This process requires administrator permission,
so you have to type sudo at the beginning of the command (Figure 8).
When you hit Enter, the installation process begins. If you have done everything right,
Ozeki Installer is going to be installed on your computer just after a few seconds.
To make sure about the success of the installation, just search for the Installation finished!
line in the logs of Terminal as on Figure 9.
Figure 9 - Successful installation
After the successful installation, now you should be able to use Ozeki Installer.
For that, just open up your web browser and type localhost:9545 since
Ozeki Installer runs on the port 9545 on your computer. To open Ozeki Installer just hit Enter.
(Figure 10)
Figure 10 - Open Ozeki Installer
Step 4 - Install SMS Gateway using Ozeki Installer
The main menu of Ozeki Installer is an app store, where you can choose from
many Ozeki products. By following this guide, you are going to install the
SMS Gateway application. To open its details page, just click on the tile of
the app. (Figure 11)
Figure 11 - Select SMS Gateway
The details page of each product contains all important information about the
selected application such as version number, descriptions and screenshots. To start the installation of the
product just click on the Install as you can see it on Figure 12.
Figure 12 - Install SMS Gateway
After clicking on the Install button, a progress bar shows the status of the installation
process. When it finished successfully, the blue button switches to a green Open
button. By clicking that, you can open the installed SMS Gateway.
(Figure 13)
Figure 13 - Open SMS Gateway
The installed applications can be reached at port 9515. So, the installed
SMS Gateway opens up on that port as well. This desktop shows the products
that were installed previously on your computer. To open SMS Gateway, click
on its icon (Figure 14)
Figure 14 - Desktop of SMS Gateway
And finally, now you will be able to see the main menu of the installed SMS Gateway,
which is ready to use. (Figure 15)
Figure 15 - Main menu of SMS Gateway
Step 5 - Set a root password for remote access
For security reasons, it is not possible to log in remotely in Ozeki 10 by default.
For remote access to work, a secure password must be set for admin users.
You can do this by running a script called install-password.sh and it is located
in the Ozeki folder. To do this, go to the Ozeki folder with the following
command that you can see on Figure 16:
cd /usr/lib/Ozeki
Figure 16 - Change to Ozeki directory
Then run the install-password.sh script with the following command. The script
will ask for the new password and then set it for the admin user. (Figure 17)
sudo ./install-password.sh
Figure 17 - Run install-password.sh
Finally, you need to enable the appropriate ports on your linux firewall in order
to access Ozeki 10 from the outside. To do this, you need to run the following commands.
9543 is the http port and 9544 is the websocket port, 9545 is the https port and 9546 is the secure websocket port.
(Figure 18)
The Linux SMS Gateway software enables you to route SMS text messages
automatically. It is a two-way SMS Gateway so you can send and receive SMS text
messages. You can connect to the mobile network with a mobile phone
(or GSM modem) attached to your PC, or an IP SMS link over the Internet
directly to the Mobile Network Operator.
If you use this Linux operating system, the operation with the Ozeki 10 SMS Gateway
is possible together with Mono Framework after installing both programs in your system.
Figure 1 - Linux SMS Gateway
Linux SMS Gateway software
The Linux SMS Gateway makes it possible to send and receive SMS text messages, whilst connected directly to the
SMSC via Internet or with a GSM mobile phone attached to the PC/Laptop. With the text message software, you can
build a bulk SMS messaging system on Linux. The Linux SMS gateway software works on Ubuntu and Debian. Ozeki SMS Gateway
for Linux is the best software for those who want to provide SMS services for their company and/or their customers and
business partners! Linux SMS Gateway software
Connect your SMS gateway to the mobile network
To connect your SMS gateway to the mobile network you have various options. You can connect wirelessly the
same way as mobile phones connect. You can connect to the SMSC of a mobile network operator over the Internet
using the SMPP, UCP or CIMD2 protocol or you can use an on-line http sms service. Connect your Linux SMS gateway to the mobile network
Linux SMS Developers Guide
The Ozeki SMS Gateway allows for sms developers to use sms api software for short message sending and receiving.
You can use it to integrate and quickly deploy SMS messaging solutions. It can operate in your server computer, or
you can install it on your customers' or suppliers' system. SMS APIs for Linux Developers
Setup an SQL to SMS gateway on Linux
The following guide provides you information about how you can send and receive messages from an SQL
database server with the help of Ozeki 10 SMS Gateway as a Linux SMS Gateway.
This document divided into 3 main segments:
First the supported database servers are listed. Setup an SQL to Linux SMS gateway
The Linux SMS Gateway makes it possible to send and receive SMS text messages,
whilst connected directly to the SMSC via Internet or with a GSM mobile phone
attached to the PC/Laptop. With the text message software, you can build a bulk
SMS messaging system on Linux. The Linux SMS gateway software works on
Ubuntu and Debian. Ozeki SMS Gateway for Linux is the best software for those
who want to provide SMS services for their company and/or their customers
and business partners!
Accelerate innovation, optimise operations, and delight users with high-quality SMS services.
Your company can host Linux SMS Gateway software in-house, in an on-premise environment or
you can choose a third-party provider in a cloud environment to host it all for you.
Figure 1 - Linux SMS Gateway software
Corporate SMS services for your own company
The Linux SMS Gateway works as a Linux SMS server. You can create a self-hosted
corporate SMS Gateway, which we built from scratch and have been developing
over the past 20 years. Your ability to host the SMS service gives you 100%
control over your data’s security, within your corporate environment (all of
your messages and contacts are kept in-house).
Figure 2 - Corporate Linux SMS Gateway
SMS Developer
Join the happy developers who have discovered how easy it is to integrate
the Ozeki SMS API with their website, app, software, e-commerce, and CRM
application. Free SMS API examples help developers to create their
sms solutions effectively.
You can connect your applications with Ozeki SMS APIs. We support lots of
programming languages (including PHP, .NET, C#, Java, Python, Ruby, VB.NET).
All you have to do is just to copy the free example, make some necessary
modifications, and you can start sending and receiving SMS messages.
The Linux SMS Gateway can serve highly scalable applications. SMS message can
be delivered through HTTP/HTTPS and SMPP protocols. On the other hand,
if your Mobile Network Operators (MNOs) or independent SMS Service
Providers use UCP or CIMD2, you can connect to them over the Internet.
SMS System Administrator
Intelligent text message routing and SMS load balancing increases performance,
prevents application downtime, and helps in detecting failures in the early stages.
Based on strong message routing algorithms, the Ozeki SMS Gateway provides
flexibility to define various routing rules and criteria, like sender ID,
source, destination and many other combinations. You can track your SMS
delivery status real time in the log.
Office users
Enhance your customers' experience of connectedness with instant mobile messaging
solutions. It is designed to help you to achieve your communication goals,
engage with customers, deliver powerful messages to drive revenue, capture
data, and increase brand loyalty. Whether you have a single SMS to send,
or a mobile communications roadmap to deliver on with the Ozeki SMS Clients
you will be able to achieve it. You can send and receive SMS messages in
the office with Ozeki SMS Messenger or Excel SMS Client or your corporate
sms website. We provide a great SMS Tool for office users.
Provide SMS Services for your technology partners
By sending bulk SMS, you can reach any sized group of contacts within seconds,
easily communicating with customers, clients and staff.
The Ozeki SMS API permits programmatic access to SMS messaging features
which are available on the Ozeki SMS messaging platform. It allows you to
create simply and quickly text enable applications from within your existing
and familiar development environments. Please, review our code samples!
Connecting mobile networks
There are several options for connecting the SMS gateway software to the mobile
network. If your enterprise wants to build a high-capacity business SMS system,
the most ideal connection method is to connect directly to the mobile operator's
SMSC. The SMSC can be connected via the Internet, which uses one of the
SMPP,
UPC or CIMD2 protocols,
or by using an HTTP/HTTPS online connection.
Figure 3 - Linux SMS Gateway for Service Providers
Build Cloud-based SMS Service for your business partners
Explore endless possibilities using the Linux SMS Gateway designed for complex
and dynamic environments. The SMS SaaS makes it possible to send bulk SMS
messages to your customers or receive text messages from them. As the
cloud-based SMS Service is a SaaS, it works through the cloud delivery model. The
SMS SaaS applications are typically accessed via web browsers or other
desktop solutions.
Figure 4 - Cloud Linux SMS Gateway
The SMS gateway supports the SMPP (Short Message Peer to Peer) protocol
(version 3.3 or 3.4 or later), as a way to connect to an SMSC over the Internet
or other private TCP/IP network. Due to SMPP being designed and optimised
especially for SMS delivery, the majority of mobile operators provide
SMPP service connections for bulk sms messaging and enable direct connection
to the SMSC. Ozeki SMS Gateway also supports SMS sending and receiving
via HTTP/HTTPS or UCP, CIMD2 protocols.
Customer connection to the Linux SMS gateway
The following SMS client connectivity tools can help their customers
to use the cloud-based SMS Saas:
Web based applications with SMS text messaging functionality
Excel SMS client
Ozeki SMS Messenger
Command line tool
Modern intranet via web browsers that includes SMS sending and receiving
functionality
Intranet collaboration tools
Mobile apps
and other advanced technological platforms that can connect with SMS API
to the Ozeki Linux SMS Gateway
Installing Ozeki SMS Gateway on a Debian system is a straightforward process that
enables you to set up a powerful and reliable SMS messaging platform.
Whether you're managing a business communication system or developing an SMS-based application,
this guide will walk you through each step of the installation, ensuring a
smooth and efficient setup on your Debian server.
How to install Ozeki SMS Gateway on Debian Linux (video tutorial)
In this video tutorial you will learn how to install Ozeki SMS Gateway on Debian Linux.
Before installing the software itself, you need to install .Net runtime and dependencies.
This is all done in the terminal. Then, you can download the Ozeki SMS Gateway installer.
Now run the installer and wait for it to complete.
When the installation is complete, you may now open Ozeki SMS Gateway.
What is Ubuntu?
Debian is a free and open-source Linux-based operating system known for its stability,
security, and large software repository. It uses the APT package manager and supports
many hardware platforms. Maintained by a global community, Debian is the foundation
for many other distributions, including Ubuntu, and is widely used on servers,
desktops, and embedded systems.
Prerequisite
Before you can install the Ozeki SMS gateway, you need to install .Net Runtime 8.0 on your Ubuntu Linux system.
What is .Net?
.Net is a free, open-source, and cross-platform framework developed by Microsoft
that supports the development and execution of applications across various platforms,
including Windows, Linux, and macOS. It provides a powerful runtime environment,
libraries, and tools for building web, desktop, cloud, and mobile applications.
What is Ozeki SMS Gateway?
Ozeki SMS Gateway is a powerful SMS Gateway software you can download and
install on your Windows or Linux computer or to your Android mobile phone.
It provides an HTTP SMS API, that allows you to connect to it from local or remote programs.
The reason why companies use Ozeki SMS Gateway as their first point of access to the mobile network,
is because it provides service provider independence. When you use Ozeki, the SMS contact lists and sms data is safe,
because Ozeki is installed in their own computer (physical or virtual),
and Ozeki provides direct access to the mobile network through wireless connections.
Add the Microsoft package signing key
Installing with APT can be done with a few commands. Before you install .NET,
run the following commands to add the Microsoft package signing key to your list
of trusted keys and add the package repository.
Open a terminal and run the following commands:
"wget https://packages.microsoft.com/config/debian/12/packages-microsoft-prod.deb -O packages-microsoft-prod.deb"
"sudo dpkg -i packages-microsoft-prod.deb"
The .NET Runtime allows you to run apps that were made with .NET that didn't provide the runtime.
The following commands install the .NET Runtime, which is the most compatible runtime for .NET. In your terminal, run the following commands:
"sudo apt-get update"
"sudo apt-get install -y dotnet-runtime-8.0"
sudo apt-get update
Figure 3 - Update Debian packages
sudo apt-get install -y dotnet-runtime-8.0
Figure 4 - Install .Net runtime 8.0
Install dependencies
Installing dependencies is also required before installing Ozeki SMS Gateway.
This is also done in the terminal (Figure 4). Open the terminal and enter the following command:
"sudo apt install libturbojpeg0 libportaudio2 xvfb libspeexdsp1 libspeex1 fonts-symbola libnss3-tools".
This command will install all dependencies on your Debian device.
After installing the dependencies in the terminal, you may now download the Ozeki SMS Gateway installer (Figure 5).
Open your browser and visit this link: Download Ozeki SMS Gateway.
Click on Download in the menu on top. Click the Linux download link to start downloading
the installer. When the download is complete, the installer will be located in the
default download directory specified in your browser's settings.
Figure 5 - Download Ozeki SMS Gateway
Install SMS Gateway
After you have successfully downloaded the installer, you may install the software via terminal (Figure 6).
Type in the following command: "sudo dpkg -i installlinux_1747215368_ozekismsgateway_10.4.71_all.deb",
then press enter. This will begin installing Ozeki SMS Gateway to your Debian device.
cd Downloads/

sudo dpkg -i installlinux_1747215368_ozekismsgateway_10.4.71_all.deb
Figure 6 - Install Ozeki SMS Gateway
Installation completed
After the installation process is complete, you get the message: "INFO installation completed." in the terminal (Figure 7).
Figure 7 - Installation completed
Start Ozeki SMS Gateway service
Befor you use the Ozeki SMS Gateway you need to start the Ozeki SMS GAteway service.
Type in the following command: "sudo service ozekisystem start" (Figure 8).
This will start the Ozeki SMS Gateway service in your Debian device.
sudo service ozekisystem start
Figure 8 - Start Ozeki SMS Gateway
Open SMS Gateway GUI
After successfully installing Ozeki SMS Gateway, it is now accessible in your browser (Figure 9).
Figure 9 - Open Ozeki SMS Gateway GUI
Send your first SMS
After the installation of the Ozeki SMS Gateway software and configuring the Android mobile, you need to add new connection,
for the purpose of enabling you to communicate on the device.
For the very first step, you have to click on the “Add new connection” link on the left of your screen,
highlighted in blue. This action will bring you a new management page tab.
Figure 10 - Add new connection
In this tab, you can find various wireless connection options, among which you have to install the “Android SMS client”,
which gives you the ability to send text messages through your Android mobile phone.
The download turns your device to a modem, which means that the phone will be able to
send and receive text messages through GSM network.
Figure 11 - Install Android SMS client connection
The following necessary movement is to enter the connection details in the boxes below.
It is required to fill the cells of host name or IP address, port number of your Android phone.
In the following section you have to give the username and password, which you can find on your mobile
phone in the Ozeki SMS Client app. Then click on the “Ok” button at the bottom of that page.
Your following assignment will be that, to create the connection to the SMS gateway.
You will find a slider button at the left side of the control table, that turns green, by clicking on it.
Figure 13 - Enable Android SMS client connection
In the android_SMS_client_1_details, that contains the log viewer panel, you have to choose the “Test” tab.
In this panel, write the recipient’s mobile phone number into the appropriate cell,
then formulate a text message into the “SMS” box. When it is done, click on the “Send” button, highlighted in blue.
Figure 14 - Send Test SMS
By clicking on the “Send” button above, you will receive a notification SMS, that your SMS has been sent successfully.
If you had followed the instructions correctly, then your connection process is done.
This quick start guide gives you all the steps needed in order to setup your
first SMS system. It shows you what you need in order to be able to send SMS
from your computer through and Android mobile phone. The step-by-step instructions
are easy to follow and will require only a few minutes of your time. Once
you got the SMS client on your Android mobile, and Ozeki SMS Gateway configured on your Windows PC
you will be ready to send SMS from your PC. This setup also allows you to setup automated SMS notification services from your business.
What you need
In order to send SMS from your PC through an Android mobile phone, you need
an Android mobile with a SIM card (the SIM card is usually already installed
in your Android phone). You also need a wifi link between your android phone
and the PC, and you need to download and install Ozeki SMS Gateway on your PC.
Select the INSTALL option to start the installation
Click on Open when the installation is finished
Allow the Android SMS Gateway's permissions
Connect Ozeki SMS Gateway on Windows to you Android mobile
How does it work
This solution turns your Android mobile phone into an SMS modem. In order for this solution
to work, you need to install two software: You need to download and install the Ozeki Android
SMS client on your android phone, and you must make it the default SMS app. Then you need to
install Ozeki SMS Gateway on your PC. Once both software is
installed, you need to configure the address of your Android mobile in Ozeki SMS Gateway.
This will allow the Ozeki SMS Gateway software to send and receive SMS messages through your Android phone.
Figure 2 - How does it work
How to install the Ozeki SMS Client on Android
The following video tutorial takes you through the steps of Installing the Android SMS
Client software on your Android mobile. Note, that you will need to
download the Android SMS app from android-sms-gateway.com. After
installation make sure you set the Ozeki app as the default SMS handler.
(You may set the default SMS handler back to the original
Android SMS client manually or by uninstalling the Ozeki SMS app). This will
enable the app to run seamlessly in the background.
Installation steps
The first step of the installation is to open android-sms-gateway.com
in your browser on your Android mobile. On this website navigate to the download
page and find the link to the latest version of the hu.ozeki.smsclient_2.1-release.apk package.
Figure 3 - Open android-sms-gateway.com
The link to the download page can be found in the top menu just below the link
to the Quick start guide. The link's colour is red. To open the download page,
simply click on this link.
Figure 4 - Open the download page
On the download page find the android logo and click on the package name that
follows the logo. The package name will be similar to this: hu.ozeki.smsclient_2.1-release.apk.
The version number might be different.
Figure 5 - Download Ozeki SMS Client APK
Installation of the .apk package
Once the installation package (.apk file) has been downloaded, you need to install it.
You can do this by locating the file in your download list and clicking on it.
Some browsers will automatically offer installation. You might receive a warning
message prompting you to allow installation from a different source.
You can safely allow the installation.
Figure 6 - Open downloaded APK
After the installation starts, you will be prompted with a dialog asking for
confirmation. Simply click install in this dialog. The installation will create
an icon on your home screen that will allow you to launch the Ozeki SMS client app.
Figure 7 - Install Ozeki SMS Client
You can also launch the Ozeki SMS client app by clicking on the Open button
after the installation completes.
Figure 8 - Open application after installation
Set the Ozeki SMS Client app to become your default SMS handler
In order for the Ozeki SMS client app to operate seamlessly it must be set as
the default sms handler. This is a very important step. The Android OS puts apps
that are not opened by the user regularly into sleep or deep sleep to save
battery power. It also often removes the permissions granted to apps when they
are put into deep sleep. By setting the Ozeki SMS client as your default SMS
handler you can prevent it from being disabled by Android. This is required to
be able to provide a reliable sms gateway service for your PC, that is able to
operate for months and years without interruption.
Figure 9 - Set as default SMS handler
By setting the Ozeki SMS Client app as your default SMS handler, you instruct
your android phone to forward all incoming sms messages to it, and you allow
this app to send sms messages from your phone. This is your desired operation
if you want to use your android phone as an SMS gateway. (You an set the SMS
functionality back by uninstalling the Ozeki SMS Client from your phone, or by
following the instructions in the
how to configure the default sms handler in your android device guide).
Figure 10 - Set Ozeki Client
Grant permissions
After you set the Ozeki SMS Client as your default SMS handler, you may click on
the Start button to start the Gateway service. On the first attempt, the app will
request various permissions to operate properly. First it will require permission
for external storage. External storage is used for storing log files and
configuration information. External storage is used in order to make it possible
for you do download log files and backup configuration. This is required by
most business customers.
Figure 11 - Access external storage
To save the logs file access permission is also mandatory.
Figure 12 - Allow all file access
Android phones usually operate from a battery. Battery optimization allows
android to disable apps to save battery power. In order to provide a reliable
SMS gateway functionality your phone should always be connected to the charger.
You should also disable battery optimization on the phone for the Ozeki SMS Client app.
This will allow the Ozeki app to operate continuously without interruptions.
Figure 13 - Ignore battery optimization
From the battery optimization menu, select no restrictions. This will allow
your SMS service to operate reliably.
Figure 14 - Set no restriction
Success! Your Ozeki SMS Client is started.
If you have completed all the steps above, your Ozeki SMS Client on your Android
device is started. This means that your pone is now setup as an SMS gateway.
It is ready to forward SMS messages coming from your PC to the mobile network.
It is also ready to forward incoming SMS from the mobile network to your PC.
Figure 15 - Ozeki SMS Client started
Configure your Windows PC
Once your Android mobile phone is setup and ready, you can move onto configuring
your Windows PC. (Note that these steps can also be completed on a Linux computer.)
The configuration of your windows PC consists of two major steps: installation
of the Ozeki SMS Gateway software and connecting the Android mobile running the
Ozeki SMSC Client app to it. The following video demonstrates what you need to
do on Windows.
After the installation of the Ozeki SMS Gateway software and connecting the Android mobile, you need to add new connection, for the purpose of enabling you to communicate on the device.
For the very first step, you have to click on the “Add new connection” link on the left of your screen, highlighted in blue. This action will bring you a new management page tab.
Figure 16 - Add new connection
In this tab, you can find various wireless connection options, among which you have to install the “Android SMS client”, which gives you the ability to send text messages through your Android mobile phone. The download turns your device to a modem, which means that the phone will be able to send and receive text messages through GSM network.
Figure 17 - Install Android SMS Client
The following necessary movement is to enter the connection details in the boxes
below. It is required to fill the cells of host name or IP address, port number
of your Android phone. In the following section you have to give the username
and password, which you can find on your mobile phone in the Ozeki SMS Client
app. Then click on the “Ok” button at the bottom of that page.
Figure 18 - Specify connection details
Your following assignment will be that, to create the connection to the SMS gateway. You will find a slider button at the left side of the control table, that turns green, by clicking on it.
Figure 19 - Connect to Android SMS Client
In the android_SMS_client_1_details, that contains the log viewer panel, you have to choose the “Test” tab. In this panel, write the recipient’s mobile phone number into the appropriate cell, then formulate a text message into the “SMS” box. When it is done, click on the “Send” button, highlighted in blue.
Figure 20 - Send test SMS
By clicking on the “Send” button above, you will receive a notification SMS, that your SMS has been sent successfully. If you had followed the instructions correctly, then your connection process is done.
Figure 21 - Message successfully sent
Summary
Now, you are able to use your SMS system, including sending text messages via Android phone to PC.
This quick list of instructions has given you the necessary information to get setup easily.
As you have already setup the Android SMS Gateway, it is a good idea to try the Ozeki sms marketing system.
The Ozeki sms marketing system has and advanced ability to manage phone number lists and call to action links, you can now seamlessly
reach out to your target audience with sms messages through your Android SMS Gateway and can convert them into loyal customers.
This feature allows you to utilize your android SMS gateway in a way that maximizes your marketing potential, resulting in
increased sales and brand visibility. Your digital marketing campaigns will be more efficient and effective than ever before!
On this page, you will find a detailed guide about how you can set up Ozeki
Installer on Raspberry Pi. By installing this software, you will have access
to every Ozeki product from Ozeki Installer's app store. The installation process
takes about 10 to 15 minutes. This guide does not require any specific knowledge
since each command listed in the document, so you need to just copy-paste them.
So, do not waste any time, and let's get started now!
How to install Ozeki on Raspberry Pi (Quick steps)
To install Ozeki on Raspberry Pi:
Download Raspbian operation system
Use win32diskimager to write Raspbian to SD card
Insert the SD card into the raspberry pie
Boot the Raspbian operating system
Open the Terminal from the Raspbian GUI
Add the Mono repository to your system
Install Mono
Install Ozeki Installer
Enter service ozekiinstaller status
Browse to https://localhost:9545
Step 1 - Download Raspbian
First step is to download Raspbian operation system. It can be downloaded
from the Raspberry Pi official page. You can reach that page by clicking on the following link:
https://raspberrypi.org/software/. Figure 1 shows the
official Raspberry Pi page.
Figure 1 - Download Raspbian
Step 2 - Write Raspbian to SD Card
After you downloaded the Raspbian operation system, you have to write it to an
SD Card. You can perform it with the win32diskimager software
which can be downloaded here:
https://sourceforge.net/projects/win32diskimager/.
In the win32diskimager browse the downloaded Raspbian image file and select the device then click on Write
as you can see it on Figure 2.
Figure 2 - Write Raspbian to SD Card
The writing process could take a bit of time, but as soon as it finished, a
little dialog window shows up as Figure 3 demonstrates. This window informs
you about the success of writing.
Figure 3 - Write Successful
Step 3 - Open terminal
After you inserted the card to the raspberry pie, boot the system. It will take
a while but after it is done, you will see the graphical user interface of the Raspbian operating system.
Please click to the terminal button (Figure 4)
Figure 4 - See how you can open terminal
Step 4 - Get root privileges
You need to have root privileges to install the Ozeki software and its
dependencies. To perform this, issue sudo -s command at the beginning
of the installation. This command delegates the authority to you to run all
forthcoming commands as root. Due to this, your Linux operating system will not
require you to use 'sudo' command before each command that need root privileges
to perform. Open Terminal using Ctrl + Alt + T shortcut key (by default) then
issue the following command (demonstrated in Figure 5).
sudo -s
Figure 5 - Get root privileges
Step 5 - Add the Mono repository to your system
Mono is an open source implementation of Microsoft's .NET Framework. Ozeki Installer
needs it to operate. To be able to install the latest release of Mono, you
need to add the official Mono repository to your system. If you are running
Raspbian 10 on Raspberry Pi, you can use the commands below to perform
this like in Figure 6. If you are running another version of Raspbian,
please follow the instructions on the official Mono site at
https://mono-project.com/download/stable/#download-lin-raspbian.
During the previous step, you added the official Mono repository to your system.
Due to this, you will be able to install the latest Mono package and all its
dependencies by issuing apt install mono-complete command as on Figure 7. This will
install all of the components of Mono. The installation process may take a few
minutes.
apt install mono-complete
Figure 7 - Install mono
Step 7 - Install other required dependencies
There are some other dependencies, that need to be installed for the clean installation of
Ozeki Installer without any error. These dependencies are exactly the following packages:
libturbojpeg0, libportaudio2, xvfb, libspeexdsp1 and
fonts-symbola. You can install them by issuing the command below. The
Figure 8 demonstrates this step.
The latest release of Ozeki Installer can be downloaded from
https://send-bulk-sms.com/p_213-download-bulk-messenger.html.
To download the latest package for Raspbian, you need to click on the
ozeki_Installer.x.x.x_all.deb link as Figure 9 shows below. We recommend
you to always download the latest software package. This one always includes the
current features and improvements.
During the previous step, you downloaded the Ozeki Installer package to the 'Downloads'
folder of your system (by default). Please navigate here by issuing
cd Downloads/ command. To install Ozeki Installer, issue
dpkg -i package_name.db (replace the package name with the name of the
downloaded file) command. During the installation, the installer asks you to
provide a password for the admin user. This will be the first user you
can use to log in to Ozeki Installer. You can see a successful installation in Figure 10.
cd Downloads/
dpkg -i installlinux_xxxxxxxxxx_ozeki_xx.x.xx_all.deb
Figure 10 - Install Ozeki Installer
Step 10 - Check Ozeki service
Services are programs that operate in the background. They can be automatically
started when the computer boots, can be paused and restarted. Ozeki Installer runs in
the background as a service. As you can see it on Figure 11, you can check
the status of Ozeki Installer service by using the service ozekiinstaller status command.
service ozekiinstaller status
Figure 11 - Ozeki status
By issuing service ozekiinstaller status command,
you can check its status.
If it is active (Figure 12), it means that it is running in the background.
Figure 12 - Ozeki service is running
Step 11 - Check programs in Ozeki Installer
Ozeki Installer can be opened through your web browser. For that just open it,
type localhost:9545 and hit Enter. On the main page, you will be able to
see the Ozeki app store (Figure 13).
On this page, you can choose from many Ozeki products such as SMS Gateway, Chat,
Phone System etc.
This guide explains how you can setup Ozeki SMS Gateway using Docker in Ubuntu.
The tutorial below presents all the steps and the necessary information to help you complete this procedure with ease.
Ozeki SMS Gateway is a great tool that makes it possible to create great solutions in various environments.
The advanced routing engine allows users to send SMS messages automatically on predetermined conditions.
In this article you will find out how to install Ozeki SMS Gateway in Ubuntu through Docker in the terminal.
This guide requires a basic understanding of the terminal in Ubuntu.
You will be provided step by step instructions. We hope you find this article informative and helpful.
Let's get it started!
What is Docker
Docker is an open platform for developing, shipping, and running applications.
Docker enables you to separate your applications from your infrastructure so you can deliver software quickly.
With Docker, you can manage your infrastructure in the same ways you manage your applications.
What is Ozeki SMS Gateway
Ozeki SMS gateway has a world class SMS routing engine.
This routing engine allows you to forward SMS messages from one user or mobile network connection to another based on conditions you define.
There are a large number of conditions, such as phone number prefix, message text matching, service period or time of day.
In addition to routing by pattern matching, the SMS routing engine also allows you to modify the SMS text messages on the fly.
You can replace the phone numbers, change the message text, append a note to the end of the messages.
How to install Ozeki SMS Gateway in Docker (Easy steps)
To install Ozeki SMS Gateway in Docker:
Execute sudo docker pull ubuntu command
Bring up file editor
Create docker file
Start Ozeki SMS Gateway installation
Read Terminal message if SMS Gateway installed
Run SMS Gateway container
Check logs if service started
Login to SMS Gateway
How to install Ozeki SMS Gateway in Docker (video tutorial)
This video tutorial shows you how you can setup Ozeki SMS Gateway in Docker. This is done through the terminal in Ubuntu.
The video provides all the steps you need to successfully install Ozeki SMS Gateway.
The process involves pulling an Ubuntu image, creating a docker file, then setting up Ozeki SMS Gateway.
Once you have installed the program you may log in and use it from your browser.
Pull Ubuntu image
First step is to pull the Ubuntu image.
Do this by typing the following command into the terminal: sudo docker pull ubuntu (Figure 1).
Then, press the enter key to execute the command.
This will download the latest Ubuntu image.
sudo docker pull ubuntu
Figure 1 - Pull ubuntu image
Create Docker file
Next, we need to create the Docker file.
Type the following command into the terminal sudo nano Dockerfile (Figure 2).
Then, press the enter key to execute this command.
This will bring up a file editor where we can paste the docker file content.
sudo nano Dockerfile
Figure 2 - Create docker file
Docker file content
Paste the commands below into the file editor.
Next, hit the enter key.
This creates the docker file we need to build the SMS Gateway image. Enter your
own time zone instead of TZ=Europe/Budapest. (Figure 3)
Type the following command into the terminal sudo docker build -t sms-gateway . (Figure 4).
Then, press enter to run this command.
This will start installation process for Ozeki SMS Gateway.
sudo docker build -t sms-gateway .
Figure 4 - Build SMS Gateway image
SMS Gateway image created
Once the installation process is completed two messages will appear in the terminal (Figure 5).
Successfully built e44dacb03f4f and Successfully tagged sms-gateway:latest.
These messages indicate that the SMS Gateway is now installed on your system.
Now it is ready to launch.
Figure 5 - SMS Gateway image created
Run SMS Gateway container
Run SMS Gateway container by typing the following command into the terminal.
sudo docker run -ti -p 9615:9515 -p 9616:9516 sms-gateway \
mono /usr/lib/ozeki/BaseSystem/v1.0.0/Ozeki_Starter.exe /run (Figure 6).
Press the enter key to execute this command and start service.
After you ran SMS Gateway container a message will appear in the terminal once again (Figure 7).
This message reads "System initialization completed".
The message means that the service started successfully.
Figure 7 - SMS Gateway service started
Login to SMS Gateway
After the service started you can log into SMS Gateway from your browser.
Start by typing https://localhost:9615 into the URL bar of your browser, then hit enter (Figure 8).
You will be forwarded to a login screen.
Enter admin into the first textbox, then enter the admin password into the second textbox.
Click on Ok to log in.
Figure 8 - Login to SMS Gateway
SMS Gateway GUI accessible
After logging in, SMS Gateway GUI is now accessible on your system (Figure 9).
Figure 9 - SMS Gateway GUI accessible
Summary
We did our very best to make it quick and simple to walk you through all the details.
If you have followed the tutorial steps closely, you should be able to send sms
using Ozeki SMS Gateway through Docker without problems.
If you have already completed the steps you can now operate SMS Gateway from
your system.
If you would like to discover more useful insights about the advantages of other
similar solutions, you can take a look at ozeki-sms-gateway.com.
I hope this tutorial will be helpful to all the readers and especially to beginners.
In this guide, we explain how to do application virtualization for Ozeki SMS Gateway using docker.
If you want to move Ozeki SMS Gateway from one system to another we will show you how to do it in the article.
Packaging applications in containers is useful because it helps portability, making the program reachable in
several platforms. We have chosen the docker container technology, and we will provide instructions
on how to create such a container on Ubuntu Linux. Important to note that you don't have to be an
Ubuntu expert to learn this skill so this should not be
a cause for concern. After you finish this article, you will be able to create an Ozeki SMS Gateway container
using Ubuntu. Get started now.
What is Ozeki SMS Gateway
Ozeki SMS gateway has a world class SMS routing engine.
This routing engine allows you to forward SMS messages from one user or mobile network connection to another based on conditions you define.
There are a large number of conditions, such as phone number prefix, message text matching, service period or time of day.
In addition to routing by pattern matching, the SMS routing engine also allows you to modify the SMS text messages on the fly.
You can replace the phone numbers, change the message text, append a note to the end of the messages.
What is Docker
Docker is an open platform for developing, shipping, and running applications.
Docker enables you to separate your applications from your infrastructure so you can deliver software quickly.
With Docker, you can manage your infrastructure in the same ways you manage your applications.
What is a Docker container
A container is a standard unit of software that packages up code and all its dependencies,
so the application runs quickly and reliably from one computing environment to another.
This article details how to put Ozeki SMS Gateway into one such container.
This process is done through the Terminal in Ubuntu.
How to put Ozeki SMS Gateway into a docker container (Quick steps)
To put Ozeki SMS Gateway into a docker container:
Launch Ubuntu Terminal
Check the content of the docker
Make .tar file from image
Use 'ls -la' command
Inspect the created .tar file
Open WinSCP
Login to Ubuntu machine
Download the .tar file
How to put Ozeki SMS Gateway into a docker container (video tutorial)
This video is made to show you how to download your docker container containing Ozeki SMS Gateway. As you can see,
the video is only 2 minutes long, so you can learn how to get this skilful product in almost no time! At the beginning, the video
starts with the Ubuntu terminal and ends with the last steps of getting Ozeki SMS Gateway to your Windows OS.
Check docker images
In order to check docker images, you have to type the following code into the Ubuntu terminal.
This shows you the content of the docker, the age and the size of them. By doing this, you can be sure that the Ozeki SMS Gateway is in your
Ubuntu OS, so it is important to start the whole process with this step. (Figure 1)
The code is:
sudo docker images
Figure 1 - Check docker images
Create .tar file from image
To advance in the downloading process, you have to make .tar file from image. (Shown in Figure 2) This will be the file
that you will download to your Windows OS. Use this code to make the file with the
proper file type (be aware that this command may take a while):
sudo docker save sms-gateway > sms-gateway.tar
Figure 2 - Create .tar file from image
Make sure that the Ozeki SMS Gateway file is created
To make sure that the file is created, you have to use the 'ls -la' command in the Ubuntu terminal. You will see a long list where
the .tar file will be highlighted. (As you can see it on Figure 3)
After you are sure that the file exists, you can go to the next step.
Figure 3 - File created
Start the file transferring
The next step is to open the WinSCP. This is the key tool in the file transfer process.
If you don't have it on your computer yet, you are able to download
the WinSCP software here: https://winscp.net/eng/download.php
You won't be able to finish this procedure without using this software, so it is important to have it in your computer. (Figure 4)
Figure 4 - Start WinSCP
Login to Ubuntu machine
To start transferring the Ozeki SMS Gateway, you have to Login to your Ubuntu machine.
In the Host name textbox, you have to write
the address of your Ubuntu machine. Below that, you can give the username and the password.
If you gave all the credentials, you can login with the Login button. After you identified the virtual machine,
you are able to see its content in WinSCP. (All highlighted in Figure 5)
Figure 5 - Login to Ubuntu machine
Download the Ozeki SMS Gateway from Ubuntu machine
To download the file from your Ubuntu machine, you can use the simple drag and drop function with the file, moving it from the source
to the Windows library. This will download the file, but the speed of the process is based on your computer's performance.
By doing this step, you can move Ozeki SMS Gateway from one system to another. (Figure 6)
Figure 6 - Download file from Ubuntu machine
Summary
As we promised you at the beginning of the article, you can download your docker container containing Ozeki SMS Gateway without
being an expert in Ubuntu.
If you followed the steps in the guide carefully, you should have the .tar file in your Windows directory. Moving storages between systems
is the main benefit of this technology, so if you want to make sure that Ozeki SMS Gateway is downloaded to all of your operational systems, you can use
the procedure that we showed you in this guide. It helps distribution and collaboration between different platforms, making system maintenance easier.
This article is a detailed guide on installing Ozeki SMS Gateway on Ubuntu.
Ozeki SMS Gateway is an incredibly useful tool in creating solutions for various SMS sending and automatization tasks.
In this tutorial we are going to update and install Docker, then load the Ozeki image to a Docker container.
After this is complete, we can launch the software.
The procedure itself requires the Terminal in your virtual Ubuntu machine, as well as WinSCP in your actual Windows machine.
The following tutorial contains all the steps you need to follow to successfully set up Ozeki SMS Gateway in Ubuntu.
Let's get started!
What is Ozeki SMS Gateway
Ozeki SMS gateway has a world class SMS routing engine.
This routing engine allows you to forward SMS messages from one user or mobile network connection to another based on conditions you define.
There are a large number of conditions, such as phone number prefix, message text matching, service period or time of day.
In addition to routing by pattern matching, the SMS routing engine also allows you to modify the SMS text messages on the fly.
You can replace the phone numbers, change the message text, append a note to the end of the messages.
What is Docker
Docker is an open platform for developing, shipping, and running applications.
Docker enables you to separate your applications from your infrastructure so you can deliver software quickly.
With Docker, you can manage your infrastructure in the same ways you manage your applications.
What is a Docker container
A container is a standard unit of software that packages up code and all its dependencies,
so the application runs quickly and reliably from one computing environment to another.
This article details how to put Ozeki SMS Gateway into one such container.
This process is done through the Terminal in Ubuntu.
How to install docker on Ubuntu
This video tutorial shows you how to install Ozeki SMS Gateway on Ubuntu using Docker.
Use the Terminal in Ubuntu to complete these steps.
Enter the following sequence of commands to successfully update and install Docker on your Ubuntu machine.
To install docker on Ubuntu you first need to update the dependencies.
Start by opening the Terminal.
Type in sudo apt-get update then press enter.
Next, enter sudo apt-get install apt-transport-https ca-certificates curl
gnupg lsb-release (Figure1).
Now everything is up to date and you can proceed.
Before you can log into the Ubuntu machine, you must first update and install Docker.
To download the update, enter sudo apt-get update into the Terminal (Figure 4).
When it is complete, install it by entering sudo apt-get install docker-ce docker-ce-cli containerd.io.
Now Docker is up to date and ready to use on your device.
Figure 4 - Update and install Docker
How to upload the Ozeki Docker container to Ubuntu
Before you can upload the image file, you must log into the Ubuntu machine using WinSCP.
Launch the WinSCP software.
In the login window, enter IP address and port of your machine into the respective textboxes.
Then type your username and password into the textboxes below.
Click on the Login button when done. (Figure 5)
Figure 5 - Login to Ubuntu machine from WinSCP
Upload image file to Ubuntu machine
After successfully logging in, you are now able to upload the Ozeki SMS Gateway image file to the Ubuntu machine.
Drag and drop the sms-gateway.tar file from your local drive to a directory in the machine (Figure 6).
Figure 6 - Upload image file to Ubuntu machine
File uploaded
To make sure the file has been uploaded, switch back to the Terminal in Ubuntu.
Enter the command ls -la and inspect the results (Figure 7).
If you find the sms-gateway.tar file among the results, it has been successfully uploaded.
Figure 7 - File uploaded
How to install the Ozeki Docker container on Ubuntu
The next step is to list Docker images and load the Ozeki SMS Gateway image file into Docker.
First, enter sudo docker images into the Terminal (Figure 8). This will return the list of Docker images.
Next, enter sudo docker load < sms-gateway.tar.
This command loads the Ozeki image to Docker.
Figure 8 - List Docker images and load Ozeki image to Docker
sudo docker images
Image appeared in the Docker image list
After you loaded the Ozeki image into Docker, you can make sure the process was successfully completed.
If you now enter the sudo docker images command again, sms-gateway will appear in the results (Figure 9).
Figure 9 - Image appeared in the Docker image list
With the image loaded into Docker, you may now launch Ozeki SMS gateway.
Type the following command in Figure 10 to run the program.
Figure 10 - Run Ozeki container
Ozeki SMS Gateway started
You can see that Ozeki SMS Gateway has now started.
Open it by typing localhost:9615 into the URL bar of your browser (Figure 11).
Figure 11 - Ozeki SMS Gateway started
Summary
Docker and Ozeki SMS Gateway are now up to date and in working order on your computer.
We hope you found this article helpful and informative.
Visit our other guides for more information on Docker and Ozeki SMS Gateway.
Some docker configurations result in constantly changing ehternet hardware
MAC address. The followin option can be enabled in the Ozeki Control Panel
to avoid the negative effects of this behaviour.
This article provides information on what are you options to connect
your SMS Gateway to the mobile network.
Why do you need to connect your computer to the mobile network?
SMS messages are delivered to mobile phones by the mobile network. You need to
find a way to connect your computer to the mobile network in order to send
SMS messages. Unless there is a connection you cannot send SMS.
How to connect your computer to the mobile network?
You can setup a connection to the mobile network in various ways:
you can connect through the Internet, you can connect direct to the Short Messages Service Center (SMSC)
of a mobile network operator or you can simply attach a mobile phone to a PC.
In more detail, to connect your SMS gateway to the mobile network you have various options. You can
connect wirelessly the same way as mobile phones connect. You can connect to
the SMSC of a mobile network operator over the Internet using the SMPP, UCP or CIMD2
protocol or you can use an on-line http sms service. In either case it is a good
practice to use multiple connections to the mobile network for fault tolerance,
load balancing, least cost routing
and backup routing purposes. A common practice is to
setup an IP sms connection (e.g. SMPP client connection) for everyday high performance
messaging. After this connection is working, it is a good idea to setup a wireless link as backup.
You can setup a wireless link using an SMS modem pool. These
to connections will make sure your system operates even if the primary SMS service fails.
The easiest: Use an Android moible phone
To connect your SMS gateway to the mobile network wirelessly, the most
simple method is to setup your Android mobile with your PC.
This can bo done by installing the Ozeki SMS Gateway Android App
on the mobile, and to connect to the mobile through Wifi. You can pair your
SMS Gateway PC with your Android mobile with a QR code scan.
A modem pool is a device with many GSM modems inside. A modem pool is also called as
a SIM bank, because it has many SIM cards (one for each modem).
In either case you need SIM cards purchased
from a local mobile network operator, and the phone numbers you can use as
SMS Sender ID will be the phone numbers assigned to the SIM cards by
the network operator. The advantage to using a wireless connection is
that it is easy to setup, and often you can send and receive SMS
messages free of charge over wireless links. (In fact many SMS service
providers run a business of purchasing SMS modem pools with SIM cards and they
sell the SMS messages and phone numbers to their clients over the Internet by
providing an HTTP sms service.)
The most reliable: Internet connection to a Mobile Network
To send large volumes of SMS messages, a direct connection to the Short
Message Service Centre (SMSC) of a Mobile Network Operator (MNO) over the Internet
is the best option.
Mobile Network Operators offer SMPP client connection
or other heavy-duty SMS protocols, such as UCP sms protocol,
CIMD2 sms protocol, HTTP sms,
HTTPS SMS or OZX sms connection.
In most cases you can connect to these providers through a secure SSL link. You
may check out the how to create a secure smpp client
connection guide on getting more information about this connection option.
Figure 3 - Direct connection to the SMSC over SMPP
The most convenient: Connect to an on-line SMS service provider
There are many on-line SMS service providers (often called SMS aggregators).
What these companies do, is that they purchase a professional system like
Ozeki SMS Gateway for SMS Service providers,
they setup one more more Internet connections to Mobile Network(s) usually
through SMPP, and they resell SMS credits to their customers over the Internet.
These SMS service providers usually maintain a website, where you
can purchase SMS credits, and the offer an
SMPP API or
an HTTP SMS API to connect to their service.
Although the HTTP protocol is not the most efficient option to
send and receive SMS messages, because it puts a large data overhead
on each SMS, and it does not support SMS delivery reports and inbound
SMS messages properly, it is still used by many businesses. The primary
reason for this is that an HTTP SMS connection can be setup very
effortlessly.
Figure 4 - Connection through an HTTP sms provider
To connect your system to an HTTP SMS service, you need to sign up
to the service on their website, and you need to enter the account
details they provide into Ozeki SMS Gateway. A list of supported
SMS service providers can be found in our
On-line SMS service providers
page. You will find step by step instructions for each provider
on how to connect to their service.
Step by Step Instructions
The following pages give you detailed, step-by-step instructions on how to setup a particular
mobile network connection type. The most popular way to connect is to use the
SMPP client connection method. Beginners often use their Android mobile phone
to create their first connection, since it is always available and very easy
to setup and use.
SMPP Mobile Network Connection
This guide gives you information about how to setup an SMPP SMS client connection. SMPP stands
for Short Message Peer to Peer protocol and is a very popular choice among SMS service
providers. The Ozeki system offers an excellent, high performance implementation of this
great protocol. Lear more about how to send SMS using SMPP
UCP/EMI SMS Client Connection
By following the guide on this page, you will get a brief introduction to UCP/EMI
SMS client connection. The Universal Computer Protocol and its extension, External
Machine Interface is a great choice to connect to short message service centres
for mobile phones. Lear more about how to send SMS using UCP/EMI
CIMD2 SMS Client Connection
Learn about how you can set up a CIMD2 SMS client connection in Ozeki SMS Gateway.
The Computer Interface Message Distribution protocol was introduced by Nokia. The
CIMD2 interface transfers messages between applications and the Nokia Short Message
Service Centre. Lear more about how to send SMS using CIMD2
OZX connection
This guide is about OZX client connection setup. It defines what an OZX connection is, what does OZX stand for and
how you can use an OZX client connection to connect your Ozeki SMS gateway system directly to
the Short Message Service Centre (SMSC) of a mobile network operator over the Internet. Lear more about how to connect to an OZX service
HTTP SMS Client Connection
You can get useful information about how you can set up a HTTP SMS client connection
in Ozeki SMS Gateway by following the guide here. By using this solution, you will be
able to communicate with web applications by using the HTTP protocol. Lear more about how to send SMS using HTTP
REST SMS client
This tutorial explains how to use the sms rest api in Ozeki SMS Gateway. It will start with defining the term of what an sms rest api
is and will move on to show you how to use it to access SMS services. We understand you will use these steps to
construct a solution to serve important business users and business applications, so we take care to provide you
with instructions that will help you create a high quality solution. Lear more about how to send SMS with the REST API
Android SMS Client Connection
This guide gives you information about how you can set up an Android SMS client connection
in Ozeki SMS Gateway. By downloading the Android SMPP Gateway to your smart phone, you
can use it as an SMPP server, and connect to that smart phone with an SMPP client connection
in SMS Gateway. Lear more about how to send SMS using an Android mobile
GSM Modem Link
The following guide is about to demonstrate how you can connect your GSM modem
to your PC and configure it with Ozeki SMS Gateway. The high speed, professional
cellular modem works well with Ozeki SMS Gateway. Lear more about how to send SMS using an SMS modem
On-line SMS Service Providers
Ozeki supports native connection to several on-line SMS service providers.
Click here for a list of connections you can setup easily. The listed providers
offer APIs that allow you to use their service from Ozeki 10 SMS Gateway. Supported SMS service provider list
How to test SMS sending in Ozeki SMS Gateway
This guide will show you how you can test text message (SMS) sending through Ozeki SMS Gateway.
The tutorial below contains all the necessary steps in order for you to set up this solution efficiently.
You will learn how to set up a Tester connection inside Ozeki sms gateway and send a test message.
A Tester connection is a great tool to help you ensure that your SMS messages are being sent. Learn more about how to test SMS sending in Ozeki SMS Gateway
How to setup sms load balancing
Setting up sms load balancing is not a hard task, but a helping hand is always useful.
Load balancing prevents application downtime, increases performance and helps in detecting failures in the early stages.
Our load balancer swiftly distributes traffic across different paths in order to reach perfect client experience.
This guide is meant to be our way of helping while showing you Ozeki SMS Gateway. Learn more about how to setup sms load balancing
How to connect your SMS Gateway to the mobile network?
The Ozeki SMS Gateway software is a tool that can be used to create your own SMS
service or to connect to other SMS services in order to send and receive SMS messages.
To send and receive SMS messages, the Ozeki SMS Gateway software needs to
be installed on a Windows or Linux PC and it needs to be connected to the mobile network.
This article explains the various options you can choose from to connect your system
to the mobile network.
How can you connect your SMS Gateway to the mobile network
There are two ways you can connect Ozeki SMS Gateway to the mobile network:
A.) Using a wireless connection: You can setup a wireless connection to a mobile network,
by connecting Ozeki SMS Gateway to an Android mobile phone or to
an SMS modem (e.g.: Ozeki 4G/5G SMS Modem),
or to an SMS modem pool.
In all of these cases you will use the SIM card in the device to send SMS the same way you would send
an SMS from your standard mobile phone. In this case the SMS will go from the Ozeki Software
to the attached mobile device (e.g. your android phone) and will leave your system through the
antenna of the attached device. Then it will travel through the air to the nearest mobile base
station, and finally it will go from the base station to the Short Message Service Centre (SMSC)
of the mobile network operator through a high-speed network link. If you use
this option, your SMS charges will be determined by the mobile
network operator who provided you the SIM card. You can find SIM
only plans that include unlimited SMS free of charge in the offerings of
most mobile networks.
B.) Using an Internet connection: Another option to connect your Ozeki SMS Gateway
software to the mobile network is to create a secure link (a secure TCP/IP connection or
a VPN link) directly to the SMSC of a mobile network or to the SMSC of an SMS Aggregator company. In this case
you will likely use an IP SMS protocol such as SMPP,
UCP, HTTP,
HTTPS or CIMD2
to send your SMS messages. If you want to send SMS using an Internet connection,
you will need to sign a contract with a mobile network (or an SMS aggregator
company) to give you login details to their network. The login details will include an IP address, a username and a password,
plus the name of the protocol you need to use. They will charge you for the SMS
messages sent.
How to connect your SMS gateway to the mobile network wirelessly
To get more information about how to connect your SMS gateway to the mobile network wirelessly you
have to investigate the pros and cons of the following three basic
options: Using one or more Android Mobiles, using one or more SMS modems
or using an SMS modem pool. In all three options, SIM cards are need, that provide
the mobile phone numbers you can use as Sender IDs. In all three options the connection
to the mobile network is done wirelessly through the air the same way as regular mobile
phones connect. Let's see what each connection type offers:
Wireless SMS connection: Using an Android Mobile Phone
If you wish to connect your system to the mobile network wirelessly you can install
the Ozeki Android SMS Client app on your Android mobile
and you can configure Ozeki SMS Gateway to send SMS through this Android phone.
In order to use this setup your Android mobile and your Ozeki SMS Gateway installation
needs to be on the same Wifi network (same LAN). The Ozeki SMS Gateway in this case
will connect to your Android phone using a TCP/IP connection and will send the SMS
messages through this connection.
You can use single or dual SIM Android devices. If you use a dual sim android phone,
you will be able to use two phone number for sending and receiving SMS text messages.
Figure 1 - Android mobile connection
Wireless SMS connection: 4G/5G SMS Modem
One of the most popular ways to connect Ozeki SMS Gateway to the mobile network
is by using the Ozeki 4G/5G sms modems. These SMS modems connect
to the PC through an USB data cable (multiple SMS modems are connected using an USB hub).
Each modem has one or two SIM cards and communicate with the mobile network over
4G LTE or 5G links. The advantage of using such modems over Android phones is that
they are more simple devices, thus they are more reliable. Since Android mobiles have a complex software stack
with many apps running and many security restrictions / battery and resource
optimization practices in place they have more room for error. The Ozeki SMS modems
have a limited well tested software stack that will only do communication.
These modems are designed to operate 24/7 without any interruption.
Hint: The Ozeki 4G SMS
modems can even provide a 300Mbps LTE Mobile Internet link that can serve as a backup
link for IP SMS services.
Figure 2 - SMS modem connection
Wireless SMS connection: Using modem pools
Modem pools are devices that put multiple SMS modems into a case. Modem
pools currently on the market often use 2G SMS modems based on chips manufactured
by Wavecom or Simcom. A modem pool can be connected to the PC over
USB or through an SMPP link. Modem pools have an advantage of being able to accept a large number of SIM
cards, thus they can provide many phone numbers. Many Internet SMS service providers
use Ozeki SMS Gateway connected to a modem pool to send SMS messages through phone numbers
assigned to Internet customers. You can also use a modem pool in your own network. You
simply have to connect it to the PC where Ozeki sms gateway is installed using
an USB data cable or an Ethernet link.
Figure 3 - SMS modem pool connection
Internet SMS links: SMPP
To send large volumes of SMS messages, a direct connection to the Short
Message Service Centre (SMSC) of a mobile network operator, or to a
high-capacity on-line SMS service is a good option. Mobile network operators
and top SMS providers offer SMPP client connection
or other heavy-duty SMS protocols, such as the UCP sms protocol,
the CIMD2 sms protocol or the OZX sms protocol.
In most cases you can connect to these providers through a secure TLS or VPN link. You
may check out the how to create a secure smpp client
connection guide on getting more information about this connection option.
Figure 4 - SMS Gateway's direct connection to the SMSC over SMPP
Internet SMS links: HTTP SMS service providers
If a direct SMSC connection over the Internet is not an option for you, another possibility
to send SMS over the Internet it to connect your system to an HTTP SMS service provider.
Although the HTTP protocol is not the most efficient option to
send and receive SMS messages, because it puts a large data overhead
on each SMS, and it does not support SMS delivery reports and inbound
SMS messages properly, it is still used by many businesses. The primary
reason for this is that an HTTP SMS connection can be setup very
effortlessly and many software developers are familiar with implementing
HTTP GET and HTTP POST requests.
Figure 5 - Connection through an HTTP sms provider
To connect your system to an HTTP SMS service, you need to sign up
to the service on their website, and you need to enter the account
details they provide into Ozeki SMS Gateway. A list of supported
SMS service providers can be found in our On-line SMS service providers
page. You will find step by step instructions for each provider
on how to connect to their service.
Multiple SMS network connections
Many Ozeki SMS Gateway user set up multiple connection to the mobile network.
This allows them to build a fault tolerant system and to do cost optimization
using least cost routing configurations. Multiple connections also give access
to multiple phones numbers called Sender IDs.
When multiple connections to the mobile networks are created various
routing algorithms can be selected in Ozeki SMS Gateway. One of the
most popular ones is random route allocation, which means that when
an SMS is sent a random connection is picked from the available
choices.
A common practice among our customers it to setup an IP sms
connection (e.g. SMPP client connection) for everyday high performance
messaging and to setup wireless links using a GSM modem pool for backup purposes.
This setup is popular because it gives high operational reliability, because if this
setup is used the SMS communication of the business will continue to operate even
if the primary SMS service provider internet sms link fails for whatever reason. (In case of
a failure, the Ozeki SMS gateway system automatically switches to the backup link, which
is a wireless link.
Advantages of setting up multiple mobile network connection
Connecting your SMS Gateway to the mobile network offers several options that
cater to different requirements and preferences. The Ozeki SMS Gateway software
provides two main methods for connectivity: wireless connection and internet
connection.
For wireless connection, you can choose from three basic options: using an
Android mobile phone, utilizing 4G/5G SMS modems, or employing an SMS modem pool.
These options enable you to establish a wireless link with the mobile network,
allowing you to send and receive SMS messages through the connected devices.
This approach offers the advantage of often sending and receiving SMS messages
free of charge, depending on the mobile network operator's offerings.
Alternatively, you can opt for an internet connection by creating a secure link
to the Short Message Service Centre (SMSC) of a mobile network or an SMS
aggregator company. This connection involves using IP SMS protocols such as
SMPP, UCP, HTTP, or CIMD2 to send SMS messages. With an internet connection,
you need to sign a contract with a mobile network or SMS aggregator company to
obtain login details for their network. They will charge you for the SMS
messages sent.
Setting up multiple connections to the mobile network provides advantages such
as load balancing, least cost routing, backup routing, multiple sender IDs, and
higher total SMS capacity. This configuration ensures fault tolerance and a
more reliable system by allowing seamless switching to backup links in case
of primary connection failures.
Overall, choosing the appropriate method to connect your SMS Gateway to the
mobile network depends on your specific needs, resources, and preferences.
Consider the pros and cons of each option to establish a reliable and efficient
SMS service or integration with existing SMS services.
FAQs
Do I need Internet connection to operate Ozeki SMS Gateway?
Ozeki works just fine within your local network (LAN) without needing a public
internet address. You only need a public IP address if you plan to connect to
your SMS provider over the internet using an IP SMS connection (like SMPP, CIMD2,
UCP, or HTTP). In most cases, a regular public IP (the one that might change from
time to time) will suffice for these connections. However, some SMS providers
might require a fixed public IP address (one that stays the same).
Additionally, you'll need a public IP if you want to offer SMS services to your
own customers.
Do I need a fix IP address for the SMS Gateway?
The need for a fixed IP address depends on how you plan to use the software:
Internal Use: If you're using the software within your office or
organization's local network (LAN), a fixed IP isn't necessary. A dynamic IP
address, automatically assigned by your network's DHCP server, will work
just fine for the SMS Gateway.
External Use (SMS Service): If you want to offer SMS services to others over
the internet, then a fixed IP address becomes essential.
Can I use a leased line connect to my mobile operator, instead of an Internet
connection?
Absolutely, a dedicated leased line is the superior choice for security. Leased
lines offer a private, direct connection to your SMS service provider (SMSC)
compared to sharing the internet with everyone else. This translates to:
Enhanced Security: Since you're not sharing the connection, there's less risk
of unauthorized access to your SMS traffic.
Improved Reliability: Leased lines typically experience less fluctuation and
congestion compared to the internet, leading to a more reliable connection
for your SMS needs.
Therefore, if your mobile network operator or SMS provider offers a leased line
connection to the SMSC, it's highly recommended for both security and reliability.
How much bandwidth do I need on my Internet connection?
For an IP SMS connection, a minimum of 64 kbps is needed. Concerning
connection methods, all internet connection methods, such as ADSL, CableTV,
ISDN, T1, E1, etc. can be used.
Network bandwidth signifies the data transmission capacity of a connection.
A greater bandwidth directly correlates with the potential for enhanced
performance, although other contributing factors, such as latency, also influence
overall efficacy.
In the context of mobile messaging, network bandwidth dictates
the speed at which SMS messages can be transmitted and received via IP SMS
connections. Typically, an average SMS message occupies approximately one kilobyte.
To determine the requisite network bandwidth, an estimation of the average SMS
traffic volume is necessary. This volume should then be multiplied by one kilobyte
to calculate the estimated bandwidth requirement. This calculation aids in
ensuring sufficient network capacity to accommodate your SMS needs.
Can I use a Virtual Private Network (VPN) connection?
Yes. A VPN connection is great, because it is more secure than an Internet
connection.
For enhanced security when connecting your SMS Gateway to a mobile network
operator or SMS service provider over the public internet, a Virtual Private
Network (VPN) connection is strongly recommended. A VPN establishes a secure
tunnel for data transmission by encrypting all traffic. This encryption process
safeguards your communication from unauthorized access and potential interception.
There are two primary methods for establishing a VPN connection:
VPN Routers: These dedicated hardware devices provide a simple and reliable
solution for creating a VPN tunnel. They often offer user-friendly interfaces
for configuration.
Software VPN Implementations: Software-based VPN solutions can be installed
directly on your computer or server. This approach offers greater flexibility
but may require more technical expertise to configure.
Common VPN protocols for establishing the secure channel include Point-to-Point
Tunnelling Protocol (PPTP) and Layer 2 Tunnelling Protocol (L2TP). It's crucial to
consult with your network administrator or chosen SMS service provider to
determine the most suitable protocol for your specific needs and infrastructure.
My Internet connection is not reliable. Will this be a problem?
No, it will only cause temporary outages.
IP SMS Connections: An internet connection is only mandatory if you intend
to utilize IP SMS connections (SMPP, CIMD2, UCP, HTTP, etc.) to connect to
your SMS service provider. These connections operate over the internet. In
the event of an internet outage, Ozeki SMS Gateway has a built-in
mechanism to buffer messages. When the connection is restored, the software
will automatically attempt to resend these queued messages.
GSM Modem Usage: Alternatively, you can leverage a GSM modem to transmit SMS
messages entirely independent of an internet connection. This offers a
reliable method for SMS communication even in scenarios without internet
access.
Enhanced Reliability with Backup Routing: To bolster overall reliability,
consider incorporating a GSM modem as a backup solution. During an internet
outage, Ozeki SMS Gateway can be configured for backup SMS routing. This
configuration seamlessly switches message transmission to the GSM modem,
ensuring uninterrupted SMS functionality. For this functionality, consult
the Ozeki SMS Gateway documentation for detailed instructions on
configuring backup SMS routing.
This quick start guide gives you all the steps needed in order to setup your
first SMS system. It shows you what you need in order to be able to send SMS
from your computer through and Android mobile phone. The step-by-step instructions
are easy to follow and will require only a few minutes of your time. Once
you got the SMS client on your Android mobile, and Ozeki SMS Gateway configured on your Windows PC
you will be ready to send SMS from your PC. This setup also allows you to setup automated SMS notification services from your business.
What you need
In order to send SMS from your PC through an Android mobile phone, you need
an Android mobile with a SIM card (the SIM card is usually already installed
in your Android phone). You also need a wifi link between your android phone
and the PC, and you need to download and install Ozeki SMS Gateway on your PC.
Select the INSTALL option to start the installation
Click on Open when the installation is finished
Allow the Android SMS Gateway's permissions
Connect Ozeki SMS Gateway on Windows to you Android mobile
How does it work
This solution turns your Android mobile phone into an SMS modem. In order for this solution
to work, you need to install two software: You need to download and install the Ozeki Android
SMS client on your android phone, and you must make it the default SMS app. Then you need to
install Ozeki SMS Gateway on your PC. Once both software is
installed, you need to configure the address of your Android mobile in Ozeki SMS Gateway.
This will allow the Ozeki SMS Gateway software to send and receive SMS messages through your Android phone.
Figure 2 - How does it work
How to install the Ozeki SMS Client on Android
The following video tutorial takes you through the steps of Installing the Android SMS
Client software on your Android mobile. Note, that you will need to
download the Android SMS app from android-sms-gateway.com. After
installation make sure you set the Ozeki app as the default SMS handler.
(You may set the default SMS handler back to the original
Android SMS client manually or by uninstalling the Ozeki SMS app). This will
enable the app to run seamlessly in the background.
Installation steps
The first step of the installation is to open android-sms-gateway.com
in your browser on your Android mobile. On this website navigate to the download
page and find the link to the latest version of the hu.ozeki.smsclient_2.1-release.apk package.
Figure 3 - Open android-sms-gateway.com
The link to the download page can be found in the top menu just below the link
to the Quick start guide. The link's colour is red. To open the download page,
simply click on this link.
Figure 4 - Open the download page
On the download page find the android logo and click on the package name that
follows the logo. The package name will be similar to this: hu.ozeki.smsclient_2.1-release.apk.
The version number might be different.
Figure 5 - Download Ozeki SMS Client APK
Installation of the .apk package
Once the installation package (.apk file) has been downloaded, you need to install it.
You can do this by locating the file in your download list and clicking on it.
Some browsers will automatically offer installation. You might receive a warning
message prompting you to allow installation from a different source.
You can safely allow the installation.
Figure 6 - Open downloaded APK
After the installation starts, you will be prompted with a dialog asking for
confirmation. Simply click install in this dialog. The installation will create
an icon on your home screen that will allow you to launch the Ozeki SMS client app.
Figure 7 - Install Ozeki SMS Client
You can also launch the Ozeki SMS client app by clicking on the Open button
after the installation completes.
Figure 8 - Open application after installation
Set the Ozeki SMS Client app to become your default SMS handler
In order for the Ozeki SMS client app to operate seamlessly it must be set as
the default sms handler. This is a very important step. The Android OS puts apps
that are not opened by the user regularly into sleep or deep sleep to save
battery power. It also often removes the permissions granted to apps when they
are put into deep sleep. By setting the Ozeki SMS client as your default SMS
handler you can prevent it from being disabled by Android. This is required to
be able to provide a reliable sms gateway service for your PC, that is able to
operate for months and years without interruption.
Figure 9 - Set as default SMS handler
By setting the Ozeki SMS Client app as your default SMS handler, you instruct
your android phone to forward all incoming sms messages to it, and you allow
this app to send sms messages from your phone. This is your desired operation
if you want to use your android phone as an SMS gateway. (You an set the SMS
functionality back by uninstalling the Ozeki SMS Client from your phone, or by
following the instructions in the
how to configure the default sms handler in your android device guide).
Figure 10 - Set Ozeki Client
Grant permissions
After you set the Ozeki SMS Client as your default SMS handler, you may click on
the Start button to start the Gateway service. On the first attempt, the app will
request various permissions to operate properly. First it will require permission
for external storage. External storage is used for storing log files and
configuration information. External storage is used in order to make it possible
for you do download log files and backup configuration. This is required by
most business customers.
Figure 11 - Access external storage
To save the logs file access permission is also mandatory.
Figure 12 - Allow all file access
Android phones usually operate from a battery. Battery optimization allows
android to disable apps to save battery power. In order to provide a reliable
SMS gateway functionality your phone should always be connected to the charger.
You should also disable battery optimization on the phone for the Ozeki SMS Client app.
This will allow the Ozeki app to operate continuously without interruptions.
Figure 13 - Ignore battery optimization
From the battery optimization menu, select no restrictions. This will allow
your SMS service to operate reliably.
Figure 14 - Set no restriction
Success! Your Ozeki SMS Client is started.
If you have completed all the steps above, your Ozeki SMS Client on your Android
device is started. This means that your pone is now setup as an SMS gateway.
It is ready to forward SMS messages coming from your PC to the mobile network.
It is also ready to forward incoming SMS from the mobile network to your PC.
Figure 15 - Ozeki SMS Client started
Configure your Windows PC
Once your Android mobile phone is setup and ready, you can move onto configuring
your Windows PC. (Note that these steps can also be completed on a Linux computer.)
The configuration of your windows PC consists of two major steps: installation
of the Ozeki SMS Gateway software and connecting the Android mobile running the
Ozeki SMSC Client app to it. The following video demonstrates what you need to
do on Windows.
After the installation of the Ozeki SMS Gateway software and connecting the Android mobile, you need to add new connection, for the purpose of enabling you to communicate on the device.
For the very first step, you have to click on the “Add new connection” link on the left of your screen, highlighted in blue. This action will bring you a new management page tab.
Figure 16 - Add new connection
In this tab, you can find various wireless connection options, among which you have to install the “Android SMS client”, which gives you the ability to send text messages through your Android mobile phone. The download turns your device to a modem, which means that the phone will be able to send and receive text messages through GSM network.
Figure 17 - Install Android SMS Client
The following necessary movement is to enter the connection details in the boxes
below. It is required to fill the cells of host name or IP address, port number
of your Android phone. In the following section you have to give the username
and password, which you can find on your mobile phone in the Ozeki SMS Client
app. Then click on the “Ok” button at the bottom of that page.
Figure 18 - Specify connection details
Your following assignment will be that, to create the connection to the SMS gateway. You will find a slider button at the left side of the control table, that turns green, by clicking on it.
Figure 19 - Connect to Android SMS Client
In the android_SMS_client_1_details, that contains the log viewer panel, you have to choose the “Test” tab. In this panel, write the recipient’s mobile phone number into the appropriate cell, then formulate a text message into the “SMS” box. When it is done, click on the “Send” button, highlighted in blue.
Figure 20 - Send test SMS
By clicking on the “Send” button above, you will receive a notification SMS, that your SMS has been sent successfully. If you had followed the instructions correctly, then your connection process is done.
Figure 21 - Message successfully sent
Summary
Now, you are able to use your SMS system, including sending text messages via Android phone to PC.
This quick list of instructions has given you the necessary information to get setup easily.
As you have already setup the Android SMS Gateway, it is a good idea to try the Ozeki sms marketing system.
The Ozeki sms marketing system has and advanced ability to manage phone number lists and call to action links, you can now seamlessly
reach out to your target audience with sms messages through your Android SMS Gateway and can convert them into loyal customers.
This feature allows you to utilize your android SMS gateway in a way that maximizes your marketing potential, resulting in
increased sales and brand visibility. Your digital marketing campaigns will be more efficient and effective than ever before!
This quick start guide takes you through the steps of installing
Ozeki SMS Gateway on Windows and sending SMS messages through an
Android Mobile phone. In order for the Android phone to work with
Ozeki SMS Gateway, the Ozeki SMS App needs to be installed on it. In this
guide, you will learn how to pair your Android phone with the Windows Ozeki
SMS Gateway system using a QR code scan.
Overview
The quickest way to send SMS is to hook up an Android mobile phone to your
PC and send an SMS. In this quick start guide, this is what we are going to
present. If you wish to send SMS using other methods, such as SMPP,
HTTP, GSM modems,
check out the "How to connect to mobile networks" guide.
To send SMS from your PC using an Android mobile read on:
Prerequisites
Windows PC
Android mobile phone*
*We recommend you to use a dedicated Android phone for production
systems, because in order for the Ozeki Android SMS App to operate
well it should be set as the Default SMS handler on the mobile device,
and it should always be connected to your Windows SMS Gateway system.
Quick steps
Step 1 - Download and Install Ozeki 10 SMS Gateway for Windows
Step 2 - Download and Install Ozeki SMS App for Android
Step 3 - Connect the Android by scanning a QR code
Step 4 - Send a test SMS from Windows
Step 1 - Setup Ozeki SMS Gateway on your Windows PC
To install the Ozeki SMS Gateway on Windows, download the .zip file from the
Download page, extract it, run the .exe installer,
and follow the on-screen instructions. Open the SMS Gateway within Ozeki 10 following
installation.
The following video shows you how you can download and install Ozeki SMS Gateway on Windows.
Step 2 - Install the Android App on your mobile phone
You can install the Android app by scanning the following QR code or by clicking on the
link below it. You can also take a look at the video that shows how you can
setup the Ozeki Android app, and how you can configure it by scanning a QR code shown
in Ozeki SMS Gateway. The video also shows how to send a message to ensure the connection is successfully
established.
Android App installation QR code:
Scan this QR code to install the
Ozeki Android SMS App on your Android mobile
(use Android 9 or newer).
How to install the Android App on your Android mobile.
Step 3 - Connect the Android by scanning a QR code
Once Ozeki SMS Gateway is installed on Windows, click Add new connection on the left panel
of the main page, as illustrated in Figure 1.
Figure 1 - Add a new connection
Next, click on Install next to Android SMS QR, highlighted in red in Figure 2.
Figure 2 - Install Android SMS QR connection
Enter the phone number of your Android phone into the corresponding
textbox, then hit OK, as shown in Figure 3.
Figure 3 - Configure phone number
If you have not already done so, this is the time to install the Ozeki Android App
on your mobile phone. (If QR code installation does not work, you can install the
Android app manually by downloading the installation file (APK) from the
android-sms-gateway.com website,
enable 'Unknown sources' in device settings, use a file manager to locate and
tap the APK, then follow on-screen instructions to complete installation
and grant necessary permissions.)
Scan this QR code to install the
Ozeki Android SMS App on your Android mobile
(use Android 9 or newer).
Once the Ozeki App is running on the Android phone, you need to connect
the phone to your Windows PC. In Windows, click on the QR code
tab located near the middle in the upper half of the screen of
your Android QR connection's details page. You should see a QR
code similar to the one in Figure 4.
Figure 4 - Scan QR Code
Video tutorial:
The next short video takes you through the steps of starting the Ozeki SMS App
by connecting it to the SMS Gateway by scanning the QR code.
In order for the Ozeki SMS client app to operate seamlessly, it must be set as
the default SMS handler (see Figure 5 and 6).
This is a very important step. The Android OS puts apps that are not opened by
the user regularly into sleep or deep sleep
to save battery power. It also often removes the permissions granted to apps
when they are put into deep sleep.
By setting the Ozeki SMS client as your default SMS handler,
you can prevent it from being disabled by Android.
This is required to be able to provide a reliable SMS gateway service for your PC,
that is able to operate for months and years without interruption.
Figure 5 - Set as default sms handler
Figure 6 - Select Ozeki SMS Client
Inside the Android app, tap the Start button, like in Figure 7.
Figure 7 - Start Service
Then, tap on the link that says Scan QR code. It is highlighted in
Figure 8.
Figure 8 - Open Scan QR code option
The camera should open. Point it at the QR code on your screen to scan it,
similar to Figure 9.
Figure 9 - Scan QR code
If done correctly, the row that previously said 'Link: not connected', should
have turned to 'Link: Connected.' in the Android SMS Client (Figure 10).
Figure 10 - Connected to the SMS Gateway
The Events tab of the freshly created connection should also tell you that the
connection was successful, as seen in Figure 11.
Figure 11 - Client connected
Step 4 - Send your first SMS
Now that everything is setup you are ready to send a test SMS. Click on New in
the toolbar. This will take you to the message composer page (Figure 12). Enter a
phone number and your message text and hit Ok to send it.
Figure 12 - Send message
If successful, both the web GUI and the Android app should tell you the message
was sent out (Figure 13).
Figure 13 - Message sent
To make sure you have done everything correctly, head to the new connection's
Events page, where you should see logs similar to Figure 14.
Figure 14 - Message sent log
Are there other ways to connect my Android phone and my PC?
What is the difference between the QR code setup and the manual config
The Ozeki Android SMS App and Ozeki SMS Gateway on Windows communicate through a
TCP/IP link. When you scan a QR code to setup this link with your Android mobile,
you download the TCP/IP connection details to the mobile phone, and it will act
as a TCP/IP client. In this case your mobile phone will initiate the connection.
If you wish to do manual configuration, you will use the TCP/IP endpoint information
deisplayed on your Android App's user interface and you will enter it into
Ozeki SMS Gateway. In this setup your Android mobile phone will be a TCP/IP server
and your windows PC will connect to it to establish the link.
Both options are equally good. This guide explains the steps to take to use the
second option.
What you'll need?
In order to send SMS from your PC through an Android mobile phone,
you need an Android mobile with a SIM card (the SIM card is usually already installed in your Android phone).
You also need a wifi link between your Android phone and the PC,
and you need to download and install Ozeki SMS Gateway on your PC.
Figure 1 - Everything You Need to Get Started
SMS Gateway using your Android mobile phone (Quick steps)
SMS Gateway using your Android mobile phone:
Download and install Ozeki Android SMS Client app
Set the Ozeki app as the default SMS handler, grant permissions
Download and install Ozeki SMS gateway on Windows
Start Ozeki Android SMS Client
Configure your Windows PC
Start the Gateway on Windows
Send SMS with SMS Messenger
Congratulations! You have successfully sent an SMS message with Ozeki Android SMS Gateway
Install the Android SMS gateway app on your Android phone (Video tutorial)
The following video tutorial takes you through the steps of Installing the Android SMS
Client software on your Android mobile. Note, that you will need to
download the Android SMS app from android-sms-gateway.com. After
installation make sure you set the Ozeki app as the default SMS handler.
(You may set the default SMS handler back to the original
Android SMS client manually or by uninstalling the Ozeki SMS app). This will
enable the app to run seamlessly in the background. Continue with downloading
the Ozeki SMS Gateway in video 2.
Step 1 - Download Android App
The first step of the installation is to visit android-sms-gateway.com
on your Android phone. From the menu tap on Download which will open the downloads menu.
Here the download is straightforward, you'll see a blue .apk label on the screen,
simply tap on it and it will start the downloading (see Figure 1).
Figure 1 - Download Android App
Step 2 - Installation of the .apk package
Once the installation package (.apk file) has been downloaded, you need to install it.
You can do this by locating the file in your download list and clicking on it.
Some browsers will automatically offer installation.
You might receive a warning message prompting you to allow installation from a different source. You can safely allow the installation.
After the installation starts, you will be prompted with a dialog asking for confirmation.
Simply click install in this dialog.
The installation will create an icon on your home screen that will allow you to launch the Ozeki SMS client app (see Figure 2).
Figure 2 - Installation of the .apk package
Step 3 - Set the Ozeki SMS Client app to become your default SMS handler
In order for the Ozeki SMS client app to operate seamlessly it must be set as the default SMS handler (see Figure 3).
This is a very important step. The Android OS puts apps that are not opened by the user regularly into sleep or deep sleep to save battery power.
It also often removes the permissions granted to apps when they are put into deep sleep.
By setting the Ozeki SMS client as your default SMS handler you can prevent it from being disabled by Android.
This is required to be able to provide a reliable SMS gateway service for your PC, that is able to operate for months and years without interruption.
Figure 3 - Set as default SMS handler
Step 4 - Grant permissions
After you set the Ozeki SMS Client as your default SMS handler, you may click on the Start button to start the Gateway service.
On the first attempt, the app will request various permissions to operate properly. First, it will require permission for external storage.
You have to grant permission to manage all files (see Figure 4).
You should also disable battery optimization on the phone for the Ozeki SMS Client app (see Figure 5).
Figure 4 - Grant access to all files
Figure 5 - Set no restriction
Note
Now you finished the first step of using the Ozeki Android SMS gateway.
If the instructions weren't clear or if you want more details, you can view a
detailed tutorial of the installation.
Download and install the Ozeki SMS gateway on Windows (Video tutorial)
In this brief video, we guide you through the process of downloading and installing the
Ozeki SMS Gateway.
Begin by accessing the download site, proceed to extract the RAR file, and then
install the program using the provided installer.
Follow the given instructions, to learn the easy process of downloading the Ozeki
SMS Gateway software. By the end of this educational video, you will successfully
download and install the Ozeki SMS Gateway on your computer. The next video will be
about configuration. Continue learning.
Video 2 - How to download and install the Ozeki SMS gateway on
Windows (Video tutorial)
Step 1 - Download Ozeki SMS Gateway
From the download page, download Ozeki SMS Gateway for Windows (see Figure 6).
Figure 6 - Download Ozeki SMS Gateway
Step 2 - Extract files
the downloading process is complete, you'll find a compressed file.
Right-click on the file and select the "Extract All" or "Extract Here" option from the menu.
Allow the extraction process to unfold, patiently waiting until it reaches completion (see Figure 7).
Figure 7 - Extract files
Step 3 - Install Ozeki SMS Gateway
Once the extraction is complete, you'll find a .exe file in your directory.
Run the .exe file to initiate the installation process.
Follow the on-screen prompts to complete the installation (see Figure 8).
Figure 8 - Install Ozeki SMS Gateway
Note
Now you finished the next step of using the Ozeki Android SMS gateway.
If the instructions weren't clear or if you want more details, you can view a
detailed tutorial of the installation.
Start Ozeki Android SMS Client
On the Ozeki SMS Gateway app, tap the Start button.
This will start the Ozeki SMS Gateway Client, meaning your Windows PC will be able to connect to your phone,
over wifi to enjoy the benefits of the Ozeki Android SMS Gateway.
After tapping the start button you will see that the 'Status' will change to 'running', and details will appear.
Status will show if it is running or not, and there will be the connection details (see Figure 10).
Figure 10 - Start Ozeki Android SMS Client
Configure your Windows PC (Video tutorial)
Once your Android mobile phone is set up and ready, the next step involves configuring your Windows PC.
The upcoming video will provide a step-by-step demonstration,
guiding you through the process of connecting to the Android mobile device that
is running the Ozeki SMSC Client app. Follow this easy guide and complete the
configuration process of Ozeki SMS Gateway. This step is essential to continue
with the following step to set up Standard user, presented in the next video.
Step 1 - Add new connection
To establish a new connection, simply click on "Add new connection" located in the left menu bar (see Figure 11).
Before proceeding, ensure you have installed the Android SMS Client, a crucial component that transforms your Android phone into an efficient SMS modem.
Figure 11 - Install Android SMS Client connection
Step 2 - Configure connection details
Next, proceed to fill in the essential details in the host, port, username, and password boxes.
You can easily obtain this information from the Android app on your phone.
Once you've entered these details, click the "OK" button (see Figure 12).
With this connection in place, you'll unlock the potential of Ozeki SMS Gateway, granting you access to a wide array of powerful features and functionalities.
Figure 12 - Configure connection details
Step 3 - Start the Gateway on Windows
You will now find a slider button at the left side of the control table, that will start the gateway, by clicking on it.
The Ozeki SMS Gateway has successfully started on your Windows PC (see Figure 13).
Figure 13 - Start the Gateway on Windows
Note
Now you finished the next step of using the Ozeki Android SMS gateway.
If the instructions weren't clear or if you want more details, you can view a
detailed tutorial of the installation.
Send SMS text message with Ozeki SMS Messenger (Video tutorial)
In the following video,
you will learn about how you can set up a Standard user in the Ozeki SMS Gateway server software and start using the SMS Messenger to send your first short text message.
The video is a little shorter than 1 minute but it contains all necessary information to be able to do it alone.
Step 1 - Install standard user
Access the Home page of the gateway. Choose the "Add new user/application..." option from the Management panel to add a new user.
Setting up the Standard User involves installing it through the General section.
To proceed with the installation of the Standard User, simply click on the "Install" link situated next to it (see Figure 14).
Then set up Standard user login information, so you can access it with login data. Enter a Username and Password to it (see Figure 15).
After these steps, you need to log out from the current account (start button at the bottom left corner).
Figure 14 - Install standard user
Figure 15 - Configure user
Step 2 - Login and send SMS
You can now log in as the standard user in the Ozeki SMS Gateway.
Simply input the Username and Password on the login page to access the standard user account (see Figure 16).
On the Ozeki Desktop look for "SMS Messenger" and click it to open (see Figure 17).
Figure 16 - Login as standard user
Figure 17 - Open SMS messenger
Step 3 - Send SMS
By clicking on the "New" button, create an SMS message in Ozeki Gateway.
Add your recipient's mobile phone number and formulate the text message in the appropriate cells (see Figure 18).
After entering these details, click on the "OK" button to start the process of delivery.
Figure 18 - Send SMS Message
Note
Now you finished the next step of using the Ozeki Android SMS gateway.
If the instructions weren't clear or if you want more details, you can view a
detailed tutorial of the installation.
How does a successful SMS sending log look?
When a message is sent using Ozeki SMS Gateway,
the system automatically generates a log for reference.
To access and review this log, navigate to the 'Events' tab within the application (see Figure 19)
or if you sent it from Ozeki SMS Messenger, simply view the Message delivery history (see Figure 20).
Overall, the SMS log is a valuable tool for users of Ozeki SMS Gateway. It provides a detailed record of all SMS activity, which can be used for a variety of purposes.
Figure 19 - Message Log
Figure 20 - Message History
Successful SMS Sending Log (Video)
In this video you can see, what the log message looks like after you send a
test message in Ozeki SMS Gateway. By observing the measures, you can monitor the
status of your messages, and ensure that your SMS communications are functioning
well. Watch this short video for a detailed guidance of the essential steps you
need to make fo successful SMS sending log. In the next video, you can see what
does the log text message look like.
In this video you can see, what the log message looks like in Ozeki SMS
Messenger. This quick video, we will present you the process of getting the
Message delivery history details easily in the Ozeki Messenger. Follow the step-by-step
guidance for better understanding. By the end of this short video tutorial, you can
learn this easy process and check the details anytime you want.
How Does it work?
This solution turns your Android mobile phone into an SMS modem. In order for this solution
to work, you need to install two software: You need to download and install the Ozeki Android
SMS client on your Android phone, and you must make it the default SMS app. Then you need to
install
Ozeki SMS Gateway on your PC. Once both software is
installed, you need to configure the address of your Android mobile in Ozeki SMS Gateway.
This will allow the Ozeki SMS Gateway software to send and receive SMS messages through your Android phone.
Figure 21 - How Does it work
FAQs
What kind of user interface is available for Ozeki SMS Gateway?
Ozeki SMS Gateway offers a convenient web-based user interface, accessible
through any web browser on your computer. While older versions like Mozilla
Firefox 2.0 and Internet Explorer 6.0 are technically compatible, it's
recommended to use a more recent browser for optimal performance and security.
To access the interface, simply open your web browser and type in the following
address: http://127.0.0.1:9501/ This will launch the login screen where you can
enter the default username and password to start managing your SMS gateway.
What is the default username and password?
Username: admin Password: abc123
It is strongly recommended to change the default password immediately after
installation.
Can I access the web-based user interface remotely?
You can access the Ozeki SMS Gateway user interface (UI) from your local
network (LAN) or even over the internet. However, for remote access, you might
need to adjust your firewall settings.
To connect to the UI, open a web browser and enter the correct URL in the
address bar.
The default URL for local access is:
http://127.0.0.1:9501
If you have a Domain Name System (DNS) server, you can create a DNS "A" record
pointing to your public IP address. This allows you to use a more user-friendly
domain name instead of the IP address.
The default port for the UI is 9501. If you changed this in the Ozeki
settings, you'll need to include the new port number in the URL. For instance,
if you changed it to port 80 (the standard HTTP port), you could use:
http://127.0.0.1 (local access)
http://152.66.115.1 (remote access with default port)
http://smsgateway.mydomain.com (remote access with custom DNS name)
If you can't access the UI, your firewall might be blocking access to the port
used by Ozeki (usually port 9501). You might need to adjust your firewall
settings to allow remote connections to this port.
Conclusion
We've strived to simplify the process and guide you through every step with utmost ease.
You learned how to install the Ozeki Android SMS Client app, set up SMS Gateway on Windows, and send SMS via this solution.
Everything that you need to try out Ozeki SMS Gateway.
If you've closely followed these instructions,
you should now be proficient in sending SMS messages using Ozeki Android SMS Gateway, without encountering any hitches.
Ozeki offers you the unique ability to route SMS messages across various endpoints while granting you control over your messages throughout their journey.
You can efficiently manage SMS costs and monitor your SMS traffic,
as well as log SMS messages into a database, offering comprehensive reporting capabilities to enhance your understanding of your SMS communication.
To learn more about the advantages of Ozeki and explore similar solutions, please visit ozeki-sms-gateway.com.
This article is about sending SMS through the Android SMPP Gateway using Ozeki SMS Gateway. After reading this, you will be able
to send out SMS using SMPP protocol. SMPP (Short Message Peer-to-Peer) and Ozeki SMS Gateway give you the
ability to send out text messages from your computer. The distribution is helped by an Android phone, so you will also get to see
how to use the Ozeki Android SMPP Gateway on your phone. This guide is highly recommended if your company wants to send out
SMS in a simple but rapid way.
Az Android SMPP Gateway accepts connections over the Internet (or Lan) from computers. These computers
send SMS to the Android mobile phone using the SMPP protocol, and the Android mobile phone forwards
these SMS messages to the mobile network.
How to send sms through the Android SMPP Gateway (Simple guidelines)
This SMS communication solution make it possible to use your computer to send SMS messages to any mobile phone.
The solution consists of a computer with the Ozeki SMS Gateway installed, your mobile phone with the Ozeki SMPP SMS Gateway application installed and some other mobile users.
Your computer and the SMS gateway software is responsible for compiling the message.
Your mobile phone will receive the request and will send the message using the gateway application.
On the diagram (Figure 1) you will see that the computer will configure the message and submit it for sending.
Your mobile phone will get the submission using a wireless connection and will send it to the recipients.
Figure 1 - Android mobile connection
How to send SMS through the Android SMPP Gateway (Quick steps)
To send SMS through the Android SMPP gateway:
Setup Ozeki Android SMPP Gateway on your phone
Start the application
Launch Ozeki SMS Gateway on your desktop
Add new service provider connection
Install SMPP client connection
Enter the parameters from the Android SMPP SMS Gateway app
Check SMPP connection installation status on Events tab
Create test SMS text message on Test tab
Send the test SMS text message via the Android SMPP Gateway
Start the application by clicking on its icon then "Start" button.
You will see the followings on the top left-hand side of the screen:
Host address, Port number, User name, Password (Figure 2).
You need to memorize these parameters because they will be needed later.
Figure 2 - Ozeki Android SMPP SMS Gateway has been installed and launched successfully
How to send sms through the Android SMPP Gateway (video tutorial)
In this video tutorial we show you how to configure the SMPP client in Ozeki SMS Gateway and send out a test message.
A bit longer than one minute but shows everything step by step, so it is fair to call this tutorial short and detailed.
Advised to watch it carefully in order to do every step right. After watching the video, you will be able to configure everything
by yourself.
Setup SMS Gateway to use your Android phone
You need to install and configure SMPP connection.
Firstly, add new service provider connection by clicking on the left-hand sided
Connections panel's "Add new connection" link.
After this, the "Add a connection" list will appear on the right side of the GUI. Look for IP SMS connections
install list and select the SMPP client install item to use the SMPP protocol. (Highlighted in Figure 3)
Figure 3 - Adding a new SMPP connection
Specify the SMPP server settings
Provide your SMPP credentials on the Install connection page's General tab.
There you can find the Connect to server group box, where you need to enter the following parameters:
Host, Port number, Username, Password.
You can find these parameters in your Ozeki Android SMPP SMS Gateway application. (see Figure 4)
Figure 4 - Specifying the SMPP server settings
Check the installation of the SMPP connection
In the SMPP_client_1 details page you can find the Events tab where the "Successful login" and "Connection online" messages
indicate that the SMPP connection has been installed successfully. Study the Event log in order to understand what is happening in the
connection. You can switch on/off the update of the log, delete the content and update it with the buttons
in the right corner of the tab page. (Figure 5)
Figure 5 - SMPP connection has been installed successfully
Send your first SMS
Switching to the Test tab page you can send test SMS message. Go for
the General tab and provide the recipient address by
writing the phone number to the Recipient group box,
write the message to the SMS group box and click on the Send button to create
and send out a test message. (All highlighted in Figure 6)
Figure 6 - Sending a test message
Make sure that the message is sent successfully
Finally, you can check whether the message is sent successfully or not by looking at the bottom of the page.
There you can find information about the time the message was sent, the status of the messaging procedure and the connection.
A green check mark shows that sending the test message was successful. (Figure 7)
Figure 7 - Message successfully sent
Summary
In this article we showed you how to send out SMS with SMPP protocol using Ozeki Android SMPP SMS Gateway and Ozeki SMS Gateway.
This solution helps you to send out SMS from your computer, you only need Ozeki SMS Gateway installed in your selected computer
and a mobile phone with Android SMPP SMS Gateway to transmit these messages to the recipients. The messaging will be easy and
fast with this solution.
Do not finish your work here,
you can read more about different types of connections, like UCP connection and OZX connection in our website.
Yes it is possible. You may send SMS messages free of charge from your PC. This guide
gives you information about how this can be done. In short, you need to
install the Ozeki Android SMS gateway on an Android mobile phone running
Android 9 or later, and you need to connect to it from your PC using a
webbrowser.
What is the trick?
While on-line SMS service providers often charge for
SMS messages sent or recieved over the Internet. Mobile network operators
now offer plans and subscription with free and unlimited text option.
The trick is that you purchase a SIM card with such a plan and
you install the Ozeki Android SMS Gateway software to your Android Mobile phone.
Such as SIM card costs GBP 1 (yes, one pund) in the UK, plus you need to topup
a minimum amount of GBP 10. That is all the cost you will pay.
When you purchase the SIM card, look for the "unlimited text" option in the advertised mobile phone
plan.
Free SMS - Vodafone UK
Go to any Tesco store in the UK and get a SIM card with unlimited texts. Fore example
you can choose Vodafone SIM cards because they offer umlimited free SMS messages (Figure 1).
Figure 1 - Send SMS free of charge
Free SMS - O2 UK
O2 UK also offers unlimited free sms messaging from your mobile phone (Figure 2). Similar
plans are available from other providers as well.
Figure 2 - Send SMS free of charge with O2 UK
Once you have a SIM card with unlimited text plan, and you have installed
Ozeki Android SMS gateway to your mobile, your business applications can
connect to your Android Mobile phone using the same connection methods you have
used to connect to On-line SMS services (e.g. HTTP API, SMPP, etc.) and you
can send SMS messages free of charge.
This article shows you how to send SMS wirelessly using an SMS modem.
The article explains these steps using the Ozeki 4G LTE SMS Modem.
The Ozeki 4G LTE SMS Modem is high speed professional wireless modem that
can be connected to a PC using an USB port. It is an excellent choice for most SMS solutions.
It operates at 115200 baud and features excellent support with Ozeki SMS
Gateway.
What is a 4G modem?
A 4G modem is a hardware device designed to make connections to cellular networks.
After connecting to the network, you can use it to send and receive SMS messages.
It is a great choice for created automated text messaging services like SMS alarms
or sending bulk marketing sms messages.
How does sending SMS through a 4G modem work
Sending SMS from a 4G modem requires the modem itself, a computer, Ozeki SMS
Gateway and the recipient's mobile device. The connected computer will compile
the text message for the SMS message using Ozeki SMS Gateway. It only needs the
address and the message text. The computer will use the modem to send the SMS
message to the service provider. The service provider will forward the text
message to the recipient's phone. (Figure 1)
Figure 1 - Send SMS from PC with Ozeki 4G LTE SMS Modem
Compatibility with Ozeki SMS Gateway
The Ozeki 4G Modem is the perfect choice to use with Ozeki SMS Gateway. When we
built the modem, we paid extra attention to compatibility with Ozeki SMS Gateway
and other Ozeki Services, as well as high speed, small form factor and ease of
setup. We also provide up to date information and setup guides for all our devices.
How to send SMS with a 4G modem
To send SMS with a 4G modem:
Insert the SIM card into the modem
Plug the antenna into the modem
Connect the modem to your PC with USB cable
Launch the Ozeki SMS Gateway
Run the sms modem autodetection
Specify the recipient phone number
Write the content of the SMS message
Click on Send to send the SMS
Review the test SMS message you sent
Ozeki 4G LTE SMS Modem setup (video tutorial)
In this guide video, we will show you how to set up the Ozeki 4G modem.
For this setup you need the Ozeki 4G modem, a SIM card, two antennas and a USB cable.
First, we insert the SIM card into the modem, then we connect the antennas to the modem.
Now all we have to do is connect the modem to the PC. Once the modem is successfully
connected to the PC, the power led will light up to indicate that it is working.
Get the parts that you need to connect the modem successfully
To connect the modem to a PC, you'll require the following components, (Seen on Figure 2)
a SIM card, two antennas, a USB cable, and the
modem itself. Make sure that you have all necessary accessories for utilizing
the modem, as even the smallest details are significant.
Figure 2 - Required parts
Insert the SIM card into the modem
Begin by inserting the SIM card into the modem, which is the initial step in the
process. This action closely resembles inserting a SIM card into a mobile phone.
The SIM card serves to establish the connection between the modem and the network.
(Illustrated in Figure 3)
Figure 3 - Inserting SIM Card, pay close attention to correct seating
Important settings for SIM card
The settings outlined here are very important. Failing to
complete these steps will result in the incompatibility of your SIM card
with Ozeki 4G Modem. It's crucial to disable your PIN code and
divert phone calls to an alternate number. These actions can be performed
on a conventional mobile phone (Refer to Figure 4).
Figure 4 - Set your sim card
Connect the antenna to the modem
Once the SIM card is inserted, proceed to attach the antennas to the modem.
Ensure proper and accurate connection for optimal performance. The antenna's
role involves both signal transmission and reception.
(Visualized in Figure 5).
Figure 5 - Attaching antennas
Insert the USB cable into the modem
The next step is to insert the USB cable into the modem. This action establishes
a connection between the modem and your computer. It is recommended to employ a
fully functional cable to prevent any potential disconnections.
(Refer to Figure 6).
Figure 6 - Connecting USB-C to modem
Plug the USB cable into your computer
Finally, attach the opposite end of the USB cable to your PC.
Insert it into your computer's port.
(As depicted in Figure 7).
In this video you will learn how you can set up an Ozeki 4G LTE SMS Modem to send text messages (SMS)
using a USB cable. For this setup, you need to have a connected Ozeki 4G Modem and Ozeki Software Platform installed.
We will install the drivers and use Ozeki SMS Gateway to install a new SMS Modem to send our first test message.
Once we send the message we check it on our recipient device.
To install the Modem Driver, access the folder where the downloaded file is located.
Unpack the downloaded files into a new folder and locate the Driver Executable
File. Start the installer by double-clicking on it; if prompted for Administrator
rights, click on Allow. (Refer to Figure 8 for an example).
Figure 8 - Install Ozeki Modem Driver
Proceed with Installing
To start the driver installation, after opening the installer window, simply
click the Install button and patiently wait for the completion of the install.
Once the installation is finalized, click the Finish button to
conclude the setup procedure. (Shown in Figure 9).
Figure 9 - Press Install
Open Ozeki SMS Gateway App in Ozeki Software Platform
To launch the Ozeki Software Platform, access the search feature within the Windows
Taskbar. Input Ozeki 10 and select the corresponding application. The
software is supposed to start within a brief period.
Within the Ozeki Software Platform, navigate to the Ozeki SMS Gateway. Typically
located on the left side, it has various default apps. Locate and open the
SMS Gateway application, identifiable by a phone icon with "SMS" text.
This will start the SMS Gateway Application. (Refer to Figure 10).
To establish a fresh connection in Ozeki SMS Gateway, locate the
add new connection link within the Connections panel on the
left-hand side. Click on it to unveil the page containing the connection list,
where you can configure an SMS modem. (Visible in Figure 11).
Figure 11 - Add new connection
Install a new SMS Modem
In the next window, you will find a list of available connections
you can establish within the SMS Gateway application. Locate the Wireless
connections install list and choose the SMS modem installation item.
Click on the Install link, that will let you install a new modem in Ozeki
SMS Gateway (Exemplified in Figure 12).
Figure 12 - Install new SMS modem
Select the Port
Within the Serial port settings, access the Port dropdown menu. Search for the
Ozeki Modem Port entry and click on it. This will select the
integrated modem within the Ozeki SMS Gateway Modem,
enabling the transmission of messages via 4G. (Refer to Figure 13).
Figure 13 - Select Ozeki Modem
Autodetect properties
Next to the dropdown menu, find the blue button with the text
Autodetect, click this button to automatically get
all data from your SIM card like your phone number and configure it,
it may take a few seconds.
(Figure 14)
Figure 14 - Click autodetect
Check the information
Check your details, a window will pop up named Autodetect, check
if every detail matches to your SIM card,
you can also see the modem details here. Click on the Ok button
at the bottom when you are done checking
everything. This will finish the Autodetect procedure and ready your
modem for sending sms messages from your computer.
(Figure 15)
Figure 15 - Details of the detected modem
Finish setting up your modem
To finalize the setup of your modem, locate the blue Ok button situated
at the screen's bottom. If you desire to make additional adjustments to your
modem, you can do so under the SMS tab or the Advanced tab. Alternatively, you
can return to this tab after clicking Ok and access the Configure tab at a later
time.
(Can be seen on Figure 16)
Figure 16 - Press OK in SMS modem installer
Enable SMS Modem Connection
To enable SMS modem connection, find the Connection group on the left,
you have to Enable the Connection switch,
which is the second option in the group. Click on it to make it green
and your modem will start connecting to your service provider.
(Figure 17)
Figure 17 - Enable SMS modem Connection
Navigate to the Test panel
Navigate to the navigation bar in the right panel and click Test
to open the Test tab page and enter the Test
SMS sending page. You can send test messages from here to anyone with
custom content.
(Seen on Figure 18)
Figure 18 - Select Test option
Fill the recipient's address and test message
Fill in the recipient's address and enter the test message, look for the
To field in the Recipient group,
you can enter the phone number there, and type into the SMS
text field what you want to send. You can write whatever you want here.
(Figure 19)
Figure 19 - Enter the SMS details
Send the SMS
Send the SMS if you are done, look for a blue Send button at the
bottom of the screen. Click on the
button to send the message and you will soon receive the SMS on the
specified phone number.
(Figure 20).
Figure 20 - Press Send
Check the test message
Check the test message on your mobile device, look for an application
that handles SMS messages and open it, if you
see your test message appear with the correct content, your SMS modem
is working correctly, congratulation!
(Figure 21)
Figure 21 - SMS Received
Summary
As you can see in the guide, the Ozeki SMS Modem works really well with Ozeki SMS Gateway. Using them together lets you send messages from your computer, helping your company to grow bigger. You can use this to send out automated or bulk messages. After you went through the steps, got the needed hardware and software, you will be able to send SMS using your computer.
The easiest way to send sms is to use an Android phone with Ozeki SMS Gateway.
In case an Android mobile is not available, you can also use a GSM modem.
This guide explains how you can attach a GSM modem to your PC with a data cable to send
and receive SMS messages.
This guide will take you through the steps of how to send SMS from the Windows SMS server with a GSM modem.
How to send SMS with a GSM modem
To send SMS with a GSM modem:
Check the prerequisites
Launch Ozeki SMS Gateway and login
Add new SMS modem connection
Install new Standard user
Provide unique username and password
Create a new inbound route
Set the Mode to Move
Configure a new outbound route
Select the Move from Mode options
Send test SMS with the GSM modem
Video tutorial
This video demonstrates the setup of the GSM modem connection and automatic
recognition of the SMS modem port. You’ll gain knowledge on creating a new user
and applications. Following that, the user could utilize a user-friendly
graphical interface (GUI) to send and receive SMS messages.
Figure 1 - PC to SMS modem and SMS Gateway prerequisites
SIM card: To use all the functionality of Ozeki SMS Gateway, first you need a mobile subscription
that comes with a SIM card. This SIM card will provide you a telephone number, that is crucial to send and
receive SMS messages with Ozeki SMS Gateway.
GSM modem: A special type of modem, that accepts SIM cards. That modem can be
connected to your PC via a data cable and use it as a broadcaster
for your messages. The GSM modem is available directly from Ozeki Ltd.
Data cable: To connect your GSM modem to the PC, you just need a simple USB data cable that is
provided for each modem that has been ordered from Ozeki Ltd.
If you want to send mass text messages from computer, the first thing that
you need to do after the installation to log in to your account that you created during
the installation. For that just click on the Ozeki Desktop icon and
your Ozeki SMS Gateway will open up in your web browser (Figure 1).
Figure 1 - Log in for the first time
In the login window just enter the username
which is 'admin' by default and your password that you specified during the installation. After you pressed OK, the SMS Gateway
starts automatically with an opening window as Figure 2 demonstrates it. Here there are four main
panels that collect all the main features of the SMS Gateway you need to handle SMS messages. If you
want to change the password of the default 'admin' user, you can easily do that by following the quick
guide on the link.
Figure 2 - Opening window of the SMS Gateway
Step 2: Set up your mobile network connection
The next step is to connect your system to the mobile network. To do this there are two options.
You can connect to the mobile network like any other mobile phone does, in this case you
need to connect a GSM modem or you need to connect through
an Android mobile phone. The other option is to connect to the Short Message Service Centre (SMSC)
of a mobile network operator over the Internet. In this case you would setup an
SMPP connection, an UCP connection
a CIMD2 connection or an HTTP SMS connection.
The simplest option is to connect your computer to the mobile network using an GSM/SMS modem.
An SMS modem is s simplified mobile phone. You can put a SIM card in it, and it has an antenna.
In this case Ozeki SMS Gateway will communicate with you modem over a data cable
and will receive incoming SMS and will send outgoing messages through the wireless link
provided by the modem. The way you will do that is very simple, you only need to create a
connection that can manage the GSM modem and use to send and receive SMS messages. To create
that connection just select Add new connection... like in Figure 3.
Figure 3 - Choose Add new connection to create one
Next, as Figure 4 shows that, you can choose from numerous connections since Ozeki SMS Gateway
supports many protocol types. But now, to follow this guide you need to create a wireless
connection, more specifically an SMS modem connection that can be performed by clicking on the Install
button.
Figure 4 - Available connections in Ozeki SMS Gateway
Before finishing the creation of the connection, you can give a name to the
connection and select the port, where you connected the SMS modem. If you are not sure about
specific number of the port, just click on the Autodetect button (Figure 5), and
a few moments later, the system finds that for you. Lastly you have to enter the telephone
number of the SIM card that you plugged into the SMS modem. To finish the creation just click on OK.
Figure 5 - Autodetect the port where you plugged the GSM modem
Step 3: Create new user or application
Ozeki SMS Gateway provides you the functionality of handling multiple users, so the
messages can be separated by the different users. To add a new user just select the
Add new user/application... or click on the Add button on the top of the
Users and applications panel as you can see in Figure 6.
Figure 6 - Two ways of entering to the creation of a new user or application
Next, you can choose between various types of users
and applications. Here you can create a general or a network user, select from
numerous application interfaces and also you can create services that can handle the
incoming messages. If you follow this guide, you will create a standard user by selecting the
Standard user like in Figure 7.
Figure 7 - List of creatable users and applications
In the installation menu you can name the user at the General panel. This name
will show up in the list of users. In the Authentication tab (Figure 8) you can secure the
account by entering a unique username and a password. The rules of the password are the same
as it was at the creation of the 'admin' account. To finish the creation just click on OK.
Figure 8 - Select a username and password for the account
Now, you can see the created user in the Users and applications panel. To modify
the parameters of the account, just select the user, and you will be able to do
that in Configure tab (Figure 9). To view the events related to the user, select the Events
tab.
Figure 9 - Configuration menu of the Standard user
Step 4: Routing your messages
With the installation and the creation of the default 'admin' account, Ozeki SMS Gateway also created a default
routing rules for the incoming and outgoing messages that can be seen in the Incoming
and the Outgoing panels like in Figure 10. But of course, you have the opportunity to
define your own routing protocols.
Figure 10 - Routing tables in Ozeki SMS Gateway
Inbound routing: The incoming messages can be destined to one or more users. There is a
default route that was created at the installation process, but you can easily set your own routing rules.
For that, just select the Add new route... option and now you will be able to add a new route or
configure the existing routes as well. If you would like to create a new route, first of all you have to define which user or
connection send the message to which user or connection. The other main feature that you need to setup, is the
mode of the route. There are three options to choose from: Move, Copy or Drop (Figure 11). Now, if you click on OK,
the freshly created route will appear in the list of the routes.
Figure 11 - Select a mode for the routing rule
Now, if you take a look at your routing table you will be able to see that your routes list up in order.
So, that means in case of an incoming messages, the program tries to activate a first route of the table.
If there is a match of the rules, the messages will be delivered to the user specified in the rule. But if the parameters do not meet
the criteria the program will go on to the next rule. If a rule matched with the criteria, there are
two ways the routing can continue. If the matched rule has the mode Copy, the program will continue
going through the subsequent routing rules. The other option is that the rule is in Move mode. In that case
the routing will finish, and the subsequent rules will be ignored. The order of the rules can be easily changed as
Figure 12 shows
by clicking on the icons in the Order column.
Figure 12 - Change the order of the routing rules
Outbound routing: An outgoing message can be sent using one of the service providers you are
connected to. With the outbound routing you can configure the rules for the program to decide which service provider
connection to use to send out a message. The routing rules are the same as it was at the inbound routing, so the
program goes through the routing table from top to bottom. To create a new route, just select the Add new route...
on the Outgoing panel (Figure 13).
Figure 13 - Routing table of the outgoing messages
Here in the creation panel (Figure 14), the setting up of the route is pretty much the same as at the
creation of the inbound route. That means the main parameter that you have to define is the
two endpoints of the route. With that you can set the connection or user where the messages will be
sent from, and also the recipient user or connection that will receive the message. The other main thing
that can be modified is the mode which can be Move, Copy or Drop. When you finished with the setting up,
just click on OK to create your own route for the outgoing messages.
Figure 14 - Creation of route for outgoing messages
Step 5: Send your first SMS using the connection
Now with the previous steps you prepared to send and receive SMS messages with
Ozeki SMS Gateway and in that last step you can write and send your first SMS using the created
connection. So, to enter the Message composer just click on the New icon
as Figure 15 shows, or select File and next click on Compose.
Figure 15 - Write a new message by Clicking on the New icon
Here in Message composer, you have to specify that who is going to
be the recipient of your message (Figure 16). For that you can select the option Use routing table or
select a connection that will send your message to the specified address that you have to enter in
the Address field. In the Message field just type the message and if you click on OK
you just sent your first SMS message using Ozeki SMS Gateway.
Figure 16 - Message composer in Ozeki SMS Gateway
FAQs
What is SM-MT (short message - mobile terminated)?
SM-MT: Delivering Your Message to Mobile Phones
SM-MT stands for Short Message - Mobile Terminated. It describes a key function
within the GSM system: delivering messages to mobile phones.
Here's how it works:
The Journey Begins: A message arrives at the Short Message Service Centre
(SMSC) from various sources:
Mobile Users: This could be a standard SMS sent from another phone
(Mobile Originated message).
Other Applications: Messages can also originate from computers or
other systems (Application Originated messages).
Delivery Attempt: Once received, the SMSC tries to deliver the message
(now considered an SM-MT message) to the recipient's mobile phone.
Delivery Status:
Success: If the phone is reachable, the message is delivered.
Failure: If the phone is unavailable, the SMSC stores the message for
a certain period and attempts delivery later.
Feedback Loop: The SMSC typically sends a delivery report back to the sender,
indicating success or failure.
In simpler terms, SM-MT ensures your messages reach their mobile phone
destination, even if there's a temporary delay. The SMSC acts as a reliable
intermediary, attempting delivery and providing feedback on the outcome.
What is SM-MO (short message - mobile originated)?
SM-MO stands for Short Message - Mobile Originated. This term describes the
process of sending an SMS message from your mobile phone (M) to another recipient
via the Short Message Service Centre (SMSC).
Here's what happens when you send an SMS:
Message Composition: You create your message on your mobile phone.
Connecting to the SMSC: Your phone transmits the message to the SMSC, acting
as a central hub for SMS communication.
Routing and Delivery: The SMSC acts like a post office. It analyses the
recipient's phone number (SME) and determines the best route for delivery.
The message can be destined for:
Another Mobile Phone: This is the most common scenario.
A Fixed Network Subscriber: In some cases, SMS messages can be delivered
to landline phones with SMS capabilities.
Delivery Status: The SMSC attempts to deliver the message and may send you
a report indicating success or failure.
In essence, SM-MO lets you utilize your mobile phone to initiate SMS communication
and receive feedback on the delivery status.
What are the classes of SM-MT (mobile terminated) messages?
Classes identify the importance of the message importance and the location where
it should be stored. There are four message classes.
Class 0 SMS (Flash SMS): Get noticed instantly! This high-priority message
displays immediately on the recipient's phone screen, even if the phone is
locked. A delivery report is sent back to the sender, but the message itself
isn't saved on the phone unless the user chooses to keep it.
Class 1 SMS (Standard SMS): This is the workhorse of SMS messaging. Messages
are stored on the recipient's phone or SIM card (depending on available space).
They don't pop up automatically like Flash SMS, but users can access them easily
from their inbox.
Class 2 SMS (SIM Data Transfer): (This class is less common) Used for
transferring data specifically to the recipient's SIM card. Successful
transfer triggers a confirmation to the sender, while any issues during
transfer result in an error message.
Class 3 SMS (Forwarding to External Devices): This class is designed to relay
messages to external devices connected to the recipient's phone. Even if the
forwarding fails, a delivery report is sent back to the sender.
In summary, understanding these SMS classes allows you to choose the right type
of message for your needs, ensuring it reaches the recipient effectively.
What is outbound SMS routing and how can I use it?
Outbound SMS routing is the decision-making process within an SMS gateway that
determines the optimal SMS service provider connection for sending a message.
This functionality is only relevant when your system has access to multiple
connections, each capable of transmitting messages to mobile networks.
Backup Routing: Ensures uninterrupted service by designating a specific
connection as a backup in case primary connections become unavailable.
Least Cost Routing: Minimizes messaging expenses by routing
messages based on phone number prefixes, directing them to the most cost-effective
connection for that particular destination.
Load Balancing: Distributes message traffic across multiple connections,
enhancing overall message throughput and system performance.
By implementing these outbound routing strategies, you can optimize message
delivery, reduce costs, and ensure the reliability of your SMS gateway.
What is inbound SMS routing and how can I use it?
Inbound SMS routing is a critical process within
SMS gateway systems. Its primary function is to determine the appropriate recipient
for an incoming SMS message originating from a mobile phone. This recipient can
be either a designated user or a specific application configured within the system.
The implementation of inbound routing becomes pertinent only when a system has
multiple users or applications set up to receive SMS messages. In such scenarios,
customized inbound routing rules can be established. These rules dictate which
user or application will receive a copy of the incoming message.
Inbound routing decisions are formulated based on a pre-defined set of criteria.
These criteria can encompass:
Sender and Recipient Phone Numbers: The phone numbers associated with both
the message originator and intended recipient. Optionally, specific prefixes
of these phone numbers can also be used.
Message Content: The analysis of the textual content within the message body
can be employed for routing purposes. For instance, messages containing
specific keywords might be directed towards designated applications.
Service Provider Connection: If the system utilizes multiple service provider
connections for message reception, then the specific connection itself can also
be a factor in routing decisions.
The configuration of inbound routing decisions typically occurs within the
inbound routing table of an SMS gateway application. This table allows for the
definition of customized rules that govern the delivery of incoming messages to
the appropriate users or applications within the system.
How to receive an SMS Message with a modem using AT commands
The following AT commands show you how to work with the SMS protocol in
a real life scenario. It explains, how you can read an incoming SMS from the
SIM card of an SMS modem in either PDU more or Text mode. You will see that the
SMS PDU returned matched the SMS protocol explanation.
How to receive SMS with at commands (Quick steps)
To receive SMS with at commands:
Receive the message to the SMS modem
Use the AT+CGMR=location command to read the SMS message
Modify the code depending on it's in PDU or text mode
Use AT+CMGD=location command to delete one SMS message
Check the log from the SMS modem
Receiving an SMS with an SMS modem
When there a new SMS message arrives to the SMS modem, it will be stored in the SIM card or
the memory of the modem. This is done automatically. You have no control over
this procedure
To read the SMS message, Ozeki SMS Gateway will issue the Read memory command
using an AT command. By default, Ozeki uses the modem in PDU mode and it uses
the AT+CMGR command to get the message. Ozeki uses two methods, it can rely
on the message indication (AT+CMTI) or it can loop through all the memory cells
of the SIM card the modem memory.
How to read the memory of a GSM modem in PDU mode
In PDU mode, when the SMS modem receives a SMS message, the following message will be
sent to the PC over the serial or USB PORT:
+CMTI: “SM”, 1
where 1 is the memory location in which the message can be read from.
To read a SMS message from a particular location in memory (eg. location 1) use the AT+CGMR command IS required.
AT+CMGR=1[ENTER]
The SMS modem should return the PDU message as follow.
+CMGR: 0,,24
07916314786007F0040B911604994743F400009930139100406B05E8329BFD06
OK
where 0 is the status code indicating a received and already read message, 24 is the
hexadecimal number indicating the length of the message.
How to read the memory of a GSM modem in text mode
Like PDU mode, when the SMS modem receives a SMS message, the following message will appear on the PC screen.
+CMTI: “SM”, 1
where 1 is the memory location in which the message can be read from.
To read the SMS message use the AT+CGMR command as follow.
AT+CMGR=1[ENTER]
The SMS modem should return the text message as follow.
How to delete an SMS message from the SIM card or modem memory
The SMS message can be deleted from the SIM card or the memory (e.g. location 1)
using the AT+CMGD command as follows. Note that there is no AT command to delete
all the SMS messages at once.
How to send an SMS with a GSM modem using AT commands (at+cmgs)
AT+CMGS command is used to send sms messages with GSM modem in Text or PDU mode.
This document describes the process of sending SMS messages from an
SMS modem to a mobile phone using the SMS protocol.
The mobile phone referred to in this document can be any GSM phone, that is capable
of receiving SMS text messages. If you read this document, you
will understand how the modem connection in Ozeki SMS Gateway works.
What are AT commands?
“AT” commands are also known as “Attention Commands”. AT commands are a set of
instructions used to control and configure modems. “AT” stands for “come to
ATtention”. Originally developed for Hayes smart modems, they were used in
dial-up modems in the 1990s. In the present day, AT commands are employed by
all GSM modems, and they are also supported by 2G, 3G, and 4G modems.
How to send SMS with at commands (Quick steps)
To send SMS with at commands:
Check the prerequisites for sending an SMS from a modem
Set up the hardware
Configure the communications settings
Reset the SMS modem to factory default
Initialize the modem
Use the appropriate SMSC number for your mobile network
Enter the actual length of the SMS message in octets
Construct the PDU message to send test SMS in PDU mode
Refer to the SMS protocol description for instructions
Send a test SMS message in Text mode
Hardware Requirements for sending an SMS from a modem
If your modem does not support PDU mode, you can issue AT+CMGF=1[ENTER] Set the SMS modem to text mode
AT+CSCA=”+36209300099”[ENTER] Enter the SMS Centre Address
Note that you will have to use the appropriate SMSC number for your mobile network.
Each country has its own SMSC address. These can be found in the SMS Service Centre Address table.
How to send an SMS Message using AT commands in Text mode
In text mode, to send a message, e.g. “hello”, follow the three steps below.
Set the SMS modem for text SMS using: AT+CMGF=1[ENTER]
Enter the destination phone number in international format AT+CMGS=”+36419879619”[ENTER]
Enter the text message and terminate it with “CTRL Z”: >hello[CTRL Z]
Record the number 1, which is the message reference MR, which is different for every SMS message sent.
How to send an SMS Message using AT commands in PDU mode
In PDU mode, to send a message like the "Ozeki test SMS", initially, you have to convert it to a PDU
format message. Refer to the SMS protocol description for
instructions on how to construct the PDU message. Note that the actual length of the PDU string
(without the Service Centre Address) must be specified for all SMS. Follow the
steps below for sending the SMS message.
Step 1. Enter the actual length of the SMS message in octets: AT+CMGS=18
Step 2. Enter the SMS message in PDU format and terminate it with “CTRL Z”
12 is the message reference MR, which is different for every SMS message sent
Store the MR for later to be able to identify delivery reports
Key takeaways
This document explains how to send SMS messages from a GSM modem to a mobile
phone using AT commands. AT commands are instructions used to control and
configure modems.
The guide outlines two methods: text mode and PDU mode. Text mode is simpler
but offers less control over the message. PDU mode requires converting the
message to a specific format but provides more options.
To send an SMS using AT commands, you'll need an SMS modem, SIM card, antenna,
and terminal software. The guide details hardware setup, communication settings,
and modem initialization steps.
Many organizations are shifting to running services on virtual computers.
If you send SMS messages using a GSM modem, you have to options to
use a virtual machine for your SMS services. This document explains
how you can setup a virtual machine and use it with a GSM modem.
Option 1: Direct USB connection
This option is available if the USB modem is attached to the same computer where
the virtual machine is hosted. In this case your job is to attach the
physical USB port where the modem is connected to the virtual machine.
This can be done in almost all of the Windows and Linux virtualization
platforms.
Figure 1 - Direct cable connection to host PC
Option 2: Setup a Modem to SMPP Gateway
This option requires two computers: You run your primary SMS gateway
in a virtualized environment, and you configure it to connect
to a local computer in your office, that provides connection to your
modem.
In this setup, the primary SMS gateway is installed at a hosting facility
in a virtual PC. This primary SMS gateway will connect to the secondary
SMS gateway through the Internet. The connection method is called SMPP over
TCP/IP. (This can be a secure TCP/IP link, because Ozeki offers SMPP over
SSL.) The secondary SMS gateway in your office connects to the USB modem
and offers SMPP server service.
This setup requires two Ozeki SMS Gateway licenses (Figure 2).
This article shows you how to send SMS wirelessly using an SMS modem.
The article explains these steps using the Ozeki 4G LTE SMS Modem.
The Ozeki 4G LTE SMS Modem is high speed professional wireless modem that
can be connected to a PC using an USB port. It is an excellent choice for most SMS solutions.
It operates at 115200 baud and features excellent support with Ozeki SMS
Gateway.
What is a 4G modem?
A 4G modem is a hardware device designed to make connections to cellular networks.
After connecting to the network, you can use it to send and receive SMS messages.
It is a great choice for created automated text messaging services like SMS alarms
or sending bulk marketing sms messages.
How does sending SMS through a 4G modem work
Sending SMS from a 4G modem requires the modem itself, a computer, Ozeki SMS
Gateway and the recipient's mobile device. The connected computer will compile
the text message for the SMS message using Ozeki SMS Gateway. It only needs the
address and the message text. The computer will use the modem to send the SMS
message to the service provider. The service provider will forward the text
message to the recipient's phone. (Figure 1)
Figure 1 - Send SMS from PC with Ozeki 4G LTE SMS Modem
Compatibility with Ozeki SMS Gateway
The Ozeki 4G Modem is the perfect choice to use with Ozeki SMS Gateway. When we
built the modem, we paid extra attention to compatibility with Ozeki SMS Gateway
and other Ozeki Services, as well as high speed, small form factor and ease of
setup. We also provide up to date information and setup guides for all our devices.
How to send SMS with a 4G modem
To send SMS with a 4G modem:
Insert the SIM card into the modem
Plug the antenna into the modem
Connect the modem to your PC with USB cable
Launch the Ozeki SMS Gateway
Run the sms modem autodetection
Specify the recipient phone number
Write the content of the SMS message
Click on Send to send the SMS
Review the test SMS message you sent
Ozeki 4G LTE SMS Modem setup (video tutorial)
In this guide video, we will show you how to set up the Ozeki 4G modem.
For this setup you need the Ozeki 4G modem, a SIM card, two antennas and a USB cable.
First, we insert the SIM card into the modem, then we connect the antennas to the modem.
Now all we have to do is connect the modem to the PC. Once the modem is successfully
connected to the PC, the power led will light up to indicate that it is working.
Get the parts that you need to connect the modem successfully
To connect the modem to a PC, you'll require the following components, (Seen on Figure 2)
a SIM card, two antennas, a USB cable, and the
modem itself. Make sure that you have all necessary accessories for utilizing
the modem, as even the smallest details are significant.
Figure 2 - Required parts
Insert the SIM card into the modem
Begin by inserting the SIM card into the modem, which is the initial step in the
process. This action closely resembles inserting a SIM card into a mobile phone.
The SIM card serves to establish the connection between the modem and the network.
(Illustrated in Figure 3)
Figure 3 - Inserting SIM Card, pay close attention to correct seating
Important settings for SIM card
The settings outlined here are very important. Failing to
complete these steps will result in the incompatibility of your SIM card
with Ozeki 4G Modem. It's crucial to disable your PIN code and
divert phone calls to an alternate number. These actions can be performed
on a conventional mobile phone (Refer to Figure 4).
Figure 4 - Set your sim card
Connect the antenna to the modem
Once the SIM card is inserted, proceed to attach the antennas to the modem.
Ensure proper and accurate connection for optimal performance. The antenna's
role involves both signal transmission and reception.
(Visualized in Figure 5).
Figure 5 - Attaching antennas
Insert the USB cable into the modem
The next step is to insert the USB cable into the modem. This action establishes
a connection between the modem and your computer. It is recommended to employ a
fully functional cable to prevent any potential disconnections.
(Refer to Figure 6).
Figure 6 - Connecting USB-C to modem
Plug the USB cable into your computer
Finally, attach the opposite end of the USB cable to your PC.
Insert it into your computer's port.
(As depicted in Figure 7).
In this video you will learn how you can set up an Ozeki 4G LTE SMS Modem to send text messages (SMS)
using a USB cable. For this setup, you need to have a connected Ozeki 4G Modem and Ozeki Software Platform installed.
We will install the drivers and use Ozeki SMS Gateway to install a new SMS Modem to send our first test message.
Once we send the message we check it on our recipient device.
To install the Modem Driver, access the folder where the downloaded file is located.
Unpack the downloaded files into a new folder and locate the Driver Executable
File. Start the installer by double-clicking on it; if prompted for Administrator
rights, click on Allow. (Refer to Figure 8 for an example).
Figure 8 - Install Ozeki Modem Driver
Proceed with Installing
To start the driver installation, after opening the installer window, simply
click the Install button and patiently wait for the completion of the install.
Once the installation is finalized, click the Finish button to
conclude the setup procedure. (Shown in Figure 9).
Figure 9 - Press Install
Open Ozeki SMS Gateway App in Ozeki Software Platform
To launch the Ozeki Software Platform, access the search feature within the Windows
Taskbar. Input Ozeki 10 and select the corresponding application. The
software is supposed to start within a brief period.
Within the Ozeki Software Platform, navigate to the Ozeki SMS Gateway. Typically
located on the left side, it has various default apps. Locate and open the
SMS Gateway application, identifiable by a phone icon with "SMS" text.
This will start the SMS Gateway Application. (Refer to Figure 10).
To establish a fresh connection in Ozeki SMS Gateway, locate the
add new connection link within the Connections panel on the
left-hand side. Click on it to unveil the page containing the connection list,
where you can configure an SMS modem. (Visible in Figure 11).
Figure 11 - Add new connection
Install a new SMS Modem
In the next window, you will find a list of available connections
you can establish within the SMS Gateway application. Locate the Wireless
connections install list and choose the SMS modem installation item.
Click on the Install link, that will let you install a new modem in Ozeki
SMS Gateway (Exemplified in Figure 12).
Figure 12 - Install new SMS modem
Select the Port
Within the Serial port settings, access the Port dropdown menu. Search for the
Ozeki Modem Port entry and click on it. This will select the
integrated modem within the Ozeki SMS Gateway Modem,
enabling the transmission of messages via 4G. (Refer to Figure 13).
Figure 13 - Select Ozeki Modem
Autodetect properties
Next to the dropdown menu, find the blue button with the text
Autodetect, click this button to automatically get
all data from your SIM card like your phone number and configure it,
it may take a few seconds.
(Figure 14)
Figure 14 - Click autodetect
Check the information
Check your details, a window will pop up named Autodetect, check
if every detail matches to your SIM card,
you can also see the modem details here. Click on the Ok button
at the bottom when you are done checking
everything. This will finish the Autodetect procedure and ready your
modem for sending sms messages from your computer.
(Figure 15)
Figure 15 - Details of the detected modem
Finish setting up your modem
To finalize the setup of your modem, locate the blue Ok button situated
at the screen's bottom. If you desire to make additional adjustments to your
modem, you can do so under the SMS tab or the Advanced tab. Alternatively, you
can return to this tab after clicking Ok and access the Configure tab at a later
time.
(Can be seen on Figure 16)
Figure 16 - Press OK in SMS modem installer
Enable SMS Modem Connection
To enable SMS modem connection, find the Connection group on the left,
you have to Enable the Connection switch,
which is the second option in the group. Click on it to make it green
and your modem will start connecting to your service provider.
(Figure 17)
Figure 17 - Enable SMS modem Connection
Navigate to the Test panel
Navigate to the navigation bar in the right panel and click Test
to open the Test tab page and enter the Test
SMS sending page. You can send test messages from here to anyone with
custom content.
(Seen on Figure 18)
Figure 18 - Select Test option
Fill the recipient's address and test message
Fill in the recipient's address and enter the test message, look for the
To field in the Recipient group,
you can enter the phone number there, and type into the SMS
text field what you want to send. You can write whatever you want here.
(Figure 19)
Figure 19 - Enter the SMS details
Send the SMS
Send the SMS if you are done, look for a blue Send button at the
bottom of the screen. Click on the
button to send the message and you will soon receive the SMS on the
specified phone number.
(Figure 20).
Figure 20 - Press Send
Check the test message
Check the test message on your mobile device, look for an application
that handles SMS messages and open it, if you
see your test message appear with the correct content, your SMS modem
is working correctly, congratulation!
(Figure 21)
Figure 21 - SMS Received
Summary
As you can see in the guide, the Ozeki SMS Modem works really well with Ozeki SMS Gateway. Using them together lets you send messages from your computer, helping your company to grow bigger. You can use this to send out automated or bulk messages. After you went through the steps, got the needed hardware and software, you will be able to send SMS using your computer.
The Ozeki 4G LTE SMS Modem Dual SIM offers a versatile solution for SMS
messaging using two SIM Cards. With its capability to select the
appropriate SIM Card based on the Sender ID, it provides efficient and
reliable communication. Operating at 115200 baud, this high-speed wireless
cellular modem seamlessly integrates with Ozeki NG 10 and Ozeki 10
platforms, ensuring excellent compatibility and support. Moreover, its
self-powering build through two USB ports eliminates the need for an
external power supply, contributing to its convenience and reliability.
What is a 4G modem?
A 4G modem is a hardware device that can provide you connection with a service provider.
It requires a SIM card to work. It is mostly used to send out automated or bulk messages.
How does a Dual SIM modem work?
The Ozeki 4G Modem Dual SIM provides the advantage of utilizing two distinct
SIM cards. When sending a message, our software intelligently selects the
appropriate SIM card based on the Sender ID. This dynamic approach enhances
cost-effectiveness by optimizing message sending costs. Additionally, this setup
offers increased fault tolerance and redundancy, as two SIM cards provide a
backup solution in case of any issues.
How sending SMS through a 4G modem works
This SMS sending solution makes it possible to send SMS messages from
a computer. This solution uses a few components: a computer equipped
with the Ozeki SMS Gateway software, an Ozeki modem, and the recipient's mobile
phone. The computer, hosting the Ozeki SMS Gateway application takes on the role
of assembling the message, requiring both an address and a text body. The SMS
message is sent through the Ozeki SMS modem, which communicates with a
service provider. The service provider facilitates the delivery of the message
to the designated phone number as an SMS message. (Figure 1)
Figure 1 - Send SMS from PC with Ozeki 4G LTE SMS Modem
In the presented video, you will receive guidance on configuring an Ozeki 4G LTE
SMS Modem Dual SIM to send SMS messages using a USB cable. To initiate this setup,
you will require the modem, two SIM cards, four antennas, and two USB cables,
all of which are provided within the package. The procedure commences with the
insertion of the SIM cards into the modem, followed by the attachment of the
antennas. Subsequently, the modem is connected to the computer using the USB
cables. A successful connection between the modem and the PC is indicated by
the power LED turning on.
Get the parts that you need to connect the modem successfully
For a successful connection of the modem, it's essential to have a
SIM card, an antenna, a USB cable, and the modem itself. All these
components are depicted in Figure 2. Ensuring that you possess all the
necessary hardware is crucial as every detail plays a significant role in the
functionality of the modem setup.
Figure 2 - Required parts
Insert the SIM card into the modem
The first step is to insert the SIM card into the modem, a process similar to
inserting a SIM card into a mobile phone. The SIM card establishes the connection
between the modem and the network, enabling communication.
(Demonstrated in Figure 3)
Figure 3 - Inserting SIM Card, pay close attention to correct seating
Important settings for SIM card
It is crucial to pay close attention to these settings, as failing to complete
them could result in your SIM card not functioning with Ozeki Gateway One.
You need to deactivate your PIN code and forward phone calls to an
alternative phone number. These steps can typically be carried out using a regular
mobile phone.
(Figure 4)
Figure 4 - Set your sim card
Connect the antenna to the modem
Once the SIM card is securely inserted, the next step is to connect the modem to
its antennas. Ensuring a proper and secure connection is crucial to achieve optimal
performance. The antennas play a vital role in both transmitting and receiving
signals, so proper attachment is essential for effective communication. You can
refer to Figure 5 for visual guidance on how to connect the antennas correctly.
Figure 5 - Attaching antennas
Insert the USB-C cable into the modem
Moving forward, you'll need to insert the USB-C cable into the modem. This cable
serves as the power supply for the modem, drawing power from the computer. It's
crucial to use a reliable and fully functional cable to prevent any disruptions
or disconnections during the setup process. You can find a visual representation
of this step in Figure 6.
Figure 6 - Connecting USB-C to modem
Insert the USB-A cable into the modem
Continuing with the setup, insert the USB-A cable into the modem. This cable
establishes the connection between the modem and your computer. It's essential
to use a high-quality cable that's in proper working condition to prevent any
potential disconnections or interruptions. You can refer to Figure 7 for
a visual representation of this step.
Figure 7 - Connecting modem to PC via USB-A
Plug the USB cable into your computer
Connect the other ends of the USB cables to your PC. Plug each end of the USB
cables into the corresponding USB ports on your computer. You can refer to
Figure 8 for a visual representation of this step.
In the following video tutorial, you will receive guidance on how to configure
an Ozeki 4G LTE SMS Modem Dual SIM for sending text messages (SMS) using Ozeki
SMS Gateway. To proceed with this setup, ensure that you have the modem properly
connected to your computer. The steps involved include opening the SMS Gateway
within the Ozeki Software Platform, adding a new connection, and installing the
SMS modem. Once the modem installation is complete, you'll be ready to start
the process of sending text messages through your Ozeki 4G Dual SIM modem.
Once you've downloaded the driver and extracted its contents, proceed by opening
the executable file. You can refer to Figure 9 for an example of this step.
Figure 9 - Install Ozeki Modem Driver
Proceed with Installing
After launching the executable file, you will need to click on the "Install"
button to proceed with the installation process. This step is illustrated in
Figure 10.
Figure 10 - Press Install
Open Ozeki 10 SMS Gateway App
Once the installation is complete, open Ozeki 10 and launch the SMS Gateway
Application. You can locate this step in Figure 11.
After launching the application, navigate to the "Connections" group on the
left-hand side and locate the link labelled "Add new connection." This can be
found in Figure 12.
Figure 12 - Add new connection
Install a new SMS Modem
In the next window, you will see a list of all the available connections that
you can create in the SMS Gateway application. From here, locate the "Wireless
connections install" list and find the SMS modem install item. Click on
the Install link associated with it. This action will enable you to
utilize the modem within the Ozeki SMS Gateway, as shown in Figure 13.
Figure 13 - Install new SMS modem
Set a name for your modem
During this step, you'll need to assign a name to your modem. While you can stick
with the default value, it's advisable to provide a more descriptive name that
allows for easy identification. Refer to Figure 14 for a visual representation.
Figure 14 - Enter a custom name
Select the Port
After determining the name for your modem, proceed by selecting the appropriate
port for the modem. Locate and choose the "Ozeki Modem Port." In case the port
is not visible, ensure that you have correctly installed the drivers. If the port
still isn't showing, consider flipping the USB-C connector. You can refer to
Figure 15 for a visual guide.
Figure 15 - Select Ozeki Modem
Autodetect properties
In the installation menu, navigate to the General tab, where you will find the
Serial port group box. In the "Port" combo box, select the port to which you have
connected the modem. For automatic detection, click on the "Autodetect" button.
The Autodetect feature will identify your device if it is properly connected.
Refer to Figure 16 for a visual representation.
Figure 16 - Click autodetect
Check the information
The Autodetect option will identify your modem, and if it is connected correctly,
the subsequent window will display information about your connected modem and SIM
card. You can review the details in this window to ensure that the hardware and
SIM card are correct. Once you have reviewed the information, click the Ok button
to proceed. You can refer to Figure 17 for a visual representation.
Figure 17 - Details of the detected modem
Select the SMS options
Navigate to the SMS options located next to the General option. By selecting this,
you can initiate the configuration process for your Dual SIM modem. For a visual
reference, consult Figure 18.
Figure 18 - Select SMS option
Open Dual SIM settings
You can set your Dual SIM settings under the Dual SIM dropdown menu, open it (As seen on Figure 19)
Figure 19 - Dual SIM dropdown
Enable Dual SIM
If you want to use both SIM cards, you have to enable Dual SIM (Figure 20)
Figure 20 - Enable Dual SIM
Set second SIM card number
Input the phone number associated with your second SIM card. This information
can typically be found on the packaging in which your SIM card was provided.
Refer to Figure 21 for a visual representation.
Figure 21 - Set second SIM card number
Set the receive mode
For this configuration, I suggest selecting the "Receive on both" option for the
modem. This setting will allow you to monitor network changes through events.
The "Receive mode" determines how the modem manages incoming text messages.
Ozeki SMS Gateway offers four receive modes for dual SIM modems, enabling the
use of both SIM cards or just one. Refer to Figure 22 for visual guidance.
Receive on both changes SIM cards every minute, text messages may appear a bit late.
Receive on SIM1 will only show messages sent to SIM1.
Receive on SIM2 will only show messages sent to SIM2.
Receive where last sent will only show messages sent to the SIM that was last used for sending messages.
Figure 22 - Setting receiver mode
Finish the installation
After you've completed the modem configuration, click the Ok button at
the bottom of the window to finalize the setup (as shown in Figure 23).
Figure 23 - Press OK in SMS modem installer
Enable SMS Modem Connection
Now you have an SMS modem connection set up in the SMS Gateway application. To
start handling SMS messages with this connection, you need to enable it
(as shown in Figure 24) by toggling the switch button in the connection details
window. The switch turning green indicates that the SMS modem connection is
enabled. It's essential to remember that you must perform this step, as an enabled
connection is necessary for sending SMS messages.
Figure 24 - Enable SMS modem Connection
Check if you have a connection
Once you can observe both SIM cards (SIM1 and SIM2) being connected to the network
with a good signal, you are ready to move on to the next step. Please be patient,
as this step might take a few minutes to complete. You can refer to the visual
aid provided in Figure 25 for assistance.
Figure 25 - Check if both SIM cards could connect to the network
Navigate to the Test panel
To send test messages, navigate to the Test panel within the SMS Gateway details
panel. You can locate this option labelled "Test" at the top, as indicated in
Figure 26.
Figure 26 - Select Test option
Fill the recipient's address and test message
To send a test SMS, proceed to the Test tab and select the General tab. In this
tab, you will find the Recipient and SMS group boxes. To send the message, input
the recipient's phone number into the "To:" textbox within the Recipient group box.
Following that, type your desired test message into the "SMS" group box. This
message will be sent as an SMS to the provided recipient's address. Feel free to
write any content you wish. You can find this layout depicted in Figure 27.
Figure 27 - Enter the SMS details
Send the SMS
If you are ready to send the SMS message, just click on the Send button (Figure 28).
Figure 28 - Press Send
Check the test message
If all the steps were followed correctly, the test message will be successfully
received by the recipient, which you can confirm by checking the test phone. This
message functions just like any other regular SMS, demonstrating that your setup
of the Ozeki SMS Gateway and Ozeki Modem is ready for your intended use. You can
refer to Figure 29 for visual guidance.
Figure 29 - Test Message on Phone
Summary
This comprehensive guide showcases the effective functioning between the Ozeki
SMS Dual SIM Modem and Ozeki SMS Gateway. This combination allows you to send messages
conveniently from your computer, contributing to the expansion of your company's
reach. This setup is particularly advantageous for automated or bulk messaging
purposes. By following the outlined steps and acquiring the essential hardware
and software components, you'll be fully equipped to initiate SMS communication
directly from your computer.
This article is about the Ozeki SMS Gateway One Device, it's compatibility
with Ozeki SMS Gateway Software and features of it. The Ozeki SMS Gateway One
is a small form factor Hardware SMS Gateway. It features a high-speed modem
so you can utilize it in most of your solutions.
What is a hardware SMS Gateway?
A hardware SMS Gateway is used in cases where you need to have the computer and
the cellular modem in one device. It only requires an external power supply and
a SIM card to send SMS messages with plenty of software customizations available.
Ozeki SMS Gateway One Device comes with Ozeki SMS Gateway Software pre-installed
on a Linux operating system. It is responsible for compiling the message to send
as an SMS. It needs an address and a message text to create the SMS message,
which it will submit to your Service Provider. The Service Provider will send
your SMS to the recipient's phone. (Figure 1)
Figure 1 - Send SMS from PC with Ozeki SMS Gateway One
Compatibility with Ozeki SMS Gateway
The Ozeki SMS Gateway One is a great, cost-effective solution for an all-in-one
Hardware SMS Gateway with a small dimension, high speed and other extra features.
When building the device, we paid extra attention to compatibility with Ozeki SMS
Gateway and our other Services. We also provide up to date information and setup
guides for all our devices.
Ozeki SMS Gateway One (Quick setup)
To send SMS with an Ozeki SMS Gateway One:
Insert the SIM card into the computer
Plug the antennas into the computer
Connect the computer to a power supply
Launch the Ozeki SMS Gateway
Run the sms modem autodetection
Specify the recipient's phone number
Write the text of the SMS message
Click on Send to send the SMS
Check the test SMS message you sent
Ozeki SMS Gateway One hardware setup (video tutorial)
The following video guide will help you set up Ozeki SMS Gateway One Device to
send SMS (text messages) natively, from the computer itself. The Guide will start
with all accessories and by the end, you should be able to power on your device
and have Ethernet connectivity, peripherals and display connected. This tutorial
video is about 2 minutes long and to actually finish the setup, it should take
about 5-10 minutes if you follow our easy-to-understand guide with explanations.
First, we have to connect the power supply to its mains adapter. Connect it to
the device via the DC port. After that, insert the SIM card into the SIM tray of
the computer. Connect all antennas to the computer and connect it to mains electricity.
Once the power is connected to the computer, it should power on with a blue led
light visible that indicates the computer is up and running
Video 1 - Ozeki SMS Gateway One setup (Video tutorial)
Ozeki SMS Gateway One software setup (video tutorial)
In the following video guide, we will show you how to prepare your Ozeki SMS
Gateway One Computer for SMS Messaging. The guide starts from your first power
on and by the end of the video, you will be able to send text messages on demand.
The tutorial is about 2 minutes long and the setup process requires about 10-15
minutes to complete if you follow our clear, easy to understand step-by-step guide.
The Ozeki SMS Gateway One PC runs Linux and you will have to install a new SMS
modem connection on the Ozeki Software Platform that is pre-installed on the
device. Once the modem setup is done, you have to specify the target phone number
and the message text, so you can send SMS to the address. This tutorial is useful
for knowledge on how to use your Ozeki SMS Gateway One and Ozeki SMS Gateway
software for bulk messaging or other automates messages.
Video 2 - Ozeki SMS Gateway One software setup (Video tutorial)
Get the parts that you need to setup the computer correctly
You need a SIM card, two antennas, power supply with mains cable, the computer
itself and an HDMI cable (All included with Ozeki SMS Gateway One).
(All shown in Figure 2)
Make sure that you have all the hardware that you need to use the modem because
every little detail is important.
Figure 2 - Parts that you will need, included in our package
Connect the power supply
The Ozeki Gateway One operates with a 12V DC external power supply. To establish
the power connection, you'll require its mains adapter. Connect these two
components to enable the connection of your power supply to the mains network.
(Depicted in Figure 3).
Figure 3 - Connect the supply with its mains cable
Connect the computer to the power supply
Connect your computer to the power supply. Locate the DC plug on the power
supply unit and insert it into your computer's 12V DC port, positioned
adjacent to the Ethernet connectors. (Illustrated in Figure 4).
Figure 4 - Connect the computer to the power supply
Insert your SIM card
To insert your SIM card, it needs to be adjusted to the proper format. The Ozeki
Gateway One employs micro-SIMs. If your SIM card isn't pre-cut appropriately,
you can visit your service provider or a local GSM shop for resizing. In case
your SIM card is smaller than a micro-SIM, you might need to acquire an adapter
if you've lost the original one. Insert the SIM card beside the antennas,
ensuring the contacts face towards the white print on the case.
(The correct positioning is illustrated in Figure 5).
Figure 5 - Insert the SIM card into the slot
Important settings for SIM card
These settings are very important, and if you do not finish these, your SIM card won't work with Ozeki Gateway One.
You must disable your PIN code and redirect phone calls to another phone number. You can do these steps on a normal
mobile phone (Figure 6).
Figure 6 - Set your SIM card settings
Attach antennas
To attach your antennas, locate the two ports situated adjacent to the SIM slot.
Once identified, securely fasten the two antennas by screwing them in tightly.
This ensures a stable connection and prevents any potential loosening. The
provided antennas should deliver superb and high-speed connectivity, though you
also have the option to utilize your own antennas. (Depicted in Figure 7).
Figure 7 - Attach both antennas
Connect Peripherals
To continue with the setup of your Ozeki SMS Gateway One, you'll need to link your
peripherals such as your keyboard and mouse. The device provides four USB
ports, enough for most scenarios. However, if additional ports are
required, you can easily employ a USB hub. (Illustrated in Figure 8).
Figure 8 - Connect peripherals
Connect your Display
To set up a link between your computer and a display, you can choose between the
included HDMI cable or a DisplayPort cable. If your device doesn't
have these particular ports, don't worry – you can always get an adapter that
fits. Just plug your chosen cable into the USB area. (Figure 9).
Figure 9 - Connect display
Connect your computer to your Ethernet network
For everything to work smoothly, you need to link your computer to the internet.
You can make this happen using the 4 Ethernet ports located at the back of your
computer. (See Figure 10).
Figure 10 - Connect to Ethernet network
Connect your computer to electricity
You must connect your computer to electricity, look for a mains connector near
where you want to use your Ozeki Gateway One and connect it. (Figure 11)
Figure 11 - Connect to mains electricity
Turn your computer on
Once you've plugged in your computer, it should fire up automatically. But if it
doesn't, you might need to press the power button (You can find it on Figure 12)
positioned among the USB ports. If the button lights up in blue, your computer
is up and running, and you should see your system booting up on your display.
Figure 12 - Turn your computer on
Log in to Linux
To log in to Linux, just click on user, located in the middle. Then enter
the default password, which is qwe123. This will give you access to the
computer, allowing you to set up your SMS Gateway and use your Ozeki SMS Gateway
One. (Check out Figure 13).
Figure 13 - Linux Login
Open your Browser
To launch your browser in Linux, locate the browser icon on the Linux Desktop,
usually positioned on the left side. Click on it, and your browser will open.
From there, you can access the Ozeki Software Platform. (Refer to Figure 14).
Figure 14 - Open Browser
Open Ozeki 10
To access the Ozeki Software Platform, enter https://localhost:9515 at
the top of your browser. This will open up the Ozeki Software Platform, where
you can configure the built-in SMS Modem within the Ozeki SMS Gateway One.
(Shown in Figure 15).
Figure 15 - Head to Ozeki 10 website
Open SMS Gateway
Launch the Ozeki SMS Gateway within the Ozeki Platform Software. You'll spot a
lineup of default apps, typically located on the left side. Look for and open
the SMS Gateway app – it's marked with a phone icon and "SMS" written
inside. This will open the SMS Gateway Application. (Refer to Figure 16).
Figure 16 - Open SMS Gateway
Add a new connection
To add a new connection in Ozeki SMS Gateway, locate the add new connection
link positioned in the left Connections panel. Click on it, and this
action will show the connection list page, allowing you to configure an SMS modem.
(See Figure 17).
Figure 17 - Add a new connection
Install SMS Modem
Within the connection list, locate the SMS modem entry. Adjacent
to it, you'll find an Install link. This entry is positioned at the top
of the list within the Wireless Connections (SMS, MMS) category. Click
this link to initiate the setup of your SMS Gateway and start sending messages.
(See Figure 18)
Figure 18 - Install new SMS modem
Set the modems name
In the settings section, under the General tab, you have the option to assign a
custom name to your modem. However, avoid using special characters such
as question marks or asterisks. Adding a custom name is strongly advised to prevent any
confusion, especially when dealing with multiple connections. (Refer to Figure 19).
Figure 19 - Enter a custom name for the modem
Select the Modem Port
Under Serial port, you have to open the Port dropdown menu and look for
/dev/ttyUSB1, select it to start
configuring the built in modem of the Ozeki SMS Gateway One and send messages
via 4G, if ttyUSB1 does not
work later on, try the other ports. (See Figure 20)
Figure 20 - Select the modem port
Click Autodetect
Beside the dropdown menu, you'll spot a blue button labelled Autodetect.
Click on this button to automatically retrieve all the data from your SIM card,
including your phone number, and configure it accordingly. This process might
take a few seconds to complete. (Check out Figure 21).
Figure 21 - Click autodetect
Check if your details are correct
Review your details carefully. A window labelled Autodetect will appear,
presenting the opportunity to verify if all the information matches your SIM
card. This window also displays the modem details. Once you've confirmed
everything, click on the Ok button located at the bottom. This will
conclude the Autodetect procedure, ensuring your modem is prepared to send SMS
messages from your computer. (Refer to Figure 22).
Figure 22 - Check your details
Finish setting up your modem
To complete the setup for your modem, locate the blue Ok button at the
bottom. If you want to make additional adjustments to your modem settings, you
can do so now by navigating to the SMS tab or the Advanced tab. Alternatively,
you can return to this tab after clicking Ok and access the Configure tab at a
later time. (Refer to Figure 23).
Figure 23 - Finish setting up
Enable SMS Modem Connection
To activate the SMS modem connection, navigate to the Connection group on the
left. Look for the Connection switch, which is the second option in the
group. Click on it to turn it on (it will turn green), and your modem will
initiate the connection process with your service provider. (Refer to Figure 24).
Figure 24 - Enable connection
Wait for the connection to establish
Be patient while your connection sets up properly; this might take a few seconds.
Keep an eye on the Events tab. Once you see "GSM Modem polling started," that's
your cue – your modem is good to go. You're now ready for the next step to start
sending messages from your modem. (Check out Figure 25).
Figure 25 - Wait for modem to connect to network
Navigate to the Test tab page
In the right panel, head to the navigation bar and click on Test to
access the Test tab page. From there, you can enter the Test SMS sending page.
This is where you can send test messages to anyone with customized content.
(Refer to Figure 26).
Figure 26 - Select Test tab page
Fill the recipient's address and test message
Provide the recipient's address and compose your test message. Locate the To
field within the Recipient group. In this field, enter the recipient's
phone number. Then, use the SMS text field to type the content of your
message. You're free to write whatever you'd like in this field. (Refer to Figure 27).
Figure 27 - Enter recipient address and message body
Send the SMS
If you've finished composing your message, go ahead and send it. Find the blue
Send button located at the bottom of the screen. Click on this button to
initiate the sending process. You can expect to receive the SMS on the specified
phone number shortly after sending. (Refer to Figure 28).
Figure 28 - Send the message
Check the test message
Retrieve the test message on your mobile device. Locate an application designed
for handling SMS messages and open it. If you observe your test message displayed
with the accurate content, you can rest assured that your SMS modem is functioning
properly. Congratulations! (Refer to Figure 29).
Figure 29 - Receive the message
Summary
As you can see in the guide, the Ozeki SMS Gateway One works really well with Ozeki SMS Gateway. Using them together lets you send messages from your computer, helping your company to grow bigger. You can use this to send out automated or bulk messages. After you went through the steps, got the needed hardware and software, you will be able to send SMS using your computer.
This article is about the Ozeki SMS Gateway PLC, it's compatibility with Ozeki
SMS Gateway Software. The device is an all-in-one SMS Gateway Server, PLC and
Modem for all your solutions. With high-speed connection, quiet and efficient
passive cooling and all its features, it's a very good choice for your
professional solutions.
What is a 4G modem?
A 4G modem is a hardware device that can provide you connection with a service provider.
It requires a SIM card to work. It is mostly used to send out automated or bulk messages.
The Ozeki Gateway PLC features one with native support. It is easy to install and configure
with our Ozeki Software Platform which comes pre-installed on our systems.
What is a hardware SMS Gateway?
A hardware SMS Gateway is a cellular modem and a computer built together. This
solution allows you to have a Gateway Server and the modem in the same device with
extra compatibility for reliable, future-proof solutions. The Gateway Server
compiles the message for the modem to send out based on the message text and phone
number you provide. The modem forwards it to the Service provider who will send
it to the recipient's device based on the given phone number. (Figure 1)
Figure 1 - Send SMS from PC with Ozeki SMS Gateway PLC
Compatibility with Ozeki SMS Gateway
The Ozeki SMS Gateway PLC is a great solution for all-in-one industrial solutions
where a Hardware SMS Gateway is necessary. The device offers PLC functioning with
a relatively small form factor, great speed and efficient cooling. When building
this Hardware SMS Gateway, we paid extra attention to perfect compatibility with
Ozeki SMS Gateway, as well as high speed and lots of useful functions. We also
provide up to date guides and information about all our products.
What is a PLC?
A PLC (Programmable Logic Controller) is a digital device used in industrial
automation to control machinery and processes through programmed logic and
inputs/outputs.
How to send SMS with an Ozeki Gateway PLC (Quick steps)
The following guide will help you learn how to set up an Ozeki SMS Gateway PLC to
send SMS (text messages). The setup starts from the very beginning of setting up
your hardware and by the end, you should have a powered on Ozeki SMS Gateway PLC.
We will connect the power supply, Ethernet and display with other peripherals,
connect the antennas and insert the SIM card for a perfect network connectivity.
Video 1 - Ozeki SMS Gateway PLC setup (Video tutorial)
The following guide will help you learn how to set up an Ozeki SMS Gateway PLC to
send SMS (text messages). This setup uses the built in modem of the Ozeki SMS
Gateway PLC Setup with Ozeki SMS Gateway Software. The video starts from the
assembled device being turned on and by the end, you should have sent your first
test message. The video is about 2 minutes and to finish the setup, it should take
about 10-15 minutes if you follow our step-by-step, easy to understand guide.
Get the parts that you need to setup the computer correctly
You need a micro-SIM card, four antennas, power supply with mains cable, and the computer
itself (All included with Ozeki SMS Gateway PLC).
(All shown in Figure 2)
Make sure that you have all the hardware that you need to use the modem because every little detail is important.
Figure 2 - Required parts
Connect the power supply
To power up the Ozeki Gateway PLC, you'll require a 12V DC external power supply.
Connect your power supply using its mains adapter. Combine these two
components to enable you to connect your power supply to the mains network.
(Refer to Figure 3).
Figure 3 - Assemble Power Supply
Attach antennas
For antenna connection, locate four ports arranged in a row – three adjacent to
each other, and the fourth on the opposite side of the computer. Securely fasten
all four antennas by screwing them in tightly to ensure a stable connection and
prevent them from becoming loose. The provided antennas are designed to offer
excellent and high-speed connectivity, but you can also utilize your own antennas
if preferred. (Displayed in Figure 4).
Figure 4 - Connect your antennas
Insert your SIM card
For inserting your SIM card, make sure it's the proper size. The Ozeki Gateway
PLC works with micro-SIMs. If your SIM card isn't pre-cut, you can have
it resized at your service provider or a local GSM shop. If your SIM is smaller
than a micro-SIM, you might need to get an adapter if you've misplaced the original
one. Insert the SIM card next to the antennas, with the contacts facing towards
the white print on the case. (Look at Figure 5 to see the correct placement).
Figure 5 - Insert your SIM card
Important settings for SIM card
These settings are very important, and if you do not finish these, your SIM card won't work with Ozeki Gateway PLC.
You must disable your PIN code and redirect phone calls to another phone number. You can do these steps on a normal
mobile phone (Figure 6)
Figure 6 - Set your sim card
Connect the computer to the power supply
Link your computer to the power supply. Find the DC plug on the power
supply and insert it into the computer's 12V DC port. (Refer to Figure 7).
Figure 7 - Connect power supply to computer
Connect your Display
To establish a connection between your computer and a display, you can utilize
either an HDMI or a VGA cable. If your device doesn't feature these
ports, you can easily purchase an appropriate adapter to match your devices.
Connect your chosen cable accordingly. (Refer to Figure 8).
Figure 8 - Connect your display via HDMI or VGA
Connect your computer to your Ethernet network
For your computer to operate normally, you need to establish an internet
connection. This can be achieved using the 2 Ethernet ports on the back of the
computer or by connecting to Wi-Fi. (Refer to Figure 9).
Figure 9 - Connect to the Internet
Connect Peripherals
To set up your Ozeki SMS Gateway PLC, you'll need to connect peripherals like
your keyboard and mouse. The device offers multiple USB ports, which
should be sufficient for most scenarios. If you require additional ports, you
can easily expand them by using a USB hub. (Refer to Figure 10).
Figure 10 - Add your peripherals
Connect your computer to electricity
Make sure to plug your computer into a power source. Locate the mains connector
close to where you intend to use your Ozeki Gateway PLC, and then connect it
accordingly. (Refer to Figure 11).
Figure 11 - Plug in your power supply
Turn your computer on
Once you have plugged in your computer, it should turn on by itself, but if it does not, you may need to press the power button (Location seen on Figure 12) between the
USB ports. If the indicator next to it is red, it's turned on and you should be able to see your computer boot on your display.
(See Figure 12)
Figure 12 - Turn your computer on
Wait for your computer to boot
Wait for your Ozeki Gateway PLC to boot (Visible on Figure 13)
Figure 13 - Windows 11 Boot
Open Ozeki Software Platform
To access the Ozeki Software Platform, start by clicking on the search element
in the Windows Taskbar. Then, type in Ozeki 10 and click on the application
that appears in the search results named Ozeki 10. The software should launch
within a few seconds. (Visible in Figure 14).
Access the Ozeki SMS Gateway within the Ozeki Software Platform. You'll typically
find a set of default apps on the left-hand side. Open the SMS Gateway app,
identifiable by a phone icon with "SMS" written inside it. This action will launch
the SMS Gateway Application. (Visible in Figure 15).
Figure 15 - Open Ozeki SMS Gateway
Add a new connection
To add a new connection in Ozeki SMS Gateway, locate the add new connection
link in the left Connections panel and give it a click. This will open up
the connection list page, where you can configure an SMS modem.
(As demonstrated in Figure 16).
Figure 16 - Add new connection
Install a new SMS Modem
Within the connection list, search for SMS modem and locate an
Install link next to it. This entry can be found at the top of the list
within the Wireless Connections (SMS, MMS) category. Click on this link
to initiate the process of setting up your SMS Gateway and start sending messages.
(Shown in Figure 17).
Figure 17 - Install new SMS modem
Set a name for your modem
In the settings section, under the General tab, you have the option to assign a
custom name to your modem. However, avoid using special characters like
question marks or asterisks. Setting a custom name is strongly advised to prevent
any confusion, especially when managing multiple connections. (Refer to Figure 18).
Figure 18 - Enter a custom name
Select the Port
Under the Serial port settings, open the Port dropdown menu and find
Ozeki Modem Port. Choose this option to begin configuring the built-in
modem of the Ozeki SMS Gateway PLC for sending messages via 4G.
(Refer to Figure 19).
Figure 19 - Select Ozeki Modem
Autodetect properties
Adjacent to the dropdown menu, locate the blue button labelled Autodetect.
Click on this button to automatically retrieve all the necessary data from your
SIM card, including your phone number, and configure the settings accordingly.
This process might take a few seconds to complete. (Refer to Figure 20).
Figure 20 - Click autodetect
Check the information
Examine your details closely. A window labelled Autodetect will appear,
displaying the information retrieved from your SIM card. Verify that all the
details match your SIM card's information, and you can also find modem details
here. Once you've confirmed everything, click on the Ok button located at
the bottom. This will conclude the Autodetect procedure and prepare your modem
for sending SMS messages from your computer. (Refer to Figure 21).
Figure 21 - Details of the detected modem
Finish setting up your modem
To complete the setup for your modem, locate the blue Ok button at the
bottom of the screen. If you'd like to make additional adjustments to your modem
settings, you have the option to do so now under the SMS tab or the Advanced tab.
Alternatively, you can return to this tab later after pressing Ok and access the
Configure tab for further modifications. (Visible in Figure 22).
Figure 22 - Press OK in SMS modem installer
Navigate to the Test panel
Head to the navigation bar located in the right panel and select Test to
access the Test tab page. From there, you can enter the Test SMS sending page.
This is where you can send test messages to recipients with customized content.
(Visible in Figure 23).
Figure 23 - Select Test option
Enable SMS Modem Connection
To activate the SMS modem connection, locate the Connection group on the left.
Within this group, find the Connection switch, which is the second option
listed. Click on this switch to turn it on, making it green. This action will
initiate the process of your modem connecting to your service provider.
(Figure 24).
Figure 24 - Enable SMS modem Connection
Fill the recipient's address and test message
Enter the recipient's address and compose your test message. Locate the To
field within the Recipient group. In this field, input the recipient's
phone number. Then, use the SMS text field to type the content of your
message. Feel free to write any desired content here. (Refer to Figure 25).
Figure 25 - Enter the SMS details
Send the SMS
If you've finished composing your SMS, proceed to send it. Look for the blue
Send button located at the bottom of the screen. Click on this button to
send the message. You can expect to receive the SMS on the specified phone number
shortly thereafter. (Refer to Figure 26).
Figure 26 - Press Send
Check the test message
Inspect the test message on your mobile device. Locate an application designed
for managing SMS messages and launch it. If you observe your test message
displayed with the accurate content, you can rest assured that your SMS modem is
functioning properly. Congratulations! (Refer to Figure 27).
Figure 27 - Message Received
Summary
As you can see in the guide, the Ozeki SMS Gateway PLC works really well with Ozeki SMS Gateway.
Using them together lets you send messages from your computer, helping your company to grow bigger.
You can use this to send out automated or bulk messages. After you went through the steps, got
the needed hardware and software, you will be able to send SMS using your computer.
This article will compare our SMS devices, features, differences and similarities
while also pointing out the main uses for each device.
Figure 1 - Ozeki Devices
Ozeki 4G Modem
The Ozeki 4G Modem is a small form factor, easy to setup 4G Modem. This modem
does not require any external power supplies due to its efficiency; you can
just connect it to your computer. After activating the device on myozeki.com,
you can download the required drivers and use it in Ozeki SMS Gateway.
Ozeki 4G Dual SIM Modem
The Ozeki 4G Dual SIM Modem features a Dual SIM option for price-efficient SMS
sending. This modem does not require any external power supplies but needs two
USB connections for sufficient power. After activating the device on myozeki.com,
you can download the required drivers and start using it with Ozeki SMS Gateway.
The Dual SIM function works with Ozeki SMS Gateway, but the Gateway decides which
SIM card to use for best message pricing. The device can listen to only one SIM
card for incoming messages, but Ozeki SMS Gateway can automatically switch between
the SIM cards to receive all incoming messages.
Ozeki SMS Gateway One
Ozeki SMS Gateway One is a Hardware SMS Gateway featuring a high-speed modem for
the best performance. The Ozeki SMS Gateway One comes with Linux and Ozeki Software
Platform pre-installed for the easiest setup experience. You do not need to install
any drivers when using the pre-installed operating system. The device requires an
external power supply which is included in our package.
Ozeki SMS Gateway PLC
The Ozeki SMS Gateway PLC is a Hardware SMS Gateway with PLC features to fulfil
all your industrial needs. The device features several connections, Wi-Fi,
Cellular and GPS antennas, as well as different Serial port standards. The Ozeki
SMS Gateway PLC uses passive cooling, due to its efficient power use, it always
stays cool and stays quiet without the loud fans. The device comes with Windows
11 and drivers pre-installed for an easy setup experience.
What is an SMS modem?
An SMS modem is a hardware device which is connected to a computer and a cellular
network. You need to use a computer with Ozeki SMS Gateway installed to set the recipient
phone address and message text, after which Ozeki SMS Gateway will compose your
SMS, forward it to your service provider through the modem and the Service
Provider will send it to the recipient.
Figure 1 - How Ozeki SMS Devices send SMS
Comparison of the four devices
Our SMS Gateway devices come in four models, which can be seen on the sheet below
with all their important features and properties. The Ozeki devices are as compact,
as possible for a small form factor, high speed solution.
Ozeki 4G Modem
Ozeki 4G Dual SIM Modem
Ozeki SMS Gateway One
Ozeki SMS Gateway PLC
Mobile Network
4G/LTE
4G/LTE
4G/LTE
4G/LTE
Dual SIM
No
Yes
No
No
Type
Modem
Modem
Mini Desktop
Mini Desktop
Form Factor
Small
Medium
Medium
Large
COM Interface
USB-C
USB-C and USB-A
Ethernet
RS485/232/422
SMS Server
No
No
Yes
Yes
Network Interface
-
-
Ethernet
Ethernet / Wi-Fi
USB ports
-
-
4
8
Display Connections
-
-
HDMI and DisplayPort
HDMI and VGA
External Power Supply
No
No
Yes
Yes
Software support
1 year
1 year
1 year
1 year
Best use case
Office
Industrial / Office
Industrial / Office
Industrial
Software Support
The Ozeki devices are widely compatible with our services, and we offer a long
software support for these devices to ensure flawless operation for as long as
possible. The supported services can be seen on the sheet below.
Ozeki 4G Modem
Ozeki 4G Dual SIM Modem
Ozeki SMS Gateway One
Ozeki SMS Gateway PLC
Ozeki SMS Gateway
done
done
done
done
Ozeki SMS Server
done
done
done
done
Ozeki NG SMS Gateway
done
done
done
done
Ozeki Bulk Messenger
done
done
done
done
Ozeki Message Server 6
done
done
done
done
Ozeki SMS Wall
done
done
done
done
Ozeki Alarm
done
done
done
done
Ozeki Chat
close
close
done
done
Ozeki Modbus Gateway
close
close
close
done
FAQs
I have only one serial (RS232) port on my computer. How can I attach more
than one GSM phone or GSM modem to the SMS software?
If you need to connect more GSM modems to your system than the available serial
ports allow, fret not! USB to RS-232 converters offer a convenient solution.
Functionality: These converters act as adapters, transforming a standard USB
port on your computer into a virtual serial port (COM port). This enables you
to connect additional serial devices, like GSM modems, through the familiar
USB interface.
Easy Availability: USB to RS-232 converters are readily available at most
electronics and computer stores, making them a convenient option.
Multiple Modem Connections: With most computers offering several USB ports,
you can potentially connect at least four modems using individual USB to
RS-232 converters.
Further Expansion with USB Hubs: For even more connections, you can utilize
USB hubs. These devices add additional USB ports to your system, allowing you
to connect even more modems if needed.
Driver Installation and Configuration: Most USB to RS-232 converters come
with a driver disk. Installing the driver creates a new COM port on your system,
which you can then select during the modem configuration process within the
Ozeki SMS software.
By using USB to RS-232 converters, you can significantly increase the number of
GSM modems connected to your system, enhancing your communication capabilities.
If I attach multiple modems, can they be the same type, or do I need
different models? Will there be any conflicts?
Ozeki SMS Gateway offers flexibility when it comes to connecting GSM modems.
You have the option to use:
Identical Models: For optimal compatibility and potentially simplified
configuration, using the same GSM modem model across all connections is
recommended.
Different Models: While not necessarily discouraged, you can also utilize
different GSM modem models. The software communicates with each modem
through a dedicated COM port, preventing conflicts.
Ozeki SMS Gateway controls the modems by sending AT commands through the
established COM ports. This ensures clear communication regardless of the
specific modem model being used.
While both approaches work, using identical GSM modem models can potentially
streamline the setup process and minimize compatibility concerns. However, the
choice ultimately depends on your specific needs and available resources.
I can send SMS messages, but I cannot receive, what can be the problem?
While Symbian-based phones like some Nokia and Ericsson models can be used for
sending SMS messages, they might not be ideal for receiving messages through
Ozeki SMS Gateway. Here's why:
Limited Functionality in Mobile OS: Some mobile operating systems, including
older versions of Symbian, may not be fully optimized for handling incoming
SMS messages within gateway software environments. It's possible that the
phone's internal SMS software might unintentionally intercept incoming messages,
preventing them from reaching Ozeki.
Recommendation: Dedicated GSM Modem: For reliable incoming message delivery
through Ozeki, we recommend using a dedicated GSM modem. These devices are
specifically designed for SMS communication and work seamlessly with gateway
software, ensuring consistent message flow.
Alternative Solutions (if applicable):
Phone Model Compatibility: If you'd prefer to continue using a phone, check
if your specific Symbian phone model has documented compatibility with Ozeki
for receiving messages. Some models might have workarounds or configuration
options to enable proper message reception.
Software Updates: For Symbian phones that support software updates, consider
checking if a newer version might address the message handling issue.
Overall, while Symbian phones might have limitations for receiving messages
within Ozeki, using a dedicated GSM modem is the recommended approach for
optimal performance and reliability.
I would like to send SMS and MMS messages from my computer. To do this, can I
connect the application to any mobile phone or GSM modem, and which is better if
it support both?
Ozeki SMS Gateway offers flexibility in how users establish a connection for
sending and receiving SMS/MMS messages. This document outlines the two primary
methods available:
Mobile Phone Connection:
A mobile phone can be connected to a computer using a dedicated
phone-to-PC data cable. Alternatively, infrared or Bluetooth connections
can be employed for compatible devices.
This approach offers a convenient solution for users who already own a
mobile phone.
GSM Modem Connection:
For users prioritizing long-term reliability and performance, a dedicated
GSM modem is the recommended choice.
Several advantages make GSM modems the preferred option:
Enhanced Reliability: GSM modems feature streamlined software designed
specifically for SMS communication. This reduces the potential for
software-related issues compared to a mobile phone's operating system.
Continuous Operation: Unlike mobile phones, GSM modems do not rely on
batteries that require frequent charging. This ensures uninterrupted
operation for critical SMS/MMS communication needs.
Both mobile phone and GSM modem connections offer functionalities for sending
and receiving SMS/MMS messages through Ozeki SMS Gateway. However, for users
seeking a more reliable and long-term solution with optimized performance, a
dedicated GSM modem is the recommended choice.
This guide gives information on how to connect SMS modem pools to Ozeki SMS Gateway.
Setting up a modem pool is usually very easy. Modems in the modem pool will be
handled as independent modems in your system. In this guide you can read the
detailed steps for configuring an 8 port GSM modem pool. The steps
are similar for larger 16, 32, 64, 128 port pools. Modem pools are a good choice if
you want to operate many phone numbers. To get the phone numbers, you need to
purchase SIM cards for each modem slot in the modem pool. The SIM cards will
have their mobile phone numbers assigned to them, and you can use these phone
numbers in the SMS routing in Ozeki 10 SMS gateway. (Figure 1)
Figure 1 - SMS modem pool connection
How to send sms with a gsm modem pool
Check the prerequisites
Set up the modem pool
Connect the modem pool to the computer via USB cable
Launch Ozeki using your account
Add new connection by install SMS modem connection
Autodetect the port where you connected the modem
Create connections for all ports of the modem
Enable Connection in the Connection details tab
Compose a test SMS message with recipient address and text
Send test SMS text message with the GSM modem pool
Review the received SMS message
How to set up an 8-port GSM modem pool using USB for Ozeki SMS Gateway (video tutorial)
This video tutorial shows you how you can set up an 8-port GSM modem pool using USB to use with Ozeki SMS Gateway.
In this video we can find all components required for connectivity.
You need a SIM card, an antenna, an 8 port gsm modem pool, a power cable and a USB cable for this setup.
First, we insert the SIM card into one of the slots of the modem pool,
then we connect the antenna.
Next, we plug our modem pool into a socket using the power cable and turn it on.
Finally, we can connect the 8-port modem pool to our computer with the USB cable.
If everything is connected properly, a blue light should start blinking on the modem pool.
Ozeki SMS Gateway configuration for 8-port GSM modem pool (video tutorial)
This video shows you how you can configure your newly setup 8 port modem pool to be used with Ozeki SMS Gateway.
In this video we use an 8-port modem pool,
which is automatically detected as the port by the Autodetect system.
We then repeat this for all 8-ports.
Now we can turn the on the connection for one of them and send a text message.
We type in our message and phone number, then click on Send.
We can see that the message was successfully sent and shows up on the mobile device.
The following document gives information on how to setup GSM modem pools with Ozeki
10 SMS Gateway. These devices allow you to send SMS through SIM cards. If you wish
to send SMS messages through SIM cards, maybe a better alternative would be to
setup Android phones using the Ozeki Android Client. They can be connected to
Ozeki SMS gateway through the network (for example the Office Wifi. There are
dual sim Android devices, and by connecting four of them, you get the same
8 phone numbers the modem pool would offer.
The reason we recommend you the Android SMS gateway option, is because the
Android phones support messaging over 3G, 4G and 5G networks, and the modem
pools only work on 2G. The 4G and 5G networks are significantly faster in terms
of SMS messaging. Another problem is that 2G networks are being phased out in
many countries. The mobile network operators will not provide 2G services in
the near future to allocate frequencies to 4G and 5G.
More information can be found about how to setup the Ozeki Android Client at this URL:
https://android-sms-gateway.com/p_34-quick-start-guide.html
Set up your 8-port GSM modem pool
The first step of setting up your modem pool is to insert a SIM card into
one or more ports. The SIM card can be plugged into the modem as Figure 2 shows.
Figure 2 - Insert the SIM card
Next, you need to connect the antenna to the ports that have a SIM card inserted
into. You can connect the antenna right after you removed the cover like in Figure 3.
Figure 3 - Connect the antenna to the selected ports
To use the modem pool, next you have to connect it to a light socket with
a power cable. As you can see on Figure 4, the power cable can be connected
to the modem pool easily.
Figure 4 - The power cable plugged into the modem pool
After you connected the modem pool to the power supply, you just need to turn on
the modem pool by switching on the button as you can see it on Figure 5.
If your modem is under power, the button lights up.
Figure 5 - The modem pool is now turned on
Next, you need to turn on the selected GSM port as well like in Figure 6.
Figure 6 - The ports can be turned on or off separately
The connectivity of the ports can be checked easily by the blue light next to the
antenna (Figure 7). If it starts to blink, the SIM card connected right.
Figure 7 - The blue light indicates the status of connectivity
The last step of the setup process is to connect the modem pool to the PC. For that,
as you can see on Figure 8, plug the USB cable into your modem pool.
Figure 8 - Plug the USB cable into the modem pool
To finish the setup, just insert the other end of the cable into your computer (Figure 9).
Figure 9 - The modem connected to the PC via the USB cable
Configure the modem pool with Ozeki NG 10
Now your modem is ready to be configured. The first step you have to fulfil
is to open Ozeki NG 10 on your desktop (Figure 10).
Figure 10 - Open Ozeki NG 10
Next, log in with your Ozeki NG 10 account by typing your username
and password as you can see on Figure 11 This account has to be created during the installation process.
Figure 11 - Login with your Ozeki NG 10 account
Here, in the SMS Gateway application, the first thing that you need to do is
to create a new connection. This can be done by clicking on Add new connection
as you can see on Figure 12.
Figure 12 - Add new connection in the SMS Gateway
The next window lists you all the connections that you can create in the SMS
Gateway application. Now, as Figure 13 demonstrates, you have to select the
SMS modem connection by clicking on Install.
Figure 13 - Select the SMS modem connection to install
In the installation menu, you need to select the port, where you connected
the modem. For that, just click on the Autodetect button as you can see
on Figure 14.
Figure 14 - Autodetect the port where you connected the modem
This Autodetect option will detect your modem, and if it is connected right
the following window should show up like in Figure 15.
Figure 15 - Details of the detected modem
You can do this process with all the other ports, so like in Figure 16,
you can manage maximum eight SMS modem connection at the same time.
Figure 16 - Connection for each port
Send an SMS message using the modem connection
At this point, you have an SMS modem connection in the SMS Gateway application.
To handle SMS messages with this connection, first, you need to enable the
connection (Figure 17) by turning on the switch button in the connection
details window.
Figure 17 - Turn on the SMS modem connection
To send the SMS message, you need to type the phone number of the recipient
(Figure 18) in the Recipient field.
Figure 18 - Type the address where you want to send the SMS message
Next, just type the text of the SMS message to the SMS field like in Figure 19.
Figure 19 - The text of the SMS message
If you are ready to send the SMS message, just click on the Send button (Figure 20).
Figure 20 - The SMS can be sent by clicking on the Send button
If you did everything right, the message will be received by the recipient as you can see on Figure 21.
Figure 21 - The received SMS message
Quick Data sheet
Support
Windows, Linux, Unix OS
Messaging capacity
6800 SMS or 3200 MMS per hour
Size
440x220x50mm
TCP/IP Stack
yes
Internet
Wireless Access to internet
Internet services
PPP, TCP, UDP, HTTP, SMTP, POP3
SIM card slots
8
Dual band
900/1800 Mhz
Tri band
850/1800/1900 Mhz 900/1800/1900 Mhz
Quad band
850/900/1800/1900 Mhz
Transmitting Speed
Maximum Transmitting Speed 115.2 Kbps
Input voltage
100V - 240V
Working temperature
-20°C to +60°C
Storage temperature
-25°C to +70°C
Summary
In this guide we showed you how to configure an 8 port GSM modem pool and how to use it with Ozeki SMS Gateway.
This solution allows you to send messages to your customers from a computer. As you could see, the configuration has a
few steps, so reading this guide carefully is recommended. After you did everything right, you will have the tools to send
out short messages with a configured modem and Ozeki SMS Gateway.
Since this is an 8 port GSM modem pool, you have the opportunity to use 8 different SIM cards when you
send SMS from your computer.
This guide is about SMPP client connection setup.
It defines what an SMPP client connection is, what does SMPP stand
for and how you can use an SMPP client connection to connect your Ozeki SMS gateway
system directly to the Short Message Service Centre (SMSC) of a mobile network
operator over the Internet.
What does SMPP stand for?
SMPP stands for Short Message Peer-to-Peer Protocol. This is an industry standard protocol
designed to deliver SMS messages over TCP/IP connections through the Internet.
This protocol is implemented by Ozeki SMS Gateway.
What is an SMPP client?
An SMPP client is a software that allows you to connect to an SMS service
provider on the Internet. An SMPP client, such as Ozeki SMS Gateway, uses
the SMPP protocol to send and receive SMS text messages.
How to connect an SMPP Client
To connect an smpp client to an SMS service provider in order to send and receive SMS, please
follow these steps:
Open https://localhost:9515 in your browser
Login using your username and password
Click on "Add new connection"
Select "SMPP client"
Enter the smpp host name and port
Enter the telephone number
Click ok to connect the smpp client
Check the smpp logs
Send a test sms
The SMPP client provides a standardized way for applications to programmatically
send and receive SMS messages in bulk to the SMPP Server. The SMPP client
initiates a TCP/IP connection to the server. This makes SMPP clients essential
for applications like marketing platforms, notification systems, and two-factor
authentication services.
How to send SMS through an SMPP client
This system works in a way that the user gives their computer instructions on sending a message (Figure 1).
The computer forwards this information to an SMS Centre.
This is done through an SMPP (Short Message Peer-to-Peer Protocol) client connection.
The SMSC then sends the text message to the recipients' mobile devices.
Figure 1 - How to send SMS through an SMPP client
How to setup an SMPP client connection using Ozeki SMS Gateway (video tutorial)
The following short video shows the steps you need to take to setup an SMPP
client connection in Ozeki SMS Gateway what works in any country.
The video starts with the login form and takes you all the way to sending your
first text message as a test
over the newly created SMPP client connection.
Detailed smpp setup instructions
Setting up an smpp SMS connection in Ozeki SMS Gateway is a relatively simple procedure.
You need to login to the SMS gateway using a web browser as administrator, and
you need to perform a few simple steps. For configuration we recommend to login
using the administrator account. The administrator account username is "admin",
and the password is the one you provided during install.
(Figure 2)
Figure 2 - Logging in to Ozeki 10 for SMPP client connection setup
How to create a new SMPP client connection
To create a new SMPP client connection after login, you need to click on the 'Add new connection' link in
the management console of the Ozeki 10 SMS Gateway app. This link is located in the Connections
panel below the text "No connections are installed..." (Figure 3). This link will bring up a list of available protocols.
Note that SMPP is an SMS protocol that can be used to send SMS messages.
Figure 3 - Create a new SMPP client connection
To install the SMPP client connection, you will have to select SMPP client from the available connections list.
The SMPP client can be found in the IP SMS Connections section (Figure 4).
You need to click install to install the SMPP client. You will use a client connection because you
wish to connect the SMS gateway to an SMS service provider over the Internet. (If you wish
to provide an SMS service, and you want your customers to connect to your SMS gateway over SMPP,
you need to setup an SMPP user account and you need
to configure an SMPP service.)
Select the 'SMPP client' from the list and click on install.
Figure 4 - Installing the SMPP client connection
Configure your SMPP client connection
In order to configure your SMPP client connection, you need to provide the host name and
port number of the SMPP service, your SMPP credentials and your must specify telephone number
associated with this connection. There could be more than one phone numbers associated
with this connection. In this case provide the first one and check the overridable checkbox.
If this checkbox is checked, you will be able to use all phone numbers as sender IDs.
To configure an smpp client (Figure 5):
Select the General tab
Scroll to the smpp client config form
Give a name to this smpp client connection
Enter the smpp hostname
Set the smpp port number
Provide your smpp username
Type your password
Assign a sender id to this smpp client
Click OK
Figure 5 - Providing SMPP Client credentials
It is important to mention that the SMPP hostname and port plus the username and
password are provided by your SMS service provider. For example, if you contact Vodafone,
and ask for an SMPP SMS service, you will sign a contract with them, and often an
attachment of this contract will contain the connection following information. If
you subscribe to an SMS service on-line, you will likely find this information in
the on-line control panel of your SMS service provider. Of course, you can always
ask your SMS service provider in e-mail and ask what the SMPP server connection
details are.
Smpp host:
The smpp host is the host name of the IP address the SMPP client uses to connect to the
SMPP server. This is the IP address (or host name) of the SMPP server.
Smpp port number:
The smpp port number is the TCP IP port number of the SMPP client uses to connect to the
SMPP server. This port number is where the server is listening for incoming SMPP connections.
Smpp username:
The smpp username is the smpp system id. This identifier is provided by the SMPP server
operator when you sign up to their service.
Smpp password:
The smpp password is the password that is used to authenticate your smpp account on the
SMPP server. This password is provided to you by the SMPP server operator (or SMPP service provider)
when you sign up to their service.
Smpp telephone number:
The smpp telephone number is the smpp sender ID. This is the phone number that is displayed
on the mobile phone as the sender address, when your SMS messages is received.
Check the SMPP log
Once the SMPP client connection is configured, you should check the SMPP client connection log
to see if the system connected properly to your SMS service provider. If the system
connected properly, you would see the "Connection online" log entry. The SMS
connection logs can be found in the following directory in Windows: C:\Program Files\Ozeki\Data\Logs\Connections\.
In this Event tab of the SMPP client connection's details page, you can see a preview
of the log. This page contains the last 100 log entries. Note that the SMPP log
files are rotated to save disk space.
How to view the SMPP client connection log (Figure 6):
Open the SMPP client connection's details page
Click on the Events tab
Click on the eye icon next to the Events title
Copy the file name next to the Events title
Open notepad
Paste the filename into the File/Open dialog in notepad
Click OK to open the SMPP log file
Use F3 to find the date you are interested in
Search for "ERRO" to find errors in the log
Figure 6 - View the SMPP client connection log
Send a test SMS message
Once your connection is connected, you can check to see if it is ready to
deliver SMS messages by sending a test SMS. To send a test SMS message, you need to
open the Test tab, and you need to enter the phone number and message text. It
is recommended to provide the phone number in international format. This means
the phone number should start with a plus sign followed by a country code. If
your local phone number starts with a 0, it is likely that you will need to drop
the 0 prefix. For example, if your UK phone number 07958663698, you would send the
test SMS to +447958663698.
How to send a test SMPP message (Figure 7):
Navigate to the SMPP client connection's details page
Select the Test tab
Enter the recipient phone number
Make sure the phone number is in international format
Enter the message text
Make sure the message text is less than 160 characters
Click on the Send button
Check the SMPP logs
The sms is sent using the smpp submit_sm pdu over the SMPP link established
between the SMPP client and the SMPP server. This PDU carries the sender id,
the recipient address, the message text and all the necessary flags and
smpp parameters needed to display the sms properly on the recipient mobile phone.
You might ask why the message text should be less than 160 characters. This
is because GSM system was designed to send 160-character-long text messages.
If a message is longer, it will be split into multiple message segments, and will
be delivered in more than one SMS message.
Figure 7 - Sending a test message
After the message is successfully sent, you should check the SMPP logs. The
SMPP logs will reveal the low level SMPP messages, that are used to pass the
message content to the SMS service provider. These messages are also called
an SMPP PDU (SMPP protocol data unit). If there is a problem with message submission,
your SMS service provider will ask for the SMPP logs. In this case, you need
to send the SMPP PDUs to them. For every SMS submission, two SMPP PDUs will appear
in the log. One is the SMPP SUBMIT_SM pdu, which passes the message to the SMS service
provider's over, and the SMPP SSUBMIT_SM_RESP, which returns a reference ID, that
can be used for tracking a message, and for finding the delivery reports returned
to you when the message is delivered to the recipient handset. (Figure 8)
Figure 8 - SMPP SMS submit result in the logs
SMPP protocol specification
The SMPP protocol specification can be used to understand each SMPP PDU you
see in the logs. You will see that there are several operations in this protocol
specifications. For example, there is an operation for keeping the SMPP client connection
alive using keep alive messages, and there are multiple operations for submitting and
receiving SMS messages and SMS delivery reports.
The SMPP standard is an evolving protocol. The first widely adopted version was v3.3. Currently the
most common version you will find is v3.4, but there is also a newer version v5.0 which is rarely used
in SMS services.
SMPP 3.3 the oldest version supports GSM SMS messages only. It generates an immediate
response for each message sent. In most cases this version is not supported over SSL connections. The
problem with SMPP 3.3 is that it requires two SMPP links: an SMPP transmitter and an SMPP receiver
link to the SMS service provider. When you setup an SMPP v3.3 link in Ozeki SMS Gateway, you will
have to create two SMPP client connections, and configure on as SMPP transmitter and the other as SMPP receiver.
The SMPP 3.4 protocol is similar to SMPP 3.3, but it has a strong advantage: it allows you to send and
receive SMS messages over a single TCP/IP link. In Ozeki SMS gateway you will only have to setup on
SMPP client connection if you wish to use this protocol. SMPP v3.4 also adds optional Tag-Length-Value (TLV) parameters,
to the SMS message, which allows the user to work with non-GSM SMS technologies, such as SMS messaging
in CDMA networks.
SMPP 5.0 is the latest version of SMPP. It extends v3.4 by adding support for cell broadcasting, smart flow control.
Not many SMS service providers use this protocol. We recommend you to setup SMPP v3.4 connections in Ozeki SMS gateway.
SMPP client testing
To test your SMPP client connection, it is a good idea to setup another SMPP gateway as
an SMPP Simulator. This way you can do performance testing and test all the aspects of SMS messaging.
To see how we have used this SMPP simulator method to test the performance of our SMS gateway by
sending 1 000 000 SMS through it, check out the SMPP performance testing page.
FAQs
What kind of parameters do I need to connect to an SMPP service provider?
These are the essential details required to configure an SMPP connection for
your Ozeki SMS Gateway:
Server Address/Hostname: Specifies the location of the SMSC server (either
its IP address or hostname) for the gateway to connect to.
Port Number: Defines the specific TCP/IP port on the SMSC server that the
gateway should use for communication.
Username (System ID): Identifies your account on the SMSC server.
Password: The password associated with your username for secure
authentication.
SMPP Version: Select the compatible version of the SMPP protocol supported
by your SMSC server (Ozeki supports v3.3 and v3.4).
System Type (Optional): Only required if the SMSC server mandates it. This
value, often "SMPP," will be provided by your SMPP system administrator.
Sender Address: The default phone number that appears as the sender for
outbound SMS messages.
Address Range (Optional): Primarily used for receiving messages. This
information, sent to the SMSC after login, is relevant when managing
multiple phone numbers on a single SMPP link.
Having these details readily available ensures a smooth configuration process
for your Ozeki SMS Gateway's SMPP connection.
What is an SMPP transmitter connection?
An SMPP transmitter connection is designed specifically for sending SMS messages.
It acts like a one-way street, allowing your Ozeki SMS Gateway to transmit
messages outward to the SMSC (Short Message Service Centre). This type of connection
is ideal when you only need to send SMS messages and don't require receiving
functionality.
What is an SMPP receiver connection?
An SMPP receiver connection functions solely for receiving incoming SMS messages.
It operates like a dedicated mailbox, allowing the SMSC (Short Message Service
Centre) to deliver messages to your Ozeki SMS Gateway. This type of connection
is suitable when you only need to receive incoming messages and don't plan on
sending any.
What is an SMPP transceiver connection?
An SMPP transceiver connection offers a versatile option for both sending and
receiving SMS messages. It functions like a two-way street, enabling your Ozeki
SMS Gateway to transmit messages outward and receive incoming messages from the
SMSC (Short Message Service Centre) over a single TCP/IP connection. This type
of connection is ideal for most scenarios where you require both sending and
receiving SMS capabilities.
Summary
This guide provided all the necessary information on how to setup SMPP client connection in Ozeki SMS Gateway.
SMPP is great because it allows you to send SMS messages to the SMSC over the Internet and
Ozeki SMS Gateway provides excellent speed for delivery. If you wish to setup an efficient
SMS notification service in your business, SMPP is the way to go.
The information you have obtained is valuable, there are further useful documents in this
guide, so keep on reading. It is a good idea to check out the UCP protocol setup
guide and the CIMD client connection tutorial, because these protocols offer
similar, high speed SMSC connectivity.
This page lists the SMPP specifications currently in use. The most widely
used SMPP version is currently version 3.4. You may download the
specifications in PDF format from this page. Ozeki SMS Gateway
implements all of these protocol versions and is fully compliant with them.
For outgoing SMPP connections you can select which protocol version to use
on the configuration form. For incoming SMPP connections, the protocol
version is automatically determined by Ozeki SMS Gateway.
There are three versions of the SMPP protocol specification in use. The original
public version of the specification is SMPP v3.3 and was released in 1997. SMPP
systems using this version usually rely on two links an SMPP transmitter and
an SMPP receiver. One link is used for sending the other is used for receiving SMS.
The original specification was updated to SMPP v3.4, the most important change in
this version was the recommendation to use a single TCP/IP link to send and receive
SMS messages instead of two links. This is called the SMPP transceiver connection.
The word transceiver is a mix of the words "transmitter" and "receiver". Using
a single link makes connection management much easier and more resource efficient
on the server side. This protocol version is the most widely used version to date (year %2025).
SMPP v5 is currently the most up to date version of the SMPP specification. This
version was released in 2003. The major change in this version was the shift to
using Type-Length-Value (TLV) fields. The idea was great, but this version is not
as widely adapted as SMPP version 3.4, as most SMPP systems were in operation
before this protocol version was released and few providers decided to upgrade
their system to work according to this standard, as the previous standard is
fulfilling most of the needs.
SMPP (Short Message Peer-to-Peer) is an open, industry standard protocol
that enables the transfer of short message data between applications and
mobile networks. SMPP is widely used for SMS messaging, as well as other
mobile services such as EMS, voicemail notifications, cell broadcasts, USSD,
and MMS. SMPP has three versions in use: SMPP 3.3, SMPP 3.4, and SMPP 5.0. Each
version has its own advantages and disadvantages, depending on the use case and requirements.
In this article, we will compare the features and benefits of each SMPP version,
and provide some statistics and a comparison table to help you choose the
best one for your needs.
SMPP 3.3
SMPP 3.3 is the oldest version of the protocol, released in 1997. It supports GSM only
and has a limited set of operations and parameters. It does not support optional
tag-length-value (TLV) parameters, which are used to extend the functionality
and information of the protocol. It also does not support non-GSM SMS technologies,
such as UMTS, CDMA, TDMA, and iDEN. Moreover, it does not support transceiver
sessions, which allow a single connection to send and receive messages.
The main advantage of SMPP 3.3 is its simplicity and compatibility with older systems.
It is easy to implement and understand, and it works with most SMS service providers
and mobile network operators. However, it has many limitations and drawbacks, such as:
It cannot handle long messages (more than 160 characters) or concatenated SMS (splitting a long message into multiple parts).
It cannot handle binary messages (such as ringtones, logos, or pictures) or Unicode messages (such as Arabic or Chinese characters).
It cannot handle delivery receipts (confirmation of message delivery or failure) or message status reports (information about the message state).
It cannot handle advanced features such as data coding schemes (specifying the encoding and compression of the message), service
types (specifying the application or service that originated the message), priority flags (specifying the urgency of the message),
validity periods (specifying how long the message should be stored by the network), or scheduled delivery times (specifying when the
message should be delivered).
According to a survey conducted by Ozeki, a leading SMS gateway software provider,
SMPP 3.3 is still widely used by businesses and SMS service providers, despite
its limitations. The survey found that 38% of respondents use SMPP 3.3 for their
SMS messaging needs.
SMPP 3.4
SMPP 3.4 is an updated version of the protocol, released in 1999. It adds optional
TLV parameters, support for non-GSM SMS technologies, and transceiver support. It also
adds new operations and parameters to enhance the functionality and information of the protocol.
The main advantage of SMPP 3.4 is its flexibility and versatility. It can handle
various types of messages and services, such as:
Long messages (up to 64 KB) or concatenated SMS
Binary messages or Unicode messages
Delivery receipts or message status reports
Data coding schemes or service types
Priority flags or validity periods
Scheduled delivery times or replace-if-present flags (specifying whether to replace an existing message with a new one)
Message payload (specifying the actual content of the message)
User data header (specifying additional information about the message)
Source address subunit (specifying the subunit within a device from which the message originated)
Destination address subunit (specifying the subunit within a device to which the message should be delivered)
More subaddress (specifying additional addressing information for routing purposes)
Callback number (specifying a number to which a reply should be sent)
Callback number presentation indicator (specifying how the callback number should be displayed)
Callback number tag (specifying an alphanumeric string associated with the callback number)
Number of messages in mailbox (specifying how many messages are waiting in a mailbox)
Alert on message delivery (specifying whether to alert the recipient when a message is delivered)
Language indicator (specifying the language of the message)
Its session initiation protocol information element (specifying information related to SIP)
The main disadvantage of SMPP 3.4 is its complexity and compatibility issues. It
is more difficult to implement and understand than SMPP 3.3, and it may not work with some SMS service providers
or mobile network operators that do not support it. Moreover, some TLV parameters are vendor-specific or
optional, which may cause interoperability problems or confusion.
SMPP 3.4 is the most popular version of the protocol, used by 54% of respondents.
It is the recommended version for most SMS messaging applications and services.
SMPP 5.0
SMPP 5.0 is the latest version of the protocol, released in 2003. It adds support
for cell broadcasting, smart flow control, and other minor enhancements. It also
clarifies some ambiguities and inconsistencies in the previous versions.
The main advantage of SMPP 5.0 is its completeness and standardization. It covers
all the features and functionalities of SMPP 3.4, and adds some new ones, such as:
Cell broadcast operations (for sending messages to multiple recipients in a specified area)
Cell broadcast data coding scheme (specifying the encoding and compression of the cell broadcast message)
Cell broadcast service type (specifying the application or service that originated the cell broadcast message)
Cell broadcast channel indicator (specifying the channel on which the cell broadcast message should be transmitted)
Cell broadcast content type indicator (specifying the type of content of the cell broadcast message)
Smart flow control (for optimizing the throughput and performance of the protocol)
Message reference number (specifying a unique identifier for each message)
Message sequence number (specifying a sequential number for each message within a session)
Message state TLV parameter (specifying the state of a message at any point in time)
The main disadvantage of SMPP 5.0 is its availability and adoption. It is not
widely supported by SMS service providers or mobile network operators, and it
is not widely used by businesses or SMS service providers. In 2023 only 8% of
respondents indicated to use SMPP 5.0 for their SMS messaging needs.
SMPP Version Comparison Table
The following table summarizes the main features and benefits of each SMPP version:
| Feature                     | 3.3 | 3.4 | 5.0 |
| --------------------------- | --- | --- | --- |
| GSM support                 | Yes | Yes | Yes |
| Non-GSM support             | No | Yes | Yes |
| TLV parameters              | No | Yes | Yes |
| Transceiver support         | No | Yes | Yes |
| Long messages               | No | Yes | Yes |
| Concatenated SMS            | No | Yes | Yes |
| Binary messages             | No | Yes | Yes |
| Unicode messages            | No | Yes | Yes |
| Delivery receipts           | No | Yes | Yes |
| Message status reports      | No | Yes | Yes |
| Data coding schemes         | No | Yes | Yes |
| Service types               | No | Yes | Yes |
| Priority flags              | No | Yes | Yes |
| Validity periods            | No | Yes | Yes |
| Scheduled delivery times    | No | Yes | Yes |
| Replace-if-present flags    | No | Yes | Yes |
| Message payload             | No | Yes | Yes |
| User data header            | No | Yes | Yes |
| Source address subunit      | No | Yes | Yes |
| Destination address subunit | No | Yes | Yes |
Conclusion
To conclude, SMPP is a powerful and flexible protocol that enables the transfer
of short message data between applications and mobile networks. SMPP has three
versions in use: SMPP 3.3, SMPP 3.4, and SMPP 5.0. Each version has its own
features and benefits, depending on the use case and requirements. SMPP 3.3 is
simple and compatible, but limited and outdated. SMPP 3.4 is flexible and versatile,
but complex and inconsistent. SMPP 5.0 is complete and standardized, but unavailable
and unpopular. The choice of the best SMPP version depends on the needs and preferences
of the user, as well as the support and compatibility of the SMS service
provider and the mobile network operator.
If you are looking for a reliable and easy-to-use SMS gateway software that supports
all SMPP versions, you may want to check out Ozeki SMS Gateway. It is a high-performance
software that allows you to send and receive SMS messages from your computer using
a GSM modem or an IP SMS connection. It also offers various features and functionalities,
such as email-to-SMS, SMS-to-email, database-to-SMS, SMS-to-database, HTTP-to-SMS,
SMS-to-HTTP, and more. You can download a free trial version from their website
and start sending and receiving SMS messages in minutes.
Find out how to view the SMPP PDUs (Protocol Data Units) in your connection's log.
This guide gives you the steps to turn on SMPP low level logging for an SMPP client
connection. It also shows you where you can find the log file in the file system.
The first step is to open the SMPP client connection on the left side of the SMS Gateway Manager console page as you can see it on the Figure 1.
Figure 1 - Open SMPP Client
Now in the Log level section of the user's Advanced tab enable the 'Log Communication Events'
checkbox if you wish to get Low Level log information about what happens on this connection (Figure 2).
Figure 2 - Enable Log Communication Events
To send a test SMS message, you need to open the Admin user, and you need to enter the phone number and message text.
It is recommended to provide the phone number in international format.
This means the phone number should start with a plus sign followed by a country code (Figure 3).
Figure 3 - Send test message
After the message is successfully sent, you should check the SMPP logs.
The SMPP logs will reveal the low level SMPP messages, that are used to pass the message content
to the SMS service provider. These messages are also called an SMPP PDU (SMPP protocol data unit).
If there is a problem with message submission, your SMS service provider will ask for the SMPP logs.
In this case, you need to send the SMPP PDUs to them. For every SMS submission, two SMPP PDUs will appear in the log (Figure 4).
C# smpp api
In this guide, you can learn about how to setup a c# SMS api with
the SMPP (Short Message Peer-to-Peer) protocol. You can download the full
source code and use it free of charge. The Ozeki SMS Gateway offers
an excellent, high performance implementation of the SMPP api with a C# SMS example. Lear more:How to send SMS using SMPP with C#.net api
C/C++ smpp api
Developers can integrate the c/c++ SMS api with the SMPP (Short Message Peer-to-Peer)
into their software. The source code of the c/c++ SMS api is free of charge.
The Ozeki SMS Gateway is a high capacity sms server software that can be
used in various environments (Windows, Linux, and Android).
Learn more:Send SMS using SMPP with c/c++ api
This page demonstrates how to send sms from c# with smpp. It will start with
clearing up the term of what c# with smpp is and will continue with the
explanation of how it can be used. C# with smpp is a great tool to send sms,
it can be used in various environments. This guide is useful for c# developers.
Maybe the biggest advantage of this smpp api solution is that all you have
to do is perform some configuration and you will be ready to send sms messages
in a short period of time.
The smpp api with c# sms example is based on Ozeki SMS Gateway, so you can take advantage of that
fact that it offers excellent logging capabilities, which means you can track down errors quickly.
We presume you are familiar with the basics of SMS technology and the c# programming.
You will be provided some valuable information and well-structured step by step instructions.
What is c# smpp?
C# smpp is a method to send sms messages from a c# application using the smpp protocol.
It is used by c# software developers in windows services, windows desktop applications
and c# driven websites.
Figure 1 - Send text message from c sharp with smpp
Detailed instructions to send sms from c# with smpp
SMPP (Short Message Peer-to-Peer) is a protocol used by the telecommunications
industry. It exchanges SMS messages between (SMSC) and Ozeki SMS gateway. SMSC acts as
middleman to store the message and route it. Ozeki SMS gateway is the system
that delivers SMS to SMSC. To use Ozeki SMS gateway to connect to the mobile network
using SMPP you need to setup an secure SMPP Client connection.
C# requirements and resources
C# is a programming language and can be used to quickly and easily add SMS support
for programmatically sending and receiving text messages. Use it for transactional
messaging and notifications between your application and mobiles. The following
are required to send SMS using C#:
Visual Studio
Ozeki c# sms example code
SMS api account created in Ozeki SMS Gateway
SMPP Client connection configured in Ozeki SMS gateway
C# SMS source code example
The following example C# source code is free to use, you can simply implement it into
your project, or you can modify the source code to use it for other projects or applications. If you
would like to run this example code, you just need to copy-paste it into your Console App project
and run the project.
using System;
using System.Net.Http;
using System.Text;
using System.Web;
namespace HttpApiTester
{
    class Program
    {
        static async System.Threading.Tasks.Task Main(string[] args)
        {
            var username = "john";
            var password = "Xc3ffs";
            var messagetype = "SMS:TEXT";
            var httpUrl = "https://127.0.0.1:9508/";
            var recipient = HttpUtility.UrlEncode("+36201324567", Encoding.UTF8);
            var messagedata = HttpUtility.UrlEncode("TestMessage", Encoding.UTF8);

            var sendString = $"{httpUrl}api?action=sendmessage&username=" +
                             $"{username}&password={password}" +
                             $"&recipient={recipient}&messagetype=" +
                             $"{messagetype}&messagedata={messagedata}";

            Console.WriteLine("Sending request: " + sendString);

            var handler = new HttpClientHandler();
            handler.ServerCertificateCustomValidationCallback =
                (sender, cert, chain, sslPolicyErrors) => { return true; };

            using var client = new HttpClient(handler);

            try
            {
                var response = await client.GetStringAsync(sendString);
                Console.WriteLine("Http response received: ");
                Console.WriteLine(response);

            } catch(Exception e)
            {
                Console.WriteLine(e.Message);
            }
        }
    }
}
Testing
For testing your application's SMS support when using the SMPP protocol,
we recommend starting with the Ozeki SMPP simulator configuration to simulate
SMS message delivery to mobiles (MT SMS) and simulate SMS messages from mobiles
(MO SMS). The SMSC Simulator supports SMPP v3.3, v3.4 and v5.
For live testing and delivery to mobiles, you can use the reliable and dependable
Ozeki SMS gateway with an android sms gateway setup.
To sum it up
We hope you didn’t get lost in the explanations.
We did our very best to make it simple and to walk you through all the details as painlessly as possible.
By following the above tutorial steps, you can create the solution in a short period of time. Now you can use c# with smpp to send texts. You have seen the advantages Ozeki SMS Gateway can bring.
If you have already completed the steps, you can enjoy a well-deserved coffee or some other treat you have in mind.
If you would like to find out more about the benefits of other similar solutions, please open ozeki-sms-gateway.com.
I hope this article will be useful to all the readers and especially to beginners.
To create software for sending text messages from c/c++ with smpp requires basic knowledge
of how mobile text messaging works and you must be familiar with c/c++ programming.
This solution is based on Ozeki SMS Gateway. It can be downloaded from our website.
The goal is to make the process of creating your c/c++ SMS program with
smpp as quick as possible. This document presents the tutorial steps and the necessary
information to help you complete the c/c++ sms api integration efficiently. We provide a
list of requirements and resources that you need to know, before you start
this sms integration project.
What is c/c++ smpp?
C/C++ smpp is an sms api used by c/c++ developers to send and receive sms
messages from their development environment and finished software products.
Figure 1 - Send text message from c/c++ with smpp
Detailed instructions to send sms from c/c++ with smpp
Create the .cpp file based on the c/c++ SMPP sms example
Send your first sms from your c/c++ program
Check the logs to see if your texts were successfully sent
C/C++ requirements and useful resources
C and C++ are commonly used programming languages that can be used to efficiently add SMS support.
This will give your applications and mobiles the ability to send and receive SMS messages.
Here are the requirements to send and receive SMS using C and C++:
Visual Studio (optional)
Ozeki C/C++ sms example code
Existing SMS api account created in Ozeki SMS Gateway
Configured SMPP Client connection in Ozeki SMS gateway
Downloaded ozApi.dll
SMPP C/C++ example code
The following C/C++ sms api example source code is free to use. You can simply
implement it into your project. You can modify the source code to use it for
other projects or applications. In order to run the following example,
you just need to copy-paste it into a blank project. Add the ozApi.dll to the
linker and run it.
#include "../ozApi/ozApi.h"
#include <iostream>
#include <string>
#include <Windows.h>
using namespace std;

// dll description
HINSTANCE hDLL = NULL;

// This function unload ozApi.dll
void UnLoadOzekiApi()
{
        FreeLibrary((HMODULE)hDLL);
}

// This function load ozApi.dll
ozApi* LoadOzekiApi()
{
        HINSTANCE hDLL = NULL;
        SmsConnection conn;

        // Load ozApi.dll
        hDLL = LoadLibrary("ozApi.dll");

        if (hDLL != NULL)
        {
                conn = (SmsConnection)GetProcAddress((HMODULE)hDLL, "CreateSmsConnection");
            if (conn != NULL) return conn();
                UnLoadOzekiApi();
        }

        return NULL;
}


int main(int argc, char** argv)
{
        // Load ozApi dll and connect to it.
        ozApi* myConn = LoadOzekiApi();
        if (myConn == NULL)
        {
                // Error while connect to dll.
                cout << "Unable to load ozApi.dll" << endl;
                system("pause");
                return 0;
        }
        else
        {
                // Dll is loaded.
                cout << "Loaded" << endl;
        }

        // Connect to Ozeki NG SMS Gateway
        // on localhost (127.0.0.1) at port 9500.
        myConn->open("127.0.0.1", 9500);

        // Login with default username and password
        // (admin / abc123)
        if(myConn->login("admin", "abc123"))
        {
                // Send a test message to 0011111
                myConn->sendMessage("0011111", "Test Message.");
        }
        else
        {
                // If username/password is bad
                cout << "Bad usename or password" << endl;
        }


        // Closing connection.
        cout << "Closing connection..." << endl;
        myConn->close();

        // Unload ozApi.dll
        UnLoadOzekiApi();
        cout << "Done" << endl;

    return 0;
}
Conclusion
We did our very best to make it simple and to walk you through all the details
as painlessly as possible. By following the steps above, you can create the
solution in a short period of time. You have seen the advantages Ozeki SMS Gateway can bring.
If you have already completed the steps, I am sure, if you let your wife
(or girlfriend) know, you will be rewarded.
If you would like to find out more useful insights about the benefits of
other similar solutions, please open ozeki-sms-gateway.com.
I hope this page will be useful to all the readers.
This guide gives you the instructions to follow if you wish to use SMPP over a
secure SSL/TLS connection. SMPP over SSL/TLS has 3 main advantages:
The network traffic between your system and the system of the SMS service provider
will be encrypted. You will be able to validate the identity of the SMS service
provider, which is great, because you can detect a Man in the Middle attack this
way, and finally the service provider will also be able to verify your system
if you setup client SSL certificates. Ozeki 10 SMS gateway supports all of these
options.
How to setup a secure SMPP client connection
To setup a secure SMPP client over SSL/TLS:
Open the security app in Ozeki
Generate an SSL certificate
Save the SSL certificate
Check "Use SSL" in the SMPP client config
Upload the SSL certificate
Enter the certificate password
Connect to the SMPP server
Send a test SMS over the secure SMPP client link
How to setup a secure SMPP client connection (video)
This video takes you through the steps of setting up a secure smpp SMS client
connection that operates over an SSL/TLS links. It shows you how you can generate
an SSL certificate to be used for authentication, and you will see how to
configure this certificate and how to enable SSL encryption over the SMPP link.
You will also see how an SMS is sent and how the SMPP submit_sm pdu can
be viewed in the logs.
Secure SMPP link configuration steps
Open Security app from the Start menu.
Figure 1 - Open Security app
Create a Signed certificate.
Figure 2 - Create Signed certificate
Specify the certificate details.
Figure 3 - Provide certificate details
Provide the password for the created certificate. Then click OK.
Figure 4 - Provide certificate password
Download the certificate and send it to the client.
Figure 5 - Download certificate
Enable SSL connection on the SMPP client.
Figure 6 - Use SSL connection
Upload the Signed certificate.
Figure 7 - Upload certificate
Provide the certificate password and then click OK.
SMPP delivery reports are sent by the SMPP Server, to
the SMPP client after the text messages was successfully
delivered to the handset. The original SMS is submitted by the SMPP client using an
smpp submit_sm request. When the submit_sm is accepted
by the SMPP server, it returns a submit_sm_resp response, with an sms reference ID.
The delivery report comes in at a later date. It contains the time of delivery and
the sms reference ID that identifies the sms. The document below explains the
contents of an SMPP delivery report PDU and gives you a delivery report example.
What is the smpp delivery report format
And smpp delivery report is received as a standard text message. The messages text
has a special format, that contains various fields about the originally submitted
sms. These fields can be used to determine the state of the sms delivery.
SMPP supports delivery receipts / reports (DLRs) for SMS messages so that your application can determine delivery outcomes.
The returning of a message delivery receipt / report (DLR) is dependent on the value set in the registered_delivery field
of the message originally sent from the ESME to the MC in an submit_sm operation. This can be configured for non-delivery
and delivery-only scenarios that can result in circumstances where the receipt will not be returned. Message delivery
receipts are returned in the deliver_sm and data_sm operations.
The following fields are relevant in the deliver_sm and data_sm operations when used for transmitting delivery receipts.
source address (i.e. source_addr_ton, source_addr_npi, source_addr) -
The source address will be taken from the destination address of the original short message,
which generated the delivery receipt. The receipt appears as if it emanated from the recipient of the original registered message.
destination address (i.e. dest_addr_ton, dest_addr_npi, destination_addr) -
The destination address will be taken from the source address of the original short message,
which generated the delivery receipt. The receipt is addressed to the SME that originally sent the registered message.
esm_class - Bit 2 of the esm_class is set to 1 to indicate that the message is an MC Delivery Receipt. If bit 5 is set, then the message is an Intermediate Notification.
message_state TLV - Indicates the final state of the original message. See Message states below.
network_error_code TLV - See Error codes below.
receipted_message_id TLV - Message ID that was returned to the ESME by the MC in the submit_sm_resp PDU.
MC Delivery Receipt
This message type is used to carry a MC delivery receipt. The MC, on detecting the final state of a registered message,
would normally generate a new receipt message addressed to the originator of the first message.
The MC Delivery Receipt is then delivered to the ESME in a deliver_sm or data_sm operation.
ESME-to-MC: Set bits 0 and 1 in a submit_sm operation registered_delivery field to request an MC Delivery Receipt.
Bit 1
Bit 0
Meaning
0
0
no receipt
0
1
receipt requested when final outcome is delivery success or failure
1
0
receipt requested when final outcome is delivery failure
1
1
receipt requested when final outcome is delivery success (SMPP v5 only)
MC-to-ESME: Bit 2 in the esm_class field of a deliver_sm indicates the receipt is an MC Delivery Receipt.
Intermediate Notification
An intermediate notification is a special form of message that the MC may send to an ESME for a mobile terminated message delivery.
It provides an intermediate status of a message delivery attempt.
Typical uses are to report the outcome of delivery attempts made during the message’s retry lifetime within the MC.
This could be used to track the various reasons why a message is not delivered to its destination and use this to profile the subscriber’s availability.
Support for Intermediate Notification functionality is specific to the MC implementation and the MC Service Provider and is beyond the scope of this specification.
ESME-to-MC: Set bit 4 in a submit_sm PDU registered_delivery field to request an Intermediate Notification.
MC-to-ESME: Bit 5 in the esm_class field of a deliver_sm indicates the receipt is an Intermediate Notification.
Receipt in short_message field
Many pre-v3.4 APIs and Message Centres supporting v3.3 are likely to have a means of passing receipt information within the short_message field.
This applies to MC Delivery Receipts and Intermediate Notifications. The format specifics of this information are SMS gateway and SMSC platform specific and
beyond the scope of the specification. However, the following shows the approach typically taken:
The message ID allocated to the message by the SMSC when originally submitted.
sub
3
Number of short messages originally submitted. The value may be padded with leading zeros.
dlvrd
3
Number of short messages delivered. The value may be padded with leading zeros.
submit date
10
The time and date at which the short message was submitted. In the case of a message which has been replaced,
this is the date that the original message was replaced. The format is as follows:
YYMMDDhhmm where: YY last two digits of the year (00-99) MM = month (01-12) DD day (01-31) hh hour (00-23) mm minute (00-59
done date
10
The time and date at which the short message reached it’s final state. The format is the same as for the submit date.
stat
7
The final status of the message. See Message states below. State text may be abbreviated.
err
3
A network or SMSC error code for the message. See Error codes below.
text
20
Unused field, result will be blank.
Ozeki SMPP improvements
As we have implemented a very large number of SMPP connections we have found the following issues in various implementations:
Finding 1:
The value of the ID field in the delivery report (which we call
Submit Reference in Ozeki) is often different from the ID we receive from the SMS service provider.
The most common difference is that the original ID is returned as a standard
integer number and the ID in the delivery report is returned as a hexadecimal number.
This can also happen vice versa. The good thing is that in this situation, when
converted back the two numbers match, so the delivery reports can match.
The Ozeki SMS implementations perform various checks and can handle the
described situation properly.
Finding 2:
The value of the date fields often come in non-standard format. Ozeki currently
parses the date fields using the following patterns. You may also define a custom
date field pattern on the configuration form of the software.
"yyMMddHHmm",
"yyMMddHHmmss",
"dd-MMM-yyHH:mm",
"dd-MMM-yyHH:mm:ss",
"dd-MMM-yy HH:mm",
"dd-MMM-yy HH:mm:ss",
"yyyyMMddHHmmss",
"yyyyMMddHHmm",
custom
Message states
The following is a list of allowable states for a short message. The MC returns the message_state
value to the ESME as part of the query_sm_resp, query_broadcast_sm_resp or deliver_sm delivery receipt PDU.
Intermediate states are states that can change. Final states are states that
represent an end-of-life state for a message.
For example, a message in retry may return an ENROUTE state. At some point in the future,
this message will either expire or be delivered. The state will then progress
to EXPIRED or DELIVERED. Thus, a message in ENROUTE state is said to be in an
intermediate state.
A message in DELIVERED or EXPIRED state cannot progress to another state. These states are therefore final states.
Message State
Value
Type
SCHEDULED
0
Intermediate
The message is scheduled. Delivery has not yet been initiated.
A message submitted with a scheduled delivery time may return this state when queried. This value was added for SMPP v5.0.
MCs supporting earlier version of SMPP v3.3 and SMPP v3.4 are likely to return ENROUTE for scheduled messages.
ENROUTE or EN_ROUTE
1
Intermediate
The message is in enroute state.
This is a general state used to describe a message as being active within the MC. The message may be in retry or dispatched to a mobile network for delivery to the mobile.
DELIVERED
2
Final
Message is delivered to destination.
The message has been delivered to the destination. No further deliveries will occur.
EXPIRED
3
Final
Message validity period has expired.
The message has failed to be delivered within its validity period and/or retry period. No further delivery attempts will be made.
DELETED
4
Final
Message has been deleted.
The message has been cancelled or deleted from the MC. No further delivery attempts will take place.
UNDELIVERABLE
5
Final
Message is undeliverable.
The message has encountered a delivery error and is deemed permanently undeliverable. No further delivery attempts will be made.
Certain network or MC internal errors result in the permanent non-delivery of a message. Examples of such errors would be an unknown
subscriber or network error that indicated that the given destination mobile was denied SMS service or could not support SMS.
SMPP Delivery Receipt Error Codes
Error codes returned in delivery receipts are used to indicate any error situation encountered when attempting to deliver a message.
Error codes are SMS gateway and SMSC platform specific. However, the following shows an approach often taken:
Code	Meaning
1	MT number is unknown in the MT network’s HLR
2	MT number is unknown in the MT network’s HLR
5	MT number is unknown in the MT network’s MSC
9	MT number is classed as an illegal subscriber in the MT network’s MSC
11	MT HLR sends back a “Teleservice not provisioned” error in response to the SRI
12	MT handset is listed as an Illegal device on the MSC.
13	Customer is barred according to the MT HLR from receiving SMS
15	MT customer is part of a CUG that is not allowed to receive SMS
21	SMS not supported in the MT network.
22	SMS not supported in the MT MSC
31	MT handset is busy. The signalling control channel is in use.
	(Probably receiving another SMS at the same time)
32	GPRS – As above
34	System failure in the MT network.
35	Data Missing in either the MT HLR or MSC
36	Unexpected data value received in response to a FSM or SRI
40	Memory capacity exceeded on the MT handset
41	MT handset protocol error
42	MT handset is not equipped to support SMS
43	Short message type “0” not supported by the MT handset.
44	MT network unable to replace the SMS on the MT customers’ handset
45	Unspecified protocol error on the MT handset
46	Message class not supported on the MT handset
47	Unspecified DCS (Data coding scheme) error on the MT handset
48	Transfer layer PDU not supported by MT handset
49	SIM card full on MT handset
50	MT handset’s SIM is unable to store the message
51	Error in MT handset
52	Memory capacity exceeded on the MT handset
53	SIM application toolkit busy on the MS handset
54	SIM data download error on the MT customer’s handset
55	Unspecified MS handset error
60	Absent subscriber. No reason known
61	Absent subscriber due to phone being switched off
62	Absent subscriber due to phone out of coverage/flat battery
63	Absent subscriber due to roaming restriction/restricted area
64	Absent subscriber due to being deregistered in the HLR
65	Absent subscriber due to being purged in the VLR (off for 24+ hours)
66	Absent subscriber (GPRS) cannot be paged by the SGSN
67	Absent subscriber due to GPRS detached
68	Absent subscriber due to deregistration in the HLR (GPRS)
69	Absent subscriber due to GPRS MS purged in VLR
70	Absent subscriber due to unidentified subscriber on the MSC that the FSM was sent to.
71	Absent subscriber due to unidentified subscriber on the SGSN
How to test SMPP delivery reports
You can create an SMPP simulator configuration,
to test SMS delivery reports. In the simulator the tester connection can
return successful delivery and failed delivery reports. It will do this
if you configure "Delivery report request" on the "Advanced" tab page
of the SMPP Tester connection's configuration form.
If you have this option enable a delivery report will be returned for
each submitted SMS at a random later date with a random status of
successful or failed delivery.
FAQs
What is a delivery report?
When sending an SMS message, confirmation of its arrival at the recipient's phone
is crucial. SMS employs a two-step confirmation system to ensure this.
Upon submitting your message to the mobile network's Short Message Service Centre
(SMSC), you receive a "message submission report." This report signifies that
the SMSC has accepted your message for delivery. It also includes a unique
identifier, often referred to as a "message reference" or "callback ID," that
allows tracking the message within the SMSC system.
After acceptance, the message is stored in the SMSC until delivery becomes
possible. This might be delayed if the recipient's phone is switched off,
potentially extending the wait to days.
Once the recipient's phone becomes available, the message is delivered. Upon
successful delivery, a "delivery report" is sent back to the sender as a separate
SMS message.
This confirmation SMS contains:
Recipient's phone number: Verifies the intended recipient received the
message.
Message reference (callback ID): Matches the identifier from the original
submission report, providing a clear link between the two stages.
Delivery timestamp: Provides the exact time the message reached the recipient's
phone.
It's important to note that "delivery report" generally refers to this confirmation
SMS received by the sender. Not all mobile networks offer delivery reports, and
some require activation by the user.
Can I adjust how long a message is stored in the SMSC?
While SMS messaging offers a convenient way to communicate, ensuring a message
reaches its recipient promptly is crucial. This is where the concept of the
"validity period" comes into play.
The validity period refers to the timeframe an SMS message is stored in the
Short Message Service Centre (SMSC) when the recipient's phone is unavailable.
If the message remains undelivered after this period elapses, it's automatically
deleted from the SMSC, preventing a delayed delivery.
Benefits of Utilizing Validity Period:
Time-Sensitive Messages: Imagine sending a text about a time-sensitive event,
like a live TV program. Setting an appropriate validity period ensures the
message isn't delivered after the event has concluded, rendering it irrelevant.
Network Efficiency: By preventing unnecessary delivery attempts to unavailable
phones, the validity period optimizes network resources.
While some mobile networks offer the option to directly set the validity period
for outgoing messages, the default setting is often the network's maximum
(typically one week). This value can be adjusted through the phone's built-in
menu options.
It's important to remember that not all mobile networks offer user-configurable
validity periods, and some may require user activation for delivery reports
(confirmation that the message reached the recipient).
An SMPP simulator is a software that acts as an virtual Short Message Service
Centre (SMSC).
It can be used to simulate an SMPP SMS service. This is often required by software developers
who want to develop an SMS solution without sending and receiving real messages. This
guide (Figure 1) explains how you can setup your own SMPP simulator using Ozeki SMS Gateway.
Figure 1 - SMPP Simulator
What is an SMPP simulator
An SMPP simulator is a software that can send and receive SMS messages through
the SMPP protocol without actually delivering the messages to the mobile network.
Ozeki SMS Gateway is an SMPP simulator.
How does an SMPP simulator work
An SMPP simulator works by providing a virtual SMPP service on a TCP/IP port. SMPP
clients can connect to this virtual SMPP service the same way they would
connect to a standard SMPP service. The SMPP clients can send and receive SMS
messages using this virtual SMPP service.
The Ozeki SMPP simulator can be used to simulate:
Successful SMS delivery
Failed SMS delivery
Successful SMS delivery report
SMS delivery failure report
SMPP server failure report
Invalid SMPP username/password
SMPP throttling error
The major difference between an SMPP simulator and a real SMSC, is that the
SMPP simulator "eats" the SMS messages. It logs the message submissions,
but instead of delivering the SMS messages to the mobile network it
removes them. The SMPP simulator gives the ability to the tester users
to simulate various conditions for SMS delivery.
Is there another name for an SMPP simulator
An SMPP simulator is also called virtual SMPP server.
How can I configure an SMPP simulator
The basic idea behind setting up an SMPP simulator with Ozeki SMS Gateway
is to route the SMS messages to a tester connection instead of routing
them to the mobile network. The tester connection will simply log the
messages and will report them as either being sent or rejected depending
on the configuration. The tester connection can also be configured to
return delivery reports. If delivery reporting is configured, delivery
reports will be returned at a later time to simulate real-life behaviour.
To setup an SMPP simulator follow these steps:
Install Ozeki SMS Gateway
Setup a tester connection
Create an SMPP user account
Enable low level SMPP logging
Create an SMS route between the SMPP user and the tester connection
Your SMPP simulator is now up and ready
Step 1 - Setup a tester connection
The tester connection is listed as a standard mobile network connection.
It can be selected from the "Connections" list, that can be accessed
from the toolbar of the SMS Gateway app by clicking on the "Connect" icon.
To install the Tester connection, all you have to do is click Install (Figure 1).
Figure 1 - Tester SMS connection
Step 2 - Install an SMPP user
To install an SMPP user for testing, you need to open the main user interface of
the SMS Gateway, called the Management console. On this form, find the "Add new user/application"
link, and click on it to open the Users/Application list screen (Figure 2).
Figure 2 - Install SMPP user
Step 3 - Configure the SMPP user
To configure the SMPP user, you need to click Install (Figure 3), then on the configuration
form, that comes up, you need to provide a username and password.
Figure 3 - Configure the SMPPP user
After you have created the SMPP user account, you are ready to connect to the SMPP simulator.
To see the SMPP communication, it is recommended to enable detailed SMPP logging. To do this,
open the SMPP user configuration form, and on the Advanced tab of the configuration form,
open the logging group box, and tick the "Low communication events" checkbox. You may
also tick the other checkboxes to have a more detailed log. The log files will be written
to the default log folder. Each SMPP simulator account will have its own log
file. (Figure 4)
Many SMPP service provider return an SMPP Throttling error, if their service cannot deal with
the transfer speed. You can simulate SMPP throttling error, by enabling the SMPP speed limit
feature in the Speed limit group box of the Advanced tab page in the SMPP user's configuration form
(Figure 5). Note that the speed limit is provided in MPM. MPM means Messages per Minute. If
you set a speed limit of 10 MPM, throttling error will happen for the 11th message, if the SMPP
client sent in 11 messages in a 1-minute window. You can increase and decrease this speed
limit according to your testing scenario and you can switch it off all together. If the speed
limit feature is switched off, no throttling error will be return. If the system gets overloaded
the system will simple react slower.
Figure 5 - Limiting SMPP speed
Simulate submit failed
To constantly simulate SMS submission failure, it is best to remove all mobile network connections
from the SMS gateway app. If the SMPP user does not find a possible route to deliver the
incoming SMS messages, it will immediately return and SMPP submit failed answer to the
SMPP client. This setup is great if you want to test your system for service provider
failures and Internet connection failures. If the Internet connection fails, all the
Internet based IP SMS connections go offline. In this case an SMS app, that wants to
send an SMS will immediately receive an SMPP submit failed message.
Simulate SMPP delivery reports
By default, the tester connection will return submit failed and submit successful reports randomly.
You can configure it to return SMS successful delivery reports for successful virtual deliveries.
If you enable this option, your SMPP client, that connected to Ozeki SMS Gateway will receive
a standard SMPP delivery report as if the submitted SMS messages was delivered to a recipient
handset (Figure 6).
Figure 6 - Simulate SMPP delivery reports
SMPP simulator alternatives
Although there are some SMPP simulators on the web, the best SMPP simulator is
Ozeki 10 SMS Gateway. The reason for this is that it is high performance,
provides details SMPP logging, handles multipart SMS messages and delivery
reports.
The following error codes are returned by smpp servers to smpp clients to
indicate that something went wrong. The table below is indicative as many smpp
providers use custom error codes in addition to the codes listed below.
The most frequent SMPP error code:
Row Number
Error Number
Error Name
Error Description
1
0x69
ESME_RSUBMITFAIL
Generic submission failure
The full SMPP Error Codes table
0
0x0
ESME_ROK
Ok - Message Acceptable
1
0x1
ESME_RINVMSGLEN
Invalid Message Length
2
0x2
ESME_RINVCMDLEN
Invalid Command Length
3
0x3
ESME_RINVCMDID
Invalid Command ID
4
0x4
ESME_RINVBNDSTS
Invalid bind status
5
0x5
ESME_RALYBND
Bind attempted when already bound
6
0x6
ESME_RINVPRTFLG
Invalid priority flag
7
0x7
ESME_RINVREGDLVFLG
Invalid registered-delivery flag
8
0x8
ESME_RSYSERR
SMSC system error
10
0xa
ESME_RINVSRCADR
Invalid source address
11
0xb
ESME_RINVDSTADR
Invalid destination address
12
0xc
ESME_RINVMSGID
Invalid message-id
13
0xd
ESME_RBINDFAIL
Generic bind failure
14
0xe
ESME_RINVPASWD
Invalid password
15
0xf
ESME_RINVSYSID
Invalid System-ID
17
0x11
ESME_RCANCELFAIL
Cancel failure
19
0x13
ESME_RREPLACEFAIL
Replace failure
20
0x14
ESME_RMSGQFUL
Too many messages in queue, at present
22
0x16
ESME_RINVSERTYP
Invalid services type
51
0x33
ESME_RINVNUMDESTS
Invalid number of destination addresses
52
0x34
ESME_RINVDLNAME
Invalid name
64
0x40
ESME_RINVDESTFLAG
Invalid Destination Flag Option
66
0x42
ESME_RINVSUBREP
Invalid value for submit with replace option
67
0x43
ESME_RINVESMCLASS
Invalid value for esm_class field
68
0x44
ESME_RCNTSUBDL
Cannot submit to a distribution list
69
0x45
ESME_RSUBMITFAIL
Generic submission failure
72
0x48
ESME_RINVSRCTON
Invalid type of number for source
73
0x49
ESME_RINVSRCNPI
Invalid numbering plan indicator for source
74
0x4a
ESME_RINVDSTTON
Invalid type of number for destination
75
0x4b
ESME_RINVDSTNPI
Invalid numbering plan indicator for destination
77
0x4d
ESME_RINVSYSTYP
Invalid esm type
78
0x4e
ESME_RINVREPFLAG
Invalid submit with replace flag option
85
0x55
ESME_RINVNUMMSGS
Invalid number of messages specified for query_last_msgs primitive
This document shows the settings that need to be applied in case
you receive an SMPP error: 1: Message Length is invalid from your
mobile network operator or SMPP service provider. In short, this error indicates
that the submitted SMPP SMS PDU contains a message that is longer than the
allowed limit set by the SMS service provider.
Error Message
2023-06-20 14:02:58.398 ERRO Swisscom: Envelope rejected by SMSC. SMPP error: 1: Message Length is invalid.
2023-06-20 14:02:58.398 INFO Swisscom: Message submit failed.
Relevant settings
To begin the process, log into your Ozeki SMS Gateway account, or if you do not have
an Ozeki account, then download the Ozeki Gateway from the https://ozeki-sms-gateway.com/
website. After logging in to the Ozeki SMS Gateway, you need to load the SMS Gateway, by
clicking on the "SMS Gateway" icon from the given ones. It will bring you to the
Ozeki Home page, where you need to find the "Connections" part of the page, which is
located on the upper left side. Click on your SMPP client to set up the necessary
settings to solve the error message, you've received before.
Figure 1 - Open the SMPP client
By clicking on the SMPP client, you will be directed to the connection's details
page. Choose the "Configure" menu, then the "SMS" tab, which allows you to access
various configurations.
Figure 2 - Select SMS tab in the Configuration
Open the "Multipart (SAR)" section of the SMS details. There you need to set up the
message reference number length to use. Mark the needed options with an "X" sign.
To enable Segmentation, you need to mark the "Segment plain text messages", "Segment
unicode text messages" and "Segment binary messages" formats.
Figure 3 - Enable Segmentation
Summary
In conclusion, Ozeki SMS Gateway provides an effective solution for overcoming SMPP
issues and assuring seamless SMS transmission. Ozeki SMS Gateway is high-performance,
reliable SMS gateway software that helps handle SMPP errors. By following these steps,
the error can be resolved, allowing users to send longer messages within the provider's
limitations.
On SMPP links you may experience the "88: Throttling error ESME has exceeded allowed message limits"
error message for some SMS service provider connections in case of high load or when sending multiple
SMS messages.
This is what you see in the logs:
-	88: Throttling error (ESME has exceeded allowed message limits)
-	Timeout. No submit response received for SMS.
What causes this error
SMS aggregators and mobile network operators often put a limitation for the number
of SMS Messages they accept on a connection per second. For example, they may say
that they only allow 10 SMS per second. If you send more messages, they will reject
some of your SMS messages with the above error code.
In short, they do not want to handle (or cannot handle) high throughput SMS connections.
Since Ozeki SMS Gateway is very fast we often see this error, when we send too many
SMS messages in a very short period of time.
When can this SMPP throttling error happen
In most cases this error happens when you send many messages (a bulk sms jobs) on
a single link.
In other cases, it happens when you send long (multi part) sms messages. In this case
the problem of the provider is that the 2nd, 3rd, ... part of the SMS follows the
first part very quickly.
How to handle this problem
If you experience this problem, you must slow down the SMPP client in Ozeki SMS Gateway.
You can do this by opening the "Advanced" tab page of the Ozeki SMS Gateway's SMPP
configuration form and select the Speed Group box.
In the "Speed" group box tick the "Limit speed" checkbox and set a capacity
limit (e.g. 60 MPM). MPM means messages per minute (Figure 1).
This article is about how you can test your SMPP SMS system by sending a test messages.
The SMPP (or Short Message Peer-to-Peer) technology is used by the industry
because it is more reliable and faster than other messaging systems.
This technology can acquire the 1000 message/second speed. By reading this
article, you will be able to test such systems with the help of a test message.
The process takes 10 minutes to perform and with the help of this detailed
tutorial, you will have no problem with the setup.
We assume that you are already familiar with the SMS technology. We are using
the Ozeki SMS Gateway in this article which features a very intuitive user
interface for the best user experience.
Figure 1 - How to send a test SMS from SMS Gateway
How to send a test SMPP SMS message (Quick steps)
To send a test SMPP SMS message:
Go to the SMPP client connection's details page
Select the Test tab
Enter the recipient phone number
Make sure the phone number is in international format
Type the test SMS message text
Ensure the message text is less than 160 characters
Click on the Send button
Check the SMPP logs
How to send a test SMPP SMS message (Video tutorial)
In the following video explain how to send a test SMPP SMS message using the Ozeki SMS Gateway.
The video starts with composing a new message, providing the address and the body of the message.
At the end of the video, it shows you how to access log of the connection.
The video is detailed and only 50 seconds long, so you will have no problem following the steps.
It uses the Ozeki SMS Gateway which is a powerful and easy to master SMS gateway that is independent from providers.
You will learn how to compose and send SMS using the SMPP protocol.
Send a test SMS message
Once your connection is connected, you can check to see if it is ready to
deliver SMS messages by sending a test SMS. To send a test SMS message, you need to
open the Test tab, and you need to enter the phone number and message text. It
is recommended to provide the phone number in international format. This means
the phone number should start with a plus sign followed by a country code. If
your local phone number starts with a 0, it is likely that you will need to drop
the 0 prefix. For example, if your UK phone number 07958663698, you would send the
test SMS to +447958663698.
The sms is sent using the smpp submit_sm pdu over the SMPP link established
between the SMPP client and the SMPP server. This PDU carries the sender id,
the recipient address, the message text and all the necessary flags and
smpp parameters needed to display the sms properly on the recipient mobile phone.
You might ask why the message text should be less than 160 characters. This
is because GSM system was designed to send 160-character long text messages.
If a message is longer, it will be split into multiple message segments, and will
be delivered in more than one SMS message.
Click the New icon on the Toolbar
On the Ozeki Home page, you can see the New icon.
It is located Toolbar next to the Home icon and can be identified by the phone
and envelope shape (Figure 1). Click it to see the message composing window.
Figure 2 - Open new message menu
Compose the SMPP test message
In the message composing window, you can see two group boxes. To and Message.
Type in the recipient’s address into the Address input field in the
To group box.
Next, you need to provide a body for the message (Figure 2).
A good test message text is Hello World which is what we used here.
Click the Ok button after you finished with this step.
Figure 3 - Sending a test message
Send the test message
After you send a message, you will see the Message deliver history page.
Here you will see details about the process of SMS sending involving all the
steps it takes.
You can see a timestamp for every event here (Figure 3). This page helps
you to identify problems during the sending process and solve them.
Figure 4 - Test SMS sent
Check the events log of the SMS gateway
If you would like to see the whole events tab, go back to the main page of the Ozeki SMS Gateway.
Look for the blue Admin link on the right-side panel of the main page. Click it and search for the Events tab in the tab bar (Figure 4).
In the Events tab, you can check all the events of the user you are logged in. You can see the sent test message here as the last record.
Figure 5 - Admin user message event log
Summary
The purpose of this short guide was to show you how to send a test SMPP SMS message using Ozeki SMS Gateway. Sending a test message is very important
because you can check whether your SMS sending connection works or not by using this function. Use a phone number which can be checked in order
to see the test message and pay attention to the 160 characters limit. Ozeki SMS Gateway is easy to use and makes your work smoother, even
when we only talk about test messages.
This guide explains how you can decode and understand an SMPP PDU better.
It shows you how to use the built in SMPP decoder of Ozeki SMS Gateway
to understand the parts of the SMPP PDU created by Ozeki SMS Gateway better.
How to decode an SMPP PDU - Using the Ozeki SMPP PDU decoder
Enable low level logging
Send a test SMS message
Copy the SMPP PDU from the log
Open the Ozeki SMPP PDU decoder
Paste the SMPP PDU into the decode window
Click Decode
Decoding an SMPP PDU (Video Tutorial)
In this video tutorial we provide a simple guide that you can use to decode an
SMPP PDU. The aim of this tutorial is to enable the users to be able to decode any
SMPP PDU by themselves. We will walk you through the most crucial steps when it
comes to decoding an SMPP PDU, from enabling low level logging to pasting the SMPP
PDU into the decoder window and decode it.
By decoding SMPP PDUs we can find and fix problems, check if messages are delivered,
Decoding an SMPP PDU (Step by step guide)
First thing first, go to 'Configure' and enable 'Log communication events'. This
way you can get more information about what happens. Once you are done press 'OK'.
If you did everything properly, a window would pop up on your screen with a notifying
message saying 'Configuration successfully updated'.
Figure 1 - Enable Log Communication Events
The next step is sending an SMS message. Do this by filling out the correct boxes.
You will be asked to enter the addressee's telephone number and then enter the desired
text in the box below.
Figure 2 - Send test SMS
When you are done with the previous steps, you have to copy message PDU from 'Events'.
Figure 3 - Copy message PDU
After copying the message PDU, you have to go to the 'PDU decoder'. There you have
to enter the SMPP PDU you would like to decode. Paste the previously copied PDU
into the box and decode it.
Figure 4 - Decode message PDU in PDU decoder
How to decode an SMPP PDU Using an independent SMPP PDU decoder
Decoding an SMPP PDU using an independent SMPP PDU decoder (Video Tutorial)
In this video tutorial we provide a simple guide that you can use to decode an
SMPP PDU using an independent SMPP PDU decoder. You can most definitely decode
SMPP PDUs within Ozeki SMS Gateway, but the aim of this video is to show users
that they can also use individual decoders. We have placed a sample individual
decoder in a link format.
Decoding an SMPP PDU using and independent SMPP PDU decoder (Step by step guide)
The very first thing you need to do, is open a web browser and copy-paste the SMPP
decoder link we have placed above. Then you need to copy message PDU from 'Events'.
Figure 5 - Copy message PDU
After copying the right message PDU you need paste it into the independent PDU decoder
and decode message PDU.
Figure 6 - Decode message PDU in independent PDU decoder
Common Questions (FAQs)
What is SMPP PDU?
An SMPP PDU is a special message format used by mobile networks to send text
messages. It contains important details like who is sending the message, who is
receiving it, and the message itself. Think of it as the basic unit that helps
mobile networks communicate with each other when sending texts.
Why is it important to decode SMPP PDUs?
Decoding SMPP PDUs is important because it helps us understand how messages move
between different parts of the mobile network. By decoding these messages, we can
find and fix problems, check if messages are getting through okay, and make texting
work better overall. It is like understanding the secret language of text messages,
so everything runs like it supposed to.
What are some common problems that decoding SMPP PDUs can help solve?
Message delivery failures: By decoding PDUs, we can identify errors or
issues that prevent messages from being delivered, such as incorrect recipient
numbers or network connectivity problems.
Message routing errors: PDUs can reveal misconfigurations or errors in
message routing, helping to ensure that messages are sent to the correct destination.
Message content issues: PDUs may help identify issues with message content,
such as encoding errors or character limitations, ensuring that messages are delivered
properly.
Are there any risks associated with decoding SMPP PDUs?
Decoding SMPP PDUs can provide valuable insights into messaging systems, but it
comes with risks such as complexity for non-experts, privacy concerns regarding
sensitive data access, resource intensiveness for analysis, and potential misuse
if security measures are lacking.
How can understanding SMPP PDUs improve your experience with texting?
Understanding SMPP PDUs can make texting easier by helping you fix any problems
with sending or receiving messages. It also lets you keep an eye on how your
messages are sent and delivered, so you can have more control. Plus, it helps make
texting faster and more reliable. So, knowing about SMPP PDUs makes texting a
a better experience overall.
Summary
Decoding SMPP PDUs is the key to understand the hidden language behind texting.
With the help of SMPP PDU decoders, we can easily understand SMPP PDUs, fixing
texting issues, monitoring message movements. Decoding improves texting performance
and helps identify problems. Try the SMPP PDU decoder within Ozeki SMS Gateway to
enhance your texting efficiency. These decoders are essential for translating
complex data into clear information, allowing for quicker issue resolution and
improved communication. Unlock the benefits of clear texting with an SMPP PDU decoder!
The service_type field in SMPP (Short Message Peer-to-Peer) protocol defines the kind of messaging service being requested when submitting a message. This field appears in several SMPP PDUs such as submit_sm, data_sm, and submit_multi.
Field Details
Field Name: service_type
Data Type: C-Octet String (null-terminated ASCII)
Max Length: 6 characters (including null terminator)
Purpose: To categorize the message being sent (e.g., voicemail, WAP push, etc.)
Common Values
While service_type is optional and often left blank (null string), it can be used to request specific message handling. Here are common values:
Value
Description
null or ""
Default SMS (no special treatment)
"CMT"
Cellular Messaging
"CPT"
Cellular Paging
"VMN"
Voice Mail Notification
"VMA"
Voice Mail Alerting
"WAP"
Wireless Application Protocol message
"USSD"
USSD message
Custom Values
Some operators or SMSCs may support custom values like "OTP" or "PROMO" to trigger special routing, filtering, or billing rules.
Example Usage in a PDU
Below is an SMPP submit_sm PDU with service_type = "CMT":
When instructed by your SMS provider for routing purposes.
To categorize messages (e.g., alerts, promotions, 2FA).
To activate services like voicemail notifications or WAP Push.
To trigger special billing or delivery logic.
Important Notes
Leaving service_type blank is standard unless otherwise required.
Some SMSCs may ignore or override this field.
Incorrect values may lead to message rejections or delivery failures.
Conclusion
The service_type field in SMPP is a flexible but often optional way to classify SMS messages. While many systems use the default empty value, certain applications—especially those requiring special treatment by the SMSC—can benefit from explicitly setting this field.
SMPP (Short Message Peer-to-Peer) is a protocol used by telecom systems to exchange SMS messages between SMSC (Short Message Service Centers) and ESMEs (External Short Messaging Entities). A key component of the protocol is how it encodes phone numbers (source and destination addresses) in the SMPP PDU (Protocol Data Unit).
Address Parameters in SMPP
The key fields used to define a phone number in SMPP are:
addr_ton (Type of Number)
addr_npi (Numbering Plan Indicator)
address_range or source_addr/destination_addr
Type of Number (TON)
This field defines the format of the number. Common values include:
Value
TON
Description
0
Unknown
Unknown format
1
International
Number includes country code
2
National
Local number format
5
Alphanumeric
Used for sender names like "MyCompany"
Numbering Plan Indicator (NPI)
This field indicates the numbering format. Common values:
Value
NPI
Description
0
Unknown
Unknown format
1
ISDN (E.164)
Standard international phone number format
3
Data
Data network (X.121)
Encoding an Address
When encoding a phone number in SMPP, the system sends the number as a null-terminated string in ASCII, accompanied by the appropriate TON and NPI values.
Alphanumeric sender IDs must be 11 characters or fewer.
Alphanumeric addresses are not supported in all countries.
Always match TON and NPI correctly with your address format to avoid routing issues.
Conclusion
SMPP number encoding is critical for ensuring proper message delivery. By setting the correct TON, NPI, and encoding the address correctly in ASCII (null-terminated), developers can ensure compatibility with SMSCs and mobile networks.
Ozeki SMS Gateway allows you to manually configure the ESM class field (Figure 1)
Figure 1 - ESM class field setting
What is the ESM Class Field?
The Extended Service Message (ESM) Class in SMPP is a 1-byte field in SMPP PDUs that controls advanced message handling features.
It is used in submit_sm, deliver_sm, and data_sm operations to specify:
Message types (e.g., SMS, delivery receipt)
Delivery receipt behavior
UDH (User Data Header) presence
Message priority and routing flags
ESM Class Structure and Bitmask
The ESM class is a bitmask where each bit or group of bits activates specific features:
0000001D  // Command Length (29 bytes)
00000004  // Command ID (SubmitSM)
00000001  // Sequence Number
00        // Source TON
00        // Source NPI
736F7572636500  // Source Address ("source")
00        // Dest TON
00        // Dest NPI
36353433323100  // Destination Address ("654321")
00        // ESM Class (0x00: Default)
00        // Protocol ID (PID)
00        // Priority
00        // Schedule Delivery Time
00        // Validity Period
00        // Registered Delivery
00        // Replace-if-Present
00        // Data Coding (DCS=0x00)
00        // SM Default Message ID
07        // SM Length (7 septets)
C8329BFD06DDDF72  // Payload ("Hello!")
Example 2: Concatenated SMS (ESM=0x40)
00000025  // Command Length (37 bytes)
00000004  // Command ID (SubmitSM)
00000002  // Sequence Number
00        // Source TON
00        // Source NPI
736F7572636500  // Source Address ("source")
00        // Dest TON
00        // Dest NPI
36353433323100  // Destination Address ("654321")
40        // ESM Class (0x40: UDHI enabled)
00        // Protocol ID (PID)
00        // Priority
00        // Schedule Delivery Time
00        // Validity Period
00        // Registered Delivery
00        // Replace-if-Present
00        // Data Coding (DCS=0x00)
00        // SM Default Message ID
0C        // SM Length (12 bytes)
0500030201C8329BFD06DDDF72  // UDH + "Hello" (Part 1/2)
Example 3: Delivery Receipt (ESM=0x20)
0000001D  // Command Length (29 bytes)
00000004  // Command ID (SubmitSM)
00000003  // Sequence Number
00        // Source TON
00        // Source NPI
736F7572636500  // Source Address ("source")
00        // Dest TON
00        // Dest NPI
36353433323100  // Destination Address ("654321")
20        // ESM Class (0x20: Delivery receipt)
00        // Protocol ID (PID)
00        // Priority
00        // Schedule Delivery Time
00        // Validity Period
01        // Registered Delivery (receipt requested)
00        // Replace-if-Present
00        // Data Coding (DCS=0x00)
00        // SM Default Message ID
07        // SM Length (7 septets)
C8329BFD06DDDF72  // Payload ("Hello!")
Interactions with Other Fields
UDHI (ESM) + DCS: If UDHI is set, ensure the DCS supports UDH (e.g., GSM-7 or 8-bit).
ESM Class + registered_delivery: Use both to request delivery receipts explicitly.
Priority Bits + Priority Flag: Some SMSCs prioritize messages based on ESM bits instead of the separate priority field.
Common Pitfalls
Setting UDHI without including a valid User Data Header.
Using delivery receipt flags (ESM=0x20) without setting registered_delivery.
Mismatching ESM priority bits with the standalone priority_flag field.
Conclusion
The ESM class is a powerful tool for controlling message behavior in SMPP. Its bitmask design enables features like concatenation, receipts, and prioritization.
Always verify SMSC support for advanced flags and test configurations thoroughly. For authoritative details, refer to the SMPP specification v3.4 or v5.0.
The Protocol Identifier (PID) in SMPP (Short Message Peer-to-Peer Protocol) is a 1-byte field within SMPP PDUs (Protocol Data Units).
It identifies the protocol used by the originating system or provides special instructions for message handling. The PID field is defined in the
submit_sm, deliver_sm, and data_sm operations and is critical for:
The PID is a bitmask where specific bits control protocol behavior. Its structure aligns with GSM 03.40 specifications:
Bits
Description
7-5
Protocol Type: Indicates the protocol (e.g., GSM, Telex, or SMS).
4-0
Instructions/Flags: Special handling (e.g., replace message, voice mail).
Key PID Values and Interpretation
PID (Hex)
Binary
Description
0x00
00000000
Default (no special protocol)
0x01
00000001
Telex (obsolete)
0x03
00000011
X.400 (obsolete)
0x40
01000000
Return call message (SIM card handling)
0x41
01000001
Replace Short Message (overwrite existing)
0x42
01000010
Voice mail notification
0x7F
01111111
Reserved for future use
Note: Values like 0x40–0x7F are network-specific and may vary by SMSC. Always verify with your provider.
Use Cases and Scenarios
1. Message Replacement (PID=0x41)
Used to overwrite an existing message stored on the recipient's device. Common in OTP (One-Time Password) systems where a new password replaces the old one.
2. Voice Mail Notification (PID=0x42)
Triggers a visual/audible alert on the recipient's device for a new voice mail. The SMS body is often empty, as the PID itself is the trigger.
3. SIM Data Download (PID=0x40)
Instructs the SIM card to process the message (e.g., updating preconfigured settings).
Example SMPP PDUs with PID
Example 1: Default PID (0x00)
0000001D  // Command Length (29 bytes)
00000004  // Command ID (SubmitSM)
00000001  // Sequence Number
00        // Source TON
00        // Source NPI
736F7572636500  // Source Address ("source")
00        // Dest TON
00        // Dest NPI
36353433323100  // Destination Address ("654321")
00        // ESM Class
00        // Protocol ID (PID=0x00)
00        // Priority Flag
00        // Schedule Delivery Time
00        // Validity Period
00        // Registered Delivery
00        // Replace-if-Present
00        // Data Coding Scheme (DCS=0x00)
00        // SM Default Message ID
07        // SM Length (7 septets)
C8329BFD06DDDF72  // Payload ("Hello!")
Example 2: Voice Mail Notification (PID=0x42)
0000001D  // Command Length (29 bytes)
00000004  // Command ID (SubmitSM)
00000002  // Sequence Number
00        // Source TON
00        // Source NPI
736F7572636500  // Source Address ("source")
00        // Dest TON
00        // Dest NPI
36353433323100  // Destination Address ("654321")
00        // ESM Class
42        // Protocol ID (PID=0x42: Voice Mail)
00        // Priority Flag
00        // Schedule Delivery Time
00        // Validity Period
00        // Registered Delivery
00        // Replace-if-Present
00        // Data Coding (DCS=0x00)
00        // SM Default Message ID
00        // SM Length (0 bytes: No payload)
Example 3: Replace Existing Message (PID=0x41)
0000001D  // Command Length (29 bytes)
00000004  // Command ID (SubmitSM)
00000003  // Sequence Number
00        // Source TON
00        // Source NPI
736F7572636500  // Source Address ("source")
00        // Dest TON
00        // Dest NPI
36353433323100  // Destination Address ("654321")
00        // ESM Class
41        // Protocol ID (PID=0x41: Replace)
00        // Priority Flag
00        // Schedule Delivery Time
00        // Validity Period
01        // Registered Delivery (receipt requested)
00        // Replace-if-Present
00        // Data Coding (DCS=0x00)
00        // SM Default Message ID
07        // SM Length (7 septets)
C8329BFD06DDDF72  // Payload ("New OTP: 1234")
PID Interaction with TP-Protocol-Identifier (GSM)
In GSM networks, the PID maps to the TP-Protocol-Identifier in SMS TPDUs. Key mappings include:
0x41: Replace Command (GSM 03.40 TP-PID=0x41)
0x42: Voice Mail (GSM 03.40 TP-PID=0x42)
Common Pitfalls
Using reserved PID values (e.g., 0x7F) without SMSC support.
Mismatching PID and DCS (e.g., using UCS2 encoding for SIM data).
Ignoring network-specific rules (e.g., PID=0x40 may require special SMSC configuration).
Conclusion
The PID field is essential for advanced SMS routing and handling. While often set to 0x00 (default), its specialized values enable features like message replacement,
SIM updates, and voice mail alerts. Always test PID configurations with your SMSC and refer to the GSM 03.40 or SMPP v5.0 specifications for precise behavior.
The Priority Flag in SMPP (Short Message Peer-to-Peer Protocol) is a 1-byte field in SMPP PDUs like submit_sm and deliver_sm.
It indicates the urgency of a message, influencing how SMSCs (Short Message Service Centers) handle queuing, delivery retries, and routing.
Key use cases include:
Prioritizing emergency alerts over promotional SMS
Optimizing network resource allocation
Meeting SLA requirements for high-priority messages
Priority Field Values and Interpretation
Defined in SMPP v3.4, the priority flag uses a 4-bit value (though only values 0-3 are typically used):
Priority (Hex)
Decimal
Description
0x00
0
Lowest priority (bulk messages)
0x01
1
Normal priority (standard SMS)
0x02
2
Interactive priority (time-sensitive)
0x03
3
Highest priority (emergency alerts)
Note: Values 0x04-0x0F are reserved. Most SMSCs ignore these bits.
How Priority Affects Message Handling
1. Queuing Behavior
High-priority messages jump ahead in SMSC queues. Example:
Priority 3: Delivered before Priority 0 messages
2. Delivery Retries
Higher priorities may get more retry attempts. Example SMSC policy:
Priority 3: 5 retries over 24 hours
Priority 0: 2 retries over 2 hours
3. Network Routing
Some SMSCs route high-priority messages through dedicated channels.
Example SMPP PDUs
Example 1: Bulk SMS (Priority=0x00)
0000001D  // Command Length (29 bytes)
00000004  // Command ID (SubmitSM)
00000001  // Sequence Number
00        // Source TON
00        // Source NPI
736F7572636500  // Source Address ("source")
00        // Dest TON
00        // Dest NPI
36353433323100  // Destination Address ("654321")
00        // ESM Class
00        // Protocol ID (PID)
00        // Priority Flag (0x00: Lowest)
00        // Schedule Delivery Time
00        // Validity Period
00        // Registered Delivery
00        // Replace-if-Present
00        // Data Coding (DCS=0x00)
00        // SM Default Message ID
07        // SM Length (7 septets)
C8329BFD06DDDF72  // Payload ("Hello!")
Example 2: Emergency Alert (Priority=0x03)
0000001D  // Command Length (29 bytes)
00000004  // Command ID (SubmitSM)
00000002  // Sequence Number
00        // Source TON
00        // Source NPI
736F7572636500  // Source Address ("source")
00        // Dest TON
00        // Dest NPI
36353433323100  // Destination Address ("654321")
00        // ESM Class
00        // Protocol ID (PID)
03        // Priority Flag (0x03: Highest)
00        // Schedule Delivery Time
FF        // Validity Period (max)
01        // Registered Delivery (receipt)
00        // Replace-if-Present
00        // Data Coding (DCS=0x00)
00        // SM Default Message ID
0A        // SM Length (10 septets)
E8329BFD0E...  // Payload ("ALERT: Flood!")
Interactions with Other Fields
ESM Class Priority Bits: Bits 3-2 of the ESM Class may override this field on some SMSCs.
validity_period: High-priority messages often have shorter validity (e.g., 1 hour vs 3 days).
The Priority field is crucial for managing SMS delivery urgency but requires careful coordination with SMSC capabilities and regulations.
Always test priority behavior with your provider and align settings with local telecom guidelines. For detailed implementations,
refer to SMPP v3.4 Section 5.2.12 and GSM 03.40 documentation.
How to configure the SMPP Scheduled Delivery Time Field
What is the Scheduled Delivery Time Field?
The Scheduled Delivery Time field in SMPP (Short Message Peer-to-Peer Protocol) is an optional parameter in the submit_sm PDU
that allows a message to be queued for delivery at a future date and time. This field is critical for:
Schedule a message to deliver exactly at midnight on the recipient’s birthday:
scheduled_delivery_time: "231016000000000+"
// Oct 16, 2023 00:00:00 UTC+0
2. Off-Peak Delivery
Avoid network congestion by sending bulk messages at night:
scheduled_delivery_time: "231015020000000+"
// Oct 15, 2023 02:00:00 UTC+0
3. Time Zone Coordination
Deliver messages at 9 AM local time for recipients in New York (UTC-5):
scheduled_delivery_time: "231015090000000-0500"
// Oct 15, 2023 09:00:00 UTC-05:00
Example SMPP PDUs
Example 1: Immediate Delivery (NULL)
0000001D  // Command Length (29 bytes)
00000004  // Command ID (SubmitSM)
00000001  // Sequence Number
00        // Source TON
00        // Source NPI
736F7572636500  // Source Address ("source")
00        // Dest TON
00        // Dest NPI
36353433323100  // Destination Address ("654321")
00        // ESM Class
00        // Protocol ID
00        // Priority Flag
00        // Schedule Delivery Time (NULL: immediate)
00        // Validity Period
00        // Registered Delivery
00        // Replace-if-Present
00        // Data Coding (DCS=0x00)
00        // SM Default Message ID
07        // SM Length (7 septets)
C8329BFD06DDDF72  // Payload ("Hello!")
Example 2: Future Delivery (Oct 15, 2023 14:30 UTC)
0000002A  // Command Length (42 bytes)
00000004  // Command ID (SubmitSM)
00000002  // Sequence Number
00        // Source TON
00        // Source NPI
736F7572636500  // Source Address ("source")
00        // Dest TON
00        // Dest NPI
36353433323100  // Destination Address ("654321")
00        // ESM Class
00        // Protocol ID
00        // Priority Flag
3233313031353134333030303030302B00  // "231015143000000+" (16 bytes + null)
00        // Validity Period
00        // Registered Delivery
00        // Replace-if-Present
00        // Data Coding (DCS=0x00)
00        // SM Default Message ID
07        // SM Length (7 septets)
C8329BFD06DDDF72  // Payload ("Hello!")
Interactions with Other Fields
validity_period: Defines how long the SMSC will attempt delivery. Starts counting from the scheduled time.
priority_flag: Higher-priority messages may bypass scheduling queues on some SMSCs.
Common Pitfalls
Using local time without specifying the time zone offset.
Incorrectly formatting the date string (e.g., invalid month "13").
Assuming all SMSCs support scheduled delivery (verify with provider).
Setting a time in the past, causing immediate delivery.
SMSC Behavior Note:
Some SMSCs ignore fractional seconds (nn) or restrict how far in advance messages can be scheduled (e.g., 7 days max).
Conclusion
The Scheduled Delivery Time field enables precise control over when SMS messages are delivered. Proper use requires careful formatting of time strings
and coordination with SMSC capabilities. Always test scheduled messages with your provider and refer to the SMPP v3.4 specification for edge cases
(e.g., leap years, time zone transitions).
The Validity Period in SMPP (Short Message Peer-to-Peer Protocol) is a null-terminated string field in PDUs like submit_sm that defines
how long an SMSC will attempt to deliver a message before discarding it. This field is critical for:
Preventing indefinite retries for undeliverable messages
validity_period: "000007000000000R" // 7 days validity
3. Midnight Expiry (Absolute Time)
validity_period: "231215235959000+" // Expires Dec 15, 2023 23:59:59 UTC+0
Example SMPP PDUs
Example 1: 24-Hour Validity (Relative Format)
0000001D  // Command Length (29 bytes)
00000004  // Command ID (SubmitSM)
00000001  // Sequence Number
...
00        // Priority Flag
00        // Schedule Delivery Time
303030303234303030303030305200  // "00002400000000R" (24 hours)
00        // Registered Delivery
...
Example 2: Absolute Expiry Time
0000002A  // Command Length (42 bytes)
00000004  // Command ID (SubmitSM)
00000002  // Sequence Number
...
00        // Schedule Delivery Time
3233313231323332353935393030302B00  // "231212235959000+" (Dec 12, 2023 23:59:59 UTC+0)
...
Interactions with Other Fields
scheduled_delivery_time: Validity period countdown starts from scheduled time if set
priority_flag: High-priority messages may override validity period settings on some SMSCs
registered_delivery: Delivery receipts are sent even after validity period expiration
Common Pitfalls
Using relative format without the 'R' suffix
Setting validity periods longer than SMSC limits (e.g., 30 days max)
Mismatching time zones between scheduled time and validity period
Assuming all SMSCs support relative format (verify with provider)
SMSC Behavior Note:
Many SMSCs convert relative periods to absolute timestamps upon message receipt. The countdown continues even if the SMSC restarts.
Validity Period vs SMSC Defaults
Validity Period Value
SMSC Behavior
NULL or 00
Uses SMSC default (varies by provider)
Explicit value
Honors value (within SMSC limits)
Past timestamp
Message discarded immediately
Conclusion
The Validity Period field is essential for controlling message lifecycle in SMPP. While absolute timestamps provide precision, relative formats offer simplicity for
common use cases. Always coordinate validity settings with SMSC policies and test edge cases (e.g., daylight saving transitions). For detailed implementations,
refer to SMPP v3.4 Section 5.2.18 and GSM 03.40 documentation.
How to configure the SMPP Registered Delivery Field
What is the Registered Delivery Field?
The Registered Delivery field in SMPP is a 1-byte bitmask in PDUs like submit_sm and data_sm that controls
delivery receipts and acknowledgments. It enables senders to track message delivery status through SMSC-generated receipts. Key functions include:
Requesting final delivery receipts (success/failure)
Enabling intermediate delivery notifications
Handling SME (Short Message Entity) acknowledgments
Field Structure and Bitmask
Defined in SMPP v3.4, the field uses the following bitmask structure:
Bit
Description
0
SMSC Delivery Receipt (0 = disabled, 1 = enabled)
1
SME Originated Acknowledgment (0 = disabled, 1 = enabled)
esm_class: Bit 6 (delivery receipt flag) must align with registered_delivery settings
validity_period: Determines how long the SMSC will attempt delivery before sending a failure receipt
message_id: Critical for correlating receipts with original messages
Common Pitfalls
Enabling receipts but not listening to deliver_sm PDUs
Assuming all SMSCs support SME acknowledgments (0x02)
Mismatching registered_delivery and esm_class flags
Ignoring SMSC rate limits for receipt generation
Billing Note:
Some providers charge extra for delivery receipts. Confirm pricing before enabling.
Conclusion
The Registered Delivery field is essential for tracking SMS delivery status in SMPP. While basic receipt handling (0x01) is widely supported,
advanced features like intermediate notifications require SMSC-specific testing. Always implement robust receipt parsing and correlate messages
using message_id. For detailed behavior, consult SMPP v3.4 Section 5.2.17 and your provider's documentation.
How to configure the SMPP Replace if Present Field
What is the Replace If Present Field?
The Replace If Present field in SMPP is a 1-byte flag in PDUs like submit_sm that instructs the SMSC to replace
an existing message stored on the recipient's device or SMSC queue. Key applications include:
Updating time-sensitive content (e.g., OTPs, status alerts)
Preventing duplicate messages
Managing device storage constraints
Field Values and Interpretation
The field uses a simple boolean-like structure:
Value (Hex)
Description
0x00
Do NOT replace existing messages (default)
0x01
Replace existing messages if present
Note: Message replacement logic depends on SMSC implementation. Common matching criteria include:
Source/Destination addresses
Message ID (if provided)
Protocol ID (PID=0x41 often triggers replacement)
Use Cases
1. OTP Message Update
replace_if_present: 0x01  // Replace prior OTP message
PID: 0x41                 // Protocol ID for replacement
payload: "Your new OTP: 5678"
SMSC Behavior Note:
Replacement policies vary widely. Some SMSCs:
Only replace messages with matching source/destination
Ignore replace_if_present if PID≠0x41
Limit replacement to messages in the SMSC queue (not delivered)
Conclusion
The Replace If Present field provides critical control over message lifecycle management but requires careful coordination with SMSC capabilities.
Always verify replacement behavior with your provider and use PID=0x41 for explicit replacement requests. For detailed implementations,
refer to SMPP v3.4 Section 5.2.20 and GSM 03.40 documentation on message handling.
The sm_default_msg_id field is part of the submit_sm and deliver_sm PDUs in the SMPP (Short Message Peer-to-Peer) protocol. It is used to reference pre-defined (built-in) short messages stored on the SMSC, typically by a numeric ID.
Field Details
Field Name: sm_default_msg_id
Size: 1 byte (unsigned integer)
Range: 0–255
Usage: Indicates which default message to send (if any)
Usage Description
The sm_default_msg_id field allows a user to request that the SMSC send a pre-defined message from its internal message store. This can be useful in constrained environments or for sending standard system messages without transmitting the full text each time.
Default Behavior
If sm_default_msg_id = 0, then the user-defined message content in short_message is used instead.
If sm_default_msg_id > 0, then the message with that ID is used, and the short_message field should typically be empty or ignored by the SMSC.
Common Practice
In most modern SMS systems and APIs, sm_default_msg_id is not used and is typically set to 0. The actual message content is sent via the short_message field.
...
00        // sm_default_msg_id = 1 (use predefined message 1)
00        // sm_length
(empty)   // short_message is empty or ignored
When to Use
While rare, you might use sm_default_msg_id when:
Working with legacy SMSC implementations that support predefined messages
Sending high-volume, repetitive system alerts or templates stored on the SMSC
You are advised by your SMS provider to use this feature
Important Considerations
If sm_default_msg_id > 0, some SMSCs may ignore short_message entirely.
If both are used, the behavior is implementation-specific. Always test or check documentation.
Setting a non-zero value without a valid predefined message ID may result in delivery failure or message rejection.
Conclusion
The sm_default_msg_id field is a legacy feature of the SMPP protocol that allows referencing default message templates stored on the SMSC. While it's largely unused in modern systems, understanding its role helps ensure compatibility when working with legacy gateways or custom SMSC implementations.
This page offers information on how to encode the SMPP DCS field.
How does Ozeki SMS Gateway encode the SMPP DCS field
In most scenarios you don't have to manually configure the DCS field of
SMPP PDUs. Ozeki SMS Gateway does this for your. To control how
Ozeki SMS Gateway does the encoding, you can configure the default aphabet
on the SMPP Client configuration form (Figure 1).
Figure 1 - SMPP DCS Encoding
On this form, you can set the preferred character set, or you can ask Ozeki SMS Gateway
to use a fix value for the DCS parameter in the SMS PDU.
What is the SMPP DCS Field?
The Data Coding Scheme (DCS) in SMPP (Short Message Peer-to-Peer Protocol) is a 1-byte field within SMPP PDUs (Protocol Data Units).
It defines how the message payload is encoded, enabling proper interpretation by the receiving entity. The DCS specifies:
Character encoding (e.g., GSM-7, UCS2, 8-bit binary)
Message class (e.g., Flash SMS)
Compression flags
DCS Structure and Bitmask
The DCS is a bitmask where each bit group serves a specific purpose:
Bits
Description
7-6
Coding Group: Determines the general encoding type.
5-4
Alphabet: Specifies the character set (if Coding Group = 00).
3-0
Message Class/Flags: Indicates message type (e.g., Flash) or compression.
Coding Group Values
Coding Group (Bits 7-6)
Description
00
General Data Coding (alphabet specified in bits 5-4)
01
Reserved
10
UCS2 Encoding (16-bit)
11
Data Coding/Message Class (e.g., Flash SMS)
Example DCS Values
DCS (Hex)
Description
Binary
0x00
GSM-7 Default Alphabet
00000000
0x04
8-bit Binary Data
00000100
0x08
UCS2 (Unicode)
00001000
0x10
Flash SMS (GSM-7)
00010000
0xF0
Flash SMS (UCS2)
11110000
Example SMPP PDUs with DCS
Example 1: SubmitSM with GSM-7 Encoding (DCS=0x00)
0000001D  // Command Length (29 bytes)
00000004  // Command ID (SubmitSM)
00000001  // Sequence Number
00        // Source TON
00        // Source NPI
736F7572636500  // Source Address ("source")
00        // Dest TON
00        // Dest NPI
36353433323100  // Destination Address ("654321")
00        // ESM Class
00        // Protocol ID
00        // Priority
00        // Schedule Delivery Time
00        // Validity Period
00        // Registered Delivery
00        // Replace-if-Present
00        // Data Coding (DCS=0x00)
00        // SM Default Message ID
07        // SM Length (7 septets)
C8329BFD06DDDF72  // Short Message ("Hello!")
Example 2: SubmitSM with UCS2 Encoding (DCS=0x08)
00000024  // Command Length (36 bytes)
00000004  // Command ID (SubmitSM)
00000002  // Sequence Number
00        // Source TON
00        // Source NPI
736F7572636500  // Source Address ("source")
00        // Dest TON
00        // Dest NPI
36353433323100  // Destination Address ("654321")
00        // ESM Class
00        // Protocol ID
00        // Priority
00        // Schedule Delivery Time
00        // Validity Period
00        // Registered Delivery
00        // Replace-if-Present
08        // Data Coding (DCS=0x08)
00        // SM Default Message ID
0C        // SM Length (12 bytes)
00480065006C006C006F0021  // "Hello!" in UCS2
Example 3: Flash SMS (DCS=0x10)
0000001D  // Command Length (29 bytes)
00000004  // Command ID (SubmitSM)
00000003  // Sequence Number
00        // Source TON
00        // Source NPI
736F7572636500  // Source Address ("source")
00        // Dest TON
00        // Dest NPI
36353433323100  // Destination Address ("654321")
00        // ESM Class
00        // Protocol ID
00        // Priority
00        // Schedule Delivery Time
00        // Validity Period
00        // Registered Delivery
00        // Replace-if-Present
10        // Data Coding (DCS=0x10: Flash SMS)
00        // SM Default Message ID
07        // SM Length (7 septets)
C8329BFD06DDDF72  // Short Message ("Hello!")
Conclusion
The DCS field is critical for ensuring SMS messages are encoded and displayed correctly.
Implementations may vary, so consult the SMPP specification (v3.4 or v5.0) for precise bitmask details.
Proper use of DCS avoids encoding errors and ensures compatibility across SMSCs.
In the SMPP protocol, the sm_length field specifies the length in bytes of the short message content contained in the short_message field of PDUs such as submit_sm, deliver_sm, and data_sm.
Field Details
Field Name: sm_length
Size: 1 byte (unsigned integer)
Range: 0–254 (maximum allowed by SMPP 3.4)
Location: Directly before the short_message field
Purpose: Indicates the number of bytes in the short_message payload
Key Behavior
The value of sm_length depends on the encoding used:
sm_length refers to byte length, not character count.
If message content is split across multiple messages (concatenation), each part has its own sm_length.
Do not confuse sm_length with the total message length (PDU length).
Message Splitting & Concatenation
When a message exceeds the maximum payload size, it is split into parts using a UDH (User Data Header). The sm_length in such cases includes the UDH as well:
The sm_length field is critical in SMPP messaging as it defines how many bytes the SMSC should read for the actual message body. Understanding how encoding affects this field ensures accurate and successful message delivery.
In SMPP (Short Message Peer-to-Peer), the Short Message (SM) payload is the actual text (or binary data) of the SMS message being transmitted. To ensure the correct interpretation of this content, the data_coding field in the PDU plays a critical role by indicating the encoding format of the message.
Common SMPP Encodings
The data_coding field is 1 byte and informs the SMSC how to interpret the message payload.
Hex
Decimal
Encoding
Description
0x00
0
GSM 7-bit default
Standard SMS character set
0x01
1
ASCII
8-bit ASCII (Latin-1 subset)
0x03
3
Latin-1 (ISO 8859-1)
Western European charset
0x08
8
UCS2
Unicode (16-bit, big-endian)
0x04
4
Binary
Raw 8-bit binary data
Examples of Encoded Messages
1. GSM 7-bit (data_coding = 0x00)
Standard SMS encoding. Efficient (up to 160 characters in a single message).
Text: "Hello"
GSM 7-bit Packed: C8 32 9B FD 06
2. UCS2 (data_coding = 0x08)
Used for non-Latin scripts (e.g., Arabic, Chinese, emojis). Supports 70 characters per message.
Long messages are split into parts using UDH (User Data Header). This reduces max payload size:
GSM 7-bit: 160 → 153 chars per part
UCS2: 70 → 67 chars per part
Example UDH for message part:
05 00 03 CC 02 01
// 05: header length
// 00 03: Concatenation IEI
// CC: Message reference
// 02: total parts
// 01: current part
Summary
SMPP provides flexible encoding options through the data_coding field. Proper encoding ensures compatibility across global networks, especially when handling multilingual text or binary data. Developers must match encoding types with the content and expected recipients to avoid message corruption.
This guide explains how to fix SMPP character encoding errors. This guide
was created because various SMPP SMS service providers encode SMPP characters
in different ways. Ozeki SMS Gateway can be configured to adjust to the requirements
of most providers. You will see the necessary steps to take to setup the
proper SMS character set encoding.
How to set the SMPP character encoding policy (Quick steps)
Send SMS message
Copy SMS PDU from the log
Decode SMS PDU in decoder
Change charset to: UCS-2
Send SMS message
Copy SMS PDU from the log
Decode SMS PDU in decoder
Change character encoding policy to: Enforce
Send SMS message
Copy SMS PDU from the log
Decode SMS PDU in decoder
How to set the SMPP character encoding policy (Video tutorial)
In this video we provide a simple, user-friendly guide that you can use to fix
SMPP character encoding errors. The goal of this video tutorial is to enable the
users to be able to fix SMPP character encoding errors by themselves. Fixing
encoding errors and having knowledge about SMPP character encoding ensures that
the messages are readable by both sender and receiver (Video 1).
How to set the SMPP character encoding policy (Step by step guide)
The very first thing you need to do is send an SMS text. You will be asked to set
the recipient's address, meaning entering their phone number. Then you have to
enter the SMS text into the box below and press 'OK' once you are done (Figure 1).
Figure 1 - Send SMS message
After succeeding with the first step, you need to copy message PDU from 'Events'
and decode SMS PDU (Figure 2).
Figure 2 - SMS PDU decoded
The third step is changing character encoding. Go to 'Configure' and then 'SMS'.
You have to open down the 'Character encoding' option and select your preferred
character set, which in this case is 'UCS-2' (Figure 3). Press 'OK' when you
are done. If you did the way you were supposed to, a window will pop up on your
screen with a notifying message saying 'Configuration successfully updated'.
Figure 3 - Change character encoding
Now you have to send another SMS message, the same way as before but with these
updated configurations. You will be asked to enter the addressee's telephone number
and then enter the desired SMS message into the box below (Figure 4).
Figure 4 - Send SMS message
When you are done with the previous steps, you have to copy message PDU from 'Events'.
Paste the previously copied PDU into the box and decode it (Figure 5). Once you
are with this step the SMS PDU will be decoded.
Figure 5 - SMS PDU decoded
Go to 'Configure' and the 'SMS'. Open down the 'Character encoding' option by clicking
on it. A couple of steps before you had to change the 'Charset'. Right now,
you have to change the 'Policy' (Figure 6). You have to select the 'Enforce' character encoding
policy in order to move onto the next step. The same way as before a window will
pop up on your screen with a message saying 'Configuration successfully updated'.
Figure 6 - Change character encoding
Now you have to send a new SMS message with the updated configurations. Enter the
addressee's telephone number and the SMS text you would like to send (Figure 7).
Figure 7 - Send SMS message
Repeat the same step we have done before. Copy PDU from 'Events', and then paste it
into to decoder and decode PDU (Figure 8). If you did everything according
to the guide the SMS PDU will be decoded.
Figure 8 - SMS PDU decoded
How to set SMPP character codes (Quick Steps)
Send SMS message
Copy message PDU
Decode SMS PDU
Go to 'Configure' and the 'User data'
Select 'USE GSM 7 but codes in ISO 8859-1 messages'
Send SMS message
Copy message PDU
Decode SMS PDU
How to set SMPP character codes (Video tutorial)
In this short video guide, we provide a simple, easy-to-follow assistance for users
about how to set up SMPP character codes. By following these steps, you will be able
to set SMPP Character codes by yourself. It is very crucial to use the right codes
because that way your SMS texts are shows correctly. If you are using the wrong one
your message might be unreadable to the recipient (Video 2).
Setting SMPP character codes (Step by step guide)
First thing first, send an SMS message. You have to enter general information, such
as the recipient's address and SMS text you would like to send. Press 'OK' when your
message is ready to be delivered (Figure 9).
Figure 9 - Send SMS message
Go the 'Event' and copy message PDU. Paste it into the decoder and press 'decode'.
As you can see in the picture the SMS PDU has been successfully decoded and the SMS
can be seen at the bottom of the screen, shown by the red arrow (Figure 10).
Figure 10 - SMS PDU decoded
Go to 'Configure' and set character codec. Select the option 'USE GSM 7 but codes
in ISO 8859-1 messages' (Figure 11). Keep in mind that the encoding requirements
of the short message data could be different for some SMS providers.
Figure 11 - Set character codec
Send an SMS message with the previously updated configurations (Figure 12).
Figure 12 - Send SMS message
When you are done with the previous step, you have to copy message PDU from 'Events'.
Paste it into the decoder and see when the SMS PDU is decoded (Figure 13).
Figure 13 - SMS PDU decoded
Frequently Asked Questions (FAQs)
What is character encoding SMPP?
Character encoding in SMPP refers to how text is represented in SMS messages.
There are different methods for encoding text, like GSM 7-bit, GSM 8-bit, and
UCS-2. Each method has limits on how many characters can be in a message. Which
one to use depends on what characters you want to send and any rules from your
network provider.
Why is SMPP Character encoding important?
SMPP Character Encoding is important because it decides how text is sent in SMS
messages. Picking the right encoding ensures messages are readable by both sender
and receiver. Incorrect encoding can make messages unreadable. So, it is vital
for clear communication.
How does character encoding affect the text messages I send and receive?
Character encoding affects your text messages by deciding how characters are sent
and received. Different encoding types have limits on what characters they support
and how many can be in one message. So, the encoding used can affect what you can
send and how your message appears to the receiver.
Do different mobile carriers or networks handle character encoding differently?
Yes, different mobile carriers or networks may handle character encoding differently.
This means that how your text messages appear or are processed could vary depending
on the carrier or network you're using.
Will changing the character code settings affect how my messages are delivered?
Yes, changing the character code settings can affect how your messages are delivered.
Using the right code ensures that your text is shown correctly to the recipient.
If you use the wrong one, your message might look strange or unreadable to them.
So it is important to choose the right code for your messages to be understood properly.
Summary
This guide explains why SMPP character encoding is important, helping you understand
how to decode confusing messages. With Ozeki SMS Gateway's flexible setup, you can
easily switch between different encoding types for better communication. By following
these steps and choosing the right encoding, you can make sure your texts are clear
and reliable. Learning this code lets you fix jumbled messages and make sure your
texts are always easy to read.
To capture SMPP traffic with wireshark you need to use Wireshark and
you need to be able to generate SMPP traffic. This document explains
how you can setup the Wireshark packet capturing utility and how you
can use it to capture SMPP traffic for further analysis.
SMPP wireshark package capture - Quick steps
Install wireshark
Start the capture
Send a test SMPP SMS
Stop the capture
Find the SMPP PDU
Save the capture dump
Installing Wireshark (Video tutorial)
In this short video guide, we provide a simple, easy-to-follow assistance guide
about installing Wireshark. Wireshark is a tool that helps you see what is happening
on your computer network. It lets you capture and look at the data going between
devices, helping to find and fix network problems (Video 1).
Installing Wireshark (Step by step guide)
The first thing you need to is download the Wireshark software.
As you can see in the picture you have various type option that you can
choose from and download them (Figure 1). Select the one that fits for your device.
Figure 1 - Download Wireshark
Open Wireshark from the 'Downloads' and start the installation. Do not forget to
allow the app to make changes to your device. The wizard will guide you the
installation of the software (Figure 2). Keep on clicking 'Next' until Wireshark
is ready to be installed.
Figure 2 - Install Wireshark
You will have to wait while Wireshark is being installed (Figure 3). That
might take some time.
Figure 3 - Wireshark installation process
Once Wireshark is installed on your computer, you can click on 'Finish' to close
the Setup. The next step is opening the Wireshark application. You can do this by
either going to the folder you have previously saved it into, or search for it
in the taskbar (Figure 4).
Figure 4 - Open Wireshark
How to capture SMPP traffic? (Quick Steps)
Start Wireshark capture
Send SMS message
Stop Wireshark capture
Filter SMPP communication
Save SMPP capture
Capture SMPP traffic (Video tutorial)
In this video tutorial we provide a simple guide that you can use to learn
how to capture SMPP traffic with the help of the Wireshark software. The aim of
this tutorial is to enable the users to be able to capture SMPP traffic by themselves.
Knowing how to capture SMPP traffic is important because it helps fix problems,
monitor performance, improve security and save costs (Video 2).
Capture SMPP traffic (Step by step guide)
First thing first, open Wireshark. To start capturing you need to click on 'Ethernet'
as you can see in the picture below (Figure 5).
Figure 5 - Start Wireshark capture
Now you have to open Ozeki SMS Gateway in order to continue the process. You have
send an SMS message. Do this by entering the recipient's phone number and the
message you would like to send (Figure 6). Press 'OK' to deliver your SMS text.
Figure 6 - Send SMS message
The next thing you need to do is stop Wireshark capture. To do this, you have to
click on little red square, as shown in the picture (Figure 7).
Figure 7 - Stop Wireshark capture
After you stopped Wireshark capturing you have to filter SMPP communication.
Do this by typing in 'smpp' into the search bar where is says 'Apply a display
filter' (Figure 8). Press enter to make the results appear.
Figure 8 - Filter SMPP communication
Your last step is to save SMPP capture. Go to 'File' in the upper left corner
select the saving option (Figure 9).
Figure 9 - Save SMPP capture
Frequently Asked Questions (FAQs)
What is Wireshark?
Wireshark is a network protocol analyser that lets you capture and inspect the
data flowing over a computer network. It allows users to see detailed information
about network traffic, including individual data packets, and helps diagnose
network issues, detect security threats, and troubleshoot network performance
problems. With its ability to analyse various protocols, Wireshark is a valuable
tool for network administrators, security professionals, and developers.
What is SMPP traffic?
SMPP traffic is the messages sent between mobile networks and other systems using
the SMPP protocol. It is how text messages are exchanged between phones and services
like messaging apps or marketing platforms.
How does Wireshark work?
Wireshark works by watching all the data going through a network. It captures
this data and lets you see it on your computer. You can then look at the data to
understand how your network is working, find problems, or see what is happening
on your network.
Why is capturing SMPP traffic important?
Fixing Problems: It helps find and fix issues with sending text messages, like
delays or failures.
Monitoring: It allows keeping an eye on how well the system for sending
messages is working.
Security: By spotting any suspicious activities, it helps in keeping the
messaging system secure.
Optimization: Analysing the traffic can lead to making the system for
sending messages work better, saving money and making users happier.
Summary
This guide has helped you learn how to use Wireshark to capture and understand
SMPP traffic. Remember, you need to create SMPP traffic to capture it effectively.
Now that you know how to set up Wireshark, you can uncover important information
hidden in the data it captures. Use this new skill to analyse communication better
by capturing and studying SMPP data!
In this chapter, we will connect a UCP sms client (UCP sms link)
to an SMS service provider and show you all steps necessary to setup this
mobile network connection. There are two UCP sms connection modes: one uses
a simple TCP/IP link, the other uses SSL/TLS over TCP/IP. The connection steps
presented in this chapter are for a simple TCP/IP link.
What is a UCP/EMI sms connection?
A UCP/EMI sms connection is a mobile network link that you can setup to connect
your SMS gateway over the Internet to the Short Message Service Centre (SMSC) of a
mobile network operator. UCP/EMI is the communication protocol used over this link.
What does UCP/EMI stand for?
UCP stands for Universal Computer Protocol. EMI stands for External Machine Interface.
This is the name of the protocol developed by CMG Wireless Solutions Inc.
How to connect a UCP client (Quick steps)
To connect a UCP client:
Open the https://localhost:9515 URL
Login with your username and password
Open "Add new connection"
Click on "UCP client"
Type in the Hostname and port
Enter the UCP OAdC and password
Enter the telephone number
Send a test message
How to send SMS through a UCP client
Sending SMS through a UCP client makes messaging from computer via SMS possible. The solution consists of a user, a computer with
Ozeki SMS Gateway connected to the SMSC of Mobile Carrier (using the Internet and a UCP client) and the mobile users. You write the
text of the message and the Ozeki SMS Gateway sends it to the users. (Shown in Figure 1)
Figure 1 - How to send SMS through a UCP client
How to send SMS through a UCP client using Ozeki SMS Gateway (video tutorial)
This video shows you how you can send SMS through a UCP client using Ozeki SMS Gateway.
First, we install and configure a new connection in form of a UCP client and enable all the Log levels.
After these steps, we can turn the connection on and send a text message.
We send an SMS that contains "Hello World" as a test.
In the event log we can see that the message was sent successfully.
Create a new connection
To create a new connection, the Ozeki Home Page offers you the Connections panel with the 'Add new connection...' link. Select that
in order to add a new connection and start the configuration process. To start the communication, you have to install a connection,
so this is the first step of the setting up. (Figure 2)
Figure 2 - Creating a new connection
Install the UCP connection
In the Add a connection list you find the IP SMS connections install section where you have plenty of options to choose.
In this guide, we are using UCP client so select the 'UCP client' install item to install the UCP connection.
By doing this, you can make sure that you use the right protocol in the
messaging process. (Highlighted in Figure 3)
Figure 3 - Install the UCP connection
Provide UCP Client credentials
The Install connection list has a General tab where you can configure the basic details.
In order to connect to the server, you have to enter the contact details like
Host, port, username (OAdC) and password ('Connect to server' group box).
After that, give the phone number of the connection in the 'Telephone number' textbox.
To save the configuration form, click on the OK button (Figure 4).
Figure 4 - Providing UCP Client credentials
Check successful login
In the UCP_client_1 details page you find the 'Events' tab where you can see the logging of the latest server events.
You can check every event in this tab, so you will find information about the success of the login process here. (Highlighted in Figure 5)
You have the ability to switch on/of the auto update of the logging, to delete or refresh the content with the buttons in the right
side of the panel. Study this Log carefully if you want to understand the ongoing process in the connection.
Figure 5 - Successful login
Send a test message
From the Test tab you can send a test SMS message.
This is the perfect way to test the configuration. In the General tab, you can
specify the recipient's address and the message that
you want to send out as a test.
To provide the recipient's address, write the phone number to the 'To:' textbox.
Write the message to the 'SMS' group box and click on the Send button.
(Figure 6)
Figure 6 - Sending a test message
Check that the message is sent
Finally, you can check whether the message is sent successfully or not at the bottom of the UCP_client_1 details page.
A short message will appear with the sending date, the status of the sending and the connection.
If you did everything right, you would see a green check mark next to the text. (Shown in Figure 7)
Figure 7 - Message successfully sent
Example UCP PDU
The following example UCP PDU is a login PDU sent by the SMS gateway to the SMSC
The next is an UCP submit message PDU, used to send an SMS to the SMSC.
Sending message (1 parts). +3620123546->+3620123456 'Hello world'
<- 01/00106/O/51/003620123456/3620123546//1//7////
/////////3//48656C6C6F20776F726C64////////1139//020100///A1
-> 01/00045/R/51/A//003620123456:200718075707/A2
Message part sent as sequence 01 was accepted by remote server.  with Reference
Id: '200718075707'.
The above PDUs were extracted from the Ozeki SMS Gateway logs.
Is your gateway fully compatible with Huawei hardware SMSCs?
Ozeki SMS Gateway seamlessly integrates with a variety of Short Message Service
Centres (SMSCs) through industry-standard IP SMS protocols. Here's an overview
of the supported protocols:
Short Message Peer-to-Peer (SMPP) v3.3 and v3.4: These widely adopted
protocols provide a robust foundation for message exchange between SMS
gateways and SMSCs.
Cellular Information Management System Definition 2 (CIMD2): This protocol
caters to specific needs within cellular networks.
Universal Charging Platform/Enhanced Messaging Interface (UCP/EMI) 4.0:
This protocol facilitates advanced functionalities like mobile billing and
enhanced messaging features.
By supporting these prevalent IP SMS standards, Ozeki SMS Gateway establishes
effective communication channels with a vast array of SMSCs. While we cannot
confirm direct experience with Huawei hardware SMSCs, the supported protocols
ensure broad compatibility, and successful communication is highly likely.
For comprehensive functionality and optimal performance, it's recommended to
consult the specific documentation of your SMSC provider. This can help verify
full compatibility and identify any potential configuration requirements.
What is a UCP/EMI connection?
The Universal Computer Protocol/External Machine Interface (UCP/EMI) protocol
is a popular choice among GSM service providers for establishing IP SMS
connectivity. It offers several advantages for high-volume SMS communication:
Extensive Version Support: UCP/EMI utilizes various versions (v3, v3.5, v4.0)
to handle large volumes of SMS traffic efficiently.
Flexible Message Rates: The protocol accommodates both standard and premium
SMS message rates, making it suitable for diverse needs.
Customizable Sender Identity: UCP/EMI empowers you to specify the sender
address for your messages. This address can be a custom phone number or a
short alphanumeric word, enhancing branding or recognition.
Rich Message Support: Beyond text-based messages, UCP/EMI allows sending
various message types supported by the GSM network. This includes binary SMS
for operator logos and ringtones, WAP Push messages, and more, enabling broader
communication possibilities.
In summary, UCP/EMI provides a robust and versatile solution for IP SMS
connectivity, catering to high-volume traffic, diverse message types, and
customizable sender identities.
Summary
In this guide, we showed you how to set up a mobile network connection using a UCP client. From the two UCP connection modes,
we used TCP/IP over SSL/TLS. TCP/IP is an open, industry-standard protocol which is helpful when you want to use a fast and simple
solution. UCP is also a protocol, helping you to connect SMSCs for mobile devices. Now you are able to send out SMS messages using a computer
device with an installed and configured Ozeki SMS Gateway.
You can find other articles related to this topic in our website, such as SMPP connection setup and HTTP SMS client connection.
Make sure that you check these links and gather as much information as you need.
The CIMD2 protocol is and SMS protocol that enables you to connect
to Nokia SMSCs. In Europe many mobile networks use this protocol to offer IP SMS
services to customers. This guide explains, how you can connect to the mobile network
that offers IPS SMS services through the CIMD2 protocol. You will also find
direct download links to the protocol specifications.
What is a CIMD2 connection?
A CIMD2 connection is TCP/IP connection to the short message service centre (SMSC)
of a mobile network operator. It allows your Ozeki SMS Gateway system to connect
directly your mobile network operator's SMSC.
What does CIMD2 stand for?
CIMD stands for Computer Interface to Message Distribution. CIMD2 stands for
version two of this protocol. This is protocol is implemented by Ozeki SMS Gateway.
How to send SMS with CIMD2 connection (Quick steps)
To send SMS with CIMD2 connection:
Browse https://localhost:9515
Login using your username and password
Add new connection in the connections panel
Select "CIMD2 client"
Type in the CIMD2 server details
Specify the telephone number
Click ok to save your entries
Send a test SMS message
How to send SMS through a CIMD2 client
This system works in a way that the user gives their computer instructions on sending a message (Figure 1).
The computer forwards this information to an SMS Centre.
This is done through a CIMD2 (Computer Interface to Message Distribution) client connection.
The SMSC then sends the text message to the recipients' mobile devices.
Figure 1 - How to send SMS through a CIMD2 client
How to setup a CIMD2 client in Ozeki SMS Gateway (video tutorial)
In this short video you will learn how to set up a CIMD2 client in Ozeki SMS
Gateway, as well as use it to send text messages.
First, we configure and install a new CIMD2 client connection.
Then we use this connection to send SMS to a phone number.
We can also monitor our actions using the event log, to see if it has been sent successfully.
Create a new connection
The first screenshot shows you how to start the connection procedure to connect
your SMS gateway system to an CIMD2 service provider.
To do this, you need to create an CIMD2 client connection. To create this new connection,
go for the Connections panel in the dashboard and click on the "Add new connection..." link. (Highlighted in Figure 2)
Figure 2 - Creating a new connection
Install the CIMD2 connection
To install the CIMD2 connection, look for the IP SMS connections install section.
This section has five install items, CIMD2 client, SMPP client, UCP client, HTTP Server and HTTP client.
You have to select the CIMD2 client to continue the instalment. (All shown in Figure 3)
Figure 3 - Install the CIMD2 connection
Provide CIMD2 Client credentials
Your next step is to provide the CIMD2 Client credentials. To give these details, go for the Install connection's page General
tab and you will find the Connect to server. There you can
enter these contact details: Host, Port, Username and Password.
You have to give the connection's telephone number in the Telephone number group box.
You can save the details by clicking the Ok button. (Highlighted in Figure 4)
Figure 4 - Providing CIMD2 Client credentials
Check that the login was successful
You can check that the login was successful by visiting the CIMD2_client_1 details page's Events tab.
Here you have the event log where you can find every notable information about the connection, such as the success of the login procedure.
It is advised to study the log carefully to fully understand the latest server events. (Shown in Figure 5)
Figure 5 - Successful login
Send a test message
In the CIMD2_client_1 details page, there is the Test tab page where you can send a test SMS message by choosing the General tab.
Provide the recipient's phone number in the Recipient group box, the message in the SMS group box
and click on the Send button to send out this test message. (Highlighted in Figure 6)
Figure 6 - Sending a test message
Check that the message was sent successfully
At the final step you can check whether the test message was sent successfully or not. At the bottom of the CIMD2_client_1 details page
you will see the exact date of the sending, the status of the message transferring process and the connection.
A green check mark indicates that everything went according to the plan. (Figure 7)
Each packet starts with STX (hex 02) and ends with ETX (hex 03). The content of
the packet consists of fields separated by TAB (hex 09). Each field, in turn,
consists of a parameter type, a colon (:), and the parameter value. Note that
the last field must also be terminated with a TAB before the ETX.
In the CIMD2 PDUs two-digit parameter types are operation codes, and each
message must have exactly one. The number after the operation code is the
sequence number used to match an operation to its response. The response code
often referred to as acknowledgement of the message is equal to the operation code plus 50.
In the example above, the operation code 03 means submit message. Field 021 defines
the destination address (telephone number), with field 033 is the user data (content)
of the message. Response code 53 with a field 060-time stamp indicates that
the message was accepted; if the message failed, the SMSC would reply with field 900 (error code) instead.
Developed by Nokia, the Computer Interface Message Distribution (CIMD) protocol
facilitated communication between applications and the Nokia Short Message
Service Centre (SMSC). Notably, the CIMD2 version (CIMD version 2) addressed
this need through a dedicated interface.
Benefits for Ozeki:
The CIMD2 interface leverages TCP/IP sockets for message exchange, making it
particularly suitable for client applications like Ozeki SMS Gateway. This
compatibility allows Ozeki to seamlessly send and retrieve SMS messages
through the Nokia SMSC.
In essence, CIMD2 serves as a bridge for Ozeki, enabling it to interact
effectively with the Nokia SMSC for SMS communication.
Summary
As you could read in this guide, CIMD2 connection helps you to send SMS using your computer and Ozeki SMS Gateway.
This protocol gives you the opportunity the reach your clients via SMS while the Ozeki SMS Gateway implements the protocol.
CIMD2 is capable of delivering different kind of SMS message types, like SMPP and UCP/EMI and Ozeki SMS Gateway is a solid platform
which helps this process.
With the explanation and the attached specification, you should be able to set up CIMD2 connection with Ozeki SMS Gateway and send messages.
Make sure to check out other articles as well, like UCP and OZX connection.
This guide is about OZX client connection setup. It defines what an OZX connection is, what does OZX stand
for and how you can use an OZX client connection to connect your Ozeki SMS gateway
system directly to the Short Message Service Centre (SMSC) of a mobile network
operator over the Internet.
What is an OZX connection?
An OZX client is a software that allows you to connect to an SMS service
provider on the Internet. An OZX client, such as Ozeki SMS Gateway, uses
the OZX protocol to send and receive SMS text messages.
How to connect to an OZX service
To connect to an OZX service:
Browse https://localhost:9515
Login using your username and password
Click on "Add new connection"
Select "OZX client"
Enter the OZX host name and port
Enter the telephone number
Click ok and send a test message
Check the logs
How to send SMS through an OZX client
Figure 1 - How to send SMS through an OZX client
How to connect an OZX connection (video tutorial)
The following short video shows the steps you need to create to setup an OZX client
connection in Ozeki 10 SMS Gateway. The video starts with the login form and
takes you all the way to
sending your first SMS test message over the newly created SMPP connection.
Detailed setup instructions
Setting up an SMS connection in Ozeki SMS Gateway is a relatively simple procedure.
You need to login to the SMS gateway using a web browser as administrator, and
you need to perform a few simple steps. For configuration we recommend to login
using the administrator account. The administrator account username is "admin",
and the password is the one you provided during install.
How to create a new OZX connection
To create a new OZX connection after login, you need to click on the 'Add new connection' link in
the management console of the Ozeki 10 SMS Gateway app. This will bring up a list of available protocols.
You will have to select OZX client from the list. Note, that an OZX client connection is used if
you wish to connect your SMS gateway to an SMS service provider over the Internet. (If you wish
to provide an SMS service, and you want your customers to connect to your SMS gateway over OZX,
you need to setup an OZX user account and you need
to configure an OZX service.)
Figure 2 - Add new connection
Select the 'OZX Client Connection' from the list and click on install next to it.
Figure 3 - Install OZX client
Configure your OZX connection
In order to configure your OZX connection, you need to provide the host name and
port number of the OZX service, your OZX credentials and you must specify telephone number
associated with this connection. There could be more than one phone numbers associated
with this connection. In this case provide the first one and check the overridable checkbox.
If this checkbox is checked, you will be able to use all phone numbers as sender IDs.
OZX connection configuration steps:
Select the General tab on the OZX connection form
Give a name to this OZX connection
Enter the OZX hostname
Enter the OZX port number
Provide your OZX username
Enter your password
Assign a telephone number to this OZX connection
Click OK
Figure 4 - OZX connection details
It is important to mention that the OZX hostname and port plus the username and
password are provided by your SMS service provider. For example, if you contact Vodafone,
and ask for an OZX SMS service, you will sign a contract with them, and often an
attachment of this contract will contain the connection following information. If
you subscribe to an SMS service on-line, you will likely find this information in
the on-line control panel of your SMS service provider. Of course, you can always
ask your SMS service provider in e-mail and ask what the OZX server connection
details are.
Check the OZX log
Once the OZX connection is configured, you should check the OZX connection log
to see if the system connected properly to your SMS service provider. If the system
connected properly, you would see the "Connection online" log entry. The SMS
connection logs can be found in the following directory in Windows: C:\Program Files\Ozeki\Data\Logs\Connections\.
In this Event tab of the OZX connection's details page, you can see a preview
of the log. This page contains the last 100 log entries. Note that the OZX log
files are rotated to save disk space.
Figure 5 - OZX client connected
Send a test SMS message
Once your connection is connected, you can check to see if it is ready to
deliver SMS messages by sending a test SMS. To send a test SMS message, you need to
open the Admin user, and you need to enter the phone number and message text. It
is recommended to provide the phone number in international format. This means
the phone number should start with a plus sign followed by a country code. If
your local phone number starts with a 0, it is likely that you will need to drop
the 0 prefix. For example, if your UK phone number 07958663698, you would send the
test SMS to +447958663698.
You might ask why the message text should be less than 160 characters. This
is because GSM system was designed to send 160-character long text messages.
If a message is longer, it will be split into multiple message segments, and will
be delivered in more than one SMS message.
Figure 6 - Send test message
After the message is successfully sent, you should check the OZX logs. The
OZX logs will reveal the low level OZX messages, that are used to pass the
message content to the SMS service provider. These messages are also called
an OZX PDU (OZX protocol data unit). If there is a problem with message submission,
your SMS service provider will ask for the OZX logs. In this case, you need
to send the OZX PDUs to them. For every SMS submission, two OZX PDUs will appear
in the log.
Figure 7 - Message log
Conclusion
This article explained how to set up an OZX connection using Ozeki SMS Gateway.
An OZX connection allows you to connect to the SMSC of a
mobile carrier or to another Ozeki SMS Gateway service effortlessly and
the connection will be very reliable and will offer amazing speed. The
main advantage of using OZX is that all messages
will be sent using a single transaction unlike other SMS protocols, such as SMPP,
CIMD2, UCP where long SMS messages are sent in multiple transactions. This
simplicity is better when it comes to controlling costs and keeping track of messages.
As you could see OZX is a better protocol for message delivery, because it offers
simplicity and better performance. If you want to build a reliable, high-performance
system you should not stop reading here. Find out how you can setup a test
system in your network that is able to deliver 1000 SMS per second.
This amazing speed can be achieved with Ozeki SMS Gateway.
To create your first high performance SMS gateway system, now is the best
time to download Ozeki SMS Gateway!
FAQs
What is an SMSC?
A Short Message Service Centre (SMSC) is a network element in the mobile
telephone network which delivers SMS messages. It has SMS message forwarding
and SMS message storing functionality.
In the world of mobile communication, a fundamental yet often unseen element plays
a vital role in ensuring the smooth delivery of text messages: the Short Message
Service Centre (SMSC). Functioning as a central hub for a wireless network or SMS
service provider, the SMSC acts as the conductor of the entire messaging process.
When a text message is sent, it is first directed to the SMSC. This intelligent
intermediary then determines the most efficient route for the message to reach its
intended recipient, potentially involving other SMSCs within the broader network
infrastructure. Importantly, the SMSC possesses storage capabilities. In
situations where the recipient's device is unavailable, the message is held for a
predefined period (typically up to a week) to ensure successful delivery once
connectivity is restored. While network operators often maintain their own SMSCs
for optimal control, the use of third-party SMSC services is also a possibility.
Although the SMSC address, formatted similarly to an international phone number,
serves as a unique identifier for a network's messaging centre, user intervention
is generally not required. Most mobile phones come pre-configured with the correct
SMSC address stored on the SIM card, allowing for a seamless text messaging
experience for users.
Can I operate my own SMSC?
Yes, you can.
Setting up a private SMSC requires a computer connected to the mobile network
and specialized software. This software acts as the brain of the operation,
routing messages efficiently and communicating with the network using
industry-standard protocols like SMPP, UCP, or CIMD2.
Benefits for Businesses:
Cost-Effectiveness: For companies sending a high volume of SMS messages,
private SMSCs can offer significant cost savings compared to traditional
SMS services.
Customization: Private SMSCs provide greater control over message delivery
and security compared to relying on third-party providers.
Integration Flexibility: The software often integrates with various
applications using APIs (Application Programming Interfaces) like HTTP,
C#, or PHP, allowing businesses to automate SMS communication within their
existing workflow.
Do I have to pay for SMS messages if I operate my own SMSC?
Yes
While SMSCs handle the magic behind sending text messages, there's a cost involved
when your message reaches the mobile network. This fee is typically charged on
a per-message basis. You'll pay this fee either to the mobile network operator
directly or to the SMS service provider who allows you to connect your system to
the network.
To send SMS messages from your SMSC, you need a way to connect to the mobile
network. This connection isn't possible without signing up for a service offered by a mobile network operator or an SMS service provider. Think of them as the gatekeepers to the network, ensuring proper routing and billing for your messages.
This rephrases the text to be more user-friendly and avoids technical jargon.
It emphasizes the per-message cost and the necessity of a connection service.
Can I connect to the SMSC of a mobile network operator (MNO)?
With the right tools in place, you can connect your system to a mobile network
operator's SMSC (Short Message Service Centre) and start sending SMS messages.
Here's what you'll need:
Internet or Leased Line Connection: A reliable internet connection or a
dedicated leased line provides the pathway for your messages to reach the
network.
IP SMS Protocol: Specialized protocols like SMPP, UCP, or CIMD2 enable
communication between your system and the SMSC. These act like a common
language for message exchange.
Mobile Network Operator Agreement: To ensure proper routing and billing,
you'll need a formal agreement with a mobile network operator. This agreement
grants you permission to connect to their SMSC and send messages through their
network.
SMS Sending Fees: Be prepared for per-message fees associated with sending
SMS messages through the network operator's SMSC. These fees cover the cost
of delivering your messages to their destinations.
Can I connect to the SMSC of a mobile network operator through SS7?
When you send a text message, it relies on a hidden communication system within
the mobile network. Here's a breakdown of two key protocols involved:
SS7: Imagine a special language used by phones and network components to talk
to each other. This protocol, called SS7, coordinates various tasks behind
the scenes, including routing SMS messages between the SMSC (Short Message
Service Centre), the HLR (Home Location Register), and mobile phones.
Traditionally, SS7 uses dedicated E1 ISDN lines for communication. However,
a newer version called SIGTRAN transmits data over the internet.
IP SMS Protocols: For connecting your system (like a business application)
to send SMS messages, SS7 isn't the right fit. Instead, you'll need a more
user-friendly option. This is where IP SMS protocols come in. Think of them
as universal translators. Protocols like SMPP, UCP, or CIMD2 allow your
system to communicate with the SMSC over the internet, eliminating the need
for the complex SS7 environment.
SS7 plays a crucial role within the mobile network, but for connecting an external
system to send SMS messages, IP SMS protocols are the way to go. They provide a
simpler and more accessible way for your system to interact with the network's
messaging centre.
This page is about to demonstrate how to set up an HTTP SMS Client connection in
Ozeki 10 SMS Gateway. The guide shows all steps that you have to follow to create
the connection, how to configure it, and most importantly, how you can send SMS
messages using this connection. The guide itself does not require any specific
knowledge, you can easily complete it by just following the steps and it does not
take more than ten minutes to successfully complete the guide. So, let's begin right now!
What is HTTP?
HTTP is a protocol, the foundation of any data exchange on the global network. It uses client-server
protocol which the client and the server communicate with each other
by exchanging individual messages.
What is an SMS?
SMS is stands for 'Short Message Service'. It is used to send text messages to
mobile phones. It was originally created for phones that use GSM communication, but now all
the major cell phone systems support it.
How to send SMS with HTTP SMS client connection
To send SMS with HTTP SMS client connection:
Browse 'https://localhost:9515'
Select the SMS Gateway application
Click on 'Add new connection...'
Select the HTTP client connection
Configure the HTTP client connection
Enable SMS forwarding for the connection
Send test message
Check the Event to see if the connection is working
How to send SMS through a HTTP SMS Client
This architecture diagram shows how the system works.
It consists of 3 parts. A computer, an HTTP SMS service provider and recipient mobile devices.
Your computer sends information containing your message to a server using an HTTP SMS client through Ozeki SMS Gateway.
This HTTP SMS server then sends the text message to your configured recipients. (Figure 1)
Figure 1 - How to send SMS through a HTTP SMS Client
How to send SMS through a HTTP SMS Client (video tutorial)
In this short video you will learn how to set up an HTTP SMS client in Ozeki
SMS Gateway, as well as use it to send text messages.
First, we configure and install a new HTTP SMS client connection.
Then we use this connection to send SMS to a phone number.
We can also monitor our actions using the event log, to see if it has been sent
successfully.
Step 1 - Create a new connection
The first step that you have to fulfil is to connect to the HTTP service provider.
For that, you need to create the HTTP client connection. So, open the SMS Gateway
in your browser by typing 'https://localhost:9515' in your browser and hit Enter.
Then, open the SMS Gateway application from the Ozeki desktop. By doing this, the
main menu of the SMS Gateway shows up as you can see it in Figure 2. Here at this point,
click on the 'Add new connection...' to create a new connection.
Figure 2 - Creating a new connection
Step 2 - Select HTTP client connection
The next menu contains every connection that can be created in the SMS Gateway.
Each of these connections has got a short description to inform you which case
you need to use them. In this list, you need to find the HTTP client connection, and
as Figure 3 shows that, click on its 'Install' button to create it.
Figure 3 - Install the HTTP Client connection
Step 3 - Configure the HTTP client connection
In the configuration menu, you need to specify some details for the connection.
First of all, just give a name for the connection or you can leave the default name
if you wish. Next, as Figure 4 demonstrates that, specify a phone number for the HTTP client
connection. This phone number will be used to identify the connection if it sends
or receives an SMS message.
Figure 4 - Providing HTTP Client phone number
Step 4 - Enable SMS forwarding
At last configuration step, that you need to perform is to enable the SMS forwarding
for that connection. To do this, select the HTTP tab in the configuration menu.
Here, in the first step, check the 'Enable SMS forwarding' option as Figure 5
shows that. Then, you can configure the HTTP URL that will be called to submit
the SMS messages. If you finished with all the configuration, just click OK
to create the HTTP client connection.
Figure 5 - Specify the URL
Step 5 - Check the Events menu of the connection
Now, your HTTP client connection is created and ready to use. To check that, you can
go to the Event menu of the connection. In this menu, you will be able to see
every event that occurred with the connection. Figure 6 shows the event that
informs you about that connection is successfully initialized and ready to use.
Figure 6 - Successful login
Step 6 - Send a test message
The HTTP client connection is capable of sending and receiving SMS messages. To test
the connection, you can simply send a message using the connection. For that, go to
the menu of the connection, and select the 'Test' tab. Here you can compose a new
message. So, as you can see it in Figure 7, set a recipient and the text of the
message. If you have done it, just click on 'Send' to send the message.
Figure 7 - Sending a test message
Step 7 - Check if the connection is working
As soon as you sent the message, the connection is going to give you feedback
about the delivery of the message was successful or not. Figure 8 demonstrates it
below, that if the connection is working and able to send messages, it displays
it with an event message.
Figure 8 - Message successfully sent
Summary
In the guide above, we showed you how to configure and use HTTP SMS client connection with Ozeki SMS Gateway.
If you are interested in sending
SMS from computers, this solution can be really useful. Ozeki has experience in SMS technologies and Ozeki
SMS Gateway is an application with the ability of sending SMS using different protocols, giving you the opportunity
to choose between them based on your needs. Ozeki SMS Gateway also offers excellent logging capabilities, so errors can be tracked
easily and quickly.
Since you have finished this article, you have the knowledge
to send messages with HTTP SMS client. This technology can be used to reach out to mobile using customers from your computer,
making the information sharing faster.
Expand your knowledge and continue reading on Ozeki's tutorial pages, where you find articles about similar topics,
like SMPP connection and SMS modem.
This tutorial provides instructions on configuring HTTP Basic authentication for
HTTP SMS Clients. It outlines the process of placing the HTTP username and password
within the SMS service access settings. Additionally, the tutorial includes a
video demonstration and several screenshots for a concise visual overview.
What is HTTP authentication?
A method for verifying the identification of users who access SMS services on the
web is known as HTTP authentication for HTTP SMS clients. It involves authenticating
user requests using credentials like usernames and passwords to make sure that
only authorized users may send or receive SMS messages using the API. During SMS
contacts, this security mechanism helps protect private communication and data.
How to setup HTTP Basic authentication for HTTP SMS Clients?
To setup HTTP Basic authentication for HTTP SMS Clients
Access your Ozeki SMS Gateway account
Open HTTP client configuration panel
Authenticate HTTP
Enter the necessary details for authentication
Send a test SMS from HTTP client
View event history
Wait for notification about successful message delivery
Apply the immersive features of Ozeki SMS Gateway in the future
In this quick video, we're going to explore the concept of HTTP Basic Authentication
for HTTP SMS clients. This authentication method plays a crucial role in ensuring
the security of your SMS API requests. By the end of this video, you can learn how
to securely add HTTP Basic Authentication to your HTTP SMS client apps,
strengthening the security of your API queries and guaranteeing the successful
delivery of your SMS messages.
For the first, log in to your Ozeki SMS Gateway account, or if you do not
have one yet, create one by downloading the Ozeki SMS Gateway software from the
ozeki-sms-gateway.com website.
To access the HTTP client configuration panel,
enter the gateway's home page and click the "HTTP client 1" link. The client's
information is visible by clicking on it.
Figure 1 - Open HTTP client
Access the "Configure" tab to make modifications. Indicate connection specifics
by selecting the "Advanced" choice and opting for "HTTP authentication" to personalize
the HTTP server operator settings.
Figure 2 - HTTP authentication
Enter username and password to setup HTTP basic authentication. Once you've entered
the username and password, click the "OK" button to finalize the setup
of HTTP basic authentication. This security measure will help protect access to the
associated resources or services.
Figure 3 - Username and password
You must use the HTTP client to send an SMS at the next step of the process. Enter
the "Test" tab, then start writing your SMS. In addition to the text message's
content, enter the recipient's details. To send the message to the recipient, use
the "Send" button. You'll get a notification as promptly as possible verifying that
the message was sent.
Figure 4 - Send SMS from HTTP client
By clicking on the "Events" tab, you can see the settings and SMS history. You
can follow up on a variety of SMS interaction-related events here. This contains
information regarding SMS messages sent, responses received, and any mistakes that
could have occurred. You may solve problems and make sure your messages are
delivered successfully by keeping a watch on these occurrences.
Figure 5 - Authorization header in the HTTP request
FAQs
How do I send HTTP basic authentication?
Provide a "Authorization" header in your HTTP request if you want to send HTTP
Basic Authentication. The Base64-encoded string containing your login and password,
connected by a colon, should be the header's value, followed by the word "Basic"
and a space (e.g., "username:password"). Make sure that the full header value is
Base64 encoded.
What is standard HTTP basic authentication with SSL?
Delivered over an encrypted connection, standard HTTP Basic Authentication with
SSL (HTTPS) involves delivering login information securely. A 401 Unauthorized
status with a "WWW-Authenticate" header indicating "Basic" realm="realm name" are
returned by the server in response to a client request. In order to ensure that
the credentials are secured by SSL encryption, the client then encodes their
username and password in Base64 and transmits them in the "Authorization" header
of subsequent requests.
What is basic authentication with HTTP client?
When making requests to a server using an HTTP client, basic authentication involves
sending a username and password as credentials. The client generates a "Authorization"
header with the value "Basic" and a Base64-encoded string in the format "username:password"
after it. The insertion of this header in the client's HTTP requests enables the
server to verify the client's access.
How do I check my HTTP basic authentication?
You must examine the headers of the HTTP request you are sending in order to
validate your HTTP basic authentication. To find the "Authorization" heading,
look for a value that starts with "Basic." Your username and password are separated
by a colon in a Base64-encoded string that makes up the remaining portion of the
value. To check the credentials you're using for authentication, you may decode
this text.
If I uninstall a user named "AAA" then try to create a new user also named
"AAA" the system tells me "AAA" already exists, even if it has been uninstalled.
How do I delete these uninstalled users definitively?
When you delete a user in the system, it might seem like they're gone forever.
However, due to the way the gateway is designed internally, these deleted users
are actually marked for deletion instead of being permanently removed right away.
To ensure the user is completely removed from the system, you need to restart
the gateway service. You can find this service by following these steps:
Open the Start menu.
Navigate to the Control Panel.
Go to Administrative Tools.
Select Services.
Locate the specific service for your gateway and restart it. Once the restart is
complete, the deleted user will be permanently removed from the system.
Why changes in the physical configuration files are not reflected in the web
Admin interface?
Ozeki SMS Gateway reads its configuration files when the service starts up. To
ensure your recent configuration changes take effect, you'll need to restart
the service. Here's how to do it:
Open the Start menu.
Navigate to the Control Panel.
Go to Administrative Tools.
Select Services.
Locate the service named Ozeki SMS Gateway and restart it.
Once the service has restarted, your new configuration settings will be applied.
For optimal performance, Ozeki stores configuration information in memory after
the initial startup. Restarting the service ensures the latest configuration
file is loaded into memory, reflecting any changes you've made.
Summary
The Ozeki SMS Gateway introduces users to the concept of HTTP Basic
authentication for HTTP SMS Clients. This page provides an in-depth understanding
of HTTP Basic authentication's significance in securing access to SMS services.
Users can learn the importance of HTTP authentication, how to configure it, and
ensure secure SMS communication. By following the guide, individuals can enhance
the security of their API queries, safeguard private communication, and ensure
the successful delivery of SMS messages.
This guide explains how you can configure your API access token in your HTTP SMS
client connection using the "Authorization: Bearer" http request header. You will
see a video on how to configure this custom header, and you will find screenshots
below to give you a quick idea.
What is Http Bearer Authentication?
HTTP bearer authentication is a type of authentication mechanism used in web
applications and APIs to secure access to resources. It is commonly used for protecting
APIs where clients need to provide some form of token to authenticate themselves
before they can access the protected resources. HTTP bearer authentication can also
be used for HTTP SMS clients to secure access when interacting with SMS gateways
or APIs that allow sending SMS messages. In this context, HTTP bearer authentication
is employed to ensure that only authorized users or applications are able to send
SMS messages through the gateway.
How to setup HTTP Bearer authentication for the HTTP sms client
To setup HTTP Bearer authentication for the HTTP sms client
Login your Ozeki SMS Gateway account
Access the HTTP client configuration panel
Customize the HTTP IP request headers
Add new Bearer token header
Send a test SMS from the HTTP client
Wait for notification message of SMS delivery
Track events
Utilize the features of Ozeki SMS Gateway
HTTP Bearer authentication setup process (video tutorial)
In this video guide, we'll take you through the step-by-step process of setting
up HTTP bearer authentication. Whether you're a developer securing your APIs or
an application owner safeguarding access to sensitive resources, HTTP bearer
authentication is a powerful tool to ensure secure communication. By the end of
this tutorial, you'll be equipped with the knowledge to implement this authentication
mechanism effectively.
To begin the process, login to your Ozeki SMS Gateway account, or if you do not
have one yet, create one by downloading the Ozeki SMS Gateway software from the
ozeki-sms-gateway.com
website. Open the gateway's home page, then click on the "HTTP_client_1" link to
open the HTTP client configuration panel. By clicking on it, you can see the
client's details.
Figure 1 - Open HTTP client
Open the "Configure" tab for modification. Specify connection details by clicking
on the "Advanced" option and choosing "Request headers" to customize the HTTP IP
request headers that will be applied to every HTTP request.
Figure 2 - Request headers
At the Request headers, enter the Key and value to the appropriate cells, then
add new Bearer token header, by clicking on the "Add new header" button. Save the
update with "Ok" button.
Figure 3 - Add new Bearer token header
In this subsequent stage of the process, you have to send an SMS from the HTTP
client. Click on the "Test" tab, then form your SMS. Enter the recipient's details
and the content of your text message. With the send button, you can deliver the
message to the addressee. You will receive an immediate notification about the
delivery of the message.
Figure 4 - Send SMS from HTTP client
If you click on the "Events" tab, you can see the settings and SMS history. Here,
you can monitor various events related to your SMS interactions. This includes
details about sent SMS messages, received responses, and any potential errors.
Keeping an eye on these events can help you troubleshoot issues and ensure the
successful delivery of your messages.
Figure 5 - Authorization header in the HTTP request
FAQs
How to send HTTP request with bearer token?
Set the "Authorization" header of the request, adding the phrase "Bearer," a space,
and your token to submit an HTTP request with a bearer token. Access to restricted
endpoints on the server is provided using this token-based authentication.
Why is HTTP Bearer Authentication important for securing SMS communications?
The significance that HTTP Bearer Authentication plays in avoiding unwanted access
and data breaches makes it essential for safeguarding SMS conversations. SMS
communications might be stolen or altered by unscrupulous parties without adequate
authentication, compromising critical data. The integrity and confidentiality of
the SMS messages are protected by Bearer Authentication, which makes sure that
only dependable and authorized clients may participate in SMS exchanges.
What are the benefits of Bearer Token Authentication for HTTP SMS clients?
For HTTP SMS clients, Bearer Token Authentication has a number of advantages. First
of all, by removing the requirement for ongoing credential exchange, it streamlines the
authentication process. Second, it increases security by decreasing the window of
vulnerability by employing temporary tokens that expire. Last but not least, Bearer
Authentication offers scalability, enabling many customers to safely use SMS services
without challenging authentication procedures.
What is basic HTTP and bearer token authentication?
Basic HTTP authentication uses base64-encoded credentials for accessing resources,
while bearer token authentication uses a lengthy string token to grant restricted
access without private information, improving security and usability.
Summary
All in all, the Ozeki SMS Gateway provides a powerful and reliable solution for
sending SMS messages while maintaining security through HTTP Bearer Authentication.
This guide takes you through the process of configuring your API access token and
demonstrates how to set up this authentication mechanism. By following the steps
outlined in this tutorial, you've gained the knowledge to securely send authenticated
SMS messages, improving your communication's security.
This page is about to demonstrate how to set up an HTTPS SMS client connection in
the Ozeki 10 SMS Gateway. The guide shows all the steps that you have to follow to
create the connection, how to configure it, and most importantly, how you can send
SMS messages using this connection. The guide itself does not require any specific
knowledge; you can easily complete it by just following the steps, and it does not
take more than ten minutes to successfully complete the guide. So, let's begin
right now!
What is HTTP?
HTTP is the protocol that facilitates communication between web clients and servers.
It defines how requests and responses for web resources are structured. However,
it lacks encryption and security measures, unlike HTTPS.
What is an SMS?
A text-based communication transmitted by mobile phones and other devices is known
as an SMS, or short message service. Using cellular networks, it enables users to
send and receive short messages that are normally limited to 160 characters. SMS
is frequently used for short, direct messages.
How to send SMS with HTTPS SMS client connection
To send SMS with HTTPS SMS client connection:
Access 'https://localhost:9515' URL in your browser
Choose the SMS Gateway application from the options
Click on 'Add new connection...'
Pick the HTTPS client connection type
Set up the configuration for the HTTPS client connection
Enable SMS forwarding for the connection
Send a test message
Check the Event log to see if the connection is working
How to send SMS through a HTTPS SMS Client
This architecture diagram shows how the system works. It consists of three parts.
A computer, an HTTPS SMS service provider, and recipient mobile devices. Your
computer sends information containing your message to a server using an HTTPS SMS
client through the Ozeki SMS Gateway. This HTTPS SMS server then sends the text
message to your configured recipients. (Figure 1)
Figure 1 - How to send SMS through a HTTPS SMS Client
How to send SMS through a HTTPS SMS Client (video tutorial)
In this short video, you will learn how to set up an HTTPS SMS client in Ozeki SMS
Gateway as well as use it to send text messages. First, we configure and install a
new HTTPS SMS client connection. Then we use this connection to send SMS to a phone
number. We can also monitor our actions using the event log to see if they have
been sent successfully.
Step 1 - Create a new connection
The first step that you have to fulfil is to connect to the HTTPS service provider.
For that, you need to create an HTTPS client connection. So, open the SMS Gateway
in your browser by typing 'https://localhost:9515' in your browser and hitting
Enter. Then, open the SMS Gateway application from the Ozeki desktop. By doing
this, the main menu of the SMS Gateway shows up, as you can see in Figure 2. At
this point, click on Add new connection...' to create a new connection.
Figure 2 - Creating a new connection
Step 2 - Select HTTPS client connection
The next menu contains every connection that can be created in the SMS Gateway.
Each of these connections has a short description to inform you in which case you
need to use it. In this list, you need to find the HTTPS client connection, and as
Figure 3 shows, click on its 'Install' button to create it.
Figure 3 - Install the HTTPS client connection
Step 3 - Configure the HTTPS client connection
In the configuration menu, you need to specify some details for the connection.
First of all, just give a name for the connection, or you can leave the default name.
if you wish. Next, as Figure 4 demonstrates, specify a phone number for the HTTPS client.
connection. This phone number will be used to identify the connection if it sends
or receives an SMS message.
Figure 4 - Providing HTTPS client phone number
Step 4 - Enable SMS forwarding
The last configuration step that you need to perform is to enable SMS forwarding
for that connection. To do this, select the General tab in the configuration menu.
In the first step, check the 'Enable SMS Forwarding option, as Figure 5 shows.
Then, you can configure the HTTPS URL that will be called to submit the SMS messages.
If you're finished with all the configuration, just click OK to create the HTTPS
client connection.
Figure 5 - Specify the URL
In the Advanced tab, you will find the option for secure HTTPS to connect to the
HTTP server. Make sure to accept all SSL certificate Press "Ok" button to save it.
(Figure 6)
Figure 6 - HTTPS Security
Step 5 - Check the Events menu of the connection
Now, your HTTPS client connection is created and ready to use. To check that,
you can go to the event menu of the connection. In this menu, you will be able to
see every event that occurred with the connection. Figure 7 shows the event that
informs you that the connection is successfully initialized and ready to use.
Figure 7 - Successful login
Step 6 - Send a test message
The HTTPS client connection is capable of sending and receiving SMS messages. To test
the connection, you can simply send a message using the connection. For that, go to
the menu of the connection, and select the 'Test' tab. Here you can compose a new
message. So, as you can see it in Figure 8, set a recipient and the text of the
message. If you have done it, just click on 'Send' to send the message.
Figure 8 - Sending a test message
Step 7 - Check if the connection is working
As soon as you send the message, the connection is going to give you feedback about
whether the delivery of the message was successful or not. Figure 9 below demonstrates
that if the connection is working and able to send messages, it displays it with
an event message.
Figure 9 - Message successfully sent
FAQs
How to send SMS via HTTP?
You will typically need to use an SMS gateway API offered by a service provider
in order to send an SMS through HTTP. Create an HTTP POST request containing the
required information, such as the recipient's number, the message's content, and
the authentication information. Make this request to the API endpoint for the SMS
gateway, and the Message will be delivered upon successful parameter inclusion
and authentication.
How do I connect to SMS gateway?
Sign up with a provider, get API access credentials, and consult their documentation
for API endpoints and parameters if you want to connect to an SMS gateway. Create
an HTTP POST request with the recipient's information, the message's content,
and your login information. Using a computer language or tools like URL, send
the request to the specified endpoint, and then process the response to confirm
the submission of the message.
What protocol does SMS use?
The SS7 (Signalling System No. 7) protocol is largely used by SMS for message
delivery and compatibility across mobile network carriers. A collection of protocols
known as SS7 are used for a variety of communications activities, including SMS
communication and SMS routing and messaging between cellular networks.
How to set up a SMS server?
Choose appropriate hardware and SMS gateway software, to set up an SMS server.
Create a script to interact with the SMS server's API for sending and receiving
messages securely after installation and configuration. Give server security,
performance tracking, and compliance to SMS rules top priority.
My configuration is lost after restarting the service. What can I do about this?
Ozeki SMS Gateway requires write permissions to the configuration directory
located at C:\Program Files\Ozeki\Ozeki - SMS Gateway\config. Please ensure
the service has the necessary access to save configuration information and
maintain optimal functionality.
The Edit - Server Preferences, edit - Server restrictions and Driver - GSM modem
1 - Configuration windows are all blank apart from the \'OK\' and \'Cancel\' buttons.
Your web browser needs Javascript enabled to use this website properly.
Here's what you can do:
Recommended Browser: We recommend using Mozilla Firefox, which has Javascript
enabled by default.
Enabling Javascript (if using a different browser): If you're using a
different browser, you might need to enable Javascript in its settings. Look
for an option related to "Javascript" or "Site preferences" in your browser's
settings menu.
Why is Javascript needed? Javascript allows our website to use interactive
features like the graphical user interface, making your experience smoother.
There are errors with the error code 1365 in the log, and the messages cannot
be sent. Why?
It refers to the improper formatting of the phone number of the recipient, or
some other SMS sending related error.
Make sure you are using the proper phone number format: +123456789 (international
format), 0623456789 (or local number format).
If you see the following lines in your log:
INFO 3344: GSM Network registration information is not available.
INFO 3350: GSM network information:
It means, that you cannot send messages, because your modem is not registered to
the GSM network. This can happen if there is no GSM signal, or the antenna is not
connected properly to your modem. It might also be possible that your SIM card is
not working. Please try to put your SIM into a normal handset and try to send an
SMS from it.
If you are sure your modem is registered to the GSM network, please try the
following:
In the "Message handling" tab of the "GSM Modem configuration form", please
check the "Include Service Centre (SCA) in PDU" checkbox.
Please verify, that SMSC setting for your network. Call the provider and find
out what is the correct messages centre address. Make sure this is entered into
the GSM modem configuration form.
Please make sure no PIN code is set on the SIM card. Try to put the SIM into
another handset to verify if it asks for a PIN
In the guide above, we showed you how to configure and use an HTTPS SMS client
connection with the Ozeki SMS Gateway. If you are interested in sending SMS from
computers, this solution can be really useful. Ozeki has experience in SMS technologies,
and Ozeki SMS Gateway is an application with the ability to send SMS using different
protocols, giving you the opportunity to choose between them based on your needs.
Ozeki SMS Gateway also offers excellent logging capabilities, so errors can be
tracked easily and quickly.
Since you have finished this article, you now have the knowledge to send messages
with an HTTPS SMS client. This technology can be used to reach out to mobile customers
from your computer, making the information sharing process faster.
Expand your knowledge and continue reading on Ozeki's tutorial pages, where you find articles about similar topics,
like SMPP connection and SMS modem.
Ozeki SMS Gateway's intuitive interface offers a seamless method to establish a
connection with an HTTP server, enabling you to efficiently manage incoming messages
for various purposes. Whether you're looking to integrate SMS communication into
your business processes, enhance customer engagement, or automate notifications,
this streamlined feature simplifies the process.
How to enable HTTP Server connection? (quick steps)
To enable HTTP Server connection
Access your Ozeki SMS Gateway account
Add new connection
Install HTTP Server protocol from Ozeki SMS Gateway
Configure HTTP Server
Enable logging options
Establish connection
Check the connectivity status and message delivery history
Make use of Ozeki SMS Gateway's countless functions
What is HTTP Server?
A software program or system component known as an HTTP Server handles incoming
Hypertext Transfer Protocol (HTTP) requests from clients, most often web browsers.
Based on the requests made by these clients, it obtains and sends online content,
such as web pages, photos, or files, to them. The ability to send data across the
internet in a standardized manner is made possible by HTTP Servers, which are
essential to the operation of websites and online applications.
Simplify SMS Communication with HTTP Server connection (video tutorial)
In this short video guide, we'll introduce you to the powerful capabilities of
Ozeki SMS Gateway. Get ready to explore a high-performance, reliable SMS gateway
software that's designed to simplify your SMS communication needs.
You can learn from this guide how to effortlessly establish a connection with an
HTTP server using Ozeki SMS Gateway's intuitive interface.
To start the process, log in to your Ozeki SMS Gateway account, or if you do not
have one yet, create one by downloading the Ozeki SMS Gateway software from the
ozeki-sms-gateway.com website.
Open the gateway's home page, then click on the
"Add new connection" link to add new HTTP client. By clicking on it, you can see
the new client configuration panel.
Figure 1 - Add new connection
At the list of installation links, choose the "HTTP Server" to use HTTP requests
to pass incoming messages to your service. This used by premium-rated SMS services
or used as a Virtual Phone for software after selecting the "HTTP Server" option
from the list of installation links, you will need to configure your system to
handle incoming HTTP requests.
Figure 2 - Install HTTP Server connection
For configuration, provide necessary information in General settings tab, like HTTP
name, base URL, and phone number for identification. Your server's unique identification
within the network is the HTTP name. It's best to pick a name that accurately
describes the nature of your product or service. On the other hand, all incoming
HTTP requests are started from the base URL. This URL specifies the path that
requests are taken to reach your service. It's crucial to provide a phone number
for identification, especially when working with SMS services or virtual phones.
This phone number serves as a special identifier that enables your service to link
incoming messages or requests to a particular person.
Figure 3 - General settings tab
In the "Log Level" section, enable the option to "Log communication events" as well
as "Log messaging events". This will provide comprehensive insights into the
interactions and activities occurring within your system. Save them with "Ok" button.
Figure 4 - Logging options
By switching the slider button to the green position, you can establish an HTTP
connection. You can view the important details in the "Events" tab when the connection
has been established successfully. You can utilize this function to keep an eye
on and check the connectivity status of your system.
Figure 5 - Enable connection
FAQs
What is HTTP server in networking?
An HTTP server is a piece of computer software that answers to requests made over
the Hypertext Transfer Protocol (HTTP) by clients, most often web browsers. By
retrieving and providing online content—which might be web pages, photos, videos,
or other resources—it responds to these requests. By allowing connection between
clients and servers, HTTP servers are essential to the World Wide Web because
they allow users to view and engage with online information.
How does HTTP connection work?
The way that HTTP (Hypertext Transfer Protocol) works is by making it easier for
a client—typically a web browser—and a server to communicate. The client makes an
HTTP request to the server and uses a URL to identify the resource (such as a web
page) that it wants. The request is processed by the server, which then creates
an HTTP response containing the requested resource and delivers it back to the
client. This connectionless exchange serves as the foundation for retrieving and
displaying web pages.
What is HTTP client and server?
An HTTP client is a program or application that sends requests to servers,
typically to retrieve web resources like web pages or files. It initiates these
requests by specifying the resource's URL and waits for the server's response.
An HTTP server, on the other hand, receives these requests, processes them, and
sends back responses containing the requested content, allowing clients to access
and interact with web resources.
When I am sending an SMS message through HTTP API, the "+" sign in the content
of SMS and in the phone number are not forwarded to Ozeki SMS Gateway. How can
I solve this issue?
There might be an issue with the way you're sending phone numbers and messages
in your HTTP requests to Ozeki SMS Gateway. For the gateway to understand these
details correctly, they need to be encoded in a specific format.
Encode phone numbers and SMS messages before sending them in your HTTP
request. Ozeki will then decode them for proper processing.
By following this step, you should be able to resolve the issue and
successfully send SMS messages through HTTP requests.
Additional Tips:
Consult the Ozeki documentation for specific instructions on encoding
phone numbers and messages for HTTP requests.
Double-check the encoding format used in your code to ensure it aligns with
Ozeki's requirements.
Can I send and receive SMS messages via HTTPS API?
Ozeki SMS Gateway empowers you to leverage HTTPS API for sending SMS messages.
Summary
The Ozeki SMS Gateway is a high-performance and reliable SMS gateway software
designed to streamline SMS communication processes.
By following this guide, you gained the knowledge to effortlessly integrate SMS
communication into your business processes, enhance customer engagement, and
automate notifications using Ozeki SMS Gateway's HTTP Server Connection feature.
Overall, the Ozeki SMS Gateway's HTTP Server Connection feature provides a
user-friendly method to connect with HTTP servers, offering a versatile solution
for managing incoming messages and improving communication strategies.
This tutorial explains how to use the sms rest api in Ozeki SMS Gateway. It will
start with defining the term of what an sms rest api is and will move on to
show you how to use it to access SMS services. We understand you will
use these steps to construct a solution to serve important business
users and business applications, so we take care to provide you with instructions
that will help you create a high-quality solution. This guide requires
standard knowledge of the http technology. You will be provided some
important definitions, detailed step by step instructions and
easy to understand examples. We hope you will enjoy it.
What is an SMS REST api?
An sms rest api is a http api application programming interface.
REST (REpresentational State Transfer) uses the HTTP protocol (HTTPS) for
conveying SMS messaging. We can use http apis to send sms or receive sms.
One of the reasons an sms rest api is frequently
used in business applications and http api services is because it is stateless,
meaning requests cannot interfere with each other. Http apis are used by businesses
because it is easier to use than a prescribed protocol like SOAP.
How to send SMS with the SMS REST API (Quick steps)
To send SMS with the SMS REST API:
Add new connection in Ozeki SMS Gateway
Install HTTP REST client connection
Configure URL to SMS service
Specify the Data fields
Type the telephone number of the connection
Test send SMS text message with REST API
Check the test SMS message's status on the Events
Review the received test SMS message on the phone
How to send SMS through a REST SMS Client
This SMS communication solution makes it possible to use your computer for sending SMS messages to any mobile phone.
The solution consists of a computer with Ozeki SMS Gateway installed, an HTTP SMS service provider and the mobile users.
The computer and the Ozeki SMS Gateway are responsible for configuring a message.
The HTTP SMS service provider is responsible for sending the message to the mobile users.
After compiling the message, the computer will submit the message for sending.
The HTTP SMS service provider will get the submission and send the SMS to the provided address.
(Figure 1)
Figure 1 - How to send SMS through a REST SMS Client
How do you use the sms rest api?
This video tutorial will show you the steps on using the HTTP rest sms api.
First add and configure a new HTTP rest client connection using Ozeki SMS Gateway.
Then we enable the connection and send a text message from the test tab.
When the message was successfully sent, it shows up int the Events tab, as well as on your mobile device.
Add a new connection
To begin the configuration, you have to have an installed connection. If you don't have one, you can install
a new connection in the Ozeki SMS Gateway Dashboard's Connections panel, located on the left-hand side.
Here you have to select the Add new connection...
install link to start the installation. (Highlighted in Figure 2)
Figure 2 - Add new connection
Install HTTP REST client
In the Add a connection list you can find the IP SMS connections install section where you have several options to select a connection.
Select the HTTP REST client install item from this list with the install link. This will allow you to configure
the SMS service. REST is considered to easier to work with than other solutions. (Figure 3)
Figure 3 - Install HTTP REST client
Configure URL and Data fields
To configure URL and Data fields properly, you have to give a unique connection
name with the right format, enter the URL
of the SMS service and specify the Data fields. These pieces of datas will be
formatted according to the data format that you select.
Next, give the connection's telephone number
in the Telephone number textbox.
Finally, click on add new header and enter a name and the value.
You can add new Data field with the Add new field button.
Click the Ok button to confirm the configuration form. (All highlighted in Figure 4)
Figure 4 - Configure URL and Data fields
Send test SMS
In the HTTP_REST_client_1 details page, select the Test tab page. The General
tab allows you to give the recipients phone number who will
get the test message in the To textbox. You can specify the test message
in the SMS group box. You can write whatever you want, and
it will be sent as a regular SMS to the given phone number. (Shown in Figure 5)
Figure 5 - Send test SMS
Check that the message was sent successfully
Switching to the Events tab allows you to read the event log where you can check the connection's work in a written form.
If you read it carefully you can see that the previously sent test message has been delivered successfully. (Figure 6)
Figure 6 - Message sent successfully
Check your phone
The final step is to check the phone with the provided phone number. If you did
everything in the right way you will see
that the text that you wrote in the Ozeki SMS Gateway came as an SMS. This
indicates that every step of the configuration is good,
and you can start sending messages with the REST SMS client. (Figure 7)
Figure 7 - Message received on phone
Conclusion
As you could see in this guide, sending messages with HTTP REST is easy to
learn. If you are interested
in sending SMS from your computer, this solution is perfect for you. REST is
fast, uses less bandwidth than SOAP and easy to
integrate it with your existing websites. Installing an SMS REST connection is
available in Ozeki SMS Gateway.
Do not finish your work here, learn about SMPP and OZX connection in our website.
To send sms with the sms rest api in Ozeki SMS Gateway we will need 14 minutes.
This document presents directions and the necessary information to help you complete
this procedure efficiently. We understand you will use these tutorial steps to create
a solution for http api services, so we make sure to present a reliable solution. This
webpage requires basic knowledge of sms http api technology. You will be presented a
few basic definitions, detailed step by step instructions and basic examples.
We hope you will enjoy it.
What is sms rest api?
An sms rest api is an sms http api application programming interface. An sms
rest api is many times used to receive sms or send sms. One of the reasons an
sms http api is regularly used in JSON applications or http api services is
due to the fact that the transferred sms messages have enough information for
processing. Businesses use it many times because it is easier to use than
a prescribed protocol like SOAP.
How could I send sms with an sms rest api?
To send sms with an sms rest api start with the following easy guidelines:
This webpage explains how to receive sms with the sms rest api in Ozeki SMS Gateway.
It will start with giving a definition of what an sms rest api is and will continue
with the receive sms with procedure. We assume you will use these guidelines to
create a solution for http api services or JSON applications, so we make sure to
present a reliable solution. This tutorial requires standard knowledge of sms
http api technology. You will be presented a few standard definitions,
detailed step by step instructions and a number of examples.
We hope you will enjoy it. Let's get cracking.
What is sms rest api?
Sms rest api is an sms http api. It can be used to receive sms and send sms.
The reason an sms http api is widely used in JSON applications or http api services
is because it is stateless, meaning requests cannot interfere with each other.
Businesses use it many times because it is easier to use than a prescribed protocol like SOAP.
What is the best way to receive sms with an sms rest api?
To receive sms with an sms rest api start with these plain, simple directions:
Businesses can use WhatsApp to communicate with customers and clients in a
personal and convenient way and they can send messages directly to their
mobile phone. One way to use WhatsApp for business is to set up a WhatsApp message connection.
This allows businesses to send and receive WhatsApp messages through their Ozeki SMS Gateway.
In this article, we will show you how to set up a WhatsApp message connection.
We will explain the process in detail, from creating a WhatsApp app in the
Facebook Developer Portal to configuring the WhatsApp message connection in the Ozeki SMS Gateway.
We'll provide screenshots and instructions for each step, so you should be able
to follow along easily.
What is WhatsApp message Gateway
WhatsApp message Gateway is a special service that allows businesses to send
and receive business WhatsApp messages through the gateway.
What is WhatsApp message connection
WhatsApp message connection is an internet-based connection to WhatsApp Business
Server to send and receive messages directly to mobile phones.
Ozeki SMS Gateway has a built-in WhatsApp message gateway that allows businesses to
send and receive WhatsApp messages using their existing Ozeki SMS platform
without the need to install additional software.
Comparison: SMS Messages vs. Business WhatsApp Messages
#
SMS Messages
#
WhatsApp Messages
1
Limited to 160 characters or 1600 (depending on the mobile service provider)
1
Limited to 4096 characters
2
Sent through cellular network
2
Uses Internet for messaging
3
Works without internet connection
3
Requires Internet connection for use
4
Charges may apply for international messages
4
The price is the same for international and local messaging
5
Stored locally on devices
5
Cloud storage for messages
6
Text communication, MMS multimedia
6
Supports rich messages
7
Compatible with any mobile number
7
Works only on smartphones and feature phones
8
Subscription required
8
Installation and registration required
9
Not synchronized across devices
9
End-to-end encryption for privacy
10
No additional apps required
10
Requires WhatsApp application installation
How the WhatsApp SMS connection works
Figure 1 - WhatsApp connection
Create WhatsApp app on Facebook developer page
In this video, we will explain the accurate process of creating a WhatsApp app
from a Facebook developer page. You can learn the essential steps from the beginning
to the end. If you follow these movements, then it will be easy for you to set up
a WhatsApp connection.
First of all, you need to load in your browser the "developers.facebook.com"
website. Then, click on the "Get Started" button in the upper right corner of
this page.
Figure 2 - Click get started
Now, the Welcome page has been brought up. In this page, you can register and
create a Meta for Developers account that allows you to manage apps that access
the Graph API and contribute to apps that others own. You have to click on the
"Continue" button, highlighted in blue, to agree with the terms and policies of the
site.
Figure 3 - Register for developer
After that you have accepted the policies, you have to verify your account. It is
required to add a mobile phone number, which will be saved to your Facebook profile.
You will receive an SMS notification, in order to be able to do your login and
personalize your profile.
When you are ready with typing your mobile number, you need to click on the "Send
Verification SMS" button. In the other hand, if you prefer other methods, instead
of giving your mobile phone number, then it is possible to verify your account by
your credit card.
Figure 4 - Send verification sms
If you have received the verification SMS to the phone number that has been entered during the registration,
then you have to type the Code from the SMS to the box. This
is required, because it is important to make sure that the phone number belongs
to you. If you do not receive any text message, the click on the "Send SMS Again"
button. When you are ready with typing the Code, then click on the "Continue" button,
highlighted in blue.
Figure 5 - Enter verification code
Now, you have to add your primary email address, in order to send you notifications
and help you with the login process. You can agree the marketing policies also, if
you are interested in. When you have entered the data, click on the "Confirm Email"
button.
Figure 6 - Confirm email address
In this section, you have to choose from the given options, that describes you most.
Choose the "Developer" option, then click on the "Complete Registration" button.
Figure 7 - Complete registration
The following step is to create the app to get started. For this, you need to
click on the "Create App" button, highlighted in green.
Figure 8 - Create app
Now, you have to select the apps' type that you want to make. For example, choose
the "Business" option from the given choices. Then, click on the "Next" button.
Figure 9 - Business app type
The next step, is to add more details to your app. Enter an app name that will
show on your My Apps page and associate with your app ID. The email address, that
you have added previously will automatically the email address where you can receive
notifications about your app. Make sure it is an address that you check regularly.
It is optional to add any business account to your app.
When is needed, you can change any details in the Setting menu.
If you are ready, click on the "Create App" button. A pop-up page will bring up
where you have to enter your password, then submit it.
Figure 10 - Add app name
Now, a page has been brought up, where it is possible to set up connections. You
have to choose the app type that you need from the given list of options. Now,
choose the WhatsApp type, by clicking on the "Set up" button in the right corner
of the bottom.
Figure 11 - Setup whatsapp app
In order to continue the process, click on the "Continue" button, highlighted in blue.
Figure 12 - Continue to create the app
A welcome page will bring up, where you need to click on the "Start using the API"
in order to get setup on the API Cloud by adding a phone number for messages.
Figure 13 - Start using the api
When the page got loaded, you need to scroll down the page and find the "Select
a recipient phone number" box. By clicking on this box, a "Manage phone number list"
option will show up. You have to click on it and add a recipient phone number.
Figure 14 - Manage phone number list
Enter the phone number and if you see a green tick in the box's corner, you can
click on the "Next" button.
Figure 15 - Add new phone number
Verify your phone number, by entering the 5-digit code that you have received in SMS.
If you do not receive any text message, the click on the "Resend code" button.
When you are ready, click on the "Next" button.
Figure 16 - Verify phone number
Before you continue, in the following page you can learn how to secure GUI access,
how to create and configure SSL certificates, and how to use HTTPS to access the SMS gateway remotely.
Configure WhatsApp connection in Ozeki SMS Gateway
In the following video you will see, how to configure WhatsApp connection in Ozeki
SMS Gateway. Follow the steps and be able to do these setups easily.
First, log in to your Ozeki SMS Gateway, then choose the SMS Gateway Desktop icon.
In the Ozeki Toolbar, choose the "Add new connections" link in the left side of the
Connections Panel.
Figure 17 - Add new connection
From the "IP SMS connections" install section, choose the WhatsApp client, and
click on the "Install" link.
Figure 18 - Install WhatsApp client
Now you have to install the connection. Copy the WhatsApp Business Account ID from
your Meta for Developers page.
Figure 19 - Copy WhatsApp Business Account ID
Now, paste your WhatsApp Business Account ID into the WABA-ID box in the
Credentials section.
Figure 20 - Paste WhatsApp Business Account ID
Copy the Temporary access token from your Meta for Developers page.
Figure 21 - Copy access token
Now, paste your Temporary access token into the Access token box in the
Credentials section.
Figure 22 - Paste access token
Now, you need to specify a telephone number on the connection. Copy the number from
the Meta for Developers page and paste into the Telephone number box. Then click
on the "Ok" button, highlighted in blue.
Figure 23 - Add telephone number
In order to create the connection, you have to switch the slider button into green,
at the left panel of Ozeki SMS Gateway.
Figure 24 - Successfully connected to WhatsApp
At the right panel of Ozeki SMS Gateway, choose the Test tab and create an SMS
message by providing the details. Type the recipients' phone number and send the
automatically generated test message, by clicking on the "Send" button. If it worked
well, then you will see a green tick under the tab, that means your connection has
been set.
Figure 25 - Send test message
Summary
If you follow the steps in this article, you should be able to set up a WhatsApp
SMS connection without any problems. This will allow you to send and receive
WhatsApp messages through your Ozeki SMS Gateway, which can be a great way to
communicate with your customers or clients.
In this article, we have shown you how to set up a WhatsApp SMS connection.
We have explained the process in detail, from creating a WhatsApp app in the
Facebook Developer Portal to configuring the connection in Ozeki SMS Gateway.
We have provided screenshots and instructions for each step, so you should
be able to follow along easily.
Here are some additional useful tips for setting up a WhatsApp SMS connection:
Make sure that you have a valid WhatsApp Business Account ID and Temporary access token.
Make sure that the phone number that you add to your WhatsApp Business App is the same phone number that you use in Ozeki SMS Gateway.
Test the connection by sending a test message to a recipient's phone number.
If you have any further question, please send us an e-mail to the info @ozeki.hu
address or register to our website
https://myozeki.com for assistance.
How to receive WhatsApp messages using Ozeki SMS Gateway
Figure 1 - Receive WhatsApp messages in SMS Gateway
In this quick video we will show you how to set up your connection to be able to
receive WhatsApp messages in Ozeki SMS Gateway. We explain you all the essential
steps you need to follow. As you reach to the end of the moves, you can see how
easy it is.
For the first, you need to open WhatsApp app configuration menu at the Meta for
Developers page.
Figure 2 - Open WhatsApp app configuration menu
If you have found it, then you have to click on the "Edit" button at the right side
of the page.
Figure 3 - Edit webhook
By clicking on the "Edit" button, an edit page will pop up where you can
edit webhook's callback URL. You need to find the callback URL at the Connection
panel at Ozeki SMS Gateway. You need to choose the "Configure tab" at the right panel.
After that you have to copy the Published callback URL that can be found under
the Receive section. Copy the URL, then paste into the asked URL box in the Meta
for Developers page.
Figure 4 - Add callback URL
Now, you have to verify token. Verify token can be found also at the Ozeki SMS Gateways'
Configure tab, under the Credentials section of the tab. Copy the Verify token code
and paste it into the asked URL box in the Meta for Developers page.
Figure 5 - Copy verify token
Paste the Verify token into the asked URL box in the Meta for Developers page.
If it is ready, click on the "Verify and save" button, highlighted in blue.
Figure 6 - Paste verify token
Now, you have to manage the webhook fields, by clicking on the "Manage" button at
the right side of the Meta for Developers page.
Figure 7 - Manage webhook fields
You have to select Webhook fields, so in the page that has been brought up, you
have to choose the "messages" field. Put a tick next to the field and click on the
"Done" button.
Figure 8 - Subscribe to messages field
Finally, you have to step on the Ozeki SMS Gateways' Events tab and read
the messages that has been received through WhatsApp.
- media message content can be configured to be downloaded into local cache
- on successful media content download, the content can be deleted from whatsapp servers
- incoming messages can be configured to be signalled as read
- default template can be configured
- 24-hour customer service window check can be disabled (advanced)
- cache / cleanup configuration (advanced)
- downloaded media content cleanup (advanced)
Automated WhatsApp features
- Phone number ID lookup
- WABA subscribe/unsubscribe
Required WhatsApp configuration
- setup the callback URL-t in the WhatsApp product
- configure the webhook message field
Figure 1 - How to send message through a WhatsApp connection API
Figure 2 - How to send message through a standard API
What is User initiated conversation in WhatsApp Cloud API?
A user-initiated conversation is a message thread in which the user sends the
first message to the business. The user can send any type of message.
The message is transmitted to the WhatsApp Server via an Internet connection,
and from there it also goes on to Business via the Internet.
The 24-hour customer service window starts when the business responds to the customer.
Figure 3 - User initiated conversation
What is Business initiated conversation in WhatsApp Cloud API?
A business-initiated conversation is a message thread in which the first message
is an approved template message and is sent by the business to the customer.
Prior registration is required. The 24-hour customer service window begins
when the business sends the template message. Within the window, all messages
sent back and forth between the customer and the business are linked to
the conversation.
After the customer responds to the business's template message, the business
can start sending any type of message to the customer. During the conversation,
in the 24-hour customer service window, the business can send any type of message,
it does not need to approve additional messages in advance.
If the customer does not respond after 24 hours, the business must send a
new approved template message to the customer to restart the 24-hour customer
service window.
If the business has not sent a message after 24 hours, but the customer responds
to the business, then a User initiated conversation begins, which was presented
previously.
Figure 4 - Business initiated conversation
What is Customer service window in WhatsApp Cloud API?
The Customer service window opens in two cases. In the first case, if the
customer sends any type of message to the business. (User initiated conversation)
In the second case, the Company sends any type of approved template message to the Customer.
(Business initiated conversation)
In time, if any of the above two types of messages are sent,
the conversation starts in the 24-hour customer service window.
The 24-hour customer service window restarts when the last Customer
service window opening message is sent.
This article as a detailed tutorial on how to send message from
MS SQL Server. Messages go out and come in via Whatsapp.
Ozeki SMS Gateway allows you to create an MS SQL Server connection and send text
messages from a database using SQL code.
You will also learn how to create a database and tables for storing incoming
and outgoing messages.
We hope you find this article informative and let's get started!
What is Ozeki SMS Gateway?
Ozeki SMS Gateway is a professional SMS gateway software that allows individuals and software applications to send and receive SMS messages,
while providing full control over the SMS infrastructure, guaranteeing security.
What is WhatsApp messaging?
WhatsApp is a popular, free, and cross-platform messaging service for exchanging text, voice, and video messages, as well as documents and photos.
What is WhatsApp webhook?
WhatsApp webhook is a programming interface that allows third parties to automatically notify and reply to new messages on the WhatsApp platform.
How to send WhatsApp message from SQL database (Quick steps)
To send message from Ozeki SMS Gateway into the WhatsApp:
Download the Ozeki SMS Gateway
Create a WhatsApp business account on Facebook developer page
Launch the Ozeki SMS Gateway app
Install a new WhatsApp client connection
Configure Connection settings
Enable the WhatsApp connection
Create an SMS Test
Check the message on your phone
How to send message to WhatsApp through Ozeki SMS Gateway (video tutorial)
This video shows you how to add a Whatsapp connection to the Ozeki SMS Gateway. You can view the basic settings required to send a WhatsApp message directly.
You can learn how to create the Default template. Database-driven WhatsApp messaging allows you to automate the WhatsApp communication system.
After the connection is established, the video shows how to compose and send the first test message, then we examine the log file to verify successful delivery.
First, log in to your Ozeki SMS Gateway, then choose the SMS Gateway Desktop icon.
In the Ozeki Toolbar, choose the Add new connections (Figure 2) link in the left side of the Connections panel to choose to install WhatsApp.
Figure 2 - Add new connection at the left side
From the IP SMS connections, service provider specific (SMS) install section, choose the WhatsApp client, and click on the Install link (Figure 3).
After installation, you will see the configuration interface.
Figure 3 - Install the WhatsApp Client
Next to the General tab, click on Advanced, and then check
these two checkboxes under the Log level (Figure 4) to get more
information, about routing decision and message delivery events.
Figure 4 - Check these logs to get more information
Now you have to configure the connection. Copy the WhatsApp Business Account ID (Figure 5) from your Meta for Developers page.
You will have to paste this into the WhatsApp general tab at Ozeki SMS Gateway.
Figure 5 - Copy the WhatsApp Business Account ID
Go back to the General tab. Paste the WhatsApp Business Account ID into the WABA-ID field (Figure 6).
This ID distinguishes all WhatsApp Business accounts.
Figure 6 - Paste the WhatsApp Business Account ID
Copy the Temporary access token (Figure 7) from your Meta for Developers page. The temporary access token that the service can use to perform a specific task.
Figure 7 - Copy the Temporary access token
Paste the Temporary access token from your Meta for Developers page into the Access token field (Figure 8).
Figure 8 - Paste the Temporary access token
The Default template (Figure 9) is used to, when no conversation is open with the recipient of the message, the template is sent instead of the message.
Then, when the conversation is opened, the original message is automatically sent.
You must first enter the recipient's telephone number in international format.
Secondly, you must specify the message type, which in this case is a template.
Thirdly, this tag specifies the name of the template to be used.
Finally, this tag specifies the language code of the template.
Fill in these fields correctly, as follows:
Tag 1: wa.to : $recipient
Tag 2: wa.type : template
Tag 3: wa.template.name : hello_world
Tag 4: wa.template.language.code : en_US
Figure 9 - Configure the default template
We also need to specify a telephone number on the connection. Copy the Test number (Figure 10) from the Meta for Developers page.
You can send free messages with the provided test phone number. You can use your own phone number which is subject to limits and pricing.
Figure 10 - Copy the Test number
Paste into the Telephone number field, then click on the Ok button, highlighted in blue (Figure 11).
After pressing the button and then you have to enable the connection.
Figure 11 - Paste the Test number for testing purposes
To establish a connection, you have to switch the switch button on the left control table, and it should be green (Figure 12).
If the connection is successful, you can see it in the logs at the Events tab, and you can use the service.
Figure 12 - Successful connection
In the right panel of the Ozeki SMS Gateway, select the Test tab and create an SMS message by entering your details.
Enter the phone number of the recipients and click Send, to send the automatically generated test message.
If this is successful, a green tick will appear below the tab, indicating that the connection has been established (Figure 13).
Look at the message on your phone.
Figure 13 - Send a successful test message to the phone number
How to send message from MS SQL (Simple guidelines)
To send message from MS SQL:
Create database and tables
Launch the Ozeki SMS Gateway app
Add new SQL messaging application
Install MS SQL Server
Configure Connection settings
Enable MS SQL Server connection
Insert a message into the database
Check the message in the Sent folder
How to send message from MS SQL Server (video tutorial)
This video shows you how to create databases. How to create MS SQL Server connection on Ozeki SMS Gateway.
The video will help you how to configure the connection. It shows how to send a message directly and view sent and received messages.
Once the connection is established, the video will show you how to write and send the first test message and then examine the log file to verify successful delivery.
Create a table definition for messages
Before you can start sending SMS using SQL, you must first create a database and tables.
You can do this by entering certain lines of code on the command line. The CREATE DATABASE command will add the new database itself.
The two CREATE TABLE commands add two tables. One to store incoming messages and one to store outgoing messages.
Finally, you can use the sp_addLogin command to create a username and password to authenticate the database.
CREATE DATABASE ozekidb
GO

USE ozekidb
GO

CREATE TABLE ozekimessagein (
 id int IDENTITY (1,1),
 sender varchar(255),
 receiver varchar(255),
 msg nvarchar(160),
 senttime varchar(100),
 receivedtime varchar(100),
 operator varchar(30),
 msgtype varchar(30),
 reference varchar(30),
);

CREATE TABLE ozekimessageout (
 id int IDENTITY (1,1),
 sender varchar(255),
 receiver varchar(255),
 msg nvarchar(160),
 senttime varchar(100),
 receivedtime varchar(100),
 operator varchar(100),
 msgtype varchar(30),
 reference varchar(30),
 status varchar(30),
 errormsg varchar(250)
);

GO

sp_addLogin 'ozekiuser', 'ozekipass'
GO

sp_addsrvrolemember 'ozekiuser', 'sysadmin'
GO
Create database and tables
To start sending SMS using MS SQL, you first need to create a database and tables. This is done via the command line.
Open the command line and enter the above code sequence. The CREATE DATABASE command creates the database itself.
Next, the tables ozekimessagein and ozekimessageout are created using the CREATE TABLE command.
Finally, we add the username and password with sp_addLogin (Figure 14). The database is now ready for SMS sending in MS SQL.
Figure 14 - Create the database and tables
First, log in to your Ozeki SMS Gateway, then choose the SMS Gateway Desktop icon.
In the Ozeki Toolbar, choose the Add new user/application (Figure 15) link in the right side of the User and applications panel to choose SQL messaging.
Figure 15 - Add new connection at the right side
From the Application interfaces install section, choose the SQL messaging, and click on the Install (Figure 16) link.
After this, you can then see the SQL services available for installation.
Figure 16 - Select SQL messaging
Find MS SQL Server under SQL Messaging and click install (Figure 17).
After installation, you will see the SQL configuration interface.
Figure 17 - Choose MS SQL Server to install this service
Next to the Send tab, click on Advanced, and then check the Attach log to every message checkbox under the Log level (Figure 18).
Enable this checkbox to log delivery events into the event log of each message.
Figure 18 - Check this log to get more information
Go back to the General tab and configure the Connection settings (Figure 19).
With these settings you can connect to your own sql database. The tables in the database will be used later.
Server: local IP address
Port: port number
Database: database name
UserID: username
Password: password
If everything is filled in correctly, press the ok button.
Figure 19 - Configure SQL for successful connection
To establish a connection, you have to switch the switch button on the left control table, and it should be green (Figure 20).
If the connection is successful, you can see it in the logs at the Events tab, and you can use the service.
Figure 20 - Successful connection
Let's insert a message into the database table. First, go to the
SQL tab of your connection. Select the INSERT INTO from the
dropdown menu.
Change the phone number and click on the Execute button to run
the command (Figure 21). This will insert the message into the
ozekimessageout table and send a message to the WhatsApp application.
Figure 21 - Select INSERT INTO option to send a test
From the ozekimessageout table (Figure 22) you can query the messages sent by selecting the SELECT * option.
If you run this query, you can see the message sent in the table.
Figure 22 - View sent messages in the database
On the left side in the control panel, under the Folders select the Sent link and you can see the messages are sent (Figure 23).
Figure 23 - View sent messages in the folders
Click on the Events tab, and you can see every log line (Figure 24).
Figure 24 - You can see the sent messages in the log files
How to receive WhatsApp message into SQL database (Simple steps)
To receive WhatsApp message into SQL database:
Launch the Ozeki SMS Gateway app
Configure the WhatsApp webhook
Check the message in the SQL database
How to receive WhatsApp message into MS SQL (Video tutorial)
This video shows you how to receive messages from WhatsApp. How to connect your WhatsApp webhook to the Ozeki SMS Gateway.
How to configure the webhook, what parameters to set.
After successful connection you can see the incoming messages in the log file and also in the database.
First log in to the Ozeki SMS Gateway, then select the SMS Gateway Desktop icon.
In the Ozeki toolbar, select the existing WhatsApp client (Figure 25) link on the left side of the Connections panel.
Figure 25 - Click WhatsApp client at the left panel
Open WhatsApp configuration menu at the Meta for Developers page to configure the webhook (Figure 26). Click on Edit.
The webhook need to be set, because it allows the Ozeki SMS Gateway to send an alert message to Whatsapp when it receives a message from a mobile phone,
or when the status of a Whatsapp message sent to a mobile phone changes.
Figure 26 - Webhook configuration settings
On the WhatsApp client page, we need the Configure tab. Scroll down to the Published callback URL section and copy it (Figure 27), it's a template.
This will help you to just copy and paste.
Figure 27 - Copy the published callback URL template
Paste the template into the Callback URL field (Figure 28).
Figure 28 - Paste the template into the webhook Callback URL
Copy the Connection name and the Verify token (Figure 29).
The connection name specifies the name of the connection, the verifiy token is
responsible for security.
Figure 29 - Copy the Connection name and Verify Token
Paste the Connection name at the end of the template. Replace the [public-ip]:[port] into your public IP with your forwarded port.
Paste the Verify token into the Verify token field on the Meta for Developers page. If you've filled everything in, click on Verify and save button.
Then press the Manage button (Figure 30).
Figure 30 - All fields filled in at the Webhook configuration
You have to select the Webhook field, so you will need to select the messages on the page. Check this box and click Done (Figure 31).
Selecting the message type in the WhatsApp webhook setting indicates that the webhook will respond to messages. It means that the webhook will work when messages are received and sent.
Figure 31 - Select the message type in the WhatsApp webhook settings
It should look like this (Figure 32), if we did everything right.
And you can test the successful connection in the Ozeki SMS Gateway.
Figure 32 - Successfully webhook configuration
Let's go back to the Ozeki SMS Gateway. In the WhatsApp client,
click on Events to see the log. Send a message in the
WhatsApp application, the message needs to appear in the
log (Figure 33).
Figure 33 - Send a test message and look at the log file
On the left side in the control panel, under the Folders click on the Forwarded link, and choose the Forward accepted tab.
Where you can see the messages (Figure 34).
Figure 34 - You can see the message in the forwarded folder
Go back to the Main page and select your existing SQL Server link at the right side of the User and applications (Figure 35) panel to see the incoming message here too.
Figure 35 - Select SQL Server to see the messages
Let's query a message from the database. Go to the SQL tab of your
connection. Select the SELECT * from the dropdown menu and you can see
every received message (Figure 36).
Figure 36 - You can query the inbox with SQL
Summary
If you follow the steps described in this article, you will be able to set
up a WhatsApp SMS connection without any problems.
This will allow you to send and receive WhatsApp messages through the Ozeki
SMS gateway, which can be a great way to communicate with clients or customers.
In this article we have shown you how to set up a WhatsApp SMS connection.
We explained the process in detail, from creating a WhatsApp application in
Facebook Developer Portal to setting up a connection in Ozeki SMS Gateway.
We have provided screenshots and instructions for each step so you can easily
follow the steps.
Here are some more useful tips for setting up your WhatsApp SMS connection:
Make sure you have a valid WhatsApp Business account ID and a temporary
access token.
Make sure the phone number you add to your WhatsApp Business App is the
same phone number you use in Ozeki SMS Gateway.
Test the connection by sending a test message to a recipient's phone number.
If you have further questions, please email info@ozeki.hu or register
on our website: https://myozeki.com for help.
How to receive WhatsApp messages into SQL database
This article is a detailed tutorial on how to receive WhatsApp messages into SQL
database. The messages come from WhatsApp and they are sent to the Microsoft SQL
server via the Ozeki SMS Gateway.
With Ozeki SMS Gateway, you can effortlessly set up a connection between your
database and WhatsApp, enabling you to receive messages directly into your SQL
tables.
We hope you find this article informative and let's get started!
What is WhatsApp messaging?
WhatsApp is a popular, free, and cross-platform messaging service for exchanging
text, voice, and video messages, as well as documents and photos.
What is WhatsApp webhook?
WhatsApp webhook is a programming interface that allows third parties to
automatically notify and reply to new messages on the WhatsApp platform.
Receiving WhatsApp messages into SQL database
The message sent from the WhatsApp user goes to the WhatsApp server which uses
an API connection to send the message to the Ozeki SMS Gateway within 24 hours.
Then the message arrives to the MS SQL Database server.
Figure 1 - Receiving WhatsApp messages into SQL database
How to receive WhatsApp messages into SQL database (Simple steps)
To receive WhatsApp messages into SQL database:
Launch the Ozeki SMS Gateway app
Configure the WhatsApp webhook
Check the message in the SQL database
How to receive WhatsApp messages into MS SQL (Video tutorial)
This video shows you how to receive messages from WhatsApp. How to connect your WhatsApp webhook to the Ozeki SMS Gateway.
How to configure the webhook, what parameters to set.
After successful connection, you can see the incoming messages in the log file and also in the database.
Video 1 - Receive Message from WhatsApp
First log in to the Ozeki SMS Gateway, then select the SMS Gateway Desktop icon.
In the Ozeki toolbar, select the existing WhatsApp client (Figure 2) link on the left side of the Connections panel.
Figure 2 - Click WhatsApp client at the left panel
Open WhatsApp configuration menu at the Meta for Developers page to configure the webhook (Figure 3). Click on Edit.
The webhook need to be set, because it allows the Ozeki SMS Gateway to send an alert message to Whatsapp when it receives a message from a mobile phone,
or when the status of a Whatsapp message sent to a mobile phone changes.
Figure 3 - Webhook configuration settings
On the WhatsApp client page, we need the Configure tab. Scroll down to the Published callback URL section and copy it (Figure 4), it's a template.
This will help you to just copy and paste.
Figure 4 - Copy the published callback URL template
Paste the template into the Callback URL field (Figure 5).
Figure 5 - Paste the template into the webhook Callback URL
Copy the Connection name and the Verify token (Figure 7).
The connection name specifies the name of the connection, the verifiy token is responsible for security.
Figure 6 - Copy the Connection name and Verify Token
Paste the Connection name at the end of the template. Replace the [public-ip]:[port] into your public IP with your forwarded port.
Paste the Verify token into the Verify token field on the Meta for Developers page. If you've filled everything in, click on Verify and save button.
Then press the Manage button (Figure 6).
Figure 7 - All fields filled in at the Webhook configuration
You have to select the Webhook field, so you will need to select the messages on the page. Check this box and click Done (Figure 30).
Selecting the message type in the WhatsApp webhook setting indicates that the webhook will respond to messages. It means that the webhook will work when messages are received and sent.
Figure 8 - Select the message type in the WhatsApp webhook settings
It should look like this (Figure 9), if we did everything right.
And you can test the successful connection in the Ozeki SMS Gateway.
Figure 9 - Successfully webhook configuration
Let's go back to the Ozeki SMS Gateway. In the WhatsApp client, click on Events to see the log. Send a message in the WhatsApp application, the message needs to appear in the log (Figure 10).
Figure 10 - Send a test message and look at the log file
On the left side in the control panel, under the Folders click on the Forwarded link, and choose the Forward accepted tab.
Where you can see the messages (Figure 11).
Figure 11 - You can see the message in the forwarded folder
Go back to the Main page and select your existing SQL Server link at the right side of the User and applications (Figure 12) panel to see the incoming message here too.
Figure 12 - Select SQL Server to see the messages
Let's query a message from the database. Go to the SQL tab of your connection. Select the SELECT * from the dropdown menu and you can see every received message (Figure 13).
Figure 13 - You can query the inbox with SQL
Frequently Asked Questions (FAQs)
What is the purpose of the webhook in Ozeki SMS Gateway?
The Ozeki SMS Gateway webhook enables the system to send an alert message to
WhatsApp. When it receives a message from a mobile phone, also, when there
is a change in the status of a WhatsApp message sent to a mobile phone.
Can I use a WhatsApp webhook to send messages?
No, you cannot. The primary purpose of a WhatsApp webhook is to receive notifications
and information, the webhook functionality is not designed for sending messages.
Why use a WhatsApp webhook?
A WhatsApp webhook helps developers automate responses, get notifications, and
connect with other systems in real-time on the WhatsApp platform.
What is the purpose of the callback URL in a WhatsApp webhook?
The callback URL in a WhatsApp webhook is where WhatsApp sends messages to inform
third-party apps about events, like new messages or changes in message status,
through HTTP requests.
Is a WhatsApp webhook secure?
The security of a WhatsApp webhook relies on how it is set up by the developer.
It is important to use secure connections (HTTPS) and proper authentication
methods to keep the data safe and confidential. Within the Ozeki SMS Gateway it
is secure.
What information can I receive through a WhatsApp webhook?
With a WhatsApp webhook, you can receive information about new messages, updates
on message status (like delivered or read), and other important events on WhatsApp.
Summary
This article provides instructions on how to receive WhatsApp messages into an
SQL database using Ozeki SMS Gateway. The article explains the components of WhatsApp
messaging, the purpose of the webhook in Ozeki SMS Gateway, and the steps involved
in configuring the webhook to receive messages from WhatsApp. Additionally, the
article provides answers to frequently asked questions (FAQs) about WhatsApp
webhooks.
By following the detailed instructions provided in the article, you can simply
integrate WhatsApp messaging into your existing SQL database infrastructure,
streamlining your communication processes and data management.
With the provided screenshots and instructions, you can easily follow the steps.
In addition, here are some more valuable tips for configuring your WhatsApp
SMS connection:
Verify that you have a valid WhatsApp Business account ID and a temporary access token.
Ensure the phone number added to WhatsApp Business App matches the one used in Ozeki SMS Gateway.
Validate the connection by sending a test message to a recipient’s phone number.
Utilize a secure callback URL for your WhatsApp webhook.
If you have further questions, please email info@ozeki.com or register on our website: https://myozeki.com for help.
https://ozeki-sms-gateway.com/p_7903-webhook.html
What is a webhook?
Understanding Webhooks: Revolutionizing Real-time Communication in Web Development
Discover the transformative realm of web development with a focus on webhooks—a
revolutionary force in real-time communication.
Imagine seamless integration into applications, from social media updates to IoT
triggers. Explore the synergy of webhooks with Ozeki SMS Gateway, offering businesses
real-time capabilities, automation, and scalable efficiency.
What is a webhook?
In the realm of web development and online services, webhooks stand as a
revolutionary method of communication that operates in response to specific events.
Imagine if your application could swiftly receive notifications akin to phone
calls whenever noteworthy occurrences transpire on the web.
Webhooks are intelligent messengers that enable real-time communication between
applications and various online services. They act as virtual phone calls,
alerting your application whenever a specific event occurs, keeping it constantly
updated and responsive. Webhooks send HTTP POST requests from the source
application to the destination application, carrying a payload of event
information. The destination application then processes this payload and takes
appropriate action, such as updating data, triggering actions, or sending
notifications. This real-time communication eliminates the need for constant
polling, reducing server load and improving efficiency. Webhooks are a powerful
tool for building modern web applications that require seamless integration and
real-time updates, making them widely used in various industries, including content
management systems, e-commerce platforms, social media platforms, payment gateways,
and customer relationship management (CRM) systems.
How does a webhook operate?
In the past, applications had to repeatedly check other services for updates,
which was inefficient and led to delayed responses. Webhooks, on the other hand,
utilize HTTP (Hypertext Transfer Protocol) to transmit data in a more streamlined
manner. When a pre-defined event occurs, the sending system initiates an HTTP POST
request to a specific URL, often called a "callback URL." This URL directs the
recipient's endpoint, where event-related data is promptly received.
In simpler terms, when a specific event happens, data associated with that event
is automatically sent to a URL designated by your application. This automated
exchange promotes real-time communication between web applications.
Key Characteristics and Applications
Webhooks find application in various scenarios:
Real-time Updates: Social media platforms utilize webhooks for instant
notifications, informing users of new messages, likes, or comments.
Ecommerce Integration: Online stores employ webhooks to ensure real-time
updates on inventory levels, process orders efficiently, and send order status
notifications.
Notifications in Messaging Apps: Messaging apps leverage webhooks to deliver
real-time notifications, such as chat messages or friend requests.
IoT (Internet of Things): Webhooks play a vital role in collecting sensor data
from IoT devices and triggering actions based on sensor readings.
Setting Up Webhooks: A Three-step Process
The process of setting up webhooks involves three main steps:
Create a Webhook Endpoint: Establish a URL in your application, serving as
the API endpoint capable of processing incoming POST requests—the preferred
HTTP method for webhooks.
Register with the Provider: Head to the provider’s dashboard or settings page
to register your webhook endpoint. Specify the events you want to subscribe
to for a customized experience.
Implement Logic for Received Webhooks: Once your application receives a
webhook, define the logic to process the data. This may include updating user
information or processing payments based on specific needs.
Unlocking the Power of Webhooks with SMS
Integrating webhooks with SMS offers a potent way to infuse real-time communication
into your applications. To embark on this journey:
Set up a webhook endpoint on your server to receive incoming SMS data.
Configure your SMS service provider, such as Sinch MessageMedia, to send a
webhook notification for each new SMS. This notification typically includes
crucial information like the sender's phone number, message content, and
timestamp.
Process the data in real-time, enabling actions like automated replies,
storing message history, or triggering specific events based on incoming
SMS content.
Business benefits of Webhooks
Real-time data updates:
Webhooks deliver notifications immediately when an event occurs, ensuring that
applications always have the latest information. This real-time data flow is
crucial for applications that require dynamic updates, such as social media
platforms, e-commerce sites, and IoT systems.
Reduced server load:
Webhooks eliminate the need for applications to constantly poll other services for
updates, which can significantly reduce server load and improve efficiency.
Instead, applications receive notifications only when events occur, minimizing
unnecessary requests.
Automated workflows:
Webhooks can trigger automated workflows, enabling applications to respond to
events without manual intervention. This automation streamlines processes,
improves efficiency, and reduces the risk of human error.
Enhanced customer experience:
Webhooks can be used to provide customers with real-time updates and notifications,
such as order status changes, shipping confirmations, and product availability.
This real-time communication enhances customer satisfaction and loyalty.
Enhanced scalability:
Webhooks can be easily scaled to accommodate growing user bases and increased
data volumes. This scalability is essential for businesses that need to handle
large volumes of data in real time.
Integrate webhooks with Ozeki SMS Gateway
Integrating webhooks with Ozeki SMS Gateway is a process that involves creating a
webhook endpoint in your application, registering the endpoint with Ozeki SMS
Gateway, and configuring your application to handle incoming webhook notifications.
Webhooks are a powerful tool that enables applications to communicate and exchange
data in real time. They work by sending HTTP POST requests from the source
application to the destination application whenever a specific event occurs. The
destination application then processes the webhook payload and takes appropriate
action, such as updating data, triggering actions, or sending notifications.
Key Reasons to Integrate Webhooks with Ozeki SMS Gateway:
Real-time SMS notifications
Reduced server load
Automated workflows
Enhanced business agility
Improved developer productivity
Scalable SMS gateway
Secure SMS communications
Versatility and customization
To seamlessly integrate webhooks with Ozeki SMS Gateway, a three-step process is
essential. First, set up a webhook endpoint by establishing a URL on your server,
serving as the designated location to receive incoming data. Next, configure Ozeki
SMS Gateway as your SMS service provider, instructing it to send webhook
notifications for each new SMS. This configuration should include crucial details
such as the sender's phone number and message content. Finally, empower your
application to process incoming SMS data in real-time by implementing logical
functionalities. This ensures immediate actions, such as automated replies or event
triggers, enhancing the overall responsiveness and effectiveness of your
communication system integrated with Ozeki SMS Gateway.
Real-Time Updates are Critical:
When you need to receive notifications as soon as an event occurs, webhooks are
the best option. For example, you could use a webhook to receive notifications
about new customer orders, inventory changes, or website activity.
Reduced polling:
If you are constantly polling a service for updates, it can put a lot of strain
on your servers. Webhooks can help to reduce the amount of polling you need to do
by sending notifications to your applications when events occur.
Decoupled architecture:
When you need to create loosely coupled systems that can communicate efficiently
without requiring direct integration, webhooks are a good choice. This decoupling
can make your systems more flexible and scalable.
Here are some specific examples of how webhooks can be used:
E-commerce: In e-commerce, webhooks can be used to notify customers about
order status changes, shipping updates, and product availability. They can
also be used to automatically process payments and generate invoices.
Social media: In social media, webhooks can be used to notify applications
about new user interactions, such as profile updates, comments, and likes.
They can also be used to trigger automated workflows, such as sending
notifications or updating content.
Payment gateways: In payment gateways, webhooks can be used to notify
applications about payment confirmations, transaction failures, and refunds.
They can also be used to update order status and send receipts to customers.
Customer relationship management (CRM): In CRM, webhooks can be used to notify
applications about customer interactions, such as email opens, website visits,
and purchases. They can also be used to trigger automated workflows, such as
sending personalized offers or updating customer profiles.
What is the difference between a hook and a webhook?
Hooks and webhooks are both mechanisms for triggering events in one application
based on events in another application. However, there are some key differences
between the two.
Hook
Hooks are a general term for any mechanism that allows an application to connect
to another application and receive notifications about events. Hooks can be
implemented in a variety of ways, using different protocols and technologies.
Webhook
Webhooks are a specific type of hook that uses the HTTP protocol to send
notifications between applications. Webhooks are typically used to send real-time
notifications, as they can be easily integrated into web applications.
Comparing Hooks and Webhooks
Comparing Hooks and Webhooks
Feature
Hooks
Webhooks
Definition
General term for any mechanism that allows an application to connect to another application and receive notifications about events.
Specific type of hook that uses the HTTP protocol to send notifications between applications.
Protocol
Versatile, can use a variety of protocols, including HTTP, WebSockets, and TCP.
Limited to HTTP, always uses the HTTP protocol.
Performance
Potentially slower, may use less efficient protocols.
Typically faster, due to the HTTP protocol's efficiency.
Real-time
Not always, may involve some delay in notification delivery.
Typically real-time, delivers notifications promptly as events occur.
Flexibility
High, allows for diverse implementation approaches.
Limited, restricted to the HTTP protocol.
Ease of Use
More complex to implement and manage.
Easier to implement and manage due to HTTP's standardization.
Applications
Suitable for scenarios requiring customized event notifications and integrations.
Ideal for applications that need real-time, reliable notification delivery without the complexities of other protocols.
What is difference between API and webhook?
API (Application Programming Interface)
APIs (Application Programming Interfaces) are sets of rules and specifications that
define how two pieces of software can communicate with each other. They provide a
structured way for applications to exchange data and functionality. APIs are
typically used for retrieving or modifying data, or for triggering actions within
another application.
Webhook
Webhooks, on the other hand, are a specific type of API that sends notifications
to a specified URL whenever a specific event occurs. This means that webhooks are
a mechanism for real-time communication between applications. They are often used
to trigger automated workflows or update data in real time.
Comparing APIs and Webhooks
Comparing APIs and Webhooks
Feature
APIs
Webhooks
Purpose
Request and receive data or trigger actions
Send real-time notifications about events
Communication Pattern
Client-initiated
Server-initiated
Data Format
Various, including JSON, XML, and plain text
Typically JSON or XML
Protocol
Various, including HTTP, HTTPS, and SOAP
Typically HTTP or HTTPS
Real-time Updates
Not always real-time
Typically real-time
Flexibility
More flexible for complex data exchange
Less flexible, but simpler to implement
Ease of Implementation
More complex to implement
Easier to implement
Suitability
Suitable for a wide range of use cases, including data retrieval, data manipulation, and triggering actions
Suitable for applications that require real-time notifications about events, such as order placed notifications, new user registrations, and account updates
How can I get a webhook?
To get a webhook
Set Up a Server
Configure the Provider
Here are the answers to your questions:
How can I get a webhook?
A webhook is a URL that is registered with an application to receive notifications
about specific events. The application that sends the notifications is called the
"source application" and the application that receives the notifications is called
the "destination application."
How do I create a webhook URL?
To create a webhook URL
Choose a Domain
Create an Endpoint
Creating a webhook URL involves a two-step process. Firstly, choose a domain where
you intend to establish the webhook. This could be your server's domain, or a
dedicated domain specifically designated for handling webhooks. Subsequently,
create a specific endpoint or route on your server that acts as the API endpoint
capable of processing incoming POST requests. This establishes the connection point
for receiving data through the webhook.
How do I run webhooks?
To run webhooks
Activate the Webhook
Monitor Incoming Data
Handle Errors and Logging
Effectively running webhooks requires several key steps. Initially, activate the
webhook to ensure it is enabled on both the sending and receiving ends of the
communication. Following activation, set up your application to monitor and process
incoming data from the webhook in real-time. This involves implementing logic to
execute predefined actions based on the information received. Additionally, to
enhance reliability, implement error handling mechanisms and logging to address
any issues that may arise during the webhook process. By diligently following these
steps, you can successfully run and manage webhooks within your application or system.
Feature
Ozeki SMS Gateway
Other Solutions
Real-Time Communication
Delivers real-time SMS notifications.
Limited real-time capabilities.
Automation
Automates a wide variety of tasks.
Manual intervention may be required.
User Engagement
Enhances user engagement with real-time updates and notifications.
Standard user engagement features.
Decision-Making Speed
Helps you make faster decisions with real-time data.
Potential delays in data processing.
Cost Savings
Reduces the need for polling and manual intervention, saving money.
Resource-intensive, constant polling methods.
Scalability
Scales to accommodate growing businesses and event volumes.
Handles growing event volume.
System Flexibility
Highly customizable to meet specific business needs.
Customizable to specific needs.
SMS data processing
Provides seamless SMS data processing.
Seamless SMS data processing.
Integration with webhooks
Offers built-in webhook integration, easy to integrate with other applications.
Offers built-in webhook integration.
Ease of Setup
Easy to set up and configure.
Three-step process for webhooks.
Customer Support
Dedicated customer support.
Dedicated support for Ozeki users.
FAQs
How does webhook function in web development?
Webhooks are a type of HTTP endpoint that allows one application to send real-time
notifications to another application when specific events occur. When an event
happens in the source application, it sends a POST request to the webhook URL of
the destination application. The destination application then receives the
notification and can take the appropriate action, such as updating a database,
sending an email, or triggering another event.
When should I consider using webhooks in my applications?
Webhooks are a great choice for applications that need to be notified of real-time
events. They are particularly useful for scenarios where you need to keep multiple
applications in sync or when you want to automate certain actions based on events.
Webhooks can be used to send notifications about new messages, updates, or changes
in status. Can be used to trigger automated workflows in other applications.
Can be used to trigger automated builds and deployments of code changes.
What are the fundamental advantages of incorporating webhooks into web development?
Incorporating webhooks into web development brings several fundamental advantages,
including real-time communication, automation, improved customer engagement, cost
savings, and scalability. Businesses can achieve quicker decision-making and
response times, streamline workflows, enhance user experiences.
How can businesses leverage the power of webhooks for SMS integration?
Unlock the potential of webhooks by setting up endpoints, configuring SMS service
providers, and processing SMS data in real-time. This integration enhances
communication systems with real-time capabilities, automation, and improved
efficiency.
Conclusion
In conclusion, the integration of webhooks with Ozeki SMS Gateway presents a powerful
solution for businesses, enhancing communication, automation, and overall system
efficiency.
Webhooks are a powerful tool that can be used to improve the real-time communication
between applications. They provide a way for applications to be notified of events
as soon as they occur, without having to constantly poll the source application.
This can save resources and improve efficiency.
With a focus on real-time capabilities, automation, and seamless SMS data processing,
Ozeki SMS Gateway stands out among other solutions. Businesses can experience
improved user engagement, faster decision-making, and significant cost savings
through efficient resource utilization. The scalability and flexibility of Ozeki
SMS Gateway allow it to handle a growing volume of events while adapting to specific
business needs. The integration process is streamlined with a user-friendly
three-step setup for webhooks, offering built-in integration and dedicated support.
Choosing Ozeki SMS Gateway ensures a comprehensive communication infrastructure,
empowering businesses with enhanced user experiences and effective communication
processes.
The Ozeki SMS Gateway offers connectivity to several on-line SMS service providers.
This page lists some of the supported providers. If you click on the name of the
provider, you can find detailed step-by-step configuration instruction to setup
such a provider. If you are an SMS service provider, and you would like your
service to be supported and listed on this page, please contact us!
Figure 1 - Connection through an HTTP sms provider
To connect your system to an HTTP SMS service, you need to sign up to the
service on their website, and you need to enter the account details they
provide into Ozeki SMS Gateway. A list of supported SMS service providers can
be found in our On-line SMS service providers page. You will find step by step
instructions for each provider on how to connect to their service.
Telekom Slovenije
Connect to the SMS center (SMSC) of the Telekom Slovenije mobile
operator using Ozeki SMS Gateway. The Telekom Slovenije service provider allows
you the bulk SMS sending from the company's SMS infrastructure.
Ozeki provides the implementation of the Telekom Slovenije API. Get to know how to setup Telekom Slovenije service provider connection.
Clicksend
Learn about how you can establish a Clicksend SMS service provider connection in Ozeki SMS
Gateway. The Clicksend service provider allows you to send and receive text messages.
Ozeki provides the implementation of the Clicksend API. Find out how to send SMS using Clicksend
Infobip
Learn about how you can establish a Infobip SMS service provider connection in Ozeki SMS
Gateway. The Infobip service provider allows you to send and receive text messages.
Ozeki provides the implementation of the Infobip API. Learn more about how to send SMS using Infobip
Nexmo
Learn about how you can establish a Nexmo SMS service provider connection in Ozeki SMS
Gateway. The Nexmo service provider allows you to send and receive text messages.
Ozeki provides the implementation of the Nexmo API. Learn more about how to send SMS using Nexmo
MessageBird
Learn about how you can establish a MessageBird SMS service provider connection in Ozeki SMS
Gateway. The MessageBird service provider allows you to send and receive text messages.
Ozeki provides the implementation of the MessageBird API. Learn more about how to send SMS using MessageBird
Telnyx
Learn about how you can establish a Telnyx SMS service provider connection in Ozeki SMS
Gateway. The Telnyx service provider allows you to send and receive text messages.
Ozeki provides the implementation of the Telnyx API. Learn more about how to send SMS using Telnyx
Twilio
Learn about how you can establish a Twilio SMS service provider connection in Ozeki SMS
Gateway. The Twilio service provider allows you to send and receive text messages.
Ozeki provides the implementation of the Twilio API. Learn more about how to send SMS using Twilio
Amazon SNS
Learn about how you can establish an Amazon SNS SMS service provider connection in Ozeki SMS
Gateway. The Amazon SNS service provider allows you to send and receive text messages.
Ozeki provides the implementation of the Amazon SNS API. Learn more about how to send SMS using Amazon SNS
Clickatell
Learn about how you can establish a Clickatell SMS service provider connection in Ozeki SMS
Gateway. The Clickatell service provider allows you to send and receive text messages.
Ozeki provides the implementation of the Clickatell API. Learn more about how to send SMS using Clickatell
MTN
Learn about how you can establish a MTN SMS service provider connection in Ozeki SMS
Gateway. The MTN service provider allows you to send and receive text messages.
Ozeki provides the implementation of the MTN API. Learn more about how to send SMS using MTN
Sunrise
Learn about how you can establish a Sunrise SMS service provider connection in Ozeki SMS
Gateway. The Sunrise service provider allows you to send and receive text messages.
Ozeki provides the implementation of the Sunrise API. Learn more about how to send SMS using Sunrise
Sinch
Learn about how you can establish a Sinch SMS service provider connection in Ozeki SMS
Gateway. The Sinch service provider allows you to send and receive text messages.
Ozeki provides the implementation of the Sinch API. Learn more about how to send SMS using Sinch
FAQs
Can I set credit limits for each client / each user?
Yes, Ozeki SMS Gateway allows you to set credit limits for each client or user.
This feature helps you manage costs and prevent excessive SMS sending. Here's how:
Version Requirement: This functionality is available in Ozeki SMS Gateway
versions 2.1.0 and later.
Configuration Location: You can configure credit limits within the individual
user/application configuration form.
Enabling Accounting: To activate credit limit functionality, enable
"accounting" for the specific user.
Setting Limits: Once accounting is enabled, you can define daily, weekly,
monthly, and yearly credit limits for each user. This allows for granular
control over SMS sending quotas.
Here are some additional points to consider:
The user configuration form can be accessed through the "Users and
Applications / Add user" menu option.
The specific steps for enabling accounting and setting credit limits might
vary slightly depending on the software version you're using. It's
recommended to consult the Ozeki SMS Gateway documentation for detailed
instructions.
How do you set daily and monthly message throughput limits for SMPP Clients and
other users (SQL user, E-mail users, etc.)?
Ozeki SMS Gateway offers credit limit handling to manage user spending. While
you can't set both daily and monthly limits simultaneously, you have flexibility
in choosing the most suitable timeframe:
Daily Limits: Ideal for controlling frequent, high-volume SMS sending.
Monthly Limits: Perfect for establishing a predictable spending cap over a
longer period.
Additionally, the system supports:
Weekly Limits: Manage costs within a workweek cycle.
Yearly Limits: Set a budget for annual SMS usage.
All-Time Limit: Define a total credit threshold for a user's lifetime.
Remember: To utilize credit limits, activate "accounting" within the individual
user configuration.
This approach provides granular control over SMS sending and helps prevent
exceeding your budget.
If you have 1000 SMPP Clients or other users (SQL users, E-mail users) connected,
how do you control the various message queues? That is, how many messages to send from each queue in turn?
Does your gateway support clustering over multiple servers and how does it occur?
The system uses a round robin approach to ensure fairness when sending messages.
Imagine a circular queue where each user takes a turn. In each turn, the system
sends one message from each user's outbox, regardless of how many messages they
have queued.
This ensures that even if one user has a large number of messages (like 10,000),
another user with just a few messages (like 100) won't be stuck waiting for the
first user's messages to clear. Everyone gets a chance to send a message in each
round, promoting a fair and efficient sharing of sending capacity.
I cannot send more than 6 messages per second, although I have a 10 MPS license.
What can be the problem?
Investigating Message Queue Management:
Outbox Queue Size: Regularly monitor the size of the outbox queue. An ideal
range falls between 100 and 2,000 messages. A consistently low queue (0-100
messages) might indicate insufficient messages available for transmission.
Conversely, a significantly large queue (over 100,000 messages) suggests the
message source is overloading the system.
Automatic Message Deletion: Consider enabling automatic deletion of old
messages within the "Edit/Server Preferences" form. This helps prevent
excessive queue buildup and potential performance degradation.
Evaluating System and Network Resources:
Hardware Resource Utilization: Utilize the Windows Task Manager to identify
any processes consuming excessive CPU resources. Disk defragmentation, screen
savers, antivirus software, or automatic updates can temporarily hinder
performance.
Network Bandwidth Constraints: Verify that your internet connection offers
adequate upload bandwidth (ideally exceeding 256 Kbps). Minimize network
congestion by closing bandwidth-intensive applications like video streaming
or file sharing software.
Considering External Factors:
SMS Provider Limitations: In some instances, the SMS service provider's
system might have inherent limitations in processing speed compared to yours.
Consult your provider regarding optimal window size settings within the "SMPP
service provider configuration form." A smaller window size can restrict sending
speed by waiting for confirmation responses before transmitting additional
messages.
Recommended Actions:
Maintain Optimal Outbox Queue Size: Aim for a steady flow of messages by
keeping the outbox queue size within the recommended range (100-2,000
messages).
Implement Automatic Message Deletion: Configure the software to automatically
remove old messages using the "Edit/Server Preferences" form.
Minimize Incoming Traffic: If feasible, reduce the volume of incoming messages,
such as delivery reports, to streamline the sending process.
Optimize Hardware Performance: Identify and close resource-intensive applications
through the Windows Task Manager.
Upgrade Network Bandwidth (if necessary): Consider upgrading your internet
plan to ensure sufficient upload capacity.
Consult SMS Provider: Discuss optimal window size settings with your SMS
service provider to enhance sending performance.
By systematically addressing these potential causes and implementing the
recommended actions, you can effectively troubleshoot slow message transmission
issues and ensure optimal performance within Ozeki SMS Gateway.
How to send SMS using the Telekom Slovenije SMS service connection
This guide outlines how to connect to the SMS center (SMSC) of the mobile
operator Telecom Slovenije for efficient bulk SMS sending and receiving. You
will learn how to configure the Telecom Slovenije SMSC connection in the
Ozeki SMS Gateway. This will enable corporate SMS sending over the Slovenian GSM network.
All SMS sending and receiving is logged, making it traceable. The Ozeki SMS Gateway
software is suitable for all large company SMS communication needs.
How to send SMS through the Telekom Slovenije SMSC (Quick steps)
To send SMS through the Telekom Slovenije SMSC service provider:
Download and install Ozeki SMS Gateway
Add new connection
Install the Telekom Slovenije connection
Provide the Telekom Slovenije SMS service's username and password
Enable logging on the Advanced tab
Turn on the connection
Start to send new SMS message
How to send SMS through Telekom Slovenije (video tutorial)
In this video, we're going to walk you through the quick steps of setting
up Ozeki SMS Gateway to send SMS messages through Telekom Slovenije's SMSC.
This is a direct connection to the mobile service provider's SMSC over on Internet (IP SMS).
First, we'll download and install Ozeki SMS Gateway, and then we'll dive right
into adding a new connection, specifically for Telekom Slovenije. You'll see
exactly where to input your Telekom Slovenije SMS service username and password.
We'll also show you how to enable logging for easy tracking and troubleshooting.
With those settings in place, we'll turn the connection on and you'll be all set
to start sending SMS messages. So, if you're ready to set your
bulk SMS communication up and connecting to Telekom Slovenije, let's get started!
Open Ozeki SMS Gateway software
Access the Ozeki SMS Gateway configuration interface by clicking the software’s
icon. If you have not yet downloaded the Ozeki SMS gateway software, you can do
so in the Download menu in the top menu.
Figure 1 - Open SMS Gateway
Add new connection
Click on the Add new connection link on the left side of the image (Figure 2).
This will take you to a page listing possible mobile serveice provider connections
for Ozeki SMS gateway, where the Telekom Slovenije SMS service provider
connection is also listed.
Figure 2 - Add new connection
Install Telecom Slovenije SMS connection
The connection of TeleKom Slovenije is at the top of the IP SMS connections list.
Click on the TeleKom Slovenije Client link, which will take you to the SMS
service provider connection settings page (Figure 3).
Figure 3 - Install Telecom Slovenije connection
Provide Username and password
When the SMS service provider contract is signed, the mobile operator provides
the user data required to access the SMS center. This user name and password
must be entered on this tab (Figure 4).
Figure 4 - Provide Username and password
Enable logging
In the next step, enable the Ozeki SMS Gateway logging feature on the Advanced tab(Figure 5).
You can choose from several logging options. It is worth choosing the first 3.
Select the following options: Log communication events,
Log communication at HTTP protocol layer, Log messaging events.
Figure 5 - Enable logging
Enable Telecom Slovenije connection
To enable SMS service connection, find the Connection group on the left (Figure 6).
You have to enable the Connection switch, which is the second option in the group.
Click on it to make it green and can start to send SMS messages to
Telekom Slovenije SMS service provider. The “Events” area will display logs
and information about the connection status and activities. This area shows
real-time updates and logs, such as successful connections, errors, and other
relevant events.
Figure 6 - Enable Telecom Slovenije connection
Can I connect to multiple SMS service providers simultaneously with the Ozeki SMS gateway?
Yes, with the Ozeki SMS Gateway, you can connect to multiple SMS service providers
simultaneously, allowing for increased message throughput, redundancy, and
cost-effectiveness. This is achieved through the gateway's support for multiple
protocols (e.g., SMPP, HTTP,
UCP) and its ability to manage multiple connections
to different providers concurrently eg Vodafone,
Sunrise, MTN.
Is it possible to send automated corporate SMS messages through the Telekom
Slovenije connection?
Yes, it is possible to send automated corporate SMS messages through a
Telekom Slovenije connection using Ozeki SMS gateway software.
By integrating Telekom Slovenije's SMS service with Ozeki SMS Gateway, you can
automate sending corporate SMS messages to your customers, employees, or
stakeholders. This setup enables reliable, high-volume message sending for
various corporate purposes, such as alerts, notifications, marketing campaigns,
or two-factor authentication. Proper setup and agreements with Telekom Slovenije
are required.
You can send mobile messages directly to SMS-enabled devices with Amazon SNS (Amazon Simple Notification Service).
What is Amazon SNS (Amazon Simple Notification Service)
Amazon SNS is an application-to-application (A2A) and application-to-person
(A2P) messaging system. It provides notifications for subscribers (users and
applications).
What kind of notifications can be sent?
User notifications to subscribers, which are sent to mobile applications
(mobile push notifications), mobile phone numbers (SMS/text messages),
e-mail addresses (emails).
As well as notifications sent to
subscribed applications (Amazon SQS queues, AWS Lambda, HTTPS, Amazon Data Firehose).
How to send SMS through the Amazon SNS (Amazon Simple Notification Service) (Quick steps)
To send SMS through the Amazon SNS:
Sign in to the Amazon SNS console.
In the Dashboard menu select Users
Add user
Create group
Create policy on Json tab
Review policy
Specify the name of the policy
Add description to the policy
Choose Create policy button
Refresh the policy list
Filter your new policy and select
Specify the group name
Choose Create group button
Click Create user button
How to send SMS through the Amazon SNS (Amazon Simple Notification Service) (Video Guide)
Amazon SNS supports the delivery of SMS notifications to mobile numbers subscribed to topics.
The following video shows the simple steps of the Amazon SNS
configuration for SMS notification sending.
This page provides information on how to send and receive sms with Clickatell using Ozeki 10 SMS Gateway.
Clickatell is an SMS service provider based in Cape Town, South Africa, so it provides SMS service to organizations in Africa.
The customer service of Clickatell talks in English, so it is not too complicated to subscribe to their service.
If you have installed Ozeki 10 SMS Gateway, it is very easy to configure a connection to the Clickatell SMS service.
Use the following instructions to setup this connection in 3 minutes.
This guide provides the setup instructions.
How do you send sms from Clickatell (quick steps)
To send sms from Clickatell let's start with these plain, simple tutorial steps:
Visit ozeki-sms-gateway.com and Download Ozeki 10 SMS Gateway, then setup the downloaded exe file. Click on the Ozeki 10 icon to open the GUI. To send sms from Clickatell you need to proceed with the configuration in this management console.
In the Ozeki management console start the SMS Gateway app. You can achieve this by navigating to the app in the Ozeki Start menu or by clicking on the desktop icon. The SMS Gateway app is needed to send sms from Clickatell.
To send sms from Clickatell the only thing left is to setup the Clickatell connection by by clicking on the 'Add new connection...' page.
How does Clickatell SMS work?
Clickatell provides sms messaging service through the Internet. They operate a server computer
in a hosting facility that accepts sms from users in the form of HTTP requests.
They setup sms connections to
other SMS aggregators and to GSM networks and they negotiate good SMS prices.
Clickatell makes its income by reselling the text messages at a premium rate.
Clickatell provides a secure HTTP SMS API, that lets you to use to their
text message service using web requests.
When sms are sent to their sms service, a unique web request is created for each message.
Is there any Clickatell alternatives?
If you look around, you will find a lot of alternative SMS services on the
Internet. If you install Ozeki SMS Gateway, you can
Connect to several SMS services and GSM telephone service provider
simultaneously. It is beneficial to use multiple providers, because it gives you
the freedom to switch providers if you find better conditions and it allows you
to reach mobile network that are only accessible directly. The most popular
alternative to using Clickatell is to connect an Android
mobile phone to your SMS Gateway PC and send sms directly to the mobile
network (Figure). This will let you system operate even if Clickatell fails.
How to handle Clickatell service failure?
Since Ozeki can be setup on multiple computers in your premises, and Ozeki
lets you to reroute texts to other SMS aggregators automatically, with the help
of Ozeki SMS Gateway, you can build a reliable, fail-safe SMS service. All you
have to do is setup multiple SMS service provider connections and configure one
of the SMS routing options: to do load balancing,
least cost SMS routing or
backup routing. All of these SMS routing options will ensure that your SMS
messages will be delivered even if a particular SMS service is out of operation.
Click on download to download Ozeki 10 SMS Gateway
Unzip and setup the downloaded installation package
Start the Ozeki dashboard
Open 'Add new connection...' in the 'Connections' panel
Locate Clickatell connection, hit install
Ozeki 10 SMS Gateway will send the sms using this link
Type in the Clickatell account details
Make sure the settings are fine, if they are not correct, you won't be able to send sms messages
To send sms, use the Test tab
Type in the recipient, the text and click send
Read the event logs to see if your texts were sent
Configuration steps in Ozeki 10 SMS gateway
To configure an Clickatell connection follow the instructions on the screenshots below.
Figure 1 - Open the Ozeki Management Console
Figure 2 - Setup the Clickatell connection
Figure 3 - Configure the Clickatell account
Figure 4 - Send SMS from Clickatell
Figure 5 - SMS sent successfully
Protect your phone number list
Your customer phone number list is a very valuable asset.
You must make sure you take good care of it and you protect it.
When you send text messages through Clickatell or any other on-line SMS service provider,
your customer phone numbers, and the message texts will be visible to Clickatell.
It is a good practice to setup connections to multiple SMS service providers and
to distribute your messages among them to make sure no entity has all your data.
It is even a better practice to send messages wirelessly directly to the mobile network using an
Android mobile phone or GSM modem attached to your computer with a phone-to-pc data cable.
Note that this option is only viable if you send less than 10 000 SMS per day.
Ozeki 10 SMS Gateway has a version that can be installed on an Android mobile. It is called
Android sms gateway. It also offers the same APIs (e.g. C# SMS API),
as the desktop version, it allows Office clients to connect, you can create E-mail to SMS configs,
and you may even provide an Android SMPP SMS gateway service
How to save the messages sent through Clickatell into a database
You can configure SQL logging for a Clickatell connection.
This is very useful, because it will help you keep track of all the SMS messages
you have sent or received through the Clickatell connection.
This database log, can not only be used to lookup old message in case of disputes,
but it can also be used to create weekly or monthly reports. These reports will let you know which
user or application in your system sent the messages and what was the pattern of your sms traffic.
Send texts from MSSQL or another database from Clickatell
If you have a Clickatell connection setup, you can easily Send texts from MSSQL or another database server.
You can use Microsoft SQL Server, SQL Express, Access, MySQL, SQLAnywhere, PostgreSQL, SAP HANA, Foxpro, MongoDB, SQLite or any other ODBC/SQL compatible SQL database server.
This functionality is available through two database tables: ozekimessagein and ozekimessageout.
The ozekimessagein table shall be used to store incoming sms and the other, the
ozekimessageout table is used for sending sms.
If you want to send an sms, all you have to do is create an SQL table entry
using an SQL INSERT command in the ozekimessageout table.
Ozeki SMS Gateway will automatically pick up the sms and it will send it to the
gsm network. During the delivery procedure it will update the status field and
timestamp fields in the database table to inform you when the SMS was sent from
your system, when was it received by the mobile user and if an error occurred,
why wasn't it delivered.
Figure 6 - Sms to SQL database server
This solution is great, because no code is needed to match incoming submit
reports, delivery reports and status reports to send messages, because Ozeki 10
does this for you automatically. Everything related to the sms is stored in the
corresponding SQL record. Another benefit is that most business applications are
database driver, so it makes sense to use the database for SMS as well.
How to send sms using C# .Net through Clickatell
Computer driven text messaging solutions work significantly better than human staff.
Because of this fact many businesses choose to use automated text messaging services.
Ozeki's C# SMS API provides an excellent tool to come up with communication systems based on automated algorithms.
This C# api is great because it also allows you to use a gsm modem or an android sms gateway to send and receive sms.
By implementing this single API, you can reach many SMS services with a single code base.
Figure 7 - Send SMS from C# through Clickatell
How to send sms using text files through Clickatell
Every software developer can create and read text files. Text files provide the
simplest interface to send and receive SMS messages. Whether you use SAP or a
custom-built business application, you will likely have the option of exporting data
in the form of csv, excel or plain txt files.
If you have this option, you can send and receive SMS messages using Ozeki 10 SMS Gateway
through Clickatell.
In this case two directories will be created, one for storing SMS messages to be sent, and
another for saving incoming sms messages. Ozeki can be configured to save incoming SMS in the
file format you prefer, and it can pick up text files containing SMS messages to be sent.
Once a text file is read, SMS messages are created, and they are sent to the mobile network
through the Clickatell connection.
Setup email to sms with Clickatell
If you configure Clickatell, you can easily provide an email to sms and sms to email service to your customers.
Any email user that can send an email to an e-mail address can send sms.
The email address format is phonenumber@email.domain.com.
An example e-mail address may look like this: 079591538@domain.
The recipient mobile number can also be put into the subject line.
In both cases the body of the email is going to be sent as the sms to the specified telephone number.
Final thoughts
Now, you can pause and catch your breath.
We hope you didn’t get lost in the explanations.
By following the above directions, you can configure the connection quickly.
Now you can use the sms messaging service provided by Clickatell to send and
receive text messages, and you can see how easy it is to use Ozeki 10 SMS
Gateway to connect to such a service.
The HTTP SMS service of Clickatell is not difficult to setup, and although it
does not provide the same performance as an SMPP sms
service, it is still a good option to use in 2021. The biggest benefit of
Clickatell is that an account can be setup in a few minutes on their website.
With Ozeki 10 SMS gateway you get access to cost control, which is normally not
provided by SMS service providers. You can limit the number of messages leaving
your system, so you don't have to worry about getting overcharged. To achieve
this you can setup SMS credit limits for your
customers, employees and SMS applications. To generate monthly or weekly reports,
you can use SQL logging and reporting. With the Ozeki SQL logging you can
save all your SMS messages into your own SQL database.
This gives you the ability to keep an eye on and control your SMS communication,
and you will be able to trace back any SMS in case a problem occurs.
How to send SMS using the MTN Developer APIs (MADAPI)
This guide explains how you can access the MTN value added APIs through the
MTN developer portal (https://developers.mtn.com/). It shows you how
to get a developer Access token, and how to use the MTN SMS API v2 to
send SMS messages using Ozeki SMS Gateway.
MTN, as a pan-African mobile operator provides SMS services (SMS sending and
receiving) for their business partners and mobile telephone users.
What is MADAPI Protocol?
It is a protocol implementation of MTN's online SMS Service.
What is MADAPI API?
The MTN MAD API is a unified API that includes various independent microservices
(such as Mobile Money API, SMS and USSD API, Chenosis Marketplace API, etc.)
These services are accessed by MTN and partner providers through the MAD API.
MAD-APi service connections are provided by Google Apigee through a unified API
gateway and provisioning portal.
How does the MADAPI API work?
MADAPI is a platform where MTN's SMS Messaging API allows developers to build
SMS messaging into their business applications.
How to register on the Madapi Developer Portal
The following video will guide you through the seamless process of registering
on the Madapi Developer Portal, where you can learn about API development possibilities.
Discover the power of MTN's APIs that can elevate your applications, enhance
communication, and streamline your projects. Follow along as we demonstrate the
simplicity and effectiveness of using the MTN SMS API v2 in combination with the
Ozeki SMS Gateway to send SMS messages seamlessly.
To begin the process, you need to register at the https://developers.mtn.com/
website, by clicking on the "Register" button at the upper right corner of the page.
This registration will enable you to create an app; just follow the straightforward
registration steps. Follow these steps to create your account:
Figure 1 - Select register
By clicking on the "Register" button will bring up a registration page, where it
is required to enter some personal details, like name, e-mail address.
Make sure to use a valid email address as this will be used for communication
and verification purposes. After that, click on the "Next" button. Add your last
name, too. Select "Next" button again.
Figure 2 - Define name and email address
Choose a strong, unique password for your account that combines capital and
lowercase letters, numbers, and special characters for safety purposes. When
you've created your password, confirm it by entering it in again, then click the
"Next" button to move on to the next stage.
Figure 3 - Add password
To proceed, select your country of residence from the provided options, and once
you've made your selection, click on the "Next" button. This will take you to the
next stage of the registration process. Read through the terms and conditions,
privacy policy, and any other relevant agreements provided by MTN. If you agree
to their terms, check the appropriate box to give your consent.
Figure 4 - Select country
After completing the registration form, an email will be sent to the address you
provided. Click on the verification link in that email to confirm your account
and activate it. You need to enter an authenticator code that you will receive
through your Google Authenticator app. If you do not have yet this application,
get it from any digital distribution platform for software called applications,
like Google Play or App Store.
Figure 5 - Verify email address
Download the Google Authenticator on your Android mobile phone from the Google
Play or App Store if you use iOS device.
Figure 6 - Install Google Authenticator
Now, you need to assign a Google Authenticator account, to be able to authenticate
your MTN account. Tap on the "+" or "Add" button within the app to set up a new
account. Enter your details, provided in the MTN's verification email.
You will have two options to add your MTN account: If MTN provides a
QR code, use the Google Authenticator app to scan it. This will automatically
set up the account within the app. Or if there is no QR code provided, you can
manually enter the account information.
Figure 7 - Add account in Google Authenticator
You will need to enter the account name, your MTN account email, and the secret
key or authentication code provided by MTN. Choose a name to identify your MTN
account within the Google Authenticator app. Enter the email address associated
with your MTN account. Paste your secret key, which is a unique code provided by
MTN specifically for enabling two-factor authentication (2FA) with Google Authenticator.
Figure 8 - Account details in Google Authenticator
Once you've added the account to Google Authenticator, the app will start
generating six-digit one-time passwords (OTPs) that change every 30 seconds.
Return to the MTN's verification email, where you should find a field to enter the
verification code generated by the Google Authenticator app.
Enter the current code from the Google Authenticator app into the designated field
on the verification email. Click on "Authenticate" button to complete the
setup process. By clicking on the "Authenticate" button, the MTN's developer portal will show up.
There, you can see a My Profile page, where you can personalize your account and
view the previously set up account details.
Figure 9 - Enable two-factor authentication
How to login using Google Authenticator
In order to log into your account, load the https://developers.mtn.com/
page and enter your email address and password to the certain boxes, then click
on the "Log In" button at the bottom.
Figure 10 - Developer portal login
After that, it is required to enter the 2FA authentication code, provided by the
Google Authenticator app. Enter the given password, then choose the "Authenticate"
button to complete login process.
Figure 11 - Two-factor authentication
How to Create an APP
In this short video, you'll discover how to create an app using the MTN SMS API v2, in
collaboration with the Ozeki SMS Gateway, enabling you to send SMS messages seamlessly.
Follow the step-by-step guide o see the effectiveness and ease of integrating these
tools into your projects.
For the first, click on the "Build app" button at the upper right corner of the
page. This button will start the app creation process and let you start by looking
through the numerous MTN developer platform development options.
Figure 12 - Build app
You need to enter some essential details connected to the Apps. These details are
necessary for setting up and configuring your app within the MTN developer platform.
Choose a unique name for your app. This name will be used to identify your application
within the developer portal. It is optional to write a brief description of your
app's purpose and functionality. After that, click on the "Select countries" button.
Figure 13 - Define app details
After entering the necessary details connected to your app, the next step is to
select the country you are coming from and would like to associate your
app with. This selection helps MTN customize and optimize the services and APIs available
to your app based on the specific region's requirements and regulations.
Figure 14 - Select country
Now, choose the MTN SMS V2 interface option from the list of products. Click on the
"+" button situated in the bottom right corner of the product description. By clicking on it,
you will create this SMS interface with callback support.
Figure 15 - Add SMS V2 interface
To initiate the app creation process, find the "Create app" button, then click on it.
Figure 16 - Create app
If the application has created successfully, you will receive a notification about
creation. Afterward, you will be directed to a summary page that provides an
overview of your approved apps. On the summary page, you will find some details
about the apps. If you have any apps that was not installed successfully, then in
that case, you will see the list of apps under the "Revoked Apps" title.
Figure 17 - Madapi application created
How to add the SMS V2 service to your App
Now, we will explain how to add the SMS V2 service to your App. To add the SMS V2
service to your app, you need to edit the application details in the My apps page,
under the Approved Apps tab.
Figure 18 - Edit application
Make changes in application details. Change the name of your app. Modify the
description of your app to better reflect its purpose and functionality. Add or
modify URLs that users should be redirected. Click on the "Edit" button, to modify
the app. After making the changes, ensure accuracy, then click on "Next" button
to proceed to the next step.
Figure 19 - Modify application details
By completing these steps, click on the tick in the black circle. The SMS V2
service will be successfully added to your app. You can now leverage MTN's SMS
capabilities to enhance communication.
Figure 20 - Add SMS V2 service to your app
How to copy the customer key and Production secret into Ozeki 10
In the upcoming video, we will demonstrate the step-by-step process of copying
the customer key and Production secret into Ozeki 10. This procedure enables the
seamless integration between the two platforms, allowing you to leverage the features
of MTN's APIs and Ozeki 10 to enhance your messaging capabilities and streamline
communication with your users.
To begin, log in to your Ozeki SMS Gateway account. If you don't have an account
yet, you can download the software from the https://ozeki.hu/ website. Once you
have your account ready, proceed to open the Ozeki Gateway on the Ozeki Desktop to
access the gateway's management interface and configure your messaging settings.
Click on the "Add new connections..." link on the Connections panel or choose the
"Connect" icon at the toolbar.
Figure 21 - Add new connection
By clicking on it, a list will appear, containing various client options that can
be installed. Find the "MTN MADAPI client" that allows you to create outgoing SMS
requests using MTN SMS V2 API, then click on the "Install" link.
Figure 22 - Install Madapi client
Installing the MTN MADAPI client, will bring up a page where you have to enter
some details to set up the connection.
Load the MNP'S Developers Portal and copy the consumer key and secret codes.
Figure 23 - Copy key and secret
Paste these codes into the designated fields at the Ozeki SMS Gateway. Once you
have pasted the codes in the appropriate sections, scroll down to the bottom of
the page. To save the changes and confirm the integration, click on the "Ok" button.
Saving the codes with the "Ok" button will ensure that the Ozeki SMS Gateway is
now properly configured to work with MTN's APIs.
Figure 24 - Paste key and secret
How to view that you have received your access token
After saving the details in the Ozeki SMS Gateway control panel, navigate to the
"Events" tab. Here, you will find a slider button on the left side of the panel.
Switch the slider button to the green position. If the setup was successful, you
will receive a notification labelled "Access Token" in the Events panel. This
indicates that the integration between MTN's APIs and Ozeki SMS Gateway is now
active, and your app can access the necessary authentication token to communicate
seamlessly with MTN's services.
Figure 25 - Access token received
How to send a test SMS and how to check the logs
In the upcoming video, we will provide a step-by-step guide of how to send a test
SMS using the integrated MTN SMS service through the Ozeki SMS Gateway. We will
guide you through the process of composing and sending the test message, ensuring
that you can effectively communicate with your intended recipients. Additionally,
we will show you how to check the logs within the Ozeki SMS Gateway to monitor
the status and delivery details of sent SMS messages.
As the first step, log into your Ozeki SMS Gateway account and load the Ozeki Home
page. Select the MNT_MADAPI_client connection. Open the "Test" tab at the MNT_MADAPI_client
details. There, you can create an SMS message. To creation, provide the recipient's
phone number into the certain filed, then enter the text message into the SMS field.
Figure 26 - Create test SMS message
After entering these data, click on the "Send" button.
Figure 27 - Send test message
Upon opening the Event tab in the Ozeki SMS Gateway, you will be able to view
the status of the message that was sent. If the message was sent successfully,
you will receive a notification labelled "Successfully initialized." This notification
confirms that the SMS was delivered to the recipient without any issues.
Figure 28 - Message sent
Summary
The guide provides step-by-step instructions on how to use the MTN Developer APIs
(MADAPI) in connection with the Ozeki SMS Gateway to send SMS messages seamlessly.
By following the guide, developers can access the MTN value added APIs through the
MTN developer portal, obtain a developer Access token and utilize the MTN SMS API
v2 to send SMS messages.
Overall, the combination of MTN Developer APIs and Ozeki SMS Gateway offers
developers a useful and reliable solution for integrating SMS messaging into
their applications, enabling efficient communication and enhancing user experience.
How to setup the Sunrise Switzerland SMS connection
This guide presents the steps you need to take to setup an IP SMS connection
to the Sunrise mobile network operator in Switzerland. Please note, that you
must obtain a username and password from Sunrise in order to use this connection.
You will also have to open a port on your firewall if you want to receive
delivery reports and incoming SMS messages.
How to send SMS through the Sunrise Switzerland (Quick steps)
To send SMS through the Sunrise Switzerland SMS service provider:
Download and install Ozeki SMS Gateway
Add new connection
Install the Sunrise connection
Configure Sunrise username and password
Turn on the connection
Send new message
Open firewall settings
In the Advanced settings create New Rule...
Select the Port type of rule
Specify local ports
Allow the connection
Specify the rule name
How to send sms through the Sunrise Switzerland SMS connection to SMSC
(video tutorial)
In this video tutorial we show you how to configure the Sunrise Switzerland SMS
connection in
Ozeki SMS Gateway and send out a test message. Finally, you can learn about how to
open a port on your firewall in case you want to receive delivery reports and
incoming SMS messages.
We created this sms connection guide with absolute beginners in mind and made
sure that it’s full of actionable advice that you can start implementing right
away.
You need to install software and follow general installation steps.
Figure 2 - Install the SMS Gateway
Firstly, add new service provider connection by clicking on the left-hand sided
Connections panel's "Add new connection" link.
Figure 3 - Add new connection
When you open the "Add new connection" link, the "Add a connection" list will appear
on the right side of the GUI. Look for IP SMS connections install list and select
the SMPP client install item to use the SMS Sunrise protocol.
Figure 4 - Install Sunrise connection
Click on the SMS Sunrise Install link which will bring up to you a configuration
page where you need to enter some necessary pieces of information. Add a unique username
and a password to set up the connection.
Figure 5 - Configure connection
When you are ready with typing information, click on the "Ok" button.
Switch the slider button, that can be found at the left side of the panel, to green,
in order to set up the connection. If it successful you can see the Events details
in order.
Figure 6 - Connection established
Find the "New" icon from the Ozeki toolbar, click on it.
Type the Address of text message then type your message into the certain boxes.
By clicking on the "Ok" button, you will see the message delivery history of your
messages that has been sent.
Figure 7 - Send new message
At your PC's start menu, you have to search for the "Windows Defender Firewall".
Figure 8 - Open firewall settings
Choose the "Advanced Settings" at the left side of the control panel.
Figure 9 - Advanced settings
Choose the "Inbound Rules" option from the control panel, then select the "New
Rule" option that can be found at the upper right side of the page.
Figure 10 - New firewall rule
By clicking on the "New Rule" link, a Rule Wizard window will appear, where you
have to choose the "Port" option that controls connections for a TCP or UDP port.
Figure 11 - Select rule type
Click on the "Next" button, then at the "Specific local ports" enter the
2500-2501 portal code.
Figure 12 - Specify ports
Choose the "Allow the connection" option then click on "Next" button.
Figure 13 - Allow connection
Allow all the given options to apply this rule by clicking on the "Next" button.
Figure 14 - Apply rule
Now, you need to define rule name. Type the "Sunrise" name to the box.
Then click on "Finish" button at the bottom.
Figure 15 - Specify rule name
As a result, you can see now the inbound rule that has been created.
In this guide we will walk you through the most important steps when it comes to
setting up Vodafone SMS service connection within Ozeki SMS Gateway. Using Vodafone's
HTTP SMS interface for sending and receiving messages offers efficiency and
reliability. It also provides cost-effective communication solutions while ensuring
accessibility from anywhere with internet access.
How to set up Vodafone SMS service connection (Quick steps)
Login to your Ozeki SMS Gateway account
Add new connection
Choose the 'Vodafone Hungary client'
Go to the 'General' tab
Enter username, password and API URL
Turn on the connection
Go to 'Events' tab
See that the connection established
Navigate to the 'Test' tab and then go to the 'General'
Enter recipient's phone number
Type in test message
Click on 'Send' to deliver message
Setting up Vodafone SMS service connection (Step by step guide)
To start the process, access your Ozeki SMS Gateway account. If you do not have
an account yet, create one, by downloading the Ozeki SMS Gateway software from the
website. After entering, you have to add a new connection.
Do this by navigating to the 'Add new connection' sign on the left side of the page.
You will see that you have a wide variety of options to choose from when it comes to
adding a new connection. Choose the 'Vodafone Hungary client'. Click on the 'Install'
sign next to it to start the installation (Figure 1). By setting up Vodafone SMS
service connection you can send and receive SMS messages using Vodafone HTTP SMS interface.
Figure 1 - Install Vodafone Hungary client
After successful installation the next step is configuring Vodafone connection
(Figure 2). Go to the 'General' tab where you have to give your username and password
provided by Vodafone. You will also be asked to enter the API URL that is also
provided by Vodafone. After filling out the configuration form you can move along.
Figure 2 - Configure Vodafone connection
The next thing you need to do is establishing connection. Choose out the connection
that you have previously named when you were configuring Vodafone connection.
You will be required to turn on the connection. Do this by switching on the connection.
It will turn green, if you did it correctly. At the 'Events' tab you can view your
connection history. After turning on the connection, you will see a 'Successfully
connected...' sign stating that the connection has been established (Figure 3).
Figure 3 - Connection established
The last step is sending a test message. Navigate to the 'Test' tab and then to
the 'General'. You will be asked to enter the recipient's phone number. Pay attention
to entering it in the correct form. Fill out the SMS box by entering the desired text
you would like to send. Click on 'Send' to deliver the message (Figure 4).
Figure 4 - Send test message
Summary
Choosing the right SMS service connection like Vodafone ensures reliable,
efficient, and cost-effective communication. Setting up Vodafone SMS connection
within Ozeki SMS Gateway Picking Vodafone for SMS means fast, dependable
communication. It will use the Vodafone's HTTP SMS interface for sending and
receiving messages. It works well with other apps, so your texting becomes more and more
efficient.
This guide shows information on how to send texts with Clicksend using Ozeki 10 SMS Gateway.
Clicksend is an SMS service provider company based in London, United Kingdom, so it offers SMS service to companies in United Kingdom.
If you use Ozeki 10 SMS Gateway, it is easy to setup a connection to the Clicksend SMS service.
The following instructions can be used to set this connection up in 6 minutes.
This tutorial provides a sample configuration.
Let's start now!
What is Clicksend?
ClickSend is an SMS provider that lets businesses send, receive, and track SMS text messages worldwide.
You can send transactional or marketing memos to customers or employees.
This product is cloud-based, so it's easy for businesses to integrate it with thousands of apps.
It's also compatible with most network providers out there.
ClickSend lets users send SMS messages via online SMS gateway applications from a user dashboard.
Alternatively, you can also send SMS messages using a designed API.
What is Ozeki SMS Gateway?
Ozeki SMS Gateway is a powerful on-premise SMS gateway software, that can be used to create SMS services.
It has a built in very high performance SMPP server and SMPP client protocol implementation.
The system can delivery up to 1000 SMS messages per second, which makes it an ideal choice for SMS service providers.
Ozeki SMS Gateway also offers UCP SMS protocol, CIMD2 protocol implementations and the best HTTP SMS API.
Ozeki SMS Gateway is also a great choice if you wish to provide SMS notification or SMS content services to customers and developers.
How to send sms from Clicksend?
To send sms from Clicksend let's start with these easy-to-follow tutorial steps
(Figure 1):
Visit ozeki-sms-gateway.com and Download Ozeki 10 SMS Gateway, then install the downloaded installation package. Click on the Ozeki 10 icon to open the graphical user interface. To send sms from Clicksend you can proceed with the setup steps in this dashboard.
The next step is to start the SMS Gateway app. This can be achieved by clicking on the desktop icon or by navigating to the app in the Ozeki Start menu. The SMS Gateway app is needed to send sms from Clicksend.
To send your first text messages from Clicksend the only thing left is to install the Clicksend connection by navigating to the 'Add new connection...' link.
Figure 1 - How to send SMS from Clicksend
How does Clicksend SMS work?
Clicksend is an SMS service provider and their sms messaging service works the same way
as the service of other SMS service providers.
They connect their server
other SMS aggregators and to mobile networks and they negotiate low prices.
Clicksend creates income by offering the sms for more.
Clicksend offers an an HTTP SMS API, that lets you to use to their
text message service using web requests.
Every text is a single web request.
Web requests are HTTP requests or REST api requests.
Click on 'Add new connection...' in the 'Connections' panel
Find Clicksend connection, click install
Ozeki 10 SMS Gateway will send the sms through this connection
Type in the Clicksend account details
Make sure the details are correct, if they are not correct, you won't be able to send texts
To send your first sms, use the Test tab
Enter the recipient, the text and click send
Read the log file to see if your sms was sent
Protect your phone number list
Your customer phone number list is a very valuable asset.
You must make sure you take good care of it and you protect it.
When you send text messages through Clicksend or any other on-line SMS service provider,
your customer phone numbers and the message texts will be visible to Clicksend.
It is a good practice to setup connections to multiple SMS service providers and
to distribute your messages among them to make sure no entity has all your data.
It is even a better practice to send messages wirelessly directly to the mobile network using an
Android mobile phone or GSM modem attached to your computer with a phone-to-pc data cable.
Note that this option is only viable if you send less than 10 000 SMS per day.
Ozeki 10 SMS Gateway has a version that can be installed on an Android mobile.
It is called Android sms gateway.
It also offers the same APIs (e.g. C# SMS API),
as the desktop version, it allows Office clients to connect, you can create E-mail to SMS configs,
and you may even provide an
Android SMPP SMS gateway service
How to save the messages sent through Clicksend into a database (Figure 2)
You can configure SQL logging for a Clicksend connection.
This is very useful, because it will help you keep track of all the SMS messages
you have sent or received through the Clicksend connection.
This database log, can not only be used to lookup old message in case of disputes,
but it can also be used to create weekly or monthly reports. These reports will let you know which
user or application in your system sent the messages and what was the pattern of your sms traffic.
How to send sms messages from a database
If you have a Telnyx connection setup, you can easily send and
receive texts from MSSQL or another database server.
You can use Microsoft SQL Server, SQL Express, MySQL, SQLAnywhere, Informix,
SAP HANA, MariaDB, Foxpro, MongoDB or any OleDB compatible SQL database server.
The procedure is easy: you have to create two database tables:
ozekimessageout and ozekimessagein.
The ozekimessageout table is used for sending sms and the other, the ozekimessagein
table is used to store incoming sms.
To send a text, all you have to do is create an SQL record using an SQL INSERT command
in the ozekimessageout table.
Ozeki 10 SMS Gateway will automatically read the sms and it will deliver it to the recipient.
During the delivery procedure it will update the status field in the database to
let you know when the SMS was sent from your system, when was it received by the
destination mobile and if an error occurred, why wasn't it delivered.
Figure 2 - Save sms into an sql database
This solution is beneficial, because sms messages stored in the database can be easily
linked to users, customers and other business data. Another benefit is that it allows
you to use custom queries and take advantage of SQL triggers and stored procedures.
Send sms using C# .Net through Clicksend (Figure 3)
Computer driven text messaging systems give much better reliability than human staff.
Due to this fact, most companies choose to build automated sms solutions.
Ozeki's C# SMS API provides an excellent tool to create communication
solutions based on automated algorithms.
This C# api is great because inbound SMS messages, delivery events will be presented in the
forms of events, errors are handled properly, and you get an excellent simulator
to test your C#.Net code.
By implementing this single API, you can reach many SMS services or GSM network
operators with a single code base.
Figure 3 - Send SMS from C# through Clicksend
How to send sms using text files through Clicksend
Every software developer can create and read text files. Text files provide the
simplest interface to send and receive SMS messages. Whether you use SAP or a
custom-built business application, you will likely have the option of exporting data
in the form of csv, excel or plain txt files.
If you have this option, you can send and receive SMS messages using Ozeki 10 SMS Gateway
through Clicksend.
In this case two directories will be created, one for storing SMS messages to be sent, and
another for saving incoming sms messages. Ozeki can be configured to save incoming SMS in the
file format you prefer, and it can pick up text files containing SMS messages to be sent.
Once a text file is read, SMS messages are created, and they are sent to the mobile network
through the Clicksend connection.
Email to sms through Clicksend
If you configure Clicksend, you can easily provide an
email to sms and sms to email service to customers and applications.
Any email user that can send an email to a formatted e-mail address can send sms messages.
The email address must be formatted as phonenumber@yourdomain.com.
An e-mail address would look like this: 079206759@domain.
The telephone number can also be put into the subject line.
In either case the email text is going to be sent as the sms to the specified phone number.
Is there any Clicksend alternative?
There are many alternative SMS service providers online.
If you use Ozeki SMS Gateway, you can connect to many
SMS service providers and mobile networks simultaneously. It is good
to use multiple providers, because it allows you create backup routes,
and it lets you take advantage of services specific to local networks.
The most popular alternative to using Clicksend is to
connect an Android mobile phone to your SMS Gateway PC and
send text messages directly to the mobile network (Figure 4). This will let your
system operate even if Clicksend fails.
Figure 4 - How to handle Clicksend service failure.
How to prepare for Clicksend service failure?
To build a reliable text message service you must avoid a single point of failure.
Since Ozeki can be installed on multiple computers in your office, and Ozeki allows
you to reroute texts to other SMS service providers or GSM network operators automatically,
with the help of Ozeki SMS Gateway, you can build a reliable, fail-safe SMS service.
All you have to do is setup multiple SMS service provider connections and
configure one of the SMS routing options:
to do load balancing, least cost SMS routing
or backup routing. All of these SMS routing
options will ensure that your SMS messages will be delivered even if a particular
SMS service is out of operation.
To sum it up
We hope you didn’t get lost in the explanations.
If you have followed the directions closely, you should be able to send
and receive text messages using the text message service provided by
Clicksend without any issues, provided you have setup the connection
properly in Ozeki 10 SMS Gateway.
The HTTP SMS service of Clicksend is not difficult to setup, and although
it does not provide the same performance as an SMPP sms service,
it is still a good option to use in 2021. The biggest benefit of Clicksend is
that an account can be setup in a few minutes on their website.
One of the biggest advantages to setting up Ozeki is that it allows you to
connect to multiple sms service providers simultaneously. This gives you
provider independence, and the ability to go truly international. This
could be a good time to connect to another SMS service provider.
Creating connections to multiple SMS providers greatly increases the operational
reliability of your system. Multiple service provider connections offer
fault tolerance, give you the ability to do least cost routing and give
you a peace of mind, that you can always switch providers in a matter of seconds
in case some unexpected happens.
Add new HTTP REST API client
The first step in implementing this solution, is to add a new HTTP REST API client.
Start by opening Ozeki SMS Gateway.
Click on add new connection inside the menu on the left (Figure 5).
Find HTTP REST client and click Install next to it.
This will forward you to a configuration screen for the client.
Figure 5 - Add new HTTP REST API client
Configure ClickSend URL
Now you need to insert the URL of your SMS Service, Clicksend.
Copy and paste https://rest.clicksend.com/v3/sms/send into the textbox under URL of SMS Service (Figure 6).
Figure 6 - Configure ClickSend URL
Specify POST data
Next you must specify the POST Data (Figure 7).
Do this by switching over to the Advanced tab on the top and opening the Custom POST data menu.
Copy and paste the following piece of code into the textbox below Custom POST data.
Figure 7 - Specify POST data
Authentication information location in ClickSend site
In Figure 8 you can find the location of the authentication information on the ClickSend website.
First open ClickSend dashboard in your browser.
In the left side menu, open Developers, then click on API Credentials.
Here you will find your username and API key.
Figure 8 - Authentication information location in ClickSend site
Provide HTTP Authentication
First, switch back to Ozeki SMS Gateway.
In the Advanced tab, you must also provide HTTP authentication (Figure 9).
Open HTTP Authentication. Here you will be asked to provide your login credentials.
Enter your username into the first textbox, then your password in the second textbox.
Scroll down and click OK to set up the client.
Figure 9 - Provide HTTP Authentication
Send test message
After successfully setting up your client, you are able to send a test message.
Click on the Test tab of your client (Figure 10).
Type in the recipient's phone number into the textbox next to "To:".
Type the message into the textbox below SMS.
Click on the blue Send button to send the test message.
Figure 10 - Send test message
Message sent successfully
If you switch over to the Events tab, you can see that the message has been sent successfully (Figure 11).
Figure 11 - Message sent successfully
Summary
Congratulations on completing this tutorial!
You can now send sms from ClickSend using Ozeki SMS Gateway.
To learn more about Ozeki SMS Gateway and our range of products, check out our various other guides as well.
This page presents information on how to send and receive text messages through Infobip using Ozeki 10 SMS Gateway.
Infobip is an SMS service provider company based in London, so it offers SMS service to customers in United Kingdom.
The customer service of Infobip talks in English, so signing up to their service can be done without much difficulty.
If you use Ozeki SMS Gateway, it is very easy to use the SMS service provided by Infobip.
Follow the instructions below to set this connection up in 10 minutes.
This guide provides an example configuration.
We hope you will find the presented instructions beneficial.
How can you send sms from Infobip?
To send sms from Infobip complete the following simple to use steps:
Install Ozeki SMS Gateway, then navigate to the red Ozeki 10 icon on your
Windows desktop. This will open the Ozeki user interface. To send sms from
Infobip you need to continue with the setup steps on this page.
In the Ozeki desktop launch the SMS Gateway application. This can be
achieved by navigating to the app in the Ozeki Start menu or by clicking on the
desktop icon. The SMS Gateway app is used to send sms from Infobip.
To send your first sms from Infobip all you have to do is to setup the
Infobip connection by clicking on the 'Add new connection...' link.
Figure 1 - How to send SMS from Infobip
How does Infobip SMS work?
Infobip provides text message service over the Internet. They operate a server computer
in a hosting facility that receives sms from clients in the form of HTTPS requests.
They use SMS protocols, such as
SMPP client connections,
UCP/EMI protocol connections and
HTTP SMS or
REST SMS connections to
connect their server to other SMS aggregators and to GSM networks.
They make income by selling the text messages at a premium rate.
can be accessed through an HTTP SMS API. Ozeki SMS gateway sends
the text messages through this HTTP API.
When texts are sent to their sms service, a unique web request is created for each message.
Detailed instructions to send sms from Infobip
To send sms from Infobip:
Start the Ozeki management console
Find the panel named 'Connections'
Open 'Add new connection...' in the 'Connections' panel
Scroll down to Infobip connection
To send sms from Infobip you should install this connection
Provide the Infobip account details
Make sure the settings are fine, they must be right to send text messages
To send your first texts, use the Test tab
Type in the recipient, the text and click send
Check the events tab to see if your sms was sent
Setup email to sms with Infobip
If you setup Infobip, you can easily provide an email to sms and sms to email functionality to your customers.
Any email user that can send an email to an e-mail address can send sms.
The email address format is phonenumber@hostname.
An e-mail address may look like this: 079765520@hostname.
It is also possible to put the mobile number into the email subject line.
In both cases the body of the email will be forwarded as the text message to the specified mobile number.
How to send sms from a database using Infobip
With Ozeki 10 it is quite easy to send and receive sms
from an SQL database.
You can use Microsoft SQL Server, Access, Oracle, SQLAnywhere, SAP HANA, Foxpro,
MongoDB, SQLite or any ODBC compatible database server.
This functionality is available through two database
tables: ozekimessagein and ozekimessageout.
Figure 2 - Use a database to store your SMS
The ozekimessagein table shall be used to store incoming sms and the other, the
ozekimessageout table is used for sending sms.
If you want to send a text message, all you have to do is create an SQL record
using an SQL INSERT command in the ozekimessageout table.
Ozeki 10 SMS Gateway will automatically SELECT the sms and it will deliver it to
the mobile network. During the delivery procedure it will update the status field and
timestamp fields in the database to inform you when the SMS was sent from your system,
when was it received by the destination handset and if an error occurred, why
wasn't it delivered.
This solution is great, because no code is needed to match incoming submit reports,
delivery reports and status reports to send messages, because Ozeki does this for
you automatically. Everything related to the sms is stored in the corresponding
SQL record. Another benefit is that it is very convenient because all of
the messages are stored in a system that was designed for easy lookups, queries and reports.
Send texts using the C# .Net API through Infobip
Automatic sms services give better reliability than humans.
Because of this fact many companies prefer to create automated text messaging systems.
Ozeki's C# SMS API provides an excellent tool to achieve this goal.
This C# api is great because it also allows you to use an
android sms gateway to send and receive sms
By implementing this single application programming interface, you can reach many
SMS service providers with a single code base.
Figure 3 - Send SMS from C# through Infobip
Can I find any Infobip alternatives?
There are quite a few alternative SMS service providers on the net. If you use
Ozeki SMS Gateway, you can connect to several SMS
carriers and mobile networks at the same time. It is good to use multiple
providers, because it gives you the freedom to switch providers if you find better
conditions and it allows you to reach mobile network that are only accessible directly.
The most popular alternative to using Infobip is to
connect an Android mobile phone to your SMS Gateway PC and
send sms directly to the mobile network (Figure 1).
Conclusion
Now, you can pause and catch your breath.
We did our very best to make it simple and to walk you through all the details as painlessly as possible.
To sum it up we can state, that to setup a connection to Infobip is pretty easy.
The HTTP SMS service of Infobip is not difficult to setup, and although it does not provide the same performance as an SMPP sms service, it is still a good option to use in 2021. The biggest benefit of Infobip is that an account can be setup in a few minutes on their website.
One of the biggest advantages to installing Ozeki is that it allows you to
connect to multiple sms service providers simultaneously. This gives you provider
independence, and the ability to go truly international. This could be a good
time to connect to another SMS service provider.
Creating connections to multiple SMS providers greatly increases the operational
reliability of your system. Multiple service provider connections offer fault
tolerance, give you the ability to do least cost routing and give you a peace
of mind, that you can always switch providers in a matter of seconds in case
some unexpected happens.
How to send your first SMS message form Infobip using Ozeki SMS Gateway
Figure 4 - Add new HTTP REST API client
Figure 5 - Configure our personal Infobip URL
Figure 6 - Specify DATA fields
Figure 7 - Provide API key for Infobip authentication
Figure 8 - API key location on the Infobip website
In order to use the MessageBird service you need to create an account. In this section we guide you how to do it.
On the main page please select the 'Sign up' button.
Figure 1 - Clicking 'Sign up'
Then provide the login details and click 'Sign up with email' button.
Figure 2 - Provide account details
Check your email and activate your account.
Figure 3 - Successful registration
After the login select the "Dashboard solutions" interface.
Figure 4 - Select Dashboard solutions
And select SMS product.
Figure 5 - Choose SMS
Send verification code to your phone number.
Figure 6 - Send verification code
After the verification, you're all set up.
Figure 7 - Successful Log in
How to setup Ozeki 10 and MessageBird for outbound SMS messages
This chapter provides you detailed information on how to configure MessageBird connection for SMS sending in the Ozeki 10 SMS Gateway software.
At first, please Log in to Ozeki 10 with your username and password.
Figure 8 - Login to Ozeki 10
Click on 'Add new connection' on the left.
Figure 9 - Add new connection
Select the 'MessageBird' Connection and click on install next to it.
Figure 10 - Install MessageBird
Provide your API key and telephone number on the Install connection page.
Figure 11 - Provide API key
You can find your API key in the MessageBird Dashboard.
Figure 12 - MessageBird API key
After it you can send a test message.
Figure 13 - Send test message
If everything fine the message successfully sent.
Figure 14 - Message successfully sent
How to setup Ozeki 10 and MessageBird for incoming SMS and delivery reports
Before you can receive incoming delivery reports and inbound SMS, you need to forward ports in order to route the external traffic to your network.
1. Open a Web browser and type your Default Gateway number into the address bar then press Enter.
2. Enter your username and password to access the interface of your router. The default username and password should be listed in the documentation of your router or on a sticker on the side of your router. If the default username and password have been changed and you do not remember them, you will need to reset your router.
3. To forward ports on your router, look for a tab or menu named 'Port Forwarding/Port Triggering' or something similar.
4. No matter what type of router or interface you have, you will need to enter
the same basic information. Enter the port you want to open under External
(Port 1) and Internal (Port 2) or enter a range of ports to open under Start
and End.
In this case Ozeki 10 uses port 9505 by default so you may also provide that
in the 'Internal' section.
5. Select the Protocol (TCP, UDP, or both).
6. Enter the Private IP address of your PC where your Ozeki 10 installed.
7. Be sure you saved the changes.
Figure 15 - Port Forwarding
After having the changes saved, please specify the callback URL on the Advanced tab's Receive section.
Figure 16 - Receive message
In order to receive messages from MessageBird you need to change the webserver protocol to HTTP.
Select Edit and Preferences.
Figure 17 - Preferences
Under the Webserver configuration choose http protocol and click on the OK button.
Figure 18 - Webserver config
To apply the changes please restart the Ozeki 10 service
Right-click on your Start button and select Run.
Figure 19 - Run
Type services.msc in the Run box.
Figure 20 - services.msc
To restart the Ozeki 10 service, select it in the service list and click Restart service.
Figure 21 - Restart Ozeki 10
After the service restart you are able to receive messages form the MessageBird. Now we will demonstrate how you can buy MessageBird number and configure MessageBird to receive SMS messages.
Select the Numbers menu and click on the Buy a number button.
Figure 22 - Buy a number
In the pop-up menu choose your country, select the SMS capability and select
a number from the list.
Figure 23 - Select a number
After the purchase you can see your number int he All Numbers list.
Figure 24 - Number purchased
Now select the Flow Builder and click on the Create new Flow.
Figure 25 - Create new Flow
Choose Create Custom Flow
Figure 26 - Custom Flow
In the Set up new Flow menu specify the Flow name and the SMS trigger.
Figure 27 - Setup new flow
Then select your phone number and drag the HTTP Request under the SMS.
Figure 28 - Add HTTP Request
In the HTTP Request select the POST Method and paste the URL from the Ozeki 10. Finally click on the Save and Publish.
Figure 29 - Set up HTTP Request
You can find the URL on the Advanced tab's Receive section.
Figure 30 - Callback URL
After the Publish you can see the new Flow in the Flow builder.
Figure 31 - Flow created
Send a Test Message to this number and you will see the message received in Ozeki 10.
Figure 32 - Test message received
Send texts using the C# SMS API through MessageBird
Automatic sms services run significantly better than human personal.
Because of this fact most organizations choose to build automated sms solutions.
Ozeki's C# SMS API offers an outstanding tool to achieve this goal.
This C# api is great because it can also send texts through high performance sms protocols,
such as SMPP,UCP or
CIMD2. These protocols are used by mobile network operators
to exchange sms between each other.
By implementing this single API, you can reach many SMS services or GSM telephone
networks with a single code base.
How to send text messages from an SQL database server through MessageBird
If you wish to Send sms from a database server, you
can use the database connection offered by your SMS Gateway.
To send and receive sms, Microsoft SQL Server, SQL Express, Access, MySQL,
PostgreSQL, MongoDB or any other ODBC/SQL compliant SQL database server can be used.
The procedure is easy: you need to create two database tables:
ozekimessagein and ozekimessageout.
The ozekimessageout table is going to be used for sending sms and the other, the
ozekimessagein table shall be used to store incoming sms.
To send a text, all you have to do is use an SQL INSERT command to create an SQL
entry in the ozekimessageout table.
Ozeki 10 will automatically SELECT the sms and it will deliver it to the
recipient. During the delivery procedure it will update the status field and
timestamp fields in the database to inform you when the SMS was sent from your
system, when was it received by the mobile user and if an error occurred, why
wasn't it delivered.
Figure 33 - Store sms in a database
This solution is useful, because it allows you to use custom queries and take advantage of SQL triggers and stored procedures. Another benefit is that most business applications are database driver, so it makes sense to use the database for SMS as well.
Figure 34 - Send SMS from C# through MessageBird
Send email to sms from MessageBird
If you setup MessageBird, you can provide an email to sms and sms to email service to office users.
Any email client that can send an email to a specially formatted e-mail address will be able to send sms.
The email address format is phonenumber@hostname.
An e-mail address could look like this: 079763000@email.domain.com.
It is also possible to put the mobile number into the email subject.
In both cases the email body will be forwarded as the sms to the specified phone number.
The Nexmo SMS service provider allows you to send and receive text and binary
SMS messages. You may purchase phone numbers for different
countries. Their API is HTTP/HTTPS based. For incoming delivery reports and
incoming messages, you will need to open a port in your firewall.
Ozeki provides the implementation of their API.
How to create a Nexmo account
To use the Nexmo service first of all you need to create a Nexmo account. In the below section we guide you how to do it.
On the main page of Nexmo please click on the 'Sign up' button (Figure 1).
Figure 1 - Clicking 'Sign up'
Then you need to provide your account details (Figure 2).
Figure 2 - Providing account details
If you are finished, then click on 'Sign Up' and wait until Nexmo sends
the verification code to your phone (Figure 3).
Figure 3 - Phone number verification
Now check your mailbox and verify your E-mail address (Figure 4).
Figure 4 - E-mail verification
Finally, Login to your new Nexmo account (Figure 5).
Figure 5 - Logging in
If everything is fine you will see the 'Getting started' page (Figure 6).
Figure 6 - Getting started page
How to setup Ozeki 10 and Nexmo for outbound SMS messages
This chapter provides you detailed information on how to install and configure Nexmo Connection for SMS sending in the Ozeki 10 SMS Gateway software.
At first, please Log in to Ozeki 10 with your username and password (Figure 7).
Figure 7 - Logging in to Ozeki 10
Then open the 'SMS Gateway' App (Figure 8).
Figure 8 - Opening the SMS Gateway App
Click on 'Add new connection' on the left (Figure 9).
Figure 9 - Creating a new connection
Select the 'Nexmo Connection' from the list and click on install next to
it (Figure 10).
Figure 10 - Installing the Nexmo connection
Provide your Nexmo API credentials and specify telephone number on the Install
connection page (Figure 11).
Figure 11 - Providing Nexmo credentials
Now it is time to send a test message (see Figure 12).
Figure 12 - Sending a test message
How to setup Ozeki 10 and Nexmo for incoming delivery reports
Before you can receive incoming delivery reports and inbound SMS, you need to
forward ports in order to route the external traffic to your network
(Figure 13).
1. Open a Web browser and type your Default Gateway number into the address bar then press Enter.
2. Enter your username and password to access the interface of your router. The default username and password should be listed in the documentation of your router or on a sticker on the side of your router. If the default username and password have been changed and you do not remember them, you will need to reset your router.
3. To forward ports on your router, look for a tab or menu named 'Port Forwarding/Port Triggering' or something similar.
4. No matter what type of router or interface you have, you will need to enter the same basic information. Enter the port you want to open under External (Port 1) and Internal (Port 2), or enter a range of ports to open under Start and End.
In this case Ozeki 10 uses port 9505 by default so you may also provide that in the 'Internal' section.
5. Select the Protocol (TCP, UDP, or both).
6. Enter the Private IP address of your PC where your Ozeki 10 installed.
7. Be sure you saved the changes.
Figure 13 - Port Forwarding
After having the changes saved, please copy the callback URL of the Nexmo
connection which you will find on the left (Figure 14).
Figure 14 - Copying the callback URL
Now we will enter the above in the Nexmo settings (Figure 15).
Figure 15 - Nexmo Settings
Enter your Public IP and the port you forwarded to the Ozeki 10 PC then save
them (Figure 16).
Figure 16 - Nexmo Settings
We are ready to send a Test Message as seen in Figure 17.
Figure 17 - Sending a test SMS
If you have forwarded the port properly you will see the delivery report
received (Figure 18).
Figure 18 - Delivery report received
How to buy a Nexmo SMS number
In the below section we will demonstrate how to buy Nexmo number to receive SMS messages.
Please navigate to the 'Buy numbers' menu, select a number and click on
the buy button next to it (Figure 19).
Figure 19 - Selecting a number
After having the number selected, you need to confirm the purchase
(Figure 20).
Figure 20 - Confirming the purchase
In the 'Your numbers' menu you can see your own Nexmo phone numbers
(Figure 21).
Figure 21 - Viewing your numbers
How to setup Ozeki 10 and Nexmo for incoming SMS messages
After you have purchased a Nexmo number you can set it up to forward the messages to the Ozeki 10 machine.
In the 'Your Numbers' menu click 'Manage' to edit the number you would
like to receive SMS messages to (Figure 22).
Figure 22 - Editing your number
Copy the callback URL from the Nexmo connection (Figure 23).
Figure 23 - Copying the callback URL
Enter your Public IP and the port you forwarded to the Ozeki 10 PC then click
'Update' (Figure 24).
Figure 24 - Providing webhook URL
Send a Test Message to this number and you will see the message received in
Ozeki 10 (Figure 25).
The ozekimessagein table shall be used to store incoming sms and the other, the ozekimessageout table shall be used for sending sms.
If you want to send an sms, all you have to do is use an SQL INSERT command to create an SQL record in the ozekimessageout table.
Ozeki 10 SMS Gateway will automatically SELECT the text message and it will send it to the recipient.
During the delivery procedure it will update the status field and timestamp fields in the database table to
inform you when the SMS was sent from your system, when was it received by the destination mobile phone and
if an error occurred, why wasn't it delivered. (Figure 26)
Figure 26 - Save your SMS messages in an SQL database
This solution is useful, because most business applications are database driver, so it makes sense to use the database for SMS as well. Another benefit is that it is very convenient because all of the messages are stored in a system that was designed for easy lookups, queries and reports.
How to send sms from the C# API through Nexmo
Automated sms solutions are significantly better than humans.
Because of this fact most companies choose to use automated text messaging systems.
Ozeki's C# SMS API offers an outstanding tool to achieve this goal.
This C# api is great because it can also send sms through high performance sms protocols, such as SMPP,UCP or CIMD2. These protocols are used by GSM service providers to exchange sms between each other.
By implementing this single API, you can reach many SMS carriers or mobile phone
networks with a single code base. (Figure 27)
Figure 27 - Send SMS from C#
Setup email to sms using Nexmo
If you setup Nexmo, you can easily provide an email to sms and sms to email service to your customers and applications.
Any email user that can send an email to a specially formatted e-mail address will be able to send sms.
The email address must be formatted as phonenumber@hostname.
An e-mail address would look like this: 079240311@hostname.
The recipient telephone number can also be put into the subject line.
In either case the email body will be sent as the sms to the specified mobile number.
This guide shows information on how to send and receive sms messages with Sinch
using Ozeki 10 SMS Gateway.
Sinch is an SMS service provider company based in Stockholm, Sweden, so it is
primarily providing SMS service to customers in Sweeden and the EU.
The customer service of Sinch talks in Swedish and English, so signing up to
their service is quite easy.
If you use Ozeki 10 SMS Gateway, it is easy to setup a connection to the Sinch
SMS service.
The following instructions can be used to set this connection up in 8 minutes.
This article shows you the installation steps.
We hope you will find the presented information beneficial.
Figure 1 - How to send sms from sinch
What is the best way to send sms from Sinch (quick steps)
To send sms from Sinch get started with these straightforward directions:
Setup Ozeki 10 SMS Gateway, then navigate to the red Ozeki 10 icon on your
Windows desktop. This will open the Ozeki GUI. To send sms from Sinch you need
to proceed with the configuration in this management console.
In the Ozeki desktop start the SMS Gateway app. This can be done
by clicking on the desktop icon or by navigating to the app in the Ozeki Start
menu. The SMS Gateway app is used to send sms from Sinch.
To send sms from Sinch all you have to do is to setup the Sinch connection
by opening the 'Add new connection...' link.
How does Sinch SMS work?
Sinch is an SMS service provider and their sms service works the similar way
as the service of other SMS service providers.
They use SMS protocols, such as
SMPP client connections,
UCP/EMI protocol connections and
HTTP SMS or
REST SMS connections to
connect their server computer to other SMS service providers and to mobile telephone network operators.
Sinch creates income by selling the sms at a premium.
Sinch provides an an HTTP API, that lets you to use to their
text message service through web requests.
Every text is a single web request.
Web requests are HTTP requests or REST api requests.
Detailed instructions to send sms from Sinch
To send sms from Sinch:
Start the Ozeki management console
Locate the panel named 'Connections' on the left
Navigate to 'Add new connection...' in the 'Connections' panel
Find Sinch connection and click install
Ozeki 10 SMS Gateway will send the text messages with this connection
Provide the configuration details on the Sinch config form
Verify the settings, they must be right to be able to send sms messages
To send your sms, use the Test tab
Type in the recipient, the text and click send
Open the events tab to see if your text messages were successfully sent
Configuration steps in Ozeki 10 SMS gateway
To configure an Sinch connection follow the instructions on the screenshots below.
Figure 2 - Open the Ozeki Management Console
Figure 3 - Setup the Sinch connection
Figure 4 - Configure the Sinch account
Figure 5 - Send SMS from Sinch
Figure 6 - SMS sent successfully
Protect your phone number list
Your customer phone number list is a very valuable asset.
You must make sure you take good care of it and protect it.
When you send text messages through Sinch or any other on-line SMS service provider,
your customer phone numbers and the message texts will be visible to Sinch.
It is a good practice to setup connections to multiple SMS service providers and
to distribute your messages among them to make sure no entity has all your data.
It is even a better practice to send messages wirelessly directly to the mobile network using an
Android mobile phone or GSM modem attached to your computer with a phone-to-pc data cable.
Note that this option is only viable if you send less than 10 000 SMS per day.
Ozeki 10 SMS Gateway has a version that can be installed on an Android mobile. It is called
Android sms gateway. It also offers the same APIs (e.g. C# SMS API),
as the desktop version, it allows Office clients to connect, you can create E-mail to SMS configs,
and you may even provide an Android SMPP SMS gateway service
How to save the messages sent through Sinch into a database
You can configure SQL logging for a Sinch connection.
This is very useful, because it will help you keep track of all the SMS messages
you have sent or received through the Sinch connection.
This database log, can not only be used to lookup old message in case of disputes,
but it can also be used to create weekly or monthly reports. These reports will let you know which
user or application in your system sent the messages and what was the pattern of your sms traffic.
How to send sms from a database using Sinch
If you have a Sinch connection setup, you can easily Send
and receive text messages from an SQL database server.
To send and receive texts, Microsoft SQL Server, MySQL, SQLAnywhere, SAP HANA,
MariaDB, Foxpro, SQLite or any other ODBC/SQL compatible database server can be
used.
This functionality is available through two database tables: ozekimessageout
and ozekimessagein.
The ozekimessageout table shall be used for sending sms and the other, the
ozekimessagein table is used to store incoming sms.
To send a text message, all that needs to be done is use an SQL INSERT command
to create an SQL entry in the ozekimessageout table.
Ozeki will automatically pick up the sms and it will deliver it to the gsm
network. During the delivery procedure it will update the status field in the
database to inform you when the SMS was sent from your system, when was it
received by the recipient and if an error occurred, why wasn't it delivered.
Figure 7 - Sms to database
This solution is beneficial, because no code is needed to match incoming submit
reports, delivery reports and status reports to send messages, because Ozeki
SMS Gateway does this for you automatically. Everything related to the sms is
stored in the corresponding SQL record. Another benefit is that it allows you to
use custom queries and take advantage of SQL triggers and stored procedures.
Send texts from C# through Sinch
Automatic text messaging systems perform significantly better than humans.
Due to this fact many companies prefer to build automated sms systems.
Ozeki's C# SMS API provides an outstanding tool to create communication systems based on automated algorithms.
This C# api is great because it can also send sms messages through high performance sms protocols, such as SMPP,UCP or CIMD2. These protocols are used by GSM telephone networks to exchange text messages between each other.
By implementing this single API, you can reach many SMS carriers with a single code base.
Figure 8 - Send SMS from C# through Sinch
How to send sms using text files through Sinch
Every software developer can create and read text files. Text files provide the
simplest interface to send and receive SMS messages. Whether you use SAP or a
custom-built business application, you will likely have the option of exporting data
in the form of csv, excel or plain txt files.
If you have this option, you can send and receive SMS messages using Ozeki 10 SMS Gateway
through Sinch.
In this case two directories will be created, one for storing SMS messages to be sent, and
another for saving incoming sms messages. Ozeki can be configured to save incoming SMS in the
file format you prefer, and it can pick up text files containing SMS messages to be sent.
Once a text file is read, SMS messages are created, and they are sent to the mobile network
through the Sinch connection.
How to setup email to sms from Sinch
If you configure Sinch, you can provide an email to sms and sms to email service to customers and applications.
Email users who can send an email to a formatted e-mail address can send sms.
The format of the email address is phonenumber@hostname.
An example e-mail address would look like this: 079797004@email.domain.com.
You can also put the mobile number into the email subject.
In both cases the email body is going to be forwarded as the text message to the specified phone number.
Sinch alternatives?
It is not too difficult to find a number of alternative SMS aggregators on the
Internet. If you setup Ozeki SMS Gateway, you can connect
to several SMS service providers and mobile networks simultaneously. It is
beneficial to use multiple providers, because it allows you to comply with
regulations effecting local networks and it allows you create backup routes. The
most popular alternative to using Sinch is to connect an Android
mobile phone to your SMS Gateway PC and send sms directly to the mobile
network (Figure 9). This will let your system work even if Sinch fails.
What to do in case the Sinch service fails?
Since Ozeki can be installed on multiple computers in your site or
in a virtualized system, and Ozeki makes it possible for you to reroute text
messages to other SMS carriers automatically, with the help of Ozeki SMS Gateway,
you can build a reliable, fail-safe SMS service. All you have to do is setup
multiple SMS service provider connections and configure one of the
SMS routing options: to do load balancing,
least cost SMS routing or backup routing.
All of these SMS routing options will ensure that your SMS messages will be delivered
even if a particular SMS service is out of operation.
Figure 9 - What to do if Sinch fails
Conclusion
Now, you can pause and catch your breath.
We hope you didn’t get lost in the explanations.
We did our very best to make it simple and to walk you through all the details
as painlessly as possible.
If you have followed the instructions closely, you should be able to send and
receive text messages using the sms messaging service of Sinch, provided you
have configured the connection properly in Ozeki 10 SMS Gateway.
The HTTP SMS service of Sinch is not difficult to set up, and although it does
not provide the same performance as an SMPP sms service,
it is still a good option to use in 2021. The biggest benefit of Sinch is that
an account can be setup in a matter of minutes on their website.
With Ozeki 10 SMS gateway you get access to cost control, which is normally not
provided by SMS service providers. You can limit the number of messages leaving
your system, so you don't have to worry about getting overcharged. To achieve
this you can setup SMS credit limits for your
customers, employees and SMS applications. To generate monthly or weekly reports,
you can use SQL logging and reporting. With the Ozeki SQL logging you can
save all your SMS messages into your own SQL database.
This gives you the ability to keep an eye on and control your SMS communication,
and you will be able to trace back any SMS in case a problem occurs.
This document shows information on how to send sms through Telnyx using Ozeki 10 SMS Gateway.
Telnyx is an SMS service provider based in Chicago, U.S.A., so it is primarily
providing SMS service to companies in United States of America.
You can talk with the customer service of Telnyx in English, so subscribing to
their service can be done without issues.
If you use Ozeki 10 SMS Gateway, it is very easy to create a connection to the Telnyx SMS service.
Follow the instructions below to setup this connection in 10 minutes.
This article shows the installation steps with some screenshots.
We hope you will find this example easy to understand.
Let's begin now!
Figure 1 - How to send SMS from Telnyx
What is the best way to send sms from Telnyx?
To send sms from Telnyx start with the following simple to use tutorial steps:
Visit ozeki-sms-gateway.com and
click on download to download Ozeki 10 SMS Gateway,
then install the downloaded exe file. Click on the Ozeki 10 icon to open the
GUI. To send sms from Telnyx you can proceed with the setup steps in this
management console.
In the Ozeki management console start the SMS Gateway app. This can
be achieved by clicking on the desktop icon or by navigating to the app in the
Ozeki Start menu. The SMS Gateway app is used to send sms from Telnyx.
To send your first texts from Telnyx the only thing left is to install the
Telnyx connection by navigating to the 'Add new connection...' link.
How does Telnyx SMS work?
Telnyx is an SMS service provider and their sms messaging service works the same way
as the service of other SMS service providers.
They use SMS protocols, such as
SMPP client connections,
UCP/EMI protocol connections and
HTTP SMS or
REST SMS connections to
connect their server computer to other SMS aggregators and to GSM telephone service provider.
Telnyx makes its money by reselling the sms messages at a premium.
Telnyx provides a secure HTTP SMS API, that lets you use to their
sms messaging service using HTTP API requests.
Each sms is a single web request.
Web requests are HTTP requests or REST api requests.
Detailed instructions to send sms from Telnyx
To send sms from Telnyx:
Launch the Ozeki management console
Find the panel on the left-hand side titled 'Connections'
Click on 'Add new connection...' in the 'Connections' panel
Find the Telnyx connection
To send sms from Telnyx you have to install this connection
Type in the Telnyx account details
To send sms messages, use the Test tab
Enter the recipient, the text and click send
Read the logs to see if your sms was successfully sent to Telnyx
Configuration steps in Ozeki 10 SMS gateway (Step-by-step configuration)
The first step within the configuration steps is opening the Ozeki Management
Console. Then, you need to install a connection to be able to communicate. Do this
by clicking on the 'Add new connection sign' shown by the red arrow in the picture
below (Figure 2).
Figure 2 - Open the Ozeki Management Console
You will see that you have plenty of connections to choose from. To setup the
Telnyx connection, you need to click on the 'Install' link next to the Telnyx
client sign. Setting up the Telnyx connection will allow you to send SMS messages
using the Telnyx v2 API (Figure 3).
Figure 3 - Setup the Telnyx connection
To continue the installation process, you need configure the Telnyx account. Open
the 'General' tab where you have to provide the API key of your Telnyx account to
be able to start sending messages (Figure 4).
Figure 4 - Configure the Telnyx account
Open the 'test' tab to send a test SMS text using your recently setup Telnyx connection.
Enter your desired SMS into the box below and then click on the 'Send' sign (Figure
5).
Figure 5 - Send SMS from Telnyx
You can send an SMS text from C# through the Telnyx connection.
Build a single API to work with different SMS services. This means you can send
and receive messages across multiple platforms using one interface (Figure 6).
Figure 6 - Send SMS from C# through Telnyx
Use a database to send sms from Telnyx
If you have a Telnyx connection setup, you can easily
send and receive texts from MSSQL or another database.
To send and receive sms, Microsoft SQL Server, SQL Express, Access, Oracle,
MySQL, MongoDB or any other ODBC/OleDB compliant database can be used.
This functionality is available through two database tables:
ozekimessagein and ozekimessageout.
The ozekimessageout table will be used for sending sms and the other, the
ozekimessagein table is going to be used to store incoming sms.
If you want to send an sms, all that needs to be done is use an SQL INSERT
command to create an SQL record in the ozekimessageout table.
Ozeki will automatically pick up the sms and it will send it to the recipient.
During the delivery procedure it will update the status field in the database
table to inform you when the SMS was sent from your system, when was it received
by the recipient and if an error occurred, why wasn't it delivered.
(Figure 7)
Figure 7 - SMS to SQL database
This solution is great, because sms messages stored in the database can be easily linked to users, customers and other business data. Another benefit is that most business applications are database driver, so it makes sense to use the database for SMS as well.
Send sms using C# .Net through Telnyx
Automated sms solutions perform much better than human employees.
Because of this fact most companies choose to build automated text messaging services.
Ozeki's C# SMS API provides an outstanding tool to
achieve this goal.
This C# api is great because it not only works with on-line SMS aggregators and
mobile service providers; it works with the android sms
gateway to allow you to send texts wirelessly.
By implementing this single API, you can reach many SMS carriers with a single
code base. (Figure 8)
Figure 8 - Send SMS from C# through Telnyx
Email to sms using Telnyx
If you configure Telnyx, you can easily provide an email to sms
and sms to email functionality to your customers.
Any email client that can send an email to an sms e-mail address will be able to send sms.
The format of the email address is telnum@hostname.
An example e-mail address would look like this: 079677035@domain.
It is also possible to put the recipient mobile number into the subject line.
In either case the email text will be sent as the text message to the specified phone number.
Are there any Telnyx competitors?
You can easily find several alternative SMS services on the Internet.
If you setup Ozeki SMS Gateway, you can connect to several
SMS services and mobile telephone network operators at the same time. It is good to
use multiple providers, because it allows you to reach mobile network that are
only accessible directly and it allows you to comply with regulations effecting
local networks. The most popular alternative to using
Telnyx is to connect an Android mobile phone to your SMS Gateway PC
and send sms directly to the mobile network (Figure 9). This lets your system work even
if Telnyx fails.
Figure 9 - How to handle Telnyx service failure
What to do in case the Telnyx service fails?
Reliable IT systems avoid a single point of failure. Since Ozeki can be setup on
multiple computers in your office, and Ozeki offers the ability for you to
reroute texts to other SMS aggregators or GSM service providers automatically,
with the help of Ozeki SMS Gateway, you can build a reliable, fail-safe SMS
service. All you have to do is setup multiple SMS service provider
connections and configure one of
the SMS routing options: to do load balancing,
least cost SMS routing or
backup routing. All of these SMS routing options
will ensure that your SMS messages will be delivered even if a particular
SMS service is out of operation.
Conclusion
Now, you can pause and catch your breath.
We hope you didn’t get lost in the explanations.
To review the above article we can state, that to setup a connection
to the text message service of Telnyx is not too complicated.
The HTTP SMS service of Telnyx is not difficult to setup, and although
it does not provide the
same performance as an SMPP sms service,
it is still a good option to use in 2021. The biggest benefit of Telnyx
is that an account can be setup in a short time on their website.
With Ozeki 10 SMS gateway you get access to cost control, which is normally
not provided by SMS service providers. You can limit the number of messages
leaving your system, so you don't have to worry about getting overcharged.
To achieve this you can setup SMS credit limits for
your customers, employees and SMS applications. To generate monthly or weekly reports,
you can use SQL logging and reporting. With the Ozeki SQL logging
you can save all your
SMS messages into your own SQL database.
This gives you the ability to keep an eye on and control your SMS communication,
and you will be able to trace back any SMS in case a problem occurs.
This page gives information on how to send texts with Twilio using
Ozeki 10 SMS Gateway. Twilio is an SMS service provider company based
in San Francisco, so it offers SMS service to people in the United States of America.
If you have installed Ozeki 10 SMS Gateway, it is easy to create a
connection to the SMS service provided by Twilio. Follow the instructions
below to setup this connection in 3 minutes. This article presents an
example configuration.
Figure 1 - How to send sms from Twilio
How would you send sms from Twilio (quick steps)
To send sms from Twilio use these instructions:
Install Ozeki 10 SMS Gateway, then navigate to the red Ozeki 10 icon on
your Windows desktop. This will open the Ozeki graphical user interface.
To send sms from Twilio you can continue with the configuration in this user interface.
In the Ozeki desktop start the SMS Gateway application.
This can be achieved by clicking on the desktop icon. The SMS Gateway app
is needed to send sms from Twilio.
To send your first text messages from Twilio the only thing left is
to install the Twilio connection by opening the 'Add new connection...' page.
How does Twilio SMS work?
Twilio is an SMS aggregator, and their service works the same way
as the service of any other SMS service provider. They connect their server to
other SMS service providers and to mobile networks and they negotiate SMS prices.
They make money by selling the SMS at a premium.
Twilio offers an HTTP SMS API, that allows you to connect to their
service through web requests. Every sms is a single web request. Web requests are
HTTP requests or REST api requests.
Are there any Twilio alternatives?
Yes, there are many alternative SMS service providers on the Internet.
If you setup Ozeki SMS Gateway, you can connect to multiple service providers at the
same time, or you can switch providers if you find better conditions. Another
alternative is to connect a mobile phone to your SMS
Gateway PC and send SMS
directly to the mobile network.
Figure 2 - Backup routes if Twilio fails
How to handle Twilio service failure
Reliable IT systems avoid a single point of failure. Since Ozeki SMS Gateway can
be installed on multiple computers in your premises or on a virtual system, and
Ozeki offers the ability to reroute the SMS messages to other SMS service providers
automatically if Twilio fails. With the help of Ozeki SMS Gateway you can build
a reliable fail-safe SMS service. When you build a business, it is important to
decrease the number of dependencies, with Ozeki you can do this, because you won't
depend on Twilio. Ozeki will give you the freedom to choose and change your
SMS connection type and your SMS service provider.
To handle service failure, you should setup backup SMS routes, and have connections
to multiple SMS service providers. It is a good idea to setup a direct wireless
connection to the mobile network using a mobile phone as a final backup.
How much does Twilio cost per SMS?
The cost of a Twilio SMS depends on destination. The cost
ranges from around USD 0.01 to USD 0.20. The price list is displayed on their
website.
This price range can be considered a standard price range in the United States of America.
Click on download to download Ozeki 10 SMS Gateway
Install the downloaded installation package
Open the Ozeki dashboard
Open 'Add new connection...' in the 'Connections' panel
Locate Twilio, and click install
Ozeki SMS Gateway will send the sms over this connection
Type in the Twilio account details
To send sms, use the Test tab
Type in the recipient, the text and click send
Read the logs to see if your sms messages was successfully sent to Twilio
Open the Ozeki Dashboard
Ozeki SMS Gateway is a great Twilio Client. After you have installed it on your Windows or Linux PC,
you can configure the Twilio connection with a few simple steps. The first step is to click on the
"Add new connection..." link in the Ozeki Management Console. The Ozeki Management Console is
often referred to as Ozeki Dashboard. This is the main Graphical User Interface (GUI) of Ozeki.
Figure 3 - Open the Ozeki Management Console
Select the Twilio connection
After you have clicked on the "Add new connection..." link, a list of available connections
will appear on your screen. You need to scroll down in the list and find the Twilio connection.
Next the "Twilio" name, you will see an Install link. Use this link to install the Twilio connection.
(Note that you may install multiple Twilio connections, each with a separate user account and you
may add connections of other SMS service providers on this screen).
Figure 4 - Setup the Twilio connection
Configure the Twilio account details
After you have installed the Twilio connection, you need to enter the Account Sid and Auth token
into the configuration form. This is your username and password. You should also configure the
Telephone number you got from Twilio to be used as Sender ID.
Figure 5 - Configure the Twilio account
Send a test SMS through Twilio
To send a test SMS through Twilio, open the Test tab, type in the recipient phone number into the To field, and
enter the messages text. To send the SMS click Send.
Figure 6 - Send sms from Twilio
Protect your phone number list
Your customer phone number list is a very valuable asset.
You must make sure you take good care of it and you protect it.
When you send text messages through Twilio or any other on-line SMS service provider,
your customer phone numbers and the message texts will be visible to Twilio.
It is a good practice to setup connections to multiple SMS service providers and
to distribute your messages among them to make sure no entity has all your data.
It is even a better practice to send messages wirelessly directly to the mobile network using an
Android mobile phone or GSM modem attached to your computer with a phone-to-pc data cable.
Note that this option is only viable if you send less than 10 000 SMS per day.
Ozeki 10 SMS Gateway has a version that can be installed on an Android mobile. It is called
Android sms gateway. It also offers the same APIs
(e.g. C# SMS API),
as the desktop version, it allows Office clients to connect, you can create E-mail to SMS configs,
and you may even provide an
Android SMPP SMS gateway service
How to save the messages sent through Twilio into a database
You can configure SQL logging for a Twilio connection.
This is very useful, because it will help you keep track of all the SMS messages
you have sent or received through the Twilio connection.
This database log can not only be used to lookup old message in case of disputes,
but it can also be used to create weekly or monthly reports. These reports will let you know which
user or application in your system sent the messages and what was the pattern of your sms traffic.
Figure 7 - Save texts sent through Twilio into an SQL database
How to send sms from an SQL database through Twilio
If you have a Twilio connection setup up,
you can easily send and receive sms messages from an SQL database.
You can use Microsoft SQL Server, Oracle, MySQL or any other
ODBC/OleDB-compatible database.
SMS messages from your database can be achieved by creating two databases tables:
ozekimessageout and ozekimessagein. The first table ozekimessageout will be used for sending sms,
the other, ozekimessagein will be used to store incoming sms.
If you want to send an SMS, all you have to do is create an SQL record using an SQL INSERT command.
in the ozekimessageout table. Ozeki 10 sms gateway will pick up the message,
it will deliver it to the mobile network, and it will update the status field and
timestamp fields in the database to let you know when the SMS was sent from your
system, when was it received by the recipient mobile and if an error occurred,
why wasn't it delivered.
Send texts from C# .Net through Twilio
Computer driven text messaging solutions perform significantly better than human employees.
Due to this fact, most companies choose to build automated sms services.
Ozeki's C# SMS API provides an excellent tool to
achieve this goal.
This C# api is great because it comes with the full source code, and you can
use it and modify it without any limitations.
By implementing this single application programming interface, you can reach
many SMS services with a single code base.
Figure 8 - Single SMS api multiple networks
Email to sms from Twilio
If you configure Twilio, you can effortlessly provide an
email to sms and sms to email
functionality to your customers. Any email user that can send an email to
an sms e-mail address can send sms. The email address format is phonenumber@hostname.
An e-mail address may look like this: 079619671@email.domain.com.
The recipient telephone number can also be put into the email subject.
In either case the email text will be forwarded as the sms to the specified phone number.
Figure 9 - Send SMS from office clients
Best practice to implement an SMS API
Implementing the SMS API of a single SMS service provider is dangerous, because
you will be locked into that service. It is a much better practice to run your
own SMS gateway on premises or at a virtual hosting company, and let your apps
connect to it. Ozeki SMS Gateway provides outstanding API, such as C# sms api, a
HTTP rest api, and free to use (and modify) programming examples for SMS messaging for almost all
programming languages.
Figure 10 - Send SMS from business apps
How to send sms using text files through Twilio
Every software developer can create and read text files. Text files provide the
simplest interface to send and receive SMS messages. Whether you use SAP or a
custom-built business application, you will likely have the option of exporting data
in the form of csv, excel or plain txt files.
If you have this option, you can send and receive SMS messages using Ozeki 10 SMS Gateway
through Twilio.
In this case two directories will be created, one for storing SMS messages to be sent, and
another for saving incoming sms messages. Ozeki can be configured to save incoming SMS in the
file format you prefer, and it can pick up text files containing SMS messages to be sent.
Once a text file is read, SMS messages are created and sent to the mobile network
through the Twilio connection.
Possible unexpected charges while using Twilio
While most sms service providers do not charge their customers for incoming sms,
Twilio put a hefty price tag on incoming sms.
This is not an issue if your application is only sending texts,
and is not interested in incoming messages, but if you
want your customers or employees to reply to or to confirm your texts,
this can become a significant, unexpected cost.
The problem with charging inbound sms is that you have no
control over who is sending a message to you and when.
Final thoughts
We hope you didn’t get lost in the explanations.
By following the above instructions, you can configure the connection in a short
period of time. Now you can use Twilio to send and receive sms messages,
and you can see how easy it is to use Ozeki 10 SMS Gateway to connect to such a service.
The HTTP SMS service of Twilio is not difficult to setup, and although it
does not provide the same performance
as an SMPP sms service, it is still a good option to use in 2021. The biggest
benefit of Twilio is that an account can be setup in a few minutes on their website.
One of the biggest advantages to using Ozeki is that it lets you connect to
multiple sms service providers simultaneously. This gives you provider independence,
and the ability to go truly international. This could be a good time to connect
to another SMS service provider.
Creating connections to multiple SMS providers greatly increases the operational
reliability of your system. Multiple service provider connections offer fault
tolerance, give you the ability to do least cost routing and give you a peace
of mind, that you can always switch providers in a matter of seconds in
case some unexpected happens.
This article will guide you through the process of setting up and using the
Yettel SMS Futár service within the Ozeki SMS Gateway to send SMS messages.
You’ll learn how to install the connection, configure it properly, and test
message delivery using a step-by-step video tutorial and quick setup instructions.
What is Yettel SMS Futár?
Yettel SMS Futár is an enterprise-grade SMS delivery service provided by
Yettel Hungary. It allows businesses to send large volumes of SMS messages quickly
and reliably using a secure HTTP or SMPP-based interface. Yettel SMS Futár is
often used for notifications, marketing messages, alerts, and transactional
communication. When integrated with Ozeki SMS Gateway, it becomes a powerful
tool for automating and managing SMS delivery efficiently.
What is Ozeki SMS Gateway?
Ozeki SMS Gateway is a high-performance software system designed to enable automated
SMS communication between computer applications and mobile networks.
With Ozeki SMS Gateway, businesses can send and receive SMS messages reliably
and at scale, whether for alerts, notifications, marketing, or customer service.
How to send SMS with Yettel SMS Futár connection (Quick Steps)
Launch Ozeki SMS Gateway
Add new connection
Select and install "Yettel SMS Futár connection"
Configure your API credentials
Enable logging
Activate the connection
Send an SMS
Check the Events tab
How to send SMS with Yettel SMS Futár connection (Video tutorial)
In this video tutorial, you will learn how to configure the Yettel SMS Futár
connection in the Ozeki SMS Gateway, send your first test message, and check the
delivery status using the system logs. This guide is perfect for both beginners
and system administrators managing SMS-based communication.
Step 1 - Open SMS Gateway
Start the Ozeki 10 application and open the SMS Gateway module, where all SMS
communication is handled (Figure 1).
Figure 1 - Open SMS Gateway
Step 2 - Add new connection
In the left-side menu, under the Connections section, click on
Add new connection... to begin setting up a new SMS route (Figure 2).
Figure 2 - Add new connection
Step 3 - Install Yettel SMS Futár connection
From the list of available providers, find "Hungary, Yettel SMS Futar client",
select it, and click Install. This will activate the integration setup (Figure 3).
Figure 3 - Install Yettel SMS Futár connection
Step 4 - Configure connection details
Under the "General" tab, configure the "Outgoing messages" section, set the
following fields "SMS Futar WS host", "Interface", "Client ID", "Password" (Figure 4).
Figure 4 - Configure connection details
Step 5 - Enable logging
Switch to the Advanced tab and enable detailed logging by selecting all available
options. This is useful for troubleshooting and monitoring message delivery (Figure 5).
Figure 5 - Enable logging
Step 6 - Enable connection
Turn on the connection by toggling the switch on the left to green. Once active,
the gateway will be ready to send messages through Yettel’s system (Figure 6).
Figure 6 - Enable connection
Step 7 - Send message
To send a test message, switch to the "Test" tab, then under the
"General" tab, set the phone number and the message you want to send (Figure 7).
Figure 7 - Send message
Step 8 - Message sent log
Navigate to the "Events" tab to verify that the message was sent successfully.
Here, you’ll see status logs, timestamps, and any delivery reports (Figure 8).
This guide will show you how you can test text message (SMS) sending through
Ozeki SMS Gateway.
The tutorial below contains all the necessary steps in order for you to set up
this solution efficiently.
You will learn how to set up a Tester connection inside Ozeki sms gateway and
send a test message.
A Tester connection is a great tool to help you ensure that your SMS messages
are being sent.
We hope you will find this article informative and helpful.
Let's get it started!
What is an sms tester connection
A tester sms connection is a virtual connection to the mobile network.
It can be used to simulate SMS delivery to remote devices, and it can be used to simulate incoming SMS traffic.
It is also often referred to as a virtual phone.
What is a test sms
A test sms is an sms message you send for testing purposes. It often contains a simple text, such as "Hello world" or "Test".
How to test SMS sending
To test SMS sending:
Launch Ozeki SMS Gateway
Add new Tester connection
Name the Tester
Configure the Advanced tab settings
Enable connection
Click on the New toolbar icon
Send test SMS message
Check the logs
How the system works
This system consists of a virtual phone, a computer with Ozeki SMS Gateway installed
and a laptop operated by a tester developer. The procedure works the following way:
The tester developer types in a test sms on his laptop. The laptop sends this test
sms to the SMS gateway. The SMS gateway send the test SMS to the virtual phone.
(Figure 1)
Since the sms is delivered to the virtual phone instead of the mobile network
it will not have any cost implications.
Figure 1 - Sms tester simulator
How to test SMS sending in Ozeki SMS Gateway (video tutorial)
In this short video tutorial, you will learn how test sending a text message in Ozeki SMS Gateway.
We first install a tester connection and configure it, along with the log levels.
Then we send a test message using the connection.
This message will appear in the event log, along with additional information confirming that it has been sent.
Open SMS Gateway
Star by logging into Ozeki 10, you will then be on the Ozeki desktop.
To open the Ozeki SMS Gateway Application, simply click on the icon labelled "SMS Gateway",
which is located on the top left of the screen below the My Account icon (Figure 2).
This will bring up the SMS Gateway window, where you can install a new connection.
Figure 2 - Open SMS Gateway
Add new connection
To add a new connection, locate the Connections menu on the left.
In this menu, click on Add new connection highlighted in blue (Figure 3).
This will bring you to a screen where you can install new connections.
Figure 3 - Add new connection
Install Tester connection
To install a new tester connection, you need to scroll down and find "Tester connection" under the "Connections for testing" section.
Click on the blue Install button next to it (Figure 4).
This will bring you to a configuration screen for your new tester connection.
Figure 4 - Install Tester connection
Tester name
Next, you need to specify a name for your tester connection.
Name it by typing your desired name into the textbox next to "Name:" (Figure 5).
Figure 5 - Tester name
Log level
Next, we need to enable log levels.
Switch over to the Advanced tab.
In the Advanced tab we can see a Log level section (Figure 6).
Enable the first two options by clicking on the checkbox next to them.
Click on OK when you are done. Now the connection is set up and in working order.
Figure 6 - Log level
Turn on the connection
The next step is to enable our newly created connection.
Do this by finding the connection menu on the left (Figure 7).
Turn the connection on by clicking on the switch button.
When the switch turns green, it indicates that the connection is on.
Figure 7 - Turn on the connection
New message
Now that the connection is on, we can send a new message.
Click on the New button in the top toolbar to create a new message (Figure 8).
This will bring you to another screen where you can configure your message.
Figure 8 - New message
Write message
On the configuration screen you are able to set your message up (Figure 9).
Set the Connection in the dropdown menu to tester_connection_1@localhost.
Next, type the recipient phone number into the textbox next to Address.
Then, enter the message into the larger textbox below.
Here we have entered "Test".
Click on the blue Ok when done to send your test SMS.
Figure 9 - Write message
Recieved message
Now that the message has been sent, you can see that it has appeared in the log.
You can view the message and additional information about it in the Events tab (Figure 10).
Figure 10 -Received message
FAQs
What kind of message types can be sent as SMS?
Standard SMS messages are plain text, limited to around 160 characters using the
basic alphabet. Need more space? Multipart SMS breaks your message into parts,
while Unicode messages allow special characters but with a shorter limit
(roughly 70 characters). Similar to multipart SMS, multipart Unicode handles
longer messages with special characters.
Beyond the text itself, SMS can include features:
FLASH SMS: Delivers your message instantly, popping up on the recipient's
screen.
Icon messages: Trigger icons on the phone, like a voicemail notification.
SMS can even carry more than text! Binary SMS can send things like ringtones,
wallpapers, or even web settings.
For a deeper dive into all the SMS message types, check out the SMS Message
Type page.
What are long (multipart) SMS messages, and how are they handled?
Within the Short Message Service (SMS) protocol, message length is restricted.
To accommodate longer text communication, multipart messaging techniques are
employed. This involves the segmentation of a single, extended message into
multiple SMS messages, each adhering to the standard-length limitations.
Message Segmentation: Upon user initiation of a lengthy SMS message, the
mobile phone segmenting the message into discrete units compliant with the
maximum SMS message length.
Network Transmission: Each segmented message is independently transmitted
through the mobile network, functioning essentially as individual SMS
messages.
Recipient Device Reassembly: Once all constituent segments of the multipart
message have been received by the recipient's device, the message is
reassembled to present the complete text to the user.
It is important to note that due to the utilization of multiple SMS messages for
transmission, multipart messages may incur higher costs compared to standard
SMS messages.
The Ozeki SMS Gateway streamlines the multipart messaging process by
automatically segmenting outgoing extended messages and reassembling incoming
multipart messages. This ensures efficient and seamless communication for users.
Summary
If you followed all the steps closely, you are now able to successfully test SMS sending in Ozeki SMS Gateway.
You can set up a tester connection and send a simple SMS in order to make sure that everything works correctly.
This is a really helpful solution because you can detect errors if the test SMS is not sent to the virtual phone.
Ozeki SMS Gateway is a great tool in SMS sending so it is recommended to check out other functions.
Continue reading in our website, where you can find information about several topics, like HTTP SMS client
and Android SMPP.
With Ozeki SMS Gateway you can setup multiple mobile network connections to send
SMS messages. To control which connection is used to send an SMS to the mobile network
you can use SMS routing.
SMS routing is the procedure used by Ozeki SMS Gateway to decide where an SMS
text message should be forwarded to. SMS routing is based on pattern matching and
it allows messages modification. SMS routing solutions are used by SMS service
providers and large organizations.
Figure 1 - What is SMS routing?
What types of sms rooting are there?
Simple SMS routing: Easily direct
SMS messages to desired destinations using straightforward routing rules.
Optimize message delivery with minimal setup.
Least cost SMS routing: Maximize cost savings
by intelligently routing SMS messages through the cheapest available channels.
Reduce SMS expenses without compromising delivery.
Backup SMS routing: Ensure uninterrupted
SMS service with reliable backup routing. Maintain high uptime and prevent
message loss in case of primary channel failures.
Load balancing with SMS routing: Distribute
SMS traffic evenly across multiple channels to prevent overload and
improve performance. Enhance system stability and responsiveness.
Blocking international SMS messages:
Prevent unwanted international SMS from being sent out or unsolicited
messages reaching your system. Protect against spam, fraud and overcharges.
How to configure SMS routing (Quick instruction list)
To configure SMS routing, you need to launch the Ozeki SMS App and you need to open
the routing table by clicking on the "Routes" toolbar button.
Figure 2 - Routing table in the SMS gateway.
To configure SMS routing follow these quick steps:
Open Ozeki SMS Gateway on the windows Desktop
Login with the username "admin"
Open the SMS Gateway app
Find the toolbar in the top
Find the "Routes" toolbar button
Click on the "Routes" toolbar button
This will bring up the routing table
Click create new route to create an SMS route
Fill in the route creation form
Click OK to create the new route
Use the red and green arrows to move the rule into position
What does SMS routing do?
Routing assigns a "To connection" to the message. In other words, it
selects the destination connection where the message should be forwarded to.
In Ozeki SMS gateway everything is a "Connection". A connection is a messaging
endpoint, that can send and receive a message. Although connections are
displayed in groups (e.g.: sms users, mobile network links, etc), they are
still identical connections when it comes to routing.
The SMS routing is the procedure that is used to decide where an SMS message
should be forwarded to. This procedure is executed when an input messages
is sent to the routing table (Figure 2). The routing table executes the routing algorithm
and returns an output message, that is identical to the input message, but it
has a "To connection" assigned to it. After the routing procedure the output message
is forwarded to the "To connection".
Figure 3 - The SMS route select the destination
What is an SMS routing rule?
The SMS routing table consists of routing rules. A routing rule has a match condition,
a modifier command set and a destination. When an SMS is sent, it is first passed
to the routing table, where it is matched against routing rules. If a rule "matches" the SMS,
it executes the modifiers and forwards the message to the destination. Matching is done
based on configured conditions, such as sender connection, sender phone number, messages text,
service period, etc. Modification rules are only applied if the SMS passes the match conditions.
If the match conditions don't fit, the next routing rule is tried in the routing table.
Figure 4 - What is an SMS rule
How are SMS routing rules executed?
For each message that is sent, the routing table is executed. The execution id done
top down: If a rule matches the destination ("To connection") is assigned and routing stops. The
message is forwarded to the selected to destination.
Figure 5 - SMS rule execution order
How is the routing table displayed?
If you open the home screen, you will see two views of the main routing table.
On the top you find a filtered table, that only displays the "inbound routes", and in
the bottom you see a filtered table that only displays the "outbound routes". In
practice we call a route inbound route, if the "From connection" is classified
as an SMS network connection. Everything else is an outbound route.
Figure 6 - SMS routing table filtered to home
This distinction is done, because most users think in terms of inbound and outbound routes.
Even though there is no difference between such rules in the ozeki routing system, it
is better to present the routing table this way. People understand it better
if routes are organized by their sender connection ("From connection") into groups and only these filtered groups
are presented. If you want to become a routing expert always use the main routing table
instead of the filtered views, because it gives you a better sense of what happens to
a certain message.
Figure 7 - Routing table in the home screen.
How can I create a routing rule?
If you want to create a routing rule, open the main routing table by clicking on the "Routes"
toolbar button, and click "Create new Route". This will bring up the route creation form.
Notice the "Match" and "Modify" tabs in this form. These are the tab pages where you can
define match condition and modification commands.
Figure 8 - Click on "Create new Route"
What if I don't see my connection?
Large SMS systems can have a very large number of connections. To simplify life
the offered "From" and "To" connections are filtered by default. Rarely used
connection are hidden. This can lead to the fact, that you don't find your
connection in the list.
If you can't see the connection you wish to work with in the "From" or "To" list,
simply click on the Cog button in front of the combo box holding the list of
connections. This will open a dialog, where you can select other connection types
to be presented in the list.
Figure 9 - Click on the Cog to find additional connections
Default SMS routing (Example 1)
Before we jump into complex routing configurations, it is a good idea to understand
the default routing table. In the default routing table you will see two routes:
out_sms and in_admin. The out_sms route is used to forward messages from so called "SMS users"
to "SMS connections". "SMS connections" are a group of connections that are used
to connect your system to the mobile network. The in_admin user is an automatically
create rule to forward a copy of each incoming SMS to the admin user. You might
notice the "Copy" mode in the routing table. More information about how to send
a copy of an SMS to a certain user can be found in the
how to forward an incoming SMS to multiple destinations
guide.
To understand how the out_sms route works, we create two SMPP SMS client connections
to two different mobile network operators. We will call these connections SMPP_client_1
and SMPP_client_2. (In this example we will not modify the
default routing table). We will send an SMS from the admin user, by clicking
on the "New" button in the toolbar. In this setup an SMS from admin will go
out on SMPP_client_1 or SMPP_client_2. The system will randomly select the
first available SMS connection from the outgoing message. The route used is the
"out_sms" route, which forwards SMS from "Any_SMS_User" to "Any_SMS_Connection".
Figure 10 - Default route highlighted in the routing table screen.
When the default route is used the SMS sent by admin is forwarded by the route called "out_sms"
Figure 11 - Randomly select the mobile network
It is worth mentioning that this random route selection is not exactly random. In
fact, a load balancing algorithm distributes the load among the mobile network connections
with free capacity taking into account the previously measured capacity of each connection.
SMS routing by source (Example 2)
The next example shows how SMS routing can be used to assign a fix destination to
a specific source. In our example we want all SMS messages sent by admin
to go out on SMPP_Client_1. This setup is very often used, because it is
often a requirement for a user to always use a specific mobile network connection.
To achieve this, we can create a simple source to destination route.
To demonstrated how this setup works, we can the same number of connections used in Example 1.
We can add an extra route to our routing table that will forward SMS from admin to
SMPP_Client_1. The route will make sure that an SMS from admin will be forced to go out on SMPP_client_1. In
this configuration the SMPP_client_2 will not be used at all.
Figure 12 - Route forcing sms from admin to smpp client 1.
Figure 13 - SMS from admin is always forwarded to SMPP_client_1
SMS routing by phone number prefix (Example 3)
The next example demonstrates how SMS routing can
be done based on phone number prefixes. This is a common task because often
you want to send certain messages belonging to a network identified by a phone
number prefix to certain connection. For example, if you would like to route SMS aimed
at Hungary you would route SMS messages sent to prefix +36.... to the Vodafone Hungary
network. You could also setup a second rout routing prefixes +44.... to the T-Mobile
network in the UK.
The following figure demonstrates how you can define a phone number prefix as
a match condition. The example uses a pcre typ regular expression. This
expression is used to match the recipient address ("To phone number") do
decided whether the route should be applied or not.
Figure 14 - Create new routing rule for SMS routing by phone number prefix
Figure 15 - Set prefix for SMS routing
Figure 16 - "+36.*" goes through route "Hungary" to SMPP_client_1
SMS routing by full phone number matching (Example 4)
If you own a set of phone numbers, you can assign a unique phone number to your customers
or users. In this case you will want to route incoming SMS messages sent to a
particular phone number to a particular user. Example 4 shows the routing configuration to
achieve this goal.
In this example we add two HTTP users: http_user_1 and http_user_2 who will receive the incoming messages. One
will be assigned phone number +3633333333, the other will be assigned phone number +3644444444.
We now create two routes with full phone number matching. These routes will forward any SMS
sent to these phone numbers to the appropriate users.
Figure 17 - Route of SMS going to +3633333333 in the routing table screen.
As you can see in the figure above, the "From" field is set to "Any_SMS_Connection". This is because
we want all SMS messages sent to phone number +3633333333 to be routed to http_user_1 regardless of
which SMS connection do they arrive. The destination ("To") for this route is fixed to http_user_1.
If you look at the figure below you will see, that in this case we specify the full phone number in the recipient
matching condition. Notice that we do not put the slash (/) in front of and after the phone number. This
is because we do not perform a regular expression pattern match in this case. We simply do a strict phone
number comparison.
Figure 18 - Set full phone number for matching to +3633333333.
The configuration for http user 2 is very similar. The difference is the destination ("To") field
and the phone number put into the "To address" group box on the "Match" tab page of the routing rule.
You might also notice that these two routes will be called route_3 and route_4.
Figure 19 - Route of SMS going to +3644444444 in the routing table screen.
If you work with many routes, it is a good idea to add meaningful names to routes,
so you can identify them quickly. There are better names, then the default route_3 or route_4 used in this
example.
Figure 20 - Set full phone number for matching to +3644444444.
Figure 21 - Incoming SMS sent to +363333333 is routed to http_user_1
SMS routing by keywords (Example 5)
The next example deals with SMS routing based on keywords in the message text.
This feature is often used in quiz games, SMS voting or keyword based content
lookup services. In this example we route
any SMS coming from Any_SMS_Connection containing the word "vote" to http user 2.
Figure 22 - Route any SMS containing the word "vote" to http user 2.
By looking at the next Figure, you might notice that we use regular expression matching. In this regular expression
pattern (also called as regex pattern), we put a .* pattern in front of and after the word. This tells the
regex engine that the keyword "vote" can be anywhere in the messages. This conditon will match the following SMS texts:
"Hello, here is my vote: red" or "vote red" or "I am not voting".
You may also consider putting in the case insensitive modifier called "i" which stands for ignor case if
you expect that the keyword will be sent as either lower case or upper case. The pattern "/.*vote.*/i" would
match "vote", "Vote", "VOTE" or "vOtE".
Figure 23 - Set message text prefix for receive SMS for http user 2.
SMS routing by text and time period matching (Example 6)
It is useful to know that there is also a service period matching condition available,
that can be used to limit the lifetime of this rule. This combination: text keyword
matching and service period are often used together for SMS content services that
operate for a given time period. In this example we route any SMS coming from
Any_SMS_Connection containing the word "vote" between 2021-04-01 00:000:00
and 2021-04-30 24:00:00 to http user 2.
Figure 24 - Route any SMS containing the word "vote" in the service period 2021-04-01 00:000:00 and 2021-04-30 24:00:00 to http user 2.
Figure 25 - Set message text prefix for receive SMS for http user 2.
Figure 26 - Set service period form for receive SMS for http user 2.
How to test sms routing
If you want to test sms routing without actually forwarding SMS messages to the
mobile network, you can setup an SMPP simulator connection.
An SMPP simulator can act as a virtual SMPP server,
that accepts submitted sms messages over an SMPP link, and can simulate sms
delivery reports.
Further reading on SMS modifier commands
The above examples demonstrated SMS matching conditions. Another strong
feature is called SMS modification during routing. The idea is that once
an SMS is matched against a rule, the SMS can be modified. This feature
is very useful, because it not only allows you to be in control of all
the messages that pass through your system, but you may also fix certain
errors, such as incorrect destination numbering, or you may blacklist
certain unacceptable content. The following documents provide information
on modifying SMS content.
An SMS system that can send and receive SMS messages.
In the world of SMS, a two-way system enables you to have a conversation with
mobile users. You can send messages to them, and they can reply back to you
through the same system.
When a mobile user replies to my SMS, can I tell which message did he originally
reply to?
No, this is not possible.
Imagine a conversation where you can only send one sentence at a time, with no
memory of what came before. That's the world of SMS!
Lost Connections: The SMS protocol doesn't have a built-in feature like a
"conversation ID" to link messages together. Each text is treated as a
single, independent message.
Keyword Clues: The only way to potentially connect replies to previous
messages is by including keywords within the message text itself. These
keywords would act as reference points to link the messages together.
Long Code Workaround (IP SMS only): For those using IP SMS connections with
a service provider that supports long codes (special sender numbers with more
digits), there's a potential trick. You can encode extra digits within the
sender number to identify the original message. However, this relies on
specific conditions and service provider capabilities.
While SMS is a great way to send quick messages, keeping track of conversation
threads can be a challenge. If you need a platform that remembers past messages,
SMS might not be the best choice. For SMS communication, consider using keywords
or explore long codes (if applicable) to improve the chances of associating
replies with the original message.
How can I send SMS messages reliably to different global destinations?
For optimal reliability, consider setting up several SMS service provider connections
within your system. Each connection will have a designated name for easy
reference in the outbound routing table.
The outbound routing table acts as your control centre. Here, you define
outbound routes specifying which connection will handle each message.
To elevate reliability, utilize at least two connections. A combination, like an
IP SMS connection and a GSM modem connection, offers a powerful solution.
Configure the GSM modem as a backup for the IP SMS connection within the
outbound routing table.
Should the IP SMS connection malfunction, the outbound routing table automatically
redirects messages to the GSM modem. This ensures uninterrupted message delivery,
maximizing system reliability.
Is there any way I can tell if an incoming SMS message is a reply to my
previously sent SMS?
Unfortunately, SMS technology itself doesn't offer a built-in way to identify if
an incoming message is a reply to a previously sent SMS. This makes it tricky to
definitively link responses.
Here are some approaches you can consider:
Message Text Identifier: Include a unique identifier within the original
message itself. This allows you to potentially match it with the reply but
requires user cooperation and isn't foolproof.
Timestamp Matching: Compare timestamps of sent and received messages. While
helpful, this method can be inaccurate due to potential delays.
Keywords in Replies: Encourage users to include a specific keyword in their
replies. You can then set up an inbound route based on this keyword
(Condition #3: message text) to create a loose association with the original
message. However, user adherence is crucial for this approach.
While these methods have limitations, they can provide some clues about potential
replies.
Can I change message parameters during routing?
Yes, SMS routing offers a surprising superpower: the ability to edit phone numbers
and message content during the delivery process! This opens doors for some creative
applications:
Number Enhancement: Need to add a prefix or postfix to a phone number?
Routing can handle that, ensuring calls reach the right destination.
Targeted Advertising: Want to tack on a promotional message to outgoing
texts? Routing lets you seamlessly integrate these ads into your existing
communication flow.
This functionality adds flexibility to your SMS strategy, allowing you to optimize
phone numbers and even add a touch of marketing magic to your messages.
This guide shows you the simplest SMS route, that routes SMS from one
user to one mobile network connection. In the guide, you can see how
you can create a new SMS route, how you can select the SMS source connection,
and how you can select the SMS destination connection. You will also see
that when an SMS comes from the source, you can see the routing
decision in the source's logs.
What is SMS route?
It routes SMS from one
user to one mobile network connection.
How to create a simple SMS route (Quick steps)
How to create a simple SMS route:
Add new routing rule
Configure routing rule
New rule created
Login as standard user
Send SMS message
Open user from Admin management console
Open the sent message
You can see the route decision in the delivery history
How to create a simple SMS route (Video tutorial)
In this short video lasting under 2 minutes, we provide a walkthrough of the process of creating an SMS route in the Ozeki SMS gateway.
Our step-by-step guide covers everything from adding a new rule to configuring it,
conducting a thorough test, and finally, viewing a detailed log.
We understand the importance of an SMS routing system,
and we've crafted this video to empower you with the knowledge and skills needed to set up and optimize your SMS routes effectively.
Step 1 - Add new routing rule
Navigate to the bottom, and you'll find the Routing Panel. Inside this panel,
locate and click "Add new route..." to access the route creation panel (see Figure 1).
This action will open the route creation panel, enabling you to create and configure the route rule.
Figure 1 - Add new routing rule
Step 2 - Configure routing rule
On the right side, find the "Settings" section. Here from dropdown menus, you can set the destination and the starting point.
After you select "From" and "To" simply click the blue "Ok" button under the form, to set the route (see Figure 2).
It will create a new routing rule.
From: User2@localhost
To: andoid_SMS_client_1@localhost
Figure 2 - Configure routing rule
Step 3 - New rule created
If you've followed the steps accurately, you should now see the rule you've just created within the Routing Panel (see Figure 3).
Figure 3 - New rule created
Step 4 - Login as standard user
Now log into your Ozeki account as a standard user, by filling in the username and password field, after clicking "Ok" (see Figure 4).
It will open your Ozeki Desktop, from where you can open SMS Messenger.
Figure 4 - Login as standard user
Step 5 - Send SMS message
Upon logging into your Ozeki account, launch SMS Messenger from the Ozeki Desktop.
Inside the "New" Tab page, fill the "From" field with the phone number from which you intend to send the SMS.
Also, input the recipient's number into the "To" field, and in the "Write" section, insert the message.
Once you have filled in these details, click the "Send" button located at the bottom (see Figure 5).
If the form is filled correctly, it will send the SMS message.
Figure 5 - Send SMS message
Step 6 - Open user from Admin management console
To see the route decision of the sent message, first, you have to open the user from the Admin management console.
Locate the User and Applications Panel, then select and click the user where you sent the message (see Figure 6).
It will open the Admin management console of the selected user.
Figure 6 - Open user from Admin management console
Step 7 - Open the sent message
Inside the control table at the left, look for the "Sent" button. After you click it, it will open the sent messages Panel.
Locate the message that you just sent and click on it to view details (see Figure 7).
Figure 7 - Open the sent message
Step 8 - Open delivery history
Here select the "Delivery history" tab, it will show the details about the message (see Figure 8).
Locate the log that is about the routing. You can see which route rule has been used for the message.
Figure 8 - You can see the route decision in the delivery history
Conclusion
Now, you can pause and catch your breath.
By following the above directions, you can create the solution in a few minutes. Now you can use the SMS route to send sms. You have seen the benefits Ozeki SMS Gateway can bring.
If you want to do well in the long run, focus on running your sms business.
If you would like to get to know more useful insights about the advantages of other similar solutions, please open ozeki-sms-gateway.com.
I hope this article will be helpful to all the readers and especially to beginners.
This is a configuration example on how to setup least cost SMS routing in Ozeki SMS Gateway.
What is least cost SMS routing?
Least cost SMS routing means, that SMS messages are routed to the appropriate SMS service
provider connection based on the telephone number prefix. If you are not familiar
with SMS routing
at all, we recommend you to read the SMS routing basics
guide before you continue.
How to setup least cost SMS routing
To setup least cost SMS routing:
Read the SMS routing basics guide if you need
Add new route on the outbound routing table in Ozeki
Specify the message route on Route details' Settings tab
Enter phone number prefix on Match menu's To address tab
Select the appropriate prefix matches SMS Service provider
Repeat these steps with every service provider connection
Return to main page where now the routing rules appeared
In our example, there are three SMS Service provider connections: Telenor, T-Mobile, Vodafone. The routing is setup the following way:
If an SMS is sent to a phone number that starts with +3620 it should be routed to Telenor
If an SMS is sent to a phone number that starts with +3630 it should be routed to T-Mobile
If an SMS is sent to a phone number that starts with +3670 it should be routed to Vodafone
All other SMS messages should be routed to one of these providers randomly.
To setup this routing the outbound routing table should be modified. The outbound routing table,
that determines which service provider connection will be used to send an SMS message,
can be found in the bottom part of the centre panel of the management form of Ozeki SMS Gateway (Figure 1).
Figure 1 - Add new routing rule
In the Route details menu select the From and To connections which are Any SMS User and Telenor in this case (Figure 2).
Figure 2 - Specify from and to connection
On the Match tab, in the To address field, you can enter the phone number prefix you want to use in the given routing rule (Figure 3).
Figure 3 - Specify to address prefix
Repeat above steps with the other two service provider connections as you can see on the Figure 4 and Figure 5.
Figure 4 - T-Mobile routing rule
Figure 5 - Vodafone routing rule
Finally, you can see the routing rules in the Outbound section the bottom
part of the centre panel of the management form (Figure 6).
This article shows you how you can create a backup SMS route using your mobile phone.
This solution offers a safety connection in case of an internet outage.
This system will continue sending the SMS messages through your mobile phone if you have a data package.
The article will show you how to add the SMS service connections, how to create the routes and how to set them as backup routes.
The process will take about 15 minutes to finish, and it requires a basic knowledge of SMS communication technologies.
Don’t waste any time, start sending SMS now!
Failover routing setup
Figure 1 - Service "A" fails, reroute to service "B"
Figure 2 - If the Internet goes offline route SMS to mobile
How to setup backup SMS routing (Clear instructions)
To setup backup SMS routing:
Launch Ozeki SMS Gateway
Add two SMS service connection
Create new route for the first connection
Specify the message route on Settings tab
Do the same with the second connection
Open the Advanced menu of the second routing rule
Click on Create new Condition in Conditions menu
Select Backup tile on Condition details
Configure which connection needs backup
Check the created backup route in Conditions
Add two new connections
The first step of the process is to create two new connections. One will serve as the regular connection that you use to send SMS with,
the second one is the backup connection that will be used in case of an internet outage.
To do so, click the blue Add new connection link under the list of existing connections.
If you have successfully created the two connection your Connections list will look like on Figure 3.
Figure 3 - Add two SMS service connection
Create routes for the services
Now you need to create a route for both connections. To do so, please click the Routes button located on the Toolbar of the Ozeki SMS Gateway.
It will open the Routing details page (Figure 4). Here, you need to provide settings for the connection A.
Make sure that the route is from the user’s main connection to the smsservicea connection. Name it in a way that the two connection is distinguishable.
Figure 4 - Add new route for service a connection
To have the other connection set up, repeat the same process with the connection B.
Open the Routing details page with the Routes button, provide the properties needed for the route and name the connection something different than service a (Figure 5).
This way you have two working connection that could be used to send SMS on.
Figure 5 - Add new route for service b connection
Open Advanced route menu
To create the condition that will be watched by the gateway, you need to open
the advanced settings of a route.
To do so, click the Advanced button located in the data line of on a
route (Figure 6). Make sure to choose one of the routes created earlier in this
tutorial.
Figure 6 - Open routing rule advanced menu
Create the conditions
To setup a new backup condition, open the Conditions tab page. Search for the Create new Condition button located next to the Conditions title.
Click it and a panel will pop up on the right side of the screen.
Choose the backup condition option (Figure 7). This way, the connection will be active in case of the other connections failure.
Figure 7 - Add new backup condition to the routing rule
Set the connection for the backup condition
In the condition details menu, you will see the Setting group box.
In there you will find a check setting.
This setting will tell which connections place it should take in case of an
outage. Provide the other created service’s address in this textbox and
click the Ok button.
This way the backup connection will check the status of the original connection
and take all the task from it in case of an outage.
(Figure 8)
Figure 8 - Set smsservicea connection for the backup condition
Check the result
As the result you will see the created backup condition in the condition list (Figure 9).
Now you don’t need to worry about an unreliable service as in case of an error you will be able to send SMS messages using the backup connection.
(Figure 9)
Figure 9 - Backup route condition created
FAQs
How can I reject certain messages starting with a specified telephone number prefix?
SMS routing offers some surprising hidden features beyond just delivery. It can
even be used to act as a gatekeeper for outgoing messages. If you want to
prevent your customers from sending messages to specific destinations, SMS
routing can come to the rescue.
The key here is to create a dummy service provider connection. This connection
won't actually send any messages, but it will act as a trap. You'll then need to
configure a new rule in your outbound routing table. This rule should be set to
identify messages with a specific prefix (the destinations you want to block)
using a regular expression. Any message matching that prefix will be routed to
the dummy connection instead of your regular SMS service provider. Since the
dummy connection is designed to drop messages, they'll be silently discarded,
effectively preventing them from being sent. This way, you can maintain control
over your communication flow and ensure messages only reach their intended targets.
How can I change the recipient field to a fixed mobile number so all texts submitted go to that mobile?
SMS routing offers more than just message delivery. It can even act as an editor,
modifying messages as they travel! This functionality is accessed through the
outbound routing table, where you define rules for message content and phone
numbers.
Conditions within these rules allow for replacements based on patterns. You can
find detailed information about content manipulation on the "SMS content modification
during routing" page (link not provided).
For instance, to replace all recipient numbers with a specific number (say,
+123456), you would create an outbound route with a condition in field #2
(recipient) that uses a search-and-replace pattern. Here's the magic formula:
s/^.*/[+]123456/. This pattern instructs the system to:
Search (s/) for any character sequence (.*) at the beginning (^) of the
recipient number.
Replace (/) the entire sequence (.*) with the desired number (+123456).
With this rule in place, every outgoing SMS will have its recipient number
automatically changed to +123456. This allows for creative uses like forwarding
messages or anonymizing them before sending.
Is there a way to define outbound rules by phone ranges. I want to route a certain prefix to a certain carrier, is this possible?
Yes, you've absolutely got it! SMS routing lets you leverage the power of regular
expressions to define phone number prefixes and even more intricate matching patterns
within the outbound routing table.
This means you can create conditions based on both sender and recipient phone
numbers. It sounds like you're particularly interested in routing messages based
on the recipient's number prefix. Here's how to achieve that:
Condition #2: Your Gateway to Control: When defining the outbound route,
focus on Condition #2, specifically dedicated to recipient phone numbers.
Regular Expression Magic: Enter the following regular expression within the
condition field: ^[+]3620.*/
/: This character marks the beginning and end of the regular expression
for the Ozeki software.
^: Matches the beginning of the phone number string.
[+]: Matches a literal plus sign (+).
3620: Matches the specific digits 3, 6, 2, and 0.
.*: The wildcard symbol, matching any character sequence following the
defined prefix.
With this rule in place, the system will only route outgoing messages where the
recipient's phone number starts with "+3620" followed by any additional digits.
This unlocks a world of possibilities, allowing you to route messages based on
specific regions, mobile network operators, or even custom criteria defined by
your regular expressions.
Setting up sms load balancing is not a hard task, but a helping hand is always useful.
Load balancing prevents application downtime, increases performance and helps in detecting failures in the early stages.
Our load balancer swiftly distributes traffic across different paths in order to reach perfect client experience.
This guide is meant to be our way of helping while showing you Ozeki SMS Gateway.
Reading this article is absolutely recommended if you are interested in
this topic!
What is SMS load balancing
Load balancing allows an increase in the throughput of SMS messages.
You may need to make use of it if you wish to send out a large number of SMS messages with small capacity connections to GSM service providers.
Load balancing means equally involving different connections in the job of sending out SMS messages.
What is Ozeki SMS Gateway
Ozeki SMS Gateway is a communication software that routes messages between
real world entities.
It allows you to build up simple communication between shared hardware and
software resources of your system.
It offers real time information and provides various configuration options
to route messages.
How to setup SMS load balancing (Quick steps)
To setup sms load balancing:
Launch Ozeki SMS Gateway
Add new connection
Install Connection Group
Configure Members in General tab
Specify the SMS message route
Look at the SMPP user's Sent folder
Check the first SMPP connection Events
Inspect the second SMPP connection logs
Realise the SMS load balancing
Bulk sms load balancing
Bulk sms load balancing is a traffic distributing process which helps the connection
to remain fast flowing and easy-to-read.
This solution uses several paths to distribute the messages in order to remain fast, scalable and secure.
As you can see in Figure 1, this procedure consists of a computer (using the Ozeki SMS Gateway)
and different SMS services. This is a highly reliable and fast solution.
Figure 1 - Bulk sms load balancing
How to setup sms load balancing
This video is a short and simple tutorial to Ozeki SMS Gateway's sms load balancing tool.
Watching this can help you to understand the full procedure in no time! It
starts with launching our program and
by the end you will realise the benefits of SMS load balancing. While you are
watching the video, you will see the steps of configuring
the connection group, the route that you want to use and the final
result of the load balancing.
Install new connection group
You can install new connection group by choosing the 'Add new connection...'
link in the Connections panel.
After that, in the Connection installation list you can find the 'Load
balancing and fault tolerance install section'
where you have to select the 'Connection Group' install item.
By selecting that, you have the opportunity to install new connection group.
This is the first step in setting up load balancing
so pay attention to every detail if you don't want to face unpleasant moments. (Figure 2)
Figure 2 - Install new connection group
Add connections to the group
In order to add connections to the group, find the Install connection detail page where
you have to go to the General tab's Members group box, which allows you to
configure the connection
group members with the 'Member configuration:' combo box. With the
'Add' button, you can extend
the configuration list so you can have as much member as you wish to use in
distribution. (Shown in Figure 3)
Figure 3 - Add connections to the group
Set route to forward messages to the connection group
In the route_1 details page, under the Configure tab page, you can find the
general tab. Clicking on that leads
you to the Setting group box where you can specify the message route with
the 'From:' and 'To:' combo boxes. (Figure 4)
This is an important step because you have to specify the sender and receiver
side in order to use the Ozeki SMS Gateway.
This particular step is vital in the whole process so make sure that you set
up a proper route.
Figure 4 - Set route to forward messages to the connection group
Messages sent to the connection group
In the left panel of SMPP user detail page, on the Control table, you can find the 'Folders' section.
This section has a 'Sent' folder where you can see the number of the messages.
It's important to keep record about these details in order to
make sure that you don't miss any message. These messages will be distributed by the load balancing solution. (Highlighted in Figure 5)
Figure 5 - Messages sent to the connection group
Messages sent out in the SMPP connection 1
In the SMS Gateway Dashboard, you can observe
several connections. To check the amount of sent messages in connection 1,
the left panel has to show SMPP_client_1. In the Connection section,
you can find the 'Odometer', which shows the number of messages sent out in the SMPP connection 1.
This basically shows you the first half of the delivery process. You can use the hint icon if you want to know
more about the Odometer. (Shown in Figure 6)
Figure 6 - Messages sent out in the SMPP connection 1
Messages sent out in the SMPP connection 2
To see the number of sent messages in the second SMPP connection, the left
panel has to show SMPP_client_2, you can switch to this
in the SMS Gateway Dashboard, right under the SMPP_client_1.
This panel also has the Connection section, where you can find the 'Odometer',
which shows the number of messages sent out in the SMPP connection 2,
so you can compare the two connection and check the method of distribution. (Figure 7)
Figure 7 - Messages sent out in the SMPP connection 2
Summary
As we promised you, this was not a hard procedure, and our explanation was
very in-depth.
This article highlighted the benefits of Ozeki SMS Gateway, if you want to use
a compact and reliable software,
you may already know that our solution is the best one for your needs.
SMS load balancing is a great innovation, increases
flexibility and scalability, helps the server to organize the SMS sending and
to optimize itself in order to keep up its response time.
Make sure to collect more information about Ozeki SMS Gateway, we have guides
about how to download and
install
Ozeki SMS Gateway using Ubuntu.
This guide is going to demonstrate how you can manipulate messages using the
SMS routing rules of the SMS Gateway. The routing rules are used in the system to
direct the messages between connections. You can setup rules to take a message
form one connection and to pass it to another connection. For example, you can
forward in incoming e-mail messages from an e-mail connection to an SMS connection and
send it to a mobile phone as SMS. A routing rule is also great tool to manipulate a message.
This guide shows how to modify the sender or recipient phone number, or how you can
modify the message text. So, let's start right now!
Change SMS recipient
SMS Gateway routing rules allow you to do some modification in the messages.
One of them is that you can change the recipient phone number of the
message. It can be useful when you have got a new phone number and you would
like to redirect the messages that still to be delivered to your old phone number
to that new phone number. Learn more about how you can change the recipient number of the SMS messages
Change SMS sender
The following guide is going to show you how you can change and manipulate
the sender phone number of an outgoing message in the SMS Gateway. By changing
the sender phone number and define a new phone number, you can ensure that
every outgoing message is going to have the same predefined phone number
as a sender address. See how to change the sender of the outgoing messages
Regexp manipulation
The regular expressions can be great if you would like to modify some details
of the sender or recipient phone number but still keep the original phone
number as well. This guide demonstrates how you can add prefix, remove or replace
some numbers of the sender or recipient phone number. Check how you can manipulate the messages using regular expressions
Change SMS text
By following the link to this guide, you will be able to learn about
how you can change the text of an outgoing message. By performing this
action, all of your outgoing message going to have got the same text since the
routing rule replace the original text with the predefined text message. Learn more about how to change the text of the outgoing messages
Append SMS message
You can learn about how you can add text to your outgoing message but keeping
the original text too at the same time. Appending the message is quite useful
when you are using a template for your messages, and you wouldn't like to
type it in every message. By applying this setting, the routing rule appends the
message by the specified text. See how to add text to your outgoing messages
Swap sender and recipient
This solution allows you to create an autoresponding service using your
routing rules. By activating this modification, you can create a two-way
communication by both the sender and the recipient receives a message. You can
replace the original message as well with a response message. Learn more about how to swap sender and recipient of your messages
This document is going to show how you can change the recipient phone number
using the sms routing table. With this operation, you can ensure for example that
any outgoing message from your SMS Gateway system will be received by a specified
phone number. This feature is also useful when you changed your phone number and you
would like to redirect the messages sent to your old phone number to the new phone number.
The guide demonstrates how you need to configure the routing rule to change the recipient
number and how to test the solution. It does not take more than five minutes to
complete this guide, so let's start right now!
How to change the SMS recipient number
To change the SMS recipient number:
Launch Ozeki SMS Gateway
Select a routing rule
Click on the Modify tab
Replace the SMS recipient number
Compose new SMS message
Type the Address and the message
Send test SMS
Check the logs
Step 1 - Open a routing rule
The first step is to select a route that you want to modify. If you are not familiar
with routing rules, here you can learn about SMS routing
in SMS Gateway. SMS Gateway creates default routes, so you can simply select
the default outgoing route as you can see it in Figure 1.
Figure 1 - Select a routing rule in SMS Gateway
Here, you can see the setting menu of the routing rule. To be able to modify
the messages on this route, you just need to select the Modify tab as you can see it
in Figure 2.
Figure 2 - Select the Modify menu
Step 2 - Configure the recipient phone number
In the Modify menu, you can perform all modifying operation for the outgoing messages.
At this point, you need to select the 'Replace the 'To' address' submenu like in
Figure 3, and here, you can just type the phone number that you want to receive
every outgoing message. Finally, just click on OK to save the modifications.
Figure 3 - Configure the recipient phone number
Step 3 - Send a test message
After you configured the outgoing routing rule, you just need to write a test message.
For that purpose, you can set up a SMPP client, which will forward the message to the
recipient. Here, you can learn how to set up a SMPP client connection.
To write the message, just open the admin account, and like in Figure 4, just write a
simple message to test the solution.
Figure 4 - Write a simple test message
Step 4 - View the results in the event log
To check if the modifications worked, you need to open the SMPP client and select the
Events tab. Here, you can see every event of the SMPP client connection. As Figure 5
shows that, the routing rule changed the recipient phone number, so the SMPP client
forwarded the message to the modified phone number.
Figure 5 - See that the routing rule changed the recipient phone number
In this guide we give example routing rules, that show you how you can
adjust phone number prefixes with routing rules. If the phone numbers
come in various formats from the users, we need to create rules, that
adjust each format to make sure that numbers are sent properly to
the sms service provider.
Introduction
In our example the SMS service provider will accept a phone number
coming in the following format:
+97466781661
The users of the system will use other formats to send the message.
For example:
66781661
->
+97466781661
0097466781661
->
+97466781661
97466781661
->
+97466781661
+97466781661
->
+97466781661
We want to make sure all of the above formats will be accepted by our
sms service provider. In order to achieve this, we will create
5 routing rules:
Route 1: Add the "+974" prefix to 8-digit long phone numbers Route 2: Change the phone numbers starting with "00974" to start with "+974" Route 3: Change the phone numbers starting with "974" to start with "+974" Route 4: Leave the phone numbers starting with "+974" and send the sms to the mobile network Route 5: Anything else should be sent to the recycle bin
Route 1 / Step 1: Create the route
The first example will add a prefix to the phone number if the phone
number is exactly 8 digits long.
Change this: 66781661
To this: +97466781661
You need to create a dedicated route to do this modification. This
route needs to match the 8-digit phone numbers, and it needs to modify
them to have the +974 prefix.
You can start by clicking on the "Routes" icon in the toolbar.
After this specify the "From" connection as "Any_SMS_User" and the
"To" connection as "SMPP_Client_1". Leave the mode as "Move".
Figure 1 - Create the route
Route 1 / Step 2: Create a match condition
To make this route match phone numbers exactly 8 digits long, you need to
add a "Match condition". The "Match condition" will check the "To address"
and if the phone number is exactly 8 digits long the root will go into effect.
Match condition:
/^\d{8}$/
The above condition can be broken down like this:
start the matching: ^
8 digits are coming: \d{8}
end the matching: $
Figure 2 - Match route
Route 1 / Step 3: Create a modifier
After the sms matches this pattern, the modification rule will take effect:
/^(\d{8})$/+974$1/
The above condition can be broken down like this:
change this: ^(\d{8})$
to this: +974$1
Note that the "to this" section contains $1. This means that the first group should be put
there. The first group is "(\d{8})". A group is marked by ( ).
Figure 3 - Modifier
Route 1 / Step 4: Test the route
To test the system, simply send an SMS to an 8-digit phone number. Note, that after
sending the message, when you check the sent items folder, you will see
that the "To" phone number was changed to the appropriate format. You have sent
the sms to "66781661", but the sms was actually sent to "+97466781661"
Figure 4 - Send message to 66781661
Figure 5 - Message sent to +97466781661
The route properties are:
Route name:
Route 1
From:
Any_SMS_User@localhost
To:
SMPP_client_1@localhost
Mode:
Move
Match To address:
/^\d{8}$/
Modify To address:
/^(\d{8})$/+974$1/
The above table contains the settings you need to apply
Route 2. - 00971 prefix to a +971 prefix
The second route will change the 00 prefix to a + sign. In mobile
networks the international phone numbers are starting with a + sign,
while in classic telephone systems they start with 00.
Change this: 0097466781661
To this: +97466781661
Match condition:
/^00974.*$/
The above condition can be broken down like this:
start the matching: ^
the following digits are: 00974
anything can come after this: .*
end the matching: $
Modifier:
/^00974(.*)$/+974$1/
The above condition can be broken down like this:
change this: ^00974(.*)$
to this: +974$1
The route properties are:
Route name:
Route 2
From:
Any_SMS_User@localhost
To:
SMPP_client_1@localhost
Mode:
Move
Match To address:
/^00974.*$/
Modify To address:
/^00974(.*)$/+974$1/
The above table contains the settings you need to apply
Route 3. - 971 prefix to a +971 prefix
The route will change add + sign to the phone number. In mobile
networks the international phone numbers are starting with a + sign,
unless the + sign is added the number will be treated as a local number.
Change this: 97466781661
To this: +97466781661
Match condition:
/^974.*$/
The above condition can be broken down like this:
start the matching: ^
the following digits are: 974
anything can come after this: .*
end the matching: $
Modifier:
/^974(.*)$/+974$1/
The above condition can be broken down like this:
change this: ^974(.*)$
to this: +974$1
The route properties are:
Route name:
Route 3
From:
Any_SMS_User@localhost
To:
SMPP_client_1@localhost
Mode:
Move
Match To address:
/^974.*$/
Modify To address:
/^974(.*)$/+974$1/
The above table contains the settings you need to apply
Route 4. - +971 prefix to a +971 prefix (let the properly formatted numbers through)
The fourth route will simply match the properly formatted phone number and
will let the SMS through without modification.
Match this: 97466781661
Match condition:
/^[+]974.*$/
The above condition can be broken down like this:
start the matching: ^
the following digit is: +
the following digits are: 974
anything can come after this: .*
end the matching: $
Note that the + sign was put in brackets: [+]. This is because the + sign
is a special character in the regular expression syntax.
Modifier:
Leave empty
If the phone number is formatted properly no modification is needed
The route properties are:
Route name:
Route 4
From:
Any_SMS_User@localhost
To:
SMPP_client_1@localhost
Mode:
Move
Match To address:
/^[+]974.*$/
Modify To address:
The above table contains the settings you need to apply
Route 5. - Move anything else to the recycle bin
Our final route will move any phone numbers that are not matched by any of the
routing conditions above to the recycle bin.
Match: Anything
No change
Route to: Recycle bin
Route name:
Route 5
From:
Any_SMS_User@localhost
To:
SMPP_client_1@localhost
Mode:
Drop
Match To address:
Modify To address:
The above table contains the settings you need to apply
The following rule will add a plus sign to every phone number that does
not start with a plus sign.
Route 1. - 971 prefix to a +971 prefix
This rule will add a plus sign in front of any number.
Change this: 97466781661
To this: +97466781661
Change this: 9711111111
To this: +9711111111
Match condition:
/^[^+].*$/
The above condition can be broken down like this:
start the matching: ^
anything that does not start with a plus sign: [^+]
anything can come after this: .*
end the matching: $
Modifier:
/^(.*)$/+$1/
The above condition can be broken down like this:
change this: ^(.*)$
to this: +$1
The route properties are:
Route name:
Route 1
From:
Any_SMS_User@localhost
To:
SMPP_client_1@localhost
Mode:
Move
Match To address:
/^[^+].*$/
Modify To address:
/^(.*)$/+$1/
The above table contains the settings you need to apply
This section is about how to change the sender phone number on an SMS message using the
sms routing table as it is forwarded from one connection to another.
The document shows you the configuration steps you need to perform in the
system to define the sender phone number. It also demonstrates how you can test
your system by sending a test message and checking the results in the logs.
Step 1 - Open a routing rule
The first step that you need to perform is to select a route that you want to modify. If you are not familiar
with routing rules, here you can learn about SMS routing
in SMS Gateway. SMS Gateway creates default routes, so you can simply select
the default outgoing route as Figure 1 demonstrates it for you.
Figure 1 - Select a routing rule in SMS Gateway
After you selected the routing rule from the routing table, you can see the
settings menu of the selected routing rule.
To be able to modify the details of the messages going through this route, you just need to select
the Modify tab as you can see it in Figure 2.
Figure 2 - Select the Modify menu
Step 2 - Configure the sender phone number
In the Modify menu, you can perform all operation that can modify outgoing messages.
At this point, you need to select the 'Replace the 'From' address' submenu as
Figure 3 demonstrates, and here, you can just type the phone number that you want to
be the sender phone number of all outgoing messages.
Figure 3 - Configure the sender phone number
Step 3 - Send a test message
After you configured the outgoing routing rule, you just need to write a test message.
For that purpose, you can set up a SMPP client, which will forward the message to the
recipient. Here, you can learn how to set up a SMPP client connection.
To write the message, just open the admin account, and as you can see it in Figure 4, just write a
simple test message.
Figure 4 - Write a simple test message
Step 4 - View the results in the event log
If you would like to check if the modifications worked, you need to open the SMPP client and select the
Events tab. Here, you can see every event of the SMPP client connection. As you
can see it in Figure 5, the routing rule changed the phone number of the sender.
Figure 5 - See that the routing rule changed the sender phone number
This video tutorial shows you the configuration to use if you wish to forward incoming SMS messages
to multiple recipients. The guide uses the Ozeki sms routing table to achieve
this result. The key
is to create a route for every recipient with "Copy" mode. If a message comes in it will
go through the routing table, and a new message will be created for every route. An interesting
choice in this solution is that we send out the messages on the same connection where the
original messages come in. In other words, the messages are routed back to the same connection,
but their recipient address is modified during routing.
What is Ozeki SMS Gateway?
Ozeki SMS Gateway a powerful on-premise SMS gateway software, that can be used
to create SMS services.
It has a built in very high performance SMPP server and SMPP client protocol
implementation.
The system can delivery up to 1000 SMS messages per second, which makes it an
ideal choice for SMS service providers.
Ozeki SMS Gateway also offers UCP SMS protocol, CIMD2 protocol implementations
and the best HTTP SMS API.
Ozeki SMS Gateway is also a great choice if you wish to provide SMS
notification or SMS content services to customers and developers.
This is a high performance, very reliable SMS gateway system. It can send over
1000 SMS per second on SMPP connections.
How to forward an SMS to multiple recipients (Easy directions)
To forward an SMS to multiple recipients (Figure 1):
Launch Ozeki SMS Gateway
Install SMPP client
Configure SMPP connection
Tick check boxes in Log level group box
Inspect the connection status logs
Create new routing rule for all recipient
Send test SMS message to multiple numbers
Check the logs
How the system works
Figure 1 - Forward SMS to multiple numbers
How to forward an SMS to multiple recipients (video tutorial)
Add new SMPP client
To get started, you fist need to open Ozeki SMS Gateway.
Click on the Connect tab in the top toolbar (Figure 2).
This will display the types of connections you can create.
Find SMPP client. Click Install next to it to begin configuring
the new SMPP client.
Figure 2 - Add new SMPP client
Configure SMPP connection
In this window you need to provide connection details to configure your SMPP connection (Figure 3).
Type your IP Address next to Host, along with the Port below.
Then, enter your username and password into the respective textboxes.
Now head over to the Advanced tab to configure logging options.
Figure 3 - Configure SMPP connection
Enable logging
Scroll down in the advanced tab.
Enable every option under Log level by clicking on the checkboxes next to them (Figure 4).
Click on OK to save your settings and create the connection.
Figure 4 - Enable logging
SMPP client connected
After you created the SMPP client, you will be brought to the details page of the connection.
When the switch button on the left is green, it means that the client is connected.
You also get a message in the Events tab, indicating that the connection has been established (Figure 5).
Figure 5 - SMPP client connected
Add new routing rule
After successfully starting the SMPP client, you need to add a new routing rule.
Click on Routes inside the toolbar on the top (Figure 6).
Click on the blue Create new Route button on the top.
Navigate to the Settings menu on the right.
Here you need to select SMPP_client_1 for both the From and To
combo boxes.
Then, select Copy for Mode.
Figure 6 - Add new routing rule
Configure new recipient address
Next you need to configure a new recipient address.
Click on the Modify tab in the Route Details menu on the right (Figure 7).
Enter your phone number into the To textbox.
Click OK to save your settings.
Figure 7 - Configure new recipient address
Create route for all phone number
In order to send SMS to multiple recipients, you need to repeat the precious two steps found above
and create a route for each phone number.
While creating the routes, you must leave all the settings the same way as before, only change the phone number.
All your created routes can be found in the Routes tab, which you can access in the toolbar on top (Figure 8).
Figure 8 - Create route for all phone number
Forward received message to all phone numbers
Now you can see in the Events tab, that your messages have been forwarded to the specified phone numbers (Figure 9).
Figure 9 - Forward received message to all phone numbers
Summary
Everything is now set up for you to send SMS to multiple recipients with one click.
We hope you find this article helpful in implementing this solution.
For more information, check out our various other guides on Ozeki SMS gateway and other Ozeki Software.
How to swap the sender and recipient phone numbers
The next document is about to show how easy you can swap the sender and the recipient phone
numbers, so the sender becomes the recipient and the recipient becomes the sender.
This operation is great to generate an autoreply message by changing the text as well
and send it back to the sender as a response. The guide does not take more than five minutes
to complete because it contains step by step instructions and each step demonstrated
with a screenshot as well which makes it easier to complete.
Step 1 - Open a routing rule
The first step is to select a route that you want to modify. If you are not familiar
with routing rules, here you can learn about SMS routing
in SMS Gateway. SMS Gateway creates default routes, so you can simply select
the default outgoing route as you can see it in Figure 1.
Figure 1 - Select a routing rule in SMS Gateway
The next menu, that you will be able to see is the details menu of the selected routing rule.
Here you can configure it and specify how it should handle your outgoing messages.
To swap the sender and recipient phone number, first you need to select the
'Modify' tab, like in Figure 2.
Figure 2 - Select the Modify menu
Step 2 - Swap the sender and receiver addresses
In the Modify menu, you need to select the 'Swap sender and receiver' option,
where you can set up the swapping of the sender and recipient address. This operation
can be done easily by just ticking the 'Swap the 'To' and the 'From' address' option
like in Figure 3. Then, you can modify or replace the original message. If you are not
familiar with these operations, you can learn more about how to
change the message text or how to add text to the message.
To save all modifications, just click OK.
Figure 3 - Configure the swap of sender and receiver
Step 3 - Send a test message
Next, you can test the solution. For that, you need to create two connections to
see if the response message arrived without any problem. These connections can be
HTTP server connections. If you don't know about how to create the HTTP Server
connection, you can check it at this point. After you created the two HTTP server
connections, open the first connection, and open the HTML form like in Figure 4.
Figure 4 - Open the HTML form of the connection
The HTML form allows you to send test messages to other connections or phone numbers.
Here, type the recipient phone number that you specified for the second HTTP server connection
as Figure 5 demonstrates it. Then, just write a simple test message in the textbox.
If you finished, just click on 'Submit' to send the message.
Figure 5 - Write and send the test message
Step 4 - View the results in the event log
The last thing that you need to perform is to check if both the original and the response
message arrived successfully to the sender and the recipient as well. For that, you can check
the Event menu of the HTTP server connection. Here, as you can see it in Figure 6,
the connection lists every event that occurred during its uptime. Here you can see
the two lines that logged, first the delivery of the original message to the recipient,
then the delivery of the response as well.
In this guide, you will learn how you can modify the text of the SMS messages.
You are presented with an sms routing rule that is replacing the content with a predefined
text message. You can find a list of detailed configuration steps. So, let's start right now!
Step 1 - Open a routing rule
The first step is to select a route that you want to modify. If you are not familiar
with routing rules, here you can learn about SMS routing
in SMS Gateway. SMS Gateway creates default routes, so you can simply select
the default outgoing route as you can see it in Figure 1.
Figure 1 - Select a routing rule in SMS Gateway
By selecting a routing rule from the list of available routes, the next menu that you
will be able to see is the details menu of the selected route. Here, you need to select
the 'Modify' tab, as you can see it in Figure 2.
Figure 2 - Select the Modify menu
Step 2 - Configure the message text
In the Modify menu, you can configure the modification of the message text for the outgoing messages.
To be able to change the text of the outgoing messages, select the 'Replace message text' submenu. Here,
you can write a message like in Figure 3, so this text is going to replace every
message that is going through that route. If you finished, you can just click OK.
Figure 3 - Configure the Replace the text message content
Step 3 - Send a test message
After you changed the text of the message in the outgoing routing rule, you just need to write a test message.
For that purpose, you can set up a SMPP client, which will forward the message to the
recipient. Here, you can learn how to set up a SMPP client connection.
To write the message, just open the admin account, and like in Figure 4, just write a
simple test message.
Figure 4 - Write a simple test message
Step 4 - View the results in the event log
To check if you have done everything right with modifying the message, you need to open the SMPP client and select the
Events tab. Here, you can see every event of the SMPP client connection. Figure 5 shows
that the original text is replaced by the specified message text.
Figure 5 - See that the routing rule changed the message text
Conclusion: Mastering SMS Text Modification with Routing Rules
This guide has walked you through the essential steps to modify SMS message text using routing rules in SMS Gateway. From selecting and editing a routing rule to configuring replacement text, sending test messages, and verifying changes in the event log, you now have the tools to customize outgoing SMS content efficiently. By leveraging these routing capabilities, you can ensure consistent messaging, automate text replacements, and streamline communication workflows. Remember to test modifications thoroughly and monitor event logs to confirm successful implementation. With these skills, you’re equipped to tailor SMS content to your specific needs, enhancing both functionality and user experience.
This section is going to demonstrate that you can append a text message to the
end of the SMS. This solution is quite useful if you want to add an advertisement
or a signature to the end of the SMS. To achieve this goal the SMS routing table
is used. An SMS routing rule, that matches the sms appends the desired text to
the end of the existing message. By following the steps in this document, you
will be able to see how you need to set up the routing rule to add text at the
end of the message. The document demonstrates every step with a short description
about what you have to do next. You can also find screenshots at each step to be able to
visually check if you have done everything correct.
Step 1 - Open a routing rule
The first step is to select a route that you want to modify. If you are not familiar
with routing rules, here you can learn about SMS routing
in SMS Gateway. SMS Gateway creates default routes, so you can simply select
the default outgoing route as you can see it in Figure 1.
Figure 1 - Select a routing rule in SMS Gateway
Here, you can see the setting menu of the routing rule. To be able to modify
the messages on this route, you just need to select the Modify tab as you can see it
in Figure 2.
Figure 2 - Select the Modify menu
Step 2 - Configure the message to add a postfix
In the Modify menu, you have to select the 'Replace message text' submenu to be
able to modify the message. To keep the original message, you can use the '${Content}'
tag as in Figure 3. This tag represents the original message, so if you write
something after that, the routing rule appends it to the original message.
To save this setting, click on OK.
Figure 3 - Configure the message to add a postfix
Step 3 - Send a test message
After you configured the outgoing routing rule, you just need to write a test message.
For that purpose, you can set up a SMPP client, which will forward the message to the
recipient. Here, you can learn how to set up a SMPP client connection.
To write the message, just open the admin account, and like in Figure 4, just write a
simple test message.
Figure 4 - Write a simple test message
Step 4 - View the results in the event log
You can simply check if you have done everything correctly by just opening the SMPP client and here, select the
Events tab. Here, you can see every event of the SMPP client connection. Figure 5 shows
that the original text is merged with the text, that you wrote before so it will
be sent together.
Figure 5 - See that the routing rule changed the message text
This article discusses the process of setting up encryption and decryption functions to connections.
Both processes will take about 5 minutes and it requires minimal knowledge of SMS communication technology.
The tutorial is detailed and easy to understand and the Ozeki SMS Gateway has an intuitive GUI.
Following the steps will be easy. You will learn how to set up a channel where you could send secured messages so nobody will access the
information on that channel.
Don’t waste any more time. Let’s start sending SMS messages.
Figure 1 - Encrypt SMS message
Computer "A" configuration
To start setting up encryption for the outgoing messages, you need to open the details of the outgoing connection.
To reach that, click the outgoing connections name in the Outgoing list
located in the centre panel (Figure 2). In the details page, you could
customize the connection.
Figure 2 - Open outgoing route on Computer "A"
Create encryption modifier
In the details panel, you can find a tab called Modification. Here you
can see all the modification options.
To add a new one, click the Create new Modifier button.
To encrypt all the outgoing message, choose the Encryption option in the
right-side panel. (Figure 3)
Figure 3 - Add Encryption modification
Create a password
In the Encryption modifier details panel (Figure 4), you can provide a
password that both sides could use to decrypt and encrypt the messages.
Make sure that the password is something that you will remember, but hard to
guess. Click the Ok button if you are satisfied with the password.
Figure 4 - Define password for Encryption
Computer "B" configuration
The Ozeki SMS Gateway on the other computer needs some modification as well.
In the Incoming list, you will find the list of all channels used for receiving messages (Figure 5).
Choose the one you wish to setup a decrypting modifier.
Figure 5 - Open incoming route on Computer "B"
Create decryption modifier
You need to create a modification on this connection as well. Click the
Modifications tab and search for the blue Create new Modifier button.
Click it and you will see a panel on the right. You will see all the modification
options there (Figure 6).
Choose the Decryption item, so you can use this channel to display
encrypted messages in a readable form.
Figure 6 - Add Decryption modification
Add password protection
In the Modifier details page, you need to provide the same password that you have provided for the outgoing connection on the other machine.
You can find the textbox for it in the Decryption group box (Figure 7).
It is important to type in the same password, so the two computers will use the same encrypting language.
Click the Ok button if you have finished the setup.
Figure 7 - Define password for Decryption
Send test sms message
To test the encryption modifier, send a test message to the other computer.
To do that, search for the New button located on the Toolbox next to the Home button.
Click it and you will see the Message composer panel (Figure 8).
In the To group box, provide the address of the other machine with the decryption function.
Type in a text in the Message Textbox and click the Ok button to encrypt and send the message.
Figure 8 - Send test message on Computer "A"
Encrypted SMS
As you can see on Figure 9, the sent message is now encrypted and the message is not readable for the human eye.
To reach the list of Sent messages, click the Sent folder located in the Folders group box in the admin details panel on the left side.
Click the blue Sent link to get here.
Figure 9 - Sent message is Encrypted on Computer "A"
Decrypted SMS
If you send an encrypted message with identical passwords, the other machine could decrypt the message and display it.
In the Message section you can see that the text that we typed in the sent message is the same that it received (Figure 10).
Figure 10 - Received message is Decrypted on Computer "B"
How to modify the SMS recipient phone using regular expressions
In the Ozeki SMS Gateway you can change the recipient phone number in the sms routing table.
You are able to modify the rule by open it from the SMS Gateway Management console Outgoing section as the Figure 1 shows.
Figure 1 - Open outgoing route
In order to manipulate the recipient phone number, open the actual routing
rule's Modify tab and in it select the "Replace the 'TO' address" section.
Here You can define an exact phone number where the messages will be sent or
you are able to add a regular expression as you can see in the Figure 2.
With this regexp if a phone number start with '06' it will replace to '+36'.
Figure 2 - Manipulate 'TO' address
To test the phone number manipulation from the admin user, send a test message
to a phone number what is start with 06 (Figure 3).
Figure 3 - Send test message
After the message is sent you will see in the admin user's sent folder the TO address will be changed to a phone number what starts with +36 as the Figure 4 shows.
Figure 4 - TO address modified
You will also see in the service provider's Forwarded folder that the message is sent to the new phone number as you can see in the Figure 5.
This article talks about how you could change the SMS text with the help of a C# algorithm.
It will start with creating a new modifier and will end with sending a test message.
With this solution, you will be able to automatically modify all messages sent in a connection.
This tutorial requires minimal knowledge of SMS sending technologies and minimal knowledge of coding in c#.
The tutorial is easy to follow, and it is very detailed. Do not waste more time, let’s start sending SMS messages.
How to change the SMS text with C# (Quick steps)
To change the SMS text with C#:
Launch Ozeki SMS Gateway
Select Routes toolbar icon
Open outgoing route's Advanced menu
Create new Modifier
Choose Formula
Write C# algorithm to change the SMS text
Send test SMS message
Check the logs
Click the Routes button
To write a script that changes the outgoing SMS messages automatically, you first need to create a modifier.
To access the Modifier creator panel, open the list of routes with the Routes button located on the toolbar of the Ozeki SMS Gateway (Figure 1).
This will open a list that contains all the created routes.
Figure 1 - Open routing table
Open the Advanced menu
To customize any route, you need to open the Advanced menu of it. To do so, search for the Advanced button located in the Advanced column (Figure 2).
Click it and it will open the menu where you could deeply customize the routes preferences.
Figure 2 - Outgoing route Advanced menu
Add a new formula
To reach the modifications panel, search for the Modification tab. Click it and it will open the list of all the possible modifications.
To create one, click the Create new Modifier button. This will open a panel on the right where you could choose which modifier to create.
Choose the Formula button to open a new panel where you can write the
script that modify the outgoing messages. (Figure 3)
Figure 3 - Add new Formula modification
Customize the formula
In the Modifier details panel, you can customize the script that changes your messages.
In the example formula, we provided you a script that will make the text of the message upper case.
This step requires knowledge of the C# language. To verify if the code is executable, click the Check syntax button.
It will run your code and decides whether the syntax is correct or not. It will notify you with a text (Figure 4). Click the Ok button to proceed.
Figure 4 - Write C# algorithm and check it
Send your first SMS
To test the modifier, send a test SMS message. Click the New button located on the toolbar. It will open the new message composer.
In the Message textbox, provide the body of the message.
In this example, we are sending the Hello World text. Click the Ok button
to start the sending procedure. (Figure 5)
Figure 5 - Send test SMS message
Check the result
As the result of the process, all the words will be capital letters in the message.
On the events tab of the recipient, you can see that the received message is all capital letters (Figure 6).
We sent the message with normal letters, so the modifier made it all capital letters.
The following guide explains how you can send a copy of an SMS message to
multiple phone numbers. The solution presented can not only be used to send the
same text to multiple contacts, but it can also be used to send a different text
from your computer to the selected phone numbers. This solution is great if
you wish to notify multiple people with one text message. It can also be used to send
additional information to a single person, when a certain text message is sent to him.
To understand the tutorial, it is helpful if you are familiar with the
SMS routing basics of Ozeki SMS Gateway.
This document contains use cases, a video tutorial and a step-by-step instruction
list which makes the whole procedure easy to complete. This guide takes about
ten minutes to complete. So, let's get started!
How to send multiple sms at once
This question is typically asked when our customers want to send SMS messages effectively.
Finding simple solution to this problem is very easy. Use bulk SMS software like Ozeki SMS Gateway.
In the software add multiple recipients from your address book in the to field in the sms composer
and write the text of the message.
Use cases
Let a business application send a notification to multiple recipients
Receive a text and forward it to multiple contacts
Send multiple sms from your pc with one click
Send multiple text messages to one person with different text
Send the same text to multiple phone numbers, when an app wants to send a notification.
Send sms to multiple contacts in a contact list
How to send sms to multiple recipients?
There are three basic methods to send SMS to multiple recipients. You can add
a list of phone numbers on the SMS composer form, you can add the phone numbers
to an SMS address book (and use the address book name as the recipient field when
you send the text messages), and you can use the routing table to send a single
SMS to many phone numbers. This document focuses on using the SMS routing table
to achieve this goal.
To send sms to multiple recipients you can:
Add multiple recipients in the to field in the sms composer
Use an SMS address book as the SMS recipient
Setup SMS routing to send the sms to many numbers
How can an application send a text to multiple numbers using a PC
If you apply this solution in a business system, you will use an SMS gateway installed
on a PC. The business application will send the SMS to this SMS gateway, and it will
make copies of the SMS and forward the copies to the mobile network. When you
send SMS to multiple recipients from a PC you can build a high-performance system
sending several thousand or even several million SMS messages.
To setup this solution install Ozeki SMS gateway on Windows or
Linux, connect it to the mobile network through the
Internet or using a wireless link, and create a user account in it for the business
application to be able to send the notification. The notification sent by the
business application can be sent to multiple phone numbers by creating several
rules in the routing table with the copy directive. (Figure 1)
Figure 1 - Send SMS to multiple contacts from PC
How to send SMS to multiple recipients (Quick instructions)
To send SMS to many numbers:
Connect your PC to the mobile network
Determine the phone number of the PC
Setup routing to copy SMS messages to multiple numbers
Send a test SMS from the SMS gateway
Send an SMS from the Business application
Let the SMS gateway forward the SMS to the recipients
Check the log to see if the SMS was sent multiple times
Ask the recipients if they received the SMS
To send sms to multiple recipients (video tutorial)
In the following video you can see the configuration example. In this
example the business application will connect to the SMS gateway through
an SMPP server user account. A similar
configuration can be used if the
business application uses the C# SMS api,
or any other method to connect to the SMS gateway.
After the business application is connected, the SMS gateway will use
an smpp client connection to forward the
SMS messages to multiple numbers to the mobile network. The routing table
will do the magic of creating copies of the sms.
The simplest solution is to use the android sms gateway option. The best
solution is to use an SMPP client connection, because it gives much higher performance.
(Figure 2)
Figure 2 - Open SMS Gateway application
After you opened the SMS Gateway application, you will be able to see the main menu
of the SMS Gateway. This main menu contains three main sections: Connections,
Routes and Users and Applications. Now, at this point, you need to create a user
in the SMS Gateway. To perform this operation, just click on 'Add new user/application...' as you can
see it in Figure 3.
Figure 3 - Add new user or application
The next menu that shows up, lists all the available users and applications that
can be created in SMS Gateway. Every option has got a short description that helps you
to decide which application is needed in your case. To follow this guide, you just
need to have a simple Standard user, so as Figure 4 shows that, just click on the
'Install' button of the Standard user connection.
Figure 4 - Install standard user
Before finishing the creation of the Standard user connection, you have to specify
some details for the connection. These details in this case are a username and a
password for the connection. So, all you need to do is to provide these details
for the connection like in Figure 5 and finally, click on Ok to create the
first of the two Standard user connections that needed to complete this guide.
Figure 5 - Define username and password
Step 2 - Create the second standard user connection
To see the effects of how Ozeki 10 SMS Gateway copies the SMS messages for multiple connections,
you need to create a second Standard user connection. To be able to do this, you just
need to follow the instructions of Step 1, since it needs to be created the same way.
The only thing that has to be different is the username and the password of the connection.
After you created the connection, it shows up as you can see it in Figure 6.
Figure 6 - Create the second Standard user connection
Step 3 - Create HTTP Server connection
The next step of the guide that you need to complete is to create an HTTP Server
connection that is capable of sending SMS messages. This way, you will be able
to see how the SMS messages are routed to the Standard user connections. To create
a new HTTP Server connection, first, select the 'Add new connection...' option from
the main menu of the SMS Gateway as Figure 7 demonstrates that.
Figure 7 - Add new connection
Next, the selection menu of the connection is going to show up, where you can choose
from a lot of available connections with some description
and choose which one suits your solution the most. Now, you need to choose the HTTP
Server connection, so as you can see it in Figure 8, click on the 'Install' button
of that connection the move to the installation menu, where you can specify some details of the connection.
Figure 8 - Install HTTP server
Finally, before you can create the HTTP Server connection, you have to provide the
main details of the connection. The first thing that you have to specify here is the
name of the connection. Next, you can choose the port, where the HTTP Server is
going to run. You can modify this port, or you can just leave it as the default port number.
Lastly, specify a telephone number for this connection which makes it easier to
identify. After you created the connection, you need to enable it by turning on the
toggle like in Figure 9. If it is successfully enabled, you will be able to see the green tick
on the connection.
Figure 9 - Enable HTTP server connection
Step 4 - Create a route to the first Standard user
After you created all connections that needed, next, you should set up the routes
that copy the messages to the user connections. Since the creation of each user
connections also created a default route for them, you don't have to create a completely
new route, you can just modify the existing one. So, just select the route of the
first Standard user connection. Here, you need to modify the 'From' field by setting the
HTTP Server connection for that like in Figure 10 and for the 'Mode', select the Copy option.
If you have done these settings, just click on OK.
Figure 10 - Modify the first route
Step 5 - Create a route to the second Standard user
The route of the second Standard user connection needs to be set up properly as well.
So, as you did with the first user connection, select the route of the second
Standard user connection from the list of the routes. Here, you need to select the
HTTP Server connection for the 'From' field, and as you can see it in Figure 11,
select the 'Move' option as the Mode. Lastly, just click OK to save the modifications.
Figure 11 - Modify the second route
Step 6 - Simulate incoming SMS
At this point, every connection and route set up for the incoming messages. Now, you
just need to receive some. To test the solution, you can use the HTTP Server connection
to initiate some message and see how it will be routed between the Standard users.
For that, open the menu of the HTTP Server connection, and here, click on its
URL on the left side. By doing this action, the HTML form of the connection shows up (Figure 12).
All you need to do here to send a test message is to set up a recipient phone number
and write the text of the message. If you finished, just click on 'Submit'.
Figure 12 - Simulate an incoming sms
Step 7 - Check the inbox folder of the first Standard user
Now, it's time to check the inbox folder of the Standard users to make sure the
route works properly and copied the messages from the HTTP Server connection.
So, to do this, just select the first Standard user from the main menu and click on
the Inbox folder. Here, you will be able to see like in Figure 13, that the message
sent by the HTTP server connection landed in the inbox folder of the Standard user
connection as well. This means the route copied the message successfully.
Figure 13 - SMS in the first user inbox
Step 8 - Check the inbox folder of the second Standard user
The last step of the guide is to check the inbox folder of the second Standard user
connection as well. For that, just select the connection from the main menu, and
as Figure 14 demonstrates that, click on the Inbox folder. Here, you should see the
same message that was in the inbox folder of the first Standard user connection.
If it is the case, that means the second route did its job successfully to move the
message to the second Standard user.
Figure 14 - SMS in the second user inbox
FAQs
Is it possible to send a single message to multiple recipients?
The world of SMS uses two main methods for sending messages:
Point-to-Point (P2P): This is the familiar texting you do with friends and
family. You send a message to a specific phone number, and it goes directly
to that recipient.
Point-to-Multipoint (Cell Broadcast): This method allows mobile network
operators to send messages to a large group of users in a particular area at
once. These messages typically contain important network information, like:
Service updates
Emergency alerts
Local weather warnings
For most users, Point-to-Point texting is the everyday way to communicate via
SMS. Cell Broadcast messages, on the other hand, are sent by the network and
typically don't require any action from you.
How can I send longer text? What are concatenated SMS messages?
The SMS technology allows you to send longer data by splitting data into segments
and transmitting the segments as multiple SMS messages.
Traditional SMS messages are limited to a mere 140 characters. But what if you
need to send a longer message? Ozeki SMS Gateway bridges this gap with
concatenated SMS, also known as long SMS or multipart SMS.
Splitting Up the Message: When you send a long message through Ozeki SMS
Gateway, it automatically splits it into smaller, digestible chunks – each
adhering to the 140-character limit.
Seamless Delivery: Each segment is then sent as a separate SMS message.
Reassembly at the Destination: Upon reaching the recipient's phone, these
individual messages are intelligently combined back into the original long
message, ensuring your message is delivered in its entirety.
Ozeki SMS Gateway handles the entire process seamlessly, taking care of the
segmentation and reassembly behind the scenes. You simply compose your message,
and the gateway ensures it reaches its destination, even if it exceeds the
standard character limit.
In essence, Ozeki SMS Gateway unlocks the full potential of SMS communication,
allowing you to transmit longer messages without compromising convenience or
clarity.
What happens if an SMS message is sent to a mobile phone that is offline?
When you send an SMS, it takes a journey before reaching the recipient's phone.
Here's what happens:
Mobile Originated (MO) Message: Your phone sends the message to a central
message centre called the SMSC (Short Message Service Centre).
Storage and Routing: The SMSC acts like a post office. It stores your message
and tries to locate the recipient's phone within the mobile network.
Mobile Terminated (MT) Delivery: Once the recipient's phone is online, the
SMSC forwards the message (now called a Mobile Terminated or MT message) to
their device.
Computers Can Send SMS Too!
SMS isn't just for phones. Applications on computers can also send SMS messages
using a process called Application Originated (AO) message submission. This
typically involves using an IP SMS protocol to connect to an SMSC.
In essence, whether from your phone or a computer application, SMS messages rely
on the SMSC to ensure they reach their destination.
Can I use my micro-SIM card with Sierra Wireless Fasttrack modem?
The Ozeki Android SMPP SMS Gateway acts as a two-way bridge between your Android
phone's SIM cards and Ozeki on your PC. It seamlessly forwards all incoming
SMS messages to Ozeki for centralized management, while also allowing you to
send SMS messages through Ozeki, selecting the appropriate SIM card on your
Android to deliver the message to the recipient (as long as their phone is
active).
Can I use my smart phone as a GSM modem?
Direct connection between Android and Ozeki isn't supported. But the Ozeki
Android SMPP SMS Gateway app lets you connect your phone, enabling sending and
receiving SMS through Ozeki on your PC.
I can send SMS, but I cannot receive with my modem. Why?
While Ozeki SMS Gateway might be receiving incoming SMS messages, there's a
possibility they are not reaching their intended destination. Here's a potential
cause and solution to consider:
Missing Inbound Routing Rule: Ozeki SMS Gateway relies on pre-defined routing
rules to direct incoming messages to specific users or applications. If such
a rule is not established for a particular sender or message type, the message
might not be forwarded as intended.
To ensure proper delivery of incoming messages, it's crucial to verify and
potentially configure inbound routing rules within Ozeki SMS Gateway. For
detailed instructions on configuring inbound routing settings, please refer to
the following resource: https://ozeki-sms-gateway.com/p_138-how-to-send-sms-from-sqlite.html
By checking and adjusting inbound routing rules as necessary, you can ensure
that Ozeki SMS Gateway efficiently forwards incoming SMS messages to their
designated recipients within your system.
In this guide you will learn about connecting your SMS system to multiple mobile
networks for sending SMS messages. This is useful to achieve redundancy and to
optimize for costs. You will learn, how to setup SMS routing to select the mobile network
you wish to route your message to. The guide does not detail the SMS routing basics
and how to setup of IP SMS connections to mobile networks,
as there are separate guides for that. The focus is on working with multiple connections,
and the ability to control what happens to messages going through your system. You will
learn how to select a destination for your messages and how to modify the message content
or the message sender and recipient addresses on the fly.
Terms and definitions
Let's get started by defining the most important definitions needed to
understand multiple mobile network connections and SMS routing.
What is an SMS message: An SMS message is a sort text or binary message that goes through
your system. It carries 140 bytes of useful data. It can carry 160 gsm (Latin) characters, which
are 7 bit long, 70 unicode characters which are 16 bit long, or 140 bytes of binary data. Long
text messages (longer than 160 characters) are split into multiple SMS in order to carry the long text over
the network. This technology is called segmentation and reassembly (SAR). The sender mobile phone segments
the long text and sends it over the network using multiple SMS messages, and the recipient waits for all message
segments to arrive and assembles them. When you are working with SMS routing you route standalone short messages
(or message segments of multipart SM). When a multipart message goes through the system, each part is routed
individually.
What is an SMS connection: A connection is an interface for an SMS message to either come into the
system or to go out from the system. For example, you can setup an SMPP client "connection" to connect
to a mobile network operator. In this case you can send messages and receive messages through this
connection to and from the mobile network. Another example would be a database. You can setup
a database with two database tables to send and receive SMS messages. In this case you would add
a database "connection" to your system.
What is an SMS route: A route takes a message from one connection and passes it to another connection.
For example, you can setup a route to take a message from the database connection and to pass it to an SMPP client
connection. Routes can also be used to modify a message on the fly (e.g. replace the message text to something else
or to change the sender or recipient phone numbers.
What is an SMS routing table: A routing table contains a list of routes. When an SMS message comes in from
a connection, the routing table is used. The system checks the first route and if it matches the sms message,
it will use it to select the destination connection. If the incoming sms does not match the first route, it
tries to use the second route, then the third and so on. Routing stops when a route matches the incoming sms.
Overview
Since the Ozeki SMS software offers many different connections that can be used as an SMS router. It will work
at high-performance, and it can be used to control your messages. In order to setup Ozeki as an SMS router,
you need to learn how to setup connection and how to setup SMS routing. Figure 1 gives you an idea on
what kind of SMS connections you may setup.
Figure 1 - SMS connections
How to route SMS messages?
Open the Ozeki SMS Gateway home screen
Add a new SMS connection to the mobile network
Add a new SMS user or an SMS application
Create an outbound SMS route
Define a phone number prefix for routing
Create an inbound SMS route
Optionally setup recipient phone number condition
Set the order of routes
Optionally modify the SMS message text
Decide if you want to copy the message or move the message
Step 1 - Open the Ozeki SMS Gateway home screen
On the main page of the Ozeki SMS gateway, you can see the Service provider connections,
the User/Application connections, outbound and inbound routing rules.
Figure 2 - SMS connections and routes on the Ozeki GUI
Step 2 - Add a new SMS connection to the mobile network
You can add a service provider connection by clicking Add new connection
in the Connections section. Then select the type of connection that suits
for you from the list and click Install to add the connection.
Figure 3 - Add a new SMS connection to the mobile network
Figure 4 - Add a new SMS connection to the mobile network
Step 3 - Add a new SMS user or an SMS application
You can add a User or Application connection by clicking Add new connection
in the Users and applications section. Then select the type of connection that suits
for you from the list and click Install to add the connection.
Figure 5 - Add a new SMS application
Figure 6 - Add a new SMS application
Step 4 - Create an outbound SMS route
You can add an outbound routing rule by clicking add new route in the Outbound section.
Then in the Settings, for the From connection, select the User connection from which
you are sending the SMS, and for the To connection, select the Service provider
connection through which you want to send the SMS to the service provider.
Figure 7 - Create an outbound SMS route
Figure 8 - Create an outbound SMS route
Step 5 - Define a phone number prefix for routing
In the SMS Gateway, during routing, you have the option of selecting which service
provider connection to send the message to, based on the prefix of the recipient's
phone number. On the Match tab, in the To address field, you can enter the phone
number prefix you want to use in the given routing rule.
Figure 9 - Route based on phone number prefix
Step 6 - Create an inbound SMS route
You can add an inbound routing rule by clicking add new route in the Inbound section.
Then in the Settings, for the From connection, select the Service provider
connection from the sms is arrived, and for the To connection,
select the User connection where you want to forward the SMS.
Figure 10 - Create an inbound SMS route
Figure 11 - Create an inbound SMS route
Step 7 - Optionally setup recipient phone number condition
In the SMS Gateway, during routing, you have the option to select which user
connection the message will be forwarded to, based on the recipient's phone number.
On the Match tab, in the To address field, you can enter the phone number you
want to use in the given routing rule.
Figure 12 - Route based on recipient phone number
Step 8 - Set the order of routes
The order of the routing rules determines the order in which the Ozeki SMS
gateway scans them. In the routing table, you can use the arrows in the order
section to change the order of the rules.
Figure 13 - Change the order of routes
Step 9 - Optionally modify the SMS message text
When sending an SMS, you have the option to modify the sent message during routing.
You can do this in the Replace message Text field on the modify tab of the routing rule.
Figure 14 - Modify the SMS message text
Step 10 - Decide if you want to copy the message or move the message
To send a message over two connections with the Ozeki SMS gateway,
all you have to do is create two routing rules. For both, the From connection
should be the user whom you want to send the message and the To connection should
be the two service providers which you want to send the SMS.
Finally set Mode to Copy for both rules.
This guide provides information about HLR lookups and how HLR information
can be used in SMS routing. It first defines what an HLR is and proceeds
to give information on how HLR information can be used in SMS routing. Finally,
it gives detailed step by step instructions on how to setup HLR lookups
in the Ozeki SMS Gateway.
What is HLR
HLR stands for Home Location Register. HLR is a database maintained by the
mobile network operator with a list of phone numbers it originally issued.
The HLR stores information about whether a phone number is connected to
the mobile network, is it ported to a different telephone company and is it
roaming a different network.
Getting started
All mobile network operators are connected within a system called the SS7
signalling network. The SS7 transports data about subscribers, networking,
voice calls, and SMS text messages between the carriers. Real-time context
and status information about every mobile phone is stored in databases called
Home Location Registers, which form the backbone of subscriber information
for a mobile network.
HLR Lookups is a technology to query home location registers and acquire live
networking and connectivity information about mobile phone numbers, such as,
whether a mobile phone is switched on or switched off, to which network it belongs,
whether it is currently roaming, if a number has been ported between networks,
and if it is valid or invalid.
HLR Lookups supply businesses with real time queries towards the home location
registers of all mobile networks. This documentation helps you to implement
HLR Lookups into your own software to automatically receive real time mobile
phone information when needed.
Create a hlr-lookups.com account (Video tutorial)
The following video informs you about how you can connect a HLR account and the Ozeki 10 SMS Gateway.
The video starts with the registration of a new HLR Lookup account and takes you all the way to having the SMS Gateway connected with it.
You will learn how to register a new HLR user account and how to setup a working connection with the Ozeki 10 SMS Gateway.
This detailed video is only a little over 2 minutes and it is easy to follow. You will have no problem following the steps.
Register a user account at HLR Lookup
To start using the service, you first need to visit the home page of HLK Lookup.
Search for a green signup button located on the upper-right side of the page (Figure 1).
Click it and you will be presented with a registration form.
Type in the information required for signing up and click the green Create Account button.
This way you will have a registered user account for the HLR Lookup service.
With this account you could begin implementing the feature to your system.
Figure 1 - Create new hlr-lookups.com account
Check the confirmation email
Login to your email account and search for a confirmation email from HLR Lookup.
Click the blue link to finalize your registration (Figure 2).
This email is an assurance that the email address for the user account is legit
and reachable by the owner.
If you activated your account, go back to the main page of the HLR Lookup website.
Figure 2 - Finalize registration
Open the API settings
Login to your account to access your dashboard, where you could check your
spendings. To access your account settings, search for a green Account
button located under the Dashboard label.
By clicking it, you will reach the account settings page. (Figure 3)
Figure 3 - Open account settings
Look for the API settings option, which is the last one on the list of settings (Figure 4).
Click it and find the green Got To API Settings button.
By configuring your API settings, you will get all the necessary API credentials you need to work with the HLR Lookup service.
Figure 4 - Open API settings
Copy the API key and API secret
An API is an Application Programming Interface that provides access to the hardware and software element of a system.
A program could send requests to an API that will return with the collection of required information.
To avoid exposing the ecosystem of HLR Lookup to attack,
it is important to protect the API with a unique key and password that is only available for the user of the service.
You could get the key and password in the API Credentials page of the HLR Lookup menu (Figure 5).
Copy those information, to use them later in the process of creating a HLR provider in Ozeki 10 SMS Gateway.
Figure 5 - API credentials
Create a new provider in Ozeki 10 SMS Gateway
Open the Ozeki 10 SMS Gateway and open the Advanced menu with the icon located on the toolbar (Figure 6).
On the left panel, you will find the HLR Lookups button. Click it and look for the blue Create new HLR provider button.
Press it and you will be presented with two options on the right side of the screen.
Choose the hlrlookups.com. This way, you will have direct connection to the HLR Lookup service through the API.
Figure 6 - Create new HLR lookup provider in Ozeki SMS Gateway
Provide the authentication details of the API
In the General tab, you can find the Authentication group box (Figure 7).
There you can find two textboxes. Insert the proper data you copied from the
HLR Lookup, into the input boxes.
The first box needs the key, the second needs the password or
secret.
Click the Ok button under the Authentication group box to finalize your
setup.
Figure 7 - Provide API key and secret
Run HRL lookup from Ozeki SMS Gateway (Video tutorial)
In this video, you will learn how to create a new HLR record directly from the Ozeki 10 SMS Gateway.
The video will start with having a HLR provider and takes you all the way until you have every information about the phone number you provided.
You will learn how to create a new HLR record and how to get information about the record.
This video is only 75 second long. It is very detailed and easy to understand, so you will have no problem following the steps.
Open the HLR Lookups link
To manage your HLR providers, open the advanced page. Click the Advanced icon located on the toolbar of the Ozeki 10 SMS Gateway.
Here you need to find the HLR Lookups on the left panel (Figure 8). Click it and you will see all the existing HLR Providers in the middle panel.
This list is important, because you could edit, delete and add new providers from here.
Figure 8 - Open HLR providers
Create a new HLR record
To add a new item to the HLR record list, find the HLR records tab page (Figure 9).
Click it and find the blue Create new HLR record button right under the tab.
Click it and in the general tab of the right-side panel,
you could type in a phone number that you wish to store and query information about with HLR Lookup.
This phone number and all the information the HLR Lookup find will become a HLR record.
Figure 9 - Create new HLR record
Request a data query from HLR Lookup
To search for information about the record, go back to the list of HLR records. There, you will find your new item.
You can find the phone number, the connectivity status, and more data.
To get even more information, press the HLR lookup button located next to the lookup date of the list item.
Press it to send a request to the API of the HLR Lookup. It will return with the most important data elements about the record.
(Figure 10)
Figure 10 - Run HLR lookup
Look at the result of the data query
To check the result of the query, look for the Details button located at the end of the record data line (Figure 11).
Click it to see the details page, which contains all the information the HLR Lookup service could acquire.
The page you will se now is the record details page.
Figure 11 - Open HLR record details
On the record details page, look for the Advanced tab. There you will see a list of information about the phone number.
You can see for example if the phone number is connected to any service provider and which country the phone number is registered in.
The Hint icon next to each textbox will give you more information about that specific data piece (Figure 12).
Figure 12 - Detailed HLR information
How are HLR lookups used in SMS routing?
The Home Location Register (HLR) plays an important role in SMS routing,
because it can provide information to where the text message should be routed
to.
Large companies setup many SMS routes, to various SMS service providers and
mobile network operators and they use SMS routing
to determine where each text messages should end up. SMS routing selects
the appropriate SMS service provider connection, such as an SMPP client
protocol connection, a CIMD2 client protocol connection or
a UCP sms client protocol connection for sms delivery.
A HLR lookup can provide valuable information on how an SMS messages should
be routed. A HLR lookup in Ozeki works by attaching tags to the SMS messages. Tags
contain information about the fields returned by the HLR lookup. HLR lookup is
performed before SMS routing takes place. When an SMS route is created it can
use match conditions of tags to select the appropriate SMS service provider connection
based on information received from the HLR lookup.
HLR based routing (Video tutorial)
The following video gives you all the information about how you can use the HLR Lookup service to route your SMS messages.
This video starts with enabling HLR lookup service to use for SMS routing and it will take you all the way to your first sent SMS message.
The video is detailed but easy to understand. It only takes a little more than 3 and a half minutes so you will have no problem following the steps.
You will learn how to enable HLR lookup for SMS routing, how to configure your message for successful delivery and how to check if the message was accepted and sent.
Edit the settings of the Ozeki 10 SMS Gateway
In the menu bar of the Ozeki 10 SMS Gateway, you can see the Edit menu button. Under it, you will see the Preferences submenu item.
Click on the button to open the preferences menu (Figure 13).
From there you can edit the settings of the Ozeki 10 SMS Gateway and enable HLR Lookup service for SMS routing.
Figure 13 - Open Server preferences
Enable the HLR Lookup for SMS routing option
In the General settings list, look for the HLR Lookup list item.
Click it to see the general setting details panel.
In the HLR Lookups group box, you will find a checkbox that is for
enabling the usage of the service for SMS routing (Figure 14).
Tick in the checkbox and click on the Ok button to finalize your configuration.
Figure 14 - Enable HLR lookup for SMS routing
Send a test message
You could test the new routing settings by sending a test message to the recorded phone number.
This way you will be able to get the tag that the HLR Lookup attaches to the message.
To do so, click the New icon on the tollbar of the Ozeki 10 SMS Gateway (Figure 15).
Now you will see New message composing panel. In the Address textbox, you will need the phone number, you wish to send the test message to.
Under it, you can see the Message input field. Type in the HLR test text and click the Ok button to send the message. This way, the HLR lookup service will
search for information about the phone number. It will attach the information to the message.
Figure 15 - Send test SMS
Check the tags of the sent message
If you have successfully sent the message and it was submitted, it will be
visible in the sent folder.
To check the information you need in the tags, look for the user information
panel on the left side (Figure 16).
In the Folders group box, you can find the Sent folder. Click it
and check the list of sent messages.
Under the list, you will find the Message details panel. Here you can
see all the information about the submitted message.
Look for the Tags tab page next to the Delivery history tab. Click it
and you will be presented with the tags that the HLR Looks service attached to
the message.
Here, you need to find the hlr_original_country_code field.
This tells where the phone number is registered originally.
Copy that information somewhere for later use.
Figure 16 - SMS message HLR tags
Add a new route according to the HLR
To have the message delivered successfully, you need to create a route for it according to the information obtained by the HLR service.
To do this, open the Route list with the Route icon located on the Toolbar (Figure 17). Now you will find a blue button titled Create new Route.
Click it to open the Route details panel on the right side of the screen.
There you will find the Settings group box. In that group box you will find the To input field. You need to provide the created SMPP clients address here.
Figure 17 - Add new HLR based routing rule
Add a new routing condition
In the Route details panel, you can find the Match tab page. Here
you will see a Tag group box (Figure 18).
In this group box, you can add a tag name which will be detected and a
tag value which will be used as the condition for detection.
Next to each input field, there will be a help icon, which can be used
as a way to get more information about what you need to type in to the textbox.
Figure 18 - Add tags match for routing
In the Tag name group box, paste in the hlr_original_country_code
text that was copied from the tags of the submitted message.
Paste the value of the hlr_original_country_code into this textbox.
This way, if the gateway detects that a message is sent with the provided value,
it will automatically use this suitable SMPP protocol for sending the SMS.
In the example case this is the GB tag (Figure 19).
Figure 19 - Define HLR tag for routing
Send a new test message
Now it is time to send a new test message. Just as before, click the New icon on the Toolbar.
This will take you to the New message compositor page. In the Address textbox, you need to provide the phone number you have sent the last test message to.
Under it you can see a Message input field. Type in the HLR route test text.
Click on the Ok button to send the message. (Figure 20)
Figure 20 - Send new test message
Test message successfully sent
On the Message delivery history page, you can confirm that now the test massage was sent through the new configured SMS connection.
The first test message status said the message is submitted.
Now this new configured SMS message status says Submit accepted by the receiver.
Now you can use this configured SMPP connection to send messages to the country you have provided the
code of as a tag value.
Figure 21 - Message sent through configured SMS connection
In some cases you need to implement routing restrictions to comply with government
regulations or customer requirements. This guide shows you how you can implement
a routing restriction. The example we are about to present is a classic example of routing restrictions.
We show how is it possible to restrict a service to prevent International SMS sending.
How to turn off sending international SMS? (Quick start guide)
Access your Ozeki SMS Gateway account
Add new routing rule
Go to the 'Match' tab
Choose the 'To address' option
Set recipient with national code
Set connections
Modify the default route to drop messages
Send a message using an international address
International message is dropped
Send a message using a national address
National message is sent
Add new rule to allowed user
Send a message from allowed user using an international address
Allowed user's international message is sent
Send a message from allowed user using a national address
Allowed user's national message is sent
How to block International SMS messages?
In this short video guide, we will walk you through the most important steps when
it comes to SMS routing. By the end of this tutorial, you will know how to disable
or able sending international SMS messages. Blocking international SMS messages
can save you money and ensure faster delivery. (Video 1)
How to prevent sending international SMS messages (Step by step guide)
To begin the process, login to your Ozeki SMS Gateway account. If you do not have
an account yet, then create one, by downloading Ozeki SMS Gateway from the website.
The first thing you have to do is click on the 'Create new route' sign to create
a new routing rule. (Figure 1)
Figure 1 - Add new routing rule
A 'Route details' window will open, where you have to select the 'Match' tab. Within
the 'Match' tab you have to choose the 'To address' option. You will be required
to set up a recipient with a national code in the 'Recipient' window. (Figure 2)
When you are ready, click on the "Ok" button to continue the process.
Figure 2 - Set recipient to start with national code
The next step is setting connections (Figure 3). Do this by clicking on the route
you have just added in the previous step. Go to the 'General' tab and specify the
message route. You have to provide where and from where you want your messages to
go. Set 'From' to 'Any_SMS_User@localhost' and 'To' to 'Any_SMS_Connection@localhost'
Hit the 'OK' button to save changes.
Figure 3 - Set connections
To continue the process, you have to modify the default route to drop messages
(Figure 4). Select 'out_sms' and then go to the 'General' tab. Go to 'Mode' and
open the drop-down list. Select the 'drop' option.
Figure 4 - Modify default route to drop messages
To succeed with this step, you have to send a message first. Set the recipient's
address and then enter the message you would like to send into the box. Press 'Ok'
to deliver the message. After sending the message you will see the 'Message delivery
history'. As you will see the message did not go through routing because international
messages are dropped (Figure 5).
Figure 5 - International messages dropped
The next step is sending a new message but using a national address. Enter recipient's
address into the proper box and type a message. Press 'Ok' to deliver the message.
You will see at the 'Message delivery history' that the national message has been
successfully sent (Figure 6).
Figure 6 - National message sent
Adding a new rule to allowed user is the next important step in the process (Figure 7).
Go to the 'General' tab and set up the new route's settings. Select
'Any_SMS_Connection@localhost' from 'To'. Press 'Ok' to add new rule.
Figure 7 - Add new rule to allowed user
Go to the Home page and select the correct user. Set the proper international
recipient's address and enter you message into the box below. You will see that
the allowed user's international message has been sent (Figure 8).
Figure 8 - Allowed user international message sent
Send another message using the same allowed user you have used before. This time
instead of an international address, use a national one. At the 'Message delivery
history' you can see that your message has also been successfully sent to a
national address (Figure 9).
Figure 9 - Allowed user national message sent
How to assign phone numbers to users using routes (Quick Start Guide)
Log into your Ozeki SMS Gateway account
Create new route to Alice
Go to the 'Match' tab and choose the 'To address' option
Set Alice's phone number
Create new route to Bob
Go to the 'Match' tab and choose the 'To address' option
Set Bob's phone number
Create route for other numbers
Modify the routing order by clicking on the arrows
Send message to Alice
Message is sent to Alice
Go to Alice's 'Inbox' and see that the message is there
Send message to Bob
Message is sent to Bob
Go to Bob's 'Inbox' and see that the message is there
Send message to other number
Message is sent to other number
Go to 'Management' and choose the 'SMPP_client_1'
Message is received by the service provider
How to assign phone numbers to users using routes (Video tutorial)
In this easy-to-follow, user-friendly video guide we will show you the most important
steps when it comes to assigning phone number to users using routes (Video 2).
How to assign phone numbers to users using routes (Step by step guide)
First thing first, log into your Ozeki SMS Gateway account. Go to the 'Create new
route' to begin the process. Navigate to the 'General' tab and within the 'Settings'
specify the message route. Set 'From' to 'Any_SMS_user@localhost' and 'To' to
'Alice@localhost' so that you create a new route to Alice (Figure 10).
Figure 10 - Create new route to Alice
Reach the 'Match' tab. Choose the 'To address' option within the 'Match' tab. Set
Alice's phone number by entering the recipient's address (Figure 11).
Figure 11 - Set Alice phone number
Now you have to repeat the previous steps, but now with Bob. Click on 'Create new
route' (Figure 12). Go to the 'Settings' within the 'General' tab and change the message route's
destination to 'Bob@localhost'.
Figure 12 - Create new route to Bob
Setting up Bob's phone number is the next crucial step. Navigate to the 'Match' tab
and select the 'To address' option from the list. Enter Bob's phone number into
the 'Recipient' box (Figure 13).
Figure 13 - Set Bob phone number
To continue the process, you need to create a new route for other numbers (Figure 14).
Go to the 'General' tab and specify the message route. Set the starting point of
the message route to 'Any_SMS_User@localhost' and the destination to
'SMPP_client_1@localhost'. Press 'Ok' to save changes.
Figure 14 - Create route for other numbers
Within your routes, you can modify the routing order (Figure 15). Click on the
proper arrows to reach to the desired order you wish to create.
Figure 15 - Modify routing order
The next step is sending a message to Alice. Enter Alice's phone number into the
'Address' box, write you message and press 'Ok' to deliver the message. At the
'Message delivery history' you will see that the message has been sent to Alice
(Figure 16).
Figure 16 - Message sent to Alice
Navigate to the 'Management' sign in the upper right corner of the screen. Select
'Alice' user. Go to 'Inbox' and you will see the message we have just sent to Alice
(figure 17).
Figure 17 - Alice inbox
Repeat the very same steps, but now with Bob. Send a message using Bob's phone
number, enter the SMS message and press 'Ok' to send. At the 'Message delivery
history' you will see that the message has been sent to Bob (Figure 18).
Figure 18 - Message sent to Bob
Go to 'Management', and select Bob user. Go to Bob's inbox to see that the message
appears in his inbox (Figure 19).
Figure 19 - Bob inbox
The next step is sending a message to another number (Figure 20). After you press
'Ok' you will see that the message has been successfully sent to other number.
Figure 20 - Message sent to other number
Go to 'Management' and choose the 'SMPP_client_1' among the connections. At the
bottom of the page, you will see that the message has been received by the service
provider (Figure 21).
Figure 21 - Message received by the service provider
Frequently Asked Questions (FAQs)
What is SMS routing?
SMS routing is the method of directing text messages from the sender to the
recipient efficiently, considering factors like destination and cost. It ensures
messages are delivered reliably and quickly while minimizing expenses.
Why is preventing international SMS messages important?
Saving money: International texting often costs more than local messaging.
By stopping international SMS, users and providers can avoid pricey fees.
Steady communication: International texting can strain networks, slowing
down delivery. Blocking unnecessary international messages keeps things running
steadily.
Targeting audience: If a business wants to reach specific group of audience,
avoiding international messaging lets them focus efforts where they matter most,
making campaigns more effective.
Why should I use routes when assigning phone number to users?
If you have both local and international phone numbers, routes ensure that your
messages are sent through the most cost-effective path. They are useful when you
need more control over how your SMS messages are handled based on the phone number
or other factors.
Summary
These SMS Routing examples can be very helpful when it comes to optimizing your
communication. For example, preventing international SMS messages in SMS routing
is important for several reasons. It helps to minimize costs for both users and
service providers by avoiding expensive international routing fees.
But knowing how to assign phone numbers to users using routes is also important.
The aim is to effectively distribute phone numbers among users, enabling proper
communication, and improving the management of resources.
Within Ozeki SMS Gateway you can try out these SMS routing examples and use them
to make your communication system better while ensuring faster and more
reliable delivery of your messages.
The Ozeki SMS User guide offers documentation of Ozeki SMS Gateway's user interface for humans.
If your employees wish to send SMS messages from office desktops, check out the
following articles.
How to create an SMS user account
One of the basic system administration tasks is to create user accounts
for all users of the SMS software. After user identification, SMS users
have access to an efficient and user-friendly SMS tool that enables
businesses to manage SMS communication. With features like bulk messaging,
personalization, scheduling, and inbox management, it offers a powerful
solution for sending and receiving SMS messages. SMS users
How to send SMS to a contact list in the Address book
"Sending SMS from the Address Book using Ozeki SMS Gateway is a simple
and efficient process. Start by importing your contacts from the Address
Book to Ozeki SMS Gateway. Then write the text of the SMS message and
select the desired contacts from the address book. Finally, click the
Send button, and the Ozeki SMS Gateway will send SMS messages to the
contacts selected from the Address Book." SMS using addressbook
How to use SMS Templates
Utilizing SMS templates with Ozeki SMS Gateway is an effortless process.
To get started, log in to the Ozeki SMS Gateway web interface. From there,
access the SMS template section and select 'Create New Template.'
Enter your desired message content, incorporating variables or
placeholders for dynamic data if needed. Once you've finalized the
template, save it, and it will be readily available for use when
sending SMS messages. This enables you to expedite and maintain
consistency in your messaging by leveraging pre-defined content SMS templates
How to use Excel to send SMS
How to send SMS from Excel
Streamline your communication process with the convenience of sending
SMS messages directly from Excel using Ozeki SMS Gateway. Follow
these steps: import your Excel contact list, set up the phone number
and message fields, and effortlessly send personalized messages to your
recipients, ensuring efficient and effective communication. Send SMS from Excel with Ozeki SMS Messenger
SMS scheduled with Excel
Effortlessly schedule SMS messages using Ozeki SMS Gateway and Excel.
Begin by importing your contact list into Excel, ensuring that each
record includes a date and time field. Next, install and configure
Ozeki SMS Gateway, making sure it is properly integrated with Excel.
Import the Excel file into the SMS Messenger and set the scheduled
time using the Date Time column from the Excel file. Once the message
is composed, it will be stored in the Outbox Postponed folder. The
messages will be sent at the specified time indicated in the Excel file,
allowing for convenient and timely delivery. SMS schedule with excel
Excel SMS with Selectable Column Data
Sending SMS from Excel with selectable Column Data streamlines bulk SMS
campaigns, offering personalized messages within the same file and complete
data control, ideal for office users and marketers. This self-contained
solution enhances brand visibility and customer engagement through
targeted messaging. Take your SMS campaigns to the next level with our
powerful solution! SMS from Excel using Column Data
Manage sending times and resubmissions
How to send scheduled SMS messages using the calendar
Using SMS templates with Ozeki SMS Gateway is an easy process. To get
started, log in to the Ozeki SMS Gateway web interface. From there,
go to the SMS template section and select "Create a new template".
Enter the desired message content and customize it using the variables.
Once you've finalized your template, save it and it'll be ready to
use when sending SMS messages. This allows you to speed up and maintain
messaging using pre-defined content SMS schedule with calendar
SMS with delays
To send an SMS message with a delay using Ozeki SMS Gateway,
you can follow these steps. First, ensure that you have installed and
configured the Ozeki SMS Gateway on your system. Next, prepare the
SMS message content, recipient's phone number in an Excel file.
Import the Excel file into the SMS Messenger and set the scheduled time
using the Advanced tab. In the Advanced tab set the delay between
SMS messages. Once the message is composed, it will be stored in the
Outbox Postponed folder. The messages will be sent at the specified
time indicated in the Send on date field and will be sent periodically
according to the adjusted delay. How to send SMS with delays
Resending failed SMS messages
Ozeki SMS Gateway offers a solution for handling errors in SMS delivery,
ensuring messages reach their recipients reliably. With the capability
to resend failed messages through SMS Messenger software connected to the
gateway, businesses and individuals can efficiently manage delivery issues.
By leveraging this feature, users experience improved reliability and efficiency
in SMS communications, ensuring timely delivery of important messages without
obstacles. How to resubmit failed SMS messages
This chapter explains how to install and configure a standard user for
SMS messaging using the graphical user interface of the Ozeki SMS Gateway software.
Standard SMS User Client
Figure 1 - SMS Messenger Client
How to create an SMS user account
To create an SMS user account:
Launch Ozeki SMS Gateway
Add a new user in Ozeki SMS Gateway
Install Standard user
Provide unique username and password
Enter the recipient phone number
Type the SMS message text
Send the test SMS message by click on Ok
Check the status of the message in Message delivery history
Create an SMS user account (video tutorial)
In this following short, 40 seconds long video you can learn how to create an SMS
user account in Ozeki SMS Gateway. It will explain you all the essential steps, you have
to make, so it won't cause any problems to complete the process. It starts by adding
a new user in the Ozeki SMS Gateway and configuring the user account, by adding
the necessary information. It will show you the method of sending an SMS message
to your recipient. The Ozeki SMS Gateway's user-friendly interface provides that,
if you follow the steps given in this video tutorial, you will be able to create
an SMS user account in a simple way, when you needed.
Step 1 - Add new user or application
To start installing and configuring a standard user, click the Add new user/application... link on the right of the Management Console (Figure 2).
Figure 2 - Add new user/application...
Step 2 - Install Standard user
An interface will open consisting of two panels. The left-side panel contains the already installed users and applications.
The right-side panel contains the users and applications you can install with a brief description next to them.
Search the Standard User and click the blue 'install' button next to it (Figure 3).
Figure 3 - Install Standard user
Step 3 - Configure username and password
Clicking the Install link will bring up the Standard user installation panel.
Here, you need to enter a unique username in the Username field and a password
in the Password filed (Figure 4).
Figure 4 - Configure username and password
Step 4 - Send test message
From the Standard user GUI, you can send SMS message. Provide the recipient address, the message and click on the OK button (Figure 5).
Figure 5 - Send test SMS message
Step 5 - Message sent
After the message is sent you can see the result of the sending in the message delivery history (Figure 6).
Ozeki SMS Messenger is a SMS text messaging software to send SMS to your entire
contact list and personalize your messages using custom fields. The SMS messenger
has intuitive user interface, so you can start to use for sending multiple
SMS messages immediately. To achieve this functionality you need to install
standard user in the Ozeki SMS Gateway, login as a standard user,
then you can start sending group text messages.
What is SMS Messenger?
Ozeki SMS Messenger is a software application designed to facilitate efficient and
effective text messaging communication. It serves as a tool within the broader Ozeki
SMS Gateway system, which specializes in managing SMS interactions and communication
channels. Ozeki SMS Messenger allows users to compose, send, and receive text messages,
providing features like message history tracking, status updates, and notifications.
It's commonly used in various industries and contexts where reliable SMS communication
is essential, such as marketing campaigns, customer support, and notifications.
Send SMS text message with Ozeki SMS Messenger (Video tutorial)
In the following video, you will learn about how you can setup Standard user in
the Ozeki SMS Gateway server software and start using the SMS Messenger with
sending your first short text message. The video is a little shorter than 1
minute, but it contains all necessary information to be able to do it alone.
How to send SMS with an Ozeki Messenger
To send SMS with an Ozeki Messenger:
Open Ozeki SMS Gateway on your desktop
Add new user in the SMS Gateway software
Install Standard user
Enter username and password
Login as standard user
Open SMS Messenger
Type in the recipient's phone number and compose the message
Click on "Ok" to send out the sms message
Check the log file
Step 1 - Add new user or application
To initiate the procedure, sign in to your Ozeki SMS Gateway account. If you haven't
acquired an Ozeki account yet, you can obtain the Ozeki SMS Gateway app from
https://ozeki.hu/ website.
Upon successful login, access the Home page of the gateway. Choose the
"Add new user/application..." option from the Management panel to add new user.
Figure 1 - Add new user
Install standard user
Setting up the Standard User involves installing it through the General section.
To proceed with the installation of the Standard User, simply click on the "Install"
link situated next to it. This straightforward action will effectively establish
the Standard User for your personal use. Once the installation is complete, you'll
have the Standard User ready to be utilized according to your needs.
Figure 2 - Install standard user
Set up Standard user login information, so you can access it with login data. Enter
a Username and Password to it. Once you've entered the Username and Password, you'll
have successfully set up the login information for the Standard User, ensuring secure
and personalized access.
Figure 3 - Configure user
You can now effortlessly log in as the standard user in the Ozeki SMS Gateway.
Simply input the established Username and Password on the login
page to access the standard user account. Upon successfully logging in as the
standard user, you'll gain access to a range of features and tools tailored to your
needs, ensuring a seamless and productive user experience.
Figure 4 - Login as standard user
Navigate to the Start menu of the Ozeki SMS Gateway and choose the "SMS Messenger"
icon. This will open Ozeki SMS Messenger.
Figure 5 - Open SMS Messenger
By clicking on the "New" button, create an SMS message in Ozeki Gateway. Add your
recipient's mobile phone number and formulate the text message in the appropriate
cells. After entering these details, click on the "Ok" button to start the process
of delivery.
Figure 6 - Send SMS message
You will have access to a message delivery history as soon as your message is
delivered. This history gives you information on the status of your SMS, including
notifications and updates regarding its progress. This amount of insight into
the route taken by your message improves your ability to manage communication successfully.
Figure 7 - SMS Message sent
FAQs
What is an SMS Gateway?
The interchange of SMS (Short Message Service) messages across various telecommunications
networks, such as mobile networks and computer systems, is made possible by an SMS
Gateway, which is a software- or hardware-based platform. It serves as a bridge,
facilitating message translation across various protocols and formats to allow for
smooth communication. SMS Gateways are necessary for many services, including
notifications, marketing campaigns, and automated alerts, since they serve a critical
role in enabling apps to send and receive SMS messages.
What is the difference between SMS gateway and SMSC?
A more general term known as an SMS Gateway refers to both software and hardware
solutions that are used to transmit and receive SMS messages between different
networks, including apps and mobile devices. On the other hand, an SMSC (Short
Message Service Centre) is a specialized term for the central component of a mobile
network that manages routing, storing, and delivering SMS messages. Although an
SMSC is a part of an SMS Gateway, the phrase "SMS Gateway" refers to a broader
range of operations, including interaction with other applications, message formatting,
and other things.
Is SMS gateway an API?
An API (Application Programming Interface) can be made available as one of an SMS
Gateway's features. The API enables programmatic SMS sending, receiving, and
administration as well as access to services like message tracking and delivery
status, allowing developers to link their applications with the capabilities of
the SMS Gateway.
Can I run it in my office, or do I need to place it into a server hosting
facility?
Both options are good.
This SMS gateway offers flexible deployment options. You can install it directly
on a computer in your office or leverage the security and reliability of a
server hosting company's server room. For ultimate control without upfront
hardware costs, consider installing it on a Virtual Private Server (VPS) anywhere
on the internet.
Does the software require a database server? Does it require any database
connectivity drivers, such as ODBC drivers?
The SMS Gateway does not require any database server or database connectivity
software by default.
You can configure it to act as an SQL-SMS gateway for sending and receiving
messages through a database, or simply log all incoming and outgoing messages for
later review. It connects seamlessly to various database servers using either
OleDb or ODBC connections, giving you flexibility and control over your SMS
communication data.
Can I use Ozeki and Ozeki Message Server 6 on the same computer with the same
GSM modem at the same time?
It is not possible. A GSM modem can only be accessed exclusively. This means that
if you connect to it using an application (Ozeki), it is locked and cannot be
accessed by another application (Ozeki Message Server 6).
Configure a single GSM modem in your SMS Gateway software (like Ozeki). This
software acts as an IP SMS service provider for the other program. All you need
to do is create a user account within the SMS Gateway software and connect the
other program using the provided IP address, port, username, and password.
Can I use Ozeki and Ozeki Message Server 6 on the same computer with two modems?
You can configure each program with its own dedicated modem. These modems can be
the same or different models, depending on your needs. This allows both programs
to function independently for sending SMS messages.
Will the software run on a Virtual Machine, such as VMWare, Microsoft Virtual PC?
Yes, it will.
For a smooth and hassle-free experience, opt for an internet-based SMS connection
(IP SMS). This method works seamlessly with virtual machines and requires minimal
setup. On the other hand, using a physical USB modem can be more challenging.
The drivers for these modems might not always be compatible with virtual machine
environments, potentially causing difficulties. Additionally, virtual machines
themselves can have limitations compared to dedicated hardware, impacting message
processing speed if you need to send a high volume of texts. Therefore, for most
users in a virtual machine environment, an IP SMS connection is the recommended
choice for its simplicity and reliability.
Summary
Ozeki SMS Gateway is a reliable software program created to provide effective and
reliable SMS communication. Ozeki SMS Messenger, a key component of the Ozeki SMS
Gateway system, is presented on this guide. Users have the ability to send SMS
messages to anyone on their contact list and customize messages thanks to the SMS
Messenger. They can quickly start sending multiple SMS messages thanks to its
simple interface. People may take use of Ozeki SMS Messenger's capabilities to
improve engagement, simplify SMS communication, and ensure efficient messaging
processes by learning how to use its features.
To send SMS from Microsoft Excel you have two choices: you can use an Excel Macro to
send the SMS directly from Excel or you can upload your Excel file to the
Ozeki SMS Messenger app. This guide shows you the Ozeki SMS Messenger app.
SMS messages are sent by uploading an Excel table containing the recipient's phone
number and also the Excel sheet that contains the SMS sent for them to the SMS
Messenger. After this we send the SMS messages.
Figure 1 - SMS Messenger Client with Excel
Note, that in order to use this functionality you must create a user account.
The following document explains how to create a standard SMS user account in
your system:
In this short video, you can learn how to send SMS messages from an Excel file through
the Ozeki SMS Gateway. You need to follow the given instructions to complete the
process successfully and be able to send an SMS to a large set of contacts within the
blink of an eye.
The first task is to log in to your Ozeki SMS Gateway account or if you do not
have any yet, then download it from the http://ozeki.hu/ website. If you are ready
to login, then open the "SMS Messenger" icon on the Ozeki Desktop.
Figure 2 - Open SMS Messenger
Now, find the "Upload Excel file" button and click on it.
Figure 3 - Upload Excel file
Select the Excel file from your PC's files, then click on the "Open" button to attach it
to your SMS.
Figure 4 - Select file to upload
To load the file data, simply click on the "Data" tab located on the SMS text box.
Figure 5 - File data loaded
Choose the "Write" tab again, then at the SMS details form, set the required data.
At the "To:" box, choose the "Phone number option", and at the "Message:" box,
select the "Message text" alternative. At the "Write" tab the #Message text# will
appear.
Figure 6 - Select phone number and message fields
After setting up the required details, send the message with the "Send" button, at the
bottom of the page, highlighted in blue.
Figure 7 - Send messages
Once you have sent your SMS, choose the "Sent" folder situated on the left side
of the panel. By opening, you will be able to view all the text
messages that have been successfully sent.
Figure 8 - The messages are sent
FAQs
Is it possible to send SMS from Excel?
Yes, it is possible to send SMS from Excel by integrating with SMS service provider
APIs, utilizing SMS gateways, or using external tools designed for sending SMS
messages directly from the spreadsheet.
How can I send bulk SMS with data?
To send bulk SMS with data, integrate with an SMS service provider that offers
an API or platform, format the messages with recipient phone numbers and content,
and use the provider's system to schedule and send the messages.
What is the SMS gateway?
An SMS gateway is a service or system that allows you to send SMS messages from
one device or platform to another, such as from a computer to a mobile phone. It
acts as a middleman, facilitating the transfer of text messages between different
devices or networks.
Why do we use Excel database?
Excel is popularly utilized as a database because of its user-friendly nature,
adaptability for organizing data, and its ability to perform data analysis tasks.
It is a cost-effective solution that empowers users to efficiently enter, manipulate,
and derive insights from their data, particularly for smaller databases and
collaborative data management scenarios.
Summary
This guide provides step-by-step instructions on how to send SMS messages from
an Excel file using the Ozeki SMS Gateway. By following the given instructions,
users can easily upload an Excel file, load the data, set up the SMS details,
and send messages to a large contact list quickly. This efficient process of
sending SMS messages from an Excel file through the Ozeki SMS Gateway saves time
and eliminates the need for manual entry, making it convenient for bulk
communication with contacts.
Welcome to our comprehensive Excel SMS guide in which, we will present you with all
the essential information, you might need when you send SMS using Excel.
This guide page provides you a precise introduction to the SMS-sending process and
tells you the main details about Excel. Whether you are a beginner or an expert,
we are sure that our plain guide will serve you as a useful tool in the topic of
sending single or bulk SMS messages from Excel.
Explore our step-by-step guides, tutorials, and tips to master the art of Excel SMS
An SMS message can be sent from the Excel spreadsheet, which works as an Excel
SMS client and is connected to the Ozeki SMS Gateway. SMS messages can be sent
to mobile users from the SMS Gateway via the Android SMS Gateway.
Figure 1 - Excel SMS Client
Send SMS from Ozeki Excel Client (Video tutorial)
In this quick video tutorial, we will guide you through the process of sending
SMS messages from Ozeki Excel SMS Client. By following the given instructions, you
can learn the accurate method that you can use in your future marketing SMS
campaigns. The video shows you the step-by-step process you need to follow. First,
you can learn how to add new HTTP user and configure the connection with Ozeki
SMS Gateway, then how to send SMS messages, using Ozeki Excel SMS Client. It shows
that first you need to download the client, then configure your SMS message details
to send. The video could serve you as a useful tool in your SMS communication and
boost your workflow while sending SMS messages to your target audience. Follow the
steps and become an expert of Excel SMS messaging.
What is Excel SMS?
Excel SMS refers to the integration of SMS (Short Message Service) functionality
with Microsoft Excel, allowing users to send and manage text messages directly
from their Excel spreadsheets. This powerful combination brings efficiency and
convenience to communication processes, making it an invaluable tool for
businesses and professionals.
When to Use Excel SMS?
Excel SMS is ideal for a variety of scenarios, including:
Marketing Campaigns: Easily send promotional messages, updates, and offers
to your target audience.
Customer Service: Streamline communication with customers by sending timely
alerts, order updates, and support messages.
Data Collection: Gather information from respondents through SMS surveys or
forms integrated with Excel.
Event Reminders: Send event details and reminders to attendees efficiently.
Internal Communication: Facilitate quick communication within your team or
organization.
Why Use Excel SMS?
Efficiency and Automation: Integrating SMS with Excel allows for the
automation of communication processes. You can send bulk messages, automate
follow-ups, and track responses directly within your familiar Excel environment.
Personalization: Create personalized messages tailored to individual recipients,
enhancing customer engagement and building stronger connections.
Accessibility: Excel SMS provides a user-friendly platform accessible to
anyone familiar with Microsoft Excel, eliminating the need for extensive
technical training.
Benefits of using Excel to send SMS messages
Saves time and effort
Cost-effective
Personalized SMS messages
Results can be tracked
Effective marketing campaigns
Send bulk messages at once
Automated and scheduled messages
Powerful data management
Message tracking and analytics
How to use Excel to SMS - Guide
In most cases, you need to create an HTTP user connection and configure HTTP user
settings in your SMS Gateway. In your SMS Gateway software, locate the option to
create a new HTTP user connection. Provide the essential information to the gateway.
Configure HTTP user settings properly to create the connection. Obtain the API key
or URL provided by your SMS Gateway service. Create your SMS message and connect
your Excel file to the SMS Gateway. By creating an HTTP user connection and
configuring settings, you enable Excel to communicate seamlessly with your SMS
Gateway, facilitating the sending of SMS messages directly from your spreadsheet.
Who Uses Excel SMS and Why?
Marketers
Targeted Campaigns: Marketers can leverage Excel SMS to create targeted campaigns,
reaching specific customer segments with tailored messages.
Promotions and Offers: Quickly communicate promotions, discounts, and exclusive
offers to boost sales.
Customer Service Professionals
Timely Updates: Keep customers informed about order statuses, delivery updates,
and support issues in real-time.
Feedback Collection: Use SMS surveys integrated with Excel to gather feedback
and improve customer satisfaction.
Bulk SMS from Excel file
Bulk SMS is a powerful communication tool that simplifies the process of sending
text messages to a large number of recipients simultaneously. This method is
widely used for business and organizational purposes, such as marketing campaigns,
customer notifications, or emergency alerts. Bulk SMS services often come with
features like message scheduling, personalization, and detailed analytics,
allowing organizations to tailor their messages, optimize delivery times, and
measure the effectiveness of their campaigns. This technology has become a vital
tool for any business seeking to maintain effective, prompt, and personalized
communication with a large audience.
Leveraging Excel in bulk SMS sending can be extremely helpful. If you have a large
number of recipients, then you can collect them into an Excel file. Connecting
this Excel file to your SMS Gateway can allow you, that you can send messages
to these recipients included in the Excel file. This can cost-effectively save
you time and energy.
We can use bulk SMS for various purposes, like:
Creating Marketing Campaigns
Sending Event Invitations
Issuing Appointment Reminders
Broadcasting Emergency Alerts
Facilitating Employee Communications
Enhancing Customer Support
Conducting Surveys and Collecting Feedback
Dispatching Payment Reminders
SMS Using Habits
Understanding consumer habits is crucial for effective SMS communication.
We can use SMS messages for various purposes, like creating marketing campaigns,
fostering customer interactions, sending timely reminders, providing real-time updates, sending
emergency alerts, or communicating with our colleagues. In this way, a reliable
SMS Gateway might be needed. An SMS Gateway acts as a mediator between the sender and
the recipient. When sending a large number of SMS messages, an SMS Gateway can
benefit us in lots of ways. We can use templates to personalize the messages,
schedule our messages, or even send bulk SMS messages at the same time. We can
track our messages and create analytics for further business decisions.
Ozeki SMS Gateway is such a reliable and effective SMS Gateway that eases our workflow
in numerous ways. Ozeki SMS Gateway allows you to create personalized messages
using templates, schedule messages, and sending bulk SMS messages simultaneously,
sending marketing campaigns, appointment reminders, or emergency alerts. Its
2-sided real-time feedback enables quick communication. With its trackable message
delivery rates, open rates empower you to make informed decisions. These analytics
serve as a valuable resource for SMS communication.
Text messages, also known as SMS, are like digital notes that people send to
each other using their phones. They're super quick and work on almost every
phone. You can say a lot in a short message, making it easy.
Businesses use it for telling people about sales or appointments, and friends
use it to chat. SMS messages are versatile and can be used for various purposes,
such as personal communication, business interactions, or informational updates.
In general, an SMS message can contain maximum 160 characters.
In Ozeki SMS Gateway, a text message can contain alphanumeric characters
of the default GSM alphabet with 160 characters. If the
message is longer, it is sent using more than one message. In this case, each SMS
contains 153 characters.
Manual messages
Manual SMS messages refer to messages that are composed and sent by their sender,
using their mobile phones or messaging apps. These messages are created and sent
typically at the same time. In this way, it provides real-time communication
between the sender and the recipient.
Automated messages
Automated SMS messages are different from manual messages, in a way that you
can schedule your SMS messages. These are programmed messages. The sender creates
and composes the message, but they set up a time and date when they want the SMS
to be sent. These messages are commonly used in business and marketing to streamline
communication processes and engage with a large audience efficiently.
Schedule your messages with Ozeki SMS Gateway
Timing is crucial, and scheduling allows you to optimize your messaging strategy.
Scheduling your messages with Ozeki SMS Gateway is a powerful feature that offers
convenience, efficiency, and precision in managing your SMS communications.
It allows businesses to plan and execute comprehensive marketing campaigns without
the need for manual intervention.
Ozeki SMS Gateway's scheduling feature is user-friendly, allowing senders to set up
the desired date and time for message delivery. This not only saves time but also
minimizes the risk of human error in manually sending messages.
Businesses can make sure that SMS campaigns are delivered at the most likely time
for recipients to read. Using Ozeki SMS Gateway for scheduling is a great approach
to improve efficiency, maximize the impact of your SMS messages, and communication.
Sending SMS messages from Excel with Ozeki SMS Gateway
The Excel SMS client of Ozeki SMS Gateway enables you to send SMS messages
from Microsoft Excel. Experience the seamless integration of Ozeki SMS Gateway
with Microsoft Excel, revolutionizing the way you send SMS messages. By creating
an HTTP User connection and configuring the HTTP API service, Ozeki ensures a
smooth and efficient communication workflow. The Excel file serves as a convenient
platform to organize and compose SMS messages, with each row representing recipient
details and message content. The Ozeki Excel Client facilitates the connection,
requiring users to input HTTP API service and HTTP User connection details.
Sending SMS messages becomes a breeze as the Ozeki Excel Client detects the open
Excel file, enabling users to select and dispatch messages effortlessly. Complete
with a detailed delivery report, this integration ensures timely, error-free
communication, making bulk SMS messaging from Excel an accessible and powerful
tool for diverse communication needs.
Excel SMS offers cost-effective communication, increased engagement, and
data-driven insights. Ozeki SMS Gateway enhances this integration by providing a
scheduling feature, optimizing the timing of your messages for maximum impact.
Whether for marketing campaigns or customer service notifications, leverage the
power of Excel SMS to streamline communication, engage your audience, and make
informed decisions. Dive into the future of personalized and efficient messaging
with Ozeki SMS Gateway.
Business Benefits of Excel SMS
Cost-Effective Communication - Excel SMS offers a cost-effective
alternative to traditional communication channels, reducing expenses associated
with paper-based communication and phone calls.
Increased Engagement - Engage with your audience in real-time, fostering a
sense of immediacy that leads to higher open and response rates compared to
other communication channels.
Data-Driven Insights - Track and analyse SMS campaign performance through Excel,
gaining valuable insights to refine future communication strategies.
Conclusion
In conclusion, Excel SMS is a powerful tool that revolutionizes communication
for marketers and customer service professionals. Whether you're aiming to
enhance marketing campaigns, streamline customer interactions, or gather valuable
insights, integrating SMS with Excel is a game-changer.
Leveraging Excel for SMS messaging provides businesses with a powerful, efficient,
and cost-effective way to communicate with their audience. Whether for marketing
campaigns or customer service notifications, the benefits of using Excel for SMS
are numerous and contribute to a more streamlined and effective communication
strategy.
For more information about SMS sending, follow the link to
ozeki-sms-gateway.com website.
FAQs
Can you send SMS from Excel?
Yes, you can send SMS from Excel by using specialized add-ins or third-party tools
that allow you to connect Excel to a messaging service.
How to integrate SMS API in Excel?
To integrate an SMS API in Excel, you need to obtain the API key from your SMS
service provider and then use Excel's developer tools or scripting capabilities
to incorporate the API calls into your spreadsheet.
How do I create a message in Excel?
Creating a message in Excel involves entering your text into a cell and then using
formulas or concatenation functions to structure the message as needed.
How do you massage data in Excel?
You can massage data in Excel by employing various functions like filtering,
sorting, and using formulas to clean, manipulate, or reformat the information
within your spreadsheet.
How to create API for SMS?
To create an API for SMS, you typically need programming skills and knowledge of
a language such as Python or JavaScript to build the necessary endpoints and
functionality for sending SMS messages.
Can I schedule an SMS?
Yes, you can schedule an SMS in Excel by using a combination of functions and
tools, or by utilizing third-party add-ins that allow you to set specific times
for sending SMS messages.
Sending SMS from Excel using selectable Column Data is a powerful and flexible text messaging solution
for bulk SMS campaigns. It saves time, ensures personalization, and makes the
business processes more efficient. This method is ideal for office users and marketers
managing large customer databases.
Excel SMS with Selectable Column Data
SMS messages using Excel column data can be customized by only selecting the
relevant columns. The messages then can be sent by uploading the Excel table into
the SMS Messenger. After this SMS will be send to mobile users from the SMS Gateway
via the Android SMS Gateway (Figure 1).
Figure 1 - Sending SMS from selected columns in Excel client
What is a bulk SMS Excel solution?
Bulk SMS Excel solutions simplify sending mass text messages directly from
Microsoft Excel. They integrate with Excel, making it easier to send personalized
messages to many contacts at once. This user-friendly method saves time and is
cost-effective for efficient communication with a large audience.
What are the benefits of sending SMS from Excel using selectable column data?
Sending SMS from Excel with Selectable Column Data offers more personalization
and adaptability than using fixed Columns. You can easily tailor messages for
different needs within the same Excel file, making it simpler and more efficient.
Fixed columns may limit your options and require more manual management while with
selectable Columns you can send personalized messages to many contacts with only
the necessary information.
This self-contained solution eliminates the need to share sensitive data with
external departments or users, granting you complete control over your SMS
campaigns. This autonomy makes it an ideal SMS sending solution for office users
and marketing professionals managing extensive customer databases.
Marketers can seamlessly integrate this service into their promotional
SMS strategies, targeting specific audience segments and promoting products
or services through bulk messaging, effectively enhancing brand visibility
and customer engagement.
SMS from Excel using Selectable Column Data (Quick Steps)
Open SMS Messenger
Click or drag an Excel file to upload
Select the Excel file then click on 'Open'
Go to 'Data'
Make sure the file data is loaded
Open the 'Insert field' drop-down list
Insert right Column data into the message
Click on 'Send' to deliver the messages
Open 'Sent' messages among the 'Folders'
Messages are sent with the correct data
SMS from Excel using Selectable Column Data (video tutorial)
In this simple video guide, you can learn how to send an SMS from Excel using
Column Data within a few minutes. We will walk you through the most important
steps with the help of an example Excel file, which you can access above. By the
end of the video, you will easily be able to send an SMS from Excel using Column
Data and also see the mechanism behind the process (Video 1).
To begin the whole process open SMS Messenger within Ozeki 10, as shown in the
picture (Figure 2).
Figure 2 - Open SMS messenger
After opening SMS Messenger, you have to upload an Excel file (Figure 3). You can
either click or drag an Excel file to upload, it is entirely up to your choice.
In this guide, we demonstrate by clicking and then selecting an Excel file.
Figure 3 - Upload excel file
The next step is selecting an Excel file to upload. Use the example Excel file we
previously uploaded for testing it out. After selecting the right file, click on
'Open' to upload the file to SMS Messenger (Figure 4).
Figure 4 - Select file to upload
Make sure you did everything according to the guide by clicking on 'Data'.
If the file data is loaded, then you did a great job (Figure 5). We are going to
use these loaded data to send an SMS text.
Figure 5 - File data loaded
The next step is writing an SMS text using Column Data. Click on the 'Insert field'
drop-down list and choose the right Column Data to insert into your message (Figure 6).
Figure 6 - Insert column data into the message
When you are done, click on 'Send' to deliver message (Figure 7).
Figure 7 - Send messages
Open 'Sent' messages within the 'Folders' and you will see, the messages are sent
to your contacts (Figure 8). The messages will automatically be personalized based
on the information and data of each of the contacts from your Excel file. That
saves you time and also makes your work more efficient.
Figure 8 - Messages are sent
Frequently Asked Questions (FAQs)
Is there a limit to the number of contacts I can send SMS to?
The SMS sending capacity for many contacts depends on two primary factors: the
capabilities of SMS Messenger or the SMS service you are using, and the
limitations of the Excel spreadsheet containing the recipient's phone number
and the text of the SMS message to be sent. The Ozeki SMS Messenger is designed
for office users to be able to send a particularly large volume of business SMS.
How to send a customized SMS Message from Excel?
To personalize and send SMS messages from Excel using column data in Ozeki SMS
Messenger, first upload the Excel file in Ozeki SMS Messenger, select the relevant
columns, and the software takes care of sending personalized messages to each
contact. No need for complex scripts it is a straightforward process within
Ozeki SMS Messenger, ensuring efficient and customized communication.
Summary
All in all, using Excel Column Data to send an SMS is very effective. The process
saves you time and ensures that all messages are automatically personalized to
each of your contacts. This makes your work quicker and more practical as you can
multitask within the same system and do not have to juggle between more programs
and endanger using the correct data.
Use our SMS Messenger to send SMS messages from Excel and optimize your work
communication.
In this guide, we'll walk you through the steps of sending SMS messages directly
from your Ozeki address book, saving you time and effort. This guide will show you how
to seamlessly send targeted SMS messages to your contacts, enabling you to engage
with your audience on a more personal level and maximize your impact.
How to send SMS message from address book (Short instructions)
To send SMS message from address book
Log in to your Ozeki SMS Gateway account
Access SMS Messenger
Open Contacts menu
Create a new standard address book
Define address book name
Open address book contacts
Create new contacts
Return to the Home icon
Use address book in SMS creation
Compose SMS with keyword
Send messages
Check Sent folder
SMS message from address book
An SMS message from Address Book is sent from the SMS Messenger. The SMS Messenger
is connected to the Ozeki SMS Gateway. The Ozeki SMS Gateway will send SMS
messages to the contacts selected from the Address Book.
Figure 1 - SMS message from address book
Send SMS message from address book (video tutorial)
In this video, you will discover the effortless method of sending personalized
SMS messages directly from your Ozeki address book, minimizing both time and
effort. Follow the step-by-step instructions to streamline your communication
process.
The first task is to log in to your Ozeki SMS Gateway account or if you do not
have any yet, then download it from the http://ozeki.hu/ website. If you are
ready with login, then open the "SMS Messenger" icon on the Ozeki Desktop.
Figure 2 - Open SMS Messenger
Choose the "Contacts" menu from the toolbar.
Figure 3 - Open Contacts menu
Click on "Create new Address book" button at the middle of the page, highlighted in blue.
At the right side of the page, select the "Standard" address book option.
Figure 4 - Create new standard address book
At the "Identification" part of the page, fill out Address book name field, then click
on the "Ok" button.
Figure 5 - Define address book name
Click on the "Contacts" to open your address book.
Figure 6 - Open address book contacts
To add contact information, choose the "Create new Contact" button, then fill out
the Personal Information form with details. Enter the recipient's name, phone number,
e-mail address. When is is ready, click on the "Ok" button.
Figure 7 - Create new contact
After adding all of your contacts, click on the "Home" icon on the left side of the toolbar.
Figure 8 - Contacts were created
Now, create an SMS. Click on the icon next to the "Phone number" field and choose
the address book from the drop-down list.
Figure 9 - Use address book
Now, start typing your text message into the "Write" field. Use keywords in order
for the system choose the appropriate data. The keywords will be automatically replaced
by the contact list data. In this way, your text messages will be more personal.
Figure 10 - Use keyword in message text
After that you have finished creating your messages, send them with the "Send" button.
Figure 11 - Send messages
Once you have sent your SMS, select the "Sent" folder situated on the left side
of the panel. By opening it, you will be able to view all the text
messages that have been successfully sent.
Figure 12 - Messages are sent
FAQs
How do you send a marketing SMS?
To effectively utilize SMS marketing, it is essential to build a list of opt-in
subscribers and obtain their explicit consent before sending messages. Develop a
personalized content strategy, optimize campaigns based on data-driven insights,
and regularly measure and report on key metrics to ensure successful engagement
throughout the customer journey.
How to automate SMS marketing?
Get started by registering for an automated text messaging service that allows
you to streamline your communication process. Once registered, upload your list
of opted-in contacts, and then employ keywords and sign-up forms to expand your
text marketing list. Next, craft personalized automated text messages and schedule
them for timely delivery to effectively engage with your audience.
Can I send SMS from my website?
To send SMS from your website, use an SMS API. It links your website or application
to an SMS platform, enabling direct message transmission.
What is an SMS gateway address?
An SMS gateway is a technology that enables your computer to send and receive
text messages. It serves as a connection point between your application or device
and the SMS network, enabling the transmission of messages. The specific format
and configuration of an SMS gateway address can vary depending on the provider
and the technology being used.
Summary
This guide provides step-by-step instructions on how to send SMS messages directly
from your address book, streamlining the process and saving you time. By following
these steps, you can effectively send targeted SMS messages to your contacts,
enhancing your engagement with your audience and maximizing your impact.
(Templates are pre-written texts, often referred to as canned messages)
This guide provides step-by-step instructions on creating and utilizing SMS
message templates through the Ozeki SMS Gateway. You'll learn how to create new
templates and save them for future use. Additionally, it will show you how to
conveniently load these templates into the SMS composer. Using SMS templates can
provide several marketing benefits for businesses and organizations. By leveraging
these benefits, businesses can enhance their SMS marketing strategies, engage with
their audience more effectively, and drive better results from their marketing
campaigns. It can greatly streamline your workflow and enhance the overall
aesthetic appeal of your documents. Simplify your SMS communication process with
these easy-to-follow steps.
How to create new SMS message template (Easy steps)
To create new SMS message template
Log in to your Ozeki SMS Gateway account
Access SMS Messenger
Select Templates menu
Create new SMS template
Compose a new message
Select message template
Finalize and send the message
Track SMS delivery
SMS message template
An SMS template which is a predefined message can be sent from SMS Messenger. The
SMS Messenger is connected to the Ozeki SMS Gateway. SMS template messages can
be sent to mobile users from the SMS Gateway via the Android SMS Gateway.
Figure 1 - SMS message template
Create new SMS message template (video tutorial)
This video tutorial guides you through the process of creating and utilizing SMS
message templates using the Ozeki SMS Gateway. Learn how to apply these templates
to compose and send SMS messages easily. Discover how these templates can enhance
your SMS communication process and effectively track your sent messages for
efficient communication.
Your first task is to log in to your Ozeki SMS Gateway account or if you do not
have any yet, then download it from the http://ozeki.hu/ website. If you are
ready with login, then open the "SMS Messenger" icon on the Ozeki Desktop.
After launching the Ozeki Desktop, you will be presented with the main interface
of the SMS Messenger. SMS Messenger is a user-friendly tool that eases you into
using your Ozeki SMS Gateway account.
Figure 2 - Open SMS Messenger
Select the "Templates" menu from the toolbar. Once you have located the
"Templates" menu icon among the toolbar icons at the top of the page, click on
it to open the Templates menu. Once you have opened the Templates menu by clicking
on the corresponding icon in the toolbar, the composer field will appear on the
page where you can create your new template for text messages.
Figure 3 - Select template menu
Click on the "Create new SMS Templates" button at the top of the SMS Templates page,
highlighted in blue. On the right side of the page, create the Template, by
entering the details into the "Template text" box. Under the field, you can track
the number of characters in the message. After that, find the "Ok" button
to save it.
Figure 4 - Create new sms template
By clicking on the "OK" button, you can confirm and finalize the template creation
process. This action will display the templates that have been successfully saved
or applied. The template, along with the modifications you made, will be
visible and ready for further use or customization.
Figure 5 - Message template created
To create a new message, you need to opt for the "New" menu from the toolbar.
Once the new message window appears, you will need to enter the addressee's phone
number in the designated recipient field. Ensure that you have entered the phone
number correctly. From the drop-down list of templates, select the desired
template that best suits your message's content or purpose. Choose the template
that aligns with your messaging goals and click on it.
Figure 6 - Select message template
To finalize the message creation process, click on the "Send" button. Be sure
you have read your message for correctness and clarity before pressing the "Send"
button. To prevent any unintentional errors, double-check the recipient's phone
number, the message's content, and the template you picked.
Figure 7 - Send message
After sending your message, choose the "Sent" button positioned on the left side
of the panel. Upon opening it, you will have the ability to observe all the text
messages that have been effectively sent. Use the features offered in the "Sent"
section to your advantage to keep track of the messages you've sent and to make
sure your communication efforts are successfully reaching the people you want
them to.
Figure 8 - Message sent
FAQs
What is a template in SMS?
An SMS template is a predefined message template designed to store content and
settings for easy creation, saving, and reuse in the SMS text messages you send.
How do I write SMS content?
Focus on conveying the most important information clearly, such as the purpose
of the message or a call-to-action. Avoid using unnecessary abbreviations that
might confuse the recipient, and always review your message for clarity and
accuracy before sending.
Summary
This guide and video tutorial provide detailed instructions on creating and utilizing
SMS message templates using the Ozeki SMS Gateway. It offers step-by-step
instructions on how to use SMS message templates effectively. The guide
demonstrates how to create, save, and apply templates simplifying SMS
communication. The guide highlights the marketing benefits of SMS templates,
emphasizing their ability to enhance SMS marketing strategies. By following the
simple step-by-step instructions, you can simplify your SMS communication process
and leverage the advantages of SMS templates.
By scheduling your SMS messages with accuracy down to the minute, you can ensure
that your important communications reach their recipients exactly when they are
needed the most, maximizing impact and engagement. This feature grants you complete
control over the timing of your message delivery, guaranteeing that your messages
arrive at the perfect moment for your recipients. This functionality is beneficial
for planning time-sensitive messages, reaching recipients in different time zones,
and managing communication tasks in advance. Explore the advantages of the
Ozeki SMS Gateway through this tutorial and leverage its efficiency to schedule
SMS messages effectively.
How to send SMS message scheduled with calendar (Plain instructions)
To send SMS message scheduled with calendar
Log in to your Ozeki SMS Gateway account
Access SMS Messenger
Compose new SMS
Set delivery date
Set delivery time
Send your scheduled message
Track SMS delivery
Confirm delivery success
Scheduled SMS with calendar
The sender of the scheduled SMS sets a specific date and time for the SMS to be
sent. Scheduled SMS messages can be sent from SMS Messenger. The SMS Messenger
software is connected to the Ozeki SMS Gateway. Scheduled SMS messages are sent
to mobile users from the SMS Gateway via the Android SMS Gateway.
Figure 1 - SMS message scheduled with calendar
Send SMS message scheduled with calendar (video tutorial)
Explore the step-by-step process of scheduling SMS messages with the Ozeki SMS
Gateway through this comprehensive video tutorial. Learn how to streamline your
messaging process, save valuable time and ensure timely delivery to your audience.
Follow the given instructions to set up easily.
Begin by either logging into your existing Ozeki SMS Gateway account or downloading
it from the http://ozeki.hu/ website if you don't have one yet. Once you're logged
in, access the Ozeki Desktop and click on the "SMS Messenger" icon. As the Ozeki
Desktop opens, and you'll find yourself on the SMS Messenger's user-friendly main
interface, simplifying your experience with the Ozeki SMS Gateway account. This
convenient tool is designed to ease you into utilizing the full potential of your
SMS Gateway for seamless communication.
Figure 2 - Open SMS messenger
Start creating a new SMS. Enter the addressee's name and phone number into the
designated fields. Proceed to compose your message in the "Write" box, allowing
you to convey your thoughts concisely and effectively.
Figure 3 - Write SMS message
Choose the advanced option from the options. There, set the "Send on a date" option,
enabling you to set up a specific delivery date for your message. You can set up
your text messages exactly to the minute.
Figure 4 - Set send date
Once you have completed the set-up process, proceed by clicking on the "Send" button.
Figure 5 - Send message
After clicking "Send," the message appears in the "Outbox" folder, at the postponed option.
The "postponed" is a holding area for messages that are pending delivery. It means that
your message will be delivered at the time that you have set.
Figure 6 - Message in postponed folder
Once you've specified a time for delivery, the SMS will be sent accordingly. You
can now find the message in the "Sent" folder, where you'll be able to view the
delivery results. If the delivery was successful, you will see the "Submitted"
subtitle indicating a successful transmission.
Figure 7 - Message sent
FAQs
Can you schedule an SMS?
Yes, you can schedule an SMS on many smartphones, messaging apps, and SMS gateway
services. This feature allows you to compose a message and set a specific date and
time for it to be sent in the future, providing convenience for sending timely
messages. Before scheduling, ensure your phone has network connectivity and
remains powered on at the scheduled time for successful delivery.
What is SMS scheduling?
SMS scheduling is a feature that allows users to set a specific date and time
for an SMS to be sent in the future. Instead of sending the message immediately,
users can compose it and specify the desired delivery time.
Can someone tell if a text was scheduled?
In most cases, recipients cannot tell if a text message was scheduled. From the
recipient's perspective, a scheduled text message appears just like any other
regular text message.
Summary
This guide shows you the step-by-step process of utilizing the Ozeki SMS Gateway
for scheduling SMS messages. By scheduling messages with precision down to the
minute, users can ensure their communications reach recipients exactly when needed,
maximizing impact and engagement. The tutorial emphasizes the feature of complete
control over message delivery timing, allowing messages to arrive at the perfect
moment for recipients.
Ozeki SMS Gateway provides an accurate solution for sending scheduled SMS messages
effortlessly by specifying the delivery time within the Excel document.
This efficient delivery system makes it a valuable tool for various applications,
whether it's for business communication, marketing campaigns, or personal
messaging needs. With Ozeki SMS Gateway, users can harness the power of SMS
communication with ease and effectiveness.
Follow the instructions to learn how to send SMS message scheduled with Excel.
How to send SMS message scheduled with Excel (Quick steps)
To send SMS message scheduled with Excel
Download Ozeki SMS Gateway software
Launch Ozeki SMS Messenger
Set up Excel document
Upload the Excel file to the Ozeki SMS Gateway interface
Extract scheduled messages
Create your SMS message
Initiate SMS delivery
Monitor SMS delivery
Scheduled SMS with Excel
Scheduled SMS messages can be sent from Excel by specifying the delivery time
within the Excel document. Then we upload the Excel table, containing the message
to the SMS Messenger. The SMS Messenger software is connected to the Ozeki SMS
Gateway. Scheduled SMS messages with Excel are sent to mobile users from the
SMS Gateway via the Android SMS Gateway.
Figure 1 - Scheduled SMS with Excel
Send SMS message scheduled with Excel (Video tutorial)
In this quick video you will see the accurate steps of the process in order.
Follow the instructions carefully and learn this process efficiently. Learn how
these settings may improve SMS communication and help you keep track of sent
messages for successful communication.
To get started, you can either log in to your current Ozeki SMS Gateway account
or download it from the http://ozeki.hu/ website if you don't have one yet. After
successfully logging in, launch the Ozeki Desktop, and locating the "SMS Messenger"
icon. Once you click on it, you'll be directed to the user-friendly main interface,
which is designed to simplify your experience with the Ozeki SMS Gateway. This
convenient tool aims to help you make the most of your SMS Gateway for seamless
communication.
Figure 2 - Open SMS Messenger
Open your Excel document and enter the delivery time of your text message. This
step is essential for scheduling when you want the messages to be sent. By
specifying the delivery time, you can ensure that your recipients receive the
messages at the most appropriate and convenient moments. Save the changes.
Figure 3 - Add send time to Excel
After filling in the delivery time for your text messages in the Excel document.
Within the Ozeki SMS Gateway's user-friendly main interface, look for and click
on the "Upload a file" button.
Figure 4 - Upload Excel file
Upon clicking the "Upload a file" button, a file browser window will appear,
allowing you to navigate to the location where you saved your Excel document.
Select the previously modified Excel worksheet and load up.
Figure 5 - Select Excel file to upload
The Ozeki SMS Gateway will now process the uploaded file, extracting the scheduled
messages and their delivery times. You will see the details of your Excel document,
at the "Data" tab.
Figure 6 - Data loaded from Excel
Click on the "Write" tab and select the "Message text" option from the message
type drop-down list. As a result of it, a #Message text# text will appear in the
field. When you upload an Excel file, Ozeki SMS Gateway will automatically fill
this field with the relevant text from the selected column in your spreadsheet
since the #Message text# item is tied to your Excel message text column.
Figure 7 - Set message text
Now, at the Advanced tab, set up the time of delivery, by selecting the "Date time"
option from the drop-down list of Schedule options. Set the accurate time you want, then
click back to the "Write" field.
Figure 8 - Set scheduled time
After you've finished composing and scheduling your message, you have to click
on the "Send" button in the "Write" field, to initiate the message delivery process.
Figure 9 - Send messages
After sending, your messages will temporarily be placed in the "Postponed" folder
due to the scheduled delivery settings. This ensures that the messages are queued
for later delivery, as you have set. You can check it to monitor the delivery
progress.
Figure 10 - Messages in postponed folder
Your messages have been sent after being in the "Postponed" folder. They have now
reached their recipients without any issues. Track the delivery progress and
ensure the messages were sent as intended, you can easily do so by checking the
"Sent" page. The "Sent" page will provide you with detailed information about
each message, including the delivery status, date and time of delivery, and the
recipient's details.
Figure 11 - Messages are sent
FAQs
Is it possible to send SMS from Excel?
You can achieve this by using external tools, such as email-to-SMS gateways or
SMS APIs, along with Excel's VBA programming capabilities. Alternatively, some
third-party SMS add-ins may offer the functionality to send SMS messages directly
from Excel.
Is it possible to send SMS from computer?
Yes, it is possible to send SMS from a computer. There are several ways to do
this, such as using web-based SMS services, email-to-SMS gateways, or desktop
applications that integrate with your mobile device to send SMS messages.
How can I send 1000 SMS at a time?
To send 1000 SMS messages at a time, you will likely need to use a bulk SMS
service or a dedicated SMS gateway that supports mass messaging. These services
usually provide APIs or web interfaces that allow you to upload a list of
recipients and the message content, which will then be sent to all recipients
simultaneously.
How many SMS can be sent at a time?
The number of SMS messages that can be sent at a time depends on the capabilities
of the SMS gateway and any rate limits imposed by mobile carriers.
Summary
Overall, Ozeki SMS Gateway offers an efficient solution for sending scheduled
SMS messages with ease and accuracy.
By specifying the delivery time within the Excel document, users can cater to
various time zones and target recipients at the most appropriate moments. This
feature proves particularly beneficial for businesses conducting international
operations or individuals who want to communicate with contacts in different
regions.
How to send SMS messages distributed evenly throughout the day
When a lot of SMS messages are sent in an SMS campaign, it might result
in many incoming phone calls. To distribute the load it is advantegous to
implmenet a delay between messages. This guide shows how this can be done.
Introduce a delay between SMS messages
To send SMS message with a delay between them, you can use Excel.
By uploading an Excel table, containing the recipient's phone number,
the message text and the exact date and time when the message should
be sent, it is possible to implement delays.
Figure 1 - SMS message with delay
How to send SMS Message with delay (quick steps)
To send SMS Message with delay
Access your Ozeki SMS Gateway account
Launch Ozeki SMS Messenger in the gateway
Click on "Upload an Excel file" button to import contact lists
Selecting message text
Setting send on date
Configure message delay
Choose the "Send" button to initiate the delivery
Viewing queued messages
Confirm submission
Send SMS Message with delay (video tutorial)
In this informative video, we'll guide you through the process of sending scheduled
SMS messages with delays. You'll learn how to compose texts ahead of time and
set them to be delivered at the perfect moment. This handy skill can help you
maintain better communication with business partners or friends.
To get started, you may either sign in to your existing Ozeki SMS Gateway account
or, if you don't already have one, download it from the http://ozeki.hu website.
Once you've logged in successfully, open the Ozeki Desktop and look for the "SMS
Messenger" icon. You will be sent to the user-friendly main interface, which is
intended to make using the Ozeki SMS Gateway as simple as possible after you
click on it. This practical tool intends to assist you in maximizing your SMS
Gateway for smooth communication.
Figure 2 - Open SMS Messenger
Find the "Upload an Excel file" button on the user-friendly main interface of
the Ozeki SMS Gateway and click it. This feature makes it simple to launch mass
SMS campaigns since it lets you import contact lists and messages from an Excel
file. Simply choose the Excel file containing your contacts and messages, and
start your SMS marketing or communication campaigns with ease.
Figure 3 - Upload Excel file
Selecting the "Message text" option from the message type drop-down list activates
a #Message text# item that appears in the field. The #Message text# item is
connected to your Excel message text column, meaning that when you upload an Excel
file, Ozeki SMS Gateway will automatically populate this field with the corresponding
text from the designated column in your spreadsheet.
Figure 4 - Select message column
At the Advanced tab of the page, you need to set the time of delivery. Choose the
"Send on date" option from the drop-down list, then set the accurate time of sending
your SMS.
Figure 5 - Set send on date
Once you've configured the delivery settings for your SMS message, you can specify
the duration of the delay between two text messages. Simply input the desired number
of seconds into the "Delay between" field.
Figure 6 - Configure message delay
Upon completing the process of composing and scheduling your message, the next
step is to take action by clicking on the "Send" button situated in the "Write" field.
This crucial action will set in motion the delivery process, ensuring your message
reaches its intended recipient.
Figure 7 - Send messages
After sending your SMS, you will see that your messages have been queued for future
delivery. This means that the messages are temporarily held in line, awaiting
their turn to be sent out to the intended recipients at the designated time or
after any specified delay. Queuing ensures a coordinated and effective delivery
mechanism, allowing for prompt contact with your receivers.
Figure 8 - Messages queued for future delivery
Once the messages were sent, you will see that the submission has been accepted by the
server. The server has confirmed that it has received your SMS and will carry out
the delivery procedure by sending this response. Once your submission is successfully
approved, you may be sure that your communications will successfully reach their
intended recipients.
Figure 9 - Messages sent with delay
FAQs
What is a delay message?
A delayed message is a communication that is planned to be transmitted at a
certain time and date in the future rather than right away after it is composed.
For quick and simple communication, this capability is offered in email clients,
SMS gateways, and messaging applications.
Can we delay the sending of an SMS message?
Yes, you can delay the sending of an SMS message. Many modern smartphones and
messaging apps provide built-in features that allow you to schedule the delivery
of SMS messages. SMS gateways often provide an option to schedule the delivery
of messages at a specified date and time. By leveraging the scheduling capabilities
of SMS gateways, you can ensure your messages reach the intended recipients at
the most appropriate moment.
How do you send a text with a time delay?
To send a text with a time delay using an SMS gateway, you need to use the gateway's
API or interface. Most SMS gateways support scheduling messages by allowing you
to set a specific date and time for the message to be sent.
Summary
In conclusion, message delays offer flexibility and efficiency, promoting
increased engagement and a better user experience for both senders and recipients.
Message delays provide control and planning, enable error correction before sending.
Businesses may strategically include message delays into their marketing strategies
to ensure that their target audience receives accurate and efficient messages.
Ozeki SMS Gateway provides a great feature to address any errors that may
occur during the SMS delivery process. In some cases, certain SMS messages may not
be successfully sent on the first try (for example if there is no GSM coverage).
This error is handled by Ozeki in way that it can be configured to automatically try
to resend such messages a few more times with delay between the retry attempts.
This guide explains how you can use this feature.
Resend failed SMS message
Failed SMS messages can be resend using the SMS Messenger software. It is connected
to the Ozeki SMS Gateway. This means failed SMS messages can be resend to mobile
users from the SMS Gateway via the Android SMS Gateway.
Figure 1 - Resend failed SMS message
How to resend failed SMS messages
To resend failed SMS Message
Sign in to your Ozeki SMS Gateway account
Open Ozeki Desktop
Launch the SMS Messenger
Access the "Not Sent" folder in the SMS Messenger interface
Move messages to the Outbox folder
Que messages to resend
Resend messages
Confirm successful transmission
Resend failed SMS Message (video tutorial)
By accurately following the provided steps, you will discover how easy is to
resend a failed SMS Message. To resend a failed SMS message, simply follow the
instructions is order. By learning how to correct errors effortlessly, you can
become more effective in the SMS sending process, ensuring your important messages
reach their recipients promptly. With these skills, you'll be able to troubleshoot
messaging issues and making your communication more efficient.
If you already have an account with Ozeki SMS Gateway, sign in to it to get started.
If not, create one by downloading it from the http://ozeki.hu website. After
successfully logging in, launch the Ozeki Desktop and locate the "SMS Messenger"
icon. Once clicked, you will be directed to the user-friendly main interface,
designed to ensure a seamless experience while using the Ozeki SMS Gateway.
This useful tool aims to help you make the most of your SMS Gateway for efficient
communication.
Figure 2 - Open SMS Messenger
Sometimes, it may happen, that your SMS is failed while delivering, because of
various obstacles, for example network issues, full message inbox or any other.
By logging in to your Ozeki SMS Gateway Messenger interface, you can find your
unsent messages at the "Not Sent" folder. If you click on it, you can see the
message details, as the recipient's pieces of information, the text, and the date of the
SMS. At the "Result" column, you will find a "Submit failed" subtitle.
Figure 3 - Message in Not Sent folder
After finding your unsuccessful messages, select them by taking a cross to the
selection box at the beginning of the SMS queue. Then move them into the "Outbox".
For that you have to choose the "Outbox" option from the drop-down list.
Click on the "Move" button to resend these messages.
Figure 4 - Move message to Outbox folder
If you take these steps correctly, then the unsent messages shall be located within
the forementioned "Sent" folder. Subsequently, the formerly unsent messages will
have been successfully transmitted. This process ensures a smooth and effective
management of your message correspondence.
Figure 5 - Message sent
FAQs
Why when I send a text it says the message failed?
When a text message fails to send, it could be due to various reasons, such as
poor network connectivity, the recipient's number being incorrect or blocked, or
issues with the messaging service. It may also occur if your device doesn't have
sufficient credit or if the message exceeds the character limit.
Does failed to send mean blocked?
Not necessarily. "Failed to send" doesn't always mean the recipient has blocked
you. It could be due to temporary network issues, the recipient's phone being
turned off or out of coverage, or a problem with your own network connection.
How do you tell someone has blocked you?
Your messages are not delivered, and there is no indication of the message being sent.
Calls to the person go straight to voicemail, without ringing their phone.
If you had regular communication before, and suddenly all your messages go
unanswered with no explanation, it could be an indication of being blocked.
Will my SMS be delivered if blocked?
No, your SMS won't reach the recipient's phone if they have banned you. When
someone "blocks" you, it means they've blocked all calls and text messages from
your phone number.
What is Person-to-Person Text Messaging?
The core application of SMS messaging, and arguably the reason for its invention,
is the ability to send short text messages between mobile phones. This simple
concept revolutionized communication, allowing people to connect instantly and
conveniently.
However, SMS has evolved beyond basic one-on-one messaging. The rise of chat
applications builds upon SMS technology, enabling real-time, interactive exchanges
within groups. This demonstrates the adaptability of SMS and its role as a
foundation for even more advanced communication tools.
What is Information Provision?
SMS isn't just about sending messages; it's also a powerful tool for receiving
information on the go. Here are some ways SMS keeps you informed:
News at Your Fingertips: Get instant updates on breaking news delivered
straight to your phone via SMS alerts. Stay informed about current events no
matter where you are.
Weather on Demand: Never get caught in a downpour unprepared again. Subscribe
to SMS weather updates and receive real-time forecasts directly on your mobile
device.
SMS messaging for Alerts and Notifications?
Yes, you can use it for these purposes.
Mobile phones are our constant companions, making them the ideal platform for
immediate updates and critical alerts. Unlike traditional methods, SMS
notifications reach you directly on your device, ensuring you're informed even
when on the go.
This proximity translates to several benefits:
Real-Time Transaction Monitoring: Receive instant SMS alerts for e-commerce
or credit card transactions, allowing you to stay on top of your finances
and identify any suspicious activity in real-time.
Never Miss a Beat: Stay informed about important messages, even when away
from your desk. SMS notifications can alert you of new emails, urgent faxes,
or voicemails requiring your attention.
By leveraging the "always-on-you" nature of mobile phones, SMS alerts bridge the
gap between traditional communication methods and the fast-paced world we live in.
Why would a SMS fail to send?
If your device has a weak network connection or is in an area with limited
coverage, the SMS may not be able to transmit successfully. If you have entered
the wrong phone number or contact details of the recipient. Network congestion
or temporary service disruptions can also contribute to sending failures.
Summary
By leveraging Ozeki SMS Gateway's error handling and resending capabilities,
businesses and individuals can experience improved reliability and efficiency in
their SMS communications.
This valuable feature allows for the timely resolution of any delivery issues
that may arise, ensuring that important messages reach their intended recipients
without any obstacles.
In this guide you can read about SMS marketing systems and get all the
information you need to setup your own. In the first part of the guide, the most
important technology aspects of such systems are covered. In the second part you
can find information about the SMS marketing software solutions offered by Ozeki.
In the final part of the article important issues such as security, how to address sms costs,
how to improve conversion rates and the legal aspects of SMS marketing campaigns are covered.
What is an SMS marketing system?
An SMS marketing system is a software platform that enables businesses to
send promotional messages to their customers' mobile devices via text.
How does an SMS marketing system work?
Every SMS marketing system is based on Graphical User Interface (GUI), a database
of phone numbers and an SMS gateway. The user interacts with the GUI, and
creates phone number lists, and schedules SMS messages to be sent to these
phone number lists. The phone number lists and the scheduled messages are
stored in the database. The SMS gateway's role in the system is to
pick up the SMS messages from the database and delivery them to the
phone number lists when time is due. (Figure 1)
Figure 1 - How does an SMS marketing system work
Good SMS marketing systems offer personalized SMS messages, and campaign
scheduling to let the marketers plan SMS marketing for days or weeks in
advance.
Better SMS marketing systems also offer unique call to action links inserted
into each SMS, that allow the SMS marketer to track what happened to each
SMS messages. By tracking the action taken by the target audience with the
help of unique call to action links the SMS marketer can make valuable
decision on the content and phone number list to use for the next campaign.
Figure 2 - Unique links in the SMS marketing campaign
Example: In the sample marketing campaign shown on Figure 2, you can notice
that each SMS messages contains a unique link. Hint: Note that each
link is very short, short links are clicked more often.
What are the key features of an SMS marketing system?
Phone number list management
SMS keywords for personalization
SMS templates for productivity
SMS scheduling
SMS delayed sending*
SMS Sender ID customization
Multiple mobile network connections
Unique call to action links
Short links in SMS messages
Marketing cost control
Marketing reports
*SMS delayed sending means, that the system puts a delay between each SMS so
for campaigns resulting in phone calls not all calls are received at the same time.
Use cases
An SMS marketing system is ideal for lots of simple and complex marketing
campaigns. Here are some tips you might use to boost your own business:
Send out invitations in a text to an event
Ask a set of customers in SMS for a favourable review
To boost a Tik-Tok or other social media post ask the to click on the link in the text
To ask customers to buy again to generate repeat sales offer them a loyalty discount in the SMS
To remind potential customers to book an appointment provide a link in the text message to your booking site
To ask for permission to make a sales phone call, ask them to click in the link in the SMS message if they are happy to talk
What are SMS marketing reports
According to Erzsébet Savanya, who is one of the best marketers in the world,
"The true value of a marketing campaign comes from customer interactions ...
the best marketers build tools to measure such interactions."
To satisfy such a demand, an SMS marketing system should be able to provide
reports, that present customer interactions. Such a report could be a list
of click to the call-to-action links (Figure 3). In all of the use cases
listed above, you can utilize call to action links. Once you include such
links in your SMS marketing campaign, you will take advantage of the
"click report" provided by the marketing system to see how efficient your
SMS marketing campaign was.
Figure 3 - Click report for an SMS marketing campaign
Scheduling SMS messages
When it comes to SMS marketing, one of the key features of an
SMS marketing system is the ability to schedule SMS messages. The SMS marketer
needs the capability to define the date and time when an SMS campaign should
be sent out. This is not only important to time the campaign in coordination
with other marketing efforts but is also a great tool to do A/B testing to
find out when the click through rate is the highest. Of course, scheduling
is also important to allow the marketer to do batches of work in advance
in order to let automation help with keeping up the attention of the target
audience. For sms scheduling the Ozeki SMS marketing
platform offers two methods: One option is to use a calendar date for the marketing
campaign to start. We call this option "campaign scheduling". The other option is is used
to set an individual date for each SMS message in the campaign. We call this option "per SMS scheduling".
To do per SMS scheduling, the easiest methos is to define dates in an Excel sheet
that holds the phone number list and the personalized data to be sent out. In this
Excel sheet a unique date and time can be assigned to each SMS.
When it comes to the topic of scheduling another important aspect needs to be mentioned.
For some campaigns it is not advantageous to send out all SMS messages in the campaign
at once. Sometimes it is better to put a delay between SMS messages.
Imagine the scenario, when you ask the recipients to call the sales team back, and you send
out a bulk of text messages and all the calls come in at once. This overload of the
call centre can be avoided by sending out the campaign with a delay. Putting a delay
between text message sending is also great to avoid website overload and mobile
network overload.
The most important question: Are my phone number lists and SMS texts safe?
One of the most important question SMS marketers ask when it comes to
choosing an SMS marketing software is about security: "Are my phone number lists and SMS texts safe?".
This question addresses key problems with on-line sms marketing systems. On-line
sms service providers require the users to upload their valuable phone number lists
and well thought out SMS texts. Platform owners often use and resell this information.
The only real way to address this issue, and to be on the safe side the is to
setup your own SMS gateway with a GSM modem or GSM modem pool (or an Android mobile
for smaller SMS volume) in your own office. With an on-primes SMS marketing system
that is installed on your own computer and that sends the SMS messages directly
to the mobile network through a wireless connection, you don't have to worry
about the security of your phone number lists and messages texts.
Having your SMS marketing system in house not only provides you more
security but also gives you the ability to take advantage of free SMS
tariffs often attached to SIM Card subscriptions, so it is also a good
way to address questions regarding costs.
Where can I download an SMS gateway to use as my own SMS marketing system?
To setup the SMS marketing system you need to install Ozeki SMS Gateway and
configure it to connect to the mobile network. The
mobile network connection allows you to send SMS messages wirelessly or through
the Internet to mobile phones. For wireless connections you can use a GSM modem
with a SIM card or an GSM/SMS modem pool with multiple SIM cards to send out your SMS messages.
You can also use an Android SMS Gateway configuration. If
you decide to go this route and you connect to the mobile network wirelessly your
SMS messages will go out through the SIM card(s) you purchase. Text messages
will be sent the same way as you would send them from a standard mobile phone.
The same prices will be applied
Hint:
Wireless SMS connections allow you to take advantage of favourable SMS plans offered by mobile network
operators for SIM only subscribers. Many mobile network operators unlimited free
SMS for subscribers in standard plans.
If you wish to connect your SMS marketing system to the mobile network through
Internet, you need to find an SMS service provider, who offers SMPP SMS connection.
In this case the sms costs will be determined by your SMPP SMS service provider.
Connect to the SMS marketing system with your browser
Send your first SMS marketing campaign
Include call to action links in your text messages
Check the SMS marketing report called "click report"
How to setup your SMS marketing system
The following Video tutorial shows the full procedure of setting up Ozeki SMS Gateway
as your primary SMS sending platform in your SMS marketing system.
Can I use the Ozeki SMS marketing system on Linux
Although most users prefer to use Windows as the base platform for their
SMS marketing system, there is an option for Linux as well. You can download and
install both the Ozeki SMS Gateway and the Ozeki SMS marketing platform for Linux.
If you are a Linux guy, you will quickly realize, that installing the SMS marketing
platform on Linux will bring some benefits in terms of multiuser access, performance
and configurability.
The SMS marketing system on Windows
The Ozeki SMS Gateway and the Ozeki SMS marketing platform can both be installed
on Windows. Lone wolf SMS marketers can install the whole system on their personal
laptops, SMS marketing teams can install it on a Windows server in their
LAN and use it remotely from their web browser. If the system is installed on a
server computer and user accounts are created the marketing teams can share
SMS contact lists, and access to SMS campaigns and marketing reports. This allows
the whole team to learn from success stories of other team members.
Why is the Ozeki SMS marketing system unique?
phone number lists and the inclusion of call-to-action links in your text messages.
With our user-friendly interface, you can quickly create and send personalized messages
to your subscribers. Our system is perfect for businesses of all sizes looking to
increase engagement and drive conversions through mobile marketing. Say goodbye
to manual phone number management and hello to an automated system that streamlines
your SMS marketing efforts. Try it out today and start seeing results in no time!
Is there an on-line version of an SMS marketing system?
This SMS
marketing software can be installed in your own IT infrastructure, or you can
use it as an on-line service at https://myozeki.com.
Why do businesses use the Ozeki SMS marketing system?
The Ozeki SMS marketing system is an excellent tool for businesses to call people to
action as text messages have high open rates and are read within minutes of being received.
The Ozeki marketing platform allows you to put call-to-action links into the
SMS messages and once people open the message, they will click on the link in the text.
SMS marketing campaigns using this call-to-action technology are great to boost sales,
increase engagement, build brand awareness and to drive website traffic. By targeting
a specific audience and delivering personalized messages in automated campaigns the
results are always outstanding.
Steps to send your SMS marketing campaign
If you are convinced that you wish to give the Ozeki SMS marketing software a try,
you can do it without installation by registering at the https://myozeki.com
portal. You may also download and install the SMS marketing system on your own
computer for testing.
Once the software is installed use the following steps to send your first SMS
marketing campaign.
Collect the phone number list
Define the message template
Include the call-to-action link
Schedule the message delivery time
Create the SMS marketing campaign
Preview the messages before sending
Launch the campaign
Track and analyse results
How to build your SMS marketing campaign
To open the SMS marketing system, you need to click on the SMS icon on your
dashboard, as you can see on Figure 4.
Figure 4 - Open the SMS marketing system
On the home page of the SMS marketing system, like on Figure 5, click on "Send"
to create your SMS marketing campaign
Figure 5 - Create the SMS marketing campaign
Build your phone number list, define the SMS template, add customizable
fields to your text message (e.g.: #FIRSTNAME#) and include the unique call to
action link (e.g.: #LINK#). (Figure 6)
Figure 6 - Write the SMS text
How is the Ozeki SMS marketing system different
It can send the SMS messages through your own device(s) directly to the mobile network
It can be installed in your own premises on Windows or Linux
It keeps data confidential between you and your customer, no 3rd party involved
It offers tools to stay compliant
It allows you to add unique call to action links for each SMS
It offers reports to analyse campaign success
It offers a user interface for A/B testing
It can send SMS by acquiring data from custom Excel sheets
It offers landing pages that convert
It offers customization and branding options
It has a mobile friendly user interface
Use your own device: Send SMS with your mobile or your own SMS gateway
The Ozeki SMS marketing system allows you to send your SMS messages using your own device,
such as your own Android Mobile phone or your own Ozeki SMS Gateway System. This
means you can send your marketing messages directly to the mobile network.
If you send messages directly from your own device, it means the Sender ID (the
phone number you use as sender address) will be yours. With your own phone number,
the reply text messages and reply calls are routed back to you directly, and you
can process the responses according to your rules.
Install your SMS marketing system in your own premises
You can setup the full system in your own office or on your own server. This means it
will not depend on anybody. Your computer will provide the user interface for
your office users, and your own devices will send out the SMS messages directly to
the mobile network. This full control over your system will provide you unprecedented operational
reliability and peace of mind. If something goes wrong, you will have the power to
act and you will not have to wait for or rely on any 3rd party to make your system
operational.
Keep your SMS phone number list and the texts confidential
If you install the Ozeki SMS marketing software in house, it will give you the
best possible security. Your phone number lists, your message texts and information
about your usage patterns and statistics will only be available for you. If you
use an online service for SMS marketing you have to share these details with a
3rd party, who can potentially sell your data. Use Ozeki and keep all your data
in house, keep all your data safe!
Include unique call to action links in your SMS messages
The Ozeki SMS marketing system can put a unique link directly into each SMS message.
When you compose your SMS, you can add the keyword #LINK1# int the text. Before the
SMS is sent the system will replace this keyword in the message to a unique short link.
When recipients receive the message a large portion of them will click on the link.
Gathering this clicks on landing pages operated by the Ozeki SMS Marketing system
will allow you to know exactly which SMS messages converted to a click. The
links in your messages will take your customer to your landing pages and will
allow you to move the customer to the next step in your sales tunnel.
Analyse SMS campaign success
The reporting feature of the Ozeki SMS Marketing system will show you what
percentage of the messages were delivered successfully to the recipient handset,
and what percentage of the users clicked the unique link in the SMS. This report
will give you the ability to evaluate your investment in this marketing activity.
A/B testing in SMS marketing campaigns
Marketers use A/B testing to figure out which SMS text works best for a particular
audience. Ozeki offers a user interface, to add a phone number list and to provide
two versions of the SMS to be sent out. The user will split the list into two
segments and send out the messages. The click through rates and reply rates will be
presented in a report.
Custom Excel sheets and automation
SMS text messages are a great way to keep users up to date. Data to be sent out
is often available in Excel sheets. The Ozeki marketing platform can use pre-written
SMS templates with keywords and custom - user specific - Excel files to send
out customized notifications to a list of recipients. For example, you can write
an SMS template like this: "Hello #FIRSTNAME#, Your KPI in #MONTH# was #VALUE#", and
you can upload an Excel with the data corresponding to #FIRSTNAME#, #MONTH#, and #VALUE#,
and the Ozeki system will create the SMS messages and will send them out.
The benefits of using links in SMS messages
The Ozeki SMS platform has a built-in short URL service, that allows you to
add short links to text messages, that will open custom landing pages. Landing
pages for appointment booking, order placement, or further information request
are already included in the software, but you can create your own landing pages
or forward clicks to already existing websites.
Thanks to this built in short URL service Ozeki’s SMS marketing system is
not only a data-driven marketing automation platform, but also a direct response
platform. It gives you direct ownership of your customer response interactions,
empowering you to turn transactions into long-term, revenue-generating relationships — at scale.
Powered by a flexible, real-time reporting system, that centralizes all your
SMS marketing campaign data Ozeki makes it easy to build, deliver, and optimize
incredibly sophisticated and personalized experiences using text messages sent
to mobile phones and taking advantage of measured call-to-action links.
The unique "per-customer" short links in the SMS messages bring personalization
to a new level. Personalization is a key feature of effective SMS marketing systems.
By utilizing the feedback provided by clicks, you can tailor the personalised content
sent to individual recipients over time in a super-efficient way.
Because you can build on input from previous campaigns, and you can combine this with
the ability to customize messages with recipient names, custom keywords containing
other relevant information in the messages, you can tailor the SMS to the preferences
of the customer, and you can create a more personal connection with the customers over time.
This level of personalization not only improves the overall customer experience but
also enhances the effectiveness of the SMS marketing campaigns and result in increased
business revenue.
Customization and branding
SMS service providers who purchase the system for offering SMS marketing to their
customers prefer to use their own brand logo and brand colours on the platform.
The Ozeki SMS Marketing system offers this option.
Mobile friendly user interface
The Ozeki Marketing system's user interface was designed to work well on mobile phones.
You can create and manage SMS marketing campaigns from your iPhone or Android device.
If you install the Ozeki App, you will also get notifications about events related to
your campaign.
Costs and prices of an SMS marketing system
When you decide to invest in SMS marketing you will have to make a one-time investment
and you must take into consideration recuring costs that come from usage. In the
following section the costs of an SMS marketing system are summarized
Hardware costs (Windows PC + GSM modem or Android phone + SIM card)
Installation and training (If you are not an IT guy)
Recuring costs
Cost per each SMS sent (if you don't use a free SMS plan)
Version update and technical support for the SMS software (optional)
Other standard business fees (electricity, employee wages, office space, administration, etc)
One of the key costs of such a system is the cost per SMS sent. Note that if you
look around carefully, you might find attractive SIM only plans offered by mobile
network operators with free unlimited SMS.
Can I do SMS marketing free of charge?
The short answer is no, but you can get quite close. If you setup your own
SMS marketing system, you will have to invest into hardware and software licenses.
You can save on the SMS costs and possibly find free SMS sending opportunities by
carefully checking the mobile phone subscription plans offered by mobile network
operators in your country. For example, in the UK, all major networks offer free
unlimited text messaging in their standard subscription based mobile plans.
Legal aspects
When you do SMS marketing it is important to comply with all the laws and
regulations in place. Please study carefully the rules, before engaging into
this activity to avoid possible fines and legal trouble. Check out or SMS
marketing compliance guide for more information on legal aspects of SMS marketing
campaigns.
Hint: use Ozeki SMS marketing software tools to stay compliant
The Ozeki SMS Marketing system offers excellent tools to stay compliant.
Read our article on compliance for SMS marketing campaigns.
Tools such as consent declaration lists, opt out lists, and customer segmentation based on consent
are offered. For example, if your customers opt in using text messages, or confirm subscription by
clicking on a link you will have a record of their consent organized into a list on
the platform. The software also offers automated opt-out lists using keywords.
The software allows you to add an unsubscription post-fix to your messages.
e.g.: "send STOP to opt out". Staying compliant is not only great to stay out of
legal trouble, but your efforts in this area also gives a great impression about
your business in the eyes of your customers and business partners.
How to write good SMS marketing messages
Tip
Description
Get permission
Only send SMS messages to people who have explicitly opted in to receive them.
This will help you avoid spam complaints and improve your deliverability rates.
Keep your messages short and sweet
SMS messages have a character limit of 160 characters, so make sure your
messages are clear and concise. Avoid using jargon or technical terms that your recipients may not understand.
Personalize your messages
Use the recipient's name and other personal details to make your messages
more relevant and engaging. This will help you build relationships with your customers and increase their loyalty.
Use a call to action
Tell your recipients what you want them to do, whether it's visiting
your website, making a purchase, or signing up for your newsletter. Make it easy for them to do it by providing clear and concise instructions.
Use clear and concise language
Use simple, easy-to-understand language in your messages. Avoid using
jargon or technical terms that your recipients may not understand.
Use active voice
Using active voice will make your messages more engaging and persuasive.
For example, instead of saying "The product was delivered," say "We delivered the product."
Use strong verbs
Using strong verbs will make your messages more powerful and effective.
For example, instead of saying "The product was good," say "The product was amazing."
Use a strong call to action
Tell your recipients what you want them to do, and make it easy for them
to do it. For example, instead of saying "Visit our website," say "Click here to visit our website."
Track your results
Use a tracking tool to see how your SMS marketing campaigns are performing.
This will help you optimize your campaigns and get the most out of your SMS marketing efforts.
Use all marketing systems
SMS marketing is most effective when used alongside other marketing channels.
This will help you reach a broader audience and improve your brand recognition.
Personalize your messages
Personalization is the key to creating engaging and effective SMS marketing
campaigns. When you address your customers by name and tailor your messages to
their interests, you'll build stronger relationships and increase sales.
Be brief
SMS messages have a character limit, so make sure your messages are clear
and concise. Avoid using jargon or technical terms that your customers may not understand.
Segment your messages
Segmenting your messages allows you to target your customers with more
relevant and engaging content. This will help you improve your open rates and click-through rates.
Select the appropriate sending times
Sending your messages at the right time can make a big difference in
your results. Avoid sending messages before 9
Good SMS marketing message examples
Now let's take a look at some SMS marketing message examples. Notice
the call to action and the links included in each of these messages:
"Don't miss out! Enjoy 20% off your next purchase at our online store.
Use code 'SUMMER20' at checkout. Offer ends tomorrow! Click here to shop: #LINK#."
"Hi [Name], we've got exciting news! Our new collection just arrived.
Visit our store this weekend and get a 10% discount on all new arrivals.
See you soon! Explore our new collection here: #LINK#."
"Happy birthday, [Name]! As our valued customer, we're giving you a
special birthday treat. Show this message in-store for a free dessert
with any meal purchase. Enjoy your day! Learn more about our birthday offer here: #LINK#."
"Hi there! We appreciate your loyalty. As a thank you, we're
offering you an exclusive sneak peek of our upcoming sale. Get early access
and shop before anyone else. Click the link to unlock: #LINK#"
"Limited time offer! Buy one, get one free on all accessories.
Upgrade your style and save big. Visit our store or shop online today!
Explore our accessory collection here: #LINK#."
"Hey [Name], summer is here, and so are the savings! Enjoy 30% off all
swimwear this weekend only. Dive into the deal now: #LINK#."
"Get ahead of the crowd! Pre-order the hottest gadget of the year and
be the first to own it. Limited quantities available. Reserve yours now: #LINK#."
"Attention all sports enthusiasts! Score big with our exclusive discount.
Use code 'SPORTS15' and get 15% off all sporting goods. Don't miss out!
Shop our sports collection here: #LINK#."
"Winter sale alert! Stay warm and stylish with our cozy sweaters. Buy two
and get the third one at 50% off. Hurry, offer ends soon! Explore our sweater
selection here: #LINK#"
"Happy holidays, [Name]! It's the season of giving, and we have a special
gift for you. Use code 'HOLIDAY20' and enjoy 20% off your next purchase. Spread
the joy! Start your holiday shopping here: #LINK#."
Note, that the Ozeki SMS system will replace the "#Link#" with the actual personalized unique
URL for each recipient. You will be able to define the landing page the URL will
take the recipient to. The unique URL will give the system the ability to track
each click.
Who will work on your SMS marketing campaigns
For small and startup companies SMS marketing campaigns will most likely be done
by the leader of the organization. Mid-size and larger businesses will assign the job to
an employee who is fit for the job. If you would like to delegate, the job of
creating SMS marketing campaigns here are some tips on how to find the best employee
for the job:
How to Choose a Good Employee for SMS Marketing Tasks
SMS marketing is a powerful tool that can help businesses reach their target audience
and boost sales. However, in order to be effective, SMS marketing campaigns need
to be well-planned and executed. This is where a good employee can make a big difference.
Here are some tips on how to choose a good employee for SMS marketing tasks:
Look for someone with experience in SMS marketing.
Look for someone who is creative and has a good understanding of your brand.
Look for someone who is organized and detail-oriented.
Look for someone who is customer-focused.
If you can find an employee who meets all of these criteria, you'll be well on your way to creating successful SMS marketing campaigns.
In addition to the above, here are some other qualities to look for in a good SMS marketing employee:
Excellent written communication skills.
Strong analytical skills.
A willingness to learn.
If you can find an employee with these qualities, you'll have a valuable asset on your team who can help you take your SMS marketing to the next level.
How to train your employees for SMS marketing
SMS marketing is a powerful tool that can be used to reach a large audience
quickly and easily. However, in order to be effective, SMS marketing campaigns
need to be well-planned and executed. This is where a trained employee can
make a big difference. Before you ask your employee to start sending out SMS messages,
we strongly recommend you to invest time into training.
Here are some of the reasons why it is important to train an employee for
SMS marketing campaigns:
To ensure that the campaigns are effective. A trained employee
will know how to create SMS messages that are clear, concise, and persuasive.
They will also know how to target the right audience and send the messages at the right time.
To save time and money. A trained employee will be able to
create and execute SMS marketing campaigns more efficiently. This will save you
time and money, which you can then invest in other marketing efforts.
To improve customer satisfaction. When SMS marketing campaigns
are executed well, they can improve customer satisfaction. This is because customers
appreciate being kept up-to-date on products, services, and promotions.
To build brand awareness. SMS marketing campaigns can help
to build brand awareness by reaching a large audience with your message. A
well-trained employee can deliver your brand's message more efficiently, resulting
in more people remembering your brand.
If you are considering using SMS marketing, I highly recommend that you train
an employee to create and execute your campaigns. A trained employee can help you
to save time, money, and improve customer satisfaction. When you put such
a training program together, you should focus on the following:
Start with the basics. Make sure your employee understands
the basics of Ozeki SMS marketing software, such as how to log in, where to click
and how to create a new campaign, how to add contacts to a campaign, and how to send a campaign.
Provide hands-on training. The best way to learn Ozeki SMS marketing
software is by doing it. Give your employee the opportunity to create their own SMS marketing
campaigns using the software and get feedback from you. You may start with small contact lists.
Use the Ozeki SMS marketing software documentation. The Ozeki SMS marketing
software documentation is a great resource for learning how to use the software. It contains
videos that can be viewed at https://ozeki-sms-gateway.com, it offers screenshots and
well written, easy to understand textual information. Make sure your employee has
access to the documentation and knows how to use it.
Set clear expectations. Let your employee know what you expect
from them in terms of the quality and quantity of SMS marketing campaigns
they create using the Ozeki SMS marketing software.
Provide regular feedback. As your employee creates SMS marketing
campaigns using the Ozeki SMS marketing software, provide them with regular feedback
on their work. This will help them improve their skills and efficiency.
Be patient. It takes time to learn how to use Ozeki SMS marketing
software effectively. Be patient with your employee and give them time to develop their skills.
Here are some resources that you can use during the training:
Ozeki SMS marketing software tutorials: There are many Ozeki SMS marketing software tutorials
available online. These tutorials can be a great way to learn how to use the software.
Ozeki SMS support tickets: The myozeki.com platforms allow your
employee to open support tickets to ask for advice or to initiate a chat conversation
with one of our experts.
By following these tips, you can train your employee to be efficient in creating
SMS marketing campaigns using the Ozeki SMS marketing software.
How to manage employees working on SMS marketing campaigns
Here are 10 best practices to give good instructions to the employee working
on SMS marketing and to make sure the quality of his work meets the expectations
and creates results:
Be clear and concise. Your instructions should be easy to
understand and follow. Avoid using jargon or technical terms that your employee
may not be familiar with.
Be specific. Don't just tell your employee to
"send out an SMS marketing campaign." Instead, give them specific instructions
on what to include in the campaign, who to target, and when to send it.
Be realistic. Don't set unrealistic expectations for
your employee. If you're expecting them to send out a campaign every day,
make sure they have the resources and time to do it.
Be flexible. Things don't always go according to plan,
so be prepared to make adjustments to your instructions as needed.
Be supportive. Let your employee know that you're there
to help them if they have any questions or problems.
Be timely. Don't wait until the last minute to give your
employee their instructions. Give them enough time to plan and execute the campaign effectively.
Be consistent. Make sure your instructions are consistent
with your overall marketing strategy. This will help your employee create
campaigns that are aligned with your brand and goals.
Be measurable. Set clear goals for your SMS marketing
campaigns so that you can track their success. This will help you determine
whether your instructions are effective and make necessary adjustments.
Be open to feedback. Ask your employee for feedback on
your instructions. This will help you improve your communication and ensure
that your instructions are clear and effective.
Be patient. It takes time to learn how to do SMS
marketing effectively. Be patient with your employee and give them time
to develop their skills.
By following these best practices, you can give your employee
the best possible chance of creating successful SMS marketing campaigns. In
addition to this it is also important to mention, that to
ensure the quality of your employee's work you should always provide
regular feedback. By providing feedback, you will let your employee know
what they're doing well and where they can improve. This will help them
stay motivated and on track. Setting clear deadlines is also
a great result driver. This will help your employee stay organized and focused.
Providing access to resources and create a positive work
environment will also improve the results. When you work with the Ozeki SMS marketing
system, make sure your employee has access to the reports, past campaigns and
resources they need to do their job effectively. This will help your
employee feel comfortable asking questions and getting help when they need it.
Good management practices will help your employee create high-quality SMS marketing
campaigns that meet your expectations and create results.
How to analyse sms marketing campaigns efficiency
Analysing SMS marketing campaign efficiency is crucial from a business perspective
to evaluate the effectiveness of your messaging strategy and make data-driven
decisions to optimize future campaigns. Here are three key steps to analyse
the efficiency of SMS marketing campaigns:
To do such analysis you must define key performance indicators (KPIs): Begin by
identifying the metrics that align with your business goals. Common KPIs for
SMS marketing include conversion rate, click-through rate, open rate, response rate,
and overall campaign ROI. These metrics provide valuable insights into the
effectiveness of your messaging, customer engagement, and the impact on
your bottom line. By setting clear KPIs, you can track the performance of your
SMS campaigns and assess their efficiency accurately.
Monitor and Analyse Data: Download the reports provided by the Ozeki SMS marketing
software and analyse it in correlation with other relevant data available in your
business to evaluate the performance of your SMS marketing campaigns. For real
time analysis you can use the live reports of the Ozeki SMS marketing platform
to track key metrics in real-time. Analyse the open rates and click-through
rates to gauge the level of customer engagement. Conversion tracking helps
you understand the effectiveness of your SMS messages in driving desired actions.
Analysing data on demographics, customer segments, and response patterns can
provide insights into the effectiveness of different campaign strategies and
help you optimize your targeting and messaging approach.
Using A/B Testing and Iterative Improvement is also a great tool. We recommend that
you implement A/B testing to compare the performance of different elements
within your SMS campaigns. Test variables such as message content, call-to-action,
timing, and frequency to identify the most effective combinations. Split your
audience into different groups and send different variations of messages to each
group. Analyse the results to determine which variations yield the best outcomes.
Continuously iterate and refine your campaigns based on the insights gained from
A/B testing, aiming for incremental improvements in key performance metrics.
By following steps like they were just discussed, you can effectively evaluate
the efficiency of the SMS marketing campaigns of your business. This data-driven
approach enables you to optimize the messaging strategies, improve customer engagement,
and drive better results from their SMS marketing efforts. Regular monitoring,
analysis, and iterative improvements are essential for staying ahead in the
dynamic world of SMS marketing and achieving long-term success.
Summary
The Ozeki SMS marketing system is an excellent tool for businesses to call people
to action as text messages have high open rates and are read within minutes of
being received. The Ozeki marketing platform allows you to put call-to-action
links into the SMS messages and once people open the message, they will
click on the link in the text.
SMS marketing campaigns using this call-to-action technology are great to
boost sales, increase engagement, build brand awareness and to drive website traffic.
By targeting a specific audience and delivering personalized messages in automated
campaigns the results are always outstanding.
When you are ready to launch an SMS marketing campaign, click on "Send" in the dashboard.
After you have built and sent your campaign, head back to the home page and click on "Reports".
You can now track the progress of your campaign by clicking on the campaign's name.
Your campaigns will bring results irrespective of the mobile phones (e.g. iPhone vs Android) your
audience uses.
SMS, or Short Message Service, is a widely used technology for sending short
text messages between mobile phones. Introduced in Europe in 1992, it quickly
became a global phenomenon due to its:
Universal Compatibility: Supported by virtually all GSM phones and included
in most mobile plans.
Simple Functionality: Enables easy message exchange without complex features.
Low Cost: Typically offered at an affordable rate by wireless carriers.
What can you send in an SMS?
Due to its "short" nature, SMS messages have a character limit. The capacity
depends on the encoding used:
160 characters: Achieved with 7-bit encoding, suitable for basic Latin
characters like English alphabets.
70 characters: Requires 16-bit Unicode encoding, necessary for languages
with special characters (Arabic, Cyrillic, etc.).
Beyond text, SMS can also transmit a limited amount of binary data for
ringtones, logos, or basic business cards.
SMS offers several advantages:
Reaches Everyone: With near-universal phone compatibility, you can connect
with almost any mobile user.
Simple Integration: Easily incorporate SMS functionality into your
applications using SMS APIs.
Real-Time Communication: Deliver critical information instantly for timely
action.
While SMS excels in simple text messages, advancements have led to other
messaging services like MMS (Multimedia Messaging Service) for richer content
and EMS (Enhanced Messaging Service) for basic animations and extra features.
Which standardization body is responsible for the SMS standard?
3GPP
Born in Europe: The European Telecommunications Standards Institute (ETSI)
initially created the GSM and SMS standards.
Evolving Together: Responsibility for these standards eventually shifted to
the Third Generation Partnership Project (3GPP).
3GPP in Charge: Today, 3GPP remains the leading organization for developing
and maintaining both GSM and SMS standards.
Why use SMS?
SMS offers applications a straightforward and reliable way to communicate with
mobile users. Here's why:
Easy Integration: SMS requires minimal setup - all you need is a phone
number and the message content. Integrate SMS functionality into your
application using APIs for seamless communication.
Broad Reach: SMS bypasses the need for users to download additional apps,
ensuring your messages reach virtually any mobile device.
Convenient for Users: SMS messages are readily accessible on any phone,
requiring no additional action from the user to receive them.
Information Gathering: SMS can also be used to collect data from users.
You can design applications that allow users to respond via SMS, providing
valuable feedback or data points.
In essence, SMS bridges the gap between your application and mobile users with a
simple and effective communication channel.
Is the SMS technology successful, because it is global?
Yes.
SMS messaging is a tried-and-true technology with near-global acceptance.
Virtually all mobile phones, regardless of manufacturer or carrier, come
equipped with SMS functionality. This widespread compatibility allows you to
seamlessly exchange messages with anyone, even if they use a different carrier
than you. It's like having a universal language for mobile phones, ensuring your
messages can reach almost anyone in the world.
Is the SMS technology successful, because it can be used by wireless
applications?
Yes.
SMS messaging boasts impressive reach due to its near-universal presence on GSM
mobile phones. This makes it a powerful platform for applications that need to
connect with a broad user base. By leveraging SMS technology, developers can
unlock new possibilities:
Enhanced Information Exchange: SMS goes beyond simple text. It can carry
binary data like ringtones, pictures, and even contact information (vCards)
and calendar entries (vCal). This opens doors for richer communication
between applications and users.
Global Connectivity: Forget carrier limitations. SMS messages can seamlessly
traverse between different carriers worldwide. This ensures wider
accessibility and removes a barrier to application adoption.
Convenient Billing: Mobile carriers offer native billing support for SMS,
including reverse billing options. This simplifies payment for users and
allows developers to create mobile content delivery platforms with clear
monetization strategies.
In essence, SMS transcends its role as a simple messaging tool. Its ubiquity,
data capabilities, and built-in billing make it a mature and powerful platform
for developers to explore, expanding the potential of mobile communication.
What applications can SMS messaging be used for?
Yes, you can use it for these purposes.
The fact that most people carry their phones constantly makes SMS ideal for
delivering critical information and timely alerts. Imagine receiving an SMS
notification for:
New Emails: Never miss an important message again. Get instant SMS alerts
whenever a new email arrives in your inbox.
Urgent Faxes and Voicemails: Stay on top of crucial communications. SMS
notifications can inform you of new faxes or voicemails requiring your
attention.
Ecommerce and Credit Card Activity: Enjoy peace of mind. Receive SMS alerts
for transactions on your ecommerce accounts or credit cards, allowing you to
quickly identify any suspicious activity.
By leveraging SMS for alerts, you can stay informed and take action promptly,
ensuring you're always in the loop, even on the go.
Is there any test account or trial software?
Download a free trial version of the software from the link below to explore its
features and functionality before committing to a purchase. Download
What are the differences between the trial and full versions?
The trial version is a good option to get acquainted with the software's core
functionalities. However, it has some limitations to keep in mind:
30-day usage limit: You can only use the trial for 30 days.
Limited message capacity: It can only handle a maximum of 80 messages per
second (MPS).
Promotional messages: One out of every six messages you send will be
converted to an "Ozeki SMS Trial" text, which might be distracting during
testing.
Why does the software still send messages with the text "Ozeki SMS Trial"
despite I already purchased a license?
Looks like you're on a 10-day trial. To keep using the software, activate your
permanent serial number.
How to connect your SMS Gateway to the SMS Marketing system
Step 1 - Register a MyOzeki.com account
In the following video we will show you, how to register a new account at
MyOzeki.com. You need to follow the given instructions, in order to make the
registration process as easy as possible.
Click on the "Create an account" button at the myozeki.com
home page.
Figure 1 - Select Create an account
Now, enter your personal details into the boxes. You have to type your full name,
Email address, mobile phone number, a unique password and its confirmation. You
need to accept the terms and policies, then click on the "Register" button, highlighted in blue
at the bottom of the page.
Figure 2 - Fill account information
Step 2 - Setup a "MyOzeki user" connection in Ozeki 10 SMS Gateway
As the second step, watch this quick video, explaining the following essential steps
of set up the connection to your SMS Marketing System.
Load your Ozeki SMS Gateway Desktop, then click on the "Add new user/application..."
link at the upper right corner of the panel.
Figure 3 - Select Add new User/Application
Now, from the following list of application interfaces choose the MyOzeki user option
and click on the belonging "Install" link.
Figure 4 - Install MyOzeki User
By clicking on the "Install" link, will bring up a new tab page requiring user
information. There you have to enter your username which is the email address that has been given during the MyOzeki
registration, and its password. If you are done with it, click on the "Ok" button
at the bottom.
Figure 5 - Provide MyOzeki user information
Finally, at the Control table that can be found at the left side of the Ozeki
SMS Gateway, switch the slider button into green, which means that your connection has been set.
If the connection went well, you would receive a notification at the Events panel.
For example: Successfully connected Bob Smith@localhost (MyOzeki user)
Figure 6 - User successfully connected
Step 3 - Show the registered SMS Gateway on your MyOzeki portal SMS App
This video will explain to you, how to show the registered SMS Gateway on your
MyOzeki portal SMS App. Follow the necessary steps to make it ready.
For the first, you have to load your profile at the myozeki.com webpage.
There, you have to choose the "SMS" option at the top of the page.
Figure 7 - Open SMS application
Now, choose the "Ozeki 10" button at the left side of the page.
Figure 8 - Select Ozeki 10 menu
Check your SMS Gateway status at the "State" option. If it is "Online", highlighted
in green, then it is connection has been set up successfully.
Figure 9 - Check SMS Gateway status
Step 4 - Send a "Hello world" message using phone numbers in Excel in the MyOzeki portal SMS App
In this short video, we will show you, how to send a "Hello world" message using
phone numbers in Excel in the MyOzeki portal SMS App. It will explain to you all
the accurate movements of the process to make your job easier.
In the beginning, load your profile at the myozeki.com
webpage and click on the "SMS" application at the Favourites. Then choose from the
left side of the page the "Send" option.
Figure 10 - Open Send menu
Now, at the first section (1. Send Message To) choose the "Excel" option from the
drop-down-list. Click on the "Choose file" button and find your excel file that contains
the necessary information. You have to take into account that the excel files' format
need to be as the given example at the bottom of the page!
If you do not have any excel file, already, then it is possibly to download the
example xlsx. If you choose the file, click on the "Add" button, highlighted
in blue.
Figure 11 - Select Excel option and choose the Excel file
When you added the excel file, then you will see at the second section (2Message Details)
the contact's details.
Figure 12 - Add contacts from the file
Enter a text message to the "Message" box (For example: Hello World), then
click on the "Next" button, highlighted in green.
Figure 13 - Define message text
A new page will bring up, where you can see the Message details. You can see the
partners' mobile phone number, the SMS message, and the state of the message. There
you can still edit your messages. These numbers exist from the chosen excel
document.
If you are ready, click on the "Send" button.
Figure 14 - Send messages
If the process was successful, you receive a notification, that your messages
submitted to Ozeki SMS Gateway to delivery. There you can also check your outbox or
send another text message.
Figure 15 - Messages submitted
Step 5 - See the marketing job in Ozeki 10 SMS Gateway
In this video, you can learn, how to check your messages that has been already
sent. We will show you the essentials, to learn it quickly and use in the future.
The first is to load your Ozeki SMS Gateway Desktop. At the Events tab you can see
the job requests from MyOzeki user.
Figure 16 - Job request in MyOzeki user
Now, open the scheduled jobs menu at the top of the page, by clicking on the "View"
menu and choosing the "Scheduled jobs" option from the drop-down-list.
Figure 17 - Open scheduled jobs menu
At the page that will be bring up, contains the messages and their data.
Now, click on the "Details" button at the right side of the page.
Figure 18 - Scheduled jobs list
By clicking on the given button, the job details can be seen at the Events tab.
Figure 19 - Job details
The following step is to find the SMPP client 1 service provider, at the upper left corner.
Figure 20 - Open service provider connection
Clicking on the SMPP client 1, will bring up the sent message reports, where you
can see all the essential details.
Figure 21 - Messages sent logs
Step 6 - Check the report in the MyOzeki portal SMS App/outbox page
The outbox page is a folder that holds your outgoing emails that has been sent.
This video below, will show you how can you check the message reports in the
MyOzeki Portal SMS App/outbox page.
First of all, load your profile at the myozeki.com.
Then, choose the "Outbox" menu from the given list at the left side of the page.
Figure 22 - Open MyOzeki Outbox menu
Now, you can see your outbox menu, where you can track your text message jobs.
You can open them and it is also possible to delete your message details.
If you want to view the messages, click on the "Open" button, highlighted in blue.
Figure 23 - View the messages
By clicking on the "Open" button, the details will show up. You can see the date,
the status of the message, its origin, to whom is was sent and what the text message
was about.
In order to see, the message reports, then you need to click on the "Reports" option
at the upper right corner, highlighted in purple.
Figure 24 - Open reports
The "Reports" button brings up the reports that has been connected to the message.
You can see the recipients' phone number, the text message, the registration data
and the results of the messages. If the message has been sent, then it will be a
notification that "Sent successfully."
Figure 25 - Detailed message report
Summary
Now, you got all the essential information about how to connect the Ozeki
SMS Gateway to the SMS Marketing System. You learnt the method of sending a text
message with the help of MyOzeki user. You are able to query the reports of the
sent text messages, that you can use for various marketing aims.
If you have any further questions send us an email to the info @ ozeki.hu address
or find our website ozeki.hu.
How to authenticate users on the customer portal using Ozeki 10
This page gives you the instructions on how to authenticate the users
on the Ozeki Customer Portal using the Authentication providers available
in Ozeki 10. You can use the built in authentication ("Local system users")
or Microsoft Active Directory, LDAP, Radius or MS SQL as the server to
identify user accounts.
Step 1 - Switch authentication
Switch to Ozeki 10 authentication by adding the following lines
to your config.php file in the customer portal's www directory.
In default installations the path of the file is:
C:\wamp64\www\ozekiconfig\config.php
Add these lines to the config.php file
//**************************************************************
// Authentication
//**************************************************************
$auth_allowregistration = false;
$auth_provider = "ozeki10"; //default | ozeki10
$auth_url = "http://127.0.0.1:9509/api"; //only used if ozeki10
$auth_providername = "Local system users"; //only used if ozeki10
In the following video you will see, how to add authentication URL to the Ozeki Customer Port.
Follow the steps and it will be easy to do these setups.
Open the config.php file, by reaching it through your PC's file manager.
You need to choose the "ozekiconfig" folder at the disk, then select from the "wamp64" folder
the folder named "www". Click on the "config.php" twice to view. (C:\wamp64\www\ozekiconfig\config.php)
Figure 1 - Open the config.php
After opening the file named "config.php", you need to add the authentication codes
to the .php file. Copy the necessary lines that we have written above, then paste into
their required place.
Copy these lines below the already existing ones:
//**************************************************************
// Authentication
//**************************************************************
$auth_allowregistration = false;
$auth_provider = "ozeki10"; //default | ozeki10
$auth_url = "http://127.0.0.1:9509/api"; //only used if ozeki10
$auth_providername = "Local system users"; //only used if ozeki10
If you are done with it, then type the authentication URL code into the
"auth_url" line. If it is ready, save the .php file.
Figure 2 - Add Ozeki 10 authentication
Step 2 - Create HTTP API users in Ozeki 10
In this short video, we will show you how to create http api user in Ozeki 10 easily.
For the first, you need to log into your Ozeki SMS Gateway. At the right side of the
Ozeki desktop, you have to choose the "Add new user/application..." link, highlighted
in blue.
Figure 3 - Add new user/application
Now, choose the "HTTP user" option from the list of the install list and click
on the "Install" link. This will allow you to send messages to your system.
Figure 4 - Install HTTP user
By clicking on the "HTTP user"link, a new page will bring up. There you have to
type a unique username and password for the HTTP API user. This will help you to
access the system through the HTTP API. If you are done, click on the "Ok" button
below.
Figure 5 - Provide login information
The HTTP users page will show up, where you can see all the information about it.
Figure 6 - User created
Step 3 - Login with the http api user account in the customer portal
This video explains to you, how to login to the customer portal with your HTTP API
user account.
Load the Myozeki.com at your browser and log into your HTTP API user account.
Figure 7 - Login from MyOzeki Customer Portal
If the login was successful, your MyOzeki profile can be seen.
Figure 8 - Login successful
In the following step you have to open the Ozeki 10 server events at your Ozeki
SMS Gateway. Choose the "View" option from the toolbar at the top of the page.
By clicking on the "View" option, a list will drop down, from which you have to choose
the "Server events" option.
Figure 9 - Open Ozeki 10 server events
By clicking on the "Server events" option the System events will be show up. There
you can see each event of the user by date.
In order to see the authentication log information, scroll down to the "INFO HTTP_API"
section of the page.
How to authenticate users on the customer portal using Active Directory
Ozeki SMS Gateway is a high-performance, reliable SMS gateway software that allows
users to authenticate on the customer portal using Active Directory authentication.
Ozeki SMS Gateway's use of Active Directory authentication improves security,
user experience, and administrative productivity.
Ozeki offers a valuable option for businesses looking for a reliable
and secure SMS gateway platform to meet their communication needs. Follow these
given instructions to learn how to authenticate users on the customer portal using
Active Directory.
What is user authentication using Active Directory?
User authentication on the customer portal using Active Directory refers to the
process of verifying the identity of customers who want to access the portal's
services or resources by leveraging Active Directory as the authentication mechanism.
Customers can sign in using their familiar credentials since it interfaces with
the Active Directory infrastructure already in place at the company. The user's
username and password are entered, and they are compared to what is already in
the Active Directory database. If the credentials match, the client has access
to the portal's services and receives the advantages of a centralized management
system, unified login, increased security, and seamless connection with corporate
environments.
How to authenticate users on the customer portal using Active Directory (simple steps)
To authenticate users on the customer portal using Active Directory
Authentication details for provider configuration (copy these)
//**************************************************************
// Authentication
//**************************************************************
$auth_allowregistration = false;
$auth_provider = "ozeki10"; //default | ozeki10
$auth_url = "http://127.0.0.1:9509/api"; //only used if ozeki10
$auth_providername = "LDAP authentication provider"; //only used if ozeki10
User Authentication with Active Directory (video tutorial)
In this quick guide of instructions, you will learn how to authenticate users on
the customer portal using Active Directory using Ozeki SMS Gateway software. You
will explore the configuration process of authentication provider using Active
Directory. We will take you through the installing and configuring process while
making it simlpe for you. In the end of the video, you'll be able to utilize Active
Directory to control user access securely and offer a smooth login process.
To start the process, you need to log into your personal account in Ozeki SMS Gateway.
If you do not have yet an Ozeki account, then download the Ozeki SMS Gateway software
from the https://ozeki.hu/
website. After logging in, navigate to the Ozeki Home page. There find the "Advanced"
icon on the toolbar and click on it. This will bring up a page, where details about
the authentication providers can be seen. Select the "Authentication providers"
option from the left-handed list to setup authentication methods to authenticate
your users in Ozeki SMS Gateway. Click on the "Create Authentication provider" button
in the middle of the page, which will show up a tab with Authentication provider
details. Choose the "LDAP" protocol option from the given list to set up the
authentication type. This makes it possible to use Microsoft Active Directory for
authentication in Ozeki 10.
Figure 1 - Add LDAP authentication provider in Ozeki 10
By choosing the authentication protocol type in Ozeki SMS Gateway, specify the
details about the authentication provider. Enter a unique name, then add LDAP server,
Username or DN, and the Password to it. At the Container options set up the container
on the store to use as the root of the context. For saving, click on the "Ok" button.
Figure 2 - Configure LDAP connection details
In the subsequent stage of the process, open MyOzeki config.php on your PC's local
disk, inside the wamp64, in the www folder to handle configurations for your Ozeki
SMS Gateway. It is essential to follow the documentation for successful integration.
Figure 3 - Open MyOzeki config.php
By opening the config.ph, you need to configure the MyOzeki authentication provider.
For successful configuration, paste these authentication details (provider URL and name)
to the appropriate part of the code. Paste the data, then save your changes with
File/ Save command.
//**************************************************************
// Authentication
//**************************************************************
$auth_allowregistration = false;
$auth_provider = "ozeki10"; //default | ozeki10
$auth_url = "http://127.0.0.1:9509/api"; //only used if ozeki10
$auth_providername = "LDAP authentication provider"; //only used if ozeki10
After successfully entering the necessary information, login to the MyOzeki account
using Active Directory user. Provide your username and password for verification.
Figure 5 - MyOzeki login using Active Directory user
If the login process was successful, then you can see your MyOzeki profile. Once
logged in, you'll have access to various features and functionalities within your
MyOzeki account.
Figure 6 - Login successful
Navigate back to the Ozeki SMS Gateway, then choose the "View" menu from the Menu bar
on the Ozeki Home screen. Select "Server events" from the drop-down list. By
clicking on it you will be able to see the authentication log information.
Figure 7 - Open server events
You can see the authentication log information by clicking on the "Server events",
which includes facts about Active Directory logins including the date and time of
successful logins and the usernames used for authentication.
Figure 8 - Check authentication Log
Conclusion
In conclusion, Ozeki SMS Gateway offers a reliable SMS gateway software solution
that enables users to authenticate on the customer portal using Active Directory
authentication. Customers can safely access the customer portal with their existing
credentials by utilizing Active Directory authentication. They can easily configure
Active Directory authentication in Ozeki SMS Gateway by following the guide's simple
instructions. Businesses can benefit from this integration's improved security,
user experience, and administrative effectiveness, while they can guarantee
communication and improved access control without any obstacles.
Best practices for SMS Marketing Compliance in 2025
SMS Marketing is probably the best tool to reach clients and to call them to
action, however if done unproperly it can lead to customer frustration and legal
troubles. In this article Ozeki would like to share with you the best practices
for doing SMS marketing legally and in a socially acceptable way.
Introduction
Fortunately, compliance is straightforward when you know the rules. With a little care,
you can design a compliant campaign and send SMS messages with confidence.
Step 1. Get consent before you send out your SMS campaign
Here are four common methods:
Texting keywords: Keyword text sign-ups make it simple to give consent.
Just ask customers to text a specific word to a phone number to opt in.
Using different keywords for specific kinds of messages lets you target
messages more easily, and you can choose keywords that reflect your brand’s
personality to increase engagement.
Sign-up widgets: Many businesses host a sign-up widget on their app or website.
Typically, it opens the customer’s mobile inbox, and then they text to give consent.
Web forms: A signup form on your website provides a checkbox to affirm consent
and presents your terms and conditions, as well as the privacy policy.
(Bonus: you can capture and request consent for both email and SMS marketing with just one form.)
Paper forms: This is a less convenient approach, but some businesses use it if
they send other paper forms in the mail or gather sign-ups at in-person events.
Once you have consent, honour it strictly. Imagine you invite people to
text "VEGANSTARS!" to your restaurant to get marketing messages about vegan products.
If you them send discount codes for pepperoni pies, you’re out of compliance,
because the consent only covers messages about vegan products.
Step 2. Provide required disclosures at opt-in
Whatever consent method you use, you must share the following with the subscriber:
Company name: Include your company’s legal name or brand name.
Campaign purpose: Say what you will be sending: alerts, marketing messages,
sweepstakes, etc. You cannot use consent for one type of campaign for another
(like informational versus marketing), so be specific!
Message frequency: Give the number of messages you plan to send per month.
Message and data rates. Some people must pay to receive messages, and if they click
your links, they might use data. Explain that message and data rates may apply.
Terms and conditions, as well as privacy policy. You don’t have to include the full
text of these documents, but you must tell the subscriber where to find them.
Step 3. Send an appropriate confirmation message
Each new text subscriber should receive a confirmation message, like this example:
Ozeki: Thank you for signing up! Use code OZEKISMS for 10% off your next order.
Msg&Data rates may apply, up to 4 msgs/month. Reply HELP for help and STOP to cancel.
You must include:
Your company name or brand name
Expected message frequency
Potential for message and data charges
Simple instructions for opting out
Make opting out easy. If it’s too difficult, you’re not only violating the law,
but you’re also encouraging people to report your texts as spam, which can lead to phone carriers blocking your number.
Step 4. Publish terms and conditions and privacy policy
You need SMS-specific terms and conditions, separate from your standard terms and conditions.
If you don’t have these already, take a look at the example at the end of this post
for a template. You’ll likely need to update your privacy policy as well.
For example, sharing information like mobile numbers with third parties or affiliates is prohibited.
Post these documents prominently on your website, marketing materials, and other
digital and print documents. You want to make it easy for your customers, CTIA auditors,
and phone carriers to see that your business is in compliance.
Step 5. Never send prohibited content
SHAFT stands for the top five prohibited SMS topics: sex, hate (including threats
of violence, hate speech, or graphic violence), alcohol, firearms, and tobacco.
Texting about these topics could result in an immediate ban, if not legal action,
from phone carriers. There are some exceptions for alcohol and tobacco if you do
appropriate age verification and tracking.
You also shouldn’t text about confidential information, cannabis (even if it’s legal
in your area), loans or other financial solicitations, and betting or gambling.
If you’re marketing for a casino, it’s okay to message about non-gambling services,
like an adjoining hotel.
Special rules apply to sweepstakes. In addition to age requirements, which vary
from state to state, you must have a separate terms and conditions disclosure on
your website for every sweepstakes.
Step 6. Keep every campaign compliant
Once you have consent, you must honour it to remain in compliance, as well as to
maintain good relationships with your customers. In addition, avoiding prohibited
content, keep these tips in mind as you’re creating campaigns and managing your
subscriber lists:
Include your business name in every message.
Make sure every campaign falls within the specific consent provided by the recipients.
If you’ve gathered consent for different kinds of messages, be sure your segmentation is targeting the right audience.
Include opt-out instructions with every text as a best practice.
It’s far better to have customers opt out than to report your messages as
spam because they can’t figure out how to unsubscribe.
If a customer opts out, they should never receive another message (other than a
confirmation that they have been unsubscribed). Be sure your automated messaging
platform instantly unsubscribes people who request it.
Staying in compliance: it’s just good business
SMS marketing compliance is a vital business practice for avoiding fines and lawsuits.
But it supports customer engagement and retention too. Every customer wants to
receive messages that appeal to them, to be treated fairly, and to keep their
private information safe. When you build compliance into your sending practices,
you’ll reap the benefits of better relationships without the risk of legal problems.
In this guide you can read about SMS marketing systems and get all the
information you need to setup your own. In the first part of the guide, the most
important technology aspects of such systems are covered. In the second part you
can find information about the SMS marketing software solutions offered by Ozeki.
In the final part of the article important issues such as security, how to address sms costs,
how to improve conversion rates and the legal aspects of SMS marketing campaigns are covered.
What is an SMS marketing system?
An SMS marketing system is a software platform that enables businesses to
send promotional messages to their customers' mobile devices via text.
How does an SMS marketing system work?
Every SMS marketing system is based on Graphical User Interface (GUI), a database
of phone numbers and an SMS gateway. The user interacts with the GUI, and
creates phone number lists, and schedules SMS messages to be sent to these
phone number lists. The phone number lists and the scheduled messages are
stored in the database. The SMS gateway's role in the system is to
pick up the SMS messages from the database and delivery them to the
phone number lists when time is due. (Figure 1)
Figure 1 - How does an SMS marketing system work
Good SMS marketing systems offer personalized SMS messages, and campaign
scheduling to let the marketers plan SMS marketing for days or weeks in
advance.
Better SMS marketing systems also offer unique call to action links inserted
into each SMS, that allow the SMS marketer to track what happened to each
SMS messages. By tracking the action taken by the target audience with the
help of unique call to action links the SMS marketer can make valuable
decision on the content and phone number list to use for the next campaign.
Figure 2 - Unique links in the SMS marketing campaign
Example: In the sample marketing campaign shown on Figure 2, you can notice
that each SMS messages contains a unique link. Hint: Note that each
link is very short, short links are clicked more often.
What are the key features of an SMS marketing system?
Phone number list management
SMS keywords for personalization
SMS templates for productivity
SMS scheduling
SMS delayed sending*
SMS Sender ID customization
Multiple mobile network connections
Unique call to action links
Short links in SMS messages
Marketing cost control
Marketing reports
*SMS delayed sending means, that the system puts a delay between each SMS so
for campaigns resulting in phone calls not all calls are received at the same time.
Use cases
An SMS marketing system is ideal for lots of simple and complex marketing
campaigns. Here are some tips you might use to boost your own business:
Send out invitations in a text to an event
Ask a set of customers in SMS for a favourable review
To boost a Tik-Tok or other social media post ask them to click on the link in the text
To ask customers to buy again to generate repeat sales offer them a loyalty discount in the SMS
To remind potential customers to book an appointment provide a link in the text message to your booking site
To ask for permission to make a sales phone call, ask them to click in the link in the SMS message if they are happy to talk
What are SMS marketing reports
According to Erzsébet Savanya, who is one of the best marketers in the world,
"The true value of a marketing campaign comes from customer interactions ...
the best marketers build tools to measure such interactions."
To satisfy such a demand, an SMS marketing system should be able to provide
reports, that present customer interactions. Such a report could be a list
of click to the call to action links (Figure 3). In all of the use cases
listed above, you can utilize call-to-action links. Once you include such
links in your SMS marketing campaign, you will take advantage of the
"click report" provided by the marketing system to see how efficient your
SMS marketing campaign was.
Figure 3 - Click report for an SMS marketing campaign
Scheduling SMS messages
When it comes to SMS marketing, one of the key features of an
SMS marketing system is the ability to schedule SMS messages. The SMS marketer
needs the capability to define the date and time when an SMS campaign should
be sent out. This is not only important to time the campaign in coordination
with other marketing efforts but is also a great tool to do A/B testing to
find out when the click through rate is the highest. Of course, scheduling
is also important to allow the marketer to do batches of work in advance
in order to let automation help with keeping up the attention of the target
audience. For sms scheduling the Ozeki SMS marketing
platform offers two methods: One option is to use a calendar date for the marketing
campaign to start. We call this option "campaign scheduling". The other option is used
to set an individual date for each SMS message in the campaign.
We call this option "per SMS scheduling".
To do per SMS scheduling, the easiest methos is to define dates in an Excel sheet
that holds the phone number list and the personalized data to be sent out. In this
Excel sheet a unique date and time can be assigned to each SMS.
When it comes to the topic of scheduling another important aspect needs to be mentioned.
For some campaigns it is not advantageous to send out all SMS messages in the campaign
at once. Sometimes it is better to put a delay between SMS messages.
Imagine the scenario, when you ask the recipients to call the sales team back, and you send
out a bulk of text messages and all the calls come in at once. This overload of the
call centre can be avoided by sending out the campaign with a delay. Putting a delay
between text message sending is also great to avoid website overload and mobile
network overload.
The most important question: Are my phone number lists and SMS texts safe?
One of the most important question SMS marketers ask when it comes to
choosing an SMS marketing software is about security: "Are my phone number lists and SMS texts safe?".
This question addresses key problems with on-line sms marketing systems. On-line
sms service providers require the users to upload their valuable phone number lists
and well thought out SMS texts. Platform owners often use and resell this information.
The only real way to address this issue, and to be on the safe side the is to
setup your own SMS gateway with a GSM modem or GSM modem pool (or an Android mobile
for smaller SMS volume) in your own office. With an on-primes SMS marketing system
that is installed on your own computer and that sends the SMS messages directly
to the mobile network through a wireless connection, you don't have to worry
about the security of your phone number lists and messages texts.
Having your SMS marketing system in house not only provides you more
security but also gives you the ability to take advantage of free SMS
tariffs often attached to SIM Card subscriptions, so it is also a good
way to address questions regarding costs.
Where can I download an SMS gateway to use as my own SMS marketing system?
To setup the SMS marketing system you need to install Ozeki SMS Gateway and
configure it to connect to the mobile network. The
mobile network connection allows you to send SMS messages wirelessly or through
the Internet to mobile phones. For wireless connections you can use a GSM modem
with a SIM card or an GSM/SMS modem pool with multiple SIM cards to send out your SMS messages.
You can also use an Android SMS Gateway configuration. If
you decide to go this route and you connect to the mobile network wirelessly your
SMS messages will go out through the SIM card(s) you purchase. Text messages
will be sent the same way as you would send them from a standard mobile phone.
The same prices will be applied
Hint:
Wireless SMS connections allow you to take advantage of favourable SMS plans offered by mobile network
operators for SIM only subscribers. Many mobile network operators unlimited free
SMS for subscribers in standard plans.
If you wish to connect your SMS marketing system to the mobile network through
Internet, you need to find an SMS service provider, who offers SMPP SMS connection.
In this case the sms costs will be determined by your SMPP SMS service provider.
Connect to the SMS marketing system with your browser
Send your first SMS marketing campaign
Include call to action links in your text messages
Check the SMS marketing report called "click report"
How to setup your SMS marketing system
The following Video tutorial shows the full procedure of setting up Ozeki SMS Gateway
as your primary SMS sending platform in your SMS marketing system.
Can I use the Ozeki SMS marketing system on Linux
Although most users prefer to use Windows as the base platform for their
SMS marketing system, there is an option for Linux as well. You can download and
install both the Ozeki SMS Gateway and the Ozeki SMS marketing platform for Linux.
If you are a Linux guy, you will quickly realize, that installing the SMS marketing
platform on Linux will bring some benefits in terms of multiuser access, performance
and configurability.
The SMS marketing system on Windows
The Ozeki SMS Gateway and the Ozeki SMS marketing platform can both be installed
on Windows. Lone wolf SMS marketers can install the whole system on their personal
laptops, SMS marketing teams can install it on a Windows server in their
LAN and use it remotely from their web browser. If the system is installed on a
server computer and user accounts are created the marketing teams can share
SMS contact lists, and access to SMS campaigns and marketing reports. This allows
the whole team to learn from success stories of other team members.
Why is the Ozeki SMS marketing system unique?
phone number lists and the inclusion of call-to-action links in your text messages.
With our user-friendly interface, you can quickly create and send personalized messages
to your subscribers. Our system is perfect for businesses of all sizes looking to
increase engagement and drive conversions through mobile marketing. Say goodbye
to manual phone number management and hello to an automated system that streamlines
your SMS marketing efforts. Try it out today and start seeing results in no time!
Is there an on-line version of an SMS marketing system?
This SMS
marketing software can be installed in your own IT infrastructure, or you can
use it as an on-line service at https://myozeki.com.
Why do businesses use the Ozeki SMS marketing system?
The Ozeki SMS marketing system is an excellent tool for businesses to call people to
action as text messages have high open rates and are read within minutes of being received.
The Ozeki marketing platform allows you to put call-to-action links into the
SMS messages and once people open the message, they will click on the link in the text.
SMS marketing campaigns using this call-to-action technology are great to boost sales,
increase engagement, build brand awareness and to drive website traffic. By targeting
a specific audience and delivering personalized messages in automated campaigns the
results are always outstanding.
Steps to send your SMS marketing campaign
If you are convinced that you wish to give the Ozeki SMS marketing software a try,
you can do it without installation by registering at the https://myozeki.com
portal. You may also download and install the SMS marketing system on your own
computer for testing.
Once the software is installed use the following steps to send your first SMS
marketing campaign.
Collect the phone number list
Define the message template
Include the call-to-action link
Schedule the message delivery time
Create the SMS marketing campaign
Preview the messages before sending
Launch the campaign
Track and analyse results
How to build your SMS marketing campaign
To open the SMS marketing system, you need to click on the SMS icon on your
dashboard, as you can see on Figure 4.
Figure 4 - Open the SMS marketing system
On the home page of the SMS marketing system, like on Figure 5, click on "Send"
to create your SMS marketing campaign
Figure 5 - Create the SMS marketing campaign
Build your phone number list, define the SMS template, add customizable
fields to your text message (e.g.: #FIRSTNAME#) and include the unique call to
action link (e.g.: #LINK#). (Figure 6)
Figure 6 - Write the SMS text
How is the Ozeki SMS marketing system different
It can send the SMS messages through your own device(s) directly to the mobile network
It can be installed in your own premises on Windows or Linux
It keeps data confidential between you and your customer, no 3rd party involved
It offers tools to stay compliant
It allows you to add unique call to action links for each SMS
It offers reports to analyse campaign success
It offers a user interface for A/B testing
It can send SMS by acquiring data from custom Excel sheets
It offers landing pages that convert
It offers customization and branding options
It has a mobile friendly user interface
Use your own device: Send SMS with your mobile or your own SMS gateway
The Ozeki SMS marketing system allows you to send your SMS messages using your own device,
such as your own Android Mobile phone or your own Ozeki SMS Gateway System. This
means you can send your marketing messages directly to the mobile network.
If you send messages directly from your own device, it means the Sender ID (the
phone number you use as sender address) will be yours. With your own phone number,
the reply text messages and reply calls are routed back to you directly, and you
can process the responses according to your rules.
Install your SMS marketing system in your own premises
You can setup the full system in your own office or on your own server. This means it
will not depend on anybody. Your computer will provide the user interface for
your office users, and your own devices will send out the SMS messages directly to
the mobile network. This full control over your system will provide you unprecedented operational
reliability and peace of mind. If something goes wrong, you will have the power to
act and you will not have to wait for or rely on any 3rd party to make your system
operational.
Keep your SMS phone number list and the texts confidential
If you install the Ozeki SMS marketing software in house, it will give you the
best possible security. Your phone number lists, your message texts and information
about your usage patterns and statistics will only be available for you. If you
use an online service for SMS marketing you have to share these details with a
3rd party, who can potentially sell your data. Use Ozeki and keep all your data
in house, keep all your data safe!
Include unique call to action links in your SMS messages
The Ozeki SMS marketing system can put a unique link directly into each SMS message.
When you compose your SMS, you can add the keyword #LINK1# int the text. Before the
SMS is sent the system will replace this keyword in the message to a unique short link.
When recipients receive the message a large portion of them will click on the link.
Gathering this clicks on landing pages operated by the Ozeki SMS Marketing system
will allow you to know exactly which SMS messages converted to a click. The
links in your messages will take your customer to your landing pages and will
allow you to move the customer to the next step in your sales tunnel.
Analyse SMS campaign success
The reporting feature of the Ozeki SMS Marketing system will show you what
percentage of the messages were delivered successfully to the recipient handset,
and what percentage of the users clicked the unique link in the SMS. This report
will give you the ability to evaluate your investment in this marketing activity.
A/B testing in SMS marketing campaigns
Marketers use A/B testing to figure out which SMS text works best for a particular
audience. Ozeki offers a user interface, to add a phone number list and to provide
two versions of the SMS to be sent out. The user will split the list into two
segments and send out the messages. The click through rates and reply rates will be
presented in a report.
Custom Excel sheets and automation
SMS text messages are a great way to keep users up to date. Data to be sent out
is often available in Excel sheets. The Ozeki marketing platform can use prewritten
SMS templates with keywords and custom - user specific - Excel files to send
out customized notifications to a list of recipients. For example, you can write
an SMS template like this: "Hello #FIRSTNAME#, Your KPI in #MONTH# was #VALUE#", and
you can upload an Excel with the data corresponding to #FIRSTNAME#, #MONTH#, and #VALUE#,
and the Ozeki system will create the SMS messages and will send them out.
The benefits of using links in SMS messages
The Ozeki SMS platform has a built-in short URL service, that allows you to
add short links to text messages, that will open custom landing pages. Landing
pages for appointment booking, order placement, or further information request
are already included in the software, but you can create your own landing pages
or forward clicks to already existing websites.
Thanks to this built in short URL service Ozeki’s SMS marketing system is
not only a data-driven marketing automation platform, it is also a direct response
platform. It gives you direct ownership of your customer response interactions,
empowering you to turn transactions into long-term, revenue-generating relationships — at scale.
Powered by a flexible, real-time reporting system, that centralizes all your
SMS marketing campaign data Ozeki makes it easy to build, deliver, and optimize
incredibly sophisticated and personalized experiences using text messages sent
to mobile phones and taking advantage of measured call-to-action links.
The unique "per-customer" short links in the SMS messages bring personalization
to a new level. Personalization is a key feature of effective SMS marketing systems.
By utilizing the feedback provided by clicks, you can tailor the personalised content
sent to individual recipients over time in a super-efficient way.
Because you can build on input from previous campaigns, and you can combine this with
the ability to customize messages with recipient names, custom keywords containing
other relevant information in the messages, you can tailor the SMS to the preferences
of the customer and you can create a more personal connection with the customers over time.
This level of personalization not only improves the overall customer experience but
also enhances the effectiveness of the SMS marketing campaigns and result in increased
business revenue.
Customization and branding
SMS service providers who purchase the system for offering SMS marketing to their
customers prefer to use their own brand logo and brand colours on the platform.
The Ozeki SMS Marketing system offers this option.
Mobile friendly user interface
The Ozeki Marketing system's user interface was designed to work well on mobile phones.
You can create and manage SMS marketing campaigns from your iPhone or Android device.
If you install the Ozeki App, you will also get notifications about events related to
your campaign.
Costs and prices of an SMS marketing system
When you decide to invest in SMS marketing you will have to make a one-time investment
and you must take into consideration recuring costs that come from usage. In the
following section the costs of an SMS marketing system are summarized
Hardware costs (Windows PC + GSM modem or Android phone + SIM card)
Installation and training (If you are not an IT guy)
Recuring costs
Cost per each SMS sent (if you don't use a free SMS plan)
Version update and technical support for the SMS software (optional)
Other standard business fees (electricity, employee wages, office space, administration, etc)
One of the key costs of such a system is the cost per SMS sent. Note that if you
look around carefully, you might find attractive SIM only plans offered by mobile
network operators with free unlimited SMS.
Can I do SMS marketing free of charge?
The short answer is no, but you can get quite close. If you setup your own
SMS marketing system, you will have to invest into hardware and software licenses.
You can save on the SMS costs and possibly find free SMS sending opportunities by
carefully checking the mobile phone subscription plans offered by mobile network
operators in your country. For example in the UK, all major networks offer free
unlimited text messaging in their standard subscription based mobile plans.
Legal aspects
When you do SMS marketing it is important to comply with all the laws and
regulations in place. Please study carefully the rules, before engaging into
this activity to avoid possible fines and legal trouble. Check out or SMS
marketing compliance guide for more information on legal aspects of SMS marketing
campaigns.
Hint: use Ozeki SMS marketing software tools to stay compliant
The Ozeki SMS Marketing system offers excellent tools to stay compliant.
Read our article on compliance for SMS marketing campaigns.
Tools such as consent declaration lists, opt out lists, and customer segmentation based on consent
are offered. For example, if your customers opt in using text messages, or confirm subscription by
clicking on a link you will have a record of their consent organized into a list on
the platform. The software also offers automated opt-out lists using keywords.
The software allows you to add an unsubscription post-fix to your messages.
e.g.: "send STOP to opt out". Staying compliant is not only great to stay out of
legal trouble, but your efforts in this area also gives a great impression about
your business in the eyes of your customers and business partners.
How to write good SMS marketing messages
Tip
Description
Get permission
Only send SMS messages to people who have explicitly opted in to receive them.
This will help you avoid spam complaints and improve your deliverability rates.
Keep your messages short and sweet
SMS messages have a character limit of 160 characters, so make sure your
messages are clear and concise. Avoid using jargon or technical terms that your recipients may not understand.
Personalize your messages
Use the recipient's name and other personal details to make your messages
more relevant and engaging. This will help you build relationships with your customers and increase their loyalty.
Use a call to action
Tell your recipients what you want them to do, whether it's visiting
your website, making a purchase, or signing up for your newsletter. Make it easy for them to do it by providing clear and concise instructions.
Use clear and concise language
Use simple, easy-to-understand language in your messages. Avoid using
jargon or technical terms that your recipients may not understand.
Use active voice
Using active voice will make your messages more engaging and persuasive.
For example, instead of saying "The product was delivered," say "We delivered the product."
Use strong verbs
Using strong verbs will make your messages more powerful and effective.
For example, instead of saying "The product was good," say "The product was amazing."
Use a strong call to action
Tell your recipients what you want them to do and make it easy for them
to do it. For example, instead of saying "Visit our website," say "Click here to visit our website."
Track your results
Use a tracking tool to see how your SMS marketing campaigns are performing.
This will help you optimize your campaigns and get the most out of your SMS marketing efforts.
Use all marketing systems
SMS marketing is most effective when used alongside other marketing channels.
This will help you reach a broader audience and improve your brand recognition.
Personalize your messages
Personalization is the key to creating engaging and effective SMS marketing
campaigns. When you address your customers by name and tailor your messages to
their interests, you'll build stronger relationships and increase sales.
Be brief
SMS messages have a character limit, so make sure your messages are clear
and concise. Avoid using jargon or technical terms that your customers may not understand.
Segment your messages
Segmenting your messages allows you to target your customers with more
relevant and engaging content. This will help you improve your open rates and click-through rates.
Select the appropriate sending times
Sending your messages at the right time can make a big difference in
your results. Avoid sending messages before 9
Good SMS marketing message examples
Now let's take a look at some SMS marketing message examples. Notice
the call to action and the links included in each of these messages:
"Don't miss out! Enjoy 20% off your next purchase at our online store.
Use code 'SUMMER20' at checkout. Offer ends tomorrow! Click here to shop: #LINK#."
"Hi [Name], we've got exciting news! Our new collection just arrived.
Visit our store this weekend and get a 10% discount on all new arrivals.
See you soon! Explore our new collection here: #LINK#."
"Happy birthday, [Name]! As our valued customer, we're giving you a
special birthday treat. Show this message in-store for a free dessert
with any meal purchase. Enjoy your day! Learn more about our birthday offer here: #LINK#."
"Hi there! We appreciate your loyalty. As a thank you, we're
offering you an exclusive sneak peek of our upcoming sale. Get early access
and shop before anyone else. Click the link to unlock: #LINK#"
"Limited time offer! Buy one, get one free on all accessories.
Upgrade your style and save big. Visit our store or shop online today!
Explore our accessory collection here: #LINK#."
"Hey [Name], summer is here, and so are the savings! Enjoy 30% off all
swimwear this weekend only. Dive into the deal now: #LINK#."
"Get ahead of the crowd! Pre-order the hottest gadget of the year and
be the first to own it. Limited quantities available. Reserve yours now: #LINK#."
"Attention all sports enthusiasts! Score big with our exclusive discount.
Use code 'SPORTS15' and get 15% off all sporting goods. Don't miss out!
Shop our sports collection here: #LINK#."
"Winter sale alert! Stay warm and stylish with our cozy sweaters. Buy two
and get the third one at 50% off. Hurry, offer ends soon! Explore our sweater
selection here: #LINK#"
"Happy holidays, [Name]! It's the season of giving, and we have a special
gift for you. Use code 'HOLIDAY20' and enjoy 20% off your next purchase. Spread
the joy! Start your holiday shopping here: #LINK#."
Note, that the Ozeki SMS system will replace the "#Link#" with the actual personalized unique
URL for each recipient. You will be able to define the landing page the URL will
take the recipient to. The unique URL will give the system the ability to track
each click.
Who will work on your SMS marketing campaigns
For small and startup companies SMS marketing campaigns will most likely be done
by the leader of the organization. Mid-size and larger businesses will assign the job to
an employee who is fit for the job. If you would like to delegate, the job of
creating SMS marketing campaigns here are some tips on how to find the best employee
for the job:
How to Choose a Good Employee for SMS Marketing Tasks
SMS marketing is a powerful tool that can help businesses reach their target audience
and boost sales. However, in order to be effective, SMS marketing campaigns need
to be well-planned and executed. This is where a good employee can make a big difference.
Here are some tips on how to choose a good employee for SMS marketing tasks:
Look for someone with experience in SMS marketing.
Look for someone who is creative and has a good understanding of your brand.
Look for someone who is organized and detail-oriented.
Look for someone who is customer-focused.
If you can find an employee who meets all of these criteria, you'll be well on your way to creating successful SMS marketing campaigns.
In addition to the above, here are some other qualities to look for in a good SMS marketing employee:
Excellent written communication skills.
Strong analytical skills.
A willingness to learn.
If you can find an employee with these qualities, you'll have a valuable asset on your team who can help you take your SMS marketing to the next level.
How to train your employees for SMS marketing
SMS marketing is a powerful tool that can be used to reach a large audience
quickly and easily. However, in order to be effective, SMS marketing campaigns
need to be well-planned and executed. This is where a trained employee can
make a big difference. Before you ask your employee to start sending out SMS messages,
we strongly recommend you to invest time into training.
Here are some of the reasons why it is important to train an employee for
SMS marketing campaigns:
To ensure that the campaigns are effective. A trained employee
will know how to create SMS messages that are clear, concise, and persuasive.
They will also know how to target the right audience and send the messages at the right time.
To save time and money. A trained employee will be able to
create and execute SMS marketing campaigns more efficiently. This will save you
time and money, which you can then invest in other marketing efforts.
To improve customer satisfaction. When SMS marketing campaigns
are executed well, they can improve customer satisfaction. This is because customers
appreciate being kept up-to-date on products, services, and promotions.
To build brand awareness. SMS marketing campaigns can help
to build brand awareness by reaching a large audience with your message. A
well-trained employee can deliver your brand's message more efficiently, resulting
in more people remembering your brand.
If you are considering using SMS marketing, I highly recommend that you train
an employee to create and execute your campaigns. A trained employee can help you
to save time, money, and improve customer satisfaction. When you put such
a training program together, you should focus on the following:
Start with the basics. Make sure your employee understands
the basics of Ozeki SMS marketing software, such as how to log in, where to click
and how to create a new campaign, how to add contacts to a campaign, and how to send a campaign.
Provide hands-on training. The best way to learn Ozeki SMS marketing
software is by doing it. Give your employee the opportunity to create their own SMS marketing
campaigns using the software and get feedback from you. You may start with small contact lists.
Use the Ozeki SMS marketing software documentation. The Ozeki SMS marketing
software documentation is a great resource for learning how to use the software. It contains
videos that can be viewed at https://ozeki-sms-gateway.com, it offers screenshots and
well written, easy to understand textual information. Make sure your employee has
access to the documentation and knows how to use it.
Set clear expectations. Let your employee know what you expect
from them in terms of the quality and quantity of SMS marketing campaigns
they create using the Ozeki SMS marketing software.
Provide regular feedback. As your employee creates SMS marketing
campaigns using the Ozeki SMS marketing software, provide them with regular feedback
on their work. This will help them improve their skills and efficiency.
Be patient. It takes time to learn how to use Ozeki SMS marketing
software effectively. Be patient with your employee and give them time to develop their skills.
Here are some resources that you can use during the training:
Ozeki SMS marketing software tutorials: There are many Ozeki SMS marketing software tutorials
available online. These tutorials can be a great way to learn how to use the software.
Ozeki SMS support tickets: The myozeki.com platforms allow your
employee to open support tickets to ask for advice or to initiate a chat conversation
with one of our experts.
By following these tips, you can train your employee to be efficient in creating
SMS marketing campaigns using the Ozeki SMS marketing software.
How to manage employees working on SMS marketing campaigns
Here are 10 best practices to give good instructions to the employee working
on SMS marketing and to make sure the quality of his work meets the expectations
and creates results:
Be clear and concise. Your instructions should be easy to
understand and follow. Avoid using jargon or technical terms that your employee
may not be familiar with.
Be specific. Don't just tell your employee to
"send out an SMS marketing campaign." Instead, give them specific instructions
on what to include in the campaign, who to target, and when to send it.
Be realistic. Don't set unrealistic expectations for
your employee. If you're expecting them to send out a campaign every day,
make sure they have the resources and time to do it.
Be flexible. Things don't always go according to plan,
so be prepared to make adjustments to your instructions as needed.
Be supportive. Let your employee know that you're there
to help them if they have any questions or problems.
Be timely. Don't wait until the last minute to give your
employee their instructions. Give them enough time to plan and execute the campaign effectively.
Be consistent. Make sure your instructions are consistent
with your overall marketing strategy. This will help your employee create
campaigns that are aligned with your brand and goals.
Be measurable. Set clear goals for your SMS marketing
campaigns so that you can track their success. This will help you determine
whether your instructions are effective and make necessary adjustments.
Be open to feedback. Ask your employee for feedback on
your instructions. This will help you improve your communication and ensure
that your instructions are clear and effective.
Be patient. It takes time to learn how to do SMS
marketing effectively. Be patient with your employee and give them time
to develop their skills.
By following these best practices, you can give your employee
the best possible chance of creating successful SMS marketing campaigns. In
addition to this it is also important to mention, that to
ensure the quality of your employee's work you should always provide
regular feedback. By providing feedback, you will let your employee know
what they're doing well and where they can improve. This will help them
stay motivated and on track. Setting clear deadlines is also
a great result driver. This will help your employee stay organized and focused.
Providing access to resources and create a positive work
environment will also improve the results. When you work with the Ozeki SMS marketing
system, make sure your employee has access to the reports, past campaigns and
resources they need to do their job effectively. This will help your
employee feel comfortable asking questions and getting help when they need it.
Good management practices will help your employee create high-quality SMS marketing
campaigns that meet your expectations and create results.
How to analyse sms marketing campaigns efficiency
Analysing SMS marketing campaign efficiency is crucial from a business perspective
to evaluate the effectiveness of your messaging strategy and make data-driven
decisions to optimize future campaigns. Here are three key steps to analyse
the efficiency of SMS marketing campaigns:
To do such analysis you must define key performance indicators (KPIs): Begin by
identifying the metrics that align with your business goals. Common KPIs for
SMS marketing include conversion rate, click-through rate, open rate, response rate,
and overall campaign ROI. These metrics provide valuable insights into the
effectiveness of your messaging, customer engagement, and the impact on
your bottom line. By setting clear KPIs, you can track the performance of your
SMS campaigns and assess their efficiency accurately.
Monitor and Analyse Data: Download the reports provided by the Ozeki SMS marketing
software and analyse it in correlation with other relevant data available in your
business to evaluate the performance of your SMS marketing campaigns. For real
time analysis you can use the live reports of the Ozeki SMS marketing platform
to track key metrics in real-time. Analyse the open rates and click-through
rates to gauge the level of customer engagement. Conversion tracking helps
you understand the effectiveness of your SMS messages in driving desired actions.
Analysing data on demographics, customer segments, and response patterns can
provide insights into the effectiveness of different campaign strategies and
help you optimize your targeting and messaging approach.
Using A/B Testing and Iterative Improvement is also a great tool. We recommend
that you implement A/B testing to compare the performance of different elements
within your SMS campaigns. Test variables such as message content, call-to-action,
timing, and frequency to identify the most effective combinations. Split your
audience into different groups and send different variations of messages to each
group. Analyse the results to determine which variations yield the best outcomes.
Continuously iterate and refine your campaigns based on the insights gained from
A/B testing, aiming for incremental improvements in key performance metrics.
By following steps like they were just discussed, you can effectively evaluate
the efficiency of the SMS marketing campaigns of your business. This data-driven
approach enables you to optimize the messaging strategies, improve customer engagement,
and drive better results from their SMS marketing efforts. Regular monitoring,
analysis, and iterative improvements are essential for staying ahead in the
dynamic world of SMS marketing and achieving long-term success.
Summary
The Ozeki SMS marketing system is an excellent tool for businesses to call people
to action as text messages have high open rates and are read within minutes of
being received. The Ozeki marketing platform allows you to put call-to-action
links into the SMS messages and once people open the message, they will
click on the link in the text.
SMS marketing campaigns using this call-to-action technology are great to
boost sales, increase engagement, build brand awareness and to drive website traffic.
By targeting a specific audience and delivering personalized messages in automated
campaigns the results are always outstanding.
When you are ready to launch an SMS marketing campaign, click on "Send" in the dashboard.
After you have built and sent your campaign, head back to the home page and click on "Reports".
You can now track the progress of your campaign by clicking on the campaign's name.
Your campaigns will bring results irrespective of the mobile phones (e.g. iPhone vs Android) your
audience uses.
SMS, or Short Message Service, is a widely used technology for sending short
text messages between mobile phones. Introduced in Europe in 1992, it quickly
became a global phenomenon due to its:
Universal Compatibility: Supported by virtually all GSM phones and included
in most mobile plans.
Simple Functionality: Enables easy message exchange without complex features.
Low Cost: Typically offered at an affordable rate by wireless carriers.
What can you send in an SMS?
Due to its "short" nature, SMS messages have a character limit. The capacity
depends on the encoding used:
160 characters: Achieved with 7-bit encoding, suitable for basic Latin
characters like English alphabets.
70 characters: Requires 16-bit Unicode encoding, necessary for languages
with special characters (Arabic, Cyrillic, etc.).
Beyond text, SMS can also transmit a limited amount of binary data for
ringtones, logos, or basic business cards.
SMS offers several advantages:
Reaches Everyone: With near-universal phone compatibility, you can connect
with almost any mobile user.
Simple Integration: Easily incorporate SMS functionality into your
applications using SMS APIs.
Real-Time Communication: Deliver critical information instantly for timely
action.
While SMS excels in simple text messages, advancements have led to other
messaging services like MMS (Multimedia Messaging Service) for richer content
and EMS (Enhanced Messaging Service) for basic animations and extra features.
Which standardization body is responsible for the SMS standard?
3GPP
Born in Europe: The European Telecommunications Standards Institute (ETSI)
initially created the GSM and SMS standards.
Evolving Together: Responsibility for these standards eventually shifted to
the Third Generation Partnership Project (3GPP).
3GPP in Charge: Today, 3GPP remains the leading organization for developing
and maintaining both GSM and SMS standards.
Why use SMS?
SMS offers applications a straightforward and reliable way to communicate with
mobile users. Here's why:
Easy Integration: SMS requires minimal setup - all you need is a phone
number and the message content. Integrate SMS functionality into your
application using APIs for seamless communication.
Broad Reach: SMS bypasses the need for users to download additional apps,
ensuring your messages reach virtually any mobile device.
Convenient for Users: SMS messages are readily accessible on any phone,
requiring no additional action from the user to receive them.
Information Gathering: SMS can also be used to collect data from users.
You can design applications that allow users to respond via SMS, providing
valuable feedback or data points.
In essence, SMS bridges the gap between your application and mobile users with a
simple and effective communication channel.
Is the SMS technology successful, because it is global?
Yes.
SMS messaging is a tried-and-true technology with near-global acceptance.
Virtually all mobile phones, regardless of manufacturer or carrier, come
equipped with SMS functionality. This widespread compatibility allows you to
seamlessly exchange messages with anyone, even if they use a different carrier
than you. It's like having a universal language for mobile phones, ensuring your
messages can reach almost anyone in the world.
Is the SMS technology successful, because it can be used by wireless
applications?
Yes.
SMS messaging boasts impressive reach due to its near-universal presence on GSM
mobile phones. This makes it a powerful platform for applications that need to
connect with a broad user base. By leveraging SMS technology, developers can
unlock new possibilities:
Enhanced Information Exchange: SMS goes beyond simple text. It can carry
binary data like ringtones, pictures, and even contact information (vCards)
and calendar entries (vCal). This opens doors for richer communication
between applications and users.
Global Connectivity: Forget carrier limitations. SMS messages can seamlessly
traverse between different carriers worldwide. This ensures wider
accessibility and removes a barrier to application adoption.
Convenient Billing: Mobile carriers offer native billing support for SMS,
including reverse billing options. This simplifies payment for users and
allows developers to create mobile content delivery platforms with clear
monetization strategies.
In essence, SMS transcends its role as a simple messaging tool. Its ubiquity,
data capabilities, and built-in billing make it a mature and powerful platform
for developers to explore, expanding the potential of mobile communication.
What applications can SMS messaging be used for?
Yes, you can use it for these purposes.
The fact that most people carry their phones constantly makes SMS ideal for
delivering critical information and timely alerts. Imagine receiving an SMS
notification for:
New Emails: Never miss an important message again. Get instant SMS alerts
whenever a new email arrives in your inbox.
Urgent Faxes and Voicemails: Stay on top of crucial communications. SMS
notifications can inform you of new faxes or voicemails requiring your
attention.
Ecommerce and Credit Card Activity: Enjoy peace of mind. Receive SMS alerts
for transactions on your ecommerce accounts or credit cards, allowing you to
quickly identify any suspicious activity.
By leveraging SMS for alerts, you can stay informed and take action promptly,
ensuring you're always in the loop, even on the go.
Is there any test account or trial software?
Download a free trial version of the software from the link below to explore its
features and functionality before committing to a purchase. Download
What are the differences between the trial and full versions?
The trial version is a good option to get acquainted with the software's core
functionalities. However, it has some limitations to keep in mind:
30-day usage limit: You can only use the trial for 30 days.
Limited message capacity: It can only handle a maximum of 80 messages per
second (MPS).
Promotional messages: One out of every six messages you send will be
converted to an "Ozeki SMS Trial" text, which might be distracting during
testing.
Why does the software still send messages with the text "Ozeki SMS Trial"
despite I already purchased a license?
Looks like you're on a 10-day trial. To keep using the software, activate your
permanent serial number.
How to use call to action links in your SMS marketing campaigns
Make your SMS marketing more engaging by using dynamic call-to-action (CTA) links.
With these links, you can direct recipients to certain offers or information and
immediately attract their attention. Ozeki SMS Gateway makes it simple to integrate
CTAs seamlessly, enabling you to boost interaction rates and enhance the effectiveness
of your campaigns. Your messages will stand out, encouraging recipients to take
immediate, meaningful actions. By following these steps, you can improve your SMS
marketing strategy and provide a clear route for your audience to access valuable
offers and content.
What are call-to-action links?
Call to action links are special components inside a message or piece of content
that encourage the audience to take a certain action. These activities can take
many different forms and include things like clicking a link, buying something,
signing up for a newsletter, filling out a form, and getting in touch with a business.
Call to action links are created to direct and inspire the audience to connect with
the content or take a desired step while increasing interactions and conversions.
How to use call to action links in your SMS marketing campaigns (simple guide)
To use call-to-action links in your SMS marketing campaigns
Stay tuned for the notification regarding the user's click
View click report in your MyOzeki account
Utilize the acquired statistical data
Boost your SMS marketing with call-to-action links using of Ozeki SMS
Gateway (video tutorial)
In this quick video tutorial, you will be guided through the process of how to
effectively use call-to-action links in your SMS marketing campaigns.
By using Ozeki SMS Gateway and following the outlined steps, you can refine your
marketing strategy and provide your audience with a seamless path to interaction.
By harnessing the statistical data provided by Ozeki SMS Gateway, you have the
tools to understand your audience's behaviour and preferences. Follow the simple
steps provided by this video guide.
To get started, you have to create a personal account on the MyOzeki.com website.
Log into your account, then select "Links" option from the Dashboard. This will bring
up a new site, where you need to click on the "Create new" button in the right-handed
upper corner, highlighted in blue. This will allow you to create a new link to your
marketing campaigns.
Figure 1 - Create new link
By clicking on the "Create new" button, a new page will show up, containing
link specification settings. Enter your link details, such as Link Name. Add a short,
one-word long name to the link because you will use this word in your SMS messages
to include the link. Type the landing page's URL, to make the link able to navigate
to the chosen site, by clicking on the link. Select a short domain to use to serve
this link. Using your own domain open a support ticket, so we can add it to your list.
For instant notifications, you can set up various options. You can choose to notify
you in E-mail when the recipient opens the link or to notify you in push messages
when the recipient opens the link. For saving the setups, click on the "Save changes"
button.
Figure 2 - Specify link details
After saving the specifications, choose the "Send" option from the Dashboard. As
the first step, you have to select whom you want to send the message. Pick the
"Excel" option from the drop-down list of options. Click on the "Choose file" button
to upload the Excel file, you want to use. Select the Excel file from the library
on your Pc and click on "Open" button. With the "Add" button, highlighted in blue,
you can read the Excel file's content and make it appear on the Message Details part
of the page. You will see all the recipient's phone numbers and name in the Message
Details part that was included by the uploaded Excel file.
Figure 3 - Add recipient list
Once, you are done with creating your recipient list, formulate your SMS message
and enter it into the "Message" field. To be able to send personalized text messages
to your recipients, choose the appropriate options from the "Insert" list, while
composing your message. By assigning the appropriate details to your SMS message,
you can incorporate data that is linked to each recipient in a unified manner.
In this way, they will receive personalized messages. For sending the messages,
click on the "Next" button.
Figure 4 - Create SMS message
You will see a page, where all the message details can be seen. You can see the
recipient's phone number and the created message with its status.
Ensure that all the message details are correct. They need to contain correctly
the data that has been set up in the previous step. If you are sure that the SMS
message contents are correct, then click on the "Send" button in the upper right
corner.
Figure 5 - Send message job
When the message was successfully submitted to Ozeki SMS Gateway for delivery, you
will receive a notification about it.
Figure 6 - Messages submitted
Once the message is successfully delivered, your recipients will receive a
notification about the message. This notification serves as confirmation that
the message reached its intended recipients without any issues. By tapping on the
SMS notification, they will be able to open it and read it.
Figure 7 - Message received on phone
If the user clicks on the link, it will automatically open the landing page in
their mobile browser. This seamless functionality allows users to quickly
access the landing page without the need to manually copy or type the URL.
This ease of use can increase user engagement and make it more likely that they
will read the content on the landing page.
Figure 8 - Users open the link
As soon as your recipients open your SMS message and click on the link included
in the text, you will immediately receive a notification in the chosen format.
This notification will inform you that the user has accessed the link from the
message you sent.
Figure 9 - Notification report received about the click
Open your MyOzeki account to view your click report. Choose the "Outbox" option
from the Dashboard, then select the message, that you want to track. Click on the
"Open" button to show the statistics. Scroll down to the Reports section, then click
on the "View click report" button, highlighted in green.
Figure 10 - View click report
As you open the click report, you can see valuable details about your messages.
The click chart displays the percentage of users that clicked on and did not
click on your SMS message. You can apply this information to assess the impact
and level of engagement of your communications.
Figure 11 - Click chart
FAQs
Why do we use CTA?
We use call-to-action (CTA) features to encourage our audience into taking particular
activities and directing them toward desired results. CTAs provide consumers a sense
of meaning and urgency, motivating them to interact with our information, goods,
or services. They are essential for boosting user interaction, converting leads,
and capturing conversions in marketing campaigns.
Where do you put a CTA?
Call-to-action (CTA) elements are strategically placed within marketing materials,
such as websites, emails, social media posts, and SMS messages. They are frequently
placed in visible locations where they are easy notice, such as at the bottom of
emails, inside banners on websites, or as buttons inside mobile apps. The positioning
makes sure the CTA is seen and directs users to do the desired action.
What is an example of a CTA?
A call-to-action (CTA) is a marketing message that urges a certain action. A
"Shop Now" button leading to a discount on a clothes store's newest line, for
example, may be a CTA in an SMS campaign. By directing users to carry out desired
activities, such as making a purchase or signing up for a service, CTAs promote
rapid engagement.
What 3 elements are in CTA?
A call-to-action (CTA) comprises an action-oriented verb or phrase, such as "Buy
Now" or "Sign Up," providing clarity on the desired action. Presented as visually
distinct elements like buttons or links, CTAs guide recipients to take the specified
action in a concise and attention-grabbing manner.
What is a good CTA?
A good call-to-action (CTA) is concise, action-oriented, and creates a sense of
urgency or value. It clearly communicates the desired action and encourages users
to take immediate steps. For instance, a strong CTA could be "Get Your Free eBook
Now," which combines a clear action ("Get") with a benefit ("Free eBook") and a
sense of urgency ("Now").
What are CTA keywords?
CTA keywords are phrases used in marketing to prompt action, like "Buy Now" or
"Sign Up," encouraging audiences to engage with content, make purchases, or interact
with businesses. By strategically placing and using CTA keywords, businesses can
effectively drive user engagement and achieve their marketing goals.
Summary
This comprehensive tutorial introduces you the impressive characteristics
of SMS marketing using call-to-action (CTA) links.
Ozeki SMS Gateway's features give you the chance to improve your campaigns
and engage your audience more successfully. The tutorial encompasses essential stages,
from adding CTAs to increase interaction to using statistical analysis to fine-tune your
strategy for the best results. By following the outlined steps, you can create
SMS marketing campaigns that fascinate your audience and improve your performing
skills.
How to use templates in your SMS marketing campaigns
Elevate your SMS marketing campaigns using Ozeki SMS Gateway's impressive functionalities.
Learn, how to use templates in your SMS marketing campaigns and utilize them for
personalized communication with your audience. The guide provides step-by-step
instructions, from creating templates to sending messages with ease.
Ozeki SMS Gateway enables you to improve your message strategy and take your
campaigns to greater levels.
What is an SMS template?
An SMS template is a pre-designed and standardized message format that can be
used for sending text messages to multiple recipients. It functions as a prefabricated
framework comprising frequently used material, such as greetings, instructions,
or notifications, which may be adjusted with particular features before sending.
SMS templates simplify the process of delivering regular, repeating messages,
saving both organizations and individuals time and effort. They assist to keep
messages professional and structured while ensuring consistency in communication.
How to use templates in your SMS marketing campaigns (easy-to-follow instructions)
Wait for feedback notification of successful SMS delivery
Make use of Ozeki SMS Gateway's impressive properties during your marketing campaigns
Mastering SMS Marketing Templates with Ozeki SMS Gateway (video tutorial)
In this quick video, we will guide you through the process of using templates in
SMS marketing with Ozeki SMS Gateway. Discover the engaging features of SMS templates
for elevated SMS marketing campaigns in Ozeki SMS Gateway. By following the steps,
you will learn how to create and utilize pre-created message templates for
personalized communication.
To begin, create a personal account on the MyOzeki.com
platform. After successfully logging into your account, proceed to the Dashboard
and choose the "Templates" feature. This action will lead you to a fresh interface
where you should locate and click on the "Create new" button situated in the upper
right corner, highlighted in blue. This will allow you to create a new template
for your marketing campaigns.
Figure 1 - Create new message template
Upon selecting the "Create new" button, a new page will appear, where you need to
provide some necessary information. Enter the details, including the template,
and proceed to compose your SMS template. This ensures that you can personalize
your marketing campaigns with ease. It means that you can assign details to your
SMS template to make personal all of your text messages that will be sent.
Through this, recipients will receive messages that are customized to their characteristics.
Click on "Save changes" button, highlighted in blue.
Figure 2 - Save message template
In this subsequent stage of the process, you need to insert your message template
as an SMS. Choose the "Send" option from the Dashboard. You need to select whom
you want to send the message, so select "Excel" from the drop-down menu of choices.
To upload the Excel file you wish to utilize, click the "Select file" option.
On your computer, choose the Excel file from the library, then click "Open".
With the "Add" button, highlighted in blue, you can read the Excel file's content
and make it appear on the Message Details part of the page. The Message Details
section, which was provided by the uploaded Excel file, will contain all of the
recipient's phone numbers as well as their name.
Create your SMS message in the "Message" field once you have finished generating
your recipient list. When you wish to use your customized SMS template, select
it from the "Advanced" menu. When you are done, click on the "Next" button in the
bottom right corner.
Figure 3 - Insert message template as SMS
You'll encounter a page displaying all the message details. This encompasses
the recipient's phone number and the composed message along with its current status.
It's crucial to verify the accuracy of these message details, ensuring they align
with the data established in the previous step. Once you're done checking the SMS
message content, select the "Send" button located in the upper right-hand corner.
When the message was successfully submitted to Ozeki SMS Gateway for delivery,
you will receive a notification about it.
Figure 4 - Send template message
FAQs
What is a template in SMS?
Text messages may be sent to several recipients using an SMS template, which is
a predefined format. It acts as a pre-made framework that contains typical components
like greetings, directions, or notifications. Templates are useful for providing
consistent and organized communications since they may be adjusted with relevant
information before sending. They simplify and ensure consistency in communication
by streamlining the repeated message-sending process.
What should be included in SMS marketing?
Consistent and compelling messages with a clear call to action (CTA) encouraging
receivers to do particular activities are part of a thorough SMS marketing strategy.
Personalization increases the relevancy of the message by using names or other
information. A great user experience is made possible by adhering to opt-in rules,
timing communications appropriately, and respecting receivers' choices. Successful
SMS marketing depends on segmenting audiences, monitoring campaign results, and
maintaining a consistent brand image.
Is SMS marketing legal?
Yes, SMS marketing is legal, but it must adhere to specific regulations and guidelines
to ensure recipients' privacy and consent. In many regions, obtaining explicit opt-in
consent from recipients before sending commercial SMS messages is a legal requirement.
Non-compliance with these regulations can result in legal penalties and damage to a
company's reputation.
How successful is SMS marketing?
With excellent open rates of almost 98%, SMS marketing has shown to be quite
effective, frequently outperforming other forms of communication. It works well
for time-sensitive promotions, reminders, and customised offers because to its
direct and quick nature. SMS marketing may provide significant engagement and
conversion rates when done correctly with relevant content, appropriate scheduling,
and compliance with regulations
Summary
All in all, in this short step guide, you could learn how to create and insert
templates into your SMS marketing campaigns, through Ozeki SMS Gateway. The guide
introduces you to utilizing templates for personalized communication with your audience
and offers step-by-step instructions from template creation to message sending.
You may improve your marketing approach and boost the effectiveness of your
campaigns by utilizing the outstanding capabilities of Ozeki SMS Gateway.
Unlocking the Power of SMS Marketing with Ozeki SMS Gateway
Explore the potential of SMS marketing with Ozeki SMS Gateway. Learn how our
platform empowers businesses to reach their audience effectively through
strategically crafted SMS campaigns.
The page will guide you through the process of creating a marketing SMS channel.
Ozeki SMS Gateway ensures an impactful journey, allowing businesses to unlock the
potential of SMS marketing.
Discover the transformative power of SMS marketing with Ozeki SMS Gateway.
What is an SMS?
Short Message Service (SMS) is a widely-used communication protocol that allows
the exchange of text messages between mobile devices. Introduced in the 1980s as
part of the Global System for Mobile Communications (GSM) standard, SMS quickly
became a ubiquitous and essential means of mobile communication.
Technically, SMS operates on a store-and-forward basis, where messages are
temporarily stored and then forwarded to the recipient when they are available.
Each SMS message can contain up to 160 characters, making it a concise form of
communication. Over time, advancements like concatenated SMS have allowed longer
messages by combining multiple SMS.
People use SMS for various reasons, including personal communication, alerts, and
notifications. Its low-cost nature, reliability, and near-universal accessibility
make it ideal for quick exchanges of information.
In the business realm, SMS is employed for marketing, customer engagement, and
transactional notifications. Businesses leverage SMS to reach a wide audience
instantly, making it a powerful tool for disseminating time-sensitive information.
What is marketing?
Marketing is a multifaceted process of promoting, selling, and distributing
products or services to meet the needs and wants of consumers. It involves a range
of activities designed to attract, engage, and retain customers while creating
value for both the business and its target audience. The ultimate goal of marketing
is to generate awareness, interest, and demand for a product or service, leading
to customer satisfaction.
Marketing strategies can vary widely and may include digital marketing, content
marketing, influencer marketing, social media marketing, and more. The advent of
technology has significantly transformed marketing, enabling businesses to reach
a global audience through various online channels.
Effective marketing requires a deep understanding of consumer behaviour, market
dynamics, and the ability to adapt strategies based on changing trends and preferences.
It is a dynamic field that plays a crucial role in the success and growth of
businesses across industries.
What is an SMS marketing campaign?
An SMS marketing campaign involves the use of Short Message Service (SMS) to deliver
targeted promotional messages to a group of recipients with the goal of promoting
products, services, or engaging customers. It is a form of mobile marketing that
leverages the immediacy and widespread use of text messaging to reach a broad
audience. SMS marketing campaigns are often used by businesses to engage with their
audience in a more direct and immediate way. Common use cases include sending
promotional offers, discount codes, event reminders, product updates, and
time-sensitive alerts. When executed effectively, SMS marketing can be a powerful
tool for driving customer engagement, increasing brand awareness, and ultimately
boosting sales.
However, it's crucial for businesses to adhere to regulations, respect customer privacy.
Key components of an SMS marketing campaign include:
Message Content: Crafting concise messages that convey the
marketing objective, whether it's promoting a sale, announcing a new product,
or providing exclusive offers.
Target Audience: Identifying and segmenting the audience based on demographics,
behaviours, or preferences to deliver more personalized and relevant messages.
Timing: Timing is crucial in SMS marketing. Messages are often sent at
strategic times to maximize their impact, such as during peak shopping hours
or before an event.
Opt-In and Opt-Out Mechanisms: Adhering to legal and ethical standards,
SMS marketing campaigns typically require recipients to opt-in to receive
messages. Additionally, providing an easy opt-out option ensures compliance
with regulations and respects user preferences.
Integration with Other Channels: Combining SMS with other marketing channels,
such as email or social media, to create a cohesive and integrated marketing
strategy.
Tracking and Analytics: Utilizing analytics tools to measure the success of
the campaign, track key metrics like open rates and click-through rates, and
gather insights for future optimizations.
How to create an SMS channel?
Discover the steps to establish a successful SMS channel, outlining the key
components and considerations for effective communication.
Creating an SMS channel involves setting up the infrastructure and processes to
send and receive SMS messages for communication or marketing purposes. Here are
the general steps to create an SMS channel:
To establish an effective SMS channel, start by selecting a reliable SMS service
provider. Ozeki SMS Gateway stands out as a top choice, offering key features that
streamline the process. With Ozeki, users benefit from robust SMS sending and
receiving capabilities, supporting two-way communication through API integration.
Its flexibility extends to short and long code support, ensuring versatility in
messaging strategies. The platform's advanced features include message scheduling,
reporting, analytics, and multi-language support, enabling tailored and efficient
campaigns.
Choose between short or long codes based on your messaging strategy. Integrate the
SMS service with your existing systems using the provider's API, ensuring seamless
communication across platforms. Customize your messaging content, keeping it concise
and engaging within the 160-character limit. Utilize scheduling features to optimize
message delivery times.
Prioritize compliance by implementing opt-in and opt-out mechanisms, respecting
user preferences and adhering to local and global SMS regulations.
Monitor your campaigns gaining insights into delivery rates and engagement metrics.
Ozeki SMS Gateway's integration with marketing automation tools enhances campaign management,
making it a valuable asset for businesses seeking comprehensive SMS solutions. The
platform's commitment to continuous improvement, community resources, and accessible
trial periods adds to its appeal. Ozeki empowers users to create a seamless SMS
channel, providing the necessary tools for successful communication and marketing
efforts.
Key features that make Ozeki SMS Gateway stand out:
SMS Sending and Receiving Capabilities
Two-way Communication Support
API Integration
Short Code and Long Code Support
Message Scheduling
Reporting and Analytics
Multi-language Support
SMS channel opt-in
SMS channel opt-in refers to the process by which individuals voluntarily agree
to receive text messages from a particular sender or organization.
It is a crucial aspect of SMS marketing and communication, ensuring that recipients
have given explicit consent to receive messages before any communication takes place.
Opt-in is a fundamental practice that respects user privacy and complies with
regulatory requirements.
Opt-In Methods: Opt-in can occur through various methods, including:
Online forms on websites or mobile apps
Subscription keywords where users text a keyword to a designated number
Paper-based forms for in-person events
Verbal consent over the phone
Opt-Out Mechanism:
Alongside opt-in, providing a clear and easy opt-out mechanism
is essential. Recipients should be able to stop receiving messages at any time by
replying with a designated keyword or using other provided methods.
TCPA consent
The Telephone Consumer Protection Act (TCPA) is a U.S. federal law that places
restrictions on certain types of telemarketing practices, including the use of
automated telephone dialling systems (ATDS) and prerecorded voice messages. The
TCPA is particularly relevant to SMS marketing because text messages fall under
the definition of "calls" as per the law. Therefore, obtaining consent in compliance
with the TCPA is crucial for businesses engaging in SMS marketing campaigns.
Businesses engaging in SMS marketing campaigns must be diligent in obtaining proper
consent and ensuring ongoing compliance with the TCPA's requirements. Consulting
legal professionals with expertise in telecommunications laws is recommended to
navigate these regulations effectively.
Gather permissions for the SMS channel
Explicit consent from users to receive SMS messages should be obtained through
clear opt-in mechanisms during sign-ups or through a dedicated consent process.
SMS permissions serve various purposes, such as facilitating two-factor authentication,
account verification, or communication features within applications. This access
is often crucial for security-related processes, ensuring a secure and authenticated
user experience.
Signup forms
Signup forms are essential components of online platforms, websites, and applications,
serving as the gateway for users to create accounts and access various services.
Designing an effective signup form involves considerations for user experience,
data security, and gathering the necessary information. Here's a breakdown of key
elements and best practices for creating signup forms:
User-Friendly Design:
Keep the form simple, with clear labels and easy-to-understand instructions.
Minimal Information:
Request only essential information during the signup process. Too many
fields may discourage users from completing the form.
Clear Call-to-Action:
Use a prominent and compelling call-to-action button, such as "Sign Up" or
"Create Account," to encourage user engagement.
Responsive Design:
Ensure the signup form is responsive and accessible on various devices
Email Verification:
Implement email verification to confirm the user's identity and reduce the
likelihood of fake accounts.
Privacy and Terms:
Include links to your privacy policy and terms of service. Inform users about
how their data will be used and stored.
Social Media Signup Options:
Offer the option for users to sign up using their social media accounts,
simplifying the process.
By incorporating these elements and best practices, you can create a signup form
that not only facilitates user onboarding but also enhances overall user satisfaction
and security.
Segment SMS subscribers
Segmenting SMS subscribers involves categorizing your audience based on specific
criteria to tailor your messaging strategy and improve the relevance of your SMS
campaigns.
Segmenting SMS subscribers allows businesses to deliver more personalized and
targeted messages, increasing the chances of positive engagement and conversions.
It's an ongoing process that requires regular analysis and adjustment to align with
changing customer behaviours and preferences.
Here's a guide on how to effectively segment SMS subscribers:
Collect Relevant Information:
Gather data about your subscribers. This can include demographic
information, location, purchase history, preferences, and any other
data points that are relevant to your business or campaign.
Define Segmentation Criteria:
Demographics: Age, gender, occupation.
Location: Country, city, region.
Behaviour: Purchase history, engagement with previous SMS campaigns.
Preferences: Opt-in preferences, communication frequency.
Segmentation Tools:
Use tools or software that facilitate segmentation. Many SMS
marketing platforms provide features to segment subscribers based on
various criteria.
Create Segments:
Apply the defined criteria to create segments. For instance, you
might create segments like "Frequent Shoppers," "Local Customers," or
"New Subscribers."
Personalize Messages:
Craft SMS messages that resonate with each segment. Personalization
can include using the subscriber's name, referencing past purchases,
or tailoring content to their specific interests.
Targeted Offers and Promotions:
Create targeted promotions or offers for each segment. This enhances
the likelihood of engagement as subscribers receive messages that align
with their preferences and behaviour.
Automated Workflows:
Utilize automated workflows to trigger SMS campaigns based on
subscriber actions or characteristics. For example, send a welcome
series to new subscribers or a special discount to those who haven't
made a purchase in a while.
Test and Optimize:
Continuously test the effectiveness of your segments and adjust
criteria as needed. Analyse campaign performance to understand what
resonates with each segment and optimize your strategy accordingly.
Compliance with Regulations:
Ensure compliance with SMS marketing regulations, including
obtaining proper consent for communication and respecting opt-out
requests.
Monitor Engagement Metrics:
Track key performance indicators (KPIs) such as open rates,
click-through rates, and conversion rates for each segment. This data
can provide insights into the effectiveness of your segmentation strategy.
Subscriber Preference Page
A Subscriber Preference Page serves as a user-centric hub where subscribers can
exert control over their engagement with a service or product. Offering a range
of customizable options, it empowers users to dictate the nature and frequency
of communications they receive. Users can fine-tune their experience by selecting
their preferred communication channels, specifying content interests, and managing
subscription preferences.
This not only enhances user satisfaction by delivering a more personalized experience
but also reduces the likelihood of users unsubscribing due to irrelevant or excessive
communication. Furthermore, a well-designed Subscriber Preference Page aligns with
privacy standards, allowing users to manage their profile information and privacy
settings, fostering a relationship of trust between the user and the service provider.
SMS message restrictions
SMS (Short Message Service) message restrictions typically refer to limitations
or guidelines imposed on the content, length, frequency, and use of text messages.
These restrictions are often in place to ensure a positive user experience, prevent
abuse, and comply with legal and regulatory requirements. Some common SMS message
restrictions include:
Character Limit: SMS messages are limited to 160 characters per message.
Content Restrictions: Prohibitions on spam, offensive language, or
illegal content.
Frequency Limitations: Restrictions on the number of messages within a specific
time period to prevent spam; excessive messaging may result in penalties.
Opt-in and Opt-out Requirements: Users must explicitly opt-in; clear opt-out
mechanism for easy unsubscribe.
Time Restrictions: Limits on messaging during inappropriate hours.
Sender ID Verification: Some platforms require verification to prevent spoofing.
Compliance with Regulations: Must adhere to local and international laws,
including GDPR and TCPA.
In Practice
Whether you're a seasoned marketer or just diving into the realm of SMS campaigns,
Ozeki offers a seamless experience that unlocks the full potential of text message
marketing. With Ozeki SMS Gateway, you gain access to a comprehensive suite of
features that streamline the process of creating and managing SMS channels.
From powerful two-way communication support to advanced message scheduling, reporting,
and analytics, Ozeki ensures that your marketing campaigns are not only effective but
also tailored to your audience's preferences. The platform's support for both short
and long codes add flexibility to your messaging strategies, allowing you to craft
impactful messages.
One of the standout features of Ozeki is its commitment to compliance, respecting
user privacy and adhering to local and global SMS regulations. The integration with
marketing automation tools further enhances your campaign management capabilities,
making Ozeki an asset for businesses seeking comprehensive SMS solutions.
Download Ozeki SMS Gateway for Free
Access the power of Ozeki by downloading our SMS Gateway. This essential step
opens the door to a world of SMS marketing possibilities. Whether you're a beginner
or an experienced user, our download ensures you have the latest tools to your
SMS channel.
Try a 2-week trial for free of charge, by downloading Ozeki SMS Gateway from our
https://ozeki-sms-gateway.com/
website.
FAQs
What are the steps to create an effective SMS Channel?
To create an effective SMS Channel, start by selecting a reliable service provider
like Ozeki, choose between short or long codes based on your strategy, integrate
the service with existing systems, customize messaging content, utilize scheduling
features, prioritize compliance, and monitor campaign performance.
How does SMS Channel opt-in work?
SMS Channel opt-in involves individuals voluntarily agreeing to receive text messages
from a specific sender or organization. This crucial practice respects user privacy
and complies with regulatory requirements. Opt-in can occur through various methods,
including online forms, subscription keywords, paper-based forms, or verbal consent.
What is TCPA consent, and why is it important for SMS marketing campaigns?
The Telephone Consumer Protection Act (TCPA) is a U.S. federal law that places
restrictions on certain telemarketing practices, including SMS marketing. Obtaining
TCPA consent is crucial for businesses to comply with the law's requirements,
ensuring proper consent for automated systems and prerecorded voice messages.
How can I gather permissions for the SMS Channel?
Explicit consent from users to receive SMS messages should be obtained through clear
opt-in mechanisms during sign-ups or a dedicated consent process. Permissions serve
various purposes, such as facilitating two-factor authentication, account verification,
or communication features within applications.
Are there any SMS message restrictions I should be aware of?
Yes, common SMS message restrictions include a 160-character limit per message,
content restrictions to prevent spam or offensive language, frequency limitations
to prevent spamming, opt-in and opt-out requirements for user consent, time restrictions,
and sender ID verification to prevent spoofing.
Conclusion
In summary, Ozeki SMS Gateway emerges as a game-changing tool for businesses
entering the dynamic field of SMS marketing. Whether you are an experienced marketer
or a newcomer, Ozeki empowers users with comprehensive features, simplifying
the creation and management of SMS channels. What distinguishes Ozeki is its
commitment to compliance, ensuring user privacy and adherence to global SMS regulations.
Ozeki's support for two-way communication, advanced scheduling, and
analytics guarantees not only the effectiveness but also the precision of marketing
campaigns.
For more detailed information click on this link to https://ozeki-sms-gateway.com/.
3 Types of SMS Marketing Messages in your Marketing strategy
In the rapidly evolving landscape of digital marketing, SMS (Short Message Service)
marketing has emerged as a powerful tool for businesses to engage with their
audience. With the ubiquity of mobile devices, SMS offers a direct and immediate
channel to connect with customers. Incorporating various types of SMS marketing
messages into your strategy can significantly enhance your outreach efforts.
What is SMS marketing?
SMS marketing, or short message service marketing, is a type of direct marketing
that uses text messages to communicate with target customers. It is a
cost-effective and efficient way to reach a large audience, and it can be used to
promote products, services, events, or offers.
The 7 steps of marketing strategy
Define your objectives: What do you want to achieve with your SMS marketing
campaign? Do you want to increase brand awareness, drive website traffic, or
generate leads?
Target your audience: Who are you trying to reach with your SMS marketing
campaign? Knowing your target audience will help you create messages that are
relevant and engaging.
Choose the right message: SMS messages are short, so it's important to keep
your message concise and to the point. Use strong calls to action to encourage
your audience to take the desired action.
Get permission before you send: It is important to get your potential
customers' permission to send them SMS messages. You can do this by adding a
opt-in form to your website or app.
Schedule your messages: SMS messages are most effective when they are sent at
the right time. Use analytics to track when your audience is most engaged and
send your messages during those times.
Track your results: Monitor the results of your SMS marketing campaign to see
what's working and what's not. Use analytics to track open rates, click-through
rates, and conversions.
Refine and optimize: Based on your results, refine and optimize your SMS marketing
campaign. Try different messages, timing, and targeting strategies to improve
your results.
SMS marketing is a powerful tool that can be used to reach your customers and
promote your business. There are three main types of SMS marketing campaigns:
Promotional SMS
Transactional SMS
Conversational SMS
The best way to use SMS marketing is to use a combination of all three types of
campaigns. This will help you reach a wider audience and provide your customers
with the information they need.
Promotional SMS
Promotional SMS campaigns are used to advertise your products or services and
generate leads. They are typically sent to a large group of people (mass texting)
and can be used to announce new products, offer discounts, or run contests.
Purposes:
Promote new products: Announce the introduction of new items to the market
Offer discounts: Provide incentives to attract customers
Conduct contests: Engage the audience and generate excitement
Target Audience:
Large group: Reaches a wide range of people
Targeted: Can be customized to specific demographics, interests, or behaviour
Content:
Time-sensitive offers: Limited-time discounts to encourage immediate action
Compelling calls to action: Direct users to make a purchase, sign up for a
newsletter, or visit a website
Examples:
"Get 30% off your entire order today! Use code SUMMER30 at checkout."
"Subscribe to our newsletter and get exclusive discounts and updates!"
Transactional SMS
Transactional SMS messages provide customers with information that they need to
use your product or service. They are typically sent to individuals based on their
interactions with your business, such as after they make a purchase or schedule
an appointment.
Purposes:
Order confirmations: Acknowledge and confirm recent transactions
Shipping updates: Keep customers informed about the progress of their orders
Payment reminders: Prompt customers to make timely payments
Account alerts: Inform customers about account changes or important updates
Target Audience:
Individual customers: Tailored to specific users based on their interactions
Personalized: Include order details, appointment times, or account information
Content:
Order tracking: Provide updates on the status of shipments
Payment reminders: Send out alerts when payments are due
Account notifications: Inform users of password resets, account changes, or
promotions
Examples:
"Your order for [product name] has been confirmed and is on its way. We'll
notify you when it's shipped."
"Your package has been shipped and is out for delivery. It should arrive
today by 8 PM."
Conversational SMS
Conversational SMS is real-time customer
support via text message. You can use it to answer frequently asked questions,
resolve customer issues, and build relationships with your customers.
Purposes:
Answer frequently asked questions (FAQs): Quickly and efficiently resolve common
customer queries without requiring them to navigate lengthy websites or wait for
phone support.
Resolve customer issues: Address customer complaints, concerns, and problems
promptly and effectively, preventing them from escalating into larger issues.
Provide personalized customer support: Build stronger relationships with customers
by engaging in personalized conversations, offering tailored solutions, and
addressing their individual needs.
Gather customer feedback: Conduct informal surveys or collect feedback through
text messages to gain valuable insights into customer satisfaction and identify
areas for improvement.
Target Audience:
Customers who need assistance: Individuals seeking help with product inquiries,
order issues, technical problems, or general inquiries.
Customers who prefer text communication: Individuals who prefer to interact with
businesses via text messages rather than phone calls or email.
Repeat customers: Existing customers who have previously demonstrated interest
in interacting with the business through text messaging.
Content:
Clear and concise responses: Use simple language, avoid technical jargon, and
provide direct answers to customer questions.
Empathetic and polite tone: Maintain a friendly and professional demenaour while
addressing customer concerns.
Useful information and resources: Provide relevant links, FAQs, or contact
information when appropriate.
Strong calls to action: Encourage customers to take desired actions, such as
providing feedback, making a purchase, or scheduling an appointment.
Examples:
Customer inquiries about an order: "Hi [Customer Name], thanks for reaching out.
I see that your order is still processing. We'll send you an update as soon as it
ships."
Customer reports a technical issue: "Thank you for letting us know about this
issue. We're investigating the problem and will get back to you with a solution
as soon as possible."
Customer provides feedback: "We appreciate your feedback on our latest product.
We're always working to improve our offerings and your input is valuable."
How to create an effective marketing campaign?
Here are some tips for creating effective SMS marketing campaigns:
Get permission before you send any SMS messages. This means getting your
customers' express written consent to receive promotional texts.
Keep your messages short and to the point. People are more likely to read
and respond to SMS messages that are quick and easy to understand.
Use strong calls to action. Tell your customers what you want them to do,
such as visiting your website, signing up for a newsletter, or making a purchase.
Track your results and measure your success. This will help you see what's
working and what's not so that you can improve your campaigns over time.
Create an excellent SMS marketing campaign with Ozeki SMS Gateway
Ozeki SMS Gateway is a powerful and affordable SMS marketing platform that can
help you create and send effective SMS campaigns. With Ozeki SMS Gateway, you can:
How to create an SMS marketing campaign with Ozeki SMS Gateway?
Creating a successful SMS marketing campaign with Ozeki SMS Gateway involves a
simple and streamlined process. Firstly, download and install the software, then
launch the user-friendly dashboard. Define your campaign's objectives, target
audience, and scheduling preferences. Craft a compelling message and use Ozeki's
segmentation features to personalize the content. Obtain opt-in consent and
schedule your messages for optimal delivery. Utilize Ozeki's analytics to monitor
campaign performance and refine your strategy.
Best Practices for SMS Marketing Campaigns:
Obtain opt-in consent before sending SMS messages.
It is crucial to obtain explicit permission from your customers before sending
them SMS messages. This means getting their written consent to receive marketing
messages. You can do this by adding an opt-in form to your website or app, or by
requesting that customers opt in when they make a purchase or enrol in a loyalty
program.
Keep your messages short and to the point.
SMS messages have a 160-character limit, so it is essential to keep your messages
concise. Employ clear and straightforward language and avoid using jargon or
technical terms that your customers may not comprehend.
Use strong calls to action.
Directly tell your customers what you want them to do after reading your message.
Do you want them to visit your website, sign up for a newsletter, or make a
purchase? Utilize powerful calls to action that will motivate customers to take
action.
Personalize your messages.
The more personalized your messages are, the more likely they are to be opened
and read. Use customer names, reference prior purchases or interactions, and
tailor your messages to their interests.
Segment your audience.
Not all of your customers are identical. Segment your audience based on
demographics, interests, and purchase history to send more relevant and engaging
messages.
Use automation.
Numerous SMS marketing automation tools are available to help you create and send
effective SMS campaigns. These tools can assist in scheduling messages, segmenting
your audience, and tracking your results.
Track your results.
Utilize analytics to track your SMS marketing campaigns and identify what is working
and what is not. This will aid you in improving your campaigns over time.
FAQs
What is the best time to send SMS messages?
The best time to send SMS messages depends on your target audience, but some
general tips include sending promotional messages during the weekdays when people
are more likely to be working or checking their phones. Transactional messages can
be sent at times when your customers are most likely to be using your product or
service, such as early in the morning if you sell online. Conversational messages,
on the other hand, can be sent at times when your customers are most likely to be
available to chat, such as in the evenings or on weekends.
How should I segment my audience?
Segmenting your audience can help you send more relevant and effective SMS
messages. Here are some ways to segment your audience: by location (send messages
to people in different regions with localized content), demographics (send messages
to people of different ages, genders, or income levels), customer behaviour (send
messages to people based on their purchase history or website activity), and
purchase history (send messages to people who have recently purchased a product
or service).
What kind of content should I send in my SMS messages?
The content of your SMS messages should be informative, engaging, and relevant to
your audience. Here are some ideas for what to include in your messages:
promotional offers (announce new products, discounts, or limited-time offers),
transactional updates (send order confirmations, shipping updates, or payment
reminders), customer service (answer frequently asked questions, address customer
concerns, or resolve issues), and industry news and updates (share interesting
content related to your industry).
How often should I send SMS messages?
The frequency with which you send SMS messages depends on your audience and your
goals. However, it's important to avoid spamming your subscribers. A good rule of
thumb is to send no more than one or two SMS messages per week.
Conclusion
SMS marketing is a powerful and effective tool that can be used to reach your
customers and promote your business. By using a combination of promotional,
transactional, and conversational SMS messages, you can create a more comprehensive
and engaging marketing strategy. By following the best practices for SMS marketing
campaigns and using the right platform, such as Ozeki SMS Gateway, you can see
significant results for your business.
The Ozeki SMS Marketing Platform is a text marketing solution that provides
innovative and very efficient communication method to reach your customers.
Ozeki offers embedded links in the SMS marketing messages that bring unbelievably
high click through rates.
What is SMS marketing platform?
An SMS marketing platform is a powerful tool that leverages text messaging for
effective communication with mobile devices. This platform provides a fully
automated solution for businesses to manage their text messaging campaigns,
allowing them to create, schedule, and send messages to their target audience.
Users can monitor the status of their messages in real-time, ensuring that
they are delivered to the right people at the right time.
Furthermore, the SMS marketing platform has built-in features such as
relationship management, campaign monitoring and reporting, and automated
message sequences. Users can also take advantage of pre-designed text
templates to further personalize their message content. The entire process
of sending instant text messages can be tracked using delivery reports.
Figure 1 - How to send sms from Intranet
Here are a few ways you can use an SMS marketing platform to communicate with
your customers (or potential customers):
Send business card information, Google maps directions, Vcard and VCalendar entries
E-commerce notifications: update order status, shipping confirmations, timely deals and discounts.
Ozeki's SMS Marketing Platform makes it easy for businesses to send bulk text
messages to customers and partners, even if they have no programming experience.
This powerful platform simplifies SMS marketing by providing an intuitive user
interface that allows users to send messages quickly and easily. In addition,
the platform offers an Excel SMS solution that enables office workers to
send bulk SMS messages directly from their familiar Excel spreadsheets. With the
Ozeki SMS Marketing Platform, businesses can save time and boost their
marketing efforts with minimal effort.
What is SMS Marketing Platform?
The SMS marketing platform is a cloud-based or on-premise SMS marketing campaign
management system that can be accessed via a web interface.
What is Ozeki SMS Marketing Platform?
The Ozeki SMS Marketing Platform is an innovative customer platform that provides
businesses with an easy way to send SMS to their customers, partners and employees.
The platform has a user-friendly interface with many features that make it easy
to create, manage and send SMS campaigns.
Whether you're a small business owner,
marketer, or corporate entity, the Ozeki SMS Marketing Platform helps you connect
with your customers quickly and easily. With powerful automation capabilities,
you can schedule messages in advance, set up autoresponders, and track results
in real time. Overall, this platform is a great choice for any business that
wants to increase customer engagement and increase sales with the power of SMS marketing.
How to send SMS from Microsoft Excel using Ozeki SMS Gateway
Excel to SMS lets users to send SMS messages directly from their Excel spreadsheet.
Figure 1 - SMS notifications with website links
Improve your SMS Marketing using Ozeki SMS Gateway in integration with Excel (video tutorial)
The following short and animated video explains how to use a contact list that comes
from an Excel database to send SMS messages that contain website URLs over the
Ozeki SMS Gateway. It's advantageous to save your partner database in an Excel
spreadsheet, especially for sizable databases. When texting a huge audience, the
Ozeki SMS Gateway's ability to manage and transform these datasets into SMS
contacts is advantageous. The video demonstrates how sending SMS messages from an
Excel sheet to contacts can be made simpler by uploading databases.
By providing customized text messages and different message instructions, the Ozeki
SMS Gateway simplifies messaging. Moreover, you may incorporate special connections
and templates. The process begins with creating a contact list in Excel, followed
by uploading it to the Ozeki SMS Gateway for converting them into customer contacts.
After that, you need to format your SMS message and send it to the uploaded list of
audience. When the recipient clicks on the SMS, you will receive a notification
about the click. In this way, Ozeki SMS Gateway can produce valuable statistical
data about clicks, that you can utilize in marketing campaigns and help you to
make important decisions in the future.
Video 1 - How to improve your SMS Marketing using Ozeki SMS
Gateway in integration with Excel (Video tutorial)
Are you tired of forgetting to send an important SMS message to your clients or
employees at the right time? Sending scheduled SMS can help you plan ahead and
make sure that your messages are delivered to the right people at the right time.
In this article, we will guide you through the process of scheduling your
SMS messages on your smartphone or using Ozeki
SMS marketing platform.
What is Schedule SMS?
SMS scheduling is a function of messaging systems that allows the sender to
send pre-written SMS at a predetermined time.
How Schedule SMS works:
Plan the time to send the SMS
Plan the text
Fill in the lines of the excel table according to the sample
Upload the excel table to the SMS Platform
Check the data
Send SMS messages
Wait for the specified time
Look in the log file to see how the dispatch was completed
We will cover all necessary steps to use scheduled SMS, and the benefits
of using this powerful communication feature of the SMS marketing platform.
Whether you are a business owner or an individual, scheduling SMS can save you
time and improve your productivity.
How does the SMS scheduling work in Ozeki SMS Gateway?
The process of SMS scheduling in Ozeki SMS Gateway involves setting up messages
to be sent at a future date and time. Once a message is composed and scheduled,
the software securely stores it within its system. At the specified time, the
software automatically starts the sending process through connected communication
channels. Compose the message content with different data, depending on your
customer list. Create your Excel database, then upload it to the Ozeki SMS Gateway
to generate a contact list with personal details. Compose a scheduled SMS that will
be sent at the specific time you set. When the time reaches the specified one, your
personalized SMS will be delivered automatically through the Ozeki SMS Gateway, to
your recipient's mobile phone.
Figure 1 - Schedule SMS
How to schedule SMS birthday wishes to your customers via Ozeki SMS Gateway?
If you want to congratulate each of your customer's birthdays, collect
the details into an Excel database, including name, date of birth, phone number,
and anything you want to assign to the SMS. Upload the Excel document to the Ozeki
SMS Gateway to create the contact list, of whom you want to send this kind of SMS.
Compose the SMS, then set the date of birth option as the delivery date. As a
consequence, your customers will receive your good wishes on their birthday via
their mobile phones.
SMS Scheduling with Ozeki SMS Gateway (video tutorial)
In this quick video, you will discover how to schedule SMS messages to your
customers using the Ozeki SMS Gateway. Composing SMS messages can consume your
time and energy easily, but Ozeki SMS Gateway offers you a solution to solve this
difficulty. By scheduling SMS messages to a specified date and time, you can save
a significant amount of energy. As you can see in this tutorial, the process is
really easy to follow, so it is recommended to give it a try.
By following these steps, you'll not only save time but also ensure your messages
are reaching your audience when they're most likely to be noticed and appreciated.
Video 1 - How to schedule SMS messages to your
customers using the Ozeki SMS Gateway (Video tutorial)
SMS shipping notification in dropshipping business
With SMS shipping notifications, customers receive automated SMS updates about
their order status, such as when the item has been shipped, tracking information,
and estimated delivery time. SMS shipping notification is particularly important
in dropshipping businesses where shipping times can vary depending on the
supplier's location and other factors.
What is an SMS shipping notification?
An SMS shipping notification is a brief text message to customers to inform them
about the order's shipment status.
What types of shipping statuses are there?
Prepared: The order has been prepared for shipment
Shipped: The package has been sent for delivery
Arrived at Depot: The package has reached the warehouse
Out for Delivery: The parcel on its way
Delivered: The parcel has been successfully delivered
How does SMS shipping notification work?
SMS shipping notification works by automatically sending text messages to customers
about their order status and shipping information. Customers receive timely
updates and tracking information about their shipments straight to their phones.
How does SMS shipping notification support dropshipping businesses?
The process starts with an online order by the customer. The webstore recognizes
the purchase and sends the package on its way. The system creates the essential
data for the SMS notification, including the tracking number, expected delivery
date, and carrier information, if the Ozeki SMS Gateway is already integrated with
your dropshipping system. Through the Ozeki SMS Gateway, an SMS about the order
preparation will be sent. This contains the package number and its reply link.
The warehouse, or logistical centre, sends the parcel to the customer with the
help of a courier. It will receive an order of delivery SMS from the warehouse
about the shipment with the delivery address and customer information. When the
package is on its way, the customer will receive an SMS about the delivery, its
estimated arrival, and its reply link.
Figure 1 - SMS Dropshipping Support
Conclusion
The SMS shipping notification helps to increase customer satisfaction and minimize
customer inquiries and streamline communication between businesses and their customers.
By providing timely updates via SMS, businesses can effectively manage
customer expectations and improve the overall customer experience.
Ozeki's Event Card is a website (lead capture) that event organizers can use to
share important information about their events with visitors and exhibitors.
Using personalized SMS messaging or unique QR codes, the link to the Ozeki Event Card
can be easily distributed to interested parties. This streamlined process eliminates the need
for physical business cards and allows attendees to easily access event
information on-the-go. With the Ozeki Event Card, organizing and promoting a
successful event has never been easier.
What is an Event Card?
A digital event card is a virtual version of a traditional event card used for
organizing various events, providing information about the event date, location,
speakers, sessions, and other relevant details. It can be shared through SMS and
mobile apps, but with its QR Code, it can be scanned by a mobile phone's camera.
We can make modifications regarding our event, so the attendees can get notifications
about the changes instantly.
QR Code SMS marketing for Events: Event Card (plain commands)
Display your Event Card on billboards to let people scan its QR code
Put on flyers so that attendees can scan your Ozeki Event Card
Exhibit the Ozeki Event Card on smart displays to reach more people
Utilize the excellent features of the Ozeki Event Card
Step 1 - Create Event Card
The Ozeki Card is a digital business card service that allows you to easily create
and share professional contact information. To get started, simply register
on the MyOzeki customer portal and create your digital card by entering your
details such as your name, position, and company social information. You can then
order a physical card or multiple cards for your organization as needed.
The Ozeki Card provides a convenient way to share your contact information
with friends and business partners, event visitors, or event organizers.
Figure 1 - Create Event Card
Step 2 - Send Event Card in SMS
Once your Ozeki Event Card is set up, you can share it as you wish without any borders.
You can send it to your partners via SMS so that they get information directly to
their mobile phones. Opening in SMS, they can view the details about the event, they
can save it to their mobile phones storage, or they can forward it to other recipients
through SMS or any social media apps.
On the other hand, it is also possible to display it at places that are frequently
visited by a large number of people on a daily basis. This strategic placement
can help ensure widespread visibility. Opening Ozeki Event Cards in public areas
is possible due that the Event Cards have a unique QR code, so it enables to scan
it using a mobile phone camera. To be able to scan the QR or open the Event Card
from SMS you do not need any applications. Simply open the link and view the
Event Card on your mobile phone's browser.
Step 3 - Visitors and Exhibitors open the Event Card
Ozeki Event Card combines essential event information with practical tools to
ensure that guests have everything they need at their fingertips.
By opening the Ozeki Event Card, participants can get details about the event. They
can add timing to their phone's calendar, receive navigation guidance on maps,
or even buy admission tickets. Next to the send in SMS function, there are some
other Event Card distribution channels where you can share, such as billboards,
flyers, smart displays or NFC cards, NFC tags.
There are various methods to open the Ozeki Event Card on your mobile phone's browser.
You can open by:
Clicking on an SMS link
Scanning a QR code with your mobile phone's camera
Tapping an NFC card or tag to your smartphone
Open Ozeki Event Card with SMS link
To open the Ozeki Event Card via an SMS link, send a text message with the
provided event card to the designated people. When the recipient receives the SMS,
they can open the Event Card by clicking on the link. This will guide them through
their mobile's browser to your Ozeki Event Card and access the details.
Open Ozeki Event Card with QR code
To access the Ozeki Event Card by scanning a QR code, locate your Event Card's QR
code in crowded places, where a large number of people can recognize it. By placing
the QR code in such locations, you ensure that a large audience has the opportunity
to notice and scan it. There are numerous options you can choose from. You can
exhibit your Event Card on huge billboards. Placing your QR code on large
billboards allows it to catch the attention of passersby from a distance,
encouraging them to scan and access the Ozeki Event Card effortlessly.
Another effective way is to print the QR code on flyers. In strategic locations,
like local businesses, malls or public events flyers grab individuals' attention.
If an Event Card's QR code can be visible on a smart display, people automatically
pay attention to it because of the bright and colourful screen.
Open Ozeki Event Card with NFC
Utilizing NFC (Near Field Communication) technology, you can share the Ozeki Event
Card with a single tap on your partner's phone. When you tap your physical Ozeki Event Card
onto their NFC-enabled smartphones, they will be promptly directed to your virtual Ozeki
Event Card through their phone's browser. This interaction enables people to
effortlessly access details about events.
FAQs
Why digital invitations are better?
Compared to traditional paper invites, digital invitations provide a number of
benefits. They save carbon emissions and paper waste. Moreover, they enable fast
distribution, and the addition of interactive components like maps and links,
making the experience for recipients more beneficial and engaging.
Should I put a QR code on my wedding invitation?
Certainly, using a QR code on your wedding invitation may undoubtedly give visitors
a quick and simple way to access extra event information, improving their experience.
This modern touch can streamline information and engagement with your wedding
preparations.
Conclusion
All in all, Ozeki Event Card offers a convenient way to distribute event information
to attendees, enabling them access updates and changes in time. The platform's
user-friendly interface, accessible through smartphones and other devices,
reduces the need for conventional printed cards, supporting environmental
sustainability. As there is no requirement for higher-level informatics knowledge,
anyone can use it without any difficulties thanks to its user-friendly interface.
Ultimately, Ozeki Event Card simplifies event communication for all.
Ways to send SMS through the SMS marketing platform
Send SMS directly from Ozeki SMS Marketing Platform
Ozeki SMS Marketing Platform provides a user-friendly interface that makes it easy to send SMS messages directly from
a web browser, whether you are using your desktop computer or mobile phone. With Ozeki SMS Marketing Platform,
you don't need to use a mobile phone as an SMS gateway or any additional hardware, software or services.
Send SMS using Ozeki 10 SMS Gateway
The Ozeki SMS Marketing platform makes it easy for office users to send and receive SMS messages using a
simple interface that works seamlessly on both desktop and mobile devices. With a web browser as the only
requirement, you can easily stay connected with clients and colleagues.
Send SMS using your Android mobile phone
Ozeki SMS Marketing platform offers a flexible and easy way to send SMS messages using your Android mobile phone.
With Ozeki SMS Marketing Platform, you can send personalized SMS messages to your customers and subscribers using
your phone as the SMS gateway.
Send SMS directly from Ozeki SMS Marketing Platform
Ozeki SMS Marketing Platform provides a user-friendly interface that makes it
easy to send SMS messages directly from a web browser (e.g.: Google Chrome,
Microsoft Edge), whether you are using your desktop computer or mobile phone.
With Ozeki SMS Marketing Platform, you don't need to use a mobile phone as
an SMS gateway or any additional hardware, software, or services.
Our pay-as-you-go SMS platform is designed to allow you to start sending and
receiving bulk SMS online in just a few minutes. All you need to do is sign up
for a free account on the myozeki.com
customer portal, and you're ready to go.
How to use Ozeki SMS Marketing Platform for sending direct SMS?
Access the Ozeki SMS Marketing Platform, on the myozeki.com
site and create your SMS Marketing Campaign. Begin with entering the essential
project details into the MyOzeki SMS Marketing Platform. If you're new to the
MyOzeki, you'll need to sign up by providing your basic information and creating
a secure password.
Once you are logged in, navigate to the campaign creation
dashboard. Specify campaign details, like name, audience and content. Choose
a sender ID that your recipients will see when they receive your SMS. You can
schedule your SMS for an immediate or future date and time. Decide when you want
it to be sent out. You can send personalized messages with dynamic information,
that can change or be customized based on specific data. This makes the message
more relevant and engaging for the recipients. MyOzeki provides tools to track
the performance of your campaign. You can also utilize pre-designed text templates
to enhance the personalization of your messages. Monitoring delivery rates,
open rates, click-through rates, and even responses will help you assess
the effectiveness of your campaign and make decisions for future campaigns.
The Ozeki SMS Marketing Platform makes it easy for office users to send and receive
SMS messages using a simple interface that works seamlessly on both desktop and
mobile devices. With a web browser as the only requirement, you can easily stay
connected with clients and colleagues.
The Ozeki SMS Marketing Platform offers a user-friendly interface for mobile and
desktop devices that enables effortless SMS communication. Scheduled messaging,
delivery reports, and integration options boost productivity, while the platform's
structured message and contact management simplify communications. So, in this
way, SMS messaging has never been easier.
How to send SMS with Ozeki SMS Gateway?
Start your SMS marketing campaign by heading to the myozeki.com website to access
the Ozeki SMS Marketing Platform. If you've never used MyOzeki before, you'll have
to sign up by providing some basic information and creating a secure password.
Input the essential project data first into the MyOzeki SMS Marketing Platform.
Access the campaign creation dashboard after logging in. Describe the campaign's
specifics, including its name, target audience, and content. Choose a sender ID
that your SMS recipients may see when they receive it. The SMS can either be
scheduled for immediate delivery or for a certain time and date in the future.
Choose a date and time that suits you. Send customized messages with dynamic
content that can vary or be tailored to certain data. This strategy improves the
relevance of the message and engages the audience. You have tools to track the
effectiveness of your campaign thanks to MyOzeki. To enhance the personalization
of your communications, you may also utilize pre-made text templates. You can
analyse the success of your campaign and make wise decisions for future projects
by measuring delivery rates, open rates, click-through rates, and even responses.
Creating an SMS campaign using the Ozeki SMS Marketing platform involves several
steps. To start, users log into their accounts and navigate to the campaign creation
section. They provide campaign information once there. The SMS Ozeki Gateway, which
serves as a bridge for message transmission, interfaces with the SMS Marketing
platform hosted by Ozeki and forwards the text messages to your audience. These
messages, scheduled either immediately or for a future time, are efficiently
transmitted to the recipients' mobile devices. As a result, the recipients receive
customized SMS messages automatically on their phones.
Ozeki SMS Marketing Platform offers a flexible and easy way to send SMS messages
using your Android mobile phone. With the Ozeki SMS Marketing Platform, you can send
personalized SMS messages to your customers and subscribers using your phone as
the SMS gateway. With just a few taps, you can create, plan, and manage campaigns,
increasing engagement and optimizing your SMS marketing strategy.
How to send SMS using your Android mobile phone?
To get started, open your Android web browser and head to the myozeki.com website,
where you can access the Ozeki SMS Marketing Platform. New users can easily sign
up and create a secure password right from their Android devices to start their
SMS marketing work.
Once logged in, enter all the necessary project details into the user-friendly
MyOzeki SMS Marketing Platform, directly from your Android phone. Access the
campaign creation dashboard on your Android device after logging in, making
campaign setup convenient. Specify your campaign details, like its name,
target audience, and content, all while leveraging the ease of your Android mobile.
Choose a sender ID that ensures your SMS recipients recognize your brand when they
receive your messages. Whether you want to send the SMS immediately or schedule
it for a specific date and time, the Ozeki SMS Marketing Platform on your Android
phone allows you to make this decision without any effort.
Create personalized messages with dynamic content that suits your audience and
utilize MyOzeki's tracking tools to monitor and optimize your campaign's effectiveness
directly from your Android device. Enhance personalization by taking advantage
of pre-made text templates, simplifying your communication strategy.
Users begin by logging into their accounts and accessing the campaign creation
section, where they enter essential project parameters. The SMS Ozeki Gateway for
Android devices, acts as a link for message transmission, by connecting the
Ozeki-hosted SMS Marketing Platform with recipients. By following the process,
you can perform your SMS campaign successfully from the convenience of an Android
mobile device.
Figure 1 - Send SMS using your Android mobile phone
SMS marketing is a strategy used by businesses to communicate with their
customers via text messages. It involves sending promotional offers, updates,
reminders, and other relevant information directly to customers' mobile devices.
Unlike other marketing channels, SMS marketing offers the advantage of immediate
delivery and high open rates, as text messages are typically read within minutes
of being received.
This direct and personal form of communication enables businesses
to engage with their audience in real-time, making it ideal for time-sensitive
promotions or urgent notifications. SMS marketing is cost-effective, allows for
targeted messaging, and can be integrated with other marketing channels to create
cohesive campaigns. Overall, SMS marketing is a powerful tool for businesses to
connect with customers, drive engagement, and increase sales.
Benefits of SMS marketing
SMS marketing is a powerful tool for businesses to engage with customers, drive
sales, and build lasting relationships.
SMS marketing offers several benefits for businesses:
High Open Rates: SMS messages have incredibly high open rates, often
exceeding 90%. This ensures that your message is seen by a large portion of your
audience.
Immediate Delivery: SMS messages are delivered instantly, making them
ideal for time-sensitive promotions or urgent notifications.
Direct Communication: SMS marketing allows for direct communication
with customers on their mobile devices, providing a personal touch and fostering
a sense of connection.
Cost-Effectiveness: Compared to traditional marketing channels like print
or television ads, SMS marketing is relatively inexpensive, making it accessible
to businesses of all sizes.
High Engagement: Due to its immediacy and personal nature, SMS marketing
tends to generate high levels of engagement, leading to increased customer interaction
and response rates.
Targeted Messaging: With SMS marketing, businesses can segment their
audience and send targeted messages based on demographics, preferences, or past
interactions, increasing the relevance and effectiveness of their campaigns.
Integration with Other Channels: SMS marketing can be integrated with
other marketing channels such as email or social media to create cohesive,
multi-channel campaigns that maximize reach and impact.
How does SMS marketing differ from other marketing campaigns?
Aspect
SMS Marketing
Email Marketing
Social Media Marketing
Delivery Speed
Instant delivery, ensuring immediate engagement
May take hours or days, potentially delayed impact
Immediate, but dependent on user activity
Open Rates
Exceptionally high (typically over 90%), ensuring maximum visibility and engagement
Varies, often lower due to inbox clutter and spam filters
Varies, with potential for messages to get lost in the feed
Message Length
Limited to 160 characters, promoting concise and impactful messaging
Flexible, but may lead to information overload
Flexible, but lengthy content may result in reduced attention span
Interactivity
Limited interactivity, yet direct and personal communication
Moderate interactivity, primarily through links and multimedia
High interactivity, allowing for dynamic engagement with audience
Limited to mobile users, but reaches nearly everyone due to ubiquitous mobile phone ownership
Wide reach, yet dependent on email list quality and deliverability
Wide reach, but platform and audience demographics may affect effectiveness
Targeting Options
Limited targeting options, but still effective in reaching specific demographics
Extensive targeting options, enabling segmentation and personalized campaigns
Extensive targeting options, allowing precise audience targeting for maximum impact
Response Rates
Exceptionally high response rates, ensuring immediate engagement and action
Varies, often lower due to inbox saturation and competition for attention
Varies, with potential for high engagement, but depends on content and platform
Conversion Rates
High conversion rates due to direct and personal communication
Varies depending on content and targeting, potentially requiring multiple touchpoints
Varies depending on various factors such as content, targeting, and user behavior
How does SMS marketing work?
SMS marketing involves businesses sending promotional messages to customers via
text messages. The process typically begins with users opting in to receive texts
from a particular business by either sending a keyword to a short code or subscribing
through an online form. Once subscribed, businesses can send messages containing
promotions, discounts, event invitations, product updates, or other relevant
information.
These messages are usually concise due to the character limit of SMS (typically
160 characters). They may include links to websites or landing pages for further
engagement. SMS marketing platforms enable businesses to schedule messages,
segment their audience based on demographics or behaviour, and track the
effectiveness of their campaigns through metrics like open rates, click-through
rates, and conversions.
However, it's essential for businesses to obtain explicit consent from users
before sending them marketing messages, as violating regulations like the
Telephone Consumer Protection Act (TCPA) or the General Data Protection
Regulation (GDPR) can lead to severe penalties. Overall, SMS marketing offers a
direct and immediate way for businesses to connect with their audience, driving
engagement and fostering customer loyalty.
Capturing consent from subscribers
Capturing consent from subscribers is a crucial step in any SMS marketing campaign.
Opt-In Process: Obtain explicit consent from users before sending SMS messages.
Use a clear sign-up process and consider a double opt-in for confirmation.
Transparency: Be transparent about message content, frequency, and sender identity.
Privacy Policy: Include a link to your privacy policy during sign-up. Explain
data usage and protection.
Compliance: Follow local regulations (e.g., TCPA in the US) to avoid legal issues.
Easy Opt-Out: Provide a simple way for users to unsubscribe.
Record Keeping: Maintain consent records for accountability.
Types of SMS Campaigns
SMS campaigns are a popular marketing strategy used by businesses to engage with
their customers. There are various types of SMS campaigns, each serving different
purposes and objectives.
Promotional Campaigns: These campaigns involve sending out messages to promote
sales, discounts, special offers, or new product launches. They aim to encourage
customers to make purchases or take advantage of limited-time deals.
Transactional Messages: These are automated messages sent to customers after a
specific action, such as order confirmations, shipping notifications, appointment
reminders, or account updates. They provide essential information to customers
and enhance their overall experience.
Alerts and Notifications: SMS alerts and notifications inform customers about
important updates, such as order status changes, service outages, security alerts,
or emergency notifications. They help keep customers informed and provide timely updates.
Customer Surveys and Feedback Requests: SMS campaigns can be used to gather
feedback from customers through surveys or feedback requests. Businesses can use
this feedback to improve their products or services and enhance customer satisfaction.
Loyalty Programs: SMS campaigns can be utilized to engage with loyal customers
by offering exclusive rewards, discounts, or incentives. These messages can encourage
repeat purchases and foster customer loyalty.
Event Invitations and Reminders: Businesses can use SMS campaigns to send out
invitations and reminders for events, such as product launches, webinars, workshops,
or sales events. These messages help increase attendance and engagement.
Personalized Messages: Personalized SMS campaigns involve tailoring messages to
individual customers based on their preferences, purchase history, or demographic
information. Personalization can enhance the effectiveness of the campaign and
improve customer engagement.
Educational Content: SMS campaigns can be used to deliver educational content,
such as tips, tutorials, or how-to guides related to products or services. Providing
valuable information to customers can help build trust and credibility.
Reactivation Campaigns: These campaigns target inactive or lapsed customers with
special offers or incentives to encourage them to re-engage with the brand.
Reactivation campaigns aim to win back customers who haven't made a purchase or
interacted with the business for some time.
Holiday and Seasonal Campaigns: SMS campaigns can be tailored for holidays,
seasons, or special occasions to promote relevant products or offers. Holiday-themed
messages can help businesses capitalize on seasonal trends and drive sales.
An ultimate SMS marketing software: Ozeki SMS Gateway
Ozeki SMS Gateway is indeed a comprehensive SMS marketing software solution that
offers a wide range of features for businesses looking to implement effective SMS
campaigns.
Ozeki SMS Gateway allows businesses to send SMS messages in bulk to large contact
lists efficiently. It supports various SMS sending methods, including HTTP, SMPP,
SMTP, and more.
The software enables businesses to engage in two-way communication with their
customers, allowing recipients to reply to SMS messages.
Ozeki allows businesses to set custom sender IDs for their SMS messages.
Plan and schedule SMS campaigns in advance.
Insert personalized information (e.g., customer name) into messages. Create
dynamic templates for different scenarios (e.g., order confirmations, appointment
reminders).
Monitor message status (delivered, failed, pending) and track performance.
Seamlessly integrate Ozeki with existing systems (CRM, ERP, databases).
Ozeki ensures data security during transmission.
Developers can access APIs and SDKs for custom integrations.
Whether you’re a small business or an enterprise, Ozeki scales to your needs.
Distribute load across multiple servers for high availability.
Business benefits of using Ozeki SMS Gateway in your marketing campaigns
Ozeki SMS Gateway stands out as a comprehensive solution, offering a range of powerful
features tailored to enhance your SMS marketing endeavours. First and foremost, SMS
messages enjoy an unparalleled open rate, boasting an impressive 98% compared to email's
14.5%, ensuring that your messages are promptly seen by recipients. Moreover, the
timeliness of SMS communication is unrivalled, with approximately 83% of millennials
opening text messages within a mere 90 seconds, making it ideal for urgent or
time-sensitive promotions.
Personalization is another key strength of SMS marketing, fostering intimate
communication and driving immediate action through tailored messages. Additionally,
SMS operates as an opt-in channel, ensuring that recipients actively request to
receive your messages, leading to higher engagement levels. Furthermore, SMS marketing
proves to be cost-effective, offering simplicity and rapid delivery while enabling
businesses to reduce communication costs without sacrificing effectiveness.
Ozeki SMS Gateway also offers advanced campaign management tools, allowing businesses
to create, manage, and schedule multiple SMS campaigns simultaneously. With strategic
planning capabilities for promotions, notifications, reminders, and customer engagement
efforts, businesses can streamline their workflow processes and efficiently communicate
with their audience. Moreover, pre-designed text templates further personalize message
content, ensuring effective communication.
By leveraging these advantages, businesses can optimize their marketing strategies,
engage customers effectively, and achieve better results through SMS campaigns with
Ozeki SMS Gateway.
This guide explains how you can setup an on-premise SMS Marketing System using
the MyOzeki Customer Platform and Ozeki SMS Gateway. First, a brief overview is provided
to help you understand the system components, then the installation steps are given.
Overview
To provide content services, such as SMS marketing, QR codes or Digital business
cards from your own premises you need to install the MyOzeki WebService Platform
and Ozeki SMS Gateway. The two major components can be installed on the same
sever or on different servers.
The MyOzeki WebService Platform was designed to serve a large number
of users and to keep their data safe. It is based on PHP and uses the Apache Web Server
for serving customers. It can be installed on both Linux and Windows.
Ozeki SMS Gateway is a high-performance message delivery system. It was designed
to maintain long lasting communication channels, such as SMPP, UCP, CIMD2 and
can delivery messages at high capacity 24/7. It uses .NET and performs best on
Windows.
In this guide we will explain how to install these two components on the same Windows Computer.
You will need to use either Windows 10 or Windows 11 or a later Windows edition.
Figure 1 - MyOzeki Content Delivery
Download
To setup the system, you have to download and install 3 components:
Ozeki SMS Gateway, Apache Webserver and MyOzeki. The following links will take you to the
pages providing download locations and installation steps.
After all components have been installed, you need to setup an HTTP API user account
in your Ozeki SMS Gateway. This HTTP API user account will be used by the MyOzeki SMS
marketing app.
Next, you need to setup a password for the admin account in the MyOzeki service
and you need to install the SMS app. Finally, you have to configure the HTTP API
user of the SMS gateway in MyOzeki
Step 1 - Create an HTTP API user in Ozeki SMS Gateway
To create an HTTP API user in Ozeki SMS Gateway, you access your Ozeki SMS Gateway
account and load the SMS Gateway Home page. In this interface, find the "Add new user application..."
link and click on it. It will bring up an application installation list where you
have to choose the "HTTP User" option to create HTTP User account, which will allow
you to send messages to your system using HTTP GET and HTTP POST requests. Enter
some configuration information, like Username and Password for HTTP User, to be able
to access the system through HTTP API. Save the settings with the "Ok" button. By
navigating to the Ozeki Home page, you can see the new HTTP User on the Users and
applications part of the page.
Step 2 - Create your admin account in MyOzeki
By following these steps, you can create your admin user account in MyOzeki. First,
load the Ozeki Admin Setup page at the http://localhost/ozeki/index.php webpage.
Enter an admin e-mail address and a password. Confirm the password, then click
on the "Create admin account" button to save. After that login with these data into
your MyOzeki admin account.
Step 3 - Install the SMS service for all users in MyOzeki
Now, in this subsequent stage of the process, you need to install SMS service in
MyOzeki. Find the wamp64 folder on the Local disk of your computer and open the "www"
root. There, choose the "ozekiconfig" folder. Inside this folder select the "services"
notes option. Copy the appropriate part of the note document and with the help of it,
create a new service command. Save the changes, then load MyOzeki.com webpage again.
Refresh the page to let the "SMS" feature appear in the Favourites menu.
Enter this: include_once("$servicesdir/sms/_include.php";
Testing
Once the system is configured properly you are ready to test it. For testing, you
need to register a user account in your MyOzeki system, then you need to create
and send a test campaign. After the test campaign is sent you can check the
logs in Ozeki SMS Gateway and understand the procedure.
Step 1 - Register a user account in MyOzeki
In order to be able to send SMS messages through Ozeki SMS Gateway, you have to
register a user account in MyOzeki. To start the process, load the MyOzeki.com in
your browser. Click on the "Create an account" button, then fill the forms with the
necessary details. Enter your name, e-mail address, phone number, and provide a
unique password to your user account and its confirmation. Agree on the terms and
policies, then complete the process by clicking on the "Register" button.
Step 2 - Send a test campaign in MyOzeki
To send a test campaign in MyOzeki, open the "SMS" feature from Favorites menu.
Choose "Send" option from the left-handed Dashboard of the page, then fill out the
fields. Choose "Excel" option from the drop-down list, to be able to use Excel
document database to send SMS messages. Choose your file from the library, then
click on the "Add" button to let the data appear. Check the recipient list, then enter
your Sender ID, that will show when the audience receives the SMS messages.
After that form your SMS message in the "Message" field of the page. Insert
dynamic data, to make your SMS messages more personal. Click on the "Next" button, if
you are done with composing the messages. A details page will appear, where you
can see all the essential data about your SMS messages and recipients. You can edit
if it is needed, or by clicking on the "Send" button, you can start delivery.
If the SMS delivery was successful, you will receive a notification about
your SMS messages have been submitted to Ozeki SMS Gateway for delivery.
Step 3 - Open the logs in Ozeki SMS Gateway
You can view the logs in the Ozeki SMS Gateway, by loading the Ozeki Homepage at
Ozeki SMS Gateway. Choose the "Scheduled jobs" option from the "View" menu, where
you can see the message details about your SMS. Click on the "Details" button to see
the Events tab. The Events tab shows you accurate data about the delivery process.
Step 4 - See the report in MyOzeki
In MyOzeki you can get SMS reports with some click. Open the "Outbox" from the
Dashboard, then click on the "Open" button, highlighted in blue. This will bring up a
details page, where you can see the Jobb information about the message delivery.
By clicking on the purple "Reports" button, the Reports page will appear, containing
the SMS delivery results. If the delivery was successful, you will see the "Sent
successfully" notification.
Summary
In this guide, you have seen the steps need to setup an SMS marketing system.
Once this system is created your users can access the MyOzeki system installed
on your computer. They can register user accounts and can send out SMS marketing
campaigns. If you like this system check out how you can purchase an Ozeki
SMS Gateway License.
WAMP stands for Windows Apache MySQL and PHP. Apache is the world's most popular
webserver and PHP is the most widely used server-side scripting technology and MySQL
is a great database server that is often used with PHP. Apache, PHP and MySQL are usually
used on Linux, but often they are installed on Windows. WAMP is simply an installer that
makes it easy for you to setup Apache, PHP and MySQL on Windows.
Download and install WAMP
This tutorial will show the steps on how to install and configure the WAMP server in Windows.
It gives you the download location and guides you through the simple steps of
getting Apache running. Download and install Wamp
Configure HTTPS in Apache
After installing WAMP it is a good idea to make the Apache Webserver
it installed more secure by configuring HTTPS. This guide explains the
steps needed to enable HTTPS in your Apache Webserver on Windows How to enable HTTPS in Apache on Windows
Setup cURL on Windows
cURL is great HTTP client library, that offers secure
https:// client access. The MyOzeki system uses curl to communicate
with other services, such as Ozeki SMS Gateway, Google Authentication
and Apple Authentication services.
How to setup cURL on Windows
Setup cURL on Linux
If you use Apache on Linux, read this guide to learn how to enable
and setup cURL properly on your Linux server. In this article, you will
learn how to setup and enable CURL dll in php.ini and how
to configure it to work with secure HTTPS connections How to setup cURL on Linux Apache
https://ozeki-sms-gateway.com/p_3389-install.html
How to download and install Wamp
This tutorial will show you various steps on how to install and configure the
WAMP server in Windows 10. WAMP is a free and open-source tool most commonly used
by php developers in the Windows family and other platforms to set up the
development and testing environment.
WAMP server comes with the WAMP control panel to manage all its components easily.
WAMP stands for (W) Windows, (A) Apache, (M) MySQL, (P) PHP and some additional
modules including phpmyadmin (for the database).
Once you have installed and configured the WAMP server in your system, you can
easily work with any CMS like WordPress, Joomla, Drupal and more. WAMP server
works like a local server in your system that is generally used by PHP developers
to test the websites (like web-projects).
How to download and install WampServer (Video tutorial)
In this short video tutorial you will see, how to download and install WampServer
to your computer correctly. We will explain the process from the beginning to the
end, so you only need to follow the presented instructions. First, you will need to
load the WampServer download page to your browser, and then start downloading the file.
After downloading, install the file to your computer by following the instructions in
the video guide. By completing the process, your WampServer application will be
ready to use.
https://ozeki-sms-gateway.com/p_3387-https.html
How to set HTTPS in Wamp
Websites in a development environment that use a WAMP server sometimes require
HTTPS to be available for further development of the application/websites.
To enable https on the server, we need to enable SSL manually.
The following steps are to enable SSL on a WAMP server.
How to setup HTTPS in Wamp (Video tutorial)
The following video tutorial will be about how to set up HTTPS in WampServer.
You can learn the essential steps to enable SSL. You will see the steps in order,
so you need only to follow the presented instructions on your own. First, you need
to launch the Command Prompt to configure Wamp settings. Modify the SSL data to
enable it manually. Follow the instructions to complete the process correctly.
After the settings, make sure that the server has been configured successfully.
https://ozeki-sms-gateway.com/p_3388-remote.html
How to setup remote access in Wamp
Learn how to remotely access your WAMP server sites from any computer over
the internet. To setup remote access you need to configure in Apache.
With WAMP server it is possible to host your own websites from your own computer
by making a few changes. This can be useful for testing your websites on other
devices and remotely accessing data on your PC. For security reasons this should
not be used to permanently host a website that you expect other users to access.
For this tutorial you will need the latest version of WAMP server which can be downloaded from
wampserver.com
cURL is a computer software project providing a library (libcurl) and
command-line tool (curl) for transferring data using various network protocols.
The name stands for "Client URL"
cURL is a command-line tool for getting or sending data including files using
URL syntax. Since cURL uses libcurl, it supports every protocol libcurl supports.
cURL supports HTTPS and performs SSL certificate verification by default when a
secure protocol is specified such as HTTPS. When cURL connects to a remote server
via HTTPS, it will obtain the remote server certificate, then check against its
CA certificate store the validity of the remote server to ensure the remote
server is the one it claims to be. Some cURL packages are bundled with CA
certificate store file. There are several options to specify a CA certificate
such as --cacert and --capath. The --cacert option can be used to specify the
location of the CA certificate store file. In the Windows platform, if a CA
certificate file is not specified, cURL will look for a CA certificate file
name “curl-ca-bundle.crt” in the following order:
Directory where the cURL program is located.
Current working directory.
Windows system directory.
Windows directory.
Directories specified in the %PATH% environment variables
cURL will return an error message if the remote server is using a self-signed
certificate, or if the remote server certificate is not signed by a CA listed
in the CA cert file. -k or --insecure option can be used to skip certificate
verification. Alternatively, if the remote server is trusted, the remote server
CA certificate can be added to the CA certificate store file.
In this article, you will learn how to setup and enable CURL dll in php.ini.
The curl command downloads files that are served with FTP, HTTP, SCP, IMAP,
and other various supported protocols.
Step 1: Install CURL
sudo apt install php-curl
Step 2: enable CURL DLL in PHP.ini
Remove the semicolon before the "extension=php_curl.dll"
Step 3: Restart Apache service
sudo service apache2 restart
https://ozeki-sms-gateway.com/p_3537-sms.html
Setup the MyOzeki SMS System
The MyOzeki SMS System adds SMS campaign management capabilities to your
MyOzeki platform. It is a zip file that includes the MyOzeki Webservice
libraries and the SMS service libraries.
With the MyOzeki SMS System, you can seamlessly integrate SMS campaign management
into your existing MyOzeki platform, enhancing your communication strategies and
customer engagement. Follow the given instructions to complete the setup process.
Download
To download the MyOzeki SMS Marketing System please ask for download information
in e-mail at info@ozeki.hu. The MyOzeki SMS Marketing System is available free of
charge for license holders with active technical support subscription.
Installation
To install this library, you must unzip it and you must copy it into the www root of your Apache
webserver. Decide where you want to create the www folder. This should be in your
server's file system and easily accessible by your web server.
Create MyOzeki www folder
Creating the www folder for the MyOzeki SMS System involves setting up a directory
where you'll place the necessary web content to interact with the system. Name the
www folder to "www.default". After that, open the Ozeki 10 SMS Gateway webpage to
download the necessary myozeki.sms.www.x.x.x.zip file. Download the .zip file, then
copy the whole folder into the "wamp64" folder. Load the admin user setup page to
create a MyOzeki admin user account.
Create MyOzeki admin user
Access the Ozeki Admin Setup page by navigating to the http://localhost/ozeki/index.php
URL. Provide an administrator email address along with a chosen password.
Validate the password and proceed by selecting the "Create admin account" button
to save the details.
Following this, use the provided information to log in to your MyOzeki account.
Add MyOzeki SMS service
In the subsequent phase of the procedure, your task is to install the SMS service
within MyOzeki. Locate the "wamp64" directory on your computer's Local Disk and
access the "www" root within it. Inside this directory, you'll find the "ozekiconfig"
folder. Within the "ozekiconfig" folder, locate and select the "services" notes option.
From the note document, identify the relevant section and copy it. This copied
part will be used to create a new service command. After creating the new command,
save the changes you've made. After this, load the MyOzeki.com webpage. Refresh
the page to enable to appear the "SMS" feature in the Favourites menu.
To achieve this, input the following code: include_once("$servicesdir/sms/_include.php";
Connect MyOzeki to SMS Gateway
The process of connecting MyOzeki to an SMS gateway involves some steps, you need
to take to establish a communication link between the two systems, enabling MyOzeki
to send and receive SMS messages through the gateway. Open the "sms" notes file from
your computer's "www" directory. Find the HTTP API User, then write into the appropriate
part the "ozeki_http_user" and the provided password to it.
Save the changes, then load MyOzeki.com webpage again. Refresh the page to let
setup the connection between MyOzeki and the SMS Gateway.
Enter this: $ozeki10_httpapi_user="ozeki_http_user";
$ozeki10_httpapi_password="abc123";
Summary
All in all, the Ozeki SMS Gateway offers high-performance SMS gateway software
designed for streamlined SMS campaign management. By integrating the MyOzeki SMS
System, businesses can enhance communication strategies and customer engagement
through this user-friendly platform. By following the given steps, you can easily
set up the MyOzeki SMS System, enabling effective SMS messaging. For more information,
visit the www.ozeki-sms-gateway.com
website or contact at info@ozeki.hu e-mail address.
https://ozeki-sms-gateway.com/p_3538-linux.html
How to install MyOzeki on Linux
In this article, you can find the steps needed to set up the MyOzeki Content
delivery platform on Linux. This guide will walk you through the necessary
procedures to successfully install and run MyOzeki on an Ubuntu-based system.
You will learn what you need to install on Ubuntu, and where to copy the MyOzeki
files to get your system up and running.
What is Ubuntu Server?
Ubuntu Server is a Linux-based operating system distribution designed specifically
for use in server environments. It is part of the larger Ubuntu family and is
optimized for delivering reliable, high-performance services. It is a popular option
for both small-scale setups and big business deployments since it provides a platform
for hosting websites, applications, databases, and numerous networking services.
How to install MyOzeki on Linux (plain instructions)
To install MyOzeki on Linux
Download and Install Ubuntu Server
Setup Apache, PHP, Curl
Enable SSL and Rewrite modules
Restart Apache service
Install Certbot using Snap
Obtain an SSL certificate using Certbot
Enable Remote Access in Firewall
Download and Install MyOzeki Files
Set ownership and group
Access MyOzeki in the browser
Download and Install Ubuntu Server
To begin the process, you need to install Ubuntu Server on your computer. Load the
https://ubuntu.com/#download website,
where you need to download Ubuntu Desktop. Click on the downloaded file and start
to run on your PC. Wait for the Mouse integration, then select the "Install Ubuntu"
on the Welcome page. Select a suitable language, then click on the "Continue"
button. Opt for Normal installation, then click on the "Install Now" button. Confirm
the changes, by clicking on the "Continue" button again. Choose your location, then
specify some details as your name, username, and provide a password. Save the
settings with the "Continue" button. The installation process will be finished
when you can see a notification about completed installation. You need to restart
your computer to use the new installations. Click on the "Restart Now" button.
After restarting the computer, Ubuntu will run automatically. Login to your profile,
by entering the previously provided login information into the certain forms. There
will appear some suggestions, but if you are not interested in, you can skip them easily.
Setup Apache, PHP, Curl
Once the installation process is done, you need to set up the server. First, open
the terminal and run the following commands to update the package lists and upgrade
existing packages. Install the Apache web server using the following command:
"sudo apt install apache2", then install PHP and required extensions: "sudo apt
install php libapache2-mod-php php-curl php-mbstring". Once Apache is installed,
it will start automatically. Load in the browser the Apache2 Default Page to test
the correct operation for the Apache2 Server after installation. If the page can
load, it means that the Apache HTTP server can work properly.
Certbot will guide you through the process of obtaining and installing the SSL
certificate. It will also automatically configure your Apache virtual host to use HTTPS.
Open the terminal and run the following commands to configure HTTPS with Let's encrypt.
Enable the SSL and Rewrite modules for Apache using the following commands: "sudo
a2enmod ssl" and "sudo a2enmod rewrite". After making changes to the Apache server
configuration, it's important to restart the Apache service to apply those changes.
The command "systemctl restart apache2" is used to restart the Apache service on
systems. Install Certbot using Snap, which is a package management system:
"sudo snap install --classic certbot". Create a symbolic link for Certbot to make
it accessible from the command line: "sudo ln -s /snap/bin/certbot /usr/bin/certbot".
Run Certbot to obtain an SSL certificate for your Apache web server. Replace
your_domain.com with your actual domain name: "sudo certbot --apache". Enter your
e-mail address, then agree on the terms of service. Type "yes" if you agree. Enter
your domain name you would like on your certificate.
After completing these steps, your website should be accessible via HTTPS with a
valid SSL certificate.
Enable remote access in the firewall using IP tables
Enabling remote access using IP tables involves allowing specific incoming network
traffic to your server. Enter: "sudo ufw enable" command to enable the firewall.
Allow incoming SSH traffic with: "sudo ufw allow ssh". Allow the 'Apache Full'
profile, which includes both HTTP and HTTPS ports: "sudo ufw allow 'Apache Full'".
If you have other services running or specific needs, you can further configure
rules as necessary.
Download and install MyOzeki files in the www root
To download and install the MyOzeki files in the www root directory on Ubuntu,
you'll need to follow these general steps. Start by downloading the MyOzeki files.
Download the appropriate archive, containing the necessary files for the application.
After downloading, extract the files to a temporary location.
Move or copy the extracted files to the appropriate location in the www root directory.
By default, the www root directory is usually /var/www/html/. "sudo cp * /var/www/html/"
Change Ownership and permissions, which changes the ownership and group of the
html/ directory and its contents to www-data, which is the user and group typically
used by web servers to serve files. The -R flag makes this change recursively:
"sudo chmod -R www-data:www-data html/". Enter user password for further settings.
Once everything is set up, you should be able to access the MyOzeki application
in a web browser by navigating to the appropriate URL.
Summary
This step-by-step guide contains detailed instructions for installing and setting
up the MyOzeki on Linux. It guides you through the process to successfully install
and run MyOzeki on an Ubuntu-based system. By using the MyOzeki Platform, businesses
can streamline their messaging processes and enhance their communication strategy.
In today's fast-moving marketing landscape, SMS marketing services are essential
for businesses looking to connect directly with customers. By using mobile phones,
these services send short, powerful messages that reach people quickly and get
their attention. SMS marketing is effective because it is direct and fast, making
it easier to reach the right audience and get them to take action. In a world where
people are easily distracted by a lot of information, SMS marketing helps businesses
stand out and build strong connections with customers.
Ozeki SMS Gateway as an SMS marketing service
Users start by designing their campaigns through the Client Interface, which serves
as their workspace for creating and organizing content and contacts. The SMS
Marketing Application functions as the central hub, handling all campaign details,
including scheduling. Once the messages are prepared, the Ozeki SMS Gateway formats
them for compatibility with mobile networks and securely forwards them to an
SMS Service Provider. This provider delivers the messages directly to recipients'
mobile devices as standard text messages. Overall, the Ozeki SMS Gateway ensures
that SMS marketing campaigns are executed smoothly and reliably.
Figure 1 - SMS marketing service
What are SMS marketing services?
SMS marketing services let businesses send promotional messages, updates, and
alerts directly to customers' phones through text messages. These messages are
quick to read and often get more attention than emails. Businesses can personalize
the messages to make them more interesting to customers. SMS marketing is fast and
easy, so businesses can reach their customers quickly with important information
or offers. Customers choose to receive these messages, which keeps things private
and makes sure people are interested. Overall, SMS marketing helps businesses
connect better with customers, boost sales, and keep communication strong.
What are SMS marketing platforms?
SMS marketing platforms are tools that businesses use to send text messages to
customers. They help create messages, manage contacts, schedule campaigns, automate
sending messages, track performance, ensure compliance with rules, and work with
other marketing tools. These platforms make it easier for businesses to reach
customers, engage with them, promote products, and keep in touch efficiently.
What is bulk SMS message sending?
Bulk SMS message sending is when businesses or organizations send a large number
of text messages all at once to many people. It's a way to quickly inform customers
about special offers, updates, or important announcements. Instead of sending each
message individually, they use a service that can send hundreds or even thousands
of messages in just a few moments.
How to send 1000 messages at once in SMS?
Sending 1000 messages at once through SMS is efficient with the right tools. Begin
by crafting your message—keep it short and clear, such as a notification or a special
announcement. Next, compile a list of 1000 phone numbers of the recipients you want
to reach. Then, schedule the exact time and date you want the messages to be sent.
The service provider you use handles the task of sending all 1000 messages
simultaneously, ensuring they are delivered promptly to each recipient.
Key features to look for in an SMS marketing service
User-friendly interface: Look for a platform that is easy to use. This means
it should be simple to write and schedule messages, manage your contact lists,
and see how well your campaigns are doing, all without needing to be a tech expert.
Personalized messages: Being able to personalize messages with the
recipient's name or other details can make your messages feel more personal and
relevant. This helps increase engagement and makes customers more likely to
respond positively.
Managing contacts: A good service will let you organize your contact lists
well. You should be able to add new contacts easily, group them based on things
like age or location, and update or remove contacts when needed.
Scheduling and automation: Look for tools that let you schedule messages
to be sent at specific times. Automation features are also helpful—they can send
messages automatically on someone's birthday or when they make a purchase, for
example. This saves time and ensures messages are sent at the right moment.
Analytics and reports: It is important to know how well your messages are
performing. The service should provide clear reports on things like how many
messages were delivered, how many people opened them, and how many clicked on
links. This information helps you understand what is working and what needs
improvement.
Compliance and security: Make sure the service follows rules about data
protection and messaging laws. This includes things like getting permission from
people before sending them messages and giving them an easy way to opt out if they
want to stop receiving messages. Good security practices also protect your data
and your customers' information.
Integration with other tools: Consider whether the service works well with
other tools you use, like customer relationship management (CRM) software or email
marketing platforms. Integration makes it easier to coordinate your marketing
efforts across different channels.
Customer support: Choose a service that offers good customer support. If
you have questions or run into problems, it is important to be able to get help
quickly. Look for a service that offers support through phone, email, or live chat.
Benefits of using an SMS marketing service
High open rates: SMS messages are opened quickly by recipients, often
within minutes of being received. This ensures that your message is seen promptly
and increases the chances of engagement.
Direct and immediate communication: Messages are sent directly to
customers' mobile phones, bypassing the need for them to be connected to the
Internet. This direct delivery ensures instant communication, making SMS ideal
for time-sensitive promotions or urgent updates.
Cost-effectiveness: SMS marketing is cost-effective compared to traditional
advertising methods like print or TV ads. It allows businesses to reach a large
audience at a lower cost per message, making it accessible for businesses of all
sizes.
Personalized engagement: SMS marketing enables businesses to personalize
messages by addressing recipients by name or sending tailored offers based on
their preferences or past interactions. This personalized approach increases
engagement and encourages recipients to take action.
Trackable performance: SMS marketing platforms provide analytics tools to
track important metrics such as delivery rates, open rates, and click-through rates.
These insights help businesses measure the effectiveness of their campaigns and
make informed decisions to optimize future marketing efforts.
Using Ozeki SMS Gateway as an SMS marketing service
High capacity:
Ozeki SMS Gateway excels in managing large-scale SMS campaigns efficiently. It has
the capability to send messages to thousands or even millions of recipients swiftly
and reliably, ensuring businesses can reach broad audiences without delays.
Efficient message handling:
With its robust infrastructure, Ozeki SMS Gateway efficiently processes high
volumes of messages. This capability is crucial for businesses engaged in frequent
marketing campaigns, notifications, or customer communications. Messages are handled
promptly and reliably, minimizing delivery delays and ensuring timely communication.
Direct and timely communication:
Businesses can communicate directly and promptly with their audience through SMS
using Ozeki SMS Gateway. This direct communication channel facilitates immediate
delivery of critical information such as order confirmations, appointment reminders,
or emergency alerts, enhancing customer satisfaction and operational efficiency.
Multi-channel support:
Ozeki SMS Gateway supports various communication channels, including
GSM modems and IP SMS,
ensuring reliable message delivery across different platforms and devices. This
multi-channel capability maximizes reach and ensures messages reach recipients
regardless of their device or network.
Automation capabilities:
Automation is a cornerstone feature of Ozeki SMS Gateway, enabling businesses to
automate tasks such as sending scheduled SMS alerts, notifications, or promotional
messages based on predefined triggers or conditions.
Ozeki SMS Gateway automates SMS replies in three ways:
Autoreply Easy sends preset responses you can edit,
Autoreply by Script uses custom scripts for replies or forwarding, and
Autoreply from Database sends messages based on SQL
queries triggered by incoming SMS. These features make responding to messages
quick and easy.
Seamless integration:
Ozeki SMS Gateway integrates seamlessly with existing business systems such as
MySQL and SQL Server. This
seamless integration allows businesses to leverage their current infrastructure
and data sources for SMS communications, facilitating easy deployment and management
of SMS capabilities without disrupting ongoing operations.
Bulk messaging capabilities:
Ozeki SMS Gateway supports bulk SMS messaging, enabling
businesses to send messages to a large audience efficiently. Whether it is promotions,
updates, or important notices, Ozeki ensures messages are delivered quickly and
reliably, facilitating effective communication with a wide range of customers.
Robust security:
Ozeki SMS Gateway prioritizes security, employing strong encryption and
authentication methods to safeguard SMS communications and user data. This focus
on security ensures privacy and protects against unauthorized access, helping
businesses comply with data protection regulations and build trust with their
customers.
Comprehensive analytics:
Ozeki SMS Gateway provides businesses with detailed analytics and reports, including
delivery reports and engagement metrics. These analytics
offer valuable insights into campaign performance, allowing businesses to assess the
effectiveness of their SMS marketing efforts and make informed decisions to optimize
future campaigns.
How to send mass SMS with Ozeki SMS Gateway?
Install and configure Ozeki SMS Gateway: First, install Ozeki SMS Gateway
on your server or computer. Follow the setup instructions provided by Ozeki to
configure the gateway with your network settings and SMS service provider details.
Prepare your SMS content: Create the SMS message that you want to send to
your recipients. Ensure that the message content complies with regulations and is
clear and concise.
Upload or import recipient list: Ozeki SMS Gateway allows you to send SMS
to multiple recipients at once by uploading or importing a recipient list.
Users can prepare their recipient lists in commonly used formats such as
Excel spreadsheets. These formats support the inclusion
of essential details like phone numbers and additional personalized information,
ensuring that messages can be tailored to recipients' preferences or specific needs.
Compose your message: Use Ozeki SMS Gateway's interface to compose your
SMS message. You can personalize messages using placeholders for recipient names
or other variables if supported by the gateway.
Schedule or send immediately: Choose whether to send the SMS messages
immediately or schedule them for a specific date and
time. Ozeki SMS Gateway supports both immediate and scheduled sending options.
Monitor delivery status: Once messages are sent, Ozeki SMS Gateway provides
delivery reports and status
updates. Monitor these reports to track the delivery status of your SMS messages.
Review and optimize: After sending the mass SMS campaign, review analytics
and reports provided by Ozeki SMS Gateway. Evaluate delivery rates, open rates,
and other metrics to optimize future SMS marketing campaigns.
Frequently Asked Questions (FAQs)
Is it legal to send mass texts?
Yes, it is okay to send lots of texts to people, but you have to follow rules.
Before sending messages, make sure people agreed to get them. Always say who you
are in the messages and give an easy way for people to stop getting them, like
texting "STOP." Do not trick people with false info, and know the rules in your
area, like the TCPA in the U.S. or GDPR in Europe, to keep messages legal and
respect people's privacy. Following these rules lets businesses send texts in a
fair and legal way.
Is SMS marketing cost-effective?
Indeed, SMS marketing typically costs less than traditional advertising methods
such as TV or print ads. It enables businesses to reach a broad audience at a
lower cost per message, making it accessible for businesses of all sizes to execute
effective marketing campaigns.
Summary
In today's fast-paced marketing world, SMS marketing services like Ozeki SMS
Gateway are essential for businesses to connect directly with customers. These
services send short, powerful messages to mobile phones quickly, grabbing people's
attention. SMS marketing is effective because it is direct and speedy, making it
easier to reach the right audience and encourage them to act. In a world full of
distractions, SMS marketing helps businesses stand out and build strong connections
with customers by delivering messages straight to their phones.
Omnichannel SMS Marketing has become essential for modern businesses, reshaping
how they connect with customers across diverse digital platforms. By delivering
personalized messages directly to customers' mobile phones, companies ensure
timely and relevant communication. This approach plays a crucial role in maintaining
a consistent brand experience across all channels, from online interactions to
in-store visits. By integrating SMS seamlessly into their overall marketing
strategies, businesses not only enhance customer engagement but also drive sales
and foster loyalty in a highly competitive marketplace where seamless, interconnected
experiences are increasingly valued by consumers.
Omnichannel SMS marketing with Ozeki SMS Gateway
Marketing messages can originate from various channels such as print, store, email,
website, call centre, social media, or SMS itself. These channels connect to the
Ozeki SMS Gateway, which serves as a central hub for managing and sending out
SMS messages. The gateway then uses an SMPP client over the internet with secure
protocols (SSL/TCP/IP) to send the SMS messages to the mobile network. Finally,
the messages are delivered to the recipients' mobile phones via the mobile network
infrastructure.
Figure 1 - Omnichannel SMS marketing
What is omnichannel messaging?
Omnichannel messaging is about sending consistent messages to customers through
various channels such as email, SMS, social media, websites, apps, and physical
stores. It ensures that wherever customers interact with a brand, they receive
the same type of messages. This approach aims to create a seamless and connected
experience for customers, improving their overall satisfaction and loyalty to the
brand. By maintaining consistency across different platforms, businesses can
better engage with customers and build stronger relationships, ultimately enhancing
their success in the competitive market.
How to build SMS into your omnichannel strategy?
Know your customers: Start by understanding how your customers prefer to
interact with your brand. Use data and feedback to learn if they like receiving
SMS messages and for what purposes.
Set clear goals: Define what you want to achieve with SMS. Whether it is
boosting sales, improving customer service, or driving traffic to your website,
having specific goals will guide your SMS campaigns.
Sync customer data: Make sure customer information is shared across all
your channels. This allows for personalized messaging and ensures that every
interaction with your brand feels consistent and connected.
Coordinate messages: Align your SMS campaigns with other marketing channels
such as email, social media, and in-store promotions. Create messages that reinforce
your brand’s identity and resonate with your audience.
Personalize your messages: Use customer data to customize your SMS content.
Tailor messages based on preferences, previous purchases, or where customers are
located to make them more relevant and engaging.
Use automation tools: Consider using tools that automate the sending of
SMS messages. This can include scheduling messages in advance or sending them
based on customer actions, saving you time and ensuring timely communication.
Monitor performance: Keep an eye on how your SMS campaigns are performing.
Look at metrics like how many people open your messages, click on links, and
complete actions. Use this data to tweak your strategy for better results.
Adapt and improve: Continuously adjust your SMS strategy based on what you
learn from analytics and customer feedback. Experiment with different approaches
to find out what works best for your audience.
How does SMS fit into omnichannel marketing?
Complement E-mail campaigns: SMS boosts engagement with your regular email
newsletters and promotions. Send a text reminder before your email offer goes out
or follow up an email with an SMS containing a call to action or coupon code. This
dual approach creates more opportunities to capture customer attention and prompt
action.
Update customers with transactional messages: SMS is perfect for sending
timely transactional updates and reminders. Automate texts for post-purchase
confirmations, shipping notifications, appointment reminders, and delivery updates.
This keeps customers informed conveniently and builds trust by meeting their
communication expectations.
Collect customer feedback: Use SMS to directly request targeted feedback
from customers. After a purchase, send a text asking for reviews on their shopping
experience or the product they bought. This approach yields higher response rates
and provides valuable insights to improve customer satisfaction and refine your
offerings.
Build anticipation for events: Leverage SMS to generate excitement about
upcoming events like product launches, sales, or brand celebrations. Send a series
of texts announcing event details, offering exclusive offers, and creating
countdowns. This strategy keeps customers engaged and looking forward to your
announcements.
Tips for using SMS effectively within your marketing strategy
Get permission first: Always ask customers if they want to receive SMS
messages from you. Use opt-in forms or initial transactional messages to introduce
SMS gradually. This ensures customers are willing to hear from you and builds trust.
Keep messages clear and valuable: Each SMS should have a clear purpose
that adds value for the recipient. Whether it is a quick update, important
notification, or special offer, make sure it is relevant to them. Avoid sending
too many messages to keep their interest.
Keep it short and simple: SMS has a character limit, so keep your messages
brief and straight to the point. Deliver the necessary information without extra
details. This makes it easier for customers to read and understand quickly.
Offer an easy way to opt-out: Always provide a simple way for customers to
stop receiving SMS messages if they choose. Include instructions on how to unsubscribe,
similar to what you would do in email marketing. Respecting their preferences helps
keep your relationship positive.
Consider timing and location: Be mindful of when you send SMS messages. Avoid
sending them late at night or early in the morning to avoid disturbing customers.
If your audience spans different time zones, adjust your sending times accordingly.
Use SMS with other channels: Combine SMS with email and other communication
methods for a well-rounded marketing strategy. This balanced approach helps you
connect with customers effectively without relying too heavily on SMS alone.
Is SMS a good marketing channel?
Yes, SMS (Short Message Service) can be a highly effective marketing channel for
businesses. Here is why:
High open rates: SMS messages are often read by most recipients because
they appear directly on their phones, unlike emails that can get lost in crowded
inboxes. This means your message is more likely to be seen promptly.
Immediate delivery: SMS messages are delivered instantly and are usually
read within a few minutes. This makes them perfect for sending urgent notifications
or time-sensitive offers that require immediate attention from customers.
Direct and personal: SMS allows you to reach customers directly on their
mobile phones, creating a personal connection. This direct approach lets you send
personalized messages that resonate with your audience and build stronger
relationships.
High engagement: SMS campaigns often lead to higher interaction rates
compared to other channels. Customers are more likely to click on links, use
coupons, or take action right after receiving an SMS, which can boost sales and
marketing effectiveness.
Wide reach: Almost everyone has a mobile phone capable of receiving SMS
messages, making it a channel that reaches a broad audience across different age
groups and demographics.
Cost-effective: SMS marketing can be affordable, especially when you consider
the potential return on investment from higher engagement and conversion rates.
It is a cost-efficient way to reach customers compared to traditional advertising
methods.
Complements other channels: SMS can be used alongside emails, social media,
and in-store promotions to create a unified marketing strategy. This integration
helps reinforce your brand message and engage customers through multiple channels,
enhancing overall marketing impact.
Benefits of Omnichannel SMS marketing
Direct and immediate communication: Omnichannel SMS marketing allows
businesses to send messages directly to customers' phones, ensuring instant
visibility. Whether it is a flash sale notification or an appointment reminder,
SMS delivers messages promptly and reliably, maximizing the chance of customer
engagement.
High open and engagement rates: SMS messages boast high open rates and
quick response times. By appearing directly on recipients' phones, SMS captures
immediate attention, making it an effective channel for delivering time-sensitive
offers and increasing customer interaction compared to other marketing channels.
Personalized customer interaction: Omnichannel SMS marketing enables
businesses to personalize messages based on customer preferences and behaviours.
This personalized approach enhances relevance and customer satisfaction, as
recipients receive tailored promotions, updates, or reminders that resonate with
their interests.
Seamless integration across channels: SMS integrates seamlessly with other
marketing channels such as email and social media. This integration ensures consistent
messaging across various touchpoints, reinforcing brand identity and enhancing
the overall customer experience. By coordinating SMS with other channels, businesses
maintain a cohesive marketing strategy that reaches customers effectively.
Cost-effective and high ROI: Implementing omnichannel SMS marketing is
cost-effective, offering a strong return on investment (ROI) due to its high
engagement rates and direct communication capabilities. Compared to traditional
advertising methods, SMS campaigns require fewer resources while delivering
impactful results in terms of customer engagement and conversion rates.
Frequently Asked Questions (FAQs)
How often should I send a message?
The frequency of SMS messages should balance keeping your audience engaged without
overwhelming them. Generally, sending 1-2 messages per week is a good starting
point. Always prioritize quality and relevance over quantity to avoid annoying
your customers.
What is the difference between SMS and other marketing channels?
SMS is a direct, immediate, and personal form of communication. Unlike email or
social media, which can be crowded or delayed, SMS messages are typically read
within minutes of receipt. This makes SMS ideal for urgent updates and time-sensitive
offers.
What are the best times to send SMS messages?
The best times to send SMS messages are usually during business hours. Avoid
early mornings and late evenings. Consider testing different times to see what
works best for your audience.
Can I personalize marketing text messages?
Yes, you can personalize marketing text messages. By using customer information
like their name, what they have bought before, their preferences, and where they
live, you can make your SMS messages more relevant and engaging for each person.
Personalized messages can include special deals, recommendations based on past
purchases, or reminders about items they’ve shown interest in. Personalizing your
messages helps keep customers happy and more likely to engage with your brand.
Can I send SMS marketing to customers without getting opt-ins?
No, you cannot send SMS marketing messages to customers without their permission.
You must get their consent before sending any marketing texts. This is required
by law in many places, like the U.S. under the Telephone Consumer Protection Act
(TCPA) and the EU under the General Data Protection Regulation (GDPR). Without
permission, you risk fines and damaging your brand’s reputation. Always get clear
consent from customers before sending them marketing texts.
Summary
Omnichannel SMS marketing is essential for modern businesses, transforming how
they connect with customers across various digital platforms. By sending personalized
messages directly to mobile phones, companies ensure timely and relevant
communication. This method helps maintain a consistent brand experience across
all channels, from online interactions to in-store visits. Integrating SMS into
overall marketing strategies enhances customer engagement, boosts sales, and fosters
loyalty, meeting consumer expectations for seamless, interconnected experiences
in a competitive marketplace.
Increasing SMS marketing conversion is crucial for businesses that want to reach
and engage more customers effectively. SMS marketing is important because text
messages have a much higher chance of being opened and read compared to emails.
People often check their messages within seconds, making SMS perfect for quick
promotions, urgent updates, and personalized messages. By improving how many people
respond to these messages, businesses can get a better return on their marketing
efforts, build stronger customer relationships, and boost sales. Learning how to
make SMS marketing more successful helps businesses stay competitive in today’s
fast-paced market.
Increasing SMS marketing conversion with Ozeki SMS Gateway
The diagram shows the Ozeki SMS Gateway's features and the SMS message flow. The
features include report and analytics, automation, SQL integration, bulk SMS, and
two-way messaging, which are tools to enhance SMS marketing conversion. The gateway
can send SMS messages in two ways. The first method uses a GSM modem connected via
USB, which sends SMS to mobile networks and then to phones. The second method uses
IP SMS via the internet, supporting various protocols (SMPP, UCP, CIMD2, HTTP,
HTTPS, REST) to send SMS to mobile networks and then to phones.
Figure 1 - Increase SMS marketing conversion
What is SMS marketing?
SMS marketing is a way businesses use text messages to send promotions, updates,
and offers directly to people's mobile phones. It is a quick and direct way to
reach customers, often used for announcing sales, sending reminders, or sharing
special deals. Since people usually check their text messages quickly, SMS marketing
can be a very effective way for businesses to communicate with their customers.
What is SMS marketing conversion?
SMS marketing conversion is when people who get marketing text messages from a
business take the action the business wants them to take. This could be buying
something, signing up for a service, visiting a website, or using a discount code.
The conversion rate shows how well the SMS marketing is working. For example, if
a business sends 1000 texts and 50 people buy something, the conversion rate is
5%.
Tips for increasing your SMS marketing conversion
Use branded URLs
Make sure to use URLs that include your brand’s name instead of generic link
shorteners like bit.ly. This approach looks more professional and helps your
messages avoid being flagged as spam. Branded URLs make your messages appear more
trustworthy and relevant to your business, which encourages more clicks.
Include multiple offers
You do not have to stick to 160 characters if your SMS platform supports longer
messages. Try to keep your messages short and engaging, but feel free to include
several offers or promotions. Monitor how people respond to different types of
messages and adjust your approach based on what works best. This may involve
running tests to compare different messages and see which ones get the best
response.
Ensure easy interaction
Make it simple for your recipients to act on your messages. Use clear links,
keywords, or simple codes that they can easily follow. Ensure that the landing
pages you link to are mobile-friendly so that they load properly on smartphones.
A smooth user experience will help increase the chances that they will follow
through with your call to action.
Send a few more messages
It can be effective to send more than just one or two messages in your campaign.
Sending up to three or more can lead to significantly higher conversion rates.
However, make sure that each message provides value and is not just repeated
information. Avoid bombarding recipients with irrelevant content, each message
should be useful and engaging.
Leverage the immediacy
SMS is immediate, so use this to your advantage by sending messages that are timely
and relevant. For instance, if you are promoting an event happening soon, send
reminders on the day of the event or just before. This direct approach can be more
effective than other methods of communication. Sending multiple reminders leading
up to an event can also help keep it fresh in your customers’ minds.
Speak their language
Write your text messages in a way that matches how your audience normally communicates.
Use casual, friendly language instead of formal or technical jargon. Keep your
messages brief and to the point and avoid making them look too much like an
advertisement. This helps your messages feel more personal and engaging.
Maintain a clean database
Regularly update and clean your contact list to ensure it is accurate. Use services
to verify phone numbers and remove those that are no longer valid. After each
campaign, check for details on delivery issues and reasons for failures, such
as numbers being unreachable or blacklisted. This helps keep your contact list
high-quality and improves the effectiveness of your campaigns.
Optimize timing
Choose the best times to send your SMS messages based on when your audience is
most likely to be available and responsive. Avoid sending messages at odd hours
like late at night. Think about when people are most likely to read and act on
your messages and schedule them accordingly for better results.
Benefits of increasing SMS marketing conversion
Higher engagement rates: When more people respond to your SMS messages,
it means they are interacting with your brand more. This leads to higher engagement,
such as more clicks on links, sign-ups, and overall interest in what you offer.
Engaged customers are more likely to stay loyal and buy from you again.
Increased revenue: Better SMS marketing conversions often mean more sales
and higher revenue. When more of your message recipients take action, such as
making a purchase or using an offer, your revenue goes up. This improvement in
conversions can make a big difference in your overall sales and profit.
Better return on investment (ROI): Higher conversion rates show that your
SMS marketing is working well. This means you are getting more results from the
same amount of money spent, making your marketing budget more effective. A good
ROI means you are getting more value from each message you send.
Stronger customer relationships: Effective SMS campaigns help build stronger
relationships with your customers. When they receive messages that are useful and
relevant, they feel more connected to your brand. This can lead to increased trust
and a more positive perception of your business.
Improved customer retention: When your SMS messages are effective, customers
are more likely to return and continue buying from you. Better conversion rates
can help keep customers coming back, reducing the chances that they will leave
and increasing their lifetime value to your business.
Better data insights: As you work on improving SMS conversions, you gain
valuable information about what your customers like and how they behave. This
data helps you create more targeted and successful campaigns in the future.
Understanding what works best lets you make smarter marketing decisions.
Competitive advantage: If your SMS marketing has high conversion rates,
you stand out from your competitors. Effective campaigns that catch people’s
attention and drive action give you an edge in the market. This advantage can
lead to more recognition for your brand and a bigger share of the market.
More efficient campaigns: When you focus on increasing conversions, you
often end up with more streamlined and effective campaigns. This means you achieve
better results without wasting resources. By improving your strategies, you use
your marketing budget and efforts more wisely.
Increased brand loyalty: When customers consistently find value in your
SMS messages, they become more loyal to your brand. Loyal customers not only make
repeat purchases but also share their positive experiences with others. This can
lead to organic growth and more business through referrals.
Better customer experience: Higher conversion rates usually come from
sending messages that fit your customers’ needs and interests. This means you are
improving the overall experience they have with your brand. A better experience
leads to happier customers who are more likely to stay engaged and satisfied.
Features of Ozeki SMS Gateway that could help increasing SMS marketing conversion
Bulk SMS messaging: Ozeki SMS Gateway allows you
to send a large number of text messages all at once. This means you can quickly
reach many people with your promotions or updates. By contacting a wide audience
efficiently, you increase the chance that more people will see and respond to your
message, leading to higher conversion rates.
Automation: With automation, you can schedule your messages to be sent at
the right times, set up automatic replies, and create a series of messages that
go out over time. This helps you stay in touch with customers regularly and ensures
that they receive timely offers or follow-ups, which can make them more likely to
convert. Autoreply Easy lets you respond automatically
with a preset text that you can edit. Autoreply by Script
uses custom scripts for tailored replies or message forwarding.
Autoreply from Database connects to SQL databases to
send responses based on query results from incoming SMS, enhancing responsiveness
and data-driven communication.
Personalization: Ozeki SMS Gateway lets you customize messages for each
recipient, like using their name or referencing their past purchases. Personal
messages feel more relevant and engaging, which makes people more likely to respond
positively and take the desired action.
Two-way communication: This feature lets you have conversations with your
customers via SMS. You can use it for surveys, feedback, or customer support.
Engaging directly with your customers helps build a stronger relationship and
trust, increasing the likelihood that they will convert.
Reporting and analytics: Ozeki SMS Gateway provides easy-to-understand
reports that show how well your SMS campaigns are doing. You can see delivery
reports to know if your messages reached people, and track open rates and
click-through rates to see how many recipients read your messages and clicked on
links. This helps you adjust your strategies, like changing when you send messages
or what you include in them, to improve your results and get more conversions.
Integration with other systems: Ozeki SMS Gateway easily connects with
existing systems like MySQL and SQL
Server. This means you can use your current setup for SMS communication without
major changes. It simplifies adding SMS features to your business, helping you
operate more efficiently.
Customizable sender ID: Customizable sender IDs
let you choose a recognizable name or number for your messages, rather than a
generic one. For instance, using your business name as the sender ID instead of a
short code makes the message look more credible and trustworthy. Recipients are
more likely to open and respond to messages from a familiar sender, increasing the
chances of conversions.
Frequently Asked Questions (FAQs)
How often should I send SMS messages to avoid annoying recipients?
Start by sending SMS messages once a month or every other week. Monitor how your
audience responds and adjust the frequency based on their engagement. Make sure
each message provides value and avoid sending too many messages in a short period
to prevent irritation.
What role does message timing play in SMS marketing success?
Timing is crucial for SMS marketing. Send messages when your audience is likely
to be available and attentive, avoiding late nights or work hours. Review past
campaign data to find out the best times to send messages for maximum engagement.
How can I use SMS marketing to drive repeat purchases?
Encourage repeat purchases by sending personalized offers, loyalty rewards, or
special deals to your existing customers. You can also remind them about upcoming
sales or restocked items based on their previous purchases, making them more likely
to return.
Summary
Boosting SMS marketing conversion is essential for businesses aiming to connect
with customers more effectively. Text messages are typically opened and read faster
than emails, making SMS an ideal channel for timely promotions, urgent updates,
and personalized offers. Enhancing how many recipients engage with your messages
can lead to better marketing returns, stronger customer relationships, and increased
sales. Mastering effective SMS marketing techniques ensures businesses remain
competitive and maximize their marketing efforts in today’s dynamic market.
In today's fast-moving digital world, businesses need to communicate quickly and
effectively, especially when sending messages to many people at once. One key tool
for this is using shortened URLs in bulk SMS messages. These shorter links save
space in text messages and make them look cleaner and easier to read. They also
help businesses track how many people click on their links, giving them useful
information about their campaigns. Using shortened URLs is important for businesses
that want their messages to be clear, engaging, and effective.
Shorten URL for bulk SMS sending with Ozeki SMS Gateway
The diagram shows how the Ozeki SMS Gateway sends bulk SMS messages. It takes messages
from different sources like AI systems, Excel sheets, databases, and marketing
campaigns. The messages, including URLs, go through a URL shortening process before
being routed by the Ozeki SMS Gateway. The gateway can send messages in two ways:
through a GSM modem connected via USB, which sends the SMS to the mobile network
and then to phones, or through the internet using different protocols (SMPP, UCP,
CIMD2, HTTP, HTTPS, REST), which also deliver the SMS to the mobile network and
then to phones. This system makes it easy to send many messages quickly and
efficiently.
Figure 1 - Shorten URL for bulk SMS sending
What is bulk SMS?
Bulk SMS is a way to send many text messages to lots of people at once. Businesses
and organizations use it to quickly communicate with customers, employees, or members.
It is often used for marketing, alerts, reminders, and notifications because it
is fast, cost-effective, and people tend to read text messages more than emails.
Bulk SMS helps businesses reach a large audience instantly in a personal and
direct way.
What is URL?
A URL, which stands for Uniform Resource Locator, is the address used to access
websites and other resources on the internet. It shows where a resource, like a
webpage, is located and how to get to it. For example, in the URL
"https://www.example.com", "https" is the protocol, "www.example.com" is the
domain name, and there might be more paths or details after the domain that lead
to specific pages or files on the site. URLs are important for finding and
accessing online content.
Why use short link for SMS?
Brand impressions: Using shortened links allows businesses to customize them
with their own brand names or related keywords. This branding helps reinforce their
identity every time someone clicks on a link, increasing brand recognition and trust.
Enhanced deliverability: When businesses use branded links in SMS messages,
they are more likely to bypass filters that sometimes block generic short links.
This means more of your messages reach their intended recipients, ensuring your
marketing efforts are not wasted due to blocked links.
Encouraging action: Short links reassure recipients that clicking will take
them to a trustworthy place, such as your website or a specific offer page. This
confidence boosts the likelihood that recipients will click through, leading to
increased engagement and conversions.
Character efficiency: In SMS marketing, where space is limited to 160
characters per message, every character counts. Shortened URLs help save space
that can be used for essential message content rather than long web addresses that
could split across multiple messages, potentially confusing recipients.
Optimized mobile experience: Short links can direct mobile users to specific
locations within apps or mobile websites. This targeted approach improves user
experience by making navigation simpler and more direct, whether it is prompting
app downloads or leading to relevant content.
Insightful data analytics: Short link services provide valuable data such
as how many times a link has been clicked, which devices were used, and where
users are located. This data helps businesses understand their audience better,
allowing them to refine their SMS campaigns for better performance and engagement.
Use cases of shortening URL
Enhanced user experience:
Shortened URLs are easier to read and share because they are concise and do not
take up much space. This is particularly useful in text messages or short messages
where long URLs might get cut off or look messy. People can quickly understand and
click on shortened links without confusion.
Tracking and analytics:
When businesses use shortened URLs, they can track how many people click on them.
This helps them understand which messages or ads are most effective. By analysing
these clicks, they can make better decisions about their marketing strategies and
improve their campaigns to reach more people.
Space optimization:
Shortened URLs save space in messages, tweets, or posts where there is a limit
on the number of characters. This allows for clearer and more focused communication.
Instead of a long and complicated link that takes up valuable space, a shortened
URL keeps the message concise while still providing the necessary information.
Brand visibility:
Customized shortened URLs can include a brand name or a relevant keyword. This
helps businesses create a consistent brand presence across different platforms.
When people see these branded links, they are more likely to recognize and remember
the brand, which can strengthen brand awareness and trust over time.
Security:
Shortened URLs can help protect against phishing attempts or unauthorized access.
Long URLs can sometimes be confusing or suspicious-looking. Shortened URLs hide
the original link, making it harder for attackers to manipulate or misuse the link
to trick people into clicking on harmful websites.
Cross-platform sharing:
Shortened URLs are versatile and can be easily shared across different platforms
like emails, social media, or printed materials. This ensures that the link works
the same way and looks consistent no matter where it is shared. Users can access
the link from any device or platform without any issues.
A/B testing:
Marketers use shortened URLs to test different versions of a link or landing page
to see which one performs better. By comparing the number of clicks and engagement
rates between different versions, they can learn what resonates most with their
audience and make data-driven decisions to optimize their marketing efforts.
Offline tracking: Shortened URLs can be paired with QR codes on physical
materials like flyers, posters, or products. This allows businesses to track how
many people scan the QR code and visit the link. It provides valuable insights
into offline interactions and helps businesses understand the effectiveness of
their offline marketing efforts.
Why should you shorten URL for bulk SMS sending?
Maximize message space: SMS messages have limited characters. Shortened
URLs help conserve space, allowing you to include more content or context in your
message.
Enhance readability: Long URLs can break across lines or be difficult to
read. Shortened URLs maintain message clarity, ensuring recipients can easily
understand and interact with your link.
Increase click-through rates: Shortened URLs are concise and visually
appealing, which encourages recipients to click on them. This can lead to higher
engagement rates compared to lengthy URLs.
Track engagement: Shortened URLs often come with analytics tools that allow
you to track how many recipients clicked on the link. This data helps you measure
the effectiveness of your SMS campaign and make informed decisions for future
strategies.
Ensure delivery: Some SMS platforms have limitations on the length of URLs
they can handle. Shortened URLs reduce the risk of messages being truncated or
rejected, ensuring that your message and link are delivered intact to recipients.
Frequently Asked Questions
What are short links for SMS?
Short links for SMS enable marketers to track campaign effectiveness using
link-shortening services. These mobile links, or mobile tracking links, help
businesses monitor click-through rates and conversion metrics by creating numerous
unique links. Designed for mobile engagement, these links can direct users to
specific app content or the app store, enhancing the mobile user experience. Marketers
frequently shorten these mobile deep links for effortless sharing via SMS, optimizing
engagement strategies on mobile platforms.
How does URL shortening work for bulk SMS?
URL shortening services compress long URLs into shorter ones using algorithms that
create unique identifiers. When recipients click on these shortened links in SMS
messages, they are redirected seamlessly to the intended web page or app content.
Summary
In the modern digital landscape, effective communication is crucial for businesses
aiming to reach a large audience swiftly and clearly. A valuable tool in achieving
this goal is the use of shortened URLs within bulk SMS messaging. These compact
links streamline text messages, making them more concise and easier to comprehend.
Additionally, they provide businesses with insights into campaign effectiveness by
tracking click-through rates. Incorporating shortened URLs ensures that messages
are straightforward, engaging, and optimized for delivering information efficiently
to recipients.
ChatGPT SMS
In this article, we will explore how to integrate ChatGPT with the Ozeki AI Server and
Ozeki SMS Gateway to automate SMS responses. This setup allows ChatGPT to receive,
process, and reply to SMS messages, making it a powerful solution for businesses,
customer support, and automated communication systems. How to use ChatGPT to answer SMS messages
Local AI SMS
In this article, we will guide you through the process of setting up a local AI model to
automatically answer SMS messages using Ozeki AI Server and Ozeki SMS Gateway.
This setup enables you to deploy an AI-powered chatbot that can handle incoming SMS queries efficiently. How to use a local AI model to answer SMS messages
ChatGPT Whatsapp
In this article, we will guide you through the process of setting up ChatGPT to automatically answer
WhatsApp messages using the Ozeki SMS Gateway. This integration allows you to create a
powerful AI-driven chatbot capable of providing instant, intelligent responses, improving
customer service and enhancing communication efficiency. How to use ChatGPT to answer Whatsapp messages
Local AI Whatsapp
In this article, we will guide you through the process of setting up a local AI model to automatically
respond to WhatsApp messages using the Ozeki SMS Gateway. By integrating a local AI model,
you can enhance your messaging system with AI-powered chatbots capable of providing intelligent,
instant replies without relying on cloud-based solutions. How to use a local AI model to answer Whatsapp messages
In this article, we will explore how to integrate ChatGPT with the Ozeki AI Server
and Ozeki SMS Gateway to automate SMS responses. This setup allows ChatGPT to
receive, process, and reply to SMS messages, making it a powerful solution for
businesses, customer support, and automated communication systems.
What is ChatGPT?
ChatGPT is an advanced AI language model developed by OpenAI that can understand
and generate human-like text. It is designed for tasks such as answering questions,
engaging in conversations, providing explanations, and assisting with various
text-based activities. ChatGPT uses deep learning to process and generate responses
based on user input, making it a powerful tool for automation, customer support,
and content generation.
What is Ozeki AI Server?
Ozeki AI Server is a software platform that combines artificial intelligence (AI)
with communication systems, allowing businesses to create and implement AI-powered
applications. It supports task automation, including text messaging, voice calls,
chatbots, and machine learning processes. By integrating AI with communication networks,
it enhances customer service, optimizes workflows, and improves user interactions
across various industries. Ozeki AI Server offers a robust solution for organizations
seeking to enhance communication efficiency through AI technology.
What is Ozeki SMS Gateway?
Ozeki SMS Gateway is a software solution that enables businesses to send and
receive SMS messages through various communication channels. It supports
integration with applications, databases, and APIs, allowing automated messaging,
two-way communication, and bulk SMS sending. It is widely used for notifications,
alerts, marketing, and customer support.
How to configure ChatGPT AI chatbot in Ozeki SMS Gateway (Quick Steps)
Open Ozeki AI Server
Create a New ChatGPT AI Model
Provide ChatGPT API Key
Open SMS Gateway
Add a New User/Application
Install AI Chatbot
Select ChatGPT AI Model
Enable the Chatbot
How to configure SMPP client connection for AI SMS (Quick Steps)
Add a New Connection
Install SMPP Client
Configure SMPP Client
Enable Logging
Connect SMPP Client
Create a New Incoming Route
Create a New Outgoing Route
Send test SMS message what is answered by AI chatbot (Quick Steps)
Open AI Chatbot
Configure System Prompt
Send an SMS Message
Receive AI-Generated Response
How to configure ChatGPT AI chatbot in Ozeki SMS Gateway (Video tutorial)
In this video, we will guide you through the process of creating a ChatGPT AI
chatbot in Ozeki AI Server and setting it up to function seamlessly with the
Ozeki SMS Gateway. You will learn how to configure the AI model, establish a
connection between the chatbot and the SMS system, and ensure that incoming
messages are processed and responded to automatically. By the end of this tutorial,
you will have a fully functional AI-powered chatbot capable of handling SMS
communication efficiently.
Step 1 - Open Ozeki AI Server
Start the Ozeki 10 application. If it is not yet installed, you can download it
from the provided link.
After launching the application, locate and open the Ozeki AI Server (Figure 1).
Figure 1 - Open Ozeki AI Server
Step 2 - Create new ChatGPT AI model
The Ozeki AI Server interface is now displayed on the screen. Click on
"AI Models" at the top of the interface. Then, select the blue "Create a New AI Model"
button. On the right side, you will find multiple options, choose the "ChatGPT"
menu (Figure 2).
Figure 2 - Create new ChatGPT AI model
Step 3 - Provide ChatGPT API key
After selecting the "ChatGPT" menu, navigate to the "General" tab. In this section,
you will find a field labeled "API Key:". Paste your API Key into this input field
to establish a connection between the Ozeki AI Server and ChatGPT. Once you have
entered the key, click "OK" to save the settings (Figure 3).
Figure 3 - Provide ChatGPT API key
Step 4 - Open SMS Gateway
Launch Ozeki SMS Gateway in Ozeki 10 (Figure 4).
Figure 4 - Open SMS Gateway
Step 5 - Add new user/appilcation
After opening Ozeki SMS Gateway, on the right side under "Users and applications",
create a new application by clicking on "Add new user/application..." (Figure 5).
Figure 5 - Add new user/appilcation
Step 6 - Install AI chatbot
Among the many options, under "Chat bots" we need "AI Chat Bot",
click on "Install" (Figure 6).
Figure 6 - Install AI chatbot
Step 7 - Select ChatGPT AI model
Under the "General" tab, uncheck "Send welcome message" and then
select the right model in this case "chatGPT_Model_1", then click "Ok"
(Figure 7).
Figure 7 - Select ChatGPT AI model
Step 8 - Enable Chat bot
To connect, toggle the switch to green on the left (Figure 8).
Figure 8 - Enable Chat bot
How to configure SMPP client connection for AI SMS (Video tutorial)
In this video, we will show you how to create, configure, and connect
an SMPP client for use with AI SMS. You will learn the step-by-step
process of setting up the SMPP client connection, configuring the necessary
settings, and integrating it with the AI SMS system.
Step 9 - Add new connection
To create a new connection, click on "Add new connection..." on the left,
in the "Management" tab (Figure 9).
Figure 9 - Add new connection
Step 10 - Install SMPP Client
From the available options, locate "SMPP client" under the "IP SMS connections (SMS)"
section and click on "Install" to proceed (Figure 10).
Figure 10 - Install SMPP Client
Step 11 - Configure SMPP client
Configure the "SMPP client" by filling in the following inputs in the
"General" tab: Host, Port, Username, Password
(Figure 11).
Figure 11 - Configure SMPP client
Step 12 - Enable logging
In the "Advanced" tab, under "Log level", tick all four options for
logging (Figure 12).
Figure 12 - Enable logging
Step 13 - SMPP Client connected
To connect, toggle the "Connection" switch to green on the left,
after a successful connection you will see the logging in the "Events" tab
(Figure 13).
Figure 13 - SMPP Client connected
Step 14 - Create new incoming route
To create a new incoming route, click on the "Routes" button at the top of the
screen, then "Create new Route" and set the sender and receiver
routes on the right (Figure 14).
Figure 14 - Create new incoming route
Step 15 - Create new outgoing route
To create a new outgoing route, let's create a new route again, only this time
swap the sender and the receiver (Figure 15).
Figure 15 - Create new outgoing route
Send test SMS message what is answered by AI chatbot (Video tutorial)
In this video, we will demonstrate how to set up the system prompt
and show how SMS sending and message reception work in practice.
You will learn how to configure the system prompt for AI-generated responses
and see the full process of sending and receiving SMS messages in action.
Step 16 - Open AI chatbot
To set up the chatbot, select AI_Bot_1 on the right and click on it (Figure 16).
Figure 16 - Open AI chatbot
Step 17 - Configure system prompt
To configure the chatbot, navigate to the "Configure" tab and select the "AI"
section. In the "System Prompt" field, enter the desired prompt that will guide
the chatbot's responses and check the "Use system prompt" (Figure 17).
Figure 17 - Configure system prompt
Step 18 - Send SMS message
If you've got this far, we can test the system. Send us an SMS and you can follow
up by logging the message in the SMPP client (Figure 18).
Figure 18 - Send SMS message
Step 19 - AI generated answer received
After sending the SMS, you can see the message of the chatbot you received on
your phone and you can also see it in the AI_Bot_1 log (Figure 19).
How to use a local AI model to answer SMS messages
In this article, we will guide you through the process of setting up a local AI
model to automatically answer SMS messages using Ozeki AI Server and Ozeki SMS
Gateway. This setup enables you to deploy an AI-powered chatbot that can handle
incoming SMS queries efficiently.
What is a Local AI Model?
A local AI model is an artificial intelligence model that is installed, stored,
and executed directly on a local machine or server, rather than relying on
cloud-based systems. It allows users to run AI applications offline, providing
full control over data privacy, security, and customization.
What is Ozeki AI Server?
Ozeki AI Server is a powerful software platform that integrates artificial intelligence (AI)
with communication systems, enabling businesses to develop and deploy AI-driven applications.
It supports various automation tasks like text messaging, voice calls,
chatbots, and machine learning processes. By combining AI with communication networks,
it enhances customer service, streamlines workflows, and improves user interactions
across different industries. Ozeki AI Server provides a comprehensive
solution for organizations looking to boost communication efficiency using AI technology.
What is Ozeki SMS Gateway?
Ozeki SMS Gateway is a versatile software solution designed to enable businesses
to send and receive SMS messages via multiple communication channels.
It integrates seamlessly with applications, databases, and APIs,
offering features like automated messaging, two-way communication, and bulk SMS sending.
Commonly used for notifications, alerts, marketing, and customer support,
it provides a reliable tool for enhancing communication through SMS technology.
How to download a GGUF model from Huggingface (Quick Steps)
Open Huggingface Website
Select GGUF Models
Search for Model
Download Model File
Save Model File
How to configure local AI chatbot in Ozeki SMS Gateway (Quick Steps)
Open Ozeki AI Server
Create New AI Model
Select Model File
Open Ozeki SMS Gateway
Add New Application
Install AI Chatbot
Select AI Model
Enable Chatbot
Send test SMS message what is answered by AI chatbot (Quick Steps)
Open AI Chatbot
Configure System Prompt
Send Test SMS
Receive AI Response
How to download a GGUF model from Huggingface (Video tutorial)
In this video, you will learn how to download a GGUF model file from the
Huggingface website and where to correctly place it on your system for use
with Ozeki AI Server.
Step 1 - Open huggingface.co page
First, go to the Huggingface website.
You should see a similar page (Figure 1).
Figure 1 - Open huggingface.co page
Step 2 - Select GGUF models
Select the Models menu at top of the window, then Libraries, then
filter for GGUF files (Figure 2).
Figure 2 - Select GGUF models
Step 3 - Select model library
In the search bar, type "Meta-Llama-3.1-8B-Instruct-hf-Q4_K_M-GGUF"
and select the model titled
"Meta-Llama-3.1-8B-Instruct-hf-Q4_K_M-GGUF".
This is the model we will be using (Figure 3).
Place the previously downloaded .gguf file in the following path: C:\AIModels
(Figure 5).
Figure 5 - Copy GGUF model file to C:\AIModels
How to configure local AI chatbot in Ozeki SMS Gateway (Video tutorial)
In this video tutorial, you will learn how to configure a local AI chatbot within
the Ozeki SMS Gateway using the previously downloaded GGUF model. The step-by-step
guide will show you how to properly integrate the AI model with Ozeki AI Server
to enable automated responses to incoming SMS messages.
Step 6 - Open Ozeki AI Server
Launch the Ozeki 10 app. If you don't already have it, you can download it
here.
Then open the Ozeki AI Server (Figure 6).
Figure 6 - Open Ozeki AI Server
Step 7 - Create new GGUF AI model
The Ozeki AI Server interface is now visible on the screen. To create a new GGUF model,
start by clicking on "AI Models" at the top of the screen. Next, click the blue button
labeled "Create a new AI Model". On the right side of the interface, you will see
various options, select the "GGUF" menu (Figure 7).
Figure 7 - Create newm GGUF AI model
Step 8 - Select model file
After selecting the "GGUF" menu, select the "General" tab, select
the "C:\AIModels\Meta-Llama-3.1-8B-Instruct-Q4_K_M.gguf" Model file then
click "Ok" (Figure 8).
Figure 8 - Select model file
Step 9 - Open SMS Gateway
Launch Ozeki SMS Gateway in Ozeki 10 (Figure 9).
Figure 9 - Open SMS Gateway
Step 10 - Add new user/application
After launching Ozeki SMS Gateway, navigate to the right panel under
"Users and Applications" and click on "Add new user/application..."
to create a new application (Figure 10).
Figure 10 - Add newm user/application
Step 11 - Install AI chatbot
From the available options, go to the "Chat bots" section and select
"AI Chat Bot", then click on "Install" (Figure 11).
Figure 11 - Install AI chatbot
Step 12 - Select AI model
In the "General" tab, deselect "Send welcome message" and choose
the appropriate model, which in this case is "GGUF_Model_1". Finally,
click "Ok" (Figure 12).
Figure 12 - Select AI model
Step 13 - Enable chatbot
To establish the connection, flip the switch to green on the left side (Figure 13).
Figure 13 - Enable chatbot
How to configure SMPP client connection for AI SMS (Video tutorial)
In this video, we will guide you through the process of creating, configuring,
and connecting an SMPP client for use with AI SMS. You'll learn how
to set up the SMPP client connection step-by-step, configure the required settings,
and successfully integrate it with the AI SMS system.
Step 14 - Add new connection
To create a new connection, click on "Add new connection..." on the left,
in the "Management" tab (Figure 14).
Figure 14 - Add new connection
Step 15 - Install SMPP Client
In the "IP SMS connections (SMS)" section, find the "SMPP client"
option and click "Install" to continue (Figure 15).
Figure 15 - Install SMPP Client
Step 16 - Configure SMPP client
Configure the "SMPP client" by filling in the following inputs in the
"General" tab: Host, Port, Username, Password
(Figure 16).
Figure 16 - Configure SMPP client
Step 17 - Enable logging
In the "Advanced" tab, under "Log level", tick all four options for logging (Figure 17).
Figure 17 - Enable logging
Step 18 - SMPP Client connected
To establish the connection, switch the "Connection" toggle to green on the left.
Once connected successfully, you can view the logs under the "Events"
tab (Figure 18).
Figure 18 - SMPP Client connected
Step 19 - Create new incoming route
To set up a new incoming route, click the "Routes" button located
at the top of the screen. Then, select "Create new Route" and configure
the sender and receiver routes on the right side (Figure 19).
Figure 19 - Create new incoming route
Step 20 - Create new outgoing route
To create a new outgoing route, click on "Create new Route" once more,
but this time, switch the sender and receiver settings (Figure 20).
Figure 20 - Create new outgoing route
Send test SMS message what is answered by AI chatbot (Video tutorial)
In this video, we will guide you through the process of configuring the system prompt
and demonstrate how SMS sending and receiving function in real-time. You'll
learn how to set up the system prompt to generate AI-powered responses and
observe the complete workflow of sending and receiving SMS messages effectively.
Step 21 - Open AI chatbot
To set up the chatbot, select AI_Bot_1 on the right and click on it
(Figure 21).
Figure 21 - Open AI chatbot
Step 22 - Configure system prompt
To configure the chatbot, navigate to the "Configure" tab and select the
"AI" section. In the "System Prompt" field, enter the desired
prompt that will guide the chatbot's responses and check the "Use system prompt"
(Figure 22).
Figure 22 - Configure system prompt
Step 23 - Send SMS message
If you've reached this point, it's time to test the system. Send an SMS,
and you can monitor the process by logging the message within the SMPP client
(Figure 23).
Figure 23 - Send SMS message
Step 24 - AI generated answer received
Once the SMS is sent, you will receive the chatbot’s response on
your phone, and you can also view it recorded in the AI_Bot_1 log (Figure 24).
In this article, we will guide you through the process of setting up ChatGPT to
automatically answer WhatsApp messages using the Ozeki SMS Gateway. This
integration allows you to create a powerful AI-driven chatbot capable of providing
instant, intelligent responses, improving customer service and enhancing
communication efficiency.
What is ChatGPT?
ChatGPT is an advanced artificial intelligence language model developed by OpenAI.
It uses deep learning techniques to generate human-like text responses based on
user input. ChatGPT is widely used for chatbots, customer support systems, content
generation, coding assistance, and more. Its ability to understand natural language
and provide contextually relevant replies makes it a powerful tool for various
applications.
What is WhatsApp?
WhatsApp is a popular instant messaging platform owned by Meta.
It allows users to send text messages, voice messages, photos, videos, and files,
as well as make voice and video calls over the internet. Available on smartphones,
desktops, and web browsers, WhatsApp is widely used for personal and business
communication worldwide due to its end-to-end encryption, reliability, and
user-friendly interface.
What is Ozeki AI Server?
Ozeki AI Server is a robust software platform designed to integrate artificial
intelligence (AI) with various communication systems. It allows businesses to
create, deploy, and manage AI-powered applications for tasks such as chatbots,
automated messaging, voice calls, and machine learning processes. Ozeki AI Server
helps enhance workflow efficiency, customer interactions, and data processing by
providing seamless integration between AI models and communication networks.
What is Ozeki SMS Gateway?
Ozeki SMS Gateway is a software solution that enables businesses to send and
receive SMS messages through various communication channels. It supports
integration with applications, databases, and APIs, allowing automated messaging,
two-way communication, and bulk SMS sending. It is widely used for notifications,
alerts, marketing, and customer support.
How to configure ChatGPT AI chatbot in Ozeki SMS Gateway (Quick Steps)
Open Ozeki AI Server
Create a New ChatGPT AI Model
Provide ChatGPT API Key
Open SMS Gateway
Add a New User/Application
Install AI Chatbot
Select ChatGPT AI Model
Enable the Chatbot
How to configure Whatsapp account connection for AI messaging (Quick Steps)
Open SMS Gateway
Add New Connection
Install WhatsApp Account
Configure WhatsApp Credentials
Configure Default Template
Set Telephone Number
Enable WhatsApp Connection
Create New Incoming Route
Create New Outgoing Route
Send Whatsapp test message what is answered by AI chatbot (Quick Steps)
Open AI Chatbot
Configure System Prompt
Send WhatsApp Message
Receive AI Response
How to configure ChatGPT AI chatbot in Ozeki SMS Gateway (Video tutorial)
In this video, we will guide you through the process of creating a ChatGPT AI
chatbot in Ozeki AI Server and setting it up to function seamlessly with the
Ozeki SMS Gateway. You will learn how to configure the AI model, establish a
connection between the chatbot and the SMS system, and ensure that incoming
messages are processed and responded to automatically.
Step 1 - Open Ozeki AI Server
Start the Ozeki 10 application. If it is not yet installed, you can download it
from the provided link.
After launching the application, locate and open the Ozeki AI Server (Figure 1).
Figure 1 - Open Ozeki AI Server
Step 2 - Create new ChatGPT AI model
The Ozeki AI Server interface is now displayed on the screen. Click on
"AI Models" at the top of the interface. Then, select the blue "Create a New AI Model"
button. On the right side, you will find multiple options, choose the "ChatGPT"
menu (Figure 2).
Figure 2 - Create new ChatGPT AI model
Step 3 - Provide ChatGPT API key
After selecting the "ChatGPT" menu, navigate to the "General" tab. In this section,
you will find a field labeled "API Key:". Paste your API Key into this input field
to establish a connection between the Ozeki AI Server and ChatGPT. Once you have
entered the key, click "OK" to save the settings (Figure 3).
Figure 3 - Provide ChatGPT API key
Step 4 - Open SMS Gateway
Launch Ozeki SMS Gateway in Ozeki 10 (Figure 4).
Figure 4 - Open SMS Gateway
Step 5 - Add new user/appilcation
After opening Ozeki SMS Gateway, on the right side under "Users and applications",
create a new application by clicking on "Add new user/application..." (Figure 5).
Figure 5 - Add new user/appilcation
Step 6 - Install AI chatbot
Among the many options, under "Chat bots" we need "AI Chat Bot",
click on "Install" (Figure 6).
Figure 6 - Install AI chatbot
Step 7 - Select ChatGPT AI model
Under the "General" tab, uncheck "Send welcome message" and then
select the right model in this case "chatGPT_Model_1", then click "Ok"
(Figure 7).
Figure 7 - Select ChatGPT AI model
Step 8 - Enable Chat bot
To connect, toggle the switch to green on the left (Figure 8).
Figure 8 - Enable Chat bot
How to configure Whatsapp account connection for AI messaging (Video tutorial)
In this video, you will learn how to configure a WhatsApp account connection for
AI messaging using the Ozeki SMS Gateway. This step-by-step guide will show you
how to set up a WhatsApp message connection, allowing you to seamlessly receive
and respond to messages using AI technology.
To create a new connection, click on "Add new connection..." on the left,
in the "Management" tab (Figure 10).
Figure 10 - Add new connection
Step 11 - Install Whatsapp account
Under "Chat connections", select "WhatsApp account" and click on
"Install" to install the service (Figure 11).
Figure 11 - Install Whatsapp account
Step 12 - Configure Whatsapp credentials
Configure WhatsApp connection, under "Credentials", set "WABA-ID"
and "Access token", then scroll down for more settings (Figure 12).
Figure 12 - Configure Whatsapp credentials
Step 13 - Configure defalt template
The "Default template" is responsible for defining the standard message structure
and formatting used when responding to incoming WhatsApp messages.
By setting Tag 1 to Tag 4, you specify predefined message elements (Figure 13).
Figure 13 - Configure defalt template
Step 14 - Set telephone number
Then scroll down again to the bottom of the page, set the "Telephone number"
and click "Ok" (Figure 14).
Figure 14 - Set telephone number
Step 15 - Whatsapp account connected
After setting up Ceredentials, Default template, Phone number, make sure that
"Connection" is enabled (Figure 15).
Figure 15 - Whatsapp account connected
Step 16 - Create new incoming route
To create a new incoming route, click on the "Routes" button at the
top of the screen, then "Create new Route" and set the sender
and receiver routes on the right (Figure 16).
Figure 16 - Create new incoming route
Step 17 - Create new outgoing route
To create a new outgoing route, let's create a new route again,
only this time swap the sender and the receiver (Figure 17).
Figure 17 - Create new outgoing route
Send Whatsapp test message what is answered by AI chatbot (Video tutorial)
In this video, we will demonstrate how to test your AI chatbot’s connection and
response handling in the Ozeki SMS Gateway by sending a WhatsApp message
and verifying the AI-generated reply. This process ensures that your setup is
correctly configured and capable of processing incoming messages efficiently.
Step 18 - Open AI chatbot
To set up the chatbot, select AI_Bot_1 on the right and click on
it (Figure 18).
Figure 18 - Open AI chatbot
Step 19 - Configure system prompt
To configure the chatbot, navigate to the "Configure" tab and select
the "AI" section. In the "System Prompt" field, enter the
desired prompt that will guide the chatbot's responses and check
the "Use system prompt" (Figure 19).
Figure 19 - Configure system prompt
Step 20 - Send Whatsapp message
If you've done all the steps so far, let's test it. Send a message or ask
via WhatsApp. You can see the message you sent in the log
(Figure 20).
Figure 20 - Send Whatsapp message
Step 21 - Generated response received
After you send your message, you can see the reply the chatbot sent you
and you can track it in the log (Figure 21).
How to use a local AI model to answer Whatsapp messages
In this article, we will guide you through the process of setting up a local AI model to automatically respond to WhatsApp messages using the Ozeki SMS Gateway. By integrating a local AI model, you can enhance your messaging system with AI-powered chatbots capable of providing intelligent, instant replies without relying on cloud-based solutions. Let’s dive into the step-by-step process!
What is WhatsApp?
WhatsApp is a popular instant messaging platform owned by Meta. It allows users
to send text messages, voice messages, photos, videos, and files, as well as make
voice and video calls over the internet. Available on smartphones, desktops, and
web browsers, WhatsApp is widely used for personal and business communication
worldwide due to its end-to-end encryption, reliability, and user-friendly interface.
What is a Local AI Model?
A local AI model is an artificial intelligence model that is installed, stored,
and executed directly on a local machine or server, rather than relying on
cloud-based systems. It allows users to run AI applications offline, providing
full control over data privacy, security, and customization.
What is Ozeki AI Server?
Ozeki AI Server is a powerful software platform that integrates artificial intelligence (AI)
with communication systems, enabling businesses to develop and deploy AI-driven applications.
It supports various automation tasks like text messaging, voice calls,
chatbots, and machine learning processes. By combining AI with communication networks,
it enhances customer service, streamlines workflows, and improves user interactions
across different industries. Ozeki AI Server provides a comprehensive
solution for organizations looking to boost communication efficiency using AI technology.
What is Ozeki SMS Gateway?
Ozeki SMS Gateway is a versatile software solution designed to enable businesses
to send and receive SMS messages via multiple communication channels.
It integrates seamlessly with applications, databases, and APIs,
offering features like automated messaging, two-way communication, and bulk SMS sending.
Commonly used for notifications, alerts, marketing, and customer support,
it provides a reliable tool for enhancing communication through SMS technology.
Downloading a GGUF model from Huggingface (Quick Steps)
Open Huggingface Website
Select GGUF Models
Select Model Library
Download Model File
Save Model File
How to configure local AI chatbot in Ozeki SMS Gateway (Quick Steps)
Open Ozeki AI Server
Create New GGUF AI Model
Select Model File
Open SMS Gateway
Add New Application
Install AI Chatbot
Select AI Model
Enable Chatbot
How to configure Whatsapp account connection for AI messaging (Quick Steps)
Open SMS Gateway
Add New Connection
Install WhatsApp Account
Configure WhatsApp Credentials
Set Default Template
Set Telephone Number
Enable WhatsApp Connection
Create New Routes
Send Whatsapp test message what is answered by AI chatbot (Quick Steps)
Open AI Chatbot
Configure System Prompt
Send WhatsApp Message
Receive AI Response
Downloading a GGUF model from Huggingface (Video tutorial)
The video below walks you through all the steps in motion, starting with
navigating to the website, all the way to moving the LLM file to the right
folder. It's a worthwhile use of your time, since it takes a mere 75 seconds to
watch, but captures every important step in detail.
Step 1 - Open huggingface.co page
In your browser, enter huggingface.co in
the searchbar. You should land on a page similar to (Figure 1).
Figure 1 - Open huggingface.co page
Step 2 - Select GGUF models
First, click Models near the top edge of the screen. In the left panel,
set the filter to Libraries, then select GGUF from the available
options, as seen in (Figure 2).
On the page of the model, open the "Files and versions" tab, and look for
the file with a .gguf
format, highlighted in red in (Figure 4).
Figure 4 - Download model file
Step 5 - Copy GGUF model file to C:\AIModels
Download the .gguf file, and move or paste it to the
following folder: C:\AIModels (Figure 5).
Figure 5 - Copy GGUF model file to C:\AIModels
How to configure local AI chatbot in Ozeki SMS Gateway (Video tutorial)
In this video tutorial, you will discover how to set up a local AI chatbot in the Ozeki SMS Gateway
using the GGUF model you previously downloaded. This detailed, step-by-step guide will
walk you through the process of integrating the AI model with Ozeki AI Server,
enabling your chatbot to efficiently respond to incoming SMS messages automatically.
Step 6 - Open Ozeki AI Server
Launch the Ozeki 10 app. If you don't already have it, you can download it
here.
Once opened, open the Ozeki AI Server (Figure 6).
Figure 6 - Open Ozeki AI Server
Step 7 - Create new GGUF AI model
The Ozeki AI Server interface is now visible on the screen. To create a
new GGUF model, start by clicking on "AI Models" at the top of the
screen. Next, click the blue button labeled "Create a new AI Model". On the
right side of the interface, you will see various options, select the "GGUF"
menu (Figure 7).
Figure 7 - Create new GGUF AI model
Step 8 - Select model file
After selecting the "GGUF" menu, select the "General" tab, select
the "C:\AIModels\meta-llama-3.1-8b-instruct-hf-q4_k_m.gguf" Model file
then click "Ok" (Figure 8).
Figure 8 - Select model file
Step 9 - Open SMS Gateway
Launch Ozeki SMS Gateway in Ozeki 10 (Figure 9).
Figure 9 - Open SMS Gateway
Step 10 - Add newm user/application
After launching Ozeki SMS Gateway, navigate to the right panel under
"Users and Applications" and click on "Add new user/application..."
to create a new application (Figure 10).
Figure 10 - Add newm user/application
Step 11 - Install AI chatbot
From the available options, go to the "Chat bots" section and select
"AI Chat Bot", then click on "Install" (Figure 11).
Figure 11 - Install AI chatbot
Step 12 - Select AI model
In the "General" tab, deselect "Send welcome message" and choose
the appropriate model, which in this case is "GGUF_Model_1". Finally,
click "Ok" (Figure 12).
Figure 12 - Select AI model
Step 13 - Enable chatbot
To establish the connection, flip the switch to green on the left side (Figure 13).
Figure 13 - Enable chatbot
How to configure Whatsapp account connection for AI messaging (Video tutorial)
In this video, you will learn how to set up a WhatsApp account connection for AI
messaging with the Ozeki SMS Gateway. This comprehensive, step-by-step tutorial
will guide you through the process of configuring a WhatsApp message connection,
enabling you to effortlessly receive and respond to messages using powerful AI
technology.
To create a new connection, click on "Add new connection..." on the left,
in the "Management" tab (Figure 15).
Figure 15 - Add new connection
Step 16 - Install Whatsapp account
Under "Chat connections", select "WhatsApp account" and click on
"Install" to install the service (Figure 16).
Figure 16 - Install Whatsapp account
Step 17 - Configure Whatsapp credentials
Configure WhatsApp connection, under "Credentials", set "WABA-ID"
and "Access token", then scroll down for more settings (Figure 17).
Figure 17 - Configure Whatsapp credentials
Step 18 - Configure defalt template
The "Default template" is responsible for defining the standard message
structure and formatting used when responding to incoming WhatsApp messages.
By setting Tag 1 to Tag 4, you specify predefined message elements (Figure 18).
Figure 18 - Configure defalt template
Step 19 - Set telephone number
Then scroll down again to the bottom of the page, set the "Telephone number"
and click "Ok" (Figure 19).
Figure 19 - Set telephone number
Step 20 - Whatsapp account connected
After setting up Ceredentials, Default template, Phone number, make sure that "Connection" is enabled (Figure 20).
Figure 20 - Whatsapp account connected
Step 21 - Create new incoming route
To create a new incoming route, click on the "Routes" button at the
top of the screen, then "Create new Route" and set the sender
and receiver routes on the right (Figure 21).
Figure 21 - Create new incoming route
Step 22 - Create new outgoing route
To create a new outgoing route, let's create a new route again,
only this time swap the sender and the receiver (Figure 18).
Figure 22 - Create new outgoing route
Send Whatsapp test message what is answered by AI chatbot (Video tutorial)
In this video, we will show you how to test your AI chatbot’s connection and
response functionality in the Ozeki SMS Gateway by sending a WhatsApp message
and confirming the AI-generated response. This demonstration will help you
verify that your setup is properly configured and effectively handling incoming
messages.
Step 23 - Open AI chatbot
To set up the chatbot, select AI_Bot_1 on the right and click on it (Figure 23).
Figure 23 - Open AI chatbot
Step 24 - Configure system prompt
To configure the chatbot, navigate to the "Configure" tab and select the
"AI" section. In the "System Prompt" field, enter the desired prompt
that will guide the chatbot's responses and check the "Use system prompt" (Figure 24).
Figure 24 - Configure system prompt
Step 25 - Send Whatsapp message
If you have completed all the previous steps successfully, it's time to put your
setup to the test. To do this, send a message or ask a question via WhatsApp to
the phone number configured in the Ozeki SMS Gateway. Once the message is sent,
you can check the system logs to verify that your message has been properly
received and recorded (Figure 25).
Figure 25 - Send Whatsapp message
Step 26 - Generated response received
Once you have sent your message, you will receive a response from the AI chatbot,
which you can view directly on your WhatsApp account. Additionally, you can monitor
and track the chatbot's reply in the system logs to confirm that the communication
process is working correctly (Figure 26).
In this guide, you will learn how to send an Indication SMS using the Ozeki SMS Gateway.
Indication SMS messages are a special type of text message that notify recipients about
specific events, such as a new email, voicemail, or multimedia message. These messages
trigger the mobile device to display a prompt or icon rather than a traditional text
message. This tutorial walks you through selecting the correct message type, configuring
the required settings, and sending the message. Indication SMS is particularly useful
for service providers and businesses that want to alert users in a system-integrated,
non-intrusive way.
What is Indication SMS?
An Indication SMS is a special type of message used to notify the recipient about
specific events such as a new email, voicemail, or MMS. Instead of displaying as a
regular text message, it triggers a notification icon or alert on the recipient’s
phone. This type of SMS does not show message content directly but instructs the
phone to display a system-level prompt.
When is it best to send a Indication SMS?
An Indication SMS is best used when you want to discreetly notify a user about
a specific event without displaying a full text message. It is particularly
effective for alerts such as new voicemail, email, or multimedia messages, where
the goal is to trigger a system-level notification or icon on the recipient’s phone.
This makes it ideal for mobile service providers, automated systems, or business
applications that need to inform users about updates in a non-intrusive, integrated way.
How to send a Indication SMS in Ozeki SMS Gateway (Quick Steps)
Log in as Admin user
Select message type
Configure message settings
Enter recipient and send
How to send a Indication SMS in Ozeki SMS Gateway (Video tutorial)
In this video, you will learn how to compose and send an Indication SMS using
Ozeki SMS Gateway. The tutorial demonstrates how to log in as the Admin user,
select the "Indication" message type, and configure settings such as indication
type (e.g., voicemail, email, MMS), subject, and storage instructions. You’ll
also see how the recipient’s mobile device reacts by displaying an icon or prompt
instead of a standard SMS message. This feature is ideal for sending discreet
system alerts or service notifications. By the end of the video, you’ll be able
to send fully functional Indication SMS messages tailored to your specific use case.
Step 1 - Select Admin user
Go to the Ozeki SMS Gateway dashboard and log in using the Admin user account.
This user has full permissions to create and send special message types, including
Indication SMS (Figure 1).
Figure 1 - Select Admin user
Step 2 - View message types
Inside the Admin user interface, locate and click on the "View message type" option.
This allows you to switch between standard SMS and advanced message formats like
Indication SMS (Figure 2).
Figure 2 - View message types
Step 3 - Select indication message type
From the list of message types, choose "Indication". This selection enables input
fields specific to indication messages, such as message subject and indication
type (Figure 3).
Figure 3 - Select indication message type
Step 4 - Configure SMS Settings
Fill in the required fields: Indication type, Message count, Message text.
Then select, for example, Email Indication on the right side (Figure 4).
Figure 4 - Configure SMS Settings
Step 5 - Send indication SMS
Enter the recipient’s phone number and click the "Ok" button to transmit the
Indication SMS (Figure 5).
Figure 5 - Send indication SMS
Step 6 - Indication SMS sent
After sending, the system will confirm successful delivery. On the recipient’s
device, a prompt or icon will appear depending on the chosen indication type (Figure 6).
In this guide, you will learn how to send a Bookmark SMS using the Ozeki SMS Gateway.
A Bookmark SMS is a special type of message that contains a hyperlink. When the
recipient opens it, the mobile device offers to save the link as a bookmark in
the browser. This is a powerful tool for directing users to websites, promotions,
or online content without requiring them to manually enter URLs. This step-by-step
tutorial will show you how to choose the correct message type, configure the URL
and title, and send the Bookmark SMS to your recipients.
What is Bookmark SMS?
A Bookmark SMS is a special type of SMS message that contains a hyperlink along
with a title. When a user receives this SMS, their mobile device can interpret it
as a browser bookmark, offering to save the link directly to their browser bookmarks.
It’s a convenient and user-friendly way to promote websites, product pages, or online
resources without requiring the recipient to type or copy-paste URLs.
When is it best to send a Bookmark SMS?
A Bookmark SMS is best used when you want to provide recipients with quick and
convenient access to a specific website. It's particularly effective in marketing
campaigns, where you want users to save a promotional link, product page, or event
registration site directly in their browser. This message type is ideal when you
want to ensure the link can be revisited later, without requiring the user to
manually enter the URL. It's commonly used for sharing exclusive offers, mobile
landing pages, online tools, or time-sensitive content.
How to send a Bookmark SMS in Ozeki SMS Gateway (Quick Steps)
Log in as Admin
Access message type options
Choose 'Bookmark' as message type
Enter bookmark info
Send the SMS
How to send a Bookmark SMS in Ozeki SMS Gateway (Video tutorial)
In this video, you’ll learn how to send a Bookmark SMS through the Ozeki SMS Gateway.
The tutorial demonstrates how to log in as the Admin user, select the "Bookmark"
message type, and fill in the required fields such as the bookmark title and URL.
After completing the setup, you’ll send the message and see how the recipient’s
device handles the bookmark - offering to save the provided link directly to their
browser bookmarks. This feature is especially useful for marketing campaigns,
event invitations, and driving traffic to mobile-friendly websites. By the end
of the video, you’ll be ready to send effective and interactive Bookmark SMS messages.
Step 1 - Select Admin user
Go to the Ozeki SMS Gateway dashboard and log in with the Admin user. This user
has permission to compose and send special message types, such as Bookmark SMS (Figure 1).
Figure 1 - Select Admin user
Step 2 - View message type
Once inside the Admin interface, click on the "View message types" option to
display the available message format options (Figure 2).
Figure 2 - View message type
Step 3 - Select Bookmark type
From the list of message types, choose "Web Bookmark". This will bring up input
fields designed specifically for bookmark-related SMS content, such as title
and URL (Figure 3).
Figure 3 - Select Bookmark type
Step 4 - Set message settings
Enter the Bookmark title (the name the user will see) and the URL you want the
recipient to save. Make sure the link is valid and mobile-friendly (Figure 4).
Figure 4 - Set message settings
Step 5 - Send message
Type in the recipient's phone number, review the settings, and click "OK" to
transmit the Bookmark SMS (Figure 5).
Figure 5 - Send message
Step 6 - Message sent
After sending, a confirmation message will appear. On the recipient's device, a
browser bookmark prompt will display, allowing them to save the link directly (Figure 6).
In this guide, you will learn how to send a SyncML SMS using the Ozeki SMS Gateway.
A SyncML SMS is a special type of message used to configure mobile device settings
remotely, such as email, synchronization, or server connection profiles. This type
of SMS is commonly used by service providers and IT administrators to automate mobile
device configuration, saving time and reducing user error. The tutorial walks you
through selecting the SyncML message type, setting up the configuration parameters,
and sending the message directly to the user’s device.
What is SyncML SMS?
A SyncML SMS is a special configuration message used to remotely set up a mobile
device’s sync settings. It can configure features such as email, contacts, calendar
sync, or server access parameters. The message follows the SyncML (Synchronization
Markup Language) protocol and allows IT teams or service providers to push
ready-to-use settings directly to mobile phones without user intervention.
When is it best to send a SyncML SMS?
It is best to send a SyncML SMS when you need to remotely configure mobile devices
with settings such as email, synchronization, or server connection profiles. This
is especially useful during device onboarding, after SIM card changes, during
system migrations, or when rolling out configuration updates across multiple
devices. Service providers and IT administrators often use SyncML SMS to automate
setup, reduce manual errors, and streamline the user experience by enabling
devices to apply settings with a single confirmation.
How to send a SyncML SMS in Ozeki SMS Gateway (Quick Steps)
Log in as the Admin user in Ozeki SMS Gateway
Click "View message types" to access advanced message options
Select "SyncML" from the list of message types
Fill in the configuration parameters
Enter the recipient’s phone number
Click "OK" to send the message
How to send a SyncML SMS in Ozeki SMS Gateway (Video tutorial)
In this video, you’ll see how to compose and send a SyncML SMS using Ozeki SMS Gateway.
The tutorial starts by logging in as the Admin user, then proceeds to the message type
selection menu where you’ll choose "SyncML." After that, you’ll enter the necessary
settings such as server address, authentication credentials, and sync parameters.
Once the message is sent, the recipient’s phone will receive a system configuration
request they can apply with one click. This method is perfect for managing device
settings remotely in a secure and standardized way.
Step 1 - Select Admin user
Log in to the Ozeki SMS Gateway and select the Admin user from the dashboard.
This user role has full access to message type options, including advanced types
like SyncML (Figure 1).
Figure 1 - Select Admin user
Step 2 - View message type
Inside the Admin interface, click on the "View message types" button. This allows
you to change the type of SMS you want to compose (Figure 2).
Figure 2 - View message type
Step 3 - Select SyncML type
From the message type list, choose "SyncML". This will activate the input
fields specific to mobile synchronization and remote configuration messages (Figure 3).
Figure 3 - Select SyncML type
Step 4 - Set message settings
Enter the SyncML-specific parameters. These settings will be used by the mobile device to
configure its sync profile (Figure 4).
Figure 4 - Set message settings
Step 5 - Send message
Type in the recipient’s phone number, review all the configuration details
you’ve entered, and click "OK" to send the SyncML SMS (Figure 5).
Figure 5 - Send message
Step 6 - Message sent
Once sent, a confirmation message will appear in the interface. The recipient's
device will prompt them to apply the new configuration sent via SyncML (Figure 6).
This guide shows you how to send an OMA OTA (Over-the-Air) settings SMS using
the Ozeki SMS Gateway. These special messages configure mobile devices remotely
with settings like APN, internet, or MMS. They’re ideal for mobile operators and
IT teams looking to simplify setup without manual input.
What is OMA OTA settings SMS?
An OMA OTA (Over-the-Air) settings SMS is a special type of message used to
remotely configure a mobile device with network settings like APN, internet,
or MMS parameters. It follows the Open Mobile Alliance (OMA) standards and allows
phones to automatically apply configuration data without manual setup by the user.
When is it best to send a OMA OTA settings SMS?
It’s best to send an OMA OTA settings SMS when a mobile device requires quick and
error-free configuration. This is particularly useful after inserting a new SIM card,
when a user switches to a new network, during customer onboarding, or when providing
APN and MMS settings without involving customer support. It’s also ideal for mass
device provisioning in enterprise environments. By sending OMA OTA messages,
service providers can streamline device setup, reduce support requests, and
enhance the overall user experience.
How to send a OMA OTA settings SMS in Ozeki SMS Gateway (Quick Steps)
Log in as the Admin user in the Ozeki SMS Gateway
Click "View message types" to access special message formats
Select "OMA OTA" as the message type
Fill in settings such as APN, proxy, and other configuration values
Enter the recipient's phone number and press OK to send
How to send a OMA OTA settings SMS in Ozeki SMS Gateway (Video tutorial)
In this video, you'll learn how to send an OMA OTA SMS with Ozeki SMS Gateway.
After logging in as Admin, you’ll select the "OMA OTA" message type, fill in settings
(like APN and proxy), and send the SMS. The phone will prompt the user to apply the
settings. Perfect for fast, remote device configuration.
Step 1 - Select Admin user
Log in to the Ozeki SMS Gateway and choose the Admin user from the dashboard.
Only the Admin has access to special message types like OMA OTA (Figure 1).
Figure 1 - Select Admin user
Step 2 - View message type
Inside the Admin interface, click "View message types" to open the list of
advanced SMS formats you can send (Figure 2).
Figure 2 - View message type
Step 3 - Select OMA OTA type
From the message type list, select "OMA OTA". This will bring up fields
specifically for over-the-air device configuration settings (Figure 3).
Figure 3 - Select OMA OTA type
Step 4 - Set message settings
Enter the configuration details, such as APN, proxy address.
These settings will be applied on the recipient's mobile device (Figure 4).
Figure 4 - Set message settings
Step 5 - Send message
Type in the recipient’s phone number and click "OK" to send the OTA SMS.
Make sure all configuration fields are filled correctly (Figure 5).
Figure 5 - Send message
Step 6 - Message sent
A confirmation will appear once the SMS is sent. The recipient’s device will
display a prompt to apply the received internet/MMS settings (Figure 6).
In this guide, you will learn how to send a Business Card SMS using the Ozeki SMS
Gateway. A Business Card SMS is a special type of message that contains contact
information formatted as a digital vCard. When recipients receive it, they can
save your name, phone number, company, email address, and other details directly
into their phone’s address book. This is a highly professional way to share contact
details with clients, partners, or leads-especially useful for sales, networking,
and support purposes.
What is Business Card SMS?
A Business Card SMS is a special type of SMS message that contains contact details
formatted as a vCard (virtual contact file). When received, the message allows the
recipient to save the sender's contact information-such as name, phone number,
company name, email address, and website-directly to their phone’s contact list.
This format provides a convenient and professional way to exchange business
details over SMS.
When is it best to send a Business Card SMS?
It’s best to send a Business Card SMS when you want to share your contact details
in a professional and efficient way. Ideal situations include after business
meetings or sales calls, as a follow-up to client inquiries, during networking
events or conferences, when offering support or service contact points, or as
part of a promotional or introduction campaign. This ensures your information
is delivered in a clear format and can be instantly saved by the recipient,
making it perfect for professional communication and outreach.
How to send a Business Card SMS in Ozeki SMS Gateway (Quick Steps)
Log in as Admin user in the Ozeki SMS Gateway
Click View message types in the interface
Select the Business Card message type
Fill in the required fields
Enter the recipient’s phone number
Click OK to send the message
How to send a Business Card SMS in Ozeki SMS Gateway (Video tutorial)
In this video, you will learn how to compose and send a Business Card SMS with Ozeki
SMS Gateway. The tutorial walks you through logging in as the Admin user, switching
the message type to "Business Card," and filling out the necessary fields such as
name, phone number, company, and email. After setting up the card, you’ll send it
to the recipient, who can then easily save your details to their contact list.
This method is perfect for professionals who want to make a strong, convenient
impression through mobile messaging.
Step 1 - Open Admin user
Log in to the Ozeki SMS Gateway and select the Admin user from the dashboard.
This user has the necessary permissions to send Business Card SMS messages (Figure 1).
Figure 1 - Open Admin user
Step 2 - View message type
In the Admin user interface, click on the "View message types" option to display
all available SMS message formats (Figure 2).
Figure 2 - View message type
Step 3 - Select business card type
From the list of message types, select "Business Card". This will load the
appropriate fields for entering contact information such as name, phone number,
and company details (Figure 3).
Figure 3 - Select business card type
Step 4 - Set message settings
Fill out the Business Card fields: Address, Name, Website URL, Mobile,
and any other relevant contact info you want to include in the vCard (Figure 4).
Figure 4 - Set message settings
Step 5 - Send message
Enter the recipient’s phone number in the address field, review the information,
and click "OK" to send the Business Card SMS (Figure 5).
Figure 5 - Send message
Step 6 - Message sent
After sending, a confirmation will appear. On the recipient’s phone, the message
will arrive as a digital business card that can be easily saved to their
contacts (Figure 6).
In this guide, you will learn how to send a Data SMS using the Ozeki SMS Gateway.
A Data SMS is a special type of text message used to transmit binary data between
devices or applications. Unlike standard SMS messages, which are primarily
text-based, Data SMS can deliver information such as commands, sensor values,
or encoded content directly to a specific application port on the recipient device.
This is useful for IoT systems, remote monitoring, or device configuration over
mobile networks. The tutorial walks you through selecting the Data SMS message
type, setting up the correct values, and sending it successfully.
What is Data SMS?
A Data SMS is a special type of text message that transmits binary or hexadecimal
data directly to a specific port on a mobile device or application. Unlike normal
SMS messages that display text, Data SMS is often used for machine-to-machine (M2M)
communication. It can carry encoded instructions, system commands, sensor readings,
or configuration data. This format is ideal for technical use cases such as IoT
devices, embedded systems, or remote software operations.
When is it best to send a Data SMS?
It is best to send a Data SMS when you need to deliver machine-readable data to a
mobile device or software system. This is especially useful for sending commands
to IoT devices, transferring sensor data from remote locations, triggering automated
actions on mobile applications, configuring devices remotely using binary instructions,
and enabling secure, structured communication between machines. Data SMS is ideal
for enterprise environments, industrial systems, and remote monitoring solutions
where silent, background communication is required without user interaction.
How to send a Data SMS in Ozeki SMS Gateway (Quick Steps)
Log in as Admin
View message types
Select "Data SMS" message type
Enter port and data content
Add recipient phone number
Click "OK" to send
How to send a Data SMS in Ozeki SMS Gateway (Video tutorial)
In this video, you’ll see how to send a Data SMS using Ozeki SMS Gateway.
The tutorial begins with logging into the system as the Admin user, followed
by selecting the "Data" message type. You'll enter the destination port and
hexadecimal or binary content required for the receiving device or application.
Once sent, the recipient device processes the data payload automatically based
on its configuration. This method is ideal for technical messaging use cases like
embedded systems, IoT, and remote command execution. By the end of the video,
you'll be equipped to send Data SMS messages efficiently and reliably.
Step 1 - Select Admin user
Log in to Ozeki SMS Gateway and choose the Admin user account from the dashboard.
This user level has full access to advanced message types like Data SMS (Figure 1).
Figure 1 - Select Admin user
Step 2 - View message type
Inside the Admin interface, click the "View message types" option to access
special message formats beyond standard SMS (Figure 2).
Figure 2 - View message type
Step 3 - Select Data type
From the list, select "Data SMS" as the message type. This enables fields for
binary payload input and target port number (Figure 3).
Figure 3 - Select Data type
Step 4 - Set message settings
Enter the required port number and data content in hexadecimal format.
This data will be interpreted by the recipient device or application (Figure 4).
Figure 4 - Set message settings
Step 5 - Send message
Type the recipient’s phone number and click "OK" to send the Data SMS.
Confirm that all inputs are correctly formatted (Figure 5).
Figure 5 - Send message
Step 6 - Message sent
Once sent, a confirmation will appear. The Data SMS is now delivered to the
recipient’s device, ready for processing by its assigned port (Figure 6).
In this guide, you will learn how to send a Browser settings SMS using the Ozeki
SMS Gateway. A Browser settings SMS is a special type of message used to configure
a mobile phone’s internet or WAP browser automatically. It contains network
parameters such as the homepage URL, proxy address, and port number. This type
of SMS is especially useful for mobile operators and service providers who want
to help users quickly set up their devices without manual configuration. The
tutorial will guide you through selecting the message type, entering the necessary
details, and sending the configuration SMS to your recipients.
What is Browser settings SMS?
A Browser settings SMS is a special type of configuration message sent via SMS
that automatically sets up a mobile device’s internet or WAP browser. It contains
technical parameters such as the homepage URL, proxy address, port number, and
bearer type (e.g., GPRS or Wi-Fi). When the recipient receives the message, the
device prompts them to apply the settings, simplifying browser configuration
without manual input.
When is it best to send a Browser settings SMS?
It is best to send a Browser settings SMS when a mobile user needs quick and
automatic configuration of internet access on their phone. This is particularly
useful when a customer inserts a new SIM card, after a network change or upgrade,
during mobile phone setup or troubleshooting, as part of customer onboarding by
mobile service providers, or to ensure correct access to company or operator-branded
portals. Sending this type of SMS eliminates the need for users to enter settings
manually and reduces support requests.
How to send a Browser settings SMS in Ozeki SMS Gateway (Quick Steps)
Log in to Ozeki SMS Gateway as the Admin user
Click on "View message types" to access the message format options
Select the "Browser Settings" message type
Fill in required fields
Enter the recipient’s phone number
Click "OK" to send the message
How to send a Browser settings SMS in Ozeki SMS Gateway (Video tutorial)
In this video, you will see how to compose and send a Browser settings SMS using
the Ozeki SMS Gateway. The tutorial starts by logging into the system as the Admin
user and selecting the "Browser Settings" message type. You will then fill in fields
such as the homepage URL, proxy, port, and bearer. After completing the configuration,
the message is sent to the mobile device, which will prompt the recipient to accept
and apply the new browser settings. This feature is ideal for streamlining mobile
internet setup for customers. By the end of the video, you’ll know how to deliver
automated browser configuration to any phone that supports it.
Step 1 - Open admin user
Log in to the Ozeki SMS Gateway and select the Admin user from the dashboard.
This user has full privileges to send special message types like browser settings
SMS (Figure 1).
Figure 1 - Open admin user
Step 2 - View message types
In the Admin interface, click on "View message types" to access the list of
available SMS formats. This is where you can switch from standard SMS
to more advanced types (Figure 2).
Figure 2 - View message types
Step 3 - Select Browser settings type
From the list of message types, choose "Browser Settings". This will open a
form designed for entering mobile internet configuration data (Figure 3).
Figure 3 - Select Browser settings type
Step 4 - Set SMS settings
Fill in the required configuration fields as shown in the image (Figure 4).
Figure 4 - Set SMS settings
Step 5 - Send message
Review the filled settings, and click "OK"
to send the configuration SMS (Figure 5).
Figure 5 - Send message
Step 6 - Message sent
Once the message is sent, you will see a confirmation. On the recipient’s phone,
a prompt will appear asking to accept and apply the new browser settings (Figure 6).
In this guide, you will learn how to send a Calendar SMS using the Ozeki SMS
Gateway. Calendar SMS messages are special message types that contain event
invitations, allowing recipients to save scheduled appointments directly to
their mobile calendar. This feature is especially useful for sending meeting
reminders, appointment confirmations, or event invitations. The tutorial walks
you through selecting the correct message type, configuring the calendar event
details, and sending the SMS to your recipients.
What is Calendar SMS?
A Calendar SMS is a special type of text message that includes event details
formatted as a calendar invitation. When a recipient receives a Calendar SMS,
they can tap the message to save the event directly into their phone's calendar
application. It contains information such as the date, time and description,
making it a practical way to send appointments, meeting invites,
or reminders.
When is it best to send a Calendar SMS?
Calendar SMS messages are best used when you want recipients to remember and attend scheduled events. Ideal scenarios include:
Sending meeting invitations to staff or clients
Appointment reminders for healthcare, beauty salons, or services
Webinar or online class notifications
Event announcements such as conferences or training sessions
How to send Calendar SMS (Quick Steps)
Open Admin user
Select message type
Enter event details
Send the SMS
Confirm delivery
How to send a Calendar SMS in Ozeki SMS Gateway (Video tutorial)
In this video, you will learn how to compose and send a Calendar SMS using Ozeki
SMS Gateway. The tutorial shows how to access the Admin user interface, switch
the message type to "Calendar", and enter event-specific information like title,
location, start time, and description. By the end of the video, you'll be able to
send calendar-enabled SMS messages that your recipients can add directly to their
phone’s calendar, making it ideal for reminders, meetings, and appointment scheduling.
Step 1 - Open Admin user
Go to the Ozeki SMS Gateway dashboard and open the Admin user interface.
This user profile has the necessary permissions to send and manage message
types, including calendar messages (Figure 1).
Figure 1 - Open Admin user
Step 2 - Select "View message type" option
In the Admin user's interface, click on the "View message type" menu.
This allows you to choose what type of SMS message you want to send (Figure 2).
Figure 2 - Select "View message type" option
Step 3 - Select Calendar type
From the message type list, select "Calendar". This changes the message
editor to include calendar-specific fields such as title, location, and time (Figure 3).
Figure 3 - Select Calendar type
Step 4 - Configure SMS settings
Fill in the required calendar details, such as description, start time,
end time. These details will be embedded in the SMS
so that recipients can save the event directly to their mobile calendar (Figure 4).
Figure 4 - Configure SMS settings
Step 5 - Send calendar SMS
Enter the recipient’s phone number and click the Ok button.
The message will be formatted as a calendar event and sent via SMS (Figure 5).
Figure 5 - Send calendar SMS
Step 6 - Calendar SMS sent
After sending, you will receive a confirmation that the calendar SMS was
successfully delivered. The recipient will see the event in their calendar app,
ready to save (Figure 6).
Figure 6 - Calendar SMS sent
Conclusion
Sending Calendar SMS messages through the Ozeki SMS Gateway offers
a highly effective and efficient method for ensuring your recipients receive
and remember important scheduled events. This guide has demonstrated that by
leveraging the specific "Calendar" message type, you can easily embed event
details such as title, location, start time, and description directly into
an SMS.
This practical feature streamlines the process of sending out meeting
invitations, appointment reminders, webinar notifications, and event
announcements, allowing recipients to instantly add these details to
their mobile calendars. The clear, step-by-step process outlined in this guide,
from opening the Admin user interface to confirming delivery, makes it
straightforward for anyone to utilize this powerful communication tool
and improve event attendance and organization.
Learn about other SMS message formats and make
your communication with your customers and employees more efficient.
In this guide, you will learn how to send a Barcode SMS using the Ozeki SMS Gateway.
A Barcode SMS is a special type of message that includes a scannable barcode
(such as a QR code or 1D barcode) sent via text. When the recipient opens the message,
their mobile device displays the barcode, which can be scanned at retail points,
events, or access gates. This type of SMS is ideal for delivering tickets, vouchers,
loyalty codes, or access credentials directly to a mobile phone. The tutorial will
guide you through selecting the barcode message type, configuring its content, and
sending it to your recipients.
What is Barcode SMS?
A Barcode SMS is a special type of text message that includes a scannable barcode,
such as a QR code or a 1D barcode (like EAN13). When the recipient opens the message,
their mobile phone displays the barcode, which can be scanned at check-ins, shops,
events, or any point-of-sale systems. It’s a modern way to deliver tickets, coupons,
loyalty cards, or entry credentials directly via SMS, offering a convenient and
paperless solution for businesses and customers alike.
When is it best to send a barcode SMS?
It is best to send a Barcode SMS when you want to deliver scannable codes directly
to mobile phones for easy access, verification, or redemption. This is especially
useful for sending event tickets, discount coupons, loyalty cards, boarding passes,
or access credentials. Barcode SMS is ideal in situations where contactless
interaction is preferred-such as check-ins, retail promotions, or queue
management-because the recipient can simply show the barcode on their phone
for scanning. It improves efficiency, reduces the need for printed materials,
and ensures a smooth user experience in both commercial and service environments.
How to send a Barcode SMS in Ozeki SMS Gateway (Quick Steps)
Log in as Admin user in Ozeki SMS Gateway
Click on "View message types" to access all SMS formats
Select "Barcode" from the message type options
Enter the barcode content
Type in the recipient’s phone number
Click OK to send the Barcode SMS
The recipient receives a scannable barcode directly on their phone
How to send a Barcode SMS in Ozeki SMS Gateway (Video tutorial)
In this video, you will learn how to send a Barcode SMS with Ozeki SMS Gateway.
The tutorial walks you through accessing the Admin user interface, selecting the
"Barcode" message type, and entering the barcode content and format. Once
configured, the SMS is sent to the recipient, and their device displays the
barcode for easy scanning. This method is especially useful for ticketing,
promotions, or any system that benefits from quick barcode-based identification.
By the end of the video, you’ll be able to send fully functional Barcode SMS
messages to enhance customer experience and streamline digital access.
Step 1 - Open Admin user
Log in to the Ozeki SMS Gateway and select the Admin user from the dashboard.
This user has permission to create and send advanced message types, such as
Barcode SMS (Figure 1).
Figure 1 - Open Admin user
Step 2 - View message types
Inside the Admin interface, click on the "View message types" option. This will
display the available SMS formats, including the special types like Barcode (Figure 2).
Figure 2 - View message types
Step 3 - Select Barcode type
From the list of message types, choose "Barcode". This activates fields
specifically for barcode data, such as the content and barcode format (Figure 3).
Figure 3 - Select Barcode type
Step 4 - Set SMS settings
Enter the EAN13 code and enter the message you want to send, this is optional (Figure 4).
Figure 4 - Set SMS settings
Step 5 - Send message
Fill in the recipient’s phone number, double-check all fields, and click the
"OK" button to send the Barcode SMS (Figure 5).
Figure 5 - Send message
Step 6 - Message sent
After sending, a confirmation will appear in the interface. The recipient will
receive an SMS with the barcode, which they can display and scan using any
compatible reader (Figure 6).
In this guide, you will learn how to send a Binary SMS using the Ozeki SMS Gateway.
Binary SMS messages are used to send raw data in hexadecimal format directly to
mobile devices. This type of SMS is often used for technical tasks like device
configuration, firmware updates, or delivering encoded information. It allows
for silent, non-visible communication between systems, making it ideal for developers
and system integrators. This tutorial will guide you through selecting the message
type, entering the binary payload, and sending the message.
What is Binary SMS?
A Binary SMS is a type of message that delivers raw hexadecimal data to a mobile
device. Unlike text messages, it sends binary content that is processed by
applications, firmware, or system services. It’s commonly used for remote commands,
firmware delivery, or application-level communication.
When is it best to send a binary SMS?
Binary SMS is best used when delivering low-level instructions or data between systems.
This includes sending commands to IoT devices, triggering specific app behavior, updating
configurations, or transferring data in non-human-readable formats. It's ideal for
automation, system integration, and technical operations where direct device
communication is needed without displaying content to the user.
How to send a Binary SMS in Ozeki SMS Gateway (Quick Steps)
Log in to the Ozeki SMS Gateway as Admin
Click "View message types"
Select the "Binary" message type
Enter binary content in hexadecimal format
Add recipient phone number
Click "OK" to send the message
How to send a Binary SMS in Ozeki SMS Gateway (Video tutorial)
In this video, you will learn how to send a Binary SMS using the Ozeki SMS Gateway.
The tutorial shows you how to log in as the Admin user, switch to the "Binary"
message type, and enter the destination number and the binary content in hexadecimal
format. Once sent, the message is processed as a raw binary payload by the recipient
device or software. This is particularly useful for developers working with embedded
systems, IoT, or remote configuration. By the end of the video, you’ll know how to
send binary messages accurately and efficiently.
Step 1 - Select Admin user
Log in to the Ozeki SMS Gateway and choose the Admin user to access
advanced messaging features, including Binary SMS (Figure 1).
Figure 1 - Select Admin user
Step 2 - View message type
Click on "View message types" in the Admin interface to switch from standard
to special message formats (Figure 2).
Figure 2 - View message type
Step 3 - Select Binary type
From the message types list, choose "Binary XML SMS". This opens input fields for
binary SMS settings (Figure 3).
Figure 3 - Select Binary type
Step 4 - Set message settings
Enter the binary content in hexadecimal format. This data will be
interpreted by the recipient device (Figure 4).
Figure 4 - Set message settings
Step 5 - Send message
Enter the recipient’s phone number and click "OK" to send the binary message (Figure 5).
Figure 5 - Send message
Step 6 - Message sent
Once sent, a confirmation will appear, and the message is delivered to the device (Figure 6).
How to send a Voice message SMS in Ozeki SMS Gateway
Figure 1 - Select Admin user
Figure 2 - View message type
Figure 3 - Select Voice message type
Figure 4 - Upload voice file
Figure 5 - Send message
Figure 6 - Message sent
Conclusion
https://ozeki-sms-gateway.com/p_4271-sms-url.html
SMS URL
If you're looking to send SMS URL through the Ozeki SMS Gateway, this
guide will walk you through the process step-by-step.
Ozeki SMS Gateway is a high-performance, reliable software solution designed to
streamline your SMS campaigns. Whether you're new to Ozeki or already familiar
with the platform, this guide will show you how to quickly set up your account,
create a URL SMS, and track message delivery.
What is an SMS URL?
An SMS URL is a type of SMS message that contains a clickable link (a URL) within
the text. When the recipient receives the SMS, they can click on the URL to be
directed to a specific website, landing page, or any other online resource. This
method is commonly used in marketing, notifications, and customer service to
direct users to promotions, account information, or specific actions like
confirming appointments or making purchases.
How to create an URL SMS (Quick steps)
To create an URL SMS
Access you Ozeki SMS Gateway account
Open the SMS Messenger application
Start creating an URL SMS
Enter the recipient's mobile number
Input your SMS text in the designated field
Send the SMS
Track SMS delivery
Read the message on the recipient's phone
How to create an URL SMS (Video guide)
In this following video tutorial we will show you on how to create an Ozeki SMS Gateway
account using the Gateway. The tutorial starts with a
demonstration of the test SMS sending process, followed by a look at what should
appear on the recipient's mobile screen. By following the steps you
can learn the process in a few seconds. Once you have completed the account setup,
you'll be ready to send URL messages effectively through the Ozeki SMS
Gateway.
Begin the process, by login your Ozeki SMS Gateway. If you do not have an account
yet, create one, by downloading the Ozeki SMS Gateway from the
https://ozeki-sms-gateway.com/
website. Install the Ozeki application, then start running. When your account is
set up, open the SMS Messenger application within the Ozeki SMS Gateway.
Figure 1 - Open SMS Messenger
To create an URL SMS, start by entering the recipient's mobile number into the
appropriate field. Enter the SMS URL into the designated field, and when you
are ready, click on the send button to initiate the message delivery process.
Make sure your message is clear and concise, as it will be delivered
directly to the recipient's mobile phone.
Figure 2 - Send URL SMS
By entering into the "Sent" folder that includes the recipient's phone number,
the full content of the message, the date and time the message was sent, as well
as the delivery status. The delivery progress results provide insight into
whether the message was successfully delivered, is pending, or encountered any
issues during transmission.
Figure 3 - URL SMS sent
When the recipient receives the SMS message on their phone, the text of the
message will typically appear as a notification on their screen at the time of
delivery. Depending on their phone settings, they might also hear an alert or see
a pop-up indicating that a new message has arrived. Once the message appears,
they can open it, read it, then send a reply to your SMS message.
Figure 4 - URL SMS received on phone
Conclusion
By following this guide, you have successfully learned how to send SMS URL
messages using the Ozeki SMS Gateway. With the ability to track delivery
progress and receive feedback from recipients, you now have the
tools to optimize your SMS communication strategy. The seamless
integration of HLR lookups will ensure your messages reach their intended
audience efficiently, enhancing the reliability of your SMS campaigns.
FAQs
What should I do if the recipient doesn’t receive the SMS?
If the recipient does not receive the SMS, first check the delivery status in the
"Sent" folder for any errors or issues. Ensure that the recipient's mobile number
is correct and that there are no network problems.
What is the purpose of an SMS URL?
An SMS URL allows you to include a clickable link in your SMS messages, directing
recipients to a specific website or online resource.
Is there a character limit for URLs in SMS messages?
While there isn't a strict character limit specifically for URLs in SMS messages,
it's important to consider the overall SMS character limit. Standard SMS messages
have a character limit of 160 characters, including spaces and punctuation.
How do I shorten a long URL for use in an SMS message?
To shorten a long URL, use a URL shortening service. These services generate a
shorter link that redirects to your original URL, making it more suitable for SMS.
Can I include multiple URLs in a single SMS message?
While technically possible, including multiple URLs in a single SMS message can
quickly consume your character limit and may make the message appear cluttered.
It's generally best to include a single, concise URL for clarity and effectiveness.
Silent SMS messages are specially encoded text messages that can do through
the network and can trigger status and delivery reports, but are not displayed
on the recipient's mobile phones.
Figure 1 - Silent SMS technology
Common requirements for silent SMS messages
The common requirement for silent SMS users is to send a special MO SMS with attributes
configured to avoid detection on the recipient handset. The following attributes
should be honoured on both Android and Apple iPhone mobile phones:
The SMS is not displayed on the screen of the mobile device
No notification sound is played on the mobile device
The SMS is not stored on the mobile device
The SMS is not stored on the SIM card
No notification icon is displayed on the lock screen
No notification popup is displayed if the device is unlocked
No notification icon is displayed on the top bar
Not forwarded to Apple watch / smartwatches
The mobile device disposes of the SMS immediately
An SMS delivery report is returned to the SMS gateway
Ozeki SMS Gateway can send silent SMS messages with the above attributes.
How can silent SMS be delivered to the mobile network
Silent SMS messages can be delivered by the Ozeki SMS gateway to the mobile
network through various connections. Silent text messages can be sent to the mobile
network through wireless links or through Internet-based SMS connections or through
direct SMS connections to the Short Messages Service Centre (SMSC) of a mobile network.
Wireless (so called mobile) connections send the silent SMS messages the same
way as standard SMS messages are sent. In this case, the silent SMS is sent
through a standard mobile terminal equipment (standard
mobile phones with a SIM card). These messages are sent as MO (mobile originated)
SMS messages. For example, silent SMS messages can be sent using an Android Mobile
phone if it is connected to Ozeki SMS Gateway over a Wifi link.
Silent SMS messages can also be sent through GSM modems or GSM modem pools.
A GSM modem is a standard mobile phone without a screen.
A GSM modem pool contains multiple GSM modems. GSM modems and GSM modem
pools are connected to a Windows PC where Ozeki SMS Gateway is installed. The
modem (or modem pool) is connected to the PC using a USB data cable. Every GSM modem
needs a SIM card. A modem pool needs multiple SIM cards: one for each modem in the
pool. Any SIM card provided by any mobile network operator can be used to send
silent SMS messages, as long as it has sufficient money (balance) to send SMS messages.
It is also possible to use Ozeki's hardware SMS gateway to send silent SMS.
Ozeki's hardware SMS gateway is a professional, industrial PC with a built-in SMS modem.
It is fast and efficient and can deliver silent SMS messages over 4G LTE and 5G
connections to the mobile network. These connections are very fast by default,
so silent SMS messages delivered through Ozeki's hardware SMS gateways reach the
network quickly.
If a very large number of silent SMS messages need to be sent IP sms connections
using SMPP, CIMD2 or UCP can also be used to deliver the silent SMS messages. The
protocol implementations of these protocols in the Ozeki SMS Gateway support
silent SMS encoding.
How do users send silent SMS messages
Silent SMS messages are often sent using the Graphical user interface of
Ozeki SMS Gateway. The user selects the silent SMS type from the available
SMS message types, then enters the mobile phone of the recipient and
clicks on send. Ozeki SMS Gateway sends the silent
SMS to the mobile network, and waits for the SMS submit status report and
SMS delivery report returned by the network.
After the silent SMS has been delivered the Ozeki SMS gateway displays the
SMS submit reference and the delivery report information including the
delivery timestamp of the user on the Graphical user interface.
The user of Ozeki SMS Gateway will know from this information if his silent
SMS messages were delivered successfully and if the recipient's mobile phone
is turned on and is available on the mobile network.
The recipient of the silent SMS message does not notice anything
about the SMS reaching his mobile phone. As soon as the SMS reaches the
mobile phone, it is dropped and deleted by the device.
Silent SMS GUI of Ozeki SMS Gateway
The silent SMS sending GUI of Ozeki Gateway is used by human operators,
who put it in the phone numbers to "ping". The silent SMS messages are
entered on the graphical user interface. The human operators can
schedule the message sending frequency and can set the start and end
date/time of the ping operation. The configuration is customizable for each phone number.
A report of the ping operation is available on a per phone number basis,
that clearly shows when silent SMS messages were sent, and which of these
SMS messages were confirmed by a delivery report.
The user interface of Ozeki SMS Gateway can only be accessed by operators
in the LAN through a web browser.
Silent SMS technology offers a unique way to send specially encoded text messages
that remain completely invisible to recipients. These messages, although hidden,
can trigger status and delivery reports without any indication on the
recipient's mobile phone. In this article, we delve into the common
requirements for silent SMS messages, their delivery methods, and how users can
utilize this intriguing technology using Ozeki SMS Gateway's user-friendly interface.
What is Silent SMS
Silent SMS is a type of SMS message that does not appear on the recipient's device.
Figure 1 - IoT device monitoring with silent SMS
Who is using Silent SMS
Silent SMS is a type of SMS message that does not appear on the recipient's device.
It is often used by law enforcement agencies to track the location of suspects,
as well as by businesses to track their IoT devices. Parents can
use silent SMS to keep tabs on their children's whereabouts.
There are a number of different ways to use silent SMS. One way is to send a
message with the short message type (SMT) set to 0. This will cause the message
to be delivered to the recipient's device, but it will not appear in the
recipient's inbox.
Why do law enforcement agencies use Silent SMS
Law enforcement agencies use Silent SMS to covertly track and gather information
from suspects' mobile devices without alerting them.
Silent SMS is a technique that law enforcement agencies use to track the location
of a mobile phone without alerting the user. It involves sending a message
that does not appear on the phone's screen, but triggers a response from the
network operator. This response reveals the cell tower that the phone is
connected to, which can be used to estimate its location.
Why do businesses use Silent SMS
Businesses utilize Silent SMS for tracking IoT devices as a means to
monitor their location, performance, and operational status, ensuring efficient
management and maintenance of the IoT network.
Why do parents use Silent SMS
Parents use Silent SMS for tracking their children's mobile phones to ensure
their safety, monitor their activities, and promote responsible digital behaviour
in an unobtrusive manner.
How does Silent SMS work
Special SMS with hidden code sent to the target device
Silent SMS triggers network event without the user's knowledge
No visible content, but carries specific command or identifier
The recipient's device doesn't generate any notification or alert
How do you setup Silent SMS
Silent SMS offers a discreet means of communication by sending encoded messages
that remain invisible to recipients. Setting up silent SMS system involves following a
few straightforward steps using Ozeki SMS Gateway. From installing the software
to configuring the message attributes and monitoring delivery reports, the
following steps provide a concise overview of the process.
Install Ozeki SMS Gateway software on your device.
Open the graphical user interface of Ozeki SMS Gateway.
Select the silent SMS message type from the options.
Enter the recipient's mobile phone number.
Set the desired sending frequency and start/end date/time.
Configure attributes to avoid detection on the recipient's handset.
Connect to the mobile network using wireless or modem options.
Click on "Send" to initiate the silent SMS transmission.
Monitor the SMS submit status and delivery report information.
Verify successful delivery without any notification on the recipient's device.
How do you send Silent SMS
To get started with using Silent SMS, begin by installing the user-friendly
Ozeki SMS Gateway software on your device and follow these steps:
Launch Ozeki SMS Gateway software on your device.
Navigate to the message composition section and select "Silent SMS" as the message type.
Enter the recipient's mobile phone number, customize any desired attributes, and click the "Send" button to transmit the Silent SMS.
Please note that these steps assume you have already installed and set up the
Ozeki SMS Gateway software on your device.
How do you test Silent SMS functionality
To test Silent SMS, start by setting up the Ozeki SMS Gateway software on
your device and ensuring it's properly configured. Choose a test recipient's
mobile number and compose a Silent SMS message with the desired attributes
using the Ozeki SMS Gateway interface. Send the Silent SMS to the test
recipient's mobile number through Ozeki SMS Gateway and monitor the SMS
delivery report to verify successful transmission without any notification
appearing on the recipient's device. By following these steps, you can
effectively test the functionality and stealthiness of Silent SMS.
Difference between Silent SMS and Standard SMS
Silent SMS and Standard SMS are two distinct types of text messages with
significant differences in their behaviour and purpose. Standard SMS, also
known as a regular text message, is displayed on the recipient's mobile phone,
triggers a notification sound, and is stored in the device's messaging app
or memory. It appears on the screen, can be read by the recipient, and is
typically used for communication or information exchange between individuals.
On the other hand, Silent SMS, as the name suggests, remains invisible and
discreet on the recipient's mobile phone. It does not trigger any
notification sound, is not displayed on the screen, and is not stored
in the messaging app or memory. Silent SMS is designed for specific
purposes that require stealthy communication or tracking without the
recipient's awareness. It can be utilized for monitoring, tracking, or
triggering specific actions on the recipient's device, such as generating
delivery reports without any visible trace.
Silent SMS vs. Standard SMS vs. Flash SMS
Features
Silent SMS
Standard SMS
Flash SMS
Message Displayed
Not displayed
Displayed
Displayed
Notification Sound
No sound
Plays sound
No sound
Stored on Device
Not stored
Stored in memory
Not stored
Visibility to Recipient
Invisible
Visible
Visible
Delivery Reports
Generated
Generated
Generated
Message Length
Up to 160 characters
Up to 160 characters
Up to 160 characters
Message Type
Encoded text message
Standard text message
Flashy text message
Intended Use
Stealthy communication, tracking
Regular communication
Immediate attention
Benefits of Silent SMS
Silent SMS offers several socially positive advantages in different scenarios.
Firstly, it ensures privacy and confidentiality by allowing discreet
communication that remains unseen on the recipient's device, thus promoting
personal space and security. Secondly, Silent SMS can be used for location
tracking in emergency situations, aiding in locating individuals and providing
timely assistance. Lastly, the ability to check device availability and network
connectivity through delivery reports can facilitate efficient communication and
enhance responsiveness in critical situations. These socially positive aspects
of Silent SMS contribute to fostering privacy, safety, and effective
communication in various contexts.
Disadvantages of Silent SMS
While Silent SMS offers certain advantages, it is important to consider its
potential disadvantages in a socially positive context. One notable drawback is
the potential for misuse or abuse, as the stealthy nature of Silent SMS can
enable unethical behaviour. Additionally, the recipient may feel excluded or
uninformed when messages go unnoticed, hindering open and transparent
communication. It is crucial to strike a balance between privacy and inclusivity,
ensuring that Silent SMS is used responsibly and respectfully. By being
mindful of these potential drawbacks, we can promote a culture of ethical
communication that respects the rights and well-being of all individuals
involved.
Flash SMS is a technology that allows you to send specially encoded text
messages that pop up on the recipient's main screen when received.
This makes it a great way to send urgent or time-sensitive messages.
Flash SMS messages are delivered differently than regular SMS messages.
They are not stored in the recipient's inbox, but instead appear directly
on their main screen. This makes them more likely to be seen and acted
upon immediately.
To use Flash SMS, you need to use Ozeki SMS gateway that supports this
technology. Ozeki SMS Gateway is a popular option that offers a
user-friendly interface and a wide range of features.
What is Flash SMS?
Flash SMS is a type 0 SMS that can be used to send urgent or time-sensitive
messages. When you need to get your message seen and acted upon quickly, Flash
SMS is a great option.
Who uses Flash SMS messages?
Flash SMS messages are primarily used by various organizations and industries
that require a way to deliver urgent and immediate notifications to
recipients. Here are some examples of who might use Flash SMS:
Emergency Services and Government Agencies
Financial Institutions
Telecommunication and Network Providers
Healthcare Providers
Online Services and E-commerce Platforms
Why do emergency services use Flash SMS?
Law enforcement, fire departments, emergency management agencies, and government
bodies often use Flash SMS messages to quickly alert the public about
emergencies, disasters, or safety-related information.
Why do Banks use Flash SMS?
Banks, credit card companies, and financial service providers use Flash SMS
messages to notify customers about account activity, transaction alerts, and
potential fraud.
Why do Online Services use Flash SMS?
Some online services, e-commerce websites, and digital platforms use Flash SMS
messages for two-factor authentication (2FA), password reset codes, and account
security alerts as well as time-sensitive promotions, limited-time offers, and
special discounts to attract immediate attention.
How does Flash SMS work
Special SMS is sent with special code to the target device
Flash SMS triggers network event to alert the target device
Carries specific command or identifier
The recipient's device generates notification and alert
Message does not get stored by default
How do you set up Flash SMS
Flash SMS offers a confidential means of communication by sending messages
that alert the recipients and do not get stored on their devices.
Setting up a Flash SMS system involves following a few straightforward steps
using Ozeki SMS Gateway. From installing the software to configuring the message
attributes and monitoring delivery reports, the following steps provide a short
overview of the process.
Install Ozeki SMS Gateway software on your device.
Open the graphical user interface of Ozeki SMS Gateway.
Select the Flash SMS message type from the options.
Enter the recipient's mobile phone number.
Connect to the mobile network using wireless or modem options.
Click on "Send" to initiate the Flash SMS transmission.
Monitor the SMS submit status and delivery report information.
Verify successful delivery with alert on the recipient's device.
How do you send Flash SMS
To get started with using Flash SMS, begin by installing the
Ozeki SMS Gateway software on your device and follow these steps:
Launch Ozeki SMS Gateway software on your device.
Navigate to the message composition section and select "Flash SMS" as the
message type.
Enter the recipient's mobile phone number, customize any desired attributes,
and click the "Send" button to transmit the Flash SMS.
Please note that these steps assume you have already installed and set up the Ozeki SMS Gateway software on your device.
How do you test Flash SMS functionality
To test Flash SMS, start by setting up the Ozeki SMS Gateway software on your
device and ensuring it's properly configured. Choose a test recipient's mobile
number and compose a Flash SMS message with the desired attributes using the
Ozeki SMS Gateway interface. Send the Flash SMS to the test recipient's mobile
number through Ozeki SMS Gateway and monitor the SMS delivery report to verify
successful transmission with an alert appearing on the recipient's device.
By following these steps, you can effectively test the functionality of a Flash SMS.
Difference between Flash SMS and Standard SMS
Flash SMS and Standard SMS are two distinct types of text messages with
significant differences in their behaviour and purpose. Standard SMS, also
known as a regular text message, is displayed on the recipient's mobile phone,
triggers a notification sound, and is stored in the device's messaging app or
memory. It appears on the screen, can be read by the recipient, and is typically
used for communication or information exchange between individuals.
On the other hand, Flash SMS, as the name suggests, pops up and
shows on the main screen of the mobile phone. It alerts the user quickly and is
not stored in the messaging app or memory. Flash SMS is designed for specific
purposes that require quick instructions with possibly confidential information.
It can be utilized for alerts and instructions that require immediate action from
the end user.
Silent SMS vs. Standard SMS vs. Flash SMS
Features
Silent SMS
Standard SMS
Flash SMS
Message Displayed
Not displayed
Displayed
Displayed
Notification Sound
No sound
Plays sound
No sound
Stored on Device
Not stored
Stored in memory
Not stored
Visibility to Recipient
Invisible
Visible
Visible
Delivery Reports
Generated
Generated
Generated
Message Length
Up to 160 characters
Up to 160 characters
Up to 160 characters
Message Type
Encoded text message
Standard text message
Flashy text message
Intended Use
Stealthy communication, tracking
Regular communication
Immediate attention
Benefits of Flash SMS
Flash SMS offers several socially positive advantages in different scenarios.
Firstly, it ensures the user can see your message quickly and efficiently on
the main screen of the mobile device, without opening the message at all.
This can be useful in case of emergencies, when you need immediate action from
the end users or instructions when time is of the essence. This can also be used
for time sensitive promotions for shops and businesses.
Disadvantages of Flash SMS
While Flash SMS offers certain advantages, it is important to consider its
potential disadvantages. One notable drawback is the potential for misuse or abuse,
like spamming a user with flashy pop-up messages or over informing them with a too
high frequency of Flash SMS messages.
By being mindful of these potential drawbacks, we can promote a culture of ethical
communication that respects the rights and well-being of all individuals involved.
Summary
Flash SMS is a powerful tool that can be used to send urgent or time-sensitive
messages. If you need to get your message seen and acted upon quickly, Flash SMS
is a great option. Your Flash SMS message will be sent immediately to the
recipient's phone. It will appear on their main screen, even if their phone is
locked.
Class 0 SMS technology is a unique way to send specially coded text
notifications that appear on the recipient's main screen when received.
These messages can be sent to a cell phone to alert or instruct the recipient.
In this article, we look at the typical requirements for Class 0 SMS messages,
their methods of transmission and how users can utilize this technology using
the user-friendly Ozeki SMS Gateway interface.
What is a Class 0 SMS?
Class 0 SMS is a type of SMS message that appears on the main screen of the user
when received. They are of higher importance than Standard Class 1 SMS messages.
Class 0 SMS messages are also called Flash SMS messages.
Who uses Class 0 SMS messages?
Several businesses and organizations that need to inform their users of urgent or
immediate information use Class 0 SMS messages. Who Might Use
Class 0 SMS? Here are a Few Examples:
Emergency Services and Government Agencies
Financial Institutions
Telecommunication and Network Providers
Healthcare Providers
Online Services and E-commerce Platforms
Why do emergency services use Class 0 SMS?
Class 0 SMS messages are frequently used by law enforcement, fire departments,
emergency management organizations, and governmental organizations to immediately
warn the public of crises, disasters, or safety-related information.
Why do Banks use Class 0 SMS?
Class 0 SMS messages are used by banks, credit card companies, and other
financial service providers to alert users to account activity, transaction
notifications, and suspected fraud.
Why do Online Services use Class 0 SMS?
Several online services, e-commerce websites, and digital platforms
use Class 0 SMS texts for two-factor authentication (2FA), password reset codes, account security
warnings, and time-sensitive promotions, limited-time offers, and exclusive
discounts.
How does Class 0 SMS work
Special SMS with code sent to the target device
Class 0 SMS triggers network event to alert the target device
Carries specific command or identifier
The recipient's device generates notification and alert
Message does not get stored by default
How do you setup Class 0 SMS
Class 0 SMS provides a secure method of communication by transmitting
messages alerting the receivers without the messages being stored. Utilizing Ozeki SMS Gateway, there are a few
simple steps to setting up a Class 0 SMS system. The following steps give a
brief summary of the procedure, including everything from installing the program
to customizing the message properties and checking delivery reports.
Install Ozeki SMS Gateway software on your device.
Open the graphical user interface of Ozeki SMS Gateway.
Select the Class 0 SMS message type from the options.
Enter the recipient's mobile phone number.
Connect to the mobile network using modem options.
Click on "Send" to initiate the Class 0 SMS transmission.
Monitor the SMS submit status and delivery report information.
Verify successful delivery with alert on the recipient's device.
How do you send Class 0 SMS
To get started with using Class 0 SMS, begin by installing the user-friendly
Ozeki SMS Gateway software on your device and follow these steps:
Launch Ozeki SMS Gateway software on your device.
Navigate to the message composition section and select "Class 0 SMS" as the
message type.
Enter the recipient's mobile phone number, customize any desired attributes,
and click the "Send" button to transmit the Class 0 SMS.
Please be aware that the following instructions presume that the Ozeki SMS
Gateway software has already been installed and configured on your device.
How do you test Class 0 SMS functionality
Start by installing the Ozeki SMS Gateway software on your device and making
sure it is correctly setup before you test Class 0 SMS. Using the Ozeki SMS Gateway
interface, choose the cell phone number of a test recipient and create a Class 0 SMS
message with the needed properties. Send the Class 0 SMS to the test recipient's
cell phone number using the Ozeki SMS Gateway, and then keep an eye on the
recipient's device to see if your alert is received.
You can successfully test a Class 0 SMS's functionality
by following these guidelines.
Difference between Class 0 SMS and Standard SMS
Class 0 SMS and Standard (Class 1) SMS are two different kinds of text messages
that function and behave very differently. Regular text messages, often referred
to as standard SMS, are displayed on the recipient's smartphone, play a
notification sound, and are saved in the device's messaging app or memory.
It may be read by the recipient, displayed on the screen, and is often used
for interpersonal conversation or information sharing.
On the other hand, Class 0 SMS appears on the phone's home screen and pops up.
It quickly warns the user and does not get saved in memory or the
messaging app. Class 0 SMS is intended for particular uses where fast
instructions with potentially confidential information are needed. It can be
used for notifications and instructions that need a quick response from the user.
Silent SMS vs. Standard SMS vs. Class 0 SMS
Features
Silent SMS
Standard SMS
Class 0 SMS
Message Displayed
Not displayed
Displayed
Displayed
Notification Sound
No sound
Plays sound
No sound
Stored on Device
Not stored
Stored in memory
Not stored
Visibility to Recipient
Invisible
Visible
Visible
Delivery Reports
Generated
Generated
Generated
Message Length
Up to 160 characters
Up to 160 characters
Up to 160 characters
Message Type
Encoded text message
Standard text message
Flashy text message
Intended Use
Stealthy communication, tracking
Regular communication
Immediate attention
Benefits of Class 0 SMS
In many situations, Class 0 SMS provides several socially advantageous benefits.
First of all, it guarantees that the consumer can quickly and effectively notice
your message on the mobile device's home screen without ever opening the message.
This can come in handy when you require the end users to take immediate action
or follow instructions quickly. Additionally, this can be
utilized for time-sensitive promotions for stores and companies.
Disadvantages of Class 0 SMS
Class 0 SMS has several benefits, but it's important to think about any potential
drawbacks as well. The ability for misuse or abuse, such as spamming a user
with flashy pop-up messages or over-informing them with an excessive number of
Class 0 SMS messages, is one obvious negative. By being aware of these
potential negative effects, we can encourage an ethical communication culture
that respects the rights and welfare of all parties.
Summary
Class 0 SMS is a useful option to send important or time-sensitive
messages. If you have to get your message seen and acted upon in time, Flash SMS
is an easy, good solution. Your Flash SMS message will be sent in a few seconds to the
recipient's phone, and it will appear on their main screen, even if their phone is
locked.
With the help of the stealth SMS technology, it's possible to transmit specially
encoded text messages to receivers while remaining completely unseen to them.
Despite being hidden, these messages have the ability to initiate status and
delivery reports without giving the recipient any warning on their mobile device.
In this article, we examine the typical specifications for Stealth SMS messages,
their modes of transmission and how users can make use of this stealthy
technology utilizing the user-friendly Ozeki SMS Gateway interface.
What is Stealth SMS
Stealth SMS is a type of SMS message that is not visible on the recipient's device when received.
It's also known as Silent SMS.
Who is using Stealth SMS
A sort of SMS communication known as a stealth SMS does not show up on the
recipient's device. Both businesses and law enforcement frequently utilize it to
track the whereabouts of suspects via IoT devices. Stealth SMS can also be used by
parents to track the whereabouts of their kids.
Stealth SMS can be used in a variety of ways. Sending a message with the
short message type (SMT) set to 0 is one approach. The message will be sent to
the recipient's device, but it won't show up in their inbox.
Why do law enforcement agencies use Stealth SMS
Stealth SMS is a tool used by law enforcement to silently track and collect data
from suspects' mobile cell phones.
Law enforcement organizations can trace the location of a mobile phone without
the user being informed by using stealth SMS. It involves sending
a message that does not show up on the phone's display but instead prompts the
network operator to respond. The cell tower the phone is linked to is revealed
in this response, allowing them to determine the approximate position of the device.
Why do businesses use Stealth SMS
Businesses use Stealth SMS to track IoT devices in order to keep track of their
whereabouts, performance, and operational status and to manage and maintain the
IoT network effectively.
Why do parents use Stealth SMS
To protect their children's safety, keep an eye on their activities, and covertly
encourage proper behaviour, parents follow their kids' smartphones using
Stealth SMS.
How does Stealth SMS work
Special SMS with hidden code is sent to the target's device
Stealth SMS triggers network event without the user's knowledge
No visible content, but carries specific command or identifier
The recipient's device doesn't generate any notification or alert
How do you setup Stealth SMS
Sending encoded messages that are undetectable to recipients makes stealth SMS a
discreet way to communicate. Utilizing Ozeki SMS Gateway, there are a few simple
steps to setting up a Stealth SMS system. The stages that follow give a brief
rundown of the procedure, from setting up the software through configuring
message properties and checking delivery data.
Install Ozeki SMS Gateway software on your device.
Open the graphical user interface of Ozeki SMS Gateway.
Select the Stealth SMS message type from the options.
Enter the recipient's mobile phone number.
Set the desired sending frequency and start/end date/time.
Configure attributes to avoid detection on the recipient's handset.
Connect to the mobile network using wireless or modem options.
Click on "Send" to initiate the Stealth SMS transmission.
Monitor the SMS submit status and delivery report information.
Verify successful delivery without any notification on the recipient's device.
How do you send Stealth SMS
To get started with using Stealth SMS, begin by installing the
Ozeki SMS Gateway software on your device and follow these steps:
Launch Ozeki SMS Gateway software on your device.
Navigate to the message composition section and select "Stealth SMS" as the message type.
Enter the recipient's mobile phone number, customize any desired attributes, and click the "Send" button to transmit the Stealth SMS.
Please note that these steps assume you have already installed and set up the
Ozeki SMS Gateway software on your device.
How do you test Stealth SMS functionality
Start by installing the Ozeki SMS Gateway software on your device and making sure
it is correctly setup before you try sending a Stealth SMS. Using the Ozeki SMS Gateway
interface, select the cell phone number of a test receiver and create a Stealth
SMS message with the required properties. Send the covert SMS to the test
recipient's mobile number via the Ozeki SMS Gateway, and then check the SMS
delivery report to make sure it was delivered successfully without leaving a
trace on the recipient's device. You can successfully test the performance and
stealthiness of Stealth SMS by following this simple instruction.
Difference between Stealth SMS and Standard SMS
Stealth SMS and Standard SMS, differ
significantly in both behaviour and intent. Regular text messages, often
referred to as standard SMS, are displayed on the recipient's smartphone,
play a notification sound, and are saved in the device's messaging app or
memory. It may be read by the recipient, displayed on the screen, and is
often used for interpersonal conversation or information sharing.
Stealth SMS, on the other hand, is undetectable and covert on the recipient's
phone, as the name implies. It does not cause a notification sound, does not
appear on the screen, or store any information in the messaging app's memory.
Stealth SMS is intended for particular uses that call for covert communication
or tracking without the recipient's knowledge. It can be used to generate
delivery reports secretly or for monitoring, tracking, or setting off
particular activities on the recipient's device.
Stealth SMS vs. Standard SMS vs. Flash SMS
Features
Stealth SMS
Standard SMS
Flash SMS
Message Displayed
Not displayed
Displayed
Displayed
Notification Sound
No sound
Plays sound
No sound
Stored on Device
Not stored
Stored in memory
Not stored
Visibility to Recipient
Invisible
Visible
Visible
Delivery Reports
Generated
Generated
Generated
Message Length
Up to 160 characters
Up to 160 characters
Up to 160 characters
Message Type
Encoded text message
Standard text message
Flashy text message
Intended Use
Stealthy communication, tracking
Regular communication
Immediate attention
Benefits of Stealth SMS
In many situations, stealth SMS offers a number of socially advantageous benefits.
First off, it promotes personal space and security by ensuring privacy and
confidentiality by enabling covert communication that is invisible on the
recipient's device. Second, Stealth SMS can be used to track a person's
whereabouts in an emergency so that help can be sent as soon as possible.
Last but not least, the capability to examine device accessibility and network
connectivity via delivery reports can promote effective communication and improve
responsiveness in urgent circumstances. These socially advantageous features of
Stealth SMS help to promote privacy, safety, and successful communication in a
variety of settings.
Disadvantages of Stealth SMS
While Stealth SMS has some benefits, it's necessary to take into account any
potential drawbacks in the perspective of social progress. The potential for
misuse or abuse of Stealth SMS is a noteworthy disadvantage because it can
encourage unlawful conduct due to its stealthy nature. Additionally, when
messages go unnoticed, the recipient may feel excluded or uninformed, which
blocks open and honest communication. To ensure that Stealth SMS is used
sensibly and politely, it is critical to find a balance between privacy and
inclusivity. By being aware of these potential negative effects, we can
encourage an ethical communication culture that respects the rights and welfare
of all parties.
Summary
Stealth SMS is a type of SMS message that is not visible to the recipient. It is
often used for covert communication or tracking without the recipient's knowledge.
Stealth SMS can be used by law enforcement, businesses, and parents.
Stealth SMS offers some socially advantageous benefits, such as promoting personal
space and security, tracking a person's whereabouts in an emergency, and examining
device accessibility and network connectivity. However, it is important to be
aware of the potential for misuse or abuse of Stealth SMS, as it can encourage
unlawful conduct due to its stealthy nature. It is important to find a balance
between privacy and inclusivity when using Stealth SMS.
With the help of ping SMS technology, it's possible to transmit specially
encoded text messages to receivers while remaining completely unseen to them.
Despite being concealed, these messages have the ability to initiate status and
delivery reports without giving the recipient any warning on their mobile device.
In this article, we examine the typical specifications for ping SMS messages,
their modes of transmission, and how users can make use of this fascinating
technology utilizing the user-friendly Ozeki SMS Gateway interface.
What is Ping SMS
Ping SMS is a type of SMS message that is not visible on the recipient's device.
It's also known as Silent SMS.
Who is using Ping SMS
A sort of SMS communication known as a ping SMS does not show up on the
recipient's device. Both businesses and law enforcement frequently utilize it to
check if users are connected to a network.
Ping SMS can be utilized in a variety of ways. Sending a message with the
short message type (SMT) set to 0 is one approach. The message will be sent to
the recipient's device, but it won't show up in their inbox.
Why do law enforcement agencies use Ping SMS
Ping SMS is a tool used by law enforcement to silently track and collect data
from suspects' mobile cell phones.
Ping SMS is a technique that people can use to check if a mobile is connected to a
mobile network without the user's knowledge. It entails sending a message that the
network operator must respond to but does not appear on the phone's display.
This response reveals the cell phone is connected to a cell tower. This information
can prove someone is using their device and is available.
Why do businesses use Ping SMS
Businesses use Ping SMS to track IoT devices in order to keep track of their
performance, and operational status and to manage and maintain the
IoT network effectively.
How does Ping SMS work
Special SMS with hidden code sent to the target device
Ping SMS triggers network event without the user's knowledge
No visible content, but carries specific command or identifier
The recipient's device doesn't generate any notification or alert
Recipient's device responds with a status
How do you setup Ping SMS
Sending encoded messages that are undetectable to recipients makes Ping SMS a
discreet way to communicate. Utilizing Ozeki SMS Gateway, there are a few simple
steps to setting up a ping SMS system. The stages that follow give a brief
rundown of the procedure, from setting up the software through configuring
message properties and checking delivery data.
Install Ozeki SMS Gateway software on your device.
Open the graphical user interface of Ozeki SMS Gateway.
Select the ping SMS message type from the options.
Enter the recipient's mobile phone number.
Set the desired sending frequency and start/end date/time.
Configure attributes to avoid detection on the recipient's handset.
Connect to the mobile network using wireless or modem options.
Click on "Send" to initiate the ping SMS transmission.
Monitor the SMS submit status and delivery report information.
Verify successful delivery without any notification on the recipient's device.
How do you send Ping SMS
To get started with using Ping SMS, begin by installing the user-friendly
Ozeki SMS Gateway software on your device and follow these steps:
Launch Ozeki SMS Gateway software on your device.
Navigate to the message composition section and select "Ping SMS" as the message type.
Enter the recipient's mobile phone number, customize any desired attributes, and click the "Send" button to transmit the Ping SMS.
Please note that these steps assume you have already installed and set up the
Ozeki SMS Gateway software on your device.
How do you test Ping SMS functionality
Before you try Ping SMS, install the Ozeki SMS Gateway software on your device
and make sure it is properly configured. Choose the mobile phone number of a
test recipient using the Ozeki SMS Gateway interface, and then build a Ping SMS
message with the necessary characteristics. Utilizing the Ozeki SMS Gateway,
send the covert SMS to the test recipient's cell phone number. After checking
the SMS delivery report to ensure that the message was delivered successfully
and without leaving a trace on the recipient's device. The following can be done
to effectively verify the functionality and Pinginess of Ping SMS.
IoT Device Monitoring with ping SMS
To check the status of an IoT device, operators can send a ping SMS to the device.
When the device receives the ping SMS, it sends a notification message back to
the sender. If the device is not working or disconnected, it will not send a
notification message. This lets operators know that the device is not working
properly.
The main advantage of ping SMS is that it does not modify the codes written in
different languages that run on the IoT device. This means that incoming SMS
messages do not affect the operation of the device.
Figure 1 - IoT Device Monitoring with ping SMS
Difference between Ping SMS and Standard SMS
Ping SMS and Standard SMS, two distinct types of text messages, with quite
different behaviours and intentions. Regular text messages, also known as
standard SMS, are retained in the messaging app or memory of the recipient's
smartphone and are displayed on it along with a notification sound. It is
frequently used to facilitate interpersonal communication or information sharing
and can be read by the recipient or displayed on the screen.
On the other hand, Ping SMS is invisible and covert on
the recipient's phone. It doesn't trigger a notification sound, doesn't show
up on the screen, and doesn't save any data to the messaging app's memory.
Ping SMS is designed for specific applications where secret communication or
tracking without the recipient's knowledge is required. It can be used to
secretly produce delivery reports, monitor, or trigger certain
actions on the recipient's device.
Ping SMS vs. Standard SMS vs. Flash SMS
Features
Ping SMS
Standard SMS
Flash SMS
Message Displayed
Not displayed
Displayed
Displayed
Notification Sound
No sound
Plays sound
No sound
Stored on Device
Not stored
Stored in memory
Not stored
Visibility to Recipient
Invisible
Visible
Visible
Delivery Reports
Generated
Generated
Generated
Message Length
Up to 160 characters
Up to 160 characters
Up to 160 characters
Message Type
Encoded text message
Standard text message
Flashy text message
Intended Use
Pingy communication, tracking
Regular communication
Immediate attention
Benefits of Ping SMS
Ping SMS frequently provides a lot of socially positive advantages.
The first benefit is that it encourages personal space and security by protecting
secrecy and privacy by enabling covert communication that is undetectable on the
recipient's device. The ability to assess network connectivity and device
accessibility through delivery reports can enhance responsiveness in urgent
situations and foster efficient communication. These socially beneficial Ping
SMS features support privacy, safety, and effective communication in a number
of contexts.
Disadvantages of Ping SMS
While Ping SMS has some advantages, it is important to consider any potential
disadvantages from the standpoint of societal advancement. Because of its
character, Ping SMS has the potential to be misused or abused, which can
encourage illegal activity. Additionally, unnoticed signals might prevent open
and honest conversation by making the recipient feel excluded or ignorant.
Finding a balance between privacy and inclusivity is essential if Ping SMS is
to be utilized responsibly and respectfully. We can promote an ethical
communication culture that promotes the rights and welfare of all parties by
being aware of these possible adverse effects.
Ping SMS is a type of SMS message that is invisible to the recipient. It is
often used for covert communication or tracking without the recipient's knowledge.
Ping SMS can be used by law enforcement, businesses, and parents.
Ping SMS offers some socially advantageous benefits, such as promoting personal
space and security, tracking a person's availability in an emergency, and examining
device accessibility and network connectivity. However, it is important to be
aware of the potential for misuse or abuse of Ping SMS, as it can encourage
unlawful conduct due to its stealthy nature. It is important to find a balance
between privacy and inclusivity when using Ping SMS.
Type 0 SMS technology is a unique way to send specially created text
notifications that appear on the recipient's main screen when obtained.
To warn or instruct the recipient, these messages can be sent to a cell phone.
In this article, we'll look at the typical specifications for Type 0 SMS
messages, their modes of transmission, and the practical applications for users
of this technology via the streamlined Ozeki SMS Gateway user interface.
What is Type 0 SMS?
When a type 0 SMS is received, the user's home screen will display the message.
They are more significant than SMS messages of the Standard Class 1.
Type 0 SMS messages are also called Flash SMS messages.
Who uses Type 0 SMS messages?
Type 0 SMS messages are regularly used by many companies and organizations to
advise users of critical or imminent information. Who uses Type 0 SMS?
Here are a Few examples:
Emergency Services and Government Agencies
Financial Institutions
Telecommunication and Network Providers
Healthcare Providers
Online Services and E-commerce Platforms
Why do emergency services use Type 0 SMS?
Law enforcement, fire departments, emergency management agencies, and governmental
organizations regularly employ Type 0 SMS messages to instantly alert the public
to emergencies, disasters, or safety-related information.
Why do Banks use Type 0 SMS?
Banks, credit card firms, and other financial service providers employ type 0
SMS messages to notify customers of account activity, transaction notifications,
and possible fraud.
Why do Online Services use Type 0 SMS?
Several online businesses, e-commerce websites, and digital platforms use Type 0
SMS texts for two-factor authentication (2FA), password reset codes, account
security warnings, and time-sensitive promotions, limited-time deals, and
special discounts.
How does Type 0 SMS work
Special SMS with specific code sent to the target device
Type 0 SMS triggers network event to alert the target device
Carries specific command or identifier
The recipient's device generates notification and alert
Message does not get stored by default
How do you setup Type 0 SMS
By sending special messages to the recipients, Type 0 SMS
offers a relatively secure mode of communication with data not being stored on the device.
A Type 0 SMS system can be set up in a
few easy steps using Ozeki SMS Gateway. The process is outlined in the
following step-by-step guide, which covers everything from installing the program to
modifying the message properties and verifying delivery reports.
Install Ozeki SMS Gateway software on your device.
Open the graphical user interface of Ozeki SMS Gateway.
Select the Type 0 SMS message type from the options.
Enter the recipient's mobile phone number.
Connect to the mobile network using wireless or modem options.
Click on "Send" to initiate the Type 0 SMS transmission.
Monitor the SMS submit status and delivery report information.
Verify successful delivery with alert on the recipient's device.
How do you send Type 0 SMS
To get started with using Type 0 SMS, begin by installing the
Ozeki SMS Gateway software on your device and follow these steps:
Launch Ozeki SMS Gateway software on your device.
Navigate to the message composition section and select "Type 0 SMS" as the
message type.
Enter the recipient's mobile phone number, customize any desired attributes,
and click the "Send" button to transmit the Type 0 SMS.
Please be aware that the following instructions presume that the Ozeki SMS
Gateway software has already been installed and configured on your device.
How do you test Type 0 SMS functionality
Before testing Type 0 SMS sending, install the Ozeki SMS Gateway software on your device
and make sure it is properly configured. Enter the mobile phone number of a test
recipient using the Ozeki SMS Gateway interface, and then write a Type 0 SMS
message with the necessary characteristics. Utilizing the Ozeki SMS Gateway,
send the Type 0 SMS to the test recipient's mobile phone number. After that,
monitor the SMS delivery report to see if the recipient's device generated an
alert to confirm that the message was properly delivered. By following these
rules, you can successfully test a Type 0 SMS's functionality.
Difference between Type 0 SMS and Standard SMS
Standard (Class 1) SMS and Type 0 SMS are two distinct types of text messages that
operate and behave significantly differently. Regular text messages, also known as
standard SMS, are retained in the messaging app or memory of the recipient's
smartphone and are displayed on it along with a notification sound. It is
frequently used for interpersonal communication or information sharing, and it
can be read by the recipient or displayed on the screen.
Type 0 SMS, on the other hand, pops up on
the phone's home screen. The user is swiftly forewarned, and the message is not
saved. Type 0 SMS is designed for specific applications where quick instructions
with possibly private information are required. It can be used for alerts and
commands that require a prompt response from the user.
Silent SMS vs. Standard SMS vs. Type 0 SMS
Features
Silent SMS
Standard SMS
Type 0 SMS
Message Displayed
Not displayed
Displayed
Displayed
Notification Sound
No sound
Plays sound
No sound
Stored on Device
Not stored
Stored in memory
Not stored
Visibility to Recipient
Invisible
Visible
Visible
Delivery Reports
Generated
Generated
Generated
Message Length
Up to 160 characters
Up to 160 characters
Up to 160 characters
Message Type
Encoded text message
Standard text message
Flashy text message
Intended Use
Stealthy communication, tracking
Regular communication
Immediate attention
Benefits of Type 0 SMS
Type 0 SMS offers a number of socially advantageous aspects.
First of all, it ensures that the customer will see your message on their mobile
device's home screen right away and efficiently without ever opening it.
When you need the end users to act immediately or follow instructions and
efficiency is key, this can be useful. This can also be used for time-sensitive
promotions for businesses and stores.
Disadvantages of Type 0 SMS
Type 0 SMS has a number of advantages, but it's important to consider any
potential disadvantages as well. One obvious drawback is the possibility for
abuse or exploitation, such as spamming users with flashy pop-up messages or
over-informing them with excessive amounts of Type 0 SMS messages. We can promote
an ethical communication culture that promotes the rights and welfare of all
parties by being aware of these possible adverse effects.
Summary
Type 0 SMS is a useful method that can be used to send important or time-sensitive
messages. If you have to get your message seen and acted upon fast, Type 0 SMS
is an easy, good solution. Your Type 0 SMS message will be sent in a few seconds to the
recipient's phone, and it will appear on their main screen, even if their phone is
locked.
This article will focus on sending Silent SMS messages from a GSM modem. To send SMS
from a GSM modem, you will need a computer that can connect to the modem with
Ozeki SMS Gateway installed. The article includes a video tutorial for the
easiest setup process with screenshots on the main steps.
What is Silent SMS?
Silent SMS is a specific type of text message that can be utilized in tracking
solutions. It is also called Stealth SMS or Ping SMS because it can be used to
check if a device is connected to a cellular network. Silent SMS is a specially
encoded text message, which does not leave a notification or alert on the user's
mobile device, does not get stored, but the user device will send an
acknowledgement of receiving the message back to the sender. From this information,
you can find out if a user is connected to a mobile network, their approximate
location and availability.
What is a 4G modem?
A 4G modem is a hardware device that connects to a cellular network using 4G (LTE)
technology. It requires a SIM card to establish a data connection with a service
provider's network. This type of modem is commonly used for various purposes,
including sending out automated or bulk SMS messages. It provides a reliable and
efficient way to establish a network connection and send data, such as SMS messages,
over the cellular network.
How sending SMS through a 4G modem works
The Ozeki SMS Gateway acts as the intermediary between the computer and
the service provider, facilitating the process of composing, submitting, and
delivering SMS messages. This solution streamlines the process of sending SMS
messages from a computer and ensures that the messages are properly delivered to
the recipient's mobile phone through the service provider's network. (Figure 1)
Figure 1 - Send SMS from PC with Ozeki 4G LTE SMS Modem
How to send SMS with a 4G modem (Clear steps)
To send SMS with a 4G modem:
Insert the SIM card into the modem
Plug the antenna into the modem
Connect the modem to your PC with USB cable
Launch the Ozeki SMS Gateway
Run the sms modem autodetection
Specify the sms phone number
Write the text of the SMS message
Click on Send to send the SMS
Review the test SMS message you sent
Ozeki 4G LTE SMS Modem setup (video tutorial)
In the video, you'll discover the process of configuring an Ozeki 4G LTE SMS Modem
to send SMS messages using a USB cable. This setup requires the modem, a SIM card,
an antenna, and a USB cable. Initially, you'll insert the SIM card into the modem,
followed by attaching the antenna. Connect the modem to the computer
using the USB cable. Once the connection is established, the power LED on the modem
will illuminate, signifying that it's turned on.
Get the parts that you need to connect the modem successfully
For a successful modem connection, you'll require the following components: a
SIM card, an antenna, a USB cable, and the modem
itself. Ensure that you have all these hardware elements ready for the setup
process. Every detail is crucial for proper functioning.
(All components are depicted in Figure 2)
Figure 2 - Required parts
Insert the SIM card into the modem
Begin by inserting the SIM card into the modem. This process closely resembles
inserting a SIM card into a mobile phone. The SIM card serves as the bridge
connecting the modem to the network.
(The procedure is illustrated in Figure 3.)
Figure 3 - Inserting SIM Card, pay close attention to correct seating
Important settings for SIM card
These settings are very important. If left incomplete, your SIM card will
not function with the Ozeki 4G Modem. It is essential to both disable your PIN
code and redirect phone calls to another phone number. You can perform
these steps on a regular mobile phone.
(Depicted in Figure 4.)
Figure 4 - Set your sim card
Connect the antenna to the modem
Following the SIM card insertion, it's crucial to properly connect the modem to
its antennas. Ensuring a correct connection guarantees optimal performance. The
antenna serves the purpose of both transmitting and receiving signals.
(Illustrated in Figure 5.)
Figure 5 - Attaching antennas
Insert the USB cable into the modem
Subsequently, insert the USB cable into the modem. This action establishes a
connection between the modem and your computer. It's essential to employ a
functional cable to prevent any potential disconnections.
(Depicted in Figure 6.)
Figure 6 - Connecting USB-C to modem
Plug the USB cable into your computer
Lastly, connect the other end of the USB cable to your PC. Insert the USB cable
into one of the available ports on your computer.
(Illustrated in Figure 7.)
In this instructional video, you will gain insight into the process of setting
up an Ozeki 4G LTE SMS Modem to send text messages (SMS) using a USB cable. To
initiate this setup, ensure that you have an operational Ozeki 4G Modem and the
Ozeki Software Platform installed on your system. The procedure starts with the
driver installation, utilizing Ozeki SMS Gateway to configure a new SMS Modem,
and finally, sending a test message and verifying its arrival on the recipient device.
To install the Modem Driver, first open the folder where the downloaded file is
located. Then, extract the downloaded files into a new folder and find the Driver
Executable File within. Double-click on this file to initiate the installer. If
prompted to grant Administrator rights, click on Allow.
(This process is exemplified in Figure 8.)
Figure 8 - Install Ozeki Modem Driver
Proceed with Installing
To begin the driver installation process, once the installer window is open,
click on the Install button and patiently wait for the process to complete.
Once the installation is finished, click on the Finish button to conclude the
setup procedure.
(This is demonstrated in Figure 9.)
Figure 9 - Press Install
Open Ozeki SMS Gateway App in Ozeki Software Platform
To access the Ozeki Software Platform, you need to click on the search element
in the Windows Taskbar. Type in Ozeki 10 and select the application from the
search results. The software should launch within a few seconds. Once the Ozeki
Software Platform is open, find and open the Ozeki SMS Gateway application.
You'll typically find it among the default apps on the left side of the platform
interface. Look for the icon with a phone symbol and the text SMS written
inside. Clicking on this icon will open the SMS Gateway Application.
(Figure 10)
To create a new connection in Ozeki SMS Gateway, locate the add new connection
link in the left-side Connections panel. Click on this link, which will
open the connection list page. Here, you'll have the option to set up an SMS modem connection.
(As you can see on Figure 11)
Figure 11 - Add new connection
Install a new SMS Modem
In the following window, you will see a list of available connections that you
can create within the SMS Gateway application. Look for the section related to
wireless connections and find the SMS modem install item. Click on the
Install link next to it. This action will enable you to use the selected
modem with Ozeki SMS Gateway.
(Demonstrated in Figure 12)
Figure 12 - Install new SMS modem
Select the Port
In the Serial port section, open the Port dropdown menu and locate the entry
labelled Ozeki Modem Port. Select this option to initiate the configuration
process for the modem, allowing you to send messages via the 4G network.
(Figure 13)
Figure 13 - Select Ozeki Modem
Autodetect properties
Located next to the dropdown menu, there is a blue button with the text
Autodetect. Click on this button to trigger an automatic data retrieval
process from your SIM card. This process includes obtaining information such as
your phone number and configuring it for use. Please note that this process may
take a few seconds to complete.
(Figure 14)
Figure 14 - Click autodetect
Check the information
After clicking on the Autodetect button, a window named Autodetect
will appear. In this window, carefully review all the details to ensure that
they match the information from your SIM card. You can also find the details of
the modem displayed here. Once you have verified everything, click on the Ok
button located at the bottom of the window. This action concludes the Autodetect
procedure and prepares your modem for sending SMS messages from your computer.
(Figure 15)
Figure 15 - Details of the detected modem
Finish setting up your modem
To complete the setup process for your modem, locate the blue Ok button
at the bottom of the screen and click on it. If you have any additional changes
you want to make to your modem settings, you can do so under the SMS tab
or the Advanced tab. Alternatively, you can return to this tab later on
by pressing Ok and then accessing the Configure tab.
(Can be seen on Figure 16)
Figure 16 - Press OK in SMS modem installer
Enable SMS Modem Connection
To activate the SMS modem connection, navigate to the Connection group on
the left side of the screen. Locate the Connection switch, which is the
second option in the group. Click on the switch to turn it on and make it green.
This action will initiate the connection process between your modem and the
service provider.
(Figure 17)
Figure 17 - Enable SMS modem Connection
Navigate to the Test panel
To access the Test tab page, navigate to the navigation bar located in the
right panel of the screen. Click on the Test option to open the Test tab
page, where you can access the Test SMS sending page. From this page, you can
send test messages to anyone with custom content.
(Seen on Figure 18)
Figure 18 - Select Test option
Fill the recipient's address and test message
To proceed, fill in the recipient's address and enter the test message. Locate
the To field within the Recipient group, where you can input the
recipient's phone number. Additionally, type your desired content into the
SMS text field. Feel free to compose any message you prefer in this field.
(Figure 19)
Figure 19 - Enter the SMS details
Send the SMS
Once you have completed the message composition, you can proceed to send the SMS.
Locate the blue Send button situated at the bottom of the screen. Click
on this button to initiate the sending process. You can expect to receive the SMS
on the specified phone number shortly after sending.
(Figure 20).
Figure 20 - Press Send
Check the test message
To ensure the successful delivery of your test message, access the SMS handling
application on your mobile device. Open the application that manages SMS messages
and look for the received test message. If the test message appears with the
correct content, you can confidently conclude that your SMS modem is functioning
as expected. Congratulations on your successful setup!
(Figure 21)
Figure 21 - SMS Received
Summary
The combination of Ozeki SMS Modem and Ozeki SMS Gateway offers a seamless and
effective solution for sending SMS messages from your computer. This powerful
setup can greatly assist your company's growth by enabling you to send automated
or bulk messages. By following the provided steps, acquiring the necessary
hardware and software, you'll have the capability to send SMS messages conveniently
from your computer. This flexibility and efficiency can enhance your communication
strategies and contribute to the expansion of your business.
Email to SMS
Ozeki SMS Gateway offers various methods to setup email to SMS functionality.
You can use IMAP, POP3 or SMTP to send and receive E-mails and convert them to
and from SMS messages. You can put the phone number(s) into the subject line
of the e-mails or you may send an e-mail to an address containing the
phone number, such as +441234657@smsgw.yourcompany.com How to send SMS through an SMTP server
SMS to Email
Ozeki SMS Gateway's E-mail User can be used for sending or downloading emails from a mailbox.
For sending emails it should connect to your email account's SMTP server. For downloading emails
from a mailbox it should connect to the POP3 server through your email account. Email to sms using pop3 and smtp
SMS from Excel
The following guide is about to demonstrate how you can send multiple SMS messages by just one click from an Excel
document using the SMS Gateway. The guide provides a step by step guide which shows what components you need to set
up this solution. How to send SMS from Excel
SMS from Txt file
Ozeki SMS Gateway's File User is capable to send and receive SMS messages in different file formats.
Simple, Text, Verbose, List, CSV, XML, SAP, ATF and KAL file formats are supported by the Ozeki SMS Gateway's File User.
Your application can place these files in proper directories to send SMS messages. Send SMS from TXT files
SMS from the command line
Windows users can use Ozeki SMS Gateway's command line client
to send SMS messages from the command line. Both cmd.exe and
Windows Powershell is supported. This lightweigh client can
accept the recipient phone number and the message text as command line
arguments, and can forward the message to the SMS Gateway using a HTTP API
request. How to send sms from the Windows command line
SMS from FTP
Ozeki SMS Gateway's FTP to SMS Extended User can synchronize directories
with SMS Gateway through standard FTP, FTPS
or SFTP protocols. Incoming SMS messages will be uploaded, and outgoing
SMS messages
will be downloaded from the FTP server. You can also look at the
accepted file formats. Send SMS from an FTP server
Start your Applications with SMS
Ozeki SMS Gateway's Application Starter User can run any process or application in case an SMS message arrives.
You simply need to provide the file path. You can also fetch parameters from
received SMS messages to use them as process parameters or command line arguments. How to start an application using an SMS
SMS Messenger
Ozeki SMS Messenger is a SMS text messaging software to send SMS to your entire contact list and personalize
your messages using custom fields. The SMS messenger has intuitive user interface, so you can start to use for
sending multiple SMS messages immediately. How to send short messages with SMS Messenger
Autoreply SMS
Ozeki SMS Gateway has 3 type of Autoreply Users which are used for
automatically replying SMS messages or forwarding them to any recipient.
These users can work in 3 simple ways.
You will see how to install and configure these users on Ozeki SMS Gateway to serve your needs. How to send automatic SMS replies
SMS modification
This guide is going to demonstrate how you can manipulate messages using the SMS routing rules of the SMS Gateway.
The routing rules are used in the system to direct the messages between connections.
You can setup rules to take a message form one connection and to pass it to another connection. How to modify the sms text or sender ID
This guide explains how email to sms works. It gives information about
how to setup an email to sms system. Although there are several approaches to this
problem, we aim to present the simplest solution. In this solution email to
sms functionality is achieved with the help of a technical email box. This
solution can be created with any email system. You can create the solution
in about 5 minutes.
Figure 1 - E-mail to SMS
What is email to sms?
Email to sms is a service provided by an SMS gateway software. It allows the
user to send an e-mail, and the SMS gateway will convert this e-mail to a
text message and will forward it to a mobile phone.
Email to sms setup (video tutorial)
The following video explains how to send an SMS from an Email. This video starts with
creating a new application and takes you all the way to sending the first SMS message.
The video is only 1:45 long, but very detailed. In this video we are using the Ozeki SMS Gateway,
which is a powerful sms gateway software with a very intuitive guide, so you will have no problem
following the steps. You will learn how to create and customize a new user, and how to check the logs
of the events happening on the user.
How does email to sms work?
The simplest email to sms solution requires a technical email box
(james-sms@gmail.com in Figure 2). When the user (james@gmail.com) wants
to send an sms, he will send an e-mail to this technical email address (james-sms@gmail.com).
He will put the mobile phone number (+362011111) into the subject line of the email,
and the sms text into the email body.
Ozeki SMS gateway will operate this technical email box. It will download
the incoming email (using IMAP) and will forward it as SMS to the mobile network
through a mobile phone attached to it. The attached mobile phone in our
example (Figure 2) has a phone number of +3620222222. The mobile user, whose mobile
phone number is +36201111111 will receive the SMS, and can reply to it.
To understand how the SMS reply is sent back to james@gmail.com check out the
sms to email page.
Figure 2 - Setup Ozeki as an E-mail client
How to use E-mail to SMS Gateway (Quick commands)
To use E-mail to SMS Gateway:
Connect E-mail to SMS Gateway to mobile network
Connect E-mail to SMS Gateway to e-mail server
Launch Ozeki SMS Gateway
Select Add new user or application
Install IMAP client
Configure IMAP server
Add new SMPP client connection
Write test e-mail to see SMS is sent
Step 1 - Connect your email to sms gateway to the mobile network
To connect you email to sms gateway to the mobile network you have quite-a-few options.
The ideal option for your environment depends on the number of sms you prefer to send.
For text message volumes up to 12 000 sms per day, the best option is to use
a GSM modem or an Android mobile
phone as an SMS gateway.
The advantage of this choice is that it often allows you to
send unlimited SMS messages free of charge.
For higher SMS volumes you can switch to online SMS services.
When you use on-line SMS service providers you can use a
dedicated SMS protocol or an SMS API.
There are various SMS protocols out there: SMPP protocol,
CIMD2 protocol, UCP/EMI protocol
and there are many proprietary protocols based on HTTP. Protocols based
on HTTP are called HTTP SMS APIs. The best option to
connect to on-line SMS services is to use an SMPP connection. The SMPP protocol
is widely used in the SMS industry. It is used by mobile network operators
to exchange SMS traffic between each other. SMPP was designed for SMS, and
it gives you high performance, instant access to submit and delivery reports
and precise time stamps related to SMS delivery. So choose SMPP if possible.
Step 2 - Connect the email to sms gateway to the Email server
The next step is to connect your SMS gateway to your Email server. On your Email server
you will have to create a technical email address (james-sms@gmail.com), and you
must allow Ozeki 10 SMS gateway to download emails from this email box. You can
read the how to setup email to sms with imap guide
or the how to setup email to sms with pop3 guide for
detailed instructions. If you want to use the solution with Gmail, read the
how to setup email to sms with gmail manual. The
most popular choice is the IMAP option.
First, you need to add a new user that will check your email account for new incoming messages periodically.
To do so, you need to open the Ozeki SMS Gateway. On the front page (Figure 3),
look for a button titled Add new user/application. It is located on the right-side panel.
Click it to reach the new user install list.
Figure 3 - Add new user
Install the IMAP client
Now you are in the new user/application install list. Here you need to look for the
IMAP client option (Figure 4). This client will check your email account for any
incoming email message and forward it to a recipient phone number as an SMS message.
Click the Install button located next to the title.
This will take you to the IMAP client settings page.
Figure 4 - Install IMAP client
Configure the new IMAP server
In this page, you need to provide information about the new IMAP client.
Scroll down until you see the IMAP Server group box (Figure 5).
There you need to provide the Host address for Gmail, which is imap.gmail.com.
Type in the port number suitable for this connection, the username of the Gmail account and the password of it.
Click the Ok button to proceed to the next step.
Figure 5 - Configure IMAP server
All of these guides give you easy to follow step by step instructions on
how to setup email to sms functionality in Ozeki SMS Gateway. The configuration
usually does not take more the 3 minutes.
Step 3 - Send a test email and see how the sms is sent
To test the email to sms functionality, you need to write a test email and send it to
the technical mailbox. You will have to wait a few seconds until the Ozeki SMS Gateway
downloads the email and converts it into an sms. After Ozeki SMS Gateway has converted
the email into SMS it will send it to the recipient mobile phone over the configured
mobile network connection.
To send a test email to sms:
Create a new email message
Put the recipient phone into the subject line. Use international format: e.g. +362011111
Write the message text into the email body
Click Send
After the email is sent you can check the email to sms logs of the
SMS gateway and you will see when the email was downloaded from the technical mailbox,
and when it was forwarded to the mobile
network.
Incoming message
As you can see on Figure 6, the email account received an email.
This message needs to be forwarded to a phone number which is the subject of the email.
The IMAP client will now detect this message and begin the sending process.
Figure 6 - Message received to email inbox
Log of the message
On Figure 7, you can see the log associated with the message. You can see the event of detecting the message,
sending the message and a response for the successful submitting (Figure 7).
Figure 7 - Email sent as SMS from the IMAP client
FAQs
Can I forward a single e-mail to many SMS numbers?
Ozeki SMS Gateway allows you to forward a single email to up to 20 SMS recipients.
Here's how to accomplish this:
Access E-mail User Configuration: Locate the configuration form for your
desired "E-mail User" within Ozeki.
Navigate to the E-mail to SMS Tab: Look for a tab labelled "E-mail to SMS"
or similar within the configuration form.
Enter Recipient Numbers: In the field labelled "Send SMS to (phone number):
", enter all the SMS phone numbers you want to send the message to.
Separate each number with a semicolon ( ; ).
Save Your Configuration: Once you've added all the recipient phone numbers,
save your configuration changes.
For detailed instructions and additional configuration options, refer to the
Ozeki documentation's E-mail to SMS Configuration page
By following these steps, you can easily configure Ozeki to forward your
emails to multiple recipients via SMS.
Can I forward an incoming SMS to many e-mail addresses?
Absolutely, Ozeki lets you send copies of incoming SMS messages to as many email
addresses as you need! Here's a simplified walkthrough:
Create Email Users: For each email address you want to receive copies, set
up a dedicated "Email User" in Ozeki. You can find this option under the
"Users and applications/Add user" menu item.
Configure Incoming Routes: Navigate to the "Inbound Routing Table" within
Ozeki. Here, you'll create "copy" mode routes for each email user. These
routes will forward copies of incoming SMS messages to their respective
email addresses.
By following these steps, you can establish a system where each email address
receives a copy of incoming SMS messages through Ozeki, eliminating the need
for a limit on recipients.
Final thoughts
Now, you can pause and catch your breath.
By following the above tutorial steps, you can create the solution for sending SMS in case of an incoming email
in a few minutes.
You have seen the advantages it can bring.
If you have already completed the steps, I am sure, if you let your girlfriend (or boyfriend) know,
you will be rewarded.
If you would like to pick up more valuable information about the advantages of
other similar solutions, please open ozeki-sms-gateway.com.
How to setup e-mail to SMS forwarding using an IMAP client
This tutorial will guide you through the step you need to take to have a working
two-way system which forwards your e-mails to SMS messages and vice versa, with
the help of an IMAP client. IMAP stands for Internet Mail Access Protocol.
Simply it is a protocol, that describes, how to access messages in an email mailbox.
Some E-mail apps use this to download messages from your email account to the desktop application.
Please note, that this setup uses an e-mail account that can be access through IMAP on an E-mail server.
What is forwarding?
Forwarding is the process off sending an email or other messages to a further destination without changing it.
What is an IMAP client?
The Internet Message Access Protocol (IMAP) is a standard protocol
used by email clients to retrieve email messages from a mail server.
How to setup e-mail to SMS forwarding using an IMAP client
To setup e-mail to SMS forwarding using an IMAP client:
Launch Ozeki SMS Gateway
Select Add new user or application
Install IMAP client
Configure IMAP server
Modify IMAP settings
Set up SMTP server
Send e-mail to test SMS forwarding
Check logs
Email to sms using IMAP (video tutorial)
This video will show you how you can setup a system which will send all the incoming email to a
predefined phone number as an SMS message with the help of an IMAP client.
It will start with creating a new user/application and will take you all the way
to checking the log containing your first sent SMS. The video is only 3:33 long,
but very detailed. In this video we are using the Ozeki SMS Gateway
which is a very powerful and easy to use SMS gateway, so you will have no problem following the steps.
Step 1 - Create an IMAP client connection
First, you need to have a connection between the SMS client and the E-mail client.
To do that, please click the Add new user/application button,
which is located on the right side of the window on the Users and application panel.
Click it and proceed to the next step. You can find the button on Figure 1.
Figure 1 - Add new user
Here, please search for the IMAP client option. Here you can find a shot summary of this option under the title.
Next to it, there is the blue Install button. Click it and it will take you to the next step. You can Install button on Figure 2.
Figure 2 - Install IMAP client
Step 2 - Configure the IMAP server details
The next step is to configure your IMAP connection and make sure that it reaches your e-mail account.
To do that, please provide the IP address of the host and the port number.
You can get help with the ? icon next to the field for the port number.
In the username and password field, please type in the login credentials of your e-mail account.
You can see all the required data on Figure 3.
Figure 3 - Configure IMAP connection
Step 3 - Configure the advanced details of the connection
Now you need to set up your message handling. To do that, please head over to the IMAP settings tab.
It is located in the top tabs. Click it and start customizing your message handling.
You could set up, if you would like to delete the messages after handling, which messages
you would like to handle, how long should a message be, what should the IMAP forward
from the emails or the batch size. If you have everything setup here,
proceed down to the Recipient panel. Here you can tell the IMAP connection,
where to send the downloaded e-mails. You can see the example fill-in on
Figure 4.
Figure 4 - IMAP advanced settings
Step 4 - Configure the SMTP server
To be able to forward SMS messages as an e-mail, you need to configure an SMTP server that can send the e-mail message.
This configuration can be done with the IMAP client connection.
As Figure 5 shows that you need to click on the SMTP tab to be able to configure the details of the SMTP server.
Figure 5 shows what information you need to provide to the SMTP server in order to work.
So, type in the Host IP address and the port number, set the Authentication
to normal password and provide the username and password of your E-mail account.
Figure 5 - Configure SMTP connection
Step 5 - Configure the recipient e-mail address
The next configuration that you need to perform is to set up a recipient address which will receive the forwarded message.
In the From section, provide the information of the default sender address.
In the To section, provide the default recipient address.
This ensures that this address will show up as a sender address when the recipient gets the forwarded message.
If you finished with all configurations, you can just click OK. On Figure 6, you can see the example data we provided.
Figure 6 - Recipient address
If you click the Events tab, you can see that the connection was set up properly.
You can see your new connections properties in the connection section on the left side of the window.
If the connection indicator switch is green,
it means that the connection is active and ready to use. You can see all the data on Figure 7.
Figure 7 - IMAP client connected
Step 6 - Send test E-mail to SMS
At this point, you can write an e-mail message to the E-mail account to test the solution.
As you can see it in Figure 8, all you need to do is to write a simple message to the e-mail address
on the configured E-mail account that you set in the IMAP client connection. With everything is set up correctly,
all you need to do now is to wait for the incoming e-mail to your E-mail account.
In case of an incoming e-mail, the IMAP client connection is going to download the e-mail and forward it instantly to the specified recipient address.
Figure 8 - Send e-mail to SMS
You can see the forwarder SMS message in the IMAP client sent folder as the Figure 9 show.
Figure 9 - E-mail sent as SMS
Step 7 - Send test SMS to E-mail
With the configured SMTP server, your system is capable of receiving SMS messages and forward it as an e-mail message.
The SMS arrives at your system using a service provider connection. Then, the message routed to the IMAP client connection, which uses its SMTP server
and the given details to forward the message to the recipient e-mail address.
To check if your IMAP client connection works as expected, you can check its logs in the Events tab.
You will be able to see every event of the connection. Figure 10 demonstrates that what events logged in case of a successful SMS to e-mail forwarding.
Figure 10 - SMS received from SMS provider
You can see in the Figure 11 the SMS forwarded to the recipient E-mail address and appeared in the E-mail accounts mailbox.
Figure 11 - SMS in mailbox
Final thoughts
Now, you can pause and catch your breath.
We hope you didn’t get lost in the explanations.
We did our very best to make it simple and to walk you through all the details as painlessly as possible.
To summarize the procedure we can conclude, that setting up e-mail to SMS forwarding
using an IMAP client is quite easy.
If you have already completed the steps, you can enjoy a well-deserved mocha or some other treat
you have in mind.
If you would like to receive more information about the advantages of other similar solutions,
please open ozeki-sms-gateway.com.
How to setup e-mail to SMS forwarding using a POP3 client
Let's start by setting up e-mail to SMS forwarding. The following configuration
steps will show how the system should be configured to collect the incoming e-mails
from an e-mail account using a POP3 client connection. You will also see how these
emails are converted into SMS and how they are sent as SMS (Figure 1).
Figure 1 - Incoming email sent as SMS
How to setup e-mail to SMS forwarding using a POP3 client
To setup e-mail to SMS forwarding using a POP3 client:
Launch Ozeki SMS Gateway
Install POP3 client
Modify Gmail settings
Write test e-mail
Check POP3 logs
Configure SMTP server
Type from and to e-mail addresses
Send test SMS
Inspect the logs
Step 1 - Create a POP3 client connection
The first step of this guide is to create the POP3 client connection. For that, you
need to open the SMS Gateway application, and here, select the Apps menu from the
toolbar. In this menu, like in Figure 2, select the POP3 client from the E-mail
clients section by clicking on the Install button.
Figure 2 - Select the POP3 client connection
Step 2 - Configure the POP3 server details
The first step of the configuration of the POP3 client connection is to provide the details
of the POP3 server. This guide uses Gmail to demonstrate the process, so here,
you need to enter the details of Gmail's POP3 server. As you can see it in
Figure 3, type 'pop.gmail.com' as Host and type 995 as Port number. Then, select
SSL/TLS as POP3 Security and lastly, provide the username and password of your e-mail
account, which is in that case, a Gmail account.
Figure 3 - POP3 server details for the connection
Step 3 - Configure the advanced details of the connection
In the next step, you need to configure the way, that the connection is going to
forward the messages. For that, first, click on the POP3 tab. Here, in the 'Message handling'
section, you can set the maximum length of the message and select the way, how the
e-mail will be forwarded. Next, as Figure 4 demonstrates, you can set the recipients
for the e-mail. The addresses, that you type here will get the forwarded e-mails.
If you finished with the configuration, you could just click on OK.
Figure 4 - Advanced configuration of the POP3 client connection
Step 4 - Configure the security settings of Gmail account
After you created the POP3 client connection, you need to do some modifications
to the security settings of your Gmail account. For that, just type 'https://myaccount.google.com/lesssecureapps'
in your browser and hit Enter. Here (Figure 5), you just need to turn the 'Less secure apps access'
on. This will ensure that SMS Gateway is going to have access to download the e-mails.
Figure 5 - Turning on access for less secure apps
Step 5 - Modify the Gmail POP3 settings
In this step, you need to modify the forwarding setting of your Gmail account. For that,
open Gmail and here, click on Settings. In the Settings menu, you need to select the
Forwarding and POP/IMAP tab. Here, like Figure 6 shows that, select 'Enable POP for all mail'
and finally, click on Save Changes.
Figure 6 - Modify forwarding settings of your Gmail account
Step 6 - Send a test e-mail
At this point, you can write an e-mail message to the Gmail account to test the
solution. As you can see it in Figure 7, all you need to do is to write a simple
'Hello world!' to the e-mail address of the Gmail account that you set in the
POP3 client connection.
Figure 7 - Write an e-mail message to the Gmail account
With everything is set up correctly, all you need to do now is to wait for the incoming
e-mail to your Gmail account. In case of an incoming e-mail, the POP3 client connection
is going to download the e-mail and forward it instantly to the specified recipient
address. Figure 8 demonstrates the procedure of forwarding an incoming e-mail
by using the POP3 client connection.
Figure 8 - See how SMS Gateway forwards the message as an SMS
Step 7 - Check the POP3 logs
You can easily check the logs of the POP3 client on your computer. These logs
store every event that occurred with your POP3 client connection. Figure 9 shows the
path, you need to follow in File Explorer to open the log file of the POP3
client connection. If you open that log file, you will be able to see all events
of the POP3 client connection.
Figure 9 - File path for the log file of the POP3 client connection
The log file contains details of every event that occurred with your POP3 client connection.
Here you can see a timestamp that shows the date of each event and the name of the connection.
Lastly, each event has got a message that describes the event. Figure 10 shows the
event messages of downloading an e-mail from the Gmail account and forward it to
the given recipient address.
Figure 10 - Log file of the POP3 client connection
How to configure SMS to E-mail forwarding
After E-mail to SMS is working, you should configure the other direction:
SMS to E-mail forwarding. On Figure 11, you will see the steps
that will allow you to configure the SMTP server details, and on Video 2
you will see how incoming SMS messages are forwarded to an e-mail address.
Figure 11 - Incoming SMS sent as email
Step 8 - Configure the SMTP server
To be able to forward SMS messages as an e-mail, you need to configure an SMTP server
that can send the e-mail message. This configuration can be done with the POP3 client
connection. If you have created this connection before, you can just open it in SMS Gateway,
but if you haven't created the connection, check Step 1, how you can do that. As
Figure 12 shows that you need to click on the SMTP tab to be able to configure
the details of the SMTP server.
Figure 12 - Select SMTP menu in POP3 client connection
In the SMTP menu, you can configure the details of the SMTP server. Figure 13 shows
what settings you need to do to use the Gmail SMTP server. So, type 'smtp.gmail.com'
as Host and 587 as the port number. For SMTP security, select 'SSL/TLS' and also select the
'Normal password' option for Authentication. Lastly, just type the username and password
of your Gmail account.
Figure 13 - Configure the SMTP server details
Step 9 - Configure the recipient e-mail address
The next configuration that you need to perform is to set up a recipient address
which will receive the forwarded message. In the SMTP menu, type the recipient
e-mail address to the 'To e-mail' field, as Figure 14 shows that. To the 'From e-mail'
field, you can type the e-mail address of your Gmail account as well. This ensures
that this address will show up as a sender address when the recipient gets the
forwarded message. If you finished with all configurations, you can just click OK.
Figure 14 - Configure the recipient e-mail address
Step 10 - Send a test SMS
With the configured SMTP server, now your system is capable of receive SMS message
and forward it as an e-mail message. Figure 15 demonstrates how the solution works.
The SMS arrives at your system using a service provider connection. If you don't
have that kind of connection you can check how to create
an SMPP client connection. Then, the message routed to the POP3 client
connection, which uses its SMTP server and the given details to forward the message
to the recipient e-mail address.
Figure 15 - Workflow of SMS to e-mail forwarding
Here on Figure 16, you can see the configured SMTP server in the everyday work.
It sends the message to the POP3 client connection, so the recipient’s browser-based email provider will
receive it, so it will show up in the recipients inbox. It sends the same text
you sent from your mobile phone, so it behaves as a regular e-mail sent from a
computer. It It will work with any e-mail provider with a POP3 client.
Figure 16 - SMS message received as e-mail
Step 11 - Check the logs
To check if your POP3 client connection works as expected, you can open its log file.
Since you are using the same connection, the log file is located in the same folder
that was described in Step 7. If you open the log file, you will be able to see
every event of the connection. Figure 17 demonstrates that what events logged in
case of a successful SMS to e-mail forwarding.
Figure 17 - Log events of SMS to e-mail forwarding
Conclusion
To summarize article we can conclude, that setting up e-mail to SMS forwarding using a POP3 client is quite easy.
If you have already completed the steps, I am sure, if you let your girlfriend (or boyfriend) know, you will be rewarded.
If you would like to read more useful insights about the benefits of other similar solutions, please open ozeki-sms-gateway.com.
This article explains how you can send and receive SMS from a Gmail user account.
It will show you the communication from the perspective of the Gmail user (james@gmail.com),
and from the perspective of the mobile user (+3620111111). You will see that you
need to create a technical e-mail account (james-sms@gmail.com) to forward e-mails as
SMS messages and you will see how your SMS gateway needs to be configured to accomplish this
goal. The presented solution is a great example of an email to sms
and sms to email configuration that can be created using Ozeki SMS Gateway.
What is E-mail to SMS?
Email to SMS is solution which allows you to turn an email into a text message without any extra effort
How to setup E-mail to SMS with Gmail
To setup E-mail to SMS with Gmail:
Launch Ozeki SMS Gateway
Install SMS modem connection
Provide port name
Specify phone number
Add IMAP client
Configure IMAP Server
Modify SMTP settings
Enable using address in subject line
Send test e-mail to SMS from Gmail
E-mail user perspective (I am using E-mail)
Once the configuration is completed, the e-mail user can send an SMS, by sending an e-mail
to james-sms@gmail.com. He needs to put the phone number into the subject line of the e-mail
messages, and he needs to put the SMS text into the e-mail body (Figure 1).
Figure 1 - E-mail to SMS using G-mail
Mobile user perspective (I am using SMS)
When the mobile user receives this e-mail, he will see that it came from phone number +3620222222. He
can send a reply SMS to this phone number. The reply SMS will be returned as an e-mail message
to james@gmail.com. This configuration allows the two parties to communicate freely. James can use
his desktop e-mail account and Mobile user can use his cell phone (Figure 2).
Figure 2 - SMS to E-mail
What you need to create
To create this solution, you need to create a technical e-mail account at G-mail. You can
call this e-mail account james-sms@gmail.com. This e-mail account will serve as the
e-mail address to send and receive e-mail on behalf of the SMS gateway.
In the SMS gateway you will also have to create an IMAP user connection to
direct it to download e-mails from the james-sms@gmail.com inbox, and to send
SMS messages as e-mail using the sender address of james-sms@gmail.com. (Figure 3)
Figure 3 - E-mail to sms gateway entities
How does E-mail to SMS work
The e-mail to SMS setup works because Ozeki 10 SMS Gateway can use IMAP and SMTP communication to interact with
an e-mail account. In our example Ozeki 10 SMS gateway downloads the E-mails from the e-mail account using IMAP,
and when it receives an SMS, it will forward it as an e-mail through this e-mail account using an SMTP e-mail sending
request. (Figure 4)
Figure 4 - Imap and SMTP is used to create E-mail to SMS
E-mail to sms (IMAP download)
In this configuration, when james@gmail.com sends an e-mail to james-sms@gmail.com, he needs to put the
mobile telephone number (+3620111111) into the subject line, and he needs to write the SMS text
into the body (Figure 5).
This e-mail will arrive to the Inbox of james-sms@gmail.com. The Ozeki SMS Gateway will download
the e-mail from this inbox using an IMAP connection. After the e-mail is downloaded it will
send it as an SMS. If you have attached a GSM modem to your SMS gateway, that has a phone number
of +3620222222, the SMS sent by the SMS gateway will appear on the phone of Mobile user
as if it was sent by +3620222222.
Figure 5 - How to send SMS from G-mail
SMS to E-mail (SMTP upload)
If Mobile user replies to the SMS, he will send a reply to the phone number +3620222222. This is the
phone number of the SMS gateway. He will write his text e.g.: "Hello James" and will send the messages.
He does not know, that his sms will end up in an e-mail box.
When the SMS gateway receives this SMS, it will create an E-mail. It will send the e-mail to james@gmail.com.
The from field of the e-mail will be james-sms@gmail.com, the subject will be the phone number of the Mobile
user (+3620111111), and the e-mail body will be the SMS text ("Hello James").
The e-mail will be sent as an SMTP E-mail submit request to the G-mail SMTP server. The user account james-sms@gmail.com
will be used to login to G-mail to send the SMS. After the e-mail has been sent by the SMS gateway, james@gmail.com will receive
this e-mail. He will see that the e-mail came from jame-sms@gmail.com, and he will see the phone number of the mobile user (+3620111111)
in the subject line. (Figure 6) If he wants, he can reply to this e-mail.
Figure 6 - How to send SMS to G-mail
Install SMS modem
To install a new SMS modem, you need to open the Connection install list.
To do so, look for the blue Add new connection button located on the left-side panel
of the Ozeki SMS Gateway home page (Figure 7).
On the Install list, look for the SMS modem item and click the Install button next to it.
Figure 7 - Install new SMS Modem
Provide a port and a phone number
In the Serial port group box, you need to provide information about the port
that the connection will use.
You can use the autodetect function to automatically determine the
correct port number. In the Telephone number group box, you need
to provide a phone number for this connection (Figure 8). After you have
done the setup, click the Ok button.
Figure 8 - Specify modem port and Phone number
Install IMAP client
To setup the IMAP client which will check your email account for incoming messages,
you need to create a new application. To do so, check for the blue Add new user/application button
located on the left-side panel of the Ozeki SMS Gateway. You will be presented with the
Add user or application install list. Look for the IMAP client option and click the blue
Install button next to it (Figure 9).
This will take you to the IMAP client setup page.
Figure 9 - Install new IMAP client
Configure the IMAP Server
In the next step, you need to configure the IMAP server. You can find the IMAP server group box
if you scroll down in the General tab. You can find a Host textbox where you need to
provide host address of the mail service you are using. For Gmail, it is imap.gmail.com.
The port textbox needs the port number that the connection will use.
The username and the password textbox will need the login credentials of the gmail user account (Figure 10).
This way, the IMAP client will be able to login to the mail server.
Figure 10 - IMAP server configuration
In the SMTP tab, you need to provide the address for a sender and a recipient.
Then you need to fill in the required information
for the SMTP server. You need the host address which is smtp.gmail.com,
a correct port number and the login information for the
SMTP server (Figure 11).
Configure the SMTP
Figure 11 - SMTP server configuration
Use the subject line as the address
Click the IMAP tab and look for the checkbox titled Use address in the subject line.
This way the subject of the message
will be the address where you need to send a message (Figure 12).
Figure 12 - Configure IMAP client to use address in subject line
Final thoughts
Now, you can pause and catch your breath.
We hope you didn’t get lost in the explanations.
We did our very best to make it simple and to walk you through all the details
as painlessly as possible.
If you have followed the steps closely, you should be able to send sms messages
using the E-mail to SMS system with Ozeki SMS Gateway without issues.
If you have already completed the steps, you can enjoy a well-deserved chocolate
or some other treat you have in mind.
If you would like to receive more valuable information about the benefits of
other similar solutions, please open ozeki-sms-gateway.com.
This article will present you the steps you need to take to have a system that will detect
an incoming email in Mozilla Thunderbird and forward it to a phone number.
The article will show you how you can setup a new user that will check your email account,
a route to connect it to an SMPP server which will send the SMS message.
This process will take about 10 minutes to do. The tutorial is detailed and easy to follow.
We use the Ozeki SMS Gateway in this article, which is a powerful sms gateway with an intuitive guide.
We assume that you are familiar with the SMS and Email communication technology. Don’t waste any more time.
Let’s start sending messages.
Email to sms with Mozilla Thunderbird (Video tutorial)
The following video is about how you can send SMS in case of an incoming Email. It will start with setting
up an HTTP server and will take you all the way to receiving your first email message. The video is only a little
longer than 5 minutes and very detailed. We are using the Ozeki SMS Gateway which is a powerful SMS gateway with a very intuitive
guide so you will have no problem following the steps.
Install a new HTTP server
The first step in order to be able to send and receive SMS using Thunderbird is to establish a Service
provider connection to which the message will be forwarded.
In this documentation, the HTTP server plays this role so install an
HTTP server in the Ozeki SMS Gateway. (Figure 1)
Figure 1 - Install HTTP Server
Install a new SMTP User
The next step is to create an SMTP User to receive emails from Thunderbird.
Open the Apps menu, the left-side panel contains the already installed users and applications.
The right-side panel contains the users and applications you can install with a
brief description next to them.
Search the SMTP User and click the blue install button next to it. (Figure 2)
Figure 2 - SMTP User install
Provide login credentials
Clicking the Install link will bring up the SMTP User installation panel.
Here, you need to enter a unique username in the Username field and a password in the
Password field. (Figure 3)
Figure 3 - SMTP username and password
Install a new POP3 user
Now create a POP3 User to send emails to the Thunderbird. Open the Apps menu,
the left-side panel contains the already installed users and applications.
The right-side panel contains the users and applications you can install with a
brief description next to them.
Search the POP3 User and click the blue 'install' button next to it. (Figure 4)
Figure 4 - POP3 User install
Provide login credentials for the POP3 user
Clicking the Install link will bring up the POP3 User installation panel.
Here, you need to enter a unique username in the Username field and a password
in the Password field. (Figure 5)
Figure 5 - POP3 username and password
Check the SMTP server details
Then you must enable authentication on the SMTP server.
To do this, open the SMTP server details page in the advanced menu. (Highlighted in Figure 6)
Figure 6 - SMTP server details
Enable the Requires authentication option
On the SMTP server Details page, select the Configure tab and enable
'Require SMTP authentication' in the User Authentication section. (As you can see in the Figure 7)
Figure 7 - Enable Require Authentication
Download Thunderbird
Download the latest version of Thunderbird from
thunderbird.net. This program will be used from the Email side. (Figure 8)
Figure 8 - Download Mozilla Thunderbird
Install Thunderbird
Open the installer and click the 'Next' button on the Welcome page to begin the installation. (Figure 9)
Figure 9 - Install Mozilla Thunderbird
Start the installation process
Select the installation location and start the whole process by clicking the Install button. (Figure 10)
Figure 10 - Start Thunderbird installation
Finish the installation process
When the installation is complete, click Finish button and Thunderbird will start. (Shown in Figure 11)
Figure 11 - Installation Finished
Add a new mail account
Now you need to create a new email account in Thunderbird.
Select New section in the Menu and then the Existing Mail Account option. (Figure 12)
Figure 12 - Add new mail account
Setup the e-mail details
Then enter your name and email address and then the password you used for SMTP User.
In the Advanced configure section. Enter the IP address of the SMS Gateway on the server and the default POP3 and SMTP ports on the port, which are 110 and 25.
Finally, for SMTP, select Normal Password for Authentication. Username should be
SMTP and POP3 usernames. (Figure 13)
Figure 13 - Setup e-mail details
Send a message
The next step is to send a message from Thunderbird to the SMS Gateway. To do
this, select the Write menu.
You can enter the recipient in the form phone number@domain where the phone
number is the recipient's phone number, and the domain is the SMS Gateway domain
name.
Both the subject and the body part will be sent in the SMS. (Figure 14)
Figure 14 - Send Message
Message received by the server
You will see that both parts of the message appear on the HTTP server with
other useful information, like date and address. (Shown in Figure 15)
Figure 15 - Message Received by the HTTP Server
Edit the route
In order to receive a message on the POP3 user, the routing table must be set to forward incoming messages here.
Open the routing menu and go for the Settings group box, where you can specify the route.
In the To dropdown menu, select the POP3 user. (Highlighted in Figure 16)
Figure 16 - Edit incoming Route
Send a message back
Now send a message back from the HTTP server to the SMS Gateway by
typing the text to the MessageData textbox and click submit. (Figure 17)
Figure 17 - Send Message back to Thunderbird
Message is received
Finally, if you press the Get Messages button in Thunderbird you will see that
the message arrived in your inbox, and you can be sure that your work paid off.
(Shown in Figure 18)
Figure 18 - Message Received by the Thunderbird
Final thoughts
If you have followed the tutorial steps closely, you should be able to send
texts using the Email to SMS system with Ozeki SMS Gateway without problems.
This solution allows you to have a communication between Ozeki SMS Gateway and Mozilla Thunderbird.
You are able to perform cross platform dialogues using this innovation.
If you would like to learn more valuable information about the advantages of other
similar solutions, please visit our page, where you can read about topics like
Email to SMS - POP3
and Email to SMS - Gmail.
The following document is about to demonstrate how you can configure your Ozeki SMS
Gateway and Windows Mail to be able to send or receive SMS messages. By performing
this configuration on your system, you will be allowed to use e-mail to SMS and
SMS to e-mail forwarding. The step-by-step guide on this page shows you what connections
that you need to create in SMS Gateway and how you need to configure Windows Mail
to be able to forward e-mails and SMS messages. The guide does not take more than
10 minutes to complete, so let's start right now!
How to send E-mail to SMS from Windows mail
To send E-mail to SMS from Windows mail:
Launch Ozeki SMS Gateway
Install HTTP Server
Select SMTP user to install
Add POP3 user connection
Click on the Advanced toolbar icon
Configure SMTP service Details
Add Internet and e-mail account in Windows mail
Write test e-mail
Send SMS to test SMS to e-mail forwarding
Check the logs
Email to SMS from Windows mail (Video tutorial)
In this video, we are going to show you how to forward email to SMS using Windows
mail. The video will start with the home page of the Ozeki SMS Gateway.
The video will end with receiving the first sent message.
In the video, you will learn how to add a new POP3 user
and how to add a new Windows mail account.
The video is only 5:40 long and it features all the important
information you need to complete the process.
It is shown very detailed and easy to follow.
You will have no problem with following it.
Step 1 - Create HTTP server connection
The first step of this guide is to create a HTTP Server connection. This connection is going
to help us to send and receive SMS messages to test if the forwarding working well
to both directions. So, after you opened SMS Gateway, click on the icon of Connect
on the toolbar (Figure 1), and here from the list, click on the Install button of the
HTTP Server connection.
Figure 1 - Select the HTTP Server connection
Next, you will be able to see the configuration menu of the HTTP Server connection
as you can see it in Figure 2.
Here, you can set a name for the connection, set up the URL for the HTML form of the
connection. You will need to use this form to handle the SMS messages. Lastly,
you can specify a phone number for this connection. If you finished with the
configuration, just click on OK to create the HTTP Server connection.
Figure 2 - Configure the HTTP Server connection
Step 2 - Install SMTP User connection
Next, you need to set up a SMTP user connection in Ozeki SMS Gateway in order to
receive the e-mail messages from the Windows Mail application. To create a new user
connection in SMS Gateway, first, you need to open the Apps menu by clicking
on its icon on the toolbar. Next, scroll down to the SMTP user connection, and like
in Figure 3, click on the Install button.
Figure 3 - Select the SMTP User connection
The configuration of the SMTP User connection does not require any specific knowledge
from your side. All you need to do here is to specify a username and a password for the
SMTP user connection as Figure 4 demonstrates it. After you finished with the configuration,
just click Ok to create the SMTP user connection.
Figure 4 - Add username and password for the connection
Step 3 - Install POP3 User connection
The next step of the guide is to install a POP user connection on your SMS Gateway.
This POP3 user connection allows you to send the SMS messages received by the SMS Gateway
to the Windows Mail application. To install this connection, open the Apps menu by
clicking on its icon on the toolbar, and next, as you can see it in Figure 5, select
the POP3 user from the list, by clicking on the Install button.
Figure 5 - Select the POP3 user connection
After you clicked on the Install button, the next windows that shows up, is the
configuration menu of the POP3 user connection. Here, you need to enter a unique
username in the Username field and a password for the user in the Password field
like in Figure 6. Lastly, just click on Ok to create the POP3 user connection.
Figure 6 - Configure POP3 user connection
Step 4 - Configure the SMTP service
Before connecting and configuring the Windows Mail with Ozeki SMS Gateway, you need
to configure the SMTP service in the SMS Gateway by turning on the SMTP authentication.
This SMTP service is created automatically when you created the SMTP user connection.
To find that service, just select the Advanced menu from the toolbar, and as you
can see it in Figure 7, and then, click on the Details button of the SMTP service.
Figure 7 - Select the SMTP service
In the Details menu of the SMTP service, you can perform some modifications
on the service. To turn on the 'Require SMTP authentication' option, first,
select the Configure tab as you can see it in Figure 8. Here, in the User authentication
submenu, just check the 'Require SMTP authentication' option. If you finished,
click on OK to save the modifications of the SMTP service.
Figure 8 - Turn on 'Require SMTP authentication'
Step 5 - Create new account in Windows mail
At this point, you configured every connection and service in Ozeki SMS Gateway
to be able to handle the e-mail and SMS forwarding. Now, you need to create an account
in Windows mail that connects to the SMTP and POP3 servers integrated in SMS Gateway.
First, open Windows mail on your computer. This application is installed on every
Windows computer by default, and you can open it by clicking on its icon on the taskbar (Figure 9).
Figure 9 - Open Windows mail
After you opened the Windows mail application, you will be able to see the main menu,
where you can check the incoming and outgoing e-mail messages. To create a new account, first,
click on the Settings icon in the bottom left corner as Figure 10 shows that,
and on the right-hand side, select the 'Manage accounts' option. After opening this
menu, you need to select the 'Add account' option to be able to create a new account.
Figure 10 - Add a new account
Step 6 - Select Internet e-mail account
In the list of accounts, you can create or connect many types of e-mail accounts
to Windows mail. Now, you need to select the 'Advanced setup' option to be able to
configure the SMTP and POP3 servers. As you can see it in Figure 11, you need to
select the 'Internet email' option.
Figure 11 - Select Internet e-mail
Step 7 - Configure Internet e-mail account
The next step is to specify the details of the account to be able to send and receive
e-mails and SMS messages. First, type an e-mail address that you would like to use for
this account. Next, in the Username and Password fields, type the username and password of
your POP3 user connection that you created in SMS Gateway. Then, type an Account name, that
Windows mail uses to identify the account and to the next field, type a name that you
would like to use as a sender name when you send an e-mail. (Figure 12)
Figure 12 - Specify the details of the new account
Next, you need to specify the details of the SMTP and POP3 servers. The incoming e-mail
server will be a POP3 server. Here, you need to type 'localhost:110' to use the
built-in POP3 server of SMS Gateway. Next, select the POP3 option as an 'Account type'.
Then, in the field of 'Outgoing (SMTP) email server', type 'localhost:25' to connect to
the SMTP server of the SMS Gateway (Figure 13). In the next step, disable the 'Use the
same name and password for sending email' and here, type the username and password
of the SMTP user connection. Lastly, disable SSL for both incoming and outgoing messages,
and click on 'Sign in'.
Figure 13 - Specify the server details of the new account
Step 8 - Send e-mail to test e-mail to SMS forwarding
In the previous steps, you configured both the SMS Gateway and Windows mail, so now,
it is ready to forward the e-mail and SMS messages. First, let's try the e-mail to SMS forwarding.
For that, open Windows mail, and click on the 'Plus' button to write a new e-mail.
Here, you need to enter the recipient in phone number@domain form, where the phone number is the
recipient's phone number, and the domain is the SMS Gateway domain name. Then, just type the
subject and the body to the message. Lastly, click on Send to send the e-mail.
(Figure 14)
Figure 14 - Send test e-mail
After you sent the e-mail message, you can check if the solution works by seeing
the logs of the SMTP User connection. You can open it, by opening the menu of the
connection in SMS Gateway, and here, select the Events option as Figure 15 shows that.
Here, you can see that the e-mail was received by the connection, and it forwarded to the
HTTP Server connection which can send the SMS message.
Figure 15 - Events menu of the SMTP User connection
Step 9 - Set up route to POP3 user connection
Before testing the SMS to e-mail forwarding, you need to do one more configuration to
make sure, the solution works perfectly. At this point, you need to create a routing rule
from any SMS connection to the POP3 user connection. This allows the POP3 user connection
to collect all incoming SMS messages and send them to the connected Windows mail account.
So, open the Routes menu from the toolbar and select 'Create new Route'. Here, as
Figure 16 shows that, select 'Any SMS connection' for the 'From' field, and the POP3
user connection for the 'To' field. To create the route, just click OK.
Figure 16 - How to create new route for the POP3 user
Step 10 - Send SMS to test SMS to e-mail forwarding
You can test your solution in the other way as well and see if it can forward SMS
messages as e-mails. For that, open the HTML form of the HTTP Server connection.
Here, you can send an SMS message (Figure 17). Just type the phone number of the recipient,
and the message itself. If you are ready, just click on 'Submit' to send the SMS message.
Figure 17 - HTML form of the HTTP Server connection
As soon as you sent the SMS message, the SMS Gateway uses the created routing rule to
help the POP3 user connection to receive the SMS message. After the POP3 user connection
received the SMS message, it forwards the message to the connected Windows mail
account as a new e-mail. As you can see it in Figure 18, the message arrives as
a new e-mail in the Inbox folder.
Figure 18 - Inbox folder in Windows mail
Summary
This article explained how to configure an E-Mail to SMS and SMS to E-Mail connection using Ozeki SMS Gateway and Windows Mail.
If you have followed the steps above carefully, you are now able to set up a route between SMS and E-Mail messages, making your communication
more convenient. If you need to send messages to E-Mail address and mobile phone numbers, this solution
is definitely for you because you can reach both destinations with the simple delivery solution
offered by Ozeki SMS Gateway.
Ozeki SMS Gateway is the perfect link between SMS and E-mail, and it offers more.
Learn what else you can achieve with E-mail to SMS forwarding by
opening the following pages: IMAP to SMS forwarding
and POP3 to SMS forwarding.
Now your next thing to do is to download Ozeki SMS Gateway and configure this solution immediately! Everything
is there to get it up and running in less than 10 minutes.
FAQs
Does the software run as a Windows Service?
This software operates conveniently as a background service on Windows. This
means two key benefits:
Always Running: You don't need to be logged in for the software to function.
It will keep running in the background.
Automatic Startup: If the computer restarts, the service will automatically
launch the software again, ensuring uninterrupted operation.
The software runs as a windows service by default. Is there a way to run it as an application?
Yes, there is.
Instead of running as a service, you can choose to launch Ozeki SMS Gateway
manually. To do this, open a command prompt (search for "cmd.exe") and navigate
to the program's directory (usually "C:\Program Files\Ozeki\OzekiNG"). Then,
execute the following command to start the software in application mode:
In this guide you will learn about the configuration steps necessary to setup
an E-mail to SMS gateway through Microsoft Exchange and Ozeki SMS Gateway. You
will see how you can send an e-mail from Outlook to an e-mail address in the format
of +441234567498@domain.com, and how this e-mail will be converted routed by
exchange to the built in E-mail (SMTP) server of Ozeki SMS Gateway and how
it will be sent as SMS.
Overview
Our setup consists of 5 major components: We expect the messages to be sent
from Outlook through an Exchange server. Next the Exchange server will forward
the messages to the SMS gateway as an E-mail, which will convert it to SMS
and will forward it to the mobile Network (Figure 1).
Section 2 - Setup Microsoft Exchange to forward SMS
In this video we use the Exchange server that comes with Office 365. This Exchange server
resides in the Microsoft Azure cloud and is already setup when you purchase an Office 365
subscription. To configure this Exchange server to forward messages to the SMS gateway,
you need to create a mail connector (Video 2).
Section 3 - Send your first SMS from outlook
Once your Exchange server is configured for SMS forwarding, you are ready to test it
from Outlook 365. To send SMS from Outlook 365,
you need to create an new E-mail.
You will have to format the e-mail address to include the phone number you wish
to send the SMS to, and to
use the domain you have provided when you have
configured your Exchange server for SMS forwarding.
For example, you can user +44123457@sms.gw to send an SMS to +441234567. The
SMS messages text will be
the E-mail subject and the E-mail body combined (Video 3).
Section 4 - Trace your SMS in the logs
It is a good thing to know how you can trace your messages in the logs of the
SMS gateway. Video 4 shows you the steps to take to open the relevant log
forms of the SMS gateway to see where the E-mail comes into the system
and where the SMS goes out to the mobile network. Note that if you don't see
any incoming traffic in the SMTP server, you might have a firewall setting that
blocks incoming SMTP server traffic, or you might have configured the IP address
of you SMS gateway incorrectly in Exchange.
Summary
The purpose of this short article was to explain how to send SMS from Outlook through Microsoft Exchange with the help of
Ozeki SMS Gateway. This solution makes communication possible between email clients and mobile users.
Ozeki SMS Gateway helps the conversion and distribution, so if you followed the steps above carefully,
a fully operational email-to-sms chain is ready to be used for you or your company.
Learn more about the email to SMS solution in our page, where we show you how to use tools like Gmail
or Thunderbird in this process.
Exchange Server is Microsoft’s email, calendaring, and contact managing platform.
It is mostly used a protocol called MAPI, but it supports POP3, IMAP and EAS protocol.
This means you can use it to establish a connection which you will use to
forward e-mails as SMS messages. This tutorial will help you doing this.
Follow the steps provided below and you will have a working connection.
How to setup Exchange Server for e-mail to SMS sending
To setup Exchange Server for e-mail to SMS sending:
Login to Microsoft Exchange Server
Add new connector
Configure new connector domain
Provide new route for e-mail messaging
Enter IP address of Ozeki SMS Gateway
Validate connector
Specify test e-mail address
Do the e-mail address validation
Check if connector status is on
Test e-mail to SMS sending
Step 1 - Login to Exchange admin centre
First, you need to have access to Microsoft Exchange Server. To have this, please
log in to the Microsoft Admin Centre.
This way you can start setting up your connection. You can see the admin
centre on Figure 1.
Figure 1 - Login to Exchange admin centre
Step 2 - Open Exchange menu
Now you need to select the Exchange option from the side menu on the left.
You can see which one to choose on Figure 2.
If you click the option, you will be presented with the Exchange Admin centre.
Figure 2 - Open Exchange menu
Step 3 - Open mail flow menu
Here you will have options on the left side of the screen. Here you can manage different
settings of the Exchange Server. To setup a new connection, you
need to choose the mail flow sub-menu on the left side. You can see which one to choose on Figure 3.
Figure 3 - Open mail flow menu
Step 4 - Open connectors menu
If you head over to the connector's menu, located on the right side of the upper menu,
you can manage your existing connections or create new ones. You can see on Figure 4, where to click.
Figure 4 - Open connectors menu
Step 5 - Add new connector
Here you can see all your existing connections. If it is empty, it means that
you have no connections. To establish one, click the + icon located below the status title. You can see where to click on Figure 5.
Figure 5 - Add new connector
Step 6 - Select mail flow scenario
Now you need to select the mail flow scenarios. This is important,
because the setup process will be done with the
settings based on your choice. On Figure 6, you can see more information about your options.
Figure 6 - Select mail flow scenario
Step 7 - Select mail flow scenario options
On Figure 7, we give you the options you need to choose to have a connection that
the Ozeki Gateway can work with. These options will forward e-mails from your cloud subscription
to a partner organization, in this case the Ozeki Gateway. Click the Next button to proceed.
Figure 7 - Select mail flow scenario options
Step 8 - Add new connector name
In this step, you get to choose a name for your connector. Make sure that the
name is something that you will easily distinguish from other connectors.
You can see our example name on Figure 8. Click the next button to proceed.
Figure 8 - Add new connector name
Step 9 - Setup new connector domain
Now, you need to setup a domain for your connector. To do that, please click the + icon below the textbox.
This will take you to the add domain window. You can see the process on
Figure 9.
Figure 9 - Setup new connector domain
Step 10 - Specify the domain name of the new connector
Here, you need to provide a domain name of the new connector. If you have it typed in,
click the OK button to proceed to the next step. You can see our example domain name on Figure 10.
Figure 10 - Specify the domain name of the new connector
Step 11 - Select the e-mail option
Now you need to select your newly created connector to work with the Exchange Server.
Select it and click the next button. You can see both buttons on Figure 11.
Figure 11 - Select the e-mail option
Step 12 - E-mail messages routing
Now you need to provide a new route for email messaging. Click the + icon below the box,
so it will take you to the adding a smart host window. You can see process on Figure 12.
Figure 12 - E-mail messages routing
Step 13 - Specifying the smart host
Here, you need to provide the IP address of your Ozeki 10 SMS Gateway. As you can see on Figure 13,
we provided an example IP address. Click the Save button to proceed.
Figure 13 - Configure IP address of your Ozeki SMS Gateway
Step 14 - Route e-mail messages
Now you need to choose the created smart host.
Choose it and click the Next button to proceed. You can see the button on Figure 14.
Figure 14 - Route e-mail messages
Step 15 - Configure Transport Layer Security (TLS) connection
Using TLS (Transport Layer Security) is a very important aspect of a secure connection.
This protocol will ensure that no one except
the sender and the receiver sees the messages. You can see which box to tick in on Figure 15.
Figure 15 - Configure Transport Layer Security (TLS) connection
Step 16 - New connector confirmation
This step will let you see the settings you provided for your new connector.
Check if all your settings are correct. To save them, click the Next
button, as you can see on Figure 16.
Figure 16 - New connector confirmation
Step 17 - Connector validation
Now, the Exchange Server need to verify if the connection is working as expected.
Use a test e-mail address where the server will send a test message.
To provide the address, click the + icon. You can see where to click on Figure 17.
Figure 17 - Connector validation
Step 18 - Add test e-mail address
Now you need to type in the address where the test message should be sent.
Click the OK button to proceed. You can see the test address on Figure 18.
Figure 18 - Add test e-mail address
Step 19 - Successfully added the test e-mail address
Now a pop-up window will appear which notify you that the address is successfully saved to the connector.
Click ok to close the window and proceed to the next step. You can see the process on Figure 19.
Figure 19 - Successfully added the test e-mail address
Step 20 - Validation of the test e-mail address
Now you need to start the validation process. Click the address and click the validate button.
This will initialize the validation process. You can se the button you need to click on Figure 20.
Figure 20 - Validation of the test e-mail address
Step 21 - Starting of the validation process
The process should now start, and you should supervise the procedure with the green progression bar, that you can see on Figure 21.
Figure 21 - Starting of the validation process
Step 22 - The validation process has completed
if you get the notification that the operation is finished successfully,
you could close the pop-up window. You can see the finishing notification on Figure 22.
Figure 22 - The validation process has completed
Step 23 - The result of the validation process
Here you can see the result of the validation process. If everything came back Succeeded,
it means that the connection is working properly. Click the Finish button to close the installer.
Now you have a working connector. You can see the results on Figure 23.
Figure 23 - The result of the validation process
Now you have a working connector that is ready for e-mail sending.
You can see if the connection is turned on or off using the status column.
Step 24 - The connector status is on
Figure 24 - The connector is ready for e-mail sending
After you have done setting up the Ozeki SMS Gateway and the Exchange Server setup,
you need to check if everything works together. The best way of it is to check if
you have received the validation e-mail from Microsoft.
You can check it by visiting the SMS Gateway and looking into the SMTP Log. This tutorial will guide you through
every step you need to take to get to the log file and find the validation e-mail,
then to start sending SMS messages form Outlook.
Step 1 - Open SMTP
First step you need to take is open the SMS Gateway and search for your SMTP Server in the Users and Application panel. Click it and it will open the details of the server. You can see where to click on Figure 1.
Figure 1 - Open SMTP connection
Step 2 - Check SMTP Log
Now on the Events tab, you could see the log of the server. This will note every event
that happened on the server to make maintenance easier. On Figure 2, you could see the
log of the validation highlighted with red. This means that the validation e-mail has arrived
from the Exchange server. Click the Sent folder located on the left side of the screen to proceed.
Figure 2 - Check the SMTP Log
Step 3 - Open SMTP Sent box
Here in the Sent folder, you could see that you have sent a validation e-mail
from your SMTP server.
This was an automatic message; no further action is required. You can see the message on Figure 3.
Figure 3 - Open SMTP Sent box
Step 4 - Open SMPP client
Now your need to open the details of the SMPP client. To do that, head back to
the home page of the SMS Gateway. Here on the left side of the screen you will
find the connections panel. As you can see on Figure 4,
you need to search for your SMPP client. Click it and it will open the details of it.
Figure 4 - Open the SMPP client
Step 5 - Check SMPP log
As you can see on Figure 5, the log shows that the validation message was received successfully.
It means that you have a working connection, so you could start sending SMS from Outlook.
Figure 5 - Check the SMPP log
Step 6 - Open Microsoft Outlook
To start sending SMS form Outlook, you first need to open Outlook. As you can
see on Figure 6, you can do that by opening the start menu and start typing Outlook.
Your computer will find the application. Click it to launch the program.
Figure 6 - Open the Microsoft Outlook
Step 7 - Compose new e-mail
Now you need to start the mail composing process. Click the New Email button
on the upper left side of the screen,
as you can see on Figure 7. Click it and it will open the message composing window.
Figure 7 - Compose new e-mail
Step 8 - Enter the e-mail address and message
Compose a message with the To box filled in with the recipients address which will
be the phone number’s domain, a subject and the body of the e-mail.
Provide that information and click the Send button.
It will start the message sending process. You could see the required information on Figure 8.
Figure 8 - Send the message out
Step 9 - The message was sent out
On the bottom of Microsoft Outlook, you can see a status indicator.
If the text is the same as on Figure 9, it means that you have a working
connection with the Microsoft Exchange, so the message was sent to the phone successfully.
An SMTP (Simple Main Transfer Protocol) server’s primary purpose is to send, receive
or relay incoming and outgoing mails between sender and receivers. If your firewall
is blocking the SMTP connection, your email wouldn’t make it to the destination.
This tutorial offers you a solution to this problem. We will guide you with a
step-by-step tutorial to make an access route for the outgoing SMTP connections.
This way your firewall will not interrupt any data transfer on that connection.
Allowing SMTP through firewall - configuration steps
To allow SMTP through firewall, follow the steps:
Open Windows Defender Firewall
Go to Advanced settings
Select Inbound rules
Create a New rule to give Ozeki access
Choose Port, to let the SMTP port through
Pick TCP (SMTP goes through the firewall as TCP)
Enter the SMTP port: 25
Enable "Allow the connection"
Tick the Domain, Private, Public checkboxes
Give a name to this rule
Click Finish
Step 1 - Open Windows Defender Firewall
Now you need to open the Windows Defender Firewall. To do that, you need to search
for it on the Start menu. Press the Windows button to open the start menu and start
typing Windows Defender Firewall. Your computer will find the Security Control Panel. Click it
to open it and it will open the settings page you will need. You can see the process on Figure 1.
Figure 1 - Open Windows Defender Firewall
Step 2 - Select Advanced settings
Now you are in the Firewall control settings. Search for the Advanced settings button.
It will open the settings where you can deeply modify your firewall.
You can see where to find it on Figure 2.
Figure 2 - Select Advanced settings
Step 3 - Select Inbound rules
To have access to the list of the existing rules, look for the Inbound Rules button
located on the left side of
the screen under the Windows Defender Firewall settings. You can see where to click on Figure 3.
Figure 3 - Select Inbound rules
Step 4 - Create New rule
Now you need to create a new inbound rule. It will list all the existing rules,
so you could create and delete them. Search for the New Rule... button located on
the right side of the screen, under the Actions panel. You could see where to click on Figure 4.
Figure 4 - Create New rule
Step 5 - Configure Port rule
Now you need to choose what type of rule you would like to create. In this case,
we have a concrete port that we need to create a rule for.
The best option for you is the Port. You could see which on you need to choose on Figure 5.
Figure 5 - Configure Port rule
Step 6 - Specify the Port number
Now you need to choose which type of protocol the rule applies to. You have two options,
TCP or UDP. The main difference between them is that TCP is a
connection-oriented protocol,
which means that it establishes a connection between a sender and a receiver before data
sending, and UDP is a connection-less protocol which will not establish connection
before data sending. In this case, please choose the TCP option. Next,
you need to specify the port you wish to use for the connection.
You can see the options on Figure 6.
Figure 6 - Specify the Port number
Step 7 - Specify the action when a connection match
Here, you need to choose what action should be taken when the criteria is matched.
We need to have a steady undisturbed connection, so please choose the
Allow the connection option. As you can see on Figure 7, you need to click Next to proceed.
Figure 7 - Allow the connection
Step 8 - Rule application
Now you could choose what type if connection you wish to use on the port you are
applying the rule to. It could be a corporate Domain, a Private network in your
home, or a Public network in a caffe or on an airport. Choose all the
possible options to have a versatile connection anywhere. You could see your options on Figure 8.
Figure 8 - Rule application
Step 9 - Specify the name of the rule
Now you get to name your rule. Make sure that this is something that you will remember,
and you will distinguish the rule easily by.
On Figure 9, you could see our example name. Click Finish to exit the rule setup process.
Figure 9 - Specify the name of the rule
Step 10 - Ozeki SMTP Server rule is ready
Firewall allows for the SMTP Server to receive e-mail messages via port 25.
Now you have a working rule that will make sure thar your SMTP connection is usable
and undisturbed by your firewall. You could
see on Figure 10, that the rule is on the list, so you could disable is, delete it or copy it.
Allowing IMAP port through firewall - configuration steps
Internet Message Access Protocol (IMAP) is a protocol for accessing email messages from a local or a shared mail server or service.
IMAP allows a client e-mail program to access remote message stores as if they were local.
Windows Firewall is an application which monitors connections to make them more secure. To grant access reliably, you need to open an IMAP port on the Windows Firewall, which will let the server
send and receive packages without disturbance.
We provide you this step-by-step tutorial, which guides you through the setup of such port.
Create an access rule for outgoing IMAP connections. Follow the steps:
Open Windows Defender Firewall
Select Advanced settings
Go to Inbound rules
Add a New rule...
Select Port rule
Choose TCP
Specify the local ports: Enter "143" into the textbox
Select "Allow the connection"
Tick all of the following checkboxes: Domain, Private, Public
Give a name to this rule
Click on Finish button
Open the Windows Defender control panel
First you need to open the “Windows Defender Firewall” application. To do so, please press the windows button on your keyboard and start typing ”windows firewall”.
This way your computer will start searching for the application.
You can see on Figure 1, what should you screen look like when it finds the application. Click it and it will open.
Figure 1 - Open Windows Defender Firewall
Open the advanced settings
Now you are in the Windows Defender Firewall control panel. Here you can monitor if your firewall is working as intended and providing safety for your computer.
Next, you need to search for “Advanced Settings” in the control panel on the left side of the screen.
Here you will be able to configure your port deeply. You can find the button with the help of Figure 2.
Figure 2 - Select Advanced settings
Open the list of Inbound Rules
Next, you need to configure your new rule. To do that, simply head over to the Inbound Rules management console.
It is located on the left side of the screen. You can find it with the help of Figure 3. Click it and it will open up.
Figure 3 - Choose Inbound Rules
Create a new rule
Here you can see the list of all the existing rules. To create your new rule, click the “New Rule..” button on the right side of the screen located in the “Action” panel.
Click it and it will start a process, where you can configure and create a new rule. You can see the button on Figure 4.
Figure 4 - Create a New rule
Choose the Port rule type
Here you will have the options the set what type of port you would like to create. It could be Programs,
Ports or a Predefined which could be handy if you would like to use File or Printer sharing, or Remote Assistance on the exception you are creating.
In this case, you will need to choose the port option. To see which one to choose please look at Figure 5.
Figure 5 - Select the rule type
Choose the TCP option and configure it
Now you are choosing which type of protocol you are using on the connection. TCP is the Transmission Control Protocol,
which is designed as a model to offer highly reliable, end-to-end byte stream over an unreliable network.
UDP is almost the same as TCP, only it is not using error-checking system. TCP is slower but more secure and UDP is faster.
In this case, you need to choose TCP, and specify the local port which will be “143”. To see how the window should look like, study Figure 6.
Figure 6 - Specify the protocols and ports
Choose the condition of the rule
In this step, you will need to choose what the rule should be doing. You could choose between “Allow the connection”, “Allow the connection if it is secure” and “Block the connection”.
Our goal is to have an open, undisturbed connection, so please choose “Allow the connection”.
To see which one to choose, please see Figure 7.
Figure 7 - Allow the connection
Set which type of connection the rule should apply to
Now you need to choose which type off connection, the rule should be applied to.
You have 3 options. Domain Private and Public. Domain is strictly for corporate network,
private is for your home network and the public is for when you wish to use it on an airport network or in a caffe.
To have a connection which you can use anywhere you wish, please tick in all the boxes.
To see what this window should look like, please study Figure 8.
Figure 8 - Adjust when dose the rule apply
Name your Inbound Rule
The final step is to name your connection. It could be anything you wish, but
make sure that you can distinguish the rule by the name given.
In our example, we named it “ozeki”. If you have the name typed in, click
the finish button to finalize your decision. You can see our example name on
Figure 9.
Configure you SMPP mobile network connection in Ozeki
There are various ways to connect your SMS gateway to the mobile network.
You can use a GSM modem over a data cable, an Android Mobile phone through
Wifi or you can connect directly to an SMS service provider over the Internet.
Connecting to an SMS service provider over the Internet is your best choice,
because it provides the most reliable and highest capacity link. In this
guide you can take a look at the steps you need to connect to an SMS service
provider over the Internet using an SMPP client connection.
How to configure SMPP mobile network connection in Ozeki
To configure SMPP mobile network connection in Ozeki:
Launch Ozeki SMS Gateway
Add new client connection
Install SMPP client connection
Enter hostname or IP address
Type port number 9551
Select Advanced tab
Tick Log level check boxes
Check the logs
Step 1 - Open Ozeki SMS Gateway
Start the SMS Gateway software in the Ozeki 10 Operating System. Click on the
icon of the SMS Gateway on the desktop (Figure 1).
Figure 1 - Open Ozeki SMS gateway software
Step 2 - Add new Client connection
To create new SMPP Client connection click on the "Add new connection.."
(Figure 2) in the Connections section.
Figure 2 - Create new client connection
Step 3 - Install SMPP Client connection
To connect to the SMS provider an SMPP client connection is required. Select
the SMPP client from the list of the SMS Connections and click on the blue
Install URL (Figure 3).
Figure 3 - Install SMPP Client connection
Step 4 - Setup SMPP Client connection
The configuration process of the SMPP connection you need to give the name of your
connections in the "Name:" field. The most important part is during the configuration
by entering the service connection details. In the Host field enter the IP
address or host name of your SMS provider. Change the port number for 9551. Enter
the SMPP credentials (Name and Password). This information is usually provided
by your service provider. Finally, click on the Advanced tab to configure the
log level. (Figure 4)
Figure 4 - Setup SMPP Client connection
Step 5 - Open Advanced tab
If you want to track the communication of the SMPP client connection you need to
setup log level on the Advanced tab, as you can see on Figure 5.
Figure 5 - Open Advanced tab of the SMPP Client connection
Step 6 - Setup Log level
Check the boxes for the detailed communication log. The Log communication events
provide information about messaging between the SMPP Client and SMPP Service
provider. The Log messaging events shows the status of the SMS messages.
(Figure 6)
Figure 6 - Setup Log level
Step 7 - Checking of the events in the log and the connection
When the SMPP client connection can connect to the SMS Service provider the
connection status is enable. Like on Figure 7, once your connection is online,
you can check the SMPP client connection log to see if the SMS system connected
properly to your SMS service provider.
This document explains how you can setup an E-mail to SMS service to
serve multiple Exchange 365 servers. This setup is useful if you
provide SMS service to your customers and each customer has their
own Exchange 365 server. The configuration explains how you can
create accounts for each customer, and how your customers can
use their username and passwords in Exchange to send SMS through your service.
The document also shows how you can use SSL/STARTTLS encryption to
encrypt traffic between your customer's Exchange server and your Ozeki SMS
Gateway. This is necessary to protect your usernames and passwords.
Introduction
In this setup we assume there are multiple organizations, and each has its
own Exchange 365 server. The users send e-mails form Outlook through
these servers. The Exchange servers capture the e-mails going to a specific
domain and forward these e-mails to the Ozeki SMS Gateway. The Ozeki SMS Gateway
converts the e-mails into SMS and sends them out (Figure 1).
Figure 1 - E-mail to SMS to serve multiple Exchange servers
SMTP authentication
Unfortunately, the Exchange 365 connectors do not offer SMTP authentication. To overcome
this, you need to configure an Exchange rule to add the Ozeki Authentication header
to the e-mail. You also have to configure the SMTP server in Ozeki to use this
authentication header to determine which user the E-mail belongs to. (Figure 2
and Figure 3)
Figure 2 - Email header authentication
Figure 3 - Email header authentication
SMTP authentication in Ozeki
To configure the built in SMTP server of Ozeki to accept the username and password
in the e-mail header, you must select the "Ozeki E-mail header authentication" option
in the SMTP server configuration (Figure 4). The header field expected will be
"x-ozeki-auth: username; password". This header field is appended to each email
forwarded to the SMS gateway from exchange.
To add the SMS gateway authentication header in Exchange, you must add a new
rule. In this rule, you should filter for the domain in the recipient address.
In our case the filter is set to "sms2.gw", and you must set a message header
field to "x-ozeki-auth: username; password". In our case the username is
client1 and the password is puma123 (Figure 5).
Figure 5 - Add the Ozeki auth header to exchange
If the set header option is not available in your form, you need to click on the
More options link in the bottom left-hand side of the form. This will add the
necessary fields to the combo box. (Figure 6)
Figure 6 - Click more options
Testing the solution
You can test this solution by sending an e-mail message from Outlook through Exchange. When you send the
e-mail you must provide the recipient e-mail address in +44123467@sms2.gw format, where +44123467 should
be replaced to the SMS phone number you wish to send your message to and sms2.gw should be the domain you
have setup in your exchange server.
The e-mail you send from Outlook will go to your Exchange server. Exchange will first append the
x-ozeki-auth headers to it, then it will forward it to the SMS gateway using the connector we have
setup up.
Next the e-mail will come in to the built in SMTP Server of Ozeki SMS Gateway. The SMTP
server will select the appropriate user based on the e-mail header and will forward the messages
to it. Next Ozeki SMS gateway will convert this e-mail into SMS and will send it through a
mobile network connection. You can follow the message's path in the Ozeki NG SMS Gateway logs (Video 3).
This guide explains how you can configure the built in SMTP server of Ozeki SMS Gateway.
You will see the steps to take to create the default SMTP service. This service is
responsible for accepting e-mail messages from the Internet or LAN and converting it
into SMS messages.
How to setup SMTP server in Ozeki SMS Gateway
To setup SMTP server in Ozeki SMS Gateway:
Launch Ozeki SMS Gateway
Open Advanced menu from toolbar
Click on the Create new Service button
Select E-mail service
Choose SMTP service
Name SMTP server
Go to the Advanced tab
Tick Log level check box
Enable SMTP service
Look for the advanced menu
After launching Ozeki SMS Gateway, you can start configuring the SMTP server.
Select the Advanced button in the Toolbar.
This will open the advanced settings of the Ozeki SMS Gateway where you can start the configuration. (Figure 1)
Figure 1 - Advanced menu
Create new service
To have a working SMTP server, you need to create a new service.
You can do that by selecting the Services option in the left panel and use the Create new Service button.
It is located on the top of the Services panel, under the toolbar. This step is inevitable in providing services for the clients. (Figure 2)
Figure 2 - Create new Service
Select the E-mail service
In the Ozeki Dashboard you need to select the Details button next to the name of the service. You have three options.
E-mail, HTTP API and SMS. Now you need to choose the E-mail option. This will allow you to communicate
with other e-mail servers and clients. Selecting the E-Mail will take you to the next step. (Figure 3)
Figure 3 - SMTP Service details
Choose the SMTP service
On the Service details panel, you need to choose the e-mail service you wish to install. There are
three of them, SMTP, POP3 and IMAP. Please choose the SMTP option,
and you can start the configuration process of the SMTP service. (Figure 4)
Figure 4 - E-mail service
Set up the SMTP service
You are now in the SMTP service configurator. In the General tab you need to provide a service name (this has to be a unique name),
a port number and enable user authentication. It is optional, but we advise
you to enable it, for protecting
your SMTP service from unwanted messages. To save the details, click the blue 'Ok' button. (All shown in Figure 5)
Figure 5 - Service setup
Go to the Advanced tab
Additional options are available in the Advanced tab. You can go there by selecting the 'Advanced' tab button in Service
details panel next to the Delivery reports tab button.
There you can make several adjustments on the SMTP E-mail service, so it is recommended to visit this tab and browse the extra functions.
(You can see tab that you need to select in Figure 6)
Figure 6 - Advanced tab
Enable SMTP service log
Communication logs help you to track all your communication activities within your server,
so you have a formal record of all the events occurred. To enable this function
on your SMTP server, look at the Log level group box and click the Log communication at SMTP protocol layer tick box.
(Highlighted on Figure 7)
Press the Ok button to proceed.
Figure 7 - Enable log level
Turn on the SMTP service
If you are finished with the setup procedure, you can go back to the Services tab.
Here you will see all your existing services and you can turn them on or off with the 'Enabled' button. This is
a switch button which will be green if you decided to turn it on.
Now please turn on the SMTP_service_1 to enable the service.
(The optimal state shown on Figure 8)
Figure 8 - SMTP Service runs
Check the service status
You can make sure that the service is running as intended by checking the
Users and applications and the Connections panel. If you see that the
indicators for SMPP client and the SMTP User are green,
you have a working connection. It is important to have everything set up because the procedure only works when
Ozeki SMS Gateway shows that both parties are ready. (Figure 9)
Figure 9 - The Gateway is ready
Summary
By reading this article, you have learned how to set up your SMTP server in Ozeki SMS Gateway.
Setting up the SMTP server helps you get email messages from the email network. These messages
can be converted to sms and sent out to mobile. This service can be put into use and
can make your organization more efficient because it allows you to deliver key information
available in email to mobile phones.
If you need e-mail to sms forwarding and you have not already done so, Download Ozeki SMS Gateway now and
create this setup!
What is an SMTP connection?
The Simple Mail Transfer Protocol (SMTP) is the cornerstone of email communication
on the internet. Established by the Internet Engineering Task Force (IETF), it
dictates the exchange of email messages between email clients and servers.
How it Works:
Client and Server: SMTP relies on two key components: an email client (sender)
and an email server (receiver).
Email Client: Your email program, like Microsoft Outlook, acts as an SMTP
client. It utilizes the protocol to transmit email messages to designated
recipients.
Server Configuration: Most email clients allow you to configure the SMTP
server address provided by your internet service provider (ISP).
Message Delivery: When you send an email, your email client connects to the
specified SMTP server and leverages SMTP to communicate and deliver the
message.
In essence, SMTP acts as the invisible language that ensures seamless email
delivery across the internet.
This document explains how you can setup an E-mail to SMS service to serve Postfix servers.
This setup is useful if you provide SMS service to your customers and each customer has their own Postfix server.
The configuration explains how you can create accounts for each customer, and how your customers can use their
username and passwords in Postfix to send SMS through your service.
The document also shows how you can use SSL/STARTTLS encryption to encrypt traffic between your customer's Postfix server and your Ozeki SMS Gateway.
This is necessary to protect your usernames and passwords.
How to send E-mail to SMS from Postfix
To send E-mail to SMS from Postfix:
Launch Ozeki SMS Gateway
Configure SMTP service
Enable SMTP user authentication
Open terminal
Create transport rule in Postfix
Add the SMS Gateway authentication header
Test sending e-mail to SMS from Postfix
Check the logs
Introduction
In this setup we assume there are multiple organizations, and each has its
own Postfix server. The users send e-mails form Mozilla Thunderbird through
these servers. The Postfix servers capture the e-mails going to a specific
domain and forward these e-mails to the Ozeki SMS Gateway. The Ozeki SMS Gateway
converts the e-mails into SMS and sends them out (Figure 1).
Figure 1 - E-mail to SMS to serve multiple Postfix servers
Email to SMS with Postfix (Video tutorial)
In this video, you will learn how to setup an email to sms connection with
postfix. This video will start by setting up a new connection and will end with
the fully configured email to sms system with postfix capabilities.
In this short and easy to understand video, you will learn how to setup and configure a new connection,
how to add services and install a new user. In the video we are using the
Ozeki SMS Gateway which is a powerful but easy to understand gateway software with an intuitive guide.
This means you will have no problem following the steps. Don’t waste any more time. Let’s start!
SMTP authentication
You need to configure a header check rule in Postfix to add the Ozeki Authentication header
to the e-mail. You also have to configure the SMTP server in Ozeki to use this
authentication header to determine which user the E-mail belongs to. (Figure 2)
Figure 2 - Email header authentication
SMTP authentication in Ozeki
To configure the built in SMTP server of Ozeki to accept the username and password in the e-mail header,
you must select the "Ozeki E-mail header authentication" option in the SMTP server configuration (Figure 3).
The header field expected will be "x-ozeki-auth: username; password".
This header field is appended to each email forwarded to the SMS gateway from Postfix.
Figure 3 - Ozeki E-mail header authentication
SMTP authentication in Postfix (Video tutorial)
In this video, you will learn how to perform an authentication in postfix.
The video will start with creating a transport rule and ends with adding the SMS gateway authentication header.
This short video is detailed and easy to understand. It only takes a little over 2 minutes to watch.
You will learn how to create the transport rule for forwarding all emails where a specific domain is detected.
This video will also show you ho to add the authentication header in postfix.
Step 1: Create a transport rule in the postfix to forward all e-mail with
sms2.gw domain to the Ozeki sms gateway SMTP service. (Figure 4)
Figure 4 - Add transport rule to postfix
Step 2: To add the SMS gateway authentication header in Postfix, you must add header_checks in the main.cf.
In this rule, you should filter for the domain in the recipient address.
In our case the regexp is set to "sms2.gw", and you must add a message header field to "x-ozeki-auth: username; password".
In our case the username is client1 and the password is puma123 (Figure 5).
Figure 5 - Add header check to postfix
Testing the solution
You can test this solution by sending an e-mail message from Mozilla Thunderbird through Postfix.
When you send the e-mail you must provide the recipient e-mail address in +44123467@sms2.gw format,
where +44123467 should be replaced to the SMS phone number you wish to send your message to and
sms2.gw should be the domain you have setup in your Postfix server.
The e-mail you send from Mozilla Thunderbird will go to your Postfix server.
Postfix will first append the x-ozeki-auth headers to it, then it will forward
it to the SMS gateway using the connector we have setup up.
Next the e-mail will come in to the built in SMTP Server of Ozeki SMS Gateway.
The SMTP server will select the appropriate user based on the e-mail header
and will forward the messages to it. Next Ozeki SMS gateway will convert this
e-mail into SMS and will send it through a mobile network connection.
You can follow the message's path in the Ozeki SMS Gateway logs (Video 3).
The path of the E-mail in Ozeki NG SMS Gateway (Video tutorial)
In the last video, you will see the process of testing the created system.
It will start with sending a message to a recipient with the sms2.gw domain.
At the end, you will see the log for the sending process.
This video takes 1 and a half minutes to watch, and it is easy to understand.
The Events tab of the Ozeki SMS Gateway will store all the events on a
connection so you can use it for troubleshooting later.
After this video, you can easily check if your email to sms with postfix system
is working or not.
This document explains how you can setup an E-mail to SMS service to serve
Sendmail servers.
This setup is useful if you provide SMS service to your customers and each
customer has their own Sendmail server.
The configuration explains how you can create accounts for each customer, and
how your customers can use their
username and passwords in Sendmail to send SMS through your service.
The document also shows how you can use SSL/STARTTLS encryption to encrypt
traffic between your customer's Sendmail server and your Ozeki SMS Gateway.
This is necessary to protect your usernames and passwords.
Introduction
In this setup we assume there are multiple organizations, and each has its
own Sendmail server. The users send e-mails form Windows Mail through
these servers. The Sendmail servers capture the e-mails going to a specific
domain and forward these e-mails to the Ozeki SMS Gateway. The Ozeki SMS Gateway
converts the e-mails into SMS and sends them out (Figure 1).
Figure 1 - E-mail to SMS to serve multiple Sendmail servers
Email to sms with Sendmail (Video tutorial)
In this video, you will learn how to setup a system that forwards emails to sms message with sendmail.
The video will start with setting up a new smpp client and will end with adding smtp users.
This video is only a little more than 2 minutes long and it is easy to understand.
The software used in this video is the Ozeki SMS Gateway which is the perfect choice for building an email forwarding system.
SMTP authentication
You need to configure a header check rule in Sendmail to add the Ozeki Authentication header
to the e-mail. You also have to configure the SMTP server in Ozeki to use this
authentication header to determine which user the E-mail belongs to. (Figure 2)
Figure 2 - Email header authentication
SMTP authentication in Ozeki
To configure the built in SMTP server of Ozeki to accept the username and password in the e-mail header,
you must select the "Ozeki E-mail header authentication" option in the SMTP server configuration (Figure 3).
The header field expected will be "x-ozeki-auth: username; password".
This header field is appended to each email forwarded to the SMS gateway from Sendmail.
Figure 3 - Ozeki E-mail header authentication
SMTP authentication in Sendmail
In this video, you will learn how to configure sendmail.
It will start with adding the ozeki SMS gateway’s domain as a smart host and
will end with adding the sms gateway authentication header in sendmail.
This video in only a little more than a minute long and easy to follow.
You will have no problem completing the process. After this video, you will
have working email to sms from sendmail system.
Step 1: Add the Ozeki SMS Gateway's domain as Smart host in the Sendmail configuration file.
Step 2: To add the SMS gateway authentication header in Sendmail, you must add H Configuration Command in the Sendmail configuration file.
In this command, you should add a message header field to "x-ozeki-auth: username; password".
In our case the username is client1 and the password is puma123 (Figure 4).
Figure 4 - Add custom header to Sendmail
Testing the solution
You can test this solution by sending an e-mail message from Windows Mail
through Sendmail.
When you send the e-mail you must provide the recipient e-mail address in
+44123467@sms2.gw format,
where +44123467 should be replaced to the SMS phone number you wish to send
your message to and
sms2.gw should be the domain you have setup in your sendmail server.
The e-mail you send from Windows Mail will go to your Sendmail server.
Sendmail will first append the x-ozeki-auth headers to it, then it will forward
it to the SMS gateway using the connector we have setup up.
Next the e-mail will come in to the built in SMTP Server of Ozeki SMS Gateway.
The SMTP server will select the appropriate user based on the e-mail header
and will forward the messages to it. Next Ozeki SMS gateway will convert this
e-mail into SMS and will send it through a mobile network connection.
You can follow the message's path in the Ozeki SMS Gateway logs (Video 3).
Testing the system (Video tutorial)
In this video, you will learn how to test your email to sms with sendmail system.
It will start with sending a new message and will end with the log of the sent message.
In the Events tab of the Ozeki SMS Gateway, you will find the records of all the events in the connection.
This video is 1 and a half minutes long. It is very detailed but easy to understand.
Summary
As you could see in the guide, the E-Mail to SMS technology using Sendmail with the help of Ozeki SMS Gateway is the
perfect solution if you manage different organizations and want to send out converted SMS to your customers. Sendmail
and Ozeki SMS Gateway work together to complete the conversion and distribution. Ozeki SMS Gateway's
Ozeki E-mail header authentication is a proper tool in the distribution process, it makes sure that the
messages are delivered to the right recipients. This is a fast working, easy to set up
solution in messaging between different platforms.
If you followed every step carefully above, you are able to forward E-Mail
messages as SMS to mobile users. Ozeki SMS Gateway works in any country, so if a connection has to be set up abroad,
it will be done just like any other network.
Make sure to read more about E-Mail to SMS technologies, such as
Gmail and Winmail.
This guide explains how you can setup Ozeki SMS gateway to act as an e-mail client. This
setup offers both e-mail to sms and sms to e-mail forwarding. For e-mail to SMS forwarding
Ozeki will download e-mail messages from an e-mail server (using the POP3 or IMAP protocol) periodically,
and it will send these e-mails as SMS messages to mobile phones. For SMS to e-mail forwarding
Ozeki will accept incoming SMS messages from the mobile network and will forward these
to an e-mail address (using the SMTP protocol).
This solution consists of two parts. The first part is the SMS to E-mail forwarding. If you
look at Figure 1, you will see the route of the message. The blue arrow
shows you how the SMS comes in from the mobile network, and how it is sent e-mail client
(such as Outlook) through an E-mail server using the SMTP protocol.
Figure 1 - System architecture of the SMS through Email function
If you only want to create SMS to E-mail forwarding, and you are not interested in the
other direction (E-mail to SMS), you can continue by reading the following guide. If
you want to do both directions, skip this guide, and jump to Part 2.
The second part is the E-mail to SMS forwarding. In this part Ozeki 10 downloads the E-mail messages
(to be forwarded as SMS) from the E-mail server using the POP3 or IMAP protocol. When the e-mail
is downloaded, it is forwarded to the mobile network as SMS. Take a look at Figure 2, and see the green
arrow, that shows how the message is handled.
Figure 2 - Incoming email sent as SMS
Although Figure 2 explains the procedure using the POP3 protocol, you have
two choices. You can use POP3 or IMAP
depending on what your E-mail server supports. Read one of the following
guides to get detailed setup instructions
for configuring E-mail to SMS forwarding.
This guide
teaches you to convert incoming SMS messages into outgoing
emails sent through Gmail in Ozeki SMS Gateway. In just 10 minutes, our guide
will walk you through the entire process, complete with a concise video tutorial,
a short breakdown of the steps necessary, a detailed step-by-step guide with
screenshots, and a FAQ section. Ozeki SMS Gateway's user-friendly interface
ensures a smooth setup, regardless of your technical background. What are you
waiting for? Let's get started!
What is SMS forwarding?
SMS forwarding is basically like call forwarding, but for text messages.
Normally, texts go straight to your phone, but with forwarding enabled, they get
rerouted to another number, email address, or even an app.
Ozeki SMS Gateway can send messages through your Gmail's SMTP connection so it
can forward SMS messages by email.
Sending SMS as E-mail through Gmail (video tutorial)
The following video showcases forwarding incoming SMS messages as e-mails
through Gmail in Ozeki SMS Gateway. It is barely 3 minutes long, but covers all
the necessary steps, including setting up 2-step verification and allowing your
Gmail account to be accessed by Ozeki SMS gateway, all the while showing how
versatile the software is, making it a worthwhile watch.
Sending SMS as E-mail through Gmail (Quick steps)
Create Gmail client
Enable 2-step verification in Google
Generate app password for Google account
Configure Gmail client
Test the connection
Sending SMS as E-mail through Gmail
Gmail connection can be easily installed and configured
through the browser GUI of Ozeki SMS Gateway.
So first, open the SMS Gateway, and click on the Add new connection (Figure 1).
Figure 1 - Add new connection
Here, in this menu, scroll down to the
E-mail clients submenu, and like in Figure 2, select Gmail client by clicking on
Install.
Figure 2 - Install Gmail client
Important: To create an app password, you need 2-Step Verification on your Google Account.
Go to your Google account, select Security and under Signing in to Google,
select 2-Step Verification, as shown in Figure 3.
Figure 3 - Open 2 step verification
At the bottom of the page, select App passwords, highlighted in red in
Figure 4.
Figure 4 - App Passwords menu
Enter a name that helps you remember where you will use the app password, then
hit Create (Figure 5).
Figure 5 - Create new app password
Copy your generated password from the highlighted textbox in Figure 6 and click
Done.
Figure 6 - Save app password
Head back to Ozeki SMS Gateway, click on the Gmail client you have created, and
enter your desired name, and the credentials of the Gmail account you wish to
use in the corresponding textboxes, as shown in Figure 7.
Figure 7 - Provide the Gmail settings
Now switch to the Advanced tab (Figure 8) and make sure the emails are sent to
the correct address. In the textboxes you can set the default recipient name and
address.
Figure 8 - Enter recipient address
Finally in the Events tab you can see that when a message arrives on this SMTP
client it is forwarded to the SMTP server which sends it to the recipient's email address (Figure 9).
Figure 9 - SMS sent as e-mail
Can I forward SMS messages to different e-mail clients?
Yes, Ozeki SMS Gateway allows you to forward to SMTP, POP3 and IMAP clients.
Can I forward SMS messages to different platforms?
Yes, with the help of Ozeki SMS Gateway you can forward SMS messages to apps
such as WhatsApp or forward them to other phone numbers.
This guide gives you information on how to view the event log of e-mail
to SMS connection. It is a crucial function of the Ozeki SMS Gateway. This way you
can monitor everything happening on your network and have faster fail recognizing.
The guide focuses on the built in SMTP/POP3 client of Ozeki 10 SMS gateway.
It shows you how you can open the "Powers" tab, and how you can enable the event
viewer functionality. The steps are relatively simple. The setup should not take
more than 3 minutes.
How to send SMS from POP3 / IMAP
To send SMS from POP3 / IMAP:
Launch Ozeki SMS Gateway
Select POP3 client
Go on the Powers tab page
Create new power
Choose Events
Name the power
Open Events tab page
Check the logs
Step 1 - Open the e-mail to SMS connection
To get the events tab of a connection, first on the “Users and Application” panel,
please find the connection you want to know more about. Here on Figure 1, we
used a sample POP3 connection. You can get to the main menu of the connection by
clicking the connection name which is written in blue.
Figure 1 - Open the POP3 connection
Step 2 - Select the powers tab of the e-mail connection
Next up, you must get to the powers tab. It is located under the connection’s name.
Here you will see the powers you can set for your connection. These are different
settings which you can configure the way you want. You can find the button with the help
of Figure 2.
Figure 2 - Select the powers tab
Step 3 - Click on create new power
Now you can make a new power on your connection. To proceed, please click on the
“Create new Power” button, which will take you to the power details panel.
The button is located next to the “Powers” title. You can find it with the help
of Figure 3.
Figure 3 - Click on Create new power
Step 4 - Select events
You can see on Figure 4, the different powers you can choose for the connection.
You can install any of them by clicking on the icon. To monitor your network in
real time, you need to choose “Events”. To proceed with the installation of the
power, please click the “Events” button. This will start opening your event log.
Figure 4 - Select events
Step 5 - Approve your selection
On this panel you can identify your new power by giving it a unique name.
Just type in the filed named “Name”. Click “Ok” to proceed to the final step.
You can easily find the button with “Figure 5”.
Figure 5 - Click OK
Step 6 - View the event log
Now you can monitor your connection and see the results on the “Events” window.
You will se everything happening on your network. If the line is red, it means
something is happening out of the order. Usually, it means something has failed in the system.
You can watch your example Events window on “Figure 6”.
This document gives you the steps to take to setup an SMPP to IMAP two-way SMS to E-mail gateway system.
SMPP stands for Short Message Peer-to-Peer protocol. It enables applications to send SMS messages to
mobile devices and receive SMS from mobile devices. Please note, that this setup
uses an e-mail account that can be access through IMAP on an E-mail server.
In this setup the phone numbers where the SMS messages should be sent to are in the e-mail subject line.
How to send SMPP SMS to E-mail
To send SMPP SMS to E-mail:
Create a new user by installing the IMAP client
Specify the details of the IMAP server
Set up the IMAP advanced settings
Configure SMTP server connection
Install SMPP client connection
Send a test SMS to the SMPP link
Create a route to route the SMS to IMAP
Check the logs on the Events tab
Send test SMS to test SMS to e-mail forwarding
View the e-mail in your mailbox
Step 1 - Create an IMAP client connection
To have a connection between the two devices, you need to add a new user which will be an IMAP client.
To do that, please click the Add new user/application button on the right side if the window.
It will take you to the new user panel. You can find the button with the help of Figure 1.
Figure 1 - Add new user
On this next step, you need to choose what kind of an e-mail client you wish to use. Please choose IMAP now. IMAP stands for Internet Message Access Protocol.
Desktop email apps use this to access the messages in your email account.
To create an IMAP user, please click the Install button next to the IMAP Client title. You can find it with the help of Figure 2.
Figure 2 - Install IMAP client
Step 2 - Configure the IMAP server details
The next step of the configuration of the IMAP client connection is to provide the details of the IMAP server.
As you can see it in Figure 3, type the server ip or host name as Host and type in the Port number.
Then, provide the username and password of your e-mail account. You can see the example on Figure 3.
Figure 3 - Configure IMAP connection
Step 3 - Configure the advanced details of the connection
In the following step, you need to configure the way, that the connection is going to forward the messages.
For that, first, click on the IMAP tab. Here, in the 'Message handling' section, you can set the maximum
length of the message and select the way, how the e-mail should be forwarded. Next, as Figure 4 demonstrates,
you can set the recipients for the e-mail. The addresses, you type here will get the forwarded e-mails.
Figure 4 - IMAP advanced settings
Step 4 - Configure the SMTP server
To be able to forward SMS messages as an e-mail, you need to configure an SMTP server that can send the e-mail message.
This configuration can be done with the IMAP client connection. As Figure 5 shows that you need to click on the SMTP tab
to be able to configure the details of the SMTP server. In the SMTP menu, you can configure the details of the SMTP server.
Figure 5 shows what settings you need to do to use the SMTP server. So, type in the host IP address and the port number.
Select the Authentication option and type in the username and password of your E-mail account.
Figure 5 - Configure SMTP connection
Step 5 - Configure the recipient e-mail address
The next configuration that you need to perform is to set up a recipient address
which will receive the forwarded message.
In the SMTP menu, type in the recipient e-mail address to the 'To e-mail' field,
as Figure 6 shows.
To the 'From e-mail' field, you can type the e-mail address of your
account. This ensures that this address will
show up as a sender address when the recipient gets the forwarded message. If
you finished with all configurations, you can just click OK.
Figure 6 - Recipient address
As you can see on Figure 7, if you switch to the Events tab, you can all
the happenings, and the log information of them.
You can see all the information about your connection on the left side panel.
If the connection status indicator switch is green, it means that the connection
is working, and it is ready to use.
Figure 7 - IMAP client connected
Step 6 - Create a new SMPP connection
To create a new SMPP connection, you need to click on the
'Add new connection' link in the management console of the Ozeki 10 SMS
Gateway app (Figure 8).
This will bring up a list of available protocols. You will have to select SMPP
client from the list. Note, that an SMPP client connection is used
if you wish to connect your SMS gateway to an SMS service provider over the
Internet.
Figure 8 - Add new connection
Now you can see all your options. You can read about them and get to know each a little better with the help of the short summaries.
In this case you need to choose the SMPP client option. Click the Install button next to it and it will open the SMPP connection configurator. You can see all your option on Figure 9.
Figure 9 - Install SMPP client
Step 7 - Configure SMPP connection
In order to configure your SMPP connection, you need to provide the host
name and port number of the SMPP service. As you can see on Figure 10,
your SMPP credentials and you must specify telephone number associated with this
connection. There could be more than
one phone numbers associated with this connection. In this case provide the
first one and check the overridable checkbox.
If this checkbox is checked, you will be able to use all phone numbers as sender
IDs. It is important to mention that the
SMPP hostname and port plus the username and password are provided by your SMS
service provider.
Figure 10 - Configure SMPP client connection
Once the SMPP connection is configured, you should check the SMPP connection
log to see if the system connected properly to your SMS service provider.
If the system connected properly, you would see the "Connection online" log entry.
The SMS connection logs can be found in the following directory in
Windows: C:\Program Files\Ozeki\Data\Logs\Connections\. In this
Event tab of the SMPP connection's details page, you can see a preview of the log.
This page contains the last 100 log entries. You can see the log on
Figure 11. Note that the SMPP log files are rotated to save disk space.
Figure 11 - SMPP client connected
Step 8 - Send test E-mail to SMS
At this point, you can write an e-mail message to the E-mail account to test the solution.
As you can see it in Figure 12, all you need to do is to write a simple message to the e-mail address from the configured E-mail address that you set in the IMAP client connection.
With everything is set up correctly, all you need to do now is to wait for the incoming e-mail to your E-mail account.
In case of an incoming e-mail, the IMAP client connection is going to download the e-mail and forward it instantly to the specified recipient address.
You can see the test e-mail on Figure 12.
Figure 12 - Send test E-mail
You can easily check the logs of the IMAP client in the events tab. These logs store every event that occurred with your IMAP client connection.
You will be able to see all events of the IMAP client connection. Here you can see a timestamp that shows the date of each event and the name of the connection.
Lastly, each event has got a message that describes the event. Figure 13 shows the event messages of downloading an e-mail from the IMAP account and forward it to the given recipient address.
Figure 13 - E-mail received
As you can see on the Sent folder of the IMAP client, you have successfully sent the message to the recipient.
If under the result field, you have a check mark, it means that the message was sent successfully. You can see the sent folder on Figure 14.
Figure 14 - E-mail sent as SMS
Step 9 - Send test SMS to E-mail
With the configured SMTP server, your system is capable of receive SMS message
and forward it as an e-mail message.
The SMS arrives at your system using a service provider connection. If you don't
have that kind of connection, you can check how to create an SMPP client connection.
Then, the message routed to the IMAP client connection, which uses its SMTP
server and the given details to forward the message to the recipient e-mail address.
To check if your IMAP client connection works as expected, you can check its
logs in the Events tab.
You will be able to see every event of the connection. Figure 15
demonstrates that what events logged in case of a successful SMS to e-mail
forwarding.
Figure 15 - SMS received form SMPP
You can see in the Figure 16 the SMS forwarded to the recipient E-mail address and appeared in the E-mail accounts mailbox.
This guide explains how you can setup Ozeki SMS Gateway's built-in SMTP server.
This configuration will allow you to setup e-mail to SMS forwarding.
Ozeki SMS Gateway's SMTP server will accept your e-mail messages and will use the
phone number in the e-mail address to send the message. For example, if you use
+441234657@smsgw.mycompany.com as the recipient e-mail address, the SMS will
be sent to +441234567. The SMS text will be the e-mail subject (or optionally the
e-mail body).
How to send SMS through an SMTP server
To send SMS through an SMTP server:
Launch Ozeki SMS Gateway
Open Advanced menu from toolbar
Create new Service
Choose SMTP service
Configure Service details
Check the SMTP server status
Enter the SMTP server settings
Activate authentication
Send test SMS through SMTP server
Introduction
You can setup e-mail to SMS forwarding by configuring Ozeki SMS Gateway's built-in SMTP server.
After this configuration Ozeki SMS Gateway will listen on port 25 (the standard STMP port),
and will accept incoming SMTP (e-mail submit) requests. To get the best result it is
recommended to setup a subdomain name entry (MX record) in your DNS system that points to your
SMS gateway. For example if your SMS gateway operates at IP address 192.168.0.10, you would
create an MX record called smsgw.mycompany.com, that would point to 192.168.0.10. After creating
this entry an e-mail sent to +44123467@smsgw.mycompany.com would be automatically forwarded
to the smsgw. (Figure 1)
Figure 1 - Forwarding E-mail directly as an SMS alert
Keep in mind that the built-in SMTP server of Ozeki SMS Gateway can only be
used for sms to e-mail
forwarding. It cannot be used for e-mail-to-e-mail forwarding. It will NOT
forward e-mail messages to other Email servers. (Figure 2)
Figure 2 - An email forwarded through a company's mail server to Ozeki SMS Gateway
Video tutorial
The following video tutorial shows the steps to take to setup the built in SMTP
server of Ozeki 10 SMS gateway. These steps are also explained in the section
following the video. Please follow the steps accurately to get your system up and
running.
This video provides information on how to setup an e-mail to sms smtp server.
Step 1 - Create the SMTP service
The creation of on SMTP service in the SMS Gateway is super easy, it takes just a few clicks.
First, open the SMS Gateway application, and on the toolbar, click on the icon of the
Advanced option. Here, as you can see it in Figure 3, just click on the Create
new Service button.
Figure 3 - Create a new SMTP service in SMS Gateway
Next, you need to select the E-mail option from the list of available service types.
After you selected the E-mail option, like Figure 4 demonstrates it, you need to click on
the SMTP service type.
Figure 4 - Select the SMTP service type
Step 2 - Configure the SMTP service
Here, in the configuration menu, you need to provide a name for the service. This name
will be used by the SMS Gateway to identify the connection. The next thing, that you
need to do here is to specify a port number for the SMTP service (Figure 5). This is 25 by default,
and you can leave it there.
Figure 5 - Provide details for the SMTP service
Step 3 - Test your SMTP server
It is a good idea to check if your SMTP server is up and running.
Test your SMTP server with the Telnet application of Windows. Keep in mind that you should
manually activate Telnet
in Windows 10 ('Turn Windows features on or off').
Please telnet to port 25 of the computer running Ozeki SMS Gateway.
If the SMTP server is running on port 25, the SMS Gateway software should greet you (Figure 6).
Figure 6 - Checking the status of Ozeki SMS Gateway's SMTP server
Step 4 - Advanced configuration of STMP service
The Delivery Report tab contains some other setting that you can modify as well.
As you can see it in Figure 7, you can modify the details of the SMTP server. Here, you
can set the name of the Host, modify the SMTP security and authentication details.
Figure 7 - Advanced configuration of the SMTP service
Step 5 - Configure SMTP authentication
This step is optional.
SMTP server authentication provides a safer connection where you can connect with the username and
password. To do this, you need to setup a standard user account in Ozeki 10 SMS Gateway and
use the username and password of this user account to connect. After the standard user account
was created, you can turn on the SMTP authentication provider (Figure 8). Remember, you
will have to configure SMTP authentication in your e-mail client as well.
Figure 8 - Activating SMTP server authentication
FAQs
If my SMTP server requires authentication, can I specify my SMTP username and
password?
Great news! This software caters to both scenarios:
SMTP servers with user authentication: No problem! Just head over to the
"Advanced" tab within the email user configuration form and set up the
authentication details.
SMTP servers without user authentication: You're all set! The software works
seamlessly without needing any additional configuration in this case.
Is the following number format supported: +322010444455@sms.domain.com?
While convenient, the +322010444455@sms.domain.com format isn't directly supported.
There are a few reasons for this:
Security concerns: Spam and viruses can overwhelm the built-in mail server,
affecting the SMS gateway's performance. External mail servers (like Exchange
or Sendmail) offer better spam filtering.
Port conflicts: The mail server might already be using port 25, causing
conflicts with the SMS gateway.
Bounce handling complexity: Managing email bounces and loops within the SMS
gateway can be tricky and slow down SMS functionality.
Instead of the special format, simply include the recipient's phone number in the
subject line of your email. This works just as well with Ozeki!
Is the software able to get email (Pop3) and send (SMTP) with clear from
headers/footers/attachments codes only first 160 characters that will send to SMS?
Great! The software focuses on delivering your message efficiently. While it
skips headers, footers, and attachments to keep things concise, it captures the
crucial parts:
Subject line: This acts as a handy reference for the recipient.
Body text: The core message gets delivered without unnecessary clutter.
Plus, you can control the message length for SMS forwarding. Setting it to 160
characters ensures your message goes through in just one SMS!
To convert email to sms is as simple as sending a normal email.
All you have to do is to put the phone number into the recipient field,
write the message and click send.
To convert email to sms, follow these simple steps:
Write your email in your favourite e-mail client, such as Mozilla
thunderbird, Windows Mail or Outlook.
Put the phone number into the email address. You can use the
Ozeki SMS Gateway phone number formats, such as
0630123467@mydomain.com.
Compose the email subject and the email body and click send. Ozeki SMS
gateway will convert the subject and body into one text message.
When you convert email to sms, you might want to setup
SMS routing to receive reply messages
into your inbox.
This guide gives you instructions on how to setup an e-mail to SMS gateway
that allows you to send SMS messages from the Internet by sending e-mails
to a domain and using the username part of the e-mail as the recipient
phone number. E.g. 0123456798@emailtosms.ozeki.hu.
Step 1: Create a DNS zone called emailtosms.ozeki.hu.
In order to accept e-mails in the emailtosms.ozeki.hu subdomain, a new DNS
zone should be created for this subdomain. In our example we use Amazon
web services to create this subdomain. You can also use Amazon web services,
even if you host your main domain at a different DNS provider. Amazon Web Service
(AMS) is a massive global cloud infrastructure provider, that will innovate your
company’s development. It will lift the weight off of your shoulders by handling
the hardware need of the infrastructure,
which instantly grows as you scale up the workload on it.
On Figure 1, you can see how you can start using the AWS.
Figure 1 - Open Amazon Web Services
Next step is to choose you service. Amazon offers countless service options. Now
please choose "Route 53", as you can see on Figure 2. Route 53 is
an extremely reliable and cost effective
connection, which can be used to route users to infrastructures outside of the
AWS
Figure 2 - Select Route 53. This is the DNS service
Now you need to set up the connection between AWS and Ozeki SMS Gateway. To do that,
please look for a "Hosted Zone option on the left side of the AWS website.
You can find it with the help of Figure 3. Click on it to start setting
up a new Hosted Zone.
Figure 3 - Select Hosted Zones
Now you are on the Hosted Zones window (Figure 4). Search for a “Create hosted zone”
button to start setting up a new connection. It will take you to the hosted zone configuration panel.
Figure 4 - Create Hosted Zone
Now you need to configure the hosted zone. The important step here is to type
"emailtosms.ozeki.hu" to the “Domain name” field. This way the AWS will
connect with the Ozeki SMS Gateway and work as one system. You can find the filed
with the help of Figure 5.
Figure 5 - Enter the domain name: emailtosms.ozeki.hu
Now to finish the configuration, click “Create hosted zone”. After you clicked the
button, the AWS will try to connect with the Ozeki SMS Gateway, the green
pop-up banner on the top of Figure 6 will be visible if the connection was successful.
Figure 6 - Click Create Hosted Zone
Step 2: Create an MX record pointing to your SMS gateway
This step is about creating two records in your newly created domain. One
should be an A record pointing
to your sms gateway, the other should be an MX record telling the email servers
to forward emails
to your sms gateway. The way the system works, is that email servers on the
Internet will look up the MX record,
which point to your mail.emailtosms.ozeki.hu A record which points to the IP
address of your SMS gateway.
After the email servers found out the IP address of your SMS gateway, they will
forward the e-mail
messages to its SMTP port (25).
Now you have the connection activated, you can start creating an MX record pointing
to your SMS Gateway. You can see the working Route 53 connection in the hosted zones
list in AWS (Figure 7). Please click the blue title of the connection to
start adding a record point.
Figure 7 - Open your domain
Here you will be presented with the “Hosted zone details” panel, as you can see on Figure 8. Here you
can import files, manage tags, edit, and delete records, but most importantly
create new records. Click on the “Create record” button to start
the procedure.
Figure 8 - Create MX record
Now you will be presented with the routing policy options, which you can find on
Figure 9. AWS can handle most customer needs, so it has multiple routing
policy to choose from. Now you need the “Simple routing” option. Click it and
then click “Next”.
Figure 9 - Select simple routing
Now you are on the “Configure records” panel. Here you can create new, form or
delete existing records. To add new routing records to emailtosms.ozeki.hu
find the “Define simple record” button and click it. Figure 10 will help
you with that.
Figure 10 - Select define simple record
The next step is to define the record. To do that, we give you a hand with
Figure 11. As you can see, the first field must contain “mail”.
The second field needs the IP address of your Ozeki 10 SMS Gateway. It will tell
the Route 53, what to answer to DNS queries.
Figure 11 - Create an A record pointing to your SMS gateway
You must make another simple record. Click the “Define simple record” button
again to start the procedure one more time. You can find the button on Figure 12.
Figure 12 - Select define simple record again
Now you have to configure your second simple record. It is rather difficult, but
we give you help with “Figure 13”. the first field, called subdomain need to be
left empty. The “Value/Route traffic to” field must contain only the
following: “10 mail.emailtosms.ozeki.hu”. Below it, there is a drop-down
menu. You need to find the option called: “MX-specifies mail servers”.
If you have successfully typed in all the required data, please click the
“Define simple record” button.
Figure 13 - Create the MX record
You now have all the needed records set up. The “Simple routing records to add to
emailtosms.ozeki.hu” panel should contain the two records which we just made.
You can see how it should look like on Figure 14. Click the
“Create records” to create the records.
Figure 14 - Configured Zone
On Figure 15, you can see how your configured DNS zone should look like on the records panel.
You are finished with the record making. You should proceed to the next step.
Figure 15 - Fully configured DNS zone
Step 3 - Create an NS record pointing to your DNS zone
When your subdomain is created, the next step is to point to it from your main domain. In our example we have
create a subdomain called emailtosms.ozeki.hu, so we have to setup an NS record in the domain ozeki.hu to
point to it.
Now that you have the records created, you should head back to the “Hosted zones”
panel. Search for it on the left side of the window. You can find it with the help
of Figure 16.
Figure 16 - Back to hosted zones
Here, you need to search for your main domain. Figure 17 shows you that
our example domain is ozeki.hu. Click on it to get to the options menu of that domain.
Figure 17 - Select your main domain
You need to create a new record once again. This time it is on the domain of
“ozeki.hu”. Search for the “Create record” and click it. You can find
it easily on Figure 18.
Figure 18 - Select create record in your main domain
The next step is to create the NS record that points to your newly created zone. Note,
that the DNS server you provide in this step must match the DNS server serving your
new zone. In our example you will see if you look at Figure 16, that the DNS server
of emailtosms.ozeki.hu is ns-1489.awsdns-58.org. This is why we provided this value
in the created zone. (Of course, your DNS server for your subdomain will be
different, just make sure it matches.)
You must also note that the domain name emailtosms is used in the Record name
of the NS record. This will ensure, that queries coming to the zone
emailtosms.ozeki.hu will be directed to the appropriate DNS server serving the
emailtosms.ozeki.hu subdomain.
To configure this new record, please follow Figure 19. The first field
needs to contain your DNS server name. The second field needs to be set on
“IP address or another value depending on the record type” and contain your subdomain's DNS server.
The Record type needs to be “NS”. The others
are up to you, but we recommend the settings you can see on Figure 19.
Figure 19 - Create the NS record pointing to the subdomain
The final step is to click the “Create records” button on the bottom of the page (Figure 20).
Figure 20 - Finalize the E-mail to SMS DNS settings
The final step is to click the “Create records” button on the bottom of the page.
After these settings your DNS system will forward e-mails coming to phonenumber@emailtosms.ozeki.hu to your
SMS gateway's (23.198.78.37 in our example) SMTP port, which is the TCP/IP port 25.
How to control the To Address in SMTP to SMS forwarding
This handy guide unlocks the power to automatically convert email subjects into
SMS addresses. No coding required! In just 5 minutes, you'll be a pro at
leveraging this time-saving feature. Our guide includes a clear video tutorial,
a step-by-step breakdown with screenshots, and a helpful FAQ section, all the
while showcasing Ozeki SMS Gateway being able to automatize otherwise tedious
tasks. Boost your efficiency and take control of your SMS communication today –
dive into the guide and get started!
What is SMTP?
SMTP stands for Simple Mail Transfer Protocol. Imagine it as a set of rules that
govern how emails travel between different servers on the internet. Think of
mail trucks needing specific instructions to deliver mail between post offices.
SMTP dictates how emails are formatted, routed, and ultimately delivered to the
recipient's inbox. It's a behind-the-scenes protocol that ensures smooth email
communication.
How to control the To Address in SMTP to SMS forwarding (video tutorial)
This concise 91-second video demonstrates how to automatically convert incoming
email subjects into outgoing SMS phone numbers. Leveraging Ozeki SMS Gateway's
renowned user-friendliness, you'll be a pro in under two minutes. Plus, the
accompanying guide provides a clear roadmap for setting up this clever feature.
Don't miss out on this efficiency hack – watch the video and unlock the power of
Ozeki SMS Gateway today!
How to control the To Address in SMTP to SMS forwarding (Quick steps)
Install SMTP user
Set up SMTP user
Configure SMTP user's advanced settings
Check if messages are received
Check is SMS messages are sent out
How to control the To Address in SMTP to SMS forwarding
Inside Ozeki SMS Gateway, click on the Apps button and install an SMTP user, as
shown in Figure 1.
Figure 1 - Install SMTP user
Setup the SMTP user by entering your desired login credentials, then hit Ok, in
the same way as Figure 2.
Figure 2 - Login information
Click on the Advanced button highlighted in red in Figure 3, look for the newly
created SMTP service among the services, and click its Details button.
Figure 3 - Open SMTP service details
Under the Advanced tab, click on Message text, and select E-mail body from the
dropdown menu next to Use (Figure 4).
Figure 4 - Use email body
Click on Recipient and select Convert E-mail Subject to phone number from the
dropdown menu under To address, as seen in Figure 5, then check the box next to
Add + sign to phone number.
Figure 5 - Convert email subject
Under the Events page of this freshly created SMTP user, you can check if
your message has been received (Figure 6).
Figure 6 - Message received
If you have done everything correctly so far, your Sent folder should contain a
new sent message, as shown in Figure 7.
Figure 7 - Message sent as SMS
Can I use this technique with other e-mail servers?
Yes, you can also apply this method to POP3 and IMAP.
Can I limit the character count of the outgoing SMS?
Yes, in order to avoid sending too long or too many SMS messages, you can set an
outgoing character limit under the Advanced tab of the Details of the connection.
Learn how to test SMTP to SMS using Telnet. This comprehensive guide will walk
you through the process of enabling the SMTP service in Ozeki SMS Gateway,
downloading PuTTY, connecting to the Ozeki SMS Gateway SMTP port, sending an
email using Telnet, and checking the Ozeki SMS Gateway SMTP log.
1.) Enable the SMTP service in Ozeki SMS Gateway Advanced menu
First, open the SMS Gateway application, and on the toolbar, click on the icon of the Advanced option.
Here, as you can see it in Figure 1, just click on the Create new Service button.
Next, you need to select the E-mail option from the list of available service types.
After you selected the E-mail option, like Figure 1 demonstrates it, you need to click on the SMTP service type.
Figure 1 - Create SMTP service
Next, in the configuration menu, you need to provide a name for the service. This name will be used by the SMS Gateway to identify the connection.
The next thing, that you need to do here is to specify a port number for the SMTP service (Figure 2). This is 25 by default, and you can leave it there.
Figure 2 - Configure connection details
2.) Download putty
PuTTY is a free and open-source terminal emulator, serial console and Telnet application. It supports several network protocols,
including SCP, SSH, Telnet, rlogin, and raw socket connection. In this example we will use this software for telnet to the
Ozeki SMS Gateway SMTP port. You can download it from the putty.org (Figure 3).
Figure 3 - Download Putty
After the installer is downloaded install the software with it Setup Wizard (Figure 4).
Figure 4 - Install Putty
3.) Telnet to port 25 of the Ozeki SMS Gateway PC
Next open the Putty and connect to the Ozeki SMS Gateway SMTP service. Select the Session menu from the categories then
define the IP address and port of the Ozeki SMS Gateway SMTP service (Figure 5). The connection type will be Telnet. Finally click on the Open button.
Figure 5 - Telnet to Ozeki SMS Gateway SMTP port
4.) Send an e-mail using telnet
You can see in the new console that the connection to the Ozeki SMS Gateway SMTP service is established as the Figure 6 shows.
Figure 6 - Connection established
Finally, you can send an e-mail using telnet by typing the below commands as you can see in the Figure 7.
If you use +36201234567@mysmsgw.com as the recipient e-mail address, the SMS will be sent to +36201234567.
EHLO
MAIL FROM: test@ozekimail.com
RCPT TO: +36201234567@mysmsgw.com
DATA

Hello world
.
Figure 7 - Send message from Putty
5.) Ozeki SMS Gateway SMTP log
For check the Ozeki SMS Gateway SMTP server logs the first step is to open the SMTP server connection on the right side
of the SMS Gateway Manager console page as you can see it on the Figure 8.
Figure 8 - Open SMTP server
Now in the Log level section of the user's Advanced tab enable the 'Log communication events' and 'Log messaging events' checkboxes
if you wish to add log information about routing decisions, message delivery events and the SMTP communication (Figure 9).
Figure 9 - Enable SMTP logging
Once you have enabled the 'Log communication events' and 'Log messaging events' options, you will see information about routing decisions,
about message delivery events and you will see the SMTP communication in the Events menu when you receive an SMS (Figure 10).
This page gives information on how to configure a custom sender ID in E-mail to SMS when you send SMS from an IMAP user.
You will find some screenshots to help you find the appropriate section of the settings form.
Setting up Sender ID in E-mail to SMS (Video Tutorial)
In this 2-minute-long comprehensive video guide we will walk you through the steps
of how to configure a customer Sender ID for an E-mail client. By following the
given instructions, the accurate way of setting up Sender ID in E-mail to SMS by
yourself. The guide starts with configuring the Sender ID override in the mobile
network connection. A test message from an email client demonstrates the practical
application, and the log analysis in the Service Provider connection's Events tab
verifies the successful override of the Sender ID. This tutorial ensures a clear
understanding of the process, allowing users to customize Sender IDs effectively
in their SMS communications.
Step 1 - Configure Sender ID override in the mobile network connection (SMPP)
The first step is to open the Service Provider connection from the Management page left side (Figure 1).
Figure 1 - Open Service provider connection
In the Configure tab search the Overridable option and check it to override the
sender ID if you receive a message from the IMAP user (Figure 2).
In that case if this option is enabled the Service provider connection to use the
Sender ID what it's receive from the user instead it's default Telephone number.
Figure 2 - Enable phone number override
Step 2 - Configure the Sender ID you wish to use in the IMAP user
To configure the Sender ID, open the IMAP user from the Management page right
side (Figure 3).
Figure 3 - Open IMAP user
In the IMAP user Configure tab open the Advanced tab page and in the From address (outgoing) section
you are able to specify the From address what will be the Sender ID for the SMS messages (Figure 4).
Figure 4 - Specify Sender ID
Step 3 - Send a test message from your E-mail client (e.g. Outlook)
After you configured the Sender ID in the IMAP user and enabled the override option in your Service Provider connection you can send a test message from your e-mail client (Figure 5).
Figure 5 - Send test E-mail to SMS
Step 4 - Check the Sender ID in the logs
Finally in the Service Provider connection's Events tab you can see the log for the sent message.
In that log you can see that the Sender ID is changed to the From address that specified in the IMAP user configuration (Figure 6).
This page gives information on how to configure the maximum
message length when you receive e-mails through the built in
SMTP server of Ozeki. You will find some screenshots to
help you find the appropriate section of the settings form.
What is the SMS character limit of the text message
The SMS character limit for a standard SMS message is 160 characters.
However, some mobile carriers and messaging platforms support longer messages
by splitting them into multiple parts, each with its own 160-character limit.
These are known as concatenated SMS messages or multiple part SMS messages.
How can you use Emojis in the text messages
Using emoticons in text messages emphasizes the emotional message of the text.
You can also include emoticons in your messages, whether you're sending a business
or private text. It is important to know: the character restriction is
decreased to 70 characters when employing emoticons, allowing for short
but visually convincing communication. Make use of emoticons to improve
your messaging experience.
How to set the SMS length
To set the SMS length:
Launch Ozeki SMS Gateway
Click on the Advanced toolbar icon
Create new Service
Choose SMTP service
Configure Service Details
Select Advanced tab
Open Message text group box
Tick Limit message length check box
Set Maximum length of the SMS message
The creation of on SMTP service in the SMS Gateway is super easy, it takes just a few clicks.
First, open the SMS Gateway application, and on the toolbar, click on the icon of the Advanced option (Figure 1).
Figure 1 - Open Advanced menu
Here, as you can see it in Figure 2, just click on the Create new Service button and you need to select the E-mail option from the list of available service types.
After you selected the E-mail option, like Figure 2 demonstrates it, you need to click on the SMTP service type.
Figure 2 - Create new SMTP Service
In the configuration menu, you need to provide a name for the service. This name will be used by the SMS Gateway to identify the connection.
The next thing, that you need to do here is to specify a port number for the SMTP service (Figure 3). This is 25 by default, and you can leave it there.
Figure 3 - Add SMTP Service
You can see in Figure 4 that the new SMTP service will appear in the Services menu. Click the Details button to open additional settings.
Figure 4 - Open Details page
On the Details page, under the Configure tab, open the Advanced tab as shown in Figure 5.
Figure 5 - Open Advanced tab
Open the Message Text section where you can change the maximum message length. By default, the length of an SMS is limited to 160 characters as an email can be very long.
Change this value if you want to send a longer or shorter part of the email or you can even turn off the limit if you need to send the entire message (Figure 6).
Configure SMTP authentication in the E-mail to SMS setup
This document explains how you can setup E-mail client authentication on Ozeki SMS Gateway.
Ozeki provides a built in SMTP server for sending e-mails as SMS and a built in IMAP server for
downloading incoming SMS messages as E-mails. When you setup these servers, you have the
option to create user accounts for each email client in your organization. For example,
if your office users use Windows Mail, you can create a separate e-mail account (IMAP user) in Ozeki
for every office user. In case you use an exchange to SMS configuration,
you can setup multiple e-mail connectors with separate usernames and passwords.
How to configure SMTP authentication
To configure SMTP authentication:
Launch Ozeki SMS Gateway
Install SMPP client
Create new E-mail Service
Select SMTP service
Configure new E-mail Service
Select IMAP service
Add three new IMAP user
Modify Outlook Account Settings
Send test e-mail
Check the logs
The default setup
When you setup the built in SMTP server of Ozeki 10 SMS gateway,
by default e-mail client authentication is not enabled. Instead, a single user is created called
"SMTP Server User", and this user account will handle all e-mail messages you wish to send as
SMS (Figure 1).
Figure 1 - SMTP without authentication
Authenticating e-mail clients
To have a better system, you can create individual user accounts for each e-mail client. In
this case, your e-mail clients will have to login to the SMTP server built into Ozeki 10 using
the username and password you have configured. In this setup if an E-mail client sends an E-mail
to the system, the e-mail will be accepted by the corresponding e-mail user you have created.
You can see the e-mail in its logs, it will be registered under this username in
the SQL reporting database,
and you can use this user account to creating custom rules for routing and modifying the messages.
Figure 2 shows the setup, where you have a username and password created for each e-mail client.
Figure 2 - SMTP with authentication
SMTP vs IMAP user accounts
When you create e-mail client accounts, you may choose simple SMTP user
accounts, or you
can choose IMAP user accounts. SMTP user accounts can only be used for sending
E-mail to SMS.
IMAP is a better choice, because it also offers receiving SMS. In this case the
e-mail clients
can not only send SMS through SMTP, but they can also download incoming SMS
messages as e-mails from
the Ozeki SMS Gateway. Note that an IMAP user account provides access to both
Ozeki services: the
built in SMTP server and to the built in IMAP server.
How to create IMAP user accounts
Video 1 presents the steps to take to setup IMAP users. The steps are similar if you need SMTP users only.
In that case simply select SMTP user instead of IMAP user when you create the user account. (If
you want to use both SMTP and IMAP, you only need to create IMAP users. In this case you don't have
to create two accounts: one for SMTP and one for IMAP access.)
Sending your first SMS from Outlook
After the IMAP user accounts are created, you are ready to setup your e-mail client
to send and receive SMS messages. In our example we use Outlook 365 to send our first SMS.
To connect to the SMS Gateway in Outlook, you need to setup the e-mail account in Outlook.
Start by clicking on the File Menu in Outlook and follow the steps in Video 2. When you configure
your e-mail client you will be asked to enter the IP address of the IMAP server and the IP address
of the SMTP server. In both cases, provide the IP address of your Ozeki SMS Gateway. Make sure
you open port 25 in your firewall for SMTP traffic and
open port 143 in the firewall for IMAP traffic on the server,
where Ozeki SMS Gateway is installed.
At the end of this video, you will see how to include the mobile phone number you wish
to send you SMS to as an E-mail address in the message's To field. You will note that
you must provide the phone number as +441234567@domain, where the domain can be anything
you like.
Checking the logs
To see what happens in the background, you may check the logs of Ozeki 10 SMS Gateway. Video 3
presents you the steps to take to find your SMS in the logs. You can see the SMS in the logs
of the mobile network connection, and you can also see it in the logs of the E-mail client user.
Video 3 - Checking the logs of your E-mail to SMS service
To create a solution to send texts from email we need 25 minutes. This guide
presents steps and the necessary information to help you complete this procedure efficiently.
Maybe the biggest benefit of this email solution is that all you have to do is
perform some simple configuration and you will be ready to send SMS through a secured SMTPS protocol.
This solution uses Ozeki SMS Gateway, so you can benefit from the fact that it
is an on-premises system that results in excellent data protection.
We presume you are familiar with the basics of mobile messaging technology.
You will be presented with some valuable information and well-structured
step-by-step instructions.
We hope you will find the presented instructions beneficial.
How to send E-mail to SMS using SMTPS (STARTTLS)
To send E-mail to SMS using SMTPS (STARTTLS):
Launch Ozeki SMS Gateway
Install SMTP user
Provide username and password
Open SMTP service Details
Modify SMTP settings
Configure STARTLS connection
Send encrypted e-mail to SMS message
Check the logs
E-mail to SMS using SMTPS (STARTTLS)
The following easy to follow and detailed video explains how to forward Emails to SMS messages with a STARTTLS connection.
You will start with setting up a new SMTP user in the Ozeki 10 SMS Gateway and takes you all the way to forwarding your first email in a form of an SMS message.
This 3-minute-long video will teach you how to setup an SMTP user, how to connect the Ozeki 10 SMS Gateway with the Thunderbird email client using a secure STARTTLS connection.
Setup a new SMTP user
To setup a new SMTP user, you need to select the Apps icon from the Toolbar of the Ozeki 10 SMS Gateway (Figure 1).
If you click the button, you will be presented with the Add user or application list, where you can select what type of application you wish to configure.
Look for the SMTP user install item in the Email servers section. Click the blue Install link to access the Install user/application panel.
Figure 1 - Install SMTP user
Provide the login credentials
To provide the login credentials, look for the General tab page of the SMTP user (Figure 2).
In the Login information group box, you can see two textboxes.
Provide the login credentials of your choice and click the Ok button
located under the group box.
Figure 2 - Provide username and password
Open the Details
Now you created an SMTP service. To provide more security details, look for the
Advanced icon on the toolbar, next to the Routes button.
Click it to access the Services page.
To modify the security settings of the service, click the grey Details
button located next to the Enabled switch button (Figure 3).
Now you will see the Details page of the service.
Figure 3 - Open SMTP service details
Specify the security settings
To specify the security settings, look for the Connection details
group box, where you will find the Port input field. Change the default
port number to 857 (Figure 4), to work with your email client.
This number will also be required to change when you configure the server
details in the email client. This way the Ozeki 10 SMS Gateway and the
email client establishes connection.
Below the Connection details group box, you will find the User
authentication group box. Here you can set the Authentication method which
will be SMTP authentication in this case.
With this method, the service could only accept messages from a secure source.
Figure 4 - Setup SMTP port and authentication method
Select a security method and enable SSL connection
To select a security method, look for the Advanced tab page (Figure 5),
next to the Delivery reports tab.
Here you will see the SSL group box. The Method combo box is for changing
the security method of the connection.
In this case, choose the STARTTLS method. The STARTTLS method could
encrypt the channel in use, with the help of TLS or SSL protocol.
It could make a secure connection out of an unsecured one.
Below the combo box, you will see a Use SSL connection checkbox.
Make sure to check it, because an SSL certificate will encrypt your data before sending it to the receiver and the message could only be decrypted by the target server.
These two settings will result in a highly secure connection.
Figure 5 - Select security method and enable SSL connection
Enable logging
To enable logging, scroll down to the Log level group box, where you can
see the Log communication at SMTP protocol layer checkbox (Figure 6).
Check it to enable logging on this connection. Log files are automatically
created to store all the events on the connection.
The log file holds essential information about the error in case of one. It
speeds up the process of correcting the error.
Figure 6 - Enable logging
Open Thunderbird and configure the server
After you have configured the Ozeki 10 SMS Gateway, open Thunderbird and setup a STARTLS connection.
To do that, open the SMTP server details window (Figure 7) and provide a server name in the proper input field.
You could open the details window by clicking the three stripes icon located on the upper left corner of the Thunderbird client and find the Account settings option.
Now find the Outgoing server menu point which is at the bottom of the list.
Here you can manage all the outgoing servers you currently have. Click the add button to open the SMTP server configurator.
Next, you need to set the port number (857) that the server will use.
Below the Port field, you will see the Security and Authentication group box.
Here, you will need to set the Connection security to STARTTLS,
the Authentication method to Normal password and provide a username for the server.
This way, the server and the client side of the connection will have the same
security properties, which means maximum security.
Click the OK button located under the Username input field to finalize the setup.
Figure 7 - Configure STARTLS connection in Thunderbird
Send encrypted email message
Now you have the STARTTLS connection between the email client and the Ozeki 10 SMS Gateway.
On Figure 8, you could see that in the To input field, located under the sender address, you need to type in the phone number you wish to send the SMS to, and the server name provided before.
Write a subject that will be visible for the receiver, and the body of the email.
The email client will send the message to the data through the secured port to the Ozeki 10 SMS Gateway.
The Ozeki gateway will then forward it to the telephone number in the To textbox.
Figure 8 - Send encrypted E-mail message to Ozeki
FAQs
Is there filtering capability by specific keyword on incoming email?
Want to prioritize certain emails for SMS delivery? No problem! This software
lets you set up keyword filters. Here's how:
Go to the "Email user configuration" form.
Click on the "Filter" tab.
In the "Keywords in Subject" box, enter the specific word(s) you want to
track.
Emails with those keywords in the subject line will be automatically forwarded
as SMS messages, ensuring you never miss important notifications!
Is there filtering capability by specific keyword on incoming SMS?
You can customize where SMS notifications are sent. This software allows you to:
Forward to one email address: Perfect for receiving all important SMS
messages in a central location. Simply set the "Mode" to "Move" when
configuring the route.
Forward to multiple email addresses: Need to keep different teams informed?
No problem! Use the "Copy" mode and create separate routing rules for each
recipient.
How to set it up:
Keyword filtering is handled in the "Inbound routing" table. Access it by
clicking "View/Routing/Inbound" in the menu.
Click "Add" to create a new route.
Select the source (your service provider) and enter your keyword in the
"Condition 3. (Keyword)" field.
Choose the destination email user(s).
Set the "Mode" to "Move" for one recipient or "Copy" for multiple.
Need more details? Check out the Inbound Routing guide for further instructions
at Inbound Routing.
Can I submit non-text messages such as VCard using an e-mail to SMS configuration?
You can use this software to send vCards (and other things!) through email.
There's a specific format to follow:
Leave the subject line empty.
Copy and paste a special code into the email body.
SMS:VCARD
BEGIN:VCARD
VERSION:2.1
N:family name;given name
TEL;VOICE;HOME:home landline phone number
TEL;VOICE;WORK:work landline phone number
TEL;CELL:mobile phone number
TEL;CELL;WORK:work mobile phone number
TEL;FAX:fax number
EMAIL:e-mail address
URL:homepage address
BDAY:date of birthday
NOTE:note text
END:VCARD
This code acts like a secret instruction for the software. You can find the exact
code and instructions in the software's documentation (or the Inbound Routing
guide, if available).
Basically, the software can recognize emails with this special format and convert
them into the desired message type (like a vCard in this case).
When the built in SMTP server is used, which user account will send the messages?
The admin account
Option 1: Utilizing the Administrative Account (Unauthenticated)
The most straightforward approach is to leverage the administrative account. In
this scenario, all SMS messages will be transmitted under the identity of the
administrative user. This method offers ease of setup but may not be suitable for
scenarios requiring a more specific sender identification.
Option 2: Implementing a Dedicated User Account with SMTP Authentication
For situations demanding greater control over the sender identity, a dedicated
user account with SMTP authentication can be established. Here's the recommended
procedure:
Enabling SMTP Authentication: Within the built-in SMTP server's configuration
settings, locate the "Server Preferences" form. Activate the checkbox labelled
"SMTP Authentication."
Creation of a Standard User Account: Establish a new standard user account
specifically for sending SMS messages. This account should possess a unique
username and password.
Configuration of the External Email Client (SMTP Client): Access the settings
of your external email software (SMTP client). Locate the SMTP authentication
options and provide the username and password credentials associated with the
standard user account created in step 2.
By following these steps, you can configure your external email client to
transmit SMS messages through the built-in SMTP server while utilizing the
designated standard user account as the sender identity. This approach offers
enhanced control over the perceived sender of SMS messages.
How can I configure an SMS gateway for best performance?
Achieving optimal system performance requires a focus on minimizing
disk-intensive functionalities. Here are key strategies to consider:
Deactivate Persistent Message Queues: Disabling persistent message queues
reduces disk writes associated with storing messages for later processing.
Disable Detailed Logging: Logging provides valuable information, but detailed
logs can generate significant disk activity. Consider filtering or minimizing
logging levels to strike a balance between data and performance.
Streamline Routing Configuration: Restrict the number of incoming and outgoing
routes to the minimum necessary for your specific use case. This helps to
streamline message processing and reduce resource utilization.
Disable Unused Features: Evaluate and disable any functionalities that are
not essential for your current operations. This may include accounting modules,
inactive user accounts, and superfluous application configurations.
Our consultancy services and performance optimization packages can provide
comprehensive guidance and assistance in fine-tuning your system for optimal
results. These services leverage our expertise to ensure your system operates at
peak efficiency.
Note: I removed the sales-oriented closing sentence about purchasing specific
services.
Final thoughts
Wireshark is an analysis tool that captures traffic on the local networks.
With the help of that software, you could see the incoming and outgoing data packages in detail.
On Figure 9, you could see that the highlighted records are from the encrypted message that was sent from the email client.
Figure 9 - Encrypted message in Wireshark
Default SMTP ports for secure E-mail to SMS (SMTPS)
When you setup a secure E-mail to SMS service using the SMTPS protocol,
you have to configure the port used by the E-mail client. The
default ports are:
SMS to email is a service offered by Ozeki SMS Gateway. It
works by converting sms messages received from mobile phones into emails.
Email users doing their daily messaging with email clients can communicate
with mobile users thanks to this service. This step-by-step guide explains
how you can install and configure Ozeki SMS Gateway to act as an sms to email gateway.
What is sms to email
SMS to email is a message gateway service provided by Ozeki SMS Gateway. It
allows you to forward text messages sent from mobile phones to email addresses.
(Figure 1)
Figure 1 - sms to email
How can I send SMS to Email (video)
The following video shows the setup procedure needed to install and configure an SMS gateway
that can provide sms to email functionality. The whole procedure can be done in less
then 3 minutes. What you will see can be summed up in 3 steps:
To explain the sms to email procedure in 3 steps:
Connect Ozeki SMS Gateway to the mobile network
Configure an sms to email route
Send an sms from a mobile and read it in your email client
The video starts at clicking on the SMS Gateway desktop icon and takes you all
the way to sending a test SMS from a mobile phone and receiving it in the e-mail client.
How does sms to email work
The sms to email solution requires a connection to the mobile network. Using
this connection text messages are received by the sms gateway. The sms gateway
first converts these texts into e-mail and assigns a sender and recipient
e-mail address to them. You can configure these email address on the
Ozeki SMS Gateway user interface. During the format conversion, the message text
is placed into the E-mail subject line or into the E-mail body depending on
configuration.
After the SMS was converted into e-mail, the e-mail is forwarded by the SMS
gateway to an email server. The SMTP protocol is used to communicate with the
email server. To read the email, you have to login to your email server and
check your inbox. Depending on your system, you can login using a web interface
to check your email, or you can download the email messages using POP3 or IMAP.
This is how sms to email works in a nutshell (Figure 2).
Figure 2 - sms to email using SMTP
Detailed instructions to setup sms to email forwarding
Select 'IMAP client'; IMAP/SMTP provides sms to email
Click install
Enter the email login details
Type in the email address where the SMS should be sent to
Create a route to forward sms to the email client
Send a test SMS from your mobile
View the sms in your email client
How to connect your sms to email gateway to the mobile network
In order to forward sms to email, you need to connect your SMS gateway
to the mobile network. Ozeki SMS Gateway can be connected in quite-a-few ways.
All of these to methods allows you to send and receive text messages. The best
option for your environment depends on the number of sms messages you wish to
send and receive. For sms volumes up to 12 000 text messages per day, the
best option is to use a GSM modem or
an android sms gateway setup. The advantage
of this option is that you don't have to subscribe for a costly on-line SMS service.
The android sms gateway setup uses your standard android mobile phone
as an sms to email gateway. Incoming sms messages received by this phone will
be forwarded as email and if you use an email to sms setup
you text messages will be sent out through this phone. In this setup your sms gateway
communicates with the network using the Android mobile phone. This communication is
the same as the communication of a human user, so it means you can take advantage
of free unlimited sms sending options.
For higher SMS volumes you can switch to online SMS services, which means you
will send SMS messages over the Internet. When you use on-line SMS service providers
you can use a dedicated SMS protocol or an SMS API.
There are various SMS protocols out there: SMPP protocol,
CIMD2 protocol, UCP/EMI protocol
and there are many proprietary protocols based on HTTP. Protocols based on HTTP
are called HTTP SMS APIs. The best option to connect
to on-line SMS services is to use an SMPP connection. The SMPP protocol is widely
used in the SMS industry. It is used by mobile network operators to exchange SMS
traffic between each other. SMPP was designed for SMS, and it gives you high
performance, instant access to submit and delivery reports and precise time
stamps related to SMS delivery. So, choose SMPP if possible.
Add new user
You have to add a new user in Ozeki SMS Gateway to start working.
E-mail Users can be easily installed and configured
through the browser GUI of Ozeki SMS Gateway.
So first, open the SMS Gateway, look for the Users and applications panel in the
right-hand side and click on the Add new user/application link (Figure 3).
Figure 3 - Add new user
Install IMAP Client
In the Add user or application list, scroll down to the
E-mail clients install section, and like in Figure 4, select IMAP client item by clicking on Install.
This allows you to have an IMAP client in the connection, which is a really fast and efficient email protocol.
Figure 4 - Install IMAP Client
Provide the SMTP server settings
SMTP is an internet standard for email transmission. SMTP servers are used
for relaying outgoing emails. On the From section provide the default sender
address and make sure the emails are sent to the correct address. In the
textboxes you can set the default recipient name and address. On the SMTP server
section, please enter the SMTP server's IP address
or domain and the port number as you can see in the Figure 5. In case your SMTP
server requires authentication, provide the username and password. You can also
choose SSL connection if your SMTP server has a more secure connection.
Figure 5 - Provide the SMTP server settings
Configure routing
To configure SMS routing, you need to open the routing table by clicking on
the "Routes" toolbar button and select
the route which you want to configure. (Highlighted in Figure 6)
Figure 6 - Configure routing
Check that the message is received in the SMS connection
In the Events tab of the SMPP client you can see when an SMS arrives, it is forwarded to the IMAP client.
The notes in the event log give information about the date, exact time, the used client and a detailed description about
the event. You can switch on/off auto update, delete or refresh the log's content in the right-hand side, using
the proper buttons. (Highlighted in Figure 7)
Figure 7 - Message received in the SMS connection
Make sure that the SMS is sent as an e-mail
Finally, in the Events tab you can see that the SMS arrived on this SMTP client, and
it is forwarded to the recipient's email address. Check the event log regularly in order to be up-to-date about the
events in the connection. The helpful event notes help you to understand everything in this process. (Shown in Figure 8)
Figure 8 - SMS sent as e-mail
Check your inbox
Go to your inbox and you can open the letter that was sent from this connection. You can check the sender's details here to make sure
that you set everything as you wanted. If you are satisfied with everything in your test message, it means that you are
ready to use this solution. (Figure 9)
Figure 9 - Email received by the recipient
Summary
In this guide we showed you how to forward SMS messages to an email account using Ozeki SMS Gateway. This solution makes the communication
easier between mobile users and Email users. Follow the steps carefully, download Ozeki SMS Gateway and you will have the tools and
knowledge to convert SMS into Emails. This innovation enables cross platform communication to your company which will help you to grow
bigger and work faster.
The following guide is about to demonstrate how you can send multiple SMS messages
by just one click from an Excel spreadsheet using the SMS Gateway. The guide provides
a step-by-step guide which shows what components you need to set up this solution.
It presents how you can establish an HTTP API connection in Ozeki SMS Gateway that
can forward the messages received from the Excel document. The guide takes about
ten minutes to be successfully completed and does not require any specific knowledge.
So, let's get started.
Why Send SMS from Excel?
Sending SMS messages directly from Excel can streamline your communication processes,
whether for business marketing, customer notifications, or personal use. With Ozeki SMS Gateway,
you can automate and manage bulk SMS sending without leaving your spreadsheet.
Requirements
Microsoft Excel 2010 or later
Ozeki SMS Gateway installed on your computer
An active account with an SMS service provider
Download
Ozeki Excel Client (.xls + macro): Download Ozeki Excel client (Ozeki.xls)
(This file contains the Excel Macro to send the SMS messages using a HTTP request to the SMS gateway)
In this quick video, you can learn how to send SMS messages from Excel with ease
in Ozeki SMS Gateway. By following the instructions, you can send SMS messages
from an Excel document with just one click. We'll walk you through the entire
process from setting up the HTTP User connection to making your Excel message list
to send SMS. With this step-by-step guide you will be able to send SMS messages
easily.
Step 1 - Install Ozeki SMS Gateway
To get started, download and install Ozeki SMS Gateway from our official website.
Follow the installation wizard to set it up on your system.
The first step after the the Installation of Ozeki SMS Gateway is to create an HTTP user connection that
will be able
to handle the SMS messages from the Excel file. So, to create this connection, first open
SMS Gateway from your Ozeki desktop. Here, click on the Apps icon on the toolbar and
select the HTTP User option as you can see it in Figure 1.
Figure 1 - Select HTTP User connection from the list
In the configuration menu, you need to specify some identifiers for the HTTP User
connection to be able to handle messages from the Excel file. So, just type a username
and a password for the connection (Figure 2), but remember, you need to provide these details
for the Ozeki Excel Client as well. If you filled all the required fields, just
click on Ok to create the HTTP User connection.
Figure 2 - Configure the HTTP User connection
By creating the HTTP User connection, the SMS Gateway also created an HTTP API service.
This service can be viewed in the Advanced menu (Figure 3). If you click on the HTTP API
service, you can modify the port for the HTTP and the HTTPS as well. To follow the guide,
change the port of the HTTP to 9509 and click on OK.
Figure 3 - HTTP API Service
Step 3 - Set Up Excel for SMS Sending
Next, you need to open the downloaded Ozeki Excel example spreadsheat. Here, you have to provide
the details of the HTTP API service and the HTTP User connection, that you created
in the SMS Gateway. So, for the Ozeki HTTP API IP field, enter the IP of the localhost (127.0.0.1)
and the port number of the HTTP API service separated by a ':' sign. Next, type the
username and the password of the HTTP User connection as Figure 5 demonstrates it.
Figure 5 - Ozeki Excel Client
Step 4 - Prepare Your Excel Spreadsheet
After setting up all connections and services that needed to handle SMS messages
from Excel, now you can set up the Excel itself. For testing, you can use the
provided Excel file above, but you can easily create a new file for the messages.
In this file, each row represents the details of a message. The first column in each row
is dedicated to the phone number of the recipient and the second column is for the
message itself (Figure 4). If you have done writing the messages, just save the modifications.
Figure 4 - Excel file contains the SMS messages
Step 5 - Send SMS from Excel
After you set up all details that needed, you can just click on Send all button to send
all the messages from the Excel file. If the Excel file of the SMS messages opened as
well, Ozeki Excel Client automatically detects it, and you can select it from the
pop-up window (Figure 6). All you need to do here, is to click on OK.
Figure 6 - Select the Excel file with the SMS messages
When Ozeki Excel Client finished with sending all the message from the selected
Excel file, a delivery report shows up in the browser (Figure 7). Here, you can check if the
messages sent successfully, or a problem occurred during the sending process.
Figure 7 - Delivery report
Delivery Reports
After sending, Ozeki SMS Gateway will display a delivery report in your browser.
This report shows the status of each SMS (sent, delivered, failed). Verify that all
messages are marked Sent or Delivered. If any message failed, check
the error details in the report and adjust your setup as needed (e.g. correct number format or connection settings).
You may also check the status of each SMS message in the Ozeki SMS Gateway GUI.
Troubleshooting Common Issues
If you encounter any problems while trying to send SMS from Excel, check the following:
Ensure the Ozeki SMS Gateway is running and connected to the internet.
Verify your SMS service provider credentials are correctly entered.
Check that phone numbers in your spreadsheet are formatted properly (e.g., +1234567890).
Confirm that your SMS service provider account has sufficient credit or is active.
Conclusion
By following this step-by-step guide, you can now efficiently send bulk SMS messages directly from Excel using Ozeki SMS Gateway. The process simplifies mass communication by leveraging an HTTP API connection, allowing you to send messages with just one click. Whether for business notifications, marketing campaigns, or personal use, this method saves time and eliminates manual effort. Download the provided Excel templates, configure the HTTP User connection, and start sending SMS messages seamlessly. With Ozeki SMS Gateway, managing bulk SMS from Excel has never been easier.
Final Thoughts on Using Ozeki Excel SMS
By following the steps outlined in this guide, you can efficiently send SMS messages directly from an Excel spreadsheet using the Ozeki Excel Client. The process begins with configuring the HTTP API service and user credentials, followed by opening the Excel file containing your SMS messages. Once the setup is complete, sending messages is as simple as clicking the "Send all" button and verifying the delivery report. This method provides a seamless way to manage bulk SMS campaigns, ensuring quick and reliable message delivery. Whether for business communications or personal use, Ozeki Excel SMS simplifies the process while offering real-time feedback on message status.
With its intuitive interface and automated detection of Excel files, Ozeki Excel Client minimizes manual input, reducing the risk of errors. The delivery report feature allows you to confirm successful transmissions or identify any issues promptly. By integrating SMS capabilities into Excel, Ozeki provides a powerful yet user-friendly solution for mass messaging. This approach saves time, enhances productivity, and ensures that your messages reach their intended recipients efficiently.
The following guide is about to show how you can send message from the file or
collecting the received messages in a file as well.
This SMS form txt and SMS to txt guide will show you how to install and configure a TXT File connection in SMS Gateway.
This connection is capable of handling multiple file formats, and you can also select
the location of the following message boxes: Inbox, Outbox, Sent, Failed, Delivered.
What is SMS from TXT
Ozeki SMS gateway can send sms from text file. The sms server software read out
the message and the phone number of the recipient and send out the short message.
There are five built-in formats that can be used for SMS sending from a text file.
What is SMS to TXT
Sms to txt means when the sms gateway software recieves sms messages it stores the incoming messages
into a txt or text file. Sms to txt or sms to text terms mean the same thing.
How to send SMS from TXT files
To send SMS from TXT files:
Launch Ozeki SMS Gateway
Select the Apps toolbar icon
Install TXT File app
Configure the TXT File connection
Click on the Connect toolbar icon
Choose SMPP client to install
Set SMPP client connection
Send SMS message from TXT file
Check the Sent and the Inbox folders
The process of sending SMS from TXT files (video tutorial)
In this quick video tutorial, you'll discover how to send SMS from TXT files with
Ozeki SMS Gateway. By eliminating manual SMS handling using Ozeki's user-friendly
features, you can simplify your communication procedures. Ozeki can handle both
single messages and mass campaigns because to its flexible TXT file capabilities.
Get ready to revolutionize your SMS communication, by following the given instructions.
Step 1 - Create a TXT File connection
The first step of the guide is to create the TXT File connection in SMS Gateway.
First of all, you need to open the SMS Gateway application, and here, select the
Apps menu from the toolbar. In this menu, go to the 'Application interfaces' section,
and like in Figure 1, click on the Install button of the TXT File connection.
Figure 1 - Create a TXT File connection
Step 2 - Configure the TXT File connection
After you selected the TXT File connection, you are going to be navigated to the
configuration menu of the connection. In that menu, first, you need to define a
name for that connection (Figure 2). Then, you have to select a file format for the SMS messages.
These file formats will be discussed in the next step. Lastly, you can select folders
for the messages.
Figure 2 - Configuration menu of TXT File connection
Step 3 - Select a file format
For that connection, you can select from multiple file formats. These formats handle
the messages differently. The first format is the 'Simple'. The format can handle
one message per file. The name of the file needs to be the recipient's phone number
and the message contains the SMS message itself.
c:\smsout\+3620310536
The next file format is the 'Verbose' format. This format also handles one message
per file, but you can specify the phone number of the sender in the file. The file extension
of the Verbose format needs to be .sms.
c:\smsout\anyname.sms
The 'List' file format is capable of handle multiple messages and multiple recipients
in the same file. Each row of the file contains the phone number of the recipient
and the message. The file extension of the List format is .sml.
c:\smsout\list.sml
The 'Text' file format handles the messages the same way as the List format. The only
difference between these two formats is the file extension. The List uses .sml format
to manage the messages, the Text format uses the simple .txt format, so it is a little
bit easier to create and manage.
c:\smsout\outbox.txt
The 'XML' format is a great way to clearly organize your message in the dedicated
XML file. This format uses tags to define the parts of a message. The 'originator'
stores the phone number of the sender, and the 'recipient' stores the recipient's
phone number. The 'text' tag contains the message, the 'time' tag shows the time when
the message should be sent. Lastly, the 'messagetype' is for defining the type of
the message. This format is also capable of handling many messages in one file.
c:\smsout\outbox.xml
Figure 3 below shows all the file formats, that are available in SMS Gateway.
Figure 3 - File formats for TXT File connection
Step 4 - Select folders for the messages
In the next step, you need to set the location for the different types of messages
regarding to they are about to be sent or received. The messages stored into five
folders as you can see it in Figure 4: Inbox, Outbox, Sent, Not Sent and Delivered.
Figure 4 - Configure the location for SMS files
Step 5 - Advanced configuration of the TXT File connection
The TXT File connection can be further configured by clicking on the Advanced
tab as Figure 5 shows that. Here, the main setting is the Polling. This option
defines the time interval when the outbox folder will be checked, and the connection
tries to deliver the messages from all files that are in that folder at that point.
If you finished with the configuration, just click on OK.
Figure 5 - Advanced configuration of TXT File connection
Step 6 - Create an SMPP service provider connection
To be able to communicate with the members of the mobile network, you need a connection
that creates that link. This connection will be the SMPP client connection. To create
this connection, just select the Connect menu from the toolbar, and here as you can
see it in Figure 6, click on the Install button of the SMPP client connection.
Figure 6 - Install the SMPP client connection
In the configuration menu of the connection, first, you need to type a name for the
connection. Next, you have to provide the details of the SMPP server where you want
that connection to connect to (Figure 7). Lastly, just type the phone number with that the
connection is going to communicate with the mobile network. If you finished with
everything, you could just click on OK.
Figure 7 - Configure the SMPP client connection
Step 7 - Send a message from file
After you created the TXT file connection, now you will be able to send SMS messages
using this connection. To do that, open the outbox folder in the File Explorer.
Here, you can create a new text file, and as the format shows above, you can write
multiple messages to multiple recipients in that file (Figure 8). When you finished, just save the file.
Figure 8 - Outbox folder with the message file
As soon as the TXT File connection polls the folders for files, the file from the outbox
folder will disappear. This means the connection now processing the message file.
As soon as it delivers the message, the message file will appear in the Sent folder as
you can see it in Figure 9.
Figure 9 - Message file moved to the Sent folder
Step 8 - Receive message with the TXT File connection
The creation of the TXT File connection also created a routing rule. This routing rule
ensures that all the messages that SMS Gateway receives will be routed to that
TXT File connection. The connection in case of an incoming message will create a file
in the Inbox folder as you can see it in Figure 10. The format of this file is the
same that you defined in the settings of the connection.
See how to send SMS messages from excel sheets. You will only need a '.csv' file,
a TXT File connection in Ozeki SMS Gateway and an SMS service provider connection.
Keep in mind to write the excel sheet and export it to CSV format
CSV is a much simpler format than an excel table.
Each row in the CSV file represents a row in the excel sheet and the columns are separated by commas.
You can send data in CSV file format with the help of the TXT File connection.
Step 1 - Create a CSV file
Write your own excel datasheet or your company's application can do it for you.
It is important that
the first column is the recipient's address,
the second parameter should be the text message itself,
while the third parameter is the time when to send it.
You can see an example excel sheet on Figure 1.
Figure 1 - Example excel sheet
Please export your excel sheet to CSV file format (Figure 2).
Figure 2 - Excel sheet exported to CSV file format
Step 2 - Setup a TXT File connection in Ozeki
The next step is to create the TXT File connection. For that, you need to open
the SMS Gateway application, and here, click on the Apps menu on the toolbar.
In that menu, go to the 'Application interfaces' section, and as Figure 3
shows that, click on the Install button of the TXT File connection.
Figure 3 - Creating a File User in Ozeki SMS Gateway
To be able to handle CSV files with this connection, the main part of the configuration
is to select the CSV file format from the list of file formats as you can see it
in Figure 4. You also need to give a name for the connection here, you set the folders
for the messages as well. When you finished with these settings, you can just click OK.
Figure 4 - Change file format to CSV
Finally, you just have to copy the CSV you have created in the beginning of this tutorial to
the default Outbox directory at C:\SMS\smsout . This is the path used by the TXT File connection.
You can modify this location anytime, if you want to.
The sendsms.exe is a simple command line tool, that allows you to send sms
messages from the windows command line (cmd.exe or powershell). This page
gives you the download location of this tool, and it provides information on
how to use it.
To use this tool please setup a http api user, where you create a username and
password. After this, please download SendSms.exe
from this page and use the newly created http username and password with the following command
line options.
The following webpager provides information on how to create a HTTP API user:
Ozeki SMS Gateway's FTP User can synchronize directories with SMS Gateway through
standard FTP, FTPS (over SSL/TLS) or SFTP (SSH FTP) protocols.
Incoming SMS messages will be uploaded, and outgoing SMS messages will be
downloaded from the FTP server.
You can also look at the accepted file formats.
How to send SMS from an FTP server
To send SMS from an FTP server:
Launch Ozeki SMS Gateway
Add new FTP user
Configure the FTP connection
Select file path for SMS message folders
Specify FTP server details
Set the file format
Send test SMS from FTP server
Check the logs
How to send SMS from an FTP server (video tutorial)
This video will show you how to send SMS messages from an FTP server.
This video will begin with adding a new FTP user and it will take you all the way to sending your first SMS.
The video is only about 4 minutes long and very detailed. You will have no problem following the steps.
We are using the Ozeki SMS Gateway in this video which is a powerful but easy to use gateway solution.
You will learn how to add a new FTP user and how to configure it, how to set the FTP server settings and how to send a test SMS from the FTP server.
Don’t waste time, start sending SMS now!
FTP User can synchronize directories.
Synchronization is made between Ozeki SMS Gateway's machine and your FTP server on the following
folder types: 'Inbox', 'Outbox', 'Sent', 'Failed', 'Delivered'.
Please create these folders before providing the paths to the FTP User.
This user is basically used for sending or receiving text message files.
It works in both directions:
If the user receives an incoming message, it creates a text file in the 'Inbox' folder of your FTP server
and also a file in the 'Inbox' folder of your SMS Gateway's machine since the folders are synchronized.
The user will send the messages from the FTP server's 'Outbox' folder. The message text file will be placed accordingly
into the 'Sent', 'Failed' or 'Delivered' folder. The 'Outbox' folder will be checked periodically.
You can quickly install an FTP User
through the browser GUI of Ozeki SMS Gateway.
Step 1 - Install the FTP user
You can simply install the FTP User on the 'Management' console by clicking 'Add new user/application...'
in the 'Users/Applications' panel (Figure 1).
Figure 1 - Click 'Add new user/application...'
An interface will open consisting of two panels.
The left side panel contains the already installed users and applications.
The right-side panel contains the users and applications you can install with
a brief description next to them.
Search the FTP User and click the blue 'install' button next to it (Figure 2).
Figure 2 - Install User
Step 2 - Configure the FTP connection
The 'Configuration' panel has a 'General' tab which contains the basic file settings.
First please provide a unique username.
In the Settings section of tab page contains a combo box where you can select the file format
'Simple', 'Verbose', 'List', 'CSV' or 'XML'. Please check the File format section below for more information.
There is another combo box where you can select the character encoding.
You can also set how much time to wait before rechecking the 'Outbox'.
The default value is 30, but you can change it to any positive whole number (Figure 3).
Figure 3 - Select the file format you prefer
Step 3 - Configure the folders for messages
The lower section of the tab pages contains five sub-sections referring to the five message folder types:
'Inbox', 'Outbox', 'Sent', 'Failed' or 'Delivered' (Figure 4).
You can select each message folder's directory path on Ozeki SMS Gateway's machine and your FTP server.
The FTP User will keep the directory pairs synchronized.
Figure 4 - Select the file path for each 'Inbox', 'Outbox', 'Sent', 'Failed' or 'Delivered' folder
What kind of messages are contained in each folder
Inbox: Already delivered messages to the user. Set it by setting Ozeki SMS Gateway's inbound routing.
Outbox: Messages to be sent by the user. Set it by setting Ozeki SMS Gateway's outbound routing.
Sent: Accepted messages for delivery by Ozeki SMS Gateway and the SMS service provider.
Failed: Refused messages by Ozeki SMS Gateway or the SMS service provider.
Delivered: Messages that received delivery success report by the SMS service provider.
Step 4 - Configure FTP server details
If you have set the folders, you should switch to the FTP Connection tab to configure the FTP server connections.
First provide the server's IP address, port number and the required username and password.
Then select the protocol mode you prefer (FTP, FTPS, STFP) (Figure 5).
In the lower section you can provide a certificate if you are using the FTPS file protocol mode.
Please provide the certificate path and certificate password to add the certificate.
Figure 5 - Switch to the 'FTP connection' tab to configure your FTP server connection
Step 5 - Learn about file formats
File formats are used to define how to store messages in text files.
Various file formats are supported by Ozeki SMS Gateway's FTP to SMS Extended User:
simple, verbose, list, XML, CSV. These formats can be used for sending
or receiving SMS messages through a GSM network.
'Simple' is set as default on all FTP to SMS Extended User.
The filename itself stores the sender or recipient, depending on if it is an incoming or outgoing message.
The file contains the message content.
Simple is the default format. To change it, please click on the 'General' tab.
For example:
c:\SMS\outbox\+3620310366
c:\SMS\inbox\+3630310300
It has a side effect hidden in the name convention. More files cannot have the same name in a single directory.
This means only one message can be sent at a time to the same recipient.
If sending a new message to the same recipient, please wait until the old message gets deleted by Ozeki SMS Gateway.
This works vice versa. As an example, only one message at a time can be received by the sender,
since older received message will be deleted.
Please consider these facts before keeping this default file format or choose another format from the dropdown menu.
It is a very useful tool for position tracking, since every new coordinate overwrites the old one.
This helps you easily track vehicles that send coordinates in SMS messages.
The Verbose format stores every SMS message in a separate file, although each file can have a unique filename.
Since unique filenames are supported, it can store multiple message files
from the same sender and multiple message files from the same recipient as well.
This means it can contain more information than a 'Simple' file format.
Each file has an extension. A verbose file's extension is '.sms'.
Do not forget that each message file contains a single message.
Now let's check the structure. The first line contains the sender's phone number, while the second line is
the recipient's phone number. The message text is contained in the third line.
Simple Verbose example:
c:\SMS\outbox\anyname.sms
+36209937723
The message text
The List format is capable of storing multiple SMS messages in a single file.
A single '.sml' file can store multiple SMS messages in a simple list.
This is the most comfortable way to send and receive a massive amount of text messages.
Please look at the following file example:
c:\SMS\outbox\list.sml
+3620993723 This is the second message
+3630778972 Use Ozeki SMS Gateway!
Each line represents an SMS message. A single line consists of two important information separated by space. The first is the phone number
of the recipient while the second is the message content. To send SMS message please place your '.sml' file into the Outbox folder.
You can send and receive SMS messages using 'XML' file format as you can see in the XML message below.
Do not forget to use '.xml' file extension.
<originator>: The sender's phone number is between these tags. <recipient>: The recipient's phone number is between these tags. <text>: Type text message between these tags. <time>: Set when the message should be sent. <messagetype>: Declare the message type between these tags.
You can export any excel file in CSV file format. This CSV structure is a text file format
where the original columns are separated by commas.
Each line corresponds to a row in the original excel datasheet.
Finally, the FTP to SMS Extended User is capable to read each row
as you can see in the following example.
c:\SMS\outbox\mysms_messages.CSV
The first parameter is the recipient's or sender's address,
the second parameter is the message text
while the third parameter is when to send the message or when the message have arrived.
Ozeki SMS Gateway's Application Starter User can run any process or application in case an SMS message arrives.
You simply need to provide the file path. You can also fetch parameters from
received SMS messages to use them as process parameters or command line arguments.
Look at the workflow diagram in Figure 1 before scrolling through this step-by-step guide.
Keep in mind the incoming message must arrive at Ozeki SMS Gateway's Application Starter User, so
it can start any desired process or application.
Figure 1 - How an application gets started after receiving a message
You will find out how your application starts with a glimpse of an SMS arrival.
First, it is advised to install and configure your own Application Starter User in case an SMS is received.
You should make sure your Ozeki SMS Gateway is ready to receive any SMS from an SMPP provider
or a GSM modem.
How to start an application using an SMS
To start an application using an SMS:
Select Apps toolbar icon
Install Application Starter app
Name the connection
Enter program to execute
Set Operation mode
Click on the Connect toolbar icon
Add new SMPP client connection
Configure Ozeki service
Allow service to interact with desktop
Send test SMS
Step 1 - Create the Application starter connection
The first step is to open the SMS Gateway application. Here, in the main menu, you should
select the Apps menu on the toolbar. In this menu, just scroll down to the
'Incoming SMS message processing and autoresponding services' section, and here,
click on the Install button of the Application starter connection (Figure 2).
Figure 2 - Select the Application starter connection
Step 2 - Configure the Application Starter connection
Next, you need to configure your application starter connection. First, you need to type
a name for the connection (Figure 3). This will identify the connection in your SMS Gateway system.
Next, you need to configure the program, that the connection is going to execute.
The two main ways will be discussed in the next step.
Figure 3 - Configure the Application starter connection
Step 3 - Select a program to execute
The Application starter connection can process both bash scripts or the executable
files of the external applications as well. So, the first way is to run a bash script.
In this example, you need to create a bash script with the '.bat' file extension.
As Figure 4 shows below, you need to provide the full path for the bash script. You can
also add arguments for the execution. Here, there are two arguments. The '$SENDER'
stores the address of the sender who sent the message, the '$MSG' argument stores
the message itself.
Figure 4 - Configure a bash script with arguments
Now, you need to write the bash script. This example below is going to take the
two arguments that you set in the Application starter connection and write them
in the inputsms.txt file. If that file does not exist yet, a script creates it, if
the file exists, the script appends the file with the new message.
C:\process.bat
echo %1 %2 >> C:\inputsms.txt
The second way to configure the application starter is to run an external application.
For that, you need to specify the full path of the application that you want to run
in case of an incoming message. This guide shows you, how you can start the default
notepad application with an SMS as you can see it in Figure 5.
Figure 5 - Type the full path for the notepad application
Step 4 - Further configuration of Application Starter
The last thing, that you clearly need to configure before creating the connection,
is the mode that the application is going to run. This can be set by the 'Operation mode'
option. Here, as you can see it in Figure 6, select the 'Start on message' option.
This will ensure, that the program that you set before to execute, will only run
if an incoming message occurs. If you finished with everything, you could just click OK.
Figure 6 - Set the operation mode
Step 5 - Create an SMPP client connection
To be able to communicate with the members of the mobile network, and receive the
starting message, you need a connection
that creates that link. This connection will be the SMPP client connection. To create
this connection, just select the Connect menu from the toolbar, and here as you can
see it in Figure 7, click on the Install button of the SMPP client connection.
Figure 7 - Install the SMPP client connection
In the configuration menu of the connection, first, you need to type a name for the
connection. Next, you have to provide the details of the SMPP server where you want
that connection to connect to (Figure 8). Lastly, just type the phone number with that the
connection is going to communicate with the mobile network. If you finished with
everything, you could just click on OK.
Figure 8 - Configure the SMPP client connection
Step 6 - Configure your Ozeki service
Ozeki service runs in the background when you use Ozeki SMS Gateway.
It is essential to allow Ozeki 10 to run files with Application Starter User.
Configure this service by selecting 'Control Panel' from your Windows Start menu
and reach 'Administrative Tools/Services'.
Find 'Ozeki 10' on the list, right click, and select 'Properties' (Figure 9).
Figure 9 - Set the service properties of Ozeki
On the new window, called 'Ozeki 10 Properties', please select the 'Log On' tab page
and tick the 'Allow service to interact with desktop' checkbox (Figure 10).
Figure 10 - 'Allow service to interact with desktop'
From now on Ozeki SMS Gateway's Application Starter User will be able to
start any process or application if you provide the proper path to the file.
The file on the chosen path will start in case of an SMS message is received.
How to disable the appstarter feature on Ozeki SMS Gateway
This page is all about turning the appstarter feature off in Ozeki SMS Gateway,
which works in any country and can send and receive sms through various mobile
connections. The following steps will take around 5 minutes to complete. Following
along will teach you to kill and restart the Ozeki service, and also disable the
appstarter feature. Below, you will find a video tutorial and a written step-by-step guide with pictures. We will finish with a couple common questions and a short summary. In order to be successful, you need to be familiar with Ozeki SMS Gateway's software and navigating to the Services tab within Windows Task Manager. Let's get started, shall we?
What is Appstarter?
Appstarter is short for the Application Starter feature in Ozeki SMS Gateway.
It's main purpose is to allow the user to run .exe files or execute batch scripts
from an outside environment such as SMS, chat messages, sensor connections or other sources.
What is an automated SMS?
An automated SMS is a pre-designed message set to be sent to customers at a
specific date and time of your choice.
How to disable the Application Starter feature on Ozeki SMS Gateway (video tutorial)
The following video showcases disabling the Application Starter feature within
Ozeki SMS Gateway, from telling if you have it enabled all the way to disabling
the feature. It is a terrific watch, as it is only 60 seconds, but it captures all
the necessary steps in detail, in an easy to follow format. Not only that can
be seen in this video, but also how easy and fast it is to manage and personalize
Ozeki SMS Gateway. You will learn to check which services you have installed,
and how to disable those you do not need. You will also learn how to kill and
start the Ozeki service again.
How to disable the Application Starter feature
To disable the Application Starter feature:
Open Ozeki SMS Gateway
Navigate to Installation List
Check if Application Starter service is installed
Open the Services window
Find Ozeki service
Stop Ozeki service
Open File Browser
Locate Ext.AppStarter folder
Delete Ext.AppStarter
Start Ozeki service again
Check if Application Starter service is removed
Disabling the appstarter feature on Ozeki SMS Gateway (Step-by-step guide)
To begin the entire process, the very first thing you need to do is opening the
Ozeki SMS Gateway application. Click on the 'Add new user/application...' and
scroll down until your reach the Application Starter. You will see that the
Appstarter feature is in the user list just like in Figure 1.
Figure 1 - Appstarter feature in user list
Open 'Services' on your device and locate the Ozeki application. Once you
find it, give it a click. As shown in Figure 2, click on the 'Stop the service'
sign to stop Ozeki from running.
Figure 2 - Stop Ozeki service
As you can see in Figure 3, the next step is locating the Appstarter feature folder.
After finding the Ozeki folder, select the 'Common' folder. Locate the
'Ext.Appstarter' folder and give it a right click.
Figure 3 - Appstarter feature folder location
After giving the Ext.Appstarter folder a right click you need to choose the delete
option just like it is represented in Figure 4. This will remove the folder.
Figure 4 - Delete Appstarter folder
Now go back to the 'Services' and look for Ozeki. After locating it, click
on the 'Restart the service' sign just like in Figure 5.
Figure 5 - Start Ozeki service
Open Ozeki SMS Gateway and click on the 'Add new user/application...' sign.
Scroll down to the bottom until you reach the 'Incoming SMS message processing and
autoresponding services section'. Just like in Figure 6, you will see that the
Appstarter feature is missing indicating that the delete was successful.
Figure 6 - Appstarter feature missing
Can I disable other features of Ozeki SMS Gateway?
Yes, apply the steps above to your desired feature and it's folder.
Can I reinstall/re-enable a feature after disabling it?
Yes, it is possible to reinstall features within Ozeki SMS Gateway previously uninstalled using the method above.
Summary
Disabling the appstarter feature on Ozeki SMS Gateway ensures your system operates
more efficiently by preventing unnecessary applications from launching automatically.
This helps maintain the focus on your core SMS functions, minimizing disruptions
and enhancing overall performance. Take control of your SMS management with Ozeki
SMS Gateway and experience a smoother, more reliable service.
How to schedule SMS sending with the SMS scheduler
Ozeki SMS Gateway offers a comprehensive and user-friendly solution with its
advanced SMS Scheduler to empower your messaging strategy.
With the SMS Scheduler in Ozeki SMS Gateway, which enables you to schedule text
messages for future delivery, you can experience the comfort of periodic SMS sending. Seamlessly
automate your communication and ensure your messages reach the appropriate recipients
at the perfect time. Follow the given instructions to become more effective in
your SMS sending.
What is scheduled SMS?
Scheduled SMS, also known as "SMS scheduling," is the process of pre-scheduling
text messages for future delivery. This feature automates the time of message
transmission across many different platforms and apps. It enables organizations
and individuals to transmit messages at certain moments, assuring maximum engagement
and effectiveness. Messages may be sent across time zones with scheduled SMS
without worrying about timeliness. It improves consumer communication and experience
by providing timely reminders, notifications, and information.
Scheduled SMS may enhance communication processes by decreasing human error and
optimizing the sending process. To prevent any unwanted effects on receivers, it
is essential to utilize this tool properly and in compliance with legal requirements.
Effortless Periodic SMS Sending with Ozeki SMS Gateway (video tutorial)
In this short video, we will introduce you how to schedule period SMS sending with
SMS scheduler in Ozeki SMS Gateway. You can learn how to automate your messaging
process, providing timely reminders, notifications, and essential information to
your audience. Use the SMS Scheduler provided by Ozeki SMS Gateway to send SMS
messages regularly with ease and efficiency. Discover how to schedule
period SMS sending effortlessly and experience the comfort of automated communication.
How to schedule period SMS sending with SMS scheduler
To schedule period SMS sending with SMS scheduler
Log into your Ozeki SMS Gateway account, or download it from https://ozeki.hu/
Open Scheduler app from Ozeki Start Menu
Create New Repeated Task in Ozeki SMS Gateway
Configure your text message
Select repeat interval
Set up new routes in the Control Panel
Follow SMS delivery status
Enjoy the scheduler functions provided by Ozeki SMS Gateway
To begin the process, log in to your Ozeki SMS Gateway account, or if you don't have
yet an Ozeki account, download the Ozeki SMS Gateway app from the https://ozeki.hu/
website. After logging in, open the "Programs" tool in the Ozeki Start Menu. Select
"Administrative Tools" option from the drop-down list, then click on the "Scheduler"
one. This will bring you to the Scheduler app's configurator page.
Figure 1 - Open Scheduler app
On the Scheduler app's configurator page, click on the "Create New Repeated Task" button,
highlighted in blue. By clicking on it, it will bring a new Repeated Task tab, containing
periodic message details. There you have to configure a message that will be
routed to a connection in Ozeki 10. The connection will be founded at the Control
Panel in Ozeki SMS Gateway. Specify some essential details of the corresponding cells.
Enter the recipient's address and your text message into the boxes. This message
will be sent when the set time is reached by the clock.
Figure 2 - Create new repeated task
Now, select your preferred delivery time, and choose the desired repetition frequency.
Whether you want to send messages daily, weekly, monthly, or at specific intervals,
the SMS Scheduler allows you to customize your sending schedule to suit your needs.
Click on the "Ok" button to save the settings.
Figure 3 - Select repeat interval
Once you have set your preferred delivery time and chosen the desired repetition
frequency using Ozeki SMS Gateway's SMS Scheduler, access the "Control
Panel" in Ozeki SMS Gateway for further management of message forwarding.
Figure 4 - Open control panel
In the Control Panel, you have to set up new routes for your messages. Find "Routes"
option from the left-handed tab. Click on the "Create new Route" button to start the
process.
Figure 5 - Create new route
By clicking on the "Create new Route" button, it will bring up a tab, where you
can set up Route details. Choose the "Scheduler@localhost1" option from the drop-down list
in the "From" field then mark with an "X" sign the "App" option in the settings,
by clicking on the settings icon. After that, select "SMPP_client_1@localhost" option
in the "To" field. For saving, click on the "Ok" button.
Figure 6 - Route settings
Once you have saved your settings, open Ozeki SMS Gateway app's Home page to
follow the message's delivery status.
Figure 7 - Open sms gateway
Open SMPP client 1 (SMPP client) link on the upper left side of the page. It will
bring up the connection details and SMS delivery status. At the Events tab, you will
see the latest updates of SMS settings. Once the time reaches the set time,
the message will be automatically sent to the recipients. At the same time, you
will receive a notification at the Events tab, that the message was successfully
sent at the specified time.
Figure 8 - Messages sent
FAQs
How do I automate SMS sending?
SMS gateway APIs, marketing applications, or CRM connection all make it simple
to automate SMS messaging. To interact with your audience at the appropriate moment,
set up scheduled messages, customized campaigns, and automatic notifications.
For a seamless and successful automated SMS approach, make sure that all laws are
followed and obtain recipient consent.
Can you schedule a SMS message?
Platforms like Ozeki SMS Gateway, allow you to schedule text messages for future
delivery. You can specify a date and time for the message to be sent, and the
system will send the SMS at that time without your intervention. With Scheduler,
you can send messages that repeat themselves at certain intervals that you set.
What is the SMS Scheduler in Ozeki SMS Gateway?
The SMS Scheduler is a feature in Ozeki SMS Gateway that allows users to schedule
text messages for future delivery. It automates the process of sending messages
at specific times and intervals, ensuring timely and effective communication.
What are the benefits of using the SMS Scheduler?
The SMS Scheduler gives customers the ability to organize their messaging strategy,
enhancing communication convenience and effectiveness. Users may increase engagement
and make sure messages are delivered to the targeted audience by delivering messages
at the proper times.
Summary
Overall, Ozeki SMS Gateway offers an extensive and user-friendly solution with
its powerful SMS Scheduler, enabling customers to easily schedule period SMS
delivery. This short article teaches you how to use an SMS scheduler to set up
periodic SMS sending. You have full control over choosing the delivery time and
message repeat frequency with the SMS Scheduler from Ozeki SMS Gateway. This
removes the concern about timing and enables both companies and individuals to
deliver communications at specific times, even across time zones. Improve your
message strategy and experience the power and simplicity of scheduled SMS sending
with Ozeki SMS Gateway.
How to do periodic SMS scheduling for selected calendar days
Optimize your SMS communication process effortlessly with Ozeki SMS Gateway.
Manage efficiently periodic SMS scheduling for selected calendar days, ensuring
timely delivery to the right recipients. Discover the user-friendly platform's
seamless way to schedule SMS messages for specific calendar days. This step-by-step
guide will lead you through the process, making it easy to leverage Ozeki's
intuitive features for enhanced SMS management. Streamline your messaging strategy
with Ozeki SMS Gateway.
What is periodic SMS scheduling?
Periodic SMS scheduling is a feature that allows users to automate the process
of sending SMS messages at regular intervals or specific calendar days and times.
It is especially helpful for companies and organizations that must send consumers
or subscribers periodic communications. It is especially helpful for companies
and organizations that must send consumers or subscribers periodic communications.
The frequency, exact days, and hours for delivering the messages can all be set
by users in advance. Without requiring personal interaction for each message,
this automation streamlines marketing initiatives, and communication. Businesses
may easily send reminders every month or weekly promotions, for instance. Regular
SMS scheduling provides timely communication, saves time, and increases the
effectiveness of reaching the target audience.
Simple SMS Scheduling with Ozeki SMS Gateway (video tutorial)
In this short video, you'll explore how to effortlessly schedule SMS messages for
specific calendar days using Ozeki SMS Gateway's user-friendly tools.
By following these straightforward instructions, you can harness the power of
Ozeki SMS Gateway's scheduling features with ease and efficiency.
How to do periodic SMS scheduling for selected calendar days
To do periodic SMS scheduling for selected calendar days
Access your Ozeki SMS Gateway account, or download it from https://ozeki.hu/
Launch the Scheduler app from Ozeki Start Menu
Create a New Calendar Day Type in Ozeki SMS Gateway
Create New Repeated Task in Ozeki SMS Gateway
Set up your text message
Choose repeat interval
Configure new routes in the Control Panel
Track SMS delivery status
Make use of Ozeki SMS Gateway's scheduling features.
To start the procedure, log into your Ozeki SMS Gateway account, or download the
Ozeki SMS Gateway app from the https://ozeki.hu website if you don't already have
one. Open the "Programs" feature in the Ozeki Start Menu after logging in. From
the drop-down menu, choose "Administrative Tools," then click "Scheduler." You
will then be sent to the customization page of the Scheduler app.
Figure 1 - Open Scheduler app
In the customization page of the Scheduler app, click on the "Days" icon in the toolbar.
Choose the "Day types" tab, which represents different categories of days, such as
weekdays, weekends, holidays, etc. his feature will allow you to specify which
days fall under each day type.
Figure 2 - Open day type
Within the "Day types" tab of your customization page, you can create day types.
Click on the "Create New Calendar Day Type" button on the page, to add your own day type.
Enter a unique name of the day and choose a colour, so you can easily make a difference
between your calendar days. It is optional, to write a short explanation about
the day so that we can recognize it easily.
Figure 3 - Create new calendar day type
Find the "Calendar" icon in the toolbar and click on it to open. There you can set the
calendar day types. Choose a day from the calendar and assign a day type to it.
Mark with an "X" sign the Date type, then save with the "Ok" button. (For example, select
June 16, 2023, and order it to the Important days date type.) After saving, the
chosen day will appear on the calendar in the colour that you have set. It helps you
to easily identify and differentiate the scheduled days based on the assigned colours.
It makes it more convenient for users to manage their scheduled SMS messages
for different occasions or day types.
Figure 4 - Set calendar day type
Step on the Ozeki Scheduler Home page to start the process of creating repeated tasks.
Click on the "Create new Repeated Task" button, highlighted in blue on the Scheduler
Home page. By clicking on it, a new Repeated Task page with details about repeating
messages will appear. There you have to configure a message that will be routed
to a connection in Ozeki 10. The Control Panel in Ozeki SMS Gateway is where the
connection will be established. Provide the related cells with a few key details. Fill
up the fields with the recipient's address and your text message. When the clock
reaches the specified time, this message will be sent.
Figure 5 - Create repeated task
Choose the appropriate repeat frequency and your preferred delivery time. The
SMS Scheduler enables you to tailor your sending schedule to meet your needs,
whether you want to send messages every minute, every day, every week, every month,
or at particular intervals.
Figure 6 - Check repeated time
After setting up the repeated time, you can specify what types of days are included.
Select the intended day type from the drop-down list of the "Days" option in the Included
part of the tab. To save the settings, click the "Ok" button.
Figure 7 - Set days
After configuring your preferred delivery time and selecting the desired repetition
frequency using Ozeki SMS Gateway's SMS Scheduler, you have to access the "Control
Panel" within the Ozeki SMS Gateway for further management of message forwarding.
Figure 8 - Open control panel
Find the "Routes" option on the left-handed tab of the Control Panel to create
new routes for your messages. By clicking the "Create new Route" button, the
procedure will be started. Upon clicking the "Create new Route" button, a tab
will appear allowing you to configure Route details. From the drop-down list in
the "From" field, select the "Scheduler@localhost1" option. Then, in the settings,
click on the settings icon to mark the "App" option with an "X" sign. Next, choose
the "SMPP_client_1@localhost" option from the "To" field. To save the changes,
click on the "Ok" button.
Figure 9 - Create new route
After saving your settings, navigate to the Home page of the Ozeki SMS Gateway app
to track the delivery status of your messages. From the Home page, you will be able
to monitor the progress of the sent messages and review their delivery reports to
ensure successful delivery.
Figure 10 - Open SMS Gateway
In the page's upper left side, select the "SMPP client 1" link. The connection
details and SMS delivery status will appear alongside this. View the latest
changes to SMS settings by navigating to the "Events" page. The message will
automatically be delivered to the recipients at the designated time. You will
immediately get a notification on the "Events" page letting you know the message
was delivered properly and on time.
Figure 11 - Repeated messages sent
FAQs
Is there a way to schedule a text to send at a certain time?
Using SMS gateway software, such as Ozeki SMS Gateway, you may plan for a text
message to be sent at a specified time. The message will be automatically sent
at the chosen time once you enter the desired date and time for it to be sent.
What is periodic SMS scheduling?
Periodic SMS scheduling is the practice of automatically delivering SMS messages
at specified intervals or on specified days of the week.
How can I schedule SMS messages for selected calendar days?
You can schedule SMS messages for selected calendar days using SMS gateway software
like Ozeki SMS Gateway. The software allows you to create repeated tasks and
specify the days on which you want the messages to be sent.
Can I schedule SMS messages for specific time slots on selected days?
Yes, the scheduling functions of Ozeki SMS Gateway let you set the preferred
delivery time and repetition frequency, enabling you to send messages at particular
times on specific days.
Summary
All in all, Ozeki SMS Gateway offers high-performance and reliable SMS gateway
software, enabling efficient periodic SMS scheduling for selected calendar days.
With a user-friendly platform, users can easily set up SMS messages for specific
dates and manage their delivery effortlessly. The step-by-step guide provides
clear instructions on scheduling messages.
Ozeki SMS Gateway can be configured to replay to incoming SMS messages automatically.
To achieve this goal, it offers multiple options. The autoreply easy option will return
a response SMS to every message received. The Autoreply by script option allows you
to write a script and create a reply and to create and send new messages when an incoming
SMS arrives.
Autoreply Easy
Ozeki SMS Gateway's Autoreply Easy User can reply to every incoming SMS message with a text of your choice.
A txt file stores the text, so you can modify it from your own application or from Ozeki SMS Gateway.
This guide explains how to install and configure your Autoreply Easy User. Read about Ozeki SMS Gateway's Autoreply Easy User
Autoreply by Script
Ozeki SMS Gateway's Autoreply User can automatically reply to SMS messages or forward incoming messages.
This guide explains how to install and configure an Autoreply User on Ozeki SMS Gateway.
Each Autoreply User is controlled by their own script. You will see example scripts too by reading this guide. Read about Ozeki SMS Gateway's Autoreply User
Autoreply from Database
Ozeki SMS Gateway's Autoreply Database User can connect to your SQL database with a connection string.
It runs any SELECT query you provide, after receiving an SMS message.
The result set of the query will be sent as outgoing messages. The queries can also be modified from your own application.
Read about Ozeki SMS Gateway's Autoreply Database User
FAQs
Are there any threats with autoresponding systems?
Yes, the biggest threat is a message loop.
In the world of SMS, this can happen between automated systems (like autoresponders) accidentally triggering a message loop. This loop can lead to a massive surge in text messages and hefty phone bills for everyone involved.
Luckily, Ozeki SMS Gateway has a built-in safety feature to prevent message
loops. It acts like a guardian, stopping you from sending the same message to
the same phone number more than 10 times within an hour. This clever feature
helps avoid accidental loops and keeps your phone bill under control.
Can I query a database and return data in a response SMS?
Yes.
For automatic replies to incoming SMS messages, consider setting up a database
user within your SMS gateway software. This allows you to create custom
responses based on the content of the received message.
Can I return a webpage if I receive a certain keyword?
You cannot return a webpage, but you can return a link to a webpage.
Imagine a service that delivers a webpage link directly to a mobile phone! This
can be a convenient way to direct users to specific information or promotions.
Here's how you can potentially create such a service:
One method involves using a message type called WAP Push. This technology allows
you to transmit a webpage URL to a mobile device. The phone can then automatically
detect and open the link, seamlessly directing the user to the intended webpage.
While WAP Push is an option, it's important to consider its limitations. Modern
mobile devices might not always handle WAP Push messages as efficiently.
For a potentially smoother user experience, explore alternative solutions. You
could send SMS messages containing shortened URLs. These shortened URLs, often
generated by free online services, provide a more user-friendly way to access
the webpage. Another option is to use QR codes (those scannable blocky images)
within your SMS message. By scanning the QR code with their phone's camera,
users can instantly access the webpage. The best approach depends on your
specific needs and target audience. Researching these options will help you
choose the most suitable method for delivering webpage links directly to mobile
phones.
Can I send automatic reply messages to an incoming SMS message?
Yes, you can.
Imagine receiving SMS messages and automatically responding based on specific
keywords within those messages! This feature is available in many SMS gateway
software solutions. Here's how it works:
Automatic Replies: You can configure the software to send a pre-defined reply
message whenever it receives an incoming SMS containing a specific keyword.
This allows for automated responses to frequently asked questions or basic
inquiries.
Keyword Recognition: The software can be programmed to recognize specific
keywords within the incoming SMS message. Based on the identified keyword,
it can trigger the corresponding pre-defined reply message.
While specific implementation details will vary between software solutions,
there are two common user types:
Autoreply User: This is a simpler option that might allow setting up basic
automatic replies based on keywords.
Autoreply Database User: This option might offer more advanced features,
potentially allowing you to connect to a database and dynamically generate
reply messages based on the incoming message and database information.
By exploring these functionalities within your SMS gateway software, you can
create automated and intelligent responses to incoming SMS messages.
This guide demonstrates how easy you can create an autoreply service
using Ozeki SMS Gateway. This autoreply service is capable of sending predefined
SMS reply messages to the sender in case the system receives a message. (Figure 1)
This document demonstrates the
process of creating such an autoreply service which takes just a few clicks.
So let's begin right now.
Figure 1 - SMS reply
Steps to take to send SMS reply automatically
To send SMS reply automatically:
Launch the Ozeki dashboard
Find the panel called 'Users and applications'
Navigate to 'Add new user/application...' in the panel
Find the Autoreply easy connection
To send sms reply setup this connection
Specify a unique connection name
Provide the Reply message
Send a Test sms
Receive the sms reply
In the events tab check if your text was sent
Step 1 - Create an Autoreply Easy connection
The first step of this guide is to create the connection for the autoreply service
in SMS Gateway. So first, open the SMS Gateway, and click on the Apps button on the
toolbar. Here, in this menu, scroll down to the Incoming SMS message processing and
autoresponding services submenu, and like in Figure 2, select Autoreply easy by
clicking on Install.
Figure 2 - Create the Autoreply easy connection
Step 2 - Configure the Autoreply easy connection
The configuration of the Autoreply easy connection is quite easy, all you have to do here
is to provide some basic details for the connection. The first thing, that you need to
enter is the name of the connection. With this name, the connection can be identified in
the SMS Gateway. Next, you need to enter the reply message itself (Figure 3), which will
be sent as a reply message when someone sends a text message to you.
Figure 3 - Configure the Autoreply easy connection
Step 3 - Advanced configuration of Autoreply easy
The Autoreply easy connection can be further configured by setting a default
sender address. This address will show up at the recipient side who receives the
reply message. As Figure 4 shows, you can type here a phone number or an e-mail address
which helps to identify the autoreply easy connection. If you finished the configuration,
just click on OK.
Figure 4 - Advanced configuration of the Autoreply easy connection
Step 4 - Enable the Autoreply easy connection
After you created the Autoreply easy connection, the next window is the main
menu of the autoreply service. Here, you can modify the details of the connection anytime
you want. To activate the service, you need to enable the connection here. For that,
just click on the toggle as Figure 5 shows. The toggle is green now that indicates
that the autoreply service is now active.
Figure 5 - Enabling the Autoreply easy connection
Step 5 - Connect to the mobile network
So far, you created and enabled your autoreply service, but to receive messages,
you also need a connection that can connect to the mobile network and forward messages
to your Ozeki system. To do that, click on Connect on the toolbar, and select
the SMPP client as you can see it in Figure 6.
Figure 6 - Create an SMPP client connection
In the configuration menu, you have to provide some details about the server. This
is the server, that this SMPP client is going to use to handle SMS messages. So here,
you need to type the host, port and user account details. Then, you need to specify
a telephone number for this connection (Figure 7). With this number, the connection can be
identified, and able to send or receive messages. Lastly, you just need to click on OK
to create the SMPP client connection.
Figure 7 - Configure an SMPP client connection
Step 6 - Wait for the messages
Now your autoreply service is active and ready for the incoming messages. You can check that easily
in the main menu of the SMS Gateway. Figure 8 shows that the creation of the
autoreply service established a routing rule as well. This rule routes all the
incoming messages to the autoreply connection and it will just do its job and sends
the reply message.
Figure 8 - The incoming messages routed to the autoreply service
Figure 9 demonstrates that how simple an autoreply service works. All you need to do here
is to wait for a message forwarded to the telephone number, that you gave for the
SMPP client connection. As soon as the client received the message, it forwards it
straight to the autoreply service.
Figure 9 - Incoming messages routed to the autoreply service
At this point, the autoreply service is going to reply to the received message
with the predefined text message. The process of how the sender receives the reply
message is demonstrated in Figure 10.
Figure 10 - The autoreply service sends the predefined message
The guide on this page is going to give you a brief introduction to how easy you can
create an autoreply service that uses a script to answer by a defined action to the
received messages. (Figure 1) This service is capable of just reply with a predefined message,
but you can write a script to forward the incoming messages to a specific phone number
or do actions in case the sender phone number or the message itself matches with
your predefined details. So, let's start it right now.
Figure 1 - Autoresponding SMS script
How to write an SMS reply script
To write an SMS reply script:
Launch Ozeki SMS Gateway
Select the Apps toolbar icon
Install Autoreply app
Write a test SMS script
Specify the Sender address
Enable the Connection
Select Connect toolbar icon
Add new SMPP client connection
Check the new autoreply routing rule
Step 1 - Create an Autoreply connection
The first thing that you need to do in this guide, is to create the autoreply
service connection in the SMS Gateway. So, for that, first, click on the Apps icon on the toolbar
in the main menu. Here you can see all the available connections, that you can create in
the SMS Gateway. Now, but need to scroll down to the 'Incoming SMS message processing and autoresponding services'
section, and here, like in Figure 2, click on the Install button of the Autoreply connection.
Figure 2 - Create an Autoreply connection
Step 2 - Configure the Autoreply connection
In the configuration menu of the Autoreply connection, you need to specify a name for
the connection in the first step. Then, you select the way, that the connection uses
the script to handle the incoming messages. As you can see it in Figure 3, you can
set the path for a script file, that the connection can use, or you can just type
the script in the textbox below.
Figure 3 - Configure the Autoreply connection
Step 3 - Select an example script
The easiest way to create this autoreply service is to just select one from the
available four example scripts from the textbox. Right now, they can't be executed
since all lines commented out by an '#' sign. The first example script
sends a 'Thank you' message back to the sender.
n.*
SENDER Thank you for your message.
STOP
The second example script is capable of forwarding all the incoming messages to
the defined phone number. The second line of the script shows how you can do that
by first, defining the phone number, and then, MSG variable stores the incoming message
which is in this case will be sent to that phone number.
n.*
+3620123223 MSG
STOP
The next example script activates only when the message comes from a specified
phone number. This phone number can be defined in the first line of the script. Then,
the script forwards the message to the phone number that is defined in the second line.
The MSG variable stores the message.
n^+362000001
+3620123223 MSG
STOP
The last example shows how you can do an action in case the message starts with
a specific word. This example forwards the message to two other phone numbers defined in the
second and third row. But it happens only in case when the message starts with the word 'important'.
The word can be defined as the first row of the script demonstrates it.
To follow this guide, just select the script that will forward the message to the
defined phone number. Figure 4 demonstrates, how you need to write the script into the
textbox to be able to operate with that script in case of an incoming message.
Figure 4 - Write a script for the Autoreply service
Step 4 - Advanced configuration of Autoreply connection
The Autoreply connection can be further configured by setting a default
sender address. This address will show up at the recipient side who receives the
reply message. As you can see it in Figure 5, you can type here a phone number or an e-mail address
which helps to identify the autoreply easy connection. If you finished the configuration,
just click on OK.
Figure 5 - Advanced configuration of the Autoreply connection
Step 5 - Enable the Autoreply connection
After you created the Autoreply connection, the next window is the main
menu of the autoreply service. Here, you can modify the details of the connection anytime
you want. To activate the service, you need to enable the connection here. For that,
just click on the toggle as Figure 6 shows. The toggle is green now that indicates
that the autoreply service is now active.
Figure 6 - Enabling the Autoreply connection
Step 6 - Connect to the mobile network
By this point, you created and enabled your autoreply service, but to receive messages,
you also need a connection that can connect to the mobile network and forward messages
to your Ozeki system. To do that, click on Connect on the toolbar, and select
the SMPP client as you can see it in Figure 7.
Figure 7 - Create an SMPP client connection
In the configuration menu, you have to provide some details about the server. This
is the server, that this SMPP client is going to use to handle SMS messages. So here,
you need to type the host, port, and user account details. Then, you need to specify
a telephone number for this connection (Figure 8). With this number, the connection can be
identified, and able to send or receive messages. Lastly, you just need to click on OK
to create the SMPP client connection.
Figure 8 - Configure an SMPP client connection
Step 7 - Wait for the messages
After setting up and enabling the autoreply service, now it is ready for the
incoming messages. You can check that easily in the main menu of the SMS Gateway.
Figure 9 shows that the creation of the autoreply service established a routing
rule as well. This rule routes all the incoming messages to the autoreply
connection and it will just do its job and forward the messages to the dedicated
phone number.
Figure 9 - Route incoming messages to the Autoreply connection
Figure 10 demonstrates how simple an autoreply service works. All you need to do here
is to wait for a message forwarded to the telephone number, that you gave for the
SMPP client connection. As soon as the client received the message, it forwards it
straight to the autoreply service.
Figure 10 - Incoming messages routed to the autoreply service
When the Autoreply service receives the message, the script, that you wrote for the
service will be executed. In this case, it will forward the incoming message to
the specified phone number as Figure 11 shows that.
Figure 11 - The autoreply service forwards the message
FAQs
Can I use keywords to match replies to submitted messages?
Yes.
Keeping track of conversations in SMS can be frustrating because unlike chat apps,
SMS messages don't have a built-in way to link them together. This means you can't
necessarily tell if an incoming message is a reply to a specific SMS you sent
earlier.
One common way to work around this limitation is to use keywords. You can include
a unique keyword in the original message you send and ask the recipient to
include that same keyword in their reply. This creates a connection between the
messages, allowing you to associate the reply with the original message. However,
this method relies on the recipient remembering the keyword, which can be
unreliable. Forgetting to include the keyword can lead to confusion about which
message the reply is actually for.
If you need a more reliable way to track SMS conversations, you might need to
consider alternative solutions. For users with IP SMS connections and service
providers that support long codes (special sender numbers with more digits),
there's a potential solution. You can encode extra digits within the sender
number to identify the original message. However, this trick depends on specific
service provider capabilities and isn't a universally available option. In the
end, while keywords can be a helpful strategy for SMS, they have limitations. For
scenarios where message history is crucial, using a platform designed for
conversations might be a better choice.
Can I use long codes to match replies to submitted messages?
Yes, if you have an IP SMS connection, and a network that allows this.
Long codes, phone numbers with a special extension (like +36201234678888, where
8888 is the extension), can be used with IP SMS connections in specific networks.
Here's the idea:
The Long Code Advantage: If your network supports long codes, the recipient
(with phone number +3620123467 in our example) would receive any message sent
to a number starting with +3620123467. This means messages sent to
+36201234678888 or +3620123467999999 would both be delivered to the same
recipient.
Message ID in the Tail: Since you control the long code, you can encode a
message identifier in the final digits of the sender number (like
+3620123467****). This way, when a reply comes back to the long code, you
can identify which original message it belongs to by looking at the message
identifier embedded in the sender number.
This article is about how to forward a received SMS to multiple recipients.
We will talk about what is forwarding is, what are the benefits of it and how to setup an automated system for it.
If you study this article carefully, you will be able to setup a new SMPP client and add an application that forwards the message to multiple recipients.
It takes about 10 minutes to perform this task and the Ozeki SMS Gateway is an easy-to-use application.
With standard knowledge of SMS technology, it will not be hard to follow the tutorial. We hope you will find the presented information beneficial.
What is sms forwarding?
SMS forwarding is the process of sending an SMS or email on to a further destination.
How to forward an SMS to multiple recipients
To forward an SMS to multiple recipients:
Launch Ozeki SMS Gateway
Add new SMPP client connection
Configure SMPP client
Enable connection
Choose the Apps toolbar icon
Install Autoreply service
Provide auto reply script
Enable logging
Test to forward SMS to multiple recipients
Check the Events
How to forward an SMS to multiple recipients(Video tutorial)
The following video shows the steps of setting up a system that can send received messages to multiple addresses.
It starts with setting up an SMPP connection to receive messages end ends with reviewing the log after successful forwarding to multiple addresses.
In the video we are using the Ozeki SMS Gateway.
It is any easy to use and powerful SMS gateway that and the video is detailed and only 3 minutes long.
You will have no problem following the steps and perform the setup.
Install a new SMPP Client
On the Toolbar of the Ozeki SMS Gateway, you can find the Connect button, located next to the messages toolbar icon.
Click it to access the IP SMS connections install section (Figure 1).
In the list, you can find the SMPP client list item. Click the blue Install link next to the title. It will take you to the Install connection panel.
Figure 1 - Create new SMPP connection
Configure the new SMPP client
In the install connection panel, you can find the settings for the new SMPP
client. There are multiple group boxes here.
Look for the one titled Connect to server (Figure 2). Here you can add
the properties of the server you connect to.
Please provide the hostname (or IP address) and the port number for the server
of choice. This way the SMPP client will connect to that server.
Figure 2 - Configure SMPP client
Enable logging for the SMPP client
Having a log file for a connection is the key in error handling.
You can turn on the logging for the connection by scrolling down and looking
for the Log level group box (Figure 3).
Click the group box show/hide icon to see all the Log level settings.
To log every event on the connection, tick every checkbox.
This way the client will make a record for communication events and messaging
events, and it will attach those to every message.
Click the ok button to proceed to the next step.
Figure 3 - Enable logging
Connect the SMPP client to the server
After you clicked the Ok button, you will see the empty events tab page of the client.
This means that the connection is not active, and nothing is happening.
On the left-side panel, you can see a switch button titled Connection. Click it to turn on the connection.
This way, you will be able to see the process of connecting to the server in real time.
In the Events tab (Figure 4), you will see the process of initializing the SMPP client.
Figure 4 - SMPP client connected
Add a new Autoreply user
Now you have a new client that could handle message sending and receiving. The
next step is to create an application that will detect the message and forward
it automatically. To do so, click the App button located on the Toolbar
of the Ozeki SMS Gateway (Figure 5). It will take you to the Add user
or application install section. In the Incoming SMS message processing and
auto responding services list, you will find an autoreply list item.
Click the blue link next to it to access the Autoreply script configurator page.
Figure 5 - Add new Autoreply user
Provide a script for autoreply
Now you need to configure your Autoreply bot. The script that you write
in the Autoreply group box will define what the automated user will do.
When you first scroll down to the Autoreply group box, you will see example
scripts in the Auto reply script input field, with short explanation. You
can also name your autoreply bot here.
The script you see on Figure 6 will forward all incoming messages to the
provided 9 phone numbers.
Figure 6 - Configure Autoreply script
Enable logging on the Autoreply bot
Having a log is important in the case of an autoreply application too.
Tick in all the checkboxes in the Log level group box (Figure 7). This
way, the application will record all events. Click the Ok button to
finalize your configuration.
Figure 7 - Enable Autoreply logging
Message received record in the events tab
If the SMPP client receives a message, the autoreply bot will detect it
and you will see the record of the incoming message in the events tab page.
To reach it, search for the events tab in the tab bar of the autoreply
forward section. You will find much more information about the events in the
client here, as you can see on Figure 8.
Figure 8 - Message received
Messages successfully forwarded
In the Sent folder of the autoreply application, you can see the message was
successfully sent to all the addresses. To reach this folder, open the blue
Sent folder in the left-side panel. Here you can see all the previously
sent messages. If the Result column show a checkmark and the Submitted
text (like on Figure 9), it means that the SMPP connection sent the message to
the address.
Ozeki SMS Gateway's Autoreply Database User can connect to your Microsoft SQL, Oracle, MySQL, Sybase, etc... database with a connection string.
It runs any SELECT query you provide, after receiving an SMS message.
The result set of the query will be sent as outgoing messages.
The queries and tables can also be modified from your own application.
How to send an SMS reply from SQL
To send an SMS reply from SQL:
Launch Ozeki SMS Gateway
Add new Autoreply database user
Create SQL database table structure
Setup Autoreply database user
Provide the autoreply text script
Use identifiable numbers and keywords
Send test SMS to get reply from SQL
Check the Autoreply database user logs
You can create the following service by using this solution (Figure 1):
1.) An SMS message is received by Ozeki SMS Gateway from a mobile phone.
2.) Ozeki SMS Gateway's Autoreply Database User searches for keywords in the SMS message by using a txt file.
3.) Depending on the search, an autoreply message will be selected from your database server with the same txt file.
It is important that you have a IP SMS service provider
or a GSM modem configured on your Ozeki SMS Gateway,
so you can receive SMS messages and automatically reply to them using this example.
Figure 1 - How does Ozeki SMS Gateway's Autoreply Database User work
Step 1 - Setup Autoreply Database User in Ozeki SMS Gateway
First you need to install an Autoreply Database User to create the explained service.
On the 'Management' console please click 'Add' as seen on Figure 2.
Figure 2 - Click 'Add' user or application on the 'Management' console
Find the Autoreply Database User and click the blue 'install' link next to it. As you can see it on Figure 3.
Figure 3 - Install Autoreply Database User from the 'Management' console
Step 2 - Create database table structure
The Autoreply Database User will SELECT the reply SMS messages from a database table.
Create the following database structure to store the SMS messages (Figure 4).
This example uses a MySQL database server, but you can use other databases like
Microsoft SQL, Oracle, Sybase, etc... You use other tables and table layouts as well.
CREATE TABLE autoreplymessage (
		 id int(11) NOT NULL auto_increment,
		 keyword varchar(30) default NULL,
		 msg text default NULL,
		 PRIMARY KEY (id)
		 );

INSERT INTO autoreplymessage (keyword,msg) VALUES
		("default","There is no data for this keyword."),
		("red","Red is a good colour."),
		("blue","Blue is not the best option.");
Figure 4 - CREATE TABLE and INSERT rows into 'autoreplymessage' table
Your tables can be viewed with SELECT * FROM statements (Figure 5).
Although this example contains only one table.
> SELECT * FROM autoreplymessage;
id          keyword                        msg
----------  ------------------------------ -------------------------------------
 1          default                        There is no data for this keyword.
 2          red                            Red is a good colour.
 3          blue                           Blue is not the best option.

(3 rows affected)
Figure 5 - Read 'autoreplymessage' table with a SELECT statement
In case there is no database driver installed with the database server,
you should install a driver, because you will need the connection string in the next step.
The database driver connects Ozeki SMS Gateway and the database server.
In most cases there is a database driver installed with the database server.
Step 3 - Configure Autoreply Database User to use your database
You will need to enter the database connection type and connection
string
in the Autoreply Database User's 'Database setup' panel (Figure 6).
The type can be selected from the combo box, while the string must be placed into
the textbox.
Figure 6 - Setup Autoreply Database User for SMS information query
On Figure 7 you can see a sample string for a MySQL database connection.
Keep in mind that you can use your own connection string type (OleDB, ODBC,
SQLServer, Oracle) for your own database server
which can be Microsoft SQL, Oracle, Sybase etc... In case you are using an ODBC
driver for MySQL,
you just need to modify the MySQL server IP, database name, username and
password to your own values in the following string:
Step 4 - Write script to autoreply from SQL database
Now it is time to write the script file which is capable to SELECT
a row from your database table if the table was successfully created in STEP 2.
The message attribute of the selected row will be replied to the SMS message. Here you can find the path of the example script:
C:\Program Files\Ozeki\Ozeki10\Data\NG\config\OzekiUsername\sqlscript.txt
A simple text editor can edit these files or you can create your own txt file and edit it with your own application,
which is useful if you would like to modify the queries.
Please provide the path to the file using the Autoreply Database User by clicking 'Database setup'
and selecting the 'Autoreply script' tab page (Figure 8)
Figure 8 - Provide txt script path to Autoreply Database User
Step 5 - The structure of SQL query scripts
The Autoreply Database User's SQL script contains filter-statement pairs,
which works exactly like the if-then structure in programming languages.
The received SMS message goes through the filter and if it is ok, an SQL SELECT statement will run.
The message content of the selected rows will be forwarded to a phone number.
This number is the 1st parameter of the SELECT statement's result set, while the message text is the 2nd.
The filter is capable to identify phone numbers, text fragments and keywords.
The keyword of each message is the first word of the text.
Forwarding happens if the address of the recipient is included in the database (Figure 11).
Step 6 - A simple keyword example
This example will run on the following table which you can see in Figure 9.
id          keyword                        msg
----------  ------------------------------ -------------------------------------
 1          default                        There is no data for this keyword.
 2          red                            Red is a good colour.
 3          blue                           Blue is not the best option.
Figure 9 - The content of 'autoreplymessage' table
You can run the following script in Figure 10 on the 'autoreplymessage'
table by adding it to 'sqlscript.txt'.
As a reminder the keyword, which is symbolized by the 'k' character, is the
first word in the SMS message.
This word will be tested by the filter. If a filter check is successful,
the SELECT statement runs and the script will stop. As you can see, you can place
constant values in the SELECT statement. For example, '$sender', which is the
sender of the incoming message.
Script elements you can place into sqlscript.txt
SELECT '$sender',msg FROM autoreplymessage WHERE keyword='red'
#The first filter checks if word 'RED' was the keyword.
#If true, it SELECT-s 'Red is a good colour.' as a reply message.
#If false it goes to the next filter.

k^BLUE
SELECT '$sender',msg FROM autoreplymessage WHERE keyword='blue'
#The second filter checks if word 'BLUE' was the keyword.
#If true, it SELECT-s 'Blue is not the best option.' as a reply message.
#If false it goes to the next filter.

k.*
SELECT '$sender',msg FROM autoreplymessage WHERE keyword='default'
#The third filter will accept any other keyword.
#It SELECT-s 'There is no data for this keyword.' as a reply message.
Figure 10 - Example script which can be placed into sqlscript.txt
The filter part of the SQL query script works similarly as the filter part of the
SMS messaging script,
but keep in mind only to search filter examples, since the second part is
always an SQL SELECT statement.
Step 7 - Pre-defined keywords in Ozeki SMS Gateway
These types of keywords can be placed in the script. For example '$sender' :
SELECT '$sender',msg FROM autoreplymessage WHERE keyword='red'
Figure 11 - Sends msg to '$sender'
Autoreply Database User can recognize the following keywords:
Keyword
Value
$originator
Replaced by the telephone number of the sender.
$sender
=$originator (The $sender is another name for the $originator.)
$recipient
Replaced by the telephone number that received the message.
$receiver
=$recipient (The $receiver is another name for the $recipient.)
$messagedata
Replaced by the text of the message.
$keyword
Replaced by the 1st word in the message. This word is called keyword.
$after
Replaced by the remaining text after the keyword.
$senttime
Replaced by a timestamp which shows when the message was sent.
$receivedtime
Replaced by a timestamp which shows when the message was received.
$messagetype
Replaced by the type of the message, which is 'SMS:TEXT' in most cases.
$id
Replaced by a unique string, which identifies the message in Ozeki SMS Gateway.
$operator
Replaced the name of the service provider, which received the message in Ozeki SMS Gateway.
$1
Replaced by the 1st word in the message.
$2
Replaced by the 2nd word in the message.
$3
Replaced by the 3rd word in the message, etc...
The autoreply script's structure is explained on these webpages:
After doing Step 1 to 6, you can try the solution.
Ozeki SMS Gateway will forward incoming SMS messages to your Autoreply Database User.
The SQL query script filters the SMS message to create the proper SELECT result sets.
Each row of the result set will represent a message to be replied or forwarded.
You can track the messaging log of your Autoreply Database User at the following path:
C:\Program Files\Ozeki\Ozeki10\Data\NG\Logs
When I insert Data into Ozekimessageout table I didn't get message to my cell
phone. What would be cause that I didn't get the text message that it is
inserted into out table using my SQL console?
First, let's rule out a mobile network issue. Send a test SMS directly from
Ozeki's graphical user interface (GUI). If the message arrives successfully,
the network connection seems to be functioning properly.
Next, we need to verify if messages are being transferred from your database to
Ozeki software. Insert some test messages into the Ozekimessageout table. Then,
within Ozeki's GUI, navigate to the outbox associated with the database user
you're using. If these test messages are absent from the outbox, the problem
lies in the data transfer process between the database and Ozeki.
I would like to use one database for many "database users". Is this possible?
Absolutely! Ozeki SMS Gateway allows you to maintain distinct message logs for
different purposes by using separate database users.
Here's a step-by-step guide:
Create New Database Tables: Set up two new tables within your database.
For easy identification, you can name them ozekimessagein2 and
ozekimessageout2. These tables should mirror the structure of the existing
ozekimessagein and ozekimessageout tables used by your first database user.
Configure the Second Database User: Access the configuration form for your
second database user in Ozeki.
Modify SQL Templates: Locate the section for SQL templates within the
configuration form. These templates specify how messages are saved to the
database tables.
Update Table Names: Within the SQL templates for the second database user,
update the existing table names (ozekimessagein and ozekimessageout) to
match the newly created tables (ozekimessagein2 and ozekimessageout2).
By following these steps, you'll establish separate message logs for each
database user. This allows you to categorize or filter messages based on your
specific needs using the chosen table names.
My Ozeki SMS Gateway is always disconnecting from my MySQL server with the
following error message: MySQL Server has gone away. What should I do?
To enhance responsiveness when using Ozeki with MySQL, adjust the timeout
setting. Here's how:
Configure MySQL Timeout:
Edit your MySQL configuration file (e.g., my.ini) and set the
interactive_timeout parameter to your desired duration in seconds
(e.g., interactive_timeout = 28800 for 8 hours).
Save the changes and restart the MySQL service.
Update Ozeki Connection String:
Modify your Ozeki connection string to use Interactive instead of
wait_timeout. The correct format is
Driver={MySQL ODBC 5.2 ANSI Driver};Server=127.0.0.1;Database=ozeki;User=test;Password=test;Interactive=YOUR_TIMEOUT_VALUE.
Remember to replace YOUR_TIMEOUT_VALUE with your desired timeout in seconds.
By following these steps, you'll optimize MySQL connection timeouts for smoother
operation within Ozeki, especially beneficial for long-running tasks or
large datasets.
Autoreply Database Users are the perfect solution
for generating any message depending on the incoming message.
These messages are generated from a database. Here you will see how to install
and configure an Autoreply Database User from Ozeki SMS Gateway.
What is Ozeki SMS Gateway?
Ozeki SMS Gateway is a high-performance software platform that allows you to send
and receive SMS messages using various communication protocols such as SMPP, HTTP,
UCP, CIMD, and more. It acts as a bridge between your applications (like CRM systems,
websites, or databases) and mobile networks, enabling automated and reliable SMS
messaging.
How to install an Autoreply Database User (Quick Steps)
Open the Control Panel
Create a new database connection
Select your database type
Configure and enable the database connection
Go to the SMS Gateway dashboard
Install the Autoreply Database user
Link to the database connection
Edit and enable the autoreply script
How to install an Autoreply Database User (Video tutorial)
In this video, you will learn how to install and configure an Autoreply Database
User in the Ozeki SMS Gateway. This user automatically responds to incoming SMS
messages based on data retrieved from a connected SQL database. The tutorial shows
you how to set up a database connection, install the Autoreply Database User, and
write the SQL query that generates replies. By the end of the video, you'll be
able to create a smart auto-response system that dynamically replies to messages
using your database content - ideal for support bots, information services, or
automated replies.
Step 1 - Open Control Panel
Launch Ozeki SMS Gateway and press the Start menu on the bottom left, then go to
the Control Panel where you can manage connections and system settings (Figure 1).
Figure 1 - Open Control Panel
Step 2 - Create new application connection
Click on Create new connection, then click on Application on the right side to
start setting up a new database connection (Figure 2).
Figure 2 - Create new application connection
Step 3 - Select database
From the available options, choose Database as the type of application connection (Figure 3).
Figure 3 - Select database
Step 4 - Select SQL queries datbase connection
Select SQL queries to configure a connection that uses SQL queries to retrieve
data from your database (Figure 4).
Figure 4 - Select SQL queries datbase connection
Step 5 - Select database type
Choose the MySQL type of database (Figure 5).
Figure 5 - Select database type
Step 6 - Configure database connection
Enter the necessary details: Server, Port, Database, UserID, Password.
Save the configuration (Figure 6).
Figure 6 - Configure database connection
Step 7 - Enable database connection
Activate the connection by enabling it. This makes the database ready for
use in auto-reply functions (Figure 7).
Figure 7 - Enable database connection
Step 8 - Open SMS Gateway
Return to the SMS Gateway dashboard to configure users and messaging features (Figure 8).
Figure 8 - Open SMS Gateway
Step 9 - Add new user/application
Click on Add new user/application to create a new user that will handle the
auto-reply functionality (Figure 9).
Figure 9 - Add new user/application
Step 10 - Install Autoreply database
From the list of user types, select Autoreply database and click Install to
proceed (Figure 10).
Figure 10 - Install Autoreply database
Step 11 - Select database connection
Choose the Database connection you created earlier for use with this Autoreply
Database User (Figure 11).
Figure 11 - Select database connection
Step 12 - Configure autoreply script
In the Autoreply script tab, you will see the auto-response script pre-written (Figure 12).
Figure 12 - Configure autoreply script
Step 13 - Create autoreply database connection
Finish the setup by saving the configuration. The Autoreply user is now
linked to your database (Figure 13).
Figure 13 - Create autoreply database connection
Step 14 - Enable autoreply database connection
Enable the user so it can start receiving and replying to messages automatically
based on the SQL query (Figure 14).
See how to create a simple database on your MySQL server.
It is very important that the table structure is perfectly in line with the
SQL query script you use. You can work similarly with
Microsoft SQL Express, Oracle, Sybase, etc...
Step 1 - Download and install MySQL database server
For a step-by-step download and installation guide, please follow these screenshots and come back
to Step 2, so you can find out how to create the database structure.
Please download a MySQL wampserver
for Windows or install a MySQL debian package on your Linux operating system.
Step 2 - Create the database on your MySQL server
Open the command interpreter of your MySQL server.
Enter the proper SQL statements to create the required database structure (Figure 1).
It is essential to create your database, a table and a user.
It is also required to add user privileges, so the user can work on the database.
Keep in mind that the table structure in Figure 1 is in perfect relation
with the example script demonstrated in these tutorials.
CREATE DATABASE ozeki;

USE ozeki;

CREATE TABLE autoreplymessage (
 id int(11) NOT NULL auto_increment,
 keyword varchar(30),
 msg varchar(160),
 PRIMARY KEY (id)
)charset=utf8;
ALTER TABLE autoreplymessage ADD INDEX (id);

CREATE TABLE log (
 id int(11) NOT NULL auto_increment,
 sender varchar(30),
 message varchar(160),
 PRIMARY KEY (id)
)charset=utf8;
ALTER TABLE log ADD INDEX (id);

CREATE USER 'ozekiuser'@'localhost' IDENTIFIED BY 'ozekipass';

GRANT ALL PRIVILEGES ON ozeki.* TO 'ozekiuser'@'localhost';
Figure 1 - Create 'autoreplymessage' table in MySQL
Step 3 - Insert data into 'autoreplymessage' table
Insert some rows into the 'autoreplymessage' so it can work
with the example script demonstrated on these pages.
The example script detects if the 1st word of the incoming message is 'RED', 'red', 'BLUE' or 'blue' and reacts accordingly.
Please prepare the 'autoreplymessage' table with the INSERT statements seen on Figure 2.
INSERT INTO autoreplymessage (keyword,msg) VALUES ('default','There is no data for this keyword');
INSERT INTO autoreplymessage (keyword,msg) VALUES ('red','Red is a good colour.');
INSERT INTO autoreplymessage (keyword,msg) VALUES ('blue','Blue is not the best option.');
Figure 2 - Fill 'autoreplymessage' table with some required (keyword,msg) parameter pairs
After inserting the values from Figure 2, you should see the 'autoreplymessage' table filled exactly like on Figure 3.
> SELECT * FROM autoreplymessage;
id          keyword                        msg
----------  ------------------------------ -------------------------------------
 1          default                        There is no data for this keyword.
 2          red                            Red is a good colour.
 3          blue                           Blue is not the best option.

(3 rows affected)
Figure 3 - The values inserted into the 'autoreplymessage' table
The 'sqlscript.txt' script file is automatically generated in the folder of
every Autoreply Database User.
This sample script shows how to filter incoming SMS messages and forward or
reply to them
from the rows generated with the help of one or more SQL SELECT statement.
###########################################################################
# Default script file for Autoreply configuration. This script
# is executed every time a new message is sent to the system
# from a mobile phone
#
# Entry:
#     One entry contains a single condition line that starts
#     with a condition option. The condition line is followed
#     by one or more action lines. Action lines contain SQL
#     commands. The entry is closed by an empty line
#
# Condition options:
#     n - if the sender telephone number matches the pattern
#     m - it the message text matches the pattern
#     k - if the keyword matches the pattern. (The keyword is first word
#         of the messages. The keyword is converted to uppercase)
#
# Action:
#     Each line contains an SQL command. Before the SQL commands:
#     are executed on the database, the following words are replaced:
#     $originator - is replaced to the sender telephone number of the messages
#     $sender - is replaced to the sender telephone number of the messages
#     (an alias for originator)
#     $recipient - is replaced to the telephone number that received the message
#     $receiver - is replaced to the telephone number that received
#     the messages (an alias for recipient)
#     $messagedata - is replaced to the message text
#     $keyword - is replaced to the keyword in the message
#     $after - is replaced to the message the message text after the keyword in the message
#     $senttime - is replaced to the timestamp, that represents when the message was sent
#     $receivedtime - is replaced to the timestamp, that represents when the message was received
#     $messagetype - is replaced to the message type (in most cases this will be SMS:TEXT)
#     $id - is replaced to the unique string identifier of the message
#     $operator - is replaced to the name of the service provider
#     connection that received the message
#
# Response:
#     The SQL commands in the Action section can return one or more response messages.
#     A response message is a row in the result set of the SQL select. A row in the result
#     set should contain the following columns:
#     recipient - The 1st column in the result set (Mandatory)
#     messageData - The 2nd column in the result set (Mandatory)
#     messageType - The 3rd column in the result set (Optional)
#     sender - The 4th column in the result set (Optional)
#     operatorNames - The 5th column in the result set (Optional)
#
# Comments:
#     The hashmark sign (#) marks a single line comment
###########################################################################

###########################################################################
#Condition:
#    The sender number starts with +44
#Action:
#    One SQL statement is specified. Before the statement
#    is executed the word '$sender' is replaced to the
#    phone number of the person who sent the message to the
#    system.
#

n^+44.*
SELECT '$sender',messagetext FROM defaultresponse

###########################################################################
#Condition:
#    The message starts with the keyword: RED
#Action:
#    Two SQL statements are executed, the first one
#    updates a database table, the second one returns a
#    response message

k^RED
UPDATE stats SET incoming = incoming+1 WHERE keyword='RED';
SELECT '$sender',messagetext from defaultresponse where keyword='RED'

###########################################################################
#Condition:
#    Message text contains the word ALERT
#Action:
#    Many messages will be sent to the recipients stored in
#    the alertrecipients database table

m.*ALERT.*
SELECT recipients,'Alert, somebody broke in!' FROM alertrecipients

###########################################################################
#Condition:
#    All incoming messages (coming from any phone number)
#Action:
#    Select a response based on keyword

n.*
SELECT '$sender',messagetext from keywordresponse where keyword='$keyword'
Scroll down to see the structure of the SQL query script.
You can render a script file to each Autoreply Database User, which is capable to
send SMS messages if they follow the script. The file works with every incoming message
and selects outgoing messages according to the filter.
Introduction
Look at the script file. You can see that it is split into sections separated by empty lines (Figure 1).
You can write as many sections as you would like with no maximum limit.
The sections are read sequentially and the first section that matches
the incoming SMS will be used to create the response SMS message.
Each section's first line is the filtered condition, and the following one or more SQL statements are called action.
SQL SELECT statements can return one or more response messages.
If the filter condition matches the incoming message data, it calls the statements to be executed until the empty line is found.
In this case it will not check other sections.
Figure 1 - You can see the filtered conditions and the SQL statements in this example
Condition
Each section starts with a condition consisting of a single row split into two parts (Figure 2)
Figure 2 - The first line of every section is called: condition
The first part is the match target selector, a single character
that determines which part of the incoming message should be filtered
(Figure 3).
FONT style="font-size:15px;">You can select a match target selector character from the following options:
# Condition options:
#     n - if the sender telephone number matches the pattern
#     m - it the message text matches the pattern
#     k - if the keyword matches the pattern. (The keyword is first word
#         of the messages. The keyword is converted to uppercase)
Figure 3 - Match target selectors
The second part is the match pattern which is the character filter (Figure 4).
These match pattern examples work on the 'm' massage target:
m.* - matches any text message
m^abc.* - matches if text message starts with 'abc' or 'ABC'
m.*abc.* - matches if text message contains 'abc' or 'ABC'
Each condition filter is followed by an action which consists of SQL statements.
You can only send SMS messages with SQL SELECT queries, but you can run INSERT and UPDATE statements as well.
Keep in mind that the 1st parameter of the SELECT result set is
the recipient of the message to be sent, while the 2nd parameter is the message itself.
On Figure 5 you can see a few examples.
k^RED
INSERT INTO log (sender,message) VALUES ('$sender','$messagedata')
SELECT '$sender',msg FROM autoreplymessage WHERE keyword='red'

k^BLUE
SELECT '$sender',msg FROM autoreplymessage WHERE keyword='blue'

k.*
SELECT '$sender',msg FROM autoreplymessage WHERE keyword='default'
Figure 5 - SQL statement examples where the recipient is the '$sender'
The following words are replaced in the SQL statements:
Words
Value
$originator
The telephone number the message was sent from.
$sender
=$originator (The $sender is another name for the $originator.)
$recipient
The telephone number the message was sent to.
$receiver
=$recipient (The $receiver is another name for the $recipient.)
$messagedata
The text of the message.
$keyword
The 1st word in the message. This word is called keyword.
$after
The remaining text after the keyword.
$senttime
A timestamp which shows when the message was sent.
$receivedtime
A timestamp which shows when the message was received.
$messagetype
The type of the message, which is 'SMS:TEXT' in most cases.
$id
A unique string. It identifies each message in Ozeki SMS Gateway.
$operator
Name of the service provider. It receives the message in Ozeki SMS Gateway.
$1
The 1st word in the message.
$2
The 2nd word in the message.
$3
The 3rd word in the message, etc...
Each SQL statement is executed
line by line until the interpreter reaches an empty line, where it finally stops.
(Tip: You can only get reply message content by using SELECT statements.)
Response
The result set of the SELECT SQL statement contain the messages to be
forwarded or responded. The number of rows you can find in the result set will
determine the number of messages to be sent. (Figure 6)
The result set can contain the following parameters:
recipient - The result set's 1st column (Mandatory)
messageData - The result set's 2nd column (Mandatory)
messageType - The result set's 3rt column (Optional)
sender - The result set's 4th column (Optional)
operatorNames - The result set's 5th column (Optional)
Figure 6 - Ozeki 10 SMS Gateway's Autoreply Database User will send
SMS messages from the results.
Example
Look at an example how to filter
the 1st word in every incoming message and how to do separate actions on each.
The action depends on if the word is 'RED', 'BLUE' or other. Uppercase and
lowercase characters are taken into account equally. (Figure 7)
k^RED
INSERT INTO log (sender,message) VALUES ('$sender','$messagedata')
SELECT '$sender',msg FROM autoreplymessage WHERE keyword='red'
#The first filter checks if word 'RED' was the keyword.
#If true, it INSERT's the message into the 'log' table
#and SELECT-s 'Red is a good colour.' as a reply message.
#If false it goes to the next filter.

k^BLUE
SELECT '$sender',msg FROM autoreplymessage WHERE keyword='blue'
#The second filter checks if word 'BLUE' was the keyword.
#If true, it SELECT-s 'Blue is not the best option.' as a reply message.
#If false it goes to the next filter.

k.*
SELECT '$sender',msg FROM autoreplymessage WHERE keyword='default'
#The third filter will accept any other keyword.
#It SELECT-s 'There is no data for this keyword.' as a reply message.
Figure 7 - SQL query script example
Look at SQL tables found in Figure 8 and 9 to examine the following example:
id          keyword                        msg
----------  ------------------------------ -------------------------------------
 1          default                        There is no data for this keyword.
 2          red                            Red is a good colour.
 3          blue                           Blue is not the best option.
Figure 8 - 'autoreplymessage' table
id          sender                         message
----------  ------------------------------ -------------------------------------
 1          +3620123456                    red Hello Autoreply Database User
 2          +3670654321                    red Good day to you Recipient
When we receive a text message, we want to know about it as soon as possible,
especially when it contains important business-related information. To make
this situation much simpler, we will show you how to set up a notification
sound when a message arrives. If you follow our quick list of steps, your PC
will be able to play beep sounds on its speaker, when needed.
In this video we will show you the essential settings you have to do, in order to make your PC to play various kinds of musical sounds you want.
For the very first step, at the Ozeki SMS Gateways’ Users and applications panel you have to click on the “Add new user/ application...” link, highlighted in blue. Through this link a new panel will appear, which contains various installation options, from which “Beep” one should be selected. This service let you to play sounds on your PC speaker. (Figure 1)
Figure 1 - Install Beep user
The following instruction is to fill the configuration section. You have to set up the “Headset Earphone” option at the Play sound part of the details page. Then click on the “OK” button at the bottom. (Figure 2)
Figure 2 - Configure Beep user
After the configuration, you must switch the slider button to green, on the page
that showed up. This will change the connection’s status, so it is ready play
sounds. If it has succeeded, then you will get a feedback message about the
successful installation. (Figure 3)
Figure 3 - Enable Beep user
Now, you have to click on the “Home” icon in the SMS Gateway toolbar, then choose the “Add new route...” button in the routing panel. After that, you must specify the message route in the Settings tab, at the right side of your screen. Set the “SMPPS_client_1@localhost” option from the drop-down list as the “From” setting, then set up the “beep_1@localhost” as the “To” setting. This will define the message’s route. Then click on the “Ok” button. (Figure 4)
Figure 4 - Add new routing rule for Beep user
By clicking on the “OK” button, the routing page will show up. Your following
task is to reach the “Home” page. Now, if you receive a new text message, your computer will play the sound that has been set up. (Figure 5)
Figure 5 - Beep played when an SMS message arrives
Summary
This quick list of instructions has given you the necessary information to get setup easily. Now, you have the knowledge, how to set up various musical sounds as a notification sound on your PC. If you have any further questions, please, contact us on our e-mail address: info@ozeki.hu.
How to play a notification sound file when a new SMS message arrives
We have already showed you, how to play a beep message when a new SMS arrives,
now, we will describe you all the essential settings, how to play a
sound file if you have received a text message through your Ozeki SMS Gateway.
What is an SMS Notification?
A SMS notification is a short text message that informs people about updates,
reminders, or alerts regarding their accounts, services, or activities.
What is notification sound when a new SMS arrives in Windows?
This is a sound file that is played when the SMS system detects the arrival
of the SMS on Windows.
How To Set Text Message Notification Sound (Video tutorial)
The following video will help you go through how to get an alerting sound
when a new SMS arrives in Windows.
Your first task is to load the Ozeki Gateway Control Panel, by clicking on
the Ozeki Start Menu in the bottom left corner of the page.
In this panel, you have to find the „Create new connection” button,
highlighted in blue, then click on it. As soon as, you have clicked
on the button, a Connection details menu will appear. From this connection
method enumeration list, you have to choose the preferred one,
which is the Audio/video one. Then you have to select the connection
type that you want to install. According to this, choose the „Audio”
one, then the „Sound recorder”. (Figure 1)
Figure 1 - Create sound recorder connection
The second part of the setting proccess is to set up the general information of
the sound recorder. For the first, you have to specify a unique name in order
to identification. (For example: Recorder) Secondly, make sure that in the
„Microphone” part of this panel all the settings are correct. In the Microphone
device setting you have to choose the „AI Noise-Cancelling Microphone” option
and, in the Record sound part set up a folder where the audio sound will be
saved. (Figure 2)
Figure 2 - Configure sound recorder connection
After setting up the necessary details, click on the „OK” button. In the
connections window that has been popped up, set the Sound recorder’s status
from passive to active, by clicking on the slider button. This will turn green.
Then you will give a confirmation, that your connection request has been sent.
In order to start the recording, choose the „Details” button next to the Sound
recorder in the Icon name list. In this page, you must choose an output device
to play the recording. Then, click on the „Start recording” button from the
given options. If you heard the test sound, then click on the „Stop recording” button and then the „Play last recorded audio” button need to be chosen. You will hear the sound again. The following task is to load the Ozeki SMS Gateway panel, by clicking on the „SMS Gateway” button in the bottom. In this page, find the „Add new user/ application…” link, highlighted in blue, at the right side of the panel. (Figure 3)
Figure 3 - Start recording
By clicking on the link above, an installation list will be show up, which
includes various installation options. From this enumeration, the „Beep” one is
needed to this setting process. (Figure 4)
Figure 4 - Install Beep user
Your following task is to fill the configuration form, including a connection name, device type and audio source. (Figure 5)
Figure 5 - Configure Beep user
The audio source needs to be an audio file. This audio file should be chosen from your Recorded audio list on your PC. If you want to make sure setting up the right sound, you have the chance to test the uploaded sound above the uploading box. (Figure 6)
Figure 6 - Browse recorded sound file
After these settings are done, you have to click on the „OK” button, then enable
the Beep user. You can set up the connection at the control table, by turning
the „Connection” switch button to green. You will get a notification if the
installation has been successful. (Figure 7)
Figure 7 - Enable Beep user
By reaching the end of the setup, you need to create a routing rule for Beep
user. At the SMS Gateway panel, you have to click the „Add new rule…” link,
highlighted in blue. Then set up the routes to control how the messages go from
one direction to another one. From the drop-down list at the From part, choose
the „SMPP_client_1@localhost” and at the To part, choose the „beep_1@localhost”
option. (Figure 8)
Figure 8 - Create routing rule for Beep user
At the end of the setup your PC will play a sound when a text message has been received. (Figure 9)
Figure 9 - Play a sound file when an SMS message arrives
Summary
Now, you are able to, to set up various audio files as notification sound on
your PC when the SMS system receives alert text messages or notification SMS
messages. This quick list of instructions has given you the necessary
information to get setup easily, but if you have any further questions,
please, contact us on our e-mail address: info@ozeki.hu.
How to read out an SMS message on the PC speaker using text to speech
Sending SMS messages through the PC speaker using text-to-speech benefits users
with visual impairments, as it provides accessibility. It enables
hands-free operation, allowing users to multitask and respond quickly to messages.
Ozeki SMS Gateway offers a powerful and innovative solution that enhances the overall
messaging experience for all users. Read this quick guide on how the Ozeki SMS
Gateway's SMS-to-speech feature can transform your experience in a groundbreaking
way.
In the following video, you can learn how to effortlessly read out an SMS message
on the PC speaker using text-to-speech technology. The guide explains how to set
up the feature, including installing the necessary application and configuring
the connection. By following these step-by-step instructions, you will be able
to complete the process and fully utilize the Ozeki Gateway's efficient messaging
capabilities.
The first thing you need do is sign in to your Ozeki SMS Gateway account, or if
you don't already have one, download it from the https://ozeki.hu website. When
you are ready to log in, open the Ozeki Desktop and click the SMS Gateway icon.
You will see the SMS Gateway's primary interface after starting Ozeki Desktop.
Then find the "Apps" icon at the toolbar or click on the "Add new user/application..."
link. This will bring up a list of connections that can be installed. Select the
"Text to Speech" option, by clicking on the "Install" link, highlighted in blue.
Figure 1 - Install text to speech connection
By installing the necessary application, the settings page will bring up. You
need to set up the "Headset Earphone" option in the Play Sound field, then choose
the "Microsoft Zira Desktop" option from the drop-down list in the Speech section.
Once everything is set, simply click the "Ok" button located at the bottom of the
configuration page.
Figure 2 - Configure text to speech connection
During the subsequent stage of the process, you have to enable the text to speech
connection, by setting the "Connection" slider button into green. That means, your
connection with text to speech is set. It allows you to read out text on the speaker
that is connected to the computer where Ozeki SMS Gateway is installed.
Figure 3 - Enable text to speech connection
Now, click on the "Management" tab on the right side of the details panel. This
will bring up the Ozeki Home page, where you need to choose the "Add new route..."
link at the routing panel or click on the "Routes" icon at the toolbar. After that,
specify the message route, by setting the required details. Choose the "SMPP_client_1"
option from the drop-down list in the "From" box, then select the "text_to_Speech_1"
option in the "To" box. When you have finished, click on the "Ok" button.
Figure 4 - Create routes for text to speech connection
Now, you can utilize the text-to-speech connection, which allows you to read out
SMS messages received as text messages.
This functionality enables you to audibly hear the content of an SMS message
through the PC speaker. By employing this technology, you can conveniently access
and understand incoming SMS messages hands-free.
Figure 5 - Read out an SMS message on the PC speaker using text to speech
FAQs
How do I get my computer to read my texts out loud?
To get your computer to read your texts out loud, you can use text-to-speech (TTS)
software or built-in accessibility features. Many operating systems have native
TTS functionality, so you may need to explore the accessibility settings to enable it.
Additionally, there are various third-party TTS applications available for
different platforms that can read text from the selected text on the screen.
How do you turn on text to speech on PC?
There are two stages involved in enabling text-to-speech on a computer when utilizing
an SMS gateway. The SMS gateway must first be set up and configured for
your PC to receive text messages. The received text messages must then be converted
into voice using TTS software or APIs before being played over your computer's audio
output.
How do you listen to written text?
You must integrate text-to-speech (TTS) technology into your SMS gateway application
in order to listen to written text when utilizing an SMS gateway. The application
sends the text content from a text message that the SMS gateway receives to
a TTS engine or service, which will turn the text into a voice. The computer's audio
output then plays the created speech.
Summary
Overall, Ozeki SMS Gateway offers a powerful and innovative solution to improve
the messaging experience for all users.
The text-to-speech feature allows users to listen to SMS messages loud and clear
out through the PC speaker, enabling hands-free operation and multitasking. By
employing this technology, users can conveniently and audibly hear the content
of incoming SMS messages through the PC speaker.
We need to send a lot of automated messages, but what method should we use, and
how do we do it on the Ozeki Chat platform? Use our easy to learn, intuitive Ozeki
SMS Gateway application in Ozeki 10 to create routes and set up your automated Chat
messages!
Ozeki Chat and Ozeki SMS Gateway connection
The image shows how the Ozeki Chat and SMS Gateway connect to make communication
easy. The Ozeki SMS Gateway is like a central hub that connects to different
systems, such as SQL, TXT, and HTTP. This allows data to be shared with outside
systems and helps send messages between chat accounts on the Ozeki Chat Network.
The chat accounts, shown as smartphone icons, can send and receive messages, which
are then directed to the right place, either another chat account or an outside
system connected to the SMS Gateway. This setup makes communication efficient and
flexible across different platforms.
Figure 1 - Ozeki Chat and SMS Gateway connection
Sending Chat messages from SMS GW GUI
Ozeki SMS Gateway provides a user-friendly Graphical User Interface (GUI)
for sending MyOzeki Chat messages. This method allows you to easily test
the chat messaging feature, ensuring that it works correctly. While sendin
a large volume of messages through the GUI can be a bit tedious, it offers
a reliable way to experiment with and verify the functionality of your
chat messages right away. How to send an Ozeki Chat message from the SMS GW GUI
Sending Chat messages from SQL Database
For a more advanced approach to sending text messages, Ozeki SMS Gateway
allows you to send messages to stored contacts directly from an SQL database.
This method efficiently manages a large number of records, making it an ideal
solution for sending bulk messages through Ozeki Chat. By utilizing your
database, you can streamline the process of reaching out to multiple
contacts at once. How to send an Ozeki Chat message from MS SQL
Sending Chat messages from TXT files
If you prefer to manage your messaging locally, Ozeki SMS Gateway allows
you to send chat messages using text files. This method enables you to
easily transfer data between your application and the gateway. It is
straightforward to set up and can be automated, with options for configuring
message lists and more. This flexible approach provides a simple solution
for sending messages while maintaining control over your data. How to send an Ozeki Chat message from a .txt file
How to send an Ozeki Chat message from the SMS GW GUI
Learning how to send Ozeki Chat messages using the SMS GW GUI is important for
anyone who wants to improve communication and stay connected. Ozeki Chat is a
flexible tool that combines SMS messaging with chat features, allowing users to
talk with clients and team members in real time. By mastering this skill, you can
enjoy benefits like quicker replies, better customer service, and the ability to
handle multiple conversations at once. The SMS GW GUI also makes it easy to send
messages, even for those who aren’t very tech-savvy. This knowledge helps you
communicate better in both personal and work situations.
Sending an Ozeki Chat message from the SMS GW GUI (Video guide)
In this short, easy-to-follow video tutorial we are going to demonstrate the steps
that is vital for you to take in order to send on Ozeki Chat message from the SMS
Gateway GUI. You will learn everything you need to, from adding a new connection
to installing an Ozeki Chat account and by the end you will know how to send a message.
Sending Chat messages from the SMS GW GUI (Quick steps)
Add new connection
Install Ozeki Chat account from the Chat connections
Provide the Ozeki Chat account details
Switch the connection on
Ensure that the user is logged in
Send a message
Open Ozeki Chat and view the message
Send a chat message back
Open your Inbox from the Folders
Make sure that the message is in the Admin inbox folder
Sending Chat message from the SMS GW GUI
To begin the whole process, the very first thing you need to do is open Ozeki SMS
Gateway. On the homepage, locate the 'Connection' section and click on the 'Add
new connection' title highlighted in blue just like it is shown in Figure 1.
Figure 1 - Add new connection
The next important step is installing the Ozeki Chat account. On the connections
site, scroll down until you reach the 'Chat connections' section. There,
you need to click on the blue 'Install' link shown by the red arrow in
Figure 2.
Figure 2 - Install Ozeki Chat account
Once you install the connection you will be required to set up its details. As you
can see in Figure 3, you need t do this by remaining in the 'General' tab.
First thing first, provide the workspace name that is the hostname of the
chatserver. After that you need to enter the proper username and password
combination to be able to connect to the chat network. Make sure you provide the
account details correctly and press the blue 'OK' button in the lower right
corner.
Figure 3 - Provide account details
After saving the recent setups you need to turn the connection on for the Ozeki
Chat account. Just like in Figure 4, visit the left panel of the page and switch
the connection on. It will turn green, indicating that it is turned on. After
the successful switch on, you will see that user is logged in.
Figure 4 - User logged in
Return to the management site and log in with your admin user. To send an SMS
message click on the 'New' button on the left side. This opens the Message composer
in the main panel. In the 'To' section, set the connection to 'Use routing table'
and enter the recipient's address in the address field. In the message section,
type your message in the text box provided. Once you are done, click the OK title
just like in Figure 5 to send the message.
Figure 5 - Send message
Now, you have to open the Ozeki Chat. Just like in Figure 6, you will see that
the message you have recenty sent was successfully received.
Figure 6 - Message received
The next step is sending a chat message back to the recipient. As shown in
Figure 7, you have to navigate to the message composer and type your message.
Once you feel like it is ready, hit the blue 'Send' button in the lower
right corner.
Figure 7 - Send chat message back
As shown in Figure 8, to view the received message in Ozeki SMS Gateway, you have
to navigate to the 'Folders'section on the left side and open your
'Inbox'. You will see that the message you have just sent from Ozeki Chat is
in the Admin inbox folder. Click the message and it will display its details in
the Message details section below. Here, you can see information such as the
sender's address, recipient's address, message content and additional tabs for
delivery history, tags, and advanced settings.
Figure 8 - Message in Admin inbox folder
Summary
Learning to send messages with Ozeki Chat using SMS Gateway helps you stay in
touch and communicate better. Ozeki Chat combines easy text messaging with chat
features, so you can talk with clients and team members in real time. Knowing how
to use this tool lets you reply quickly, give better service, and manage many
chats at once. The SMS GW is simple to use, even if you are not good with
technology, so you can easily communicate in both personal and work situations.
How to send an Ozeki Chat message from a .txt file
In today’s fast-paced world, clear communication is key to keeping teams connected
and productive. Knowing how to send an Ozeki Chat message from a .txt file can make
your messaging easier and more efficient. This skill allows you to automate messages,
share important information, or send updates in bulk without typing them out each
time. In this guide, we will show you the simple steps to use this feature,
helping you keep your team informed and engaged with less effort.
How to send an Ozeki Chat message from a text file (Video Tutorial)
In this video guide, we are going to demonstrate the most important steps you
need to follow in order to send an Ozeki Chat message from a .txt file. It provides
everything that is needed to master this knowlegde, from installing the Txt file
application to entering Chat to Text route details. By the end of the tutorial
you will learn how to open the incoming text with notepad or other editor and
finally check your message.
Step 1 - Open SMS Gateway
As you can see in Figure 1, to begin the entire process you need to open the Ozeki
SMS Gateway application. Do this by clickig on its icn.
Figure 1 - Open SMS Gateway
Step 2 - Add new user or application
After opening the Gateway you will be taken to the home page of the app. To complete
this step, you first need to locate the 'Users and applications' section.
As demonstrated by the red arrow in Figure 2, you need to click on the 'Add new
user/application' link, highlighted in blue.
Figure 2 - Add new user or application
Step 3 - Install Text file application
On the Users and applications site, you need to scroll until you reach the
'Application interfaces' section. Look for the 'TXT file' among
the option, and give the 'Install' link next to it a click, shown by the
red arrow in Figure 3.
Figure 3 - Install Txt file application
Step 4 - Setup Text file application
As you can see in Figure 4, once you click on the install button, you will be
required to fill out the configuration form. While remaining in the 'General' tab,
please provide a unique name for the connection. Make sure the encoding is set
to 'Default' and the file format is set to 'List'. Lastly, please specify the
directories you wish to use. Check everything twice to make sure everything is
entered properly, and press the blue 'OK' button.
Figure 4 - Setup Text file application
Step 5 - Enable text file application
The next step is enabling the text file application. Do this the same way
as demonsrated in Figure 5. Navigate to the left panel, and locate the
'Connection' section. Switch the connection button on, to enable the
application. It will turn green, letting you know you have successfully switched
it on. You can also ensure the enabling was successful, by viewing the logs at the
'Events' tab.
Figure 5 - Enable text file application
Step 6 - Open home page
To proceed with the next step, you need to return to the home page. As
shown by the red arrow in Figure 6, you should find the home icon in the upper
left corner and give it a click.
Figure 6 - Open home page
Step 7 - Add new connection
After returning to the home page, you need to navigate to the Connections section
of the left panel. There, as you can see in Figure 7, you have to click on the
'Add new connection' link.
Figure 7 - Add new connection
Step 8 - Install Ozeki Chat account
On the 'Connection' site, you should look for the 'Chat connections' section.
Click on the blue 'Install' link next to the Ozeki Chat account as
represented in Figure 8.
Figure 8 - Install Ozeki Chat account
Step 9 - Enter Ozeki Chat Account details
The next vital step is filling out the configuration form for the Ozeki Chat
account connection. As you can see in Figure 9, you have to remain in the
'General' tab to specify the account details. First, you need to provide
the workspace name which is the hostname of the chat server you wish to use.
After that, please enter the right username and password combination to be
able to connect to the chat network. Press the blue 'OK' button to save
the setup.
Figure 9 - Enter Ozeki Chat Account details
Step 10 - Enable Ozeki Account details
You need to enable the Ozeki Account details. Do this the same way as before, by
visiting the 'Connection' panel shown in Figure 10, and switching the
connection button on. It will turn green, indicating you have successfully
switched it on. You can also ensure you enabled the Ozeki Account details
successfully, by viewing the logs at the 'Events' tab.
Figure 10 - Enable Ozeki Account details
Step 11 - Open home page
To continue, please navigate back to the home page. As indicated by the red
arrow in Figure 11, locate the home icon in the upper left corner and
click on it.
Figure 11 - Open home page
Step 12 - Add new route
To add a new route, locate the 'Add new route' option in the routing section,
which is positioned prominently in the interface. Click on the link
as shown by the red arrow in Figure 12, to start setting up a new connection route.
Figure 12 - Add new route
Step 13 - Enter Text to Chat route details
Once you have added the new route, you will be taken to a details page to configure
the route settings. In the 'Identification' section, enter a name
for the route, such as 'TEXT TO CHAT' which will help you easily identify the
route later. In the 'Settings' section, specify the source and destination
for this route by selecting the proper SMS and chat connections. Pay attention
to setting the 'From' connection to text file at localhost. After providing
everything, click the 'OK' button, as indicated by the red
arrow in Figure 13 to save your settings and activate the route.
Figure 13 - Enter Text to Chat route details
Step 14 - Create new route
You next task is creating a new route. Do this by clicking on the blue 'Create
new Route' in the upper left corner as shown in Figure 14.
Figure 14 - Create new route
Step 15 - Enter Chat to Text route details
You will be required to configure the route settings. In the 'Identification'
section, enter a name for the route, like 'CHAT TO TEXT' which will help you
identify the route later. In the 'Settings' section, specify the source and
destination for this route. Make sure you set the 'TO' connection to text file
at localhost. After entering the necessary information, click the 'OK' button, as
demonstrated by the red arrow in Figure 15 to save your settings.
Figure 15 - Enter Chat to Text route details
Step 16 - Open home page
To proceed, please return to the home page. As represented by the red arrow in
Figure 16, search for the home icon in the upper left corner and click on it.
Figure 16 - Open home page
Step 17 - Open outgoing folder
You will be required to access the outgoing folder to prepare it for handling
files. This location will be used to store outgoing files for the SMS system.
Ensure that you navigate to this directory to manage files effectively, as
demonstrated by the red arrow in Figure 17.
Figure 17 - Open outgoing folder
Step 18 - Create list file in temporary folder
Next, you need to create a list file in a temporary folder to organize
contacts or messages for processing. Choose any folder as shown in Figure 18, to
create this list file. This setup helps ensure that all relevant files are properly
managed within the temporary directory.
Figure 18 - Create list file in temporary folder
Step 19 - Open list file with notepad or other editor
You will be required to open the list file using a text editor to add any
necessary content. Right-click on the file within the temporary folder and select
'Notepad' from the options, as shown in Figure 19. This action will open the file
in Notepad, allowing you to input or edit information for further processing in
the SMS system.
Figure 19 - Open list file with notepad or other editor
Step 20 - Drag and drop the list file to the outgoing folder
After editing the list file, the next step is to move it to the outgoing folder
for use by the system. Drag and drop the file from the temporary folder into
text file folder as demonstrated in Figure 20. This placement ensures that the
SMS gateway can access and utilize the file as part of the message-sending process.
Figure 20 - Drag and drop the list file to the outgoing folder
Step 21 - Check message and reply from MyOzeki
You will have to to check and reply to messages directly from MyOzeki. Open
the MyOzeki interface and navigate to the messaging area. Type your reply in the
text box, as indicated by the red arrows in Figure 21, and send it with the blue
'Send' button.
Figure 21 - Check message and reply from MyOzeki
Step 22 - Open incoming text with notepad or other editor
Next, to review incoming messages, open the incoming text file using a text
editor such as Notepad. Locate the file in the designated directory, right-click,
and select 'Notepad' to open it, as demonstrated in Figure 22.
This step enables you to view the contents of the incoming message.
Figure 22 - Open incoming text with notepad or other editor
Step 23 - Check incoming message
Finally, confirm the message content by checking the opened file, as shown by the
red arrow in Figure 23.
Figure 23 - Check incoming message
Summary
In today’s fast-paced world, clear and easy communication is key to keeping your
team productive. With Ozeki, you can send chat messages directly from a .txt file,
making it simple to automate updates, share important info, and send messages in
bulk without retyping. This guide shows you the quick steps to use this feature,
saving you time and keeping your team connected. By using this method, you can
make communication easier, keep everyone engaged, and focus more on important
tasks instead of repeating messages.
Learning how to send Ozeki Chat messages through an HTTP request can greatly
improve your communication strategy. This method lets you automate messaging,
link chat functions with other applications, and send real-time updates quickly
and easily. By using HTTP requests, you can connect Ozeki Chat with various systems,
allowing you to send messages based on specific events or actions. This guide will
show you the steps to send messages using HTTP, helping you make the most of this
powerful tool to keep your team or clients informed and engaged with minimal effort.
How to send an Ozeki Chat message using an HTTP request (Video Tutorial)
In this brief, easy-to-follow video guide we are going to demonstrate the steps
you need to take in order to send an Ozeki Chat message using a HTTP request. From
setting up an HTTP user to entering the HTTP-GET details into the URL bar, you will
learn everything you need to. By the end of this tutorial you will successfully
receive a message in MyOzeki.
Step 1 - Add new user or application
Once you launch the Gateway, you will be directed to the app's home page. To
proceed, you must find the 'Users and applications' section. As shown by the red
arrow in Figure 1, click on the 'Add new user/application' link, which is
highlighted in blue.
Figure 1 - Add new user or application
Step 2 - Install HTTP User
On the Users and applications site, you need to locate 'Network users' section.
Search for the 'HTTP user' among the option, and give the 'Install' link
next to it a click, shown by the red arrow in Figure 2.
Figure 2 - Install HTTP User
Step 3 - Setup HTTP User
As you can see in Figure 3, in this step, you need to provide the configuration
settings for the HTTP user. While remaining in the 'General' tab please
enter a username and a password for the HTTP user. This will be used to
access the system through the network. Once done, click the blue 'OK' button
in the corner.
Figure 3 - Setup HTTP User
Step 4 - Open home page
To move on to the next step, navigate back to the home page. Referencing the red
arrow in Figure 4, locate the home icon in the upper left corner and click on it.
Figure 4 - Open home page
Step 5 - Add new connection
Once you are back on the home page, head to the 'Connections' section in
the left panel. As illustrated in Figure 5, click on the 'Add new connection' link.
Figure 5 - Add new connection
Step 6 - Install Ozeki Chat Account
On the 'Connection' site, your next step is to locate the 'Chat connections'
section. As shown in Figure 6, click on the blue 'Install' link next
to the 'Ozeki Chat account' to proceed with the installation. This will initiate
the setup process for the chat connection.
Figure 6 - Install Ozeki Chat Account
Step 7 - Enter Ozeki Chat Account details
The following important step involves filling out the configuration form for the
Ozeki Chat account connection. As shown in Figure 7, you should stay within the
'General' tab to enter the necessary account details. Start by providing the
workspace name, which is the hostname of the chat server you intend to use. Next,
input the correct username and password combination to establish a connection to
the chat network. Once you have entered these details, click the blue 'OK' button
to save your settings and finalize the setup.
Figure 7 - Enter Ozeki Chat Account details
Step 8 - Open home page
To proceed to the next step, return to the home page. As shown by the red arrow
in Figure 8, find the home icon located in the upper left corner of the screen
and click on it. This will take you back to the main dashboard, allowing you to
continue with the setup process.
Figure 8 - Open home page
Step 9 - Add new route
To add a new route, find the 'Add new route' option within the routing section,
which is displayed in the interface. As indicated by the red arrow in Figure 9,
click on this link to initiate the process of setting up a new connection
route.
Figure 9 - Add new route
Step 10 - Enter HTTP to Chat route details
This step involves entering the HTTP to Chat route details.In the
'Identification' section, enter a name for the route, such as 'HTTP_TO_CHAT'
which will help you easily find the route later. In the 'Settings' section, you
need to specify the source and destination for this route by. Ensure that the 'From'
connection is set to the api user at localhost. After providing everything, click
the 'OK' button, as indicated by the red arrow in Figure 10 to save your
settings.
Figure 10 - Enter HTTP to Chat route details
Step 11 - Open home page
To move on to the next step, return to the home page. As indicated in Figure
11, click on the home icon in the upper left corner of the screen.
Figure 11 - Open home page
Step 12 - Check your API prefix
To check your API prefix you need to choose the HTTP user from the Users and
applications section. Give the username a click and then navigate to the left
panel of its site. As you can see in Figure 12, you need to locate the API prefix
section and copy paste the second URL.
Figure 12 - Check your API prefix
Step 13 - Enter HTTP-GET details into URL bar
To enter the HTTP-GET details, first locate the URL bar in your browser.
Input the necessary HTTP-GET details into the URL bar, ensuring that the
format is correct for your request just like in Figure 13. It is important to
double-check the URL before proceeding to avoid any errors in the
connection. You need to enter the message for the end of the URL.
Figure 13 - Enter HTTP-GET details into URL bar
Step 14 - Message received in MyOzeki
After you enter the HTTP-GET details, the next step is to check for the message
received in MyOzeki. Go to the MyOzeki interface. You should see the message
related to your request just like in Figure 14, showing that the system has
processed it successfully.
Figure 14 - Message received in MyOzeki
Summary
Sending Ozeki Chat messages through an HTTP request can enhance your communication
strategy by automating messaging, integrating chat functions with other applications
and enabling quick real-time updates. This method allows you to connect Ozeki
Chat with various systems, sending messages based on specific events or actions.
This guide will walk you through the steps to effectively use HTTP requests
for messaging, helping you keep your team or clients informed and engaged with
minimal effort.
The Ozeki SMS Gateway allows for sms developers to use sms api software for short
message sending and receiving. You can use it to integrate and quickly deploy
SMS messaging solutions. It can operate in your server computer, or you can install
it on your customers' or suppliers' system. Save time and money and use the most
popular SMS gateway software in the world.
Let your Developers add SMS functionality to their code
When it comes to software development, it is crutial to stay service provider independent. Ozeki
SMS Gateway supports sending SMS through various channels and
many SMS service providers. This ensures, that your apps, that are
developed for the Ozeki APIs, will work even if you start operations in a different country,
or you simply want to swich SMS service providers.
The Ozeki SMS Gateway is a developer friendly software platform.
This page is designed to help software developers, IT and Business leaders and
solution designers to better understand the SMS technology and SMS developer tools
offered by Ozeki. Add communication capabilities to your products with Ozeki
ready-to-integrate SMS APIs to send and receive SMS messages. In addition to
sending and receiving, it also makes it possible to handle delivery reports and manage delivery times.
Send out hundreds of thousands of text messages automatically with ease. SMS automation
enables you to plan and execute surveys, notifications and campaigns or simply send
alerts and reminders. You can also integrate SMS messaging into your workflow
using these SMS APIs or send out SMS marketing campaigns in the ozeki sms marketing system.
The OZEKI SMS gateway will give you powerful developer tools needed to
build great applications. You can connect your systems
to Ozeki SMS using HTTP, or a database or using our C#.NET, Visual Basic.NET examples.
If you are looking for developer api SMS Gateway, you are in a right place.
What is an SMS API?
An SMS API is a standard Application Programming Interface for software developers
to make SMS sending and receiving possible.
How does SMS API work?
The SMS API integration makes it possible for different
business platforms (CRM, e-commerce, web based applications or else) to send and
receive short messages. The SMS API is a two-way communication API for connecting
automated software solutions and customers together.
SMS from/to Database
This is a helpful guide, so you can easily connect Ozeki SMS Gateway and a selected database server.
Follow the steps in this guide to learn how to send or receive SMS messages from a database application.
A widely used method can help you to achieve this by inserting or reading data from the tables.
You can also find easy configuration steps in this tutorial. Learn More
HTTP SMS API
Ozeki introduced a new HTTP SMS API in Ozeki SMS Gateway to address the requirements of the SMS software
developer community. This new HTTP SMS API provides more features, flexibility and
simplicity compared to previous versions. It was designed to help developers in
productivity and to be able to add SMS functionality to any project. Learn More
PHP SMS API
PHP developers can use PHS SMS API to add SMS functionality to their website.
In a few lines of code, your PHP application can send, receive, and reply to text messages with Ozeki SMS API.
This tutorial shows you how to use Ozeki SMS Gateway's PHP SMS API.
It will take you less than an hour to integrate the solution that can send and
receive messages from a MySQL database. Learn More
C# SMS API
Your C# application can connect to a Standard User or any other user created in Ozeki SMS Gateway.
You can easily prepare your C# codes to send or receive SMS messages through SMS Gateway.
Below you can download source codes for two C#.NET SMS demo projects
which demonstrates how easy it is to connect C# with Ozeki SMS Gateway. Learn More
VB.NET SMS API
See how to send and receive SMS messages by using your Visual Basic.NET
applications. It is a great choice to communicate with your clients or employees
with simple text messages. Choose which is the best method for your system by
downloading a database and a HTTP API example. Learn More
Programming APIs
On this site we provide software developers user-friendly tutorials, who
wish to send or receive SMS messages using a specific programming language.
From C# tutorial to Javascript tutorial, you can find a wide variety of
programming languages. The site is helpful for both beginners and well
experienced developers. Visit the website and choose which method works
for you the best. Learn More
Use cases
On this website you can read more about Postman and Chatbot. Both of them
are essential tools for developers. With the help of Postman, you can build,
test, and document APIs, supporting various formats and methods. Chatbots
on the other hand can automatize your communication and deliver rapid
responses to customer inquiries. Choose the use case that works for you
the best. Learn More
SMPP API
The Short Message Peer-to-Peer (SMPP) protocol is a cornerstone of modern
SMS communication, enabling seamless messaging between applications and
mobile networks. Ozeki SMS Gateway leverages the SMPP API to provide a
robust platform for sending and receiving SMS, supporting versions 3.3,
3.4, and 5.0. Learn More
The following guide provides you information
about how you can send and receive messages from an SQL database server with the
help of Ozeki SMS Gateway. This document divided into 3 main segments:
First the supported database servers are listed. Second, the procedure of
sending SMS from a database server is demonstrated using MySQL. Third, an
autoresponding SMS service is created with the help of a database trigger. To complete
this guide successfully, you need to set up a database server as a prerequisite and you
must have some basic understanding of SQL. The completion of the steps in this guide
takes about 10 to 15 minutes. So, let's start!
How receiving SMS with a database works
This 'Receiving SMS with a database' solution makes it possible to store all the
incoming messages in a database. The solution consists of a phone, a PC with
Ozeki SMS Gateway running, an SQL database server, and your application.
You can learn how this system works from the following: An android phone,
running the Ozeki SMS Gateway android app, will send the information to the Ozeki SMS Gateway application running on a PC.
It will then store it using a database server.
Your application could obtain the messages from the database server. To have a better understanding, look at Figure 1.
Figure 1 - How to receive SMS with a database
How sending SMS from a database works
The 'Send SMS from a database' solution enables you to send the information, stored in a database, to a phone using the Ozeki SMS Gateway.
This solution consists of your application, a database server, a PC running the Ozeki SMS Gateway application, and a phone that also runs the Ozeki SMS Gateway.
The system works the following way: Your application stores the SMS information on a database server.
The Ozeki SMS Gateway will obtain the info from the database server and wil send the SMS to the predefined address.
To understand the system in a better way, look at Figure 2.
Figure 2 - How to send SMS from a database
Database servers supported by Ozeki SMS Gateway
Microsoft SQL
You can use an Microsoft SQL database for SMS messaging.
Follow these pages to send or receive SMS messages through Ozeki SMS Gateway's Database User.
All you have to do is insert or read data rows from the appropriate SQL table by setting INSERT INTO and SELECT statements. See how to send SMS from an Microsoft SQL database
Microsoft SQL Express
You can use a MSSQL Express database for SMS messaging.
Follow these pages to send or receive SMS messages through Ozeki SMS Gateway's Database User.
All you have to do is insert or read data rows from the appropriate SQL table by setting INSERT INTO and SELECT statements. See how to send SMS from an MSSQL Express database
Oracle
The connection between Oracle Database and Ozeki SMS Gateway is a perfect solution for SMS messaging.
Ozeki SMS Gateway's Database User makes sure that incoming SMS messages can be inserted while outgoing SMS messages can
be selected from database tables. See how to send SMS from an Oracle SQL database
MySQL
You can combine Ozeki SMS Gateway with a MySQL database to send, receive and store SMS messages.
On these pages you can see how to install and configure the connection
with the proper connection string and how to create the recommended database structure. See how to send SMS from a MySQL database
PostgreSQL
This chapter gives you great opportunity to see how to send and receive SMS messages
through pre-created PostgreSQL database tables. You just need to connect to them with a Database User of Ozeki SMS Gateway.
Do not forget to provide the ODBC driver connection string for the user. See how to send SMS from a PostgreSQL database
SAP SQL Anywhere
See how to send and receive SMS messages through an SAP SQL Anywhere server with the Database User of Ozeki SMS Gateway.
Here you can find a connection string and short CREATE TABLE statements to get started.
You can send messages by inserting new message records. See how to send SMS from a SAP SQL Anywhere database
Microsoft Access
You can simply start to send and receive SMS messages
through Ozeki SMS Gateway's Database User by using Microsoft Access database tables.
All you have to do is insert or read data rows from the appropriate SQL table by configuring INSERT INTO and SELECT statements for the user. See how to send SMS from a Microsoft Access database
ODBC
This chapter gives you great opportunity to see how to send and receive SMS messages through ODBC connection.
You just need to connect ODBC database connection with a Database User of Ozeki SMS Gateway.
Do not forget to provide the ODBC driver connection string for the user. See how to send SMS from an ODBC database connection
OleDB
This chapter gives you great opportunity to see how to send and receive SMS messages through OleDB connection.
You just need to connect OleDB database connection with a Database User of Ozeki SMS Gateway.
Do not forget to provide the OleDB driver connection string for the user. See how to send SMS from an OleDB database connection
SQLite
See how to send and receive SMS messages through an SQLite server with the Database User of Ozeki SMS Gateway.
Here you can find a connection string and short CREATE TABLE statements to get started.
You can send messages by inserting new message records. See how to send SMS from an SQLite database
Step 1 - Setup a database connection
The first thing you need to do is to setup a database connection in Ozeki SMS Gateway.
To do this, first, open the SMS Gateway, and select the Apps
icon from the toolbar. Next, from the list of applications (Figure 2),
you have to select SQL messaging by clicking on the Install button.
Figure 2 - Create a SQL messaging application
After you selected SQL messaging, you can see all available options that you can create
in SMS Gateway. By following this guide, you will be able to see how you can create an SQL connection
with a MySQL database, so to follow that guide, just click on the Install button of
the MySQL option as you can see it in Figure 3.
Figure 3 - Install MySQL database connection
The last step of the creation of the database application is to connect it to your
database server by filling the fields of the Connection Settings (Figure 4). Here you have to give
all details about the database that you want to connect to. The first two fields are about
to identify the database server. If you left them to default when setting up the database
server, you can leave the values here default as well. Then you have to type the name
of the database that you want to connect to and your user ID with a password that you use
within the database server. If you filled all fields, you could just click OK to create
the database application.
Figure 4 - Configure the database application
Step 2 - Setup an SMPP connection
At this point, you have got a database application, but you also need a service
provider connection to handle the SMS messages. In this guide, you will be able to
create an SMPP client connection. For that, you just have to click on Connect
on the toolbar and select SMPP client (Figure 5) from the list of all available service provider
connections.
Figure 5 - Install a SMPP client connection
Before establishing the connection, you need to provide some details regarding the
connection. First, you have to type a name for the connection, then you have to define
the server that you want to connect to as Figure 6 demonstrates it. To finish the
creation of the service provider connection, just click on OK.
Figure 6 - Configure the SMPP client
Step 3 - Send SMS from a database
Figure 7 - Sending a SMS using the database server
With all connections set up properly in Ozeki SMS Gateway, now you can start
managing SMS messages from a database. First, you will be able to see, how you can
send an SMS message by using only one SQL command. By default, SMS Gateway uses
ozekimessageout table to send messages. You do not have to worry if you have not
got this table in your database, you can create this
table easily. Just open your SQL application in SMS Gateway and as you can see it on
Figure 8, you can select a SQL command to create the ozekimessageout table.
So, just select it, and click on Execute to create the table. (Figure 8)
Figure 8 - Execute the SQL command to create a table
Sending a message can be done by simply just inserting the message into the
ozekimessageout table. The SMS Gateway periodically checks this table and
sends the newly added messages. To insert a message into this table, just select
the corresponding INSERT command as you can see it in Figure 9. In the textbox, you can
change the values which represent the receiver and the message itself. When you finished with
writing the message, just click on Execute and your message is about to be sent.
If you don't know the basic SMS SQL commands learn more about SQL SMS templates.
Figure 9 - Insert the message into the database
To modify the setting of sending SMS messages, you only have to select the Configure
tab in the menu of the database application, and here, select the Send tab.
Here, you will be able to see the settings that define, how the outgoing messages
are handled. As Figure 10 shows, here you can modify the SQL statement that queries
and processes the outgoing messages. You can also set the maximum number of outgoing
messages per query and the interval of polling.
Figure 10 - Configure the settings of outgoing messages
Step 4 - Receive SMS from a database
Figure 11 - Receiving messages using the database server
When you created the database application, not only the application was created,
but the SMS Gateway also created a routing rule as well, which defines that all incoming SMS
messages will be copied into the database. This rule can be found in the list of
routing rules as you can see it in Figure 12.
Figure 12 - Routing rule created for the database application
The incoming messages from any SMS connection will be routed into the ozekimessagein
table by default. You can create this table easily by opening your database application
and in the SQL menu, select the SQL command from the list (Figure 13) which
will create the ozekimessagein table in your database after executing that command.
Figure 13 - Create table for the incoming messages
After you created the ozekimessagein table, all received messages will be
inserted into that table. To check these messages, you can start a query in the
database application. So, open the application, and in the SQL tab, select the command
that will query the incoming messages (Figure 14) and click on Execute.
If the execution was successful, you will be able to see the incoming messages.
Figure 14 - Query all received messages
To modify the settings of receiving messages, you can just select Configure tab
and here, click on Receive as Figure 15 demonstrates it.
In this menu, you can set a SQL command, that
inserts the incoming messages into a table. In the command, you can also set the
values which will be inserted into the table.
Figure 15 - Modify the SQL command for the incoming messages
Summary
The article above is about how you can send and receive messages from an SQL
database server with the help of the Ozeki SMS Gateway.
An SQL to SMS solution like this fits well with your existing infrastructure if
you already stash data in a database using a database driver business application.
SMS messages stored in a database can be easily linked to users, customers, and
other business data, which allows you to use custom queries and take advantage
of SQL triggers.
You may find more information about this technology and the Ozeki SMS Gateway.
Continue your studies with the tutorial titled How to send SMS from MS SQL Server.
Let's get to work, first of all, download the Ozeki SMS Gateway now!
FAQs
What is an SQL database?
SQL (Structured Query Language) is a specialized language used to interact with
relational databases. It allows for efficient data retrieval, manipulation,
schema management (creation and modification), and access control.
Can I save incoming SMS messages (sender address, message text, timestamp) in a
database server (MySQL/MSSQL)?
This software offers two methods for saving your SMS messages:
Database User: Store messages directly within a database using a configured
database user account.
SQL Logging: Enable SQL logging to write messages to a designated SQL
database table.
The software seamlessly integrates with various database platforms, including
popular choices like MySQL, MSSQl, Oracle, Access, Postgres, and Sybase.
Additionally, it supports any database server equipped with an OleDb or ODBC
driver, ensuring maximum compatibility.
We would like to specify different sender mobile numbers for outgoing messages. Is
it possible to do it in the SQL tables to assign the sender mobile number?
Yes, you can definitely send SMS messages with a custom sender number! This
software allows you to override the default sender number with your desired one.
Here's how to configure it:
Access the SQL User Configuration Form: Locate the form within the software
for configuring your database user settings.
Navigate to the Advanced Tab: Look for a tab labelled "Advanced" or similar
within the configuration form.
Enable Sender Number Override: In the "Sender Address" section of the
advanced tab, find a checkbox labelled "Overrideable" (or similar). Make sure
this checkbox is enabled.
Specify Your Sender Number: Once "Overrideable" is enabled, you can define
the custom sender number you want to use for your outgoing messages in the
designated field.
By following these steps, you'll successfully configure the software to utilize
your chosen sender number for all SMS messages sent through this specific SQL
user account.
This article as a detailed tutorial on how to send SMS from MS SQL Server.
Ozeki SMS Gateway allows you to create an MS SQL Server connection and send text messages from a database using SQL code.
You will also learn how to create a database and tables for storing incoming and outgoing messages.
This feature is incredibly useful for mass SMS sending.
It can send messages to thousands of users at the same time based on certain conditions.
We hope you find this article informative and let's get started!
What is MS SQL
Microsoft SQL Server is a relational database management system developed by Microsoft.
As a database server,
it is a software product with the primary function of storing and retrieving data as requested by other software applications
which may run either on the same computer or on another computer across a network (including the Internet).
Microsoft markets at least a dozen different editions of Microsoft SQL Server,
aimed at different audiences and for workloads ranging from small single-machine applications to large Internet-facing applications with many concurrent users.
What is Ozeki SMS Gateway
Ozeki SMS Gateway is a communication software that routes messages between real world entities.
It allows you to build up simple communication between shared hardware and software resources of your system.
It offers real time information and provides various configuration options to route messages.
How to send SMS from MS SQL (Quick steps)
To send SMS from MS SQL:
Create database and tables
Launch the Ozeki SMS Gateway app
Add new SQL messaging application
Install MS SQL Server
Configure Connection settings
Enable MS SQL Server connection
Insert a message into the database
Check the SMS message in the Sent folder
Inspect the database for the new SMS
How to send SMS from MS SQL database
This SMS sending system makes it possible to send SMS using
an MS SQL database.
This system consists of a phone that will be used to receive
the messages,
a computer with Ozeki SMS Gateway installed, a database server,
and your application. The procedure works the following way:
Your application will send the message to the MS SQL Database Server.
It will store your message and the Ozeki SMS Gateway will be able
to acquire it using an SQL Query.
The message will be sent to the phone after it was acquired. (Figure 2)
Figure 2 - How to send SMS with MS SQL database
How to receive SMS with MS SQL database
This SMS receiving system makes it possible to receive SMS using an MS SQL
database. This system consists of a phone that will be used to send messages, a
computer with Ozeki SMS Gateway installed, a database server, and your
application. The procedure works the following way: The phone sends the message.
The computer with the Ozeki SMS Gateway will store the message in an MS SQL
Database Server. Your application could get the messages using an SQL Query.
(Figure 1)
Figure 1 - How to receive SMS with MS SQL database
How to send sms from MS SQL Server (video tutorial)
In this video you will learn how to send SMS using MS SQL Server.
First, we are going to create an MS SQL Server connection in Ozeki SMS Gateway.
Then, we use this connection to send SMS via SQL code.
This is done through executing commands in the SQL tab.
In order for the SMS campaign to be successful, it is important that the
SMS database contains the phone numbers of customers who are motivated to
receive SMS messages from your company. SMS content can include a range
of information, like informative messages, shopping discounts, delivery
updates, reopening schedules, coupons, or new products that your customers
will be interested in.
Create table definition for SMS
Before you can start sending SMS using SQL you must create a database and tables first.
This can be done by entering certain lines of code into the command prompt.
The CREATE DATABASE command adds the new database itself.
The two CREATE TABLE commands add two tables. One for incoming and one for outgoing messages to be stored in.
Lastly, the sp_addLogin lets you create a username and a password for authentication purposes for your database.
CREATE DATABASE ozekidb
GO

USE ozekidb
GO

CREATE TABLE ozekimessagein (
 id int IDENTITY (1,1),
 sender varchar(255),
 receiver varchar(255),
 msg nvarchar(160),
 senttime varchar(100),
 receivedtime varchar(100),
 operator varchar(30),
 msgtype varchar(30),
 reference varchar(30),
);

CREATE TABLE ozekimessageout (
 id int IDENTITY (1,1),
 sender varchar(255),
 receiver varchar(255),
 msg nvarchar(160),
 senttime varchar(100),
 receivedtime varchar(100),
 operator varchar(100),
 msgtype varchar(30),
 reference varchar(30),
 status varchar(30),
 errormsg varchar(250)
);

GO

sp_addLogin 'ozekiuser', 'ozekipass'
GO

sp_addsrvrolemember 'ozekiuser', 'sysadmin'
GO
Create database and tables
To get started with sending SMS using MS SQL, you must first create a database and tables.
This is done through the command prompt.
Open the command prompt and enter the sequence of code above.
The CREATE DATABASE command creates the database itself (Figure 3).
Then, we create the ozekimessagein and ozekimessageout tables using the CREATE TABLE command.
Finally, we add username and a password using the sp_addLogin command.
The database is now set up for sending SMS in MS SQL.
Figure 3 - Create database and tables
Select 'Add new user or application'
With the database successfully created, you may now start configuring your SQL messaging application.
First, open Ozeki SMS Gateway.
Click on Add new user/application on the right-side menu (Figure 4).
This will take you to another menu where you are able to select what type of application you wish to add.
Figure 4 - Select 'Add new user or application'
Install SQL Messaging User
Under "Application interfaces", locate SQL Messaging.
Click Install next to it (Figure 5).
This will take you to another screen, where you can select the type of SQL messaging application.
Figure 5 - Install SQL Messaging User
Install MS SQL Connection
For this operation, you need to create an MS SQL Server connection.
Find MS SQL Server under SQL Messaging.
Click Install next to it (Figure 6).
Clicking on Install will bring up a configuration screen, where you need to provide details for your new connection.
Figure 6 - Install MS SQL Connection
Define the MS SQL database connection details
After selecting MS SQL Server, you must enter the details of your new connection (Figure 7).
First you need to enter your server's IP address and Port into the first checkboxes.
Enter the name of your database you previously created next to Database.
Finally enter your username and password, which you have also created in the command prompt.
Click on OK to continue.
Your MS SQL connection is now successfully configured.
Figure 7 - Define the MS SQL database connection details
Enable MS SQL connection
After configuring your MS SQL connection, you must turn it on.
Click on the switch button next to connection (Figure 8).
The switch will turn green to indicate that the connection has been turned on.
A green checkmark next to the icon of the connection also appears to show the user that the connection is on.
Figure 8 - Enable MS SQL connection
Insert message to the database table
The MS SQL connection is now set up.
Now you may proceed to insert a message into the database table.
First, switch to the SQL tab of your connection.
Enter the command in Figure 9 into the textbox.
Click on the Execute button to run the command.
This will insert the message into the ozekimessageout table.
Figure 9 - Insert message to the database table
Message sent from database
You can view sent messages by clicking on the Sent folder.
In this folder you can find your previously sent message (Figure 10).
Figure 10 - Message sent from database
Sent message in database
You are also able to view the message inside the database.
To do this, you need to enter the SQL code above into the text editor in the SQL tab (Figure 11).
Click Execute to run the command.
The SELECT * command returns all records from a certain table.
This query returns everything from the ozekimessageout table, therefore your message will appear.
Figure 11 - Sent message in database
Received message inserted into database
You may also do the same for the ozekimessagein table (Figure 10)
Enter the code found in Figure 12 into the text editor.
Then click Execute.
You can find your message in the result of the query.
Figure 12 - Received message inserted into database
Summary
Now you are able to set up an MS SQL Server connection in Ozeki SMS Gateway and send text messages via SQL code.
We hope you found this tutorial helpful and thank you for choosing Ozeki SMS Gateway.
For more information on sending SMS using databases, make sure to check out our other articles.
In this article, we are going to walk you through the steps you need to take to install Microsoft SQL Server.
Using the Microsoft SQL Server database management system will improve your data storage,
processing, and security. Reading this tutorial is worth your time because you will
be able to install it on any computer.
This article is for users, the setup process
will only take about 20 minutes to perform, and you require no
previous knowledge of the SQL language.
We hope you will find this example easy to understand.
Don't waste any more time. Let's start!
Install Microsoft SQL Server (Video tutorial)
In this video, we are going to show you the steps you need to take to install the Microsoft SQL Server.
The video will start with the download page and will take you to the
successfully installed software. You will learn what settings you need
to do in the setup process. The video is only 1:55 long but it is very
detailed and easy to follow. We tried to make the process as
simple to follow as possible.
We hope you will have no problem following it.
Find the 'Download now' button
On Figure 1, you can see that the first step of the download process is
to visit the following page :
There, you will need to find the download link for
the SQL Server Express edition (Figure 1).
Click the blue 'Download now' button to
start downloading the installer.
Figure 1 - Download MS SQL server installer
Find the installer
Now you have the installer on your computer, ready to use.
You can find it in the Downloads folder of your hard drive (Figure 2).
Run the installer to start the installation process.
You can run it by double-clicking the installer twice,
or right-clicking and selecting the run option.
Figure 2 - Start MS SQL server installer
First step of the installation process
You have just started the installation process.
As the first step, you need to select which type of
installation method you wish to use (Figure 3).
The basic method means that the SQL Server and the SQL Server
Database Engine will be installed with the default settings.
Choosing the custom option will make the
installation process more detailed but longer and it
requires more knowledge of SQL technology.
Choose the Basic option and progress to the next step.
Figure 3 - Select Basic installation type
Accept the License Terms
To have a legal copy of the software, you need to accept the Microsoft
SQL Server License Terms. Read through the text and click
the Accept button located under the text box.
This Agreement makes sure that you and the
company behind SQL Server 2019 are both protected from legal issues. (Figure 4)
Figure 4 - Accept license
Choose the install location
The software needs to be stored somewhere on your computer.
In this step, you need to choose a folder where all the data
of the software will be stored. Make sure to choose a
destination with enough free space.
You can choose a folder with the 'Browse' button (Figure 5).
If you are done, press the 'Install' button.
It will start the installation process.
Figure 5 - Specify installation location
Wait for the installation process
Wait for the installer to finish the process.
While it is installing your software, you can get some information
about the software and how to get help under the progress bar.
Once the progress bar fills,
it means that the software is installed successfully (Figure 6).
Figure 6 - Installation process
Installation finished
If you see the screen that is visible on Figure 7, it means that the software is
installed successfully. Feel free to close the installer and start
using it. On the last page, you can find information about where
some folders of the software are.
Like the log folder, media folder or resource folder.
Figure 7 - Installation finished
Create the ozeki database and user
In the next video, we are going to show you how to create a database
and a user to work with the Ozeki SMS Gateway.
The video will start with opening the SQL Server Management Studio.
At the end, you will have a working database and a user. In the process, you will learn
about what settings the new database needs and how
to create the new user. This video is only 1:33 long
and it features all the steps you need to take to complete the process.
It is easy to understand,
we hope you will have no problem following it.
Create a new database
As the first step, you need to create a new database.
Do this by opening the SQL Server Management Studio.
After opening it, right-click the 'Databases'
title in the Object Explorer located on the left side of the screen.
It will open a context menu, where you will find the
'New Database...' button.
Click it to proceed to the next step (Figure 8).
Figure 8 - Create new database
Give the database a name
In the new database creating window, you will be able to customize the
database. The most important part is to name the database 'ozekidb'.
After you have done it, click the 'OK' button at the bottom of the
window. Naming the database 'ozekidb', like on Figure 9, will come in
handy when establishing a connection between the database and the
Ozeki SMS Gateway.
Figure 9 - Define database name
Create a new login
You need to create a new login in Microsoft SQL Server Management Studio.
Right-click the 'logins' button located in the Object Explorer.
You can find it on the left side of the screen.
From the context menu, click the 'New Login...' button.
It will take you to the new login creating window (Figure 10).
Figure 10 - Create new login
Configure the new login
In this step, you need to configure the new login. Provide a name that will be
used when you are logging in in the 'Login name' field.
Then choose the 'SQL Server authentication' option under the
'Login name' field (Figure 11). Now you have the option to choose a
password. Make sure it is easy to remember but hard to guess.
You have to type in your password two times.
Password confirmation is a process that will make sure
that there is no typo in your password.
Figure 11 - Define login details
Provide server roles
In the next step, you need to manage permissions in a form of server
roles. SQL Server provides server-level roles that will help you to
manage permissions. Each login in the same server role will have
the same permissions. To manage server roles, visit the
'Server Roles' from the left side of the screen.
There, you will see a list of server role.
Make sure to tick in the checkbox before the
sysadmin option (Figure 12).
This will guarantee full permission for the user.
Figure 12 - Set user server role
Link the user to database
You need to establish a connection between the database and the user.
To do so, click the 'User Mapping' button (Figure 13).
There, you will see the databases that you can map to the current login.
Tick the Checkbox before the 'ozekidb' database to connect them.
Below the list, you can see the roles of the current user.
Figure 13 - Map user to database
Create the ozeki database tables
In the following video, we are going to show you how to create the ozeki database
table. The video will start with launching the
SQL Server Management Studio. It will take you all the way to having
the two working database tables. In the video, we are going to show
you how to log in to the SQL Server Management Studio and what
code to use to create the tables. This 1:16 long video is very
handy because it contains all the steps you need to take, and
it shows them in a very detailed way.
We hope you will have no problem with following the steps.
Log in to the database
In the next step, you need to log in to the SQL Server Management Studio.
Use the login credentials that you created before.
Type in the username and the password and click the
'Connect' button (Figure 14). It will log in to the software and you will
have access to the Databases.
Figure 14 - Log in to database
Create a new query
On Figure 15, you can see the process of creating a new query.
Click the 'New Query' button located in the menu bar of
SQL Management Studio. Search for the 'Tables'
folder in the Object Explorer. Click on it to select it.
In the code editor section,
provide the creating code for the two tables.
Figure 15 - Create new query
Execute the new query
When you are finished with the code, search for the 'Execute' button
located on the menu bar (Figure 16). Pressing it will execute the
provided code and create the two tables that will work great
with the Ozeki SMS Gateway.
Figure 16 - Execute query
Check the created tables
As you can see on Figure 17, the two tables were created, and you can see
them in the Tables folder.
Clicking them will open the table.
Figure 17 - Tables created
To sum it up
In this article, we provided you with all the necessary information on how
to install the Microsoft SQL Server. Using the Microsoft SQL Server will
improve data storing, handling, and security. This will make your organization's
work faster and more efficient.
Now your next thing to do is to download Ozeki SMS Gateway and configure
this solution immediately! Everything is there to get it up and running
in less than 10 minutes.
This section explains how to customize the SQL commands used to
access your SMS database tables. Customizing the SQL commands to access the database
tables is a key part of configuring the SQL-SMS gateway. SQL templates provide a
practical solution, enabling database configurators to save time and maintain consistency
in their database operations. These pre-written SQL queries can be easily
customized and reused for various purposes, ensuring the efficiency and
reliability of the SQL to SMS system.
What are SQL templates
SQL templates are pre-written SQL queries that can be customized and reused
for different purposes. They can be used to save time and ensure consistency in
database operations. Some useful examples of SQL SMS templates include:
INSERT INTO ozekimessagein - when you insert incoming messages into the ozekimessagein table
INSERT INTO ozekimessageout- when you insert outgoing messages into the ozekimessageout table
SELECT - you use it when you send out messages
UPDATE - when the SMS program automatically changes the status of the SMS
Scalable solution to handle high volumes of SMS messages
Efficient data management and retrieval for SMS campaigns
Ensure SMS data integrity, reducing errors in message transmission
Advanced querying for targeted SMS recipient segmentation and reporting
Seamless integration with SMS platforms for cost-effective SMS sending
The default operation of the SMS gateway
By default, the SMS gateway uses two database tables
(see in: Ozeki SMS Gateway database table layout).
One of the tables (ozekimessagein) is used for receiving SMS messages. The other
(ozekimessagout) is used to send SMS messages. If an SMS message arrives
to your gateway, it will be inserted into the ozekimessagein
database table using the following SQL command:
Before this statement is executed by the SMS gateway the keywords
(e.g.: $originator, $recipient,...) will be
replaced with the corresponding values of the incoming SMS message.
If you want to send an SMS message, you have to create a record in the
ozekimessagout table. The status of the message should be set to "send".
The SMS gateway will read the ozekimessagout
table using the following SQL query to find your message:
SELECT id,sender,receiver,msg,msgtype,operator FROM ozekimessageout WHERE status='send'
After your outgoing SMS messages have been successfully fetched, the record
will be updated using the following SQL command:
UPDATE ozekimessageout SET status='sending' WHERE id='$id'
This indicates that your SMS messages have been accepted for delivery by
the SMS gateway and are saved into the outbox of the SMS gateway. Sometime
after this, the following events can happen to your message:
delivered to network
delivery to the network is not possible
delivered to the handset
delivery to the handset is not possible
Depending on which one of these events occurs one of the following SQL commands
will be executed on your database record:
If the "delivered to network" event occurs:
UPDATE ozekimessageout SET status='sent', senttime='$senttime' WHERE id='$id'
If the "delivery to the network is not possible" event occurs:
UPDATE ozekimessageout SET status='notsent' WHERE id='$id'
If the "delivered to handset" event occurs:
UPDATE ozekimessageout SET status='delivered' WHERE id='$id'
If the "delivery to the handset is not possible" event occurs:
UPDATE ozekimessageout SET status='undelivered' WHERE id='$id'
If the status of the message stays in "sending", it indicates, that the Ozeki
software has read the message from the database. The message was accepted
for delivery and was stored in the outbox folder, but it was not yet accepted
by the mobile network operator. It means that it is "waiting for delivery".
In this case, if you look at the Graphical User Interface (GUI) of Ozeki SMS Gateway,
you should see the message in your outbox.
If the status of the message stays in "sending" for a long time, it is highly
probable that the messages are not delivered because the mobile network
connection is not functioning in your system. To resolve this issue, please check if the
service provider connection's link (SMPP, UCP, CIMD2) is working.
Customized operation of the SMS Gateway
To change this behaviour, you should modify the SQL templates used by the SMS
gateway.
This can be done by opening the "Send" or the "Receive" tab
of the "Database configuration form" (Figure 1).
Figure 1 - How to update the SQL templates
On this form, you can specify an SQL command that is valid in your database server.
You can put stored procedures and complex SQL statements. As long as the SQL
command can be executed, the SMS gateway can use it.
Conclusion
SQL templates provide a convenient and efficient way to customize the SQL commands
used for accessing and manipulating database tables in the context of an SQL to
SMS gateway configuration. By utilizing pre-written SQL queries that can be easily
customized and reused, users can save time and ensure consistency in their
database operations.
The default operation of the SMS gateway involves two
tables, namely "ozekimessagein" for receiving SMS messages and "ozekimessageout"
for sending SMS messages. Through the use of INSERT, SELECT,
and UPDATE SQL commands, incoming and outgoing messages are appropriately
managed within these tables. However, the SMS gateway's behaviour can be
further customized by modifying the SQL templates, allowing users to tailor
the system's operation to their specific requirements.
By updating the SQL templates through the provided database configuration form,
users can specify their desired SQL commands, including stored procedures and
complex statements, to be executed by the SMS gateway. This flexibility empowers
users to adapt the system's behaviour according to their database server's
capabilities and their unique needs.
This document presents the characteristics of database tables
used by Ozeki SMS Gateway. You can learn what each table and its columns
can be used for.
Database name
The name of the database is ozekidb.
Incoming messages
The table of incoming messages is filled with data by Ozeki
SMS Gateway, using SQL insert statements. The application can freely delete records
from it. You can add new columns to the table.
This distinguishes incoming messages from each other. Every id has
to be different.
1, 2, 3, ...
sender
This is the phone number of the sender of the message.
+36441234567, 06459876543
receiver
This is the phone number of the recipient of the message.
+36441234567, 06459876543
msg
This is the text of the message.
This is a message text.
senttime
This is the time of sending the message.
2024-04-23 10:02:13
receivedtime
This is the time of receiving the message.
2024-04-23 10:02:13
operator
This denotes which service provider connection was used to receive
the message.
Vodafone1
msgtype
This denotes the type of the message.
SMS:TEXT, SMS:WAPPUSH, ...
Outgoing messages
The table of outgoing messages is read by Ozeki SMS Gateway,
using SQL select statements. SQL update statements are used
to set the statuses of sent messages. This is the table into
which to insert a new row for a message to be sent.
ozekimessageout
Column name
M/O
Description
Example
id
Optional
This distinguishes outgoing messages from each other. Every id has
to be different.
1, 2, 3, ...
sender
Optional
This is the phone number of the sender of the message.
+36441234567, 06459876543
receiver
Mandatory
This is the phone number of the recipient of the message.
+36441234567, 06459876543
msg
Optional
This is the text of the message.
This is a message text.
senttime
Optional
This is the time of sending the message.
2024-04-23 10:02:13
receivedtime
Optional
This is the time of receiving the message.
2024-04-23 10:02:13
operator
Optional
This denotes which service provider connection is to be used to
send out the message. The default is ANY, which means that any of
them can be used. (Then, the program will send out the message
using the first
service provider connection to have the free capacity to do the job.)
ANY Vodafone1
msgtype
Mandatory
This denotes the type of the message. The default is SMS:TEXT
This article provides a comprehensive guide on how to install and configure Ozeki ODBC,
a powerful tool for sending and receiving SMS messages using an ODBC database.
With detailed step-by-step instructions, accompanying screenshots, and an informative video tutorial, to ensure a seamless learning experience for users of all levels.
Whether you're a beginner or an experienced user,
this page will equip you with the necessary knowledge and skills to effectively utilize Ozeki ODBC for your SMS messaging needs.
Unlock the potential of the Ozeki SMS gateway with unixODBC in just 15 minutes, install, configure, and start sending SMS seamlessly!
What is unixODBC?
UnixODBC is an open-source project that provides a standardized interface for database connectivity on Unix-like operating systems.
When and why do we use unixODBC?
We use unixODBC when we need a standardized interface for connecting Unix-based applications to different relational databases.
This is particularly helpful for achieving cross-platform compatibility and facilitating integration with various middleware solutions.
What is ODBC connector?
ODBC connector allows standardized database connectivity on various platforms.
How to send SMS from unixODBC (Quick steps)
Send SMS from unixODBC:
Install UnixODBC
Download MySQL ODBC driver
Unzip ODBC Driver
cd to driver folder
Copy driver files
Install Unicode driver
Install ANSI driver
List installed drivers
Install ODBC database connection
Configure connection string
Congratulations! ODBC connection established
How to set up Ozeki SMS gateway using unixODBC (Video Tutorial)
In this quick 4-minute video, we'll guide you through the process of setting up the Ozeki SMS gateway using unixODBC.
Starting from the installation of unixODBC and downloading the MySQL ODBC driver,
we'll walk you through extracting and copying the driver files.
Watch as we install both Unicode and ANSI drivers, listing them to ensure correct installation.
The video takes you through the installation of the ODBC module in the Ozeki SMS Gateway app and setting up the connection string.
We'll guide you through the process of successfully establishing the connection.
Step 1 - Install UnixODBC
To install UnixODBC, open a terminal window and type the following command (see Figure 1):
sudo apt-get install unixodbc
You will be prompted to enter your password. Once you have done this, the installation process will begin.
Once the installation process is complete, you will be able to use UnixODBC to connect to ODBC data sources.
Figure 1 - Install UnixODBC
Step 2 - Download MySQL ODBC driver
To download the MySQL ODBC connector, first navigate to https://dev.mysql.com/downloads/connector/odbc/
From the provided drop-down menus, select your operating system and version under "Select Operating System" and "Select OS Version.", in our case it is the Linux - Generic and all.
Click the "Download" button, next to the release that you want to download, in our case, it is the x86 version (see Figure 2).
This will download MySQL ODBC driver to your computer, in a compressed file.
Figure 2 - Download MySQL ODBC driver
Step 3 - Extract the ODBC driver from the compressed file
Inside the terminal window, navigate to the directory where the compressed file is located, using the cd command.
Here type in the following commands (see Figure 3):
gunzip mysql-connector-odbc-8.1.0-linux-glibc2.28-x86-64bit.tar.gz

tar xvf mysql-connector-odbc-8.1.0-linux-glibc2.28-x86-64bit.tar
The ODBC driver will be extracted to the current directory as a directory with the same name as the compressed file, without the .tar.gz extension.
Figure 3 - Unzip ODBC Driver
Step 4 - Navigate to the driver folder
Inside the terminal window, type in the following command (see Figure 4):
cd mysql-connector-odbc-8.1.0-linux-glibc2.28-x86-64bit
The terminal window will change to the driver folder. You can then view the contents of the driver folder by typing the ls -la command and pressing Enter.
Figure 4 - cd to driver folder
Step 5 - Copy driver files
Within the terminal window, enter the following commands (see Figure 5):
This will result in the copying of the driver files to the /usr/local/bin and /usr/local/lib directories.
After the copying process is complete, you can utilize these files to establish connections to ODBC data sources from your applications.
Figure 5 - Copy driver files
Step 6 - Install Unicode driver
To install the Unicode driver, enter the following command into the terminal (see Figure 6):
The Unicode driver will be installed on your computer. Once the driver is installed, you will be able to use it to type and display Unicode characters.
Figure 6 - Install Unicode driver
Step 7 - Install ANSI driver
Install the ANSI driver by inputting the following command in the terminal (see Figure 7):
After the installation process, the ANSI driver will be accessible on your computer.
Later, you can utilize the installed driver to input and showcase ANSI characters.
Figure 7 - Install ANSI driver
Step 8 - Display a list of installed drivers
To display a list of installed drivers, input the following command in the terminal and press Enter (see Figure 8):
myodbc-installer -d -l
A list of all installed drivers on your computer will be displayed in the command prompt window.
The list will include the name and version of the driver.
Figure 8 - List installed drivers
Step 9 - Install ODBC database connection
On the Ozeki SMS Gateway homepage, navigate to the Users and Applications on the
right-side Panel and click "Add new user/application."
Scroll down to "Application interfaces" and click on "Install" next to SQL messaging.
Continue scrolling down and install ODBC (see Figure 9). This simple process will set up the ODBC connection service in the Ozeki SMS Gateway.
Figure 9 - Install ODBC database connection
Step 10 - Configure connection string
To configure ODBV connection fill out the form inside the General tab (see Figure 10).
Driver: SQL ODBC Driver, what we displayed before (see Figure 8). In our case: {MySQL ODBC 8.1 Unicode Driver}
Server: IP address of the SQL server. In our case: 192.168.0.126
Database: Name of the Database. In our case: ozekidb
User: Username. In our case: ozekiuser
Password: password of the User. In our case: *********
If the form is filled correctly, press the "Ok" button.
This will configure your Ozeki ODBC connection.
Figure 10 - Configure connection string
Successful ODBC connection
If you've completed the 10 steps, you're ready to launch the application (see Figure 11).
To start the application, click the slide button located in the left panel.
Check the Events tab to confirm a successful connection.
Figure 11 - ODBC connection established
Summary
If you have followed the steps closely, you should be able to send texts using the unixODBC with Ozeki SMS Gateway without any problems.
Our goal was to make it easy for you to understand all the details and avoid getting lost in the explanations.
To ensure sustained success, concentrate on efficiently managing your SMS business.
If you would like to discover more information about the advantages of other similar solutions,
please open ozeki-sms-gateway.com.
We hope this guide will be useful to all the readers and especially to beginners.
You can use Microsoft SQL Server or Microsoft SQL Express for sending and receiving SMS.
Follow this page to send or receive SMS messages through Ozeki SMS Gateway's Database User.
All you have to do is insert or read data rows from the appropriate SQL table by setting INSERT INTO and SELECT statements.
The solution uses Ozeki SMS Gateway installed on your PC. This solution is divided into 4 sections:
What is MSSQL?
Microsoft SQL Server is a relational database management system developed by Microsoft.
As a database server,
it is a software product with the primary function of storing and retrieving data as requested by other software
applications, which may run either on the same computer or on another computer across a network (including the Internet).
Microsoft markets at least a dozen different editions of Microsoft SQL Server,
aimed at different audiences and for workloads ranging from small single-machine applications to large Internet-facing
applications with many concurrent users.
What is MSSQL Express?
SQL Server Express, Microsoft’s free database edition,
can be utilized in the Azure Cloud by installing on an Azure Virtual Machine (VM) – for developing small server-driven applications.
It can also be utilized for any production database that is sized at or below the current SQL.
In this case it is used to send SMS through an SMPP client connection.
What is Ozeki SMS Gateway?
Ozeki SMS Gateway is a communication software that routes messages between real world entities.
It allows you to build up simple communication between shared hardware and software resources of your system.
It offers real time information and provides various configuration options to route messages.
Please make sure you read the general SQL to SMS how to before continuing.
How to send SMS from MS SQL Express (Quick steps)
To send SMS from MS SQL Express:
Create database and tables
Launch the Ozeki SMS Gateway app
Add new SQL messaging application
Install MS SQL Express
Configure Connection settings
Enable MS SQL Express connection
Insert a text message into the database
Check the SMS message in the Sent folder
How to receive SMS with MS SQL Express database
This SMS receiving system makes it possible to receive SMS using an
MS SQL Express Database. This system consists of a phone that will be
used to send messages, a computer with Ozeki SMS Gateway installed,
a database server, and your application. The procedure works the
following way: The phone sends the message. The computer with
the Ozeki SMS Gateway will store the message in an
MS SQL Express Database Server.
Your application could get the messages using an SQL Query. (Figure 1)
Figure 1 - How to receive SMS with MS SQL Express database
How to send SMS from MS SQL Express database
This SMS sending system makes it possible to send SMS using an
MS SQL Express database.
This system consists of a phone that will be used to receive
the messages, a computer with Ozeki SMS Gateway installed,
a database server, and your application. The procedure works
the following way: Your application will send the message to
the MS SQL Express Database Server. It will store and log
your message, so the Ozeki SMS Gateway will be able to acquire
it using an SQL Query.
The message will be sent to the phone after it was acquired. (Figure 2)
Figure 2 - How to send SMS with MS SQL Express database
How to send SMS from MS SQL Express database (video tutorial)
In this quick video tutorial, you will learn how to send SMS from MS SQL Express database.
First, we need to create the databases themselves in the Command Prompt.
Then, we add an MS SQL Express messaging interface to Ozeki SMS Gateway.
Lastly, we can use this connection to send SMS using the previously created databases.
Create database and tables
To use this messaging function,
please install and configure Ozeki SMS Gateway.
After software configuration, please open its management consol so you can install a database user.
You will be able to send and receive SMS messages with an SQL Express database server.
It is required to add the database connection type as seen in the examples on
this page. In SQL Express you should provide the parameters you can see on
Figure 3:
Figure 3 - Create database and tables
Select 'Add new user or application'
First you need to be on the Home page of Ozeki SMS Gateway.
Navigate to the right-hand side of the screen to Users and applications.
Click on Add new user/application highlighted in blue (Figure 4).
This will take you to a new screen where you can configure your new user.
Figure 4 - Select 'Add new user or application'
Install SQL Messaging User
Under Application interfaces, you need to find SQL messaging.
Click on the blue Install button (Figure 5).
You will then be taken to another screen where you can select what type of SQL
messaging interface you wish to create.
Figure 5 - Install SQL Messaging User
Install MS SQL Express connection
Find MS SQL Express among SQL messaging interfaces.
Click on the blue Install next to it again (Figure 6).
This will forward you to a configuration screen where you are able to set up your new MS SQL Express connection.
Figure 6 - Install MS SQL Express connection
Define the MS SQL Express database connection details
The next step is to provide the details for your database connection (Figure 7).
First you must type in the path of your Server along with the Port.
Then you need to type in the name of your previously created database.
Lastly, you must provide a username and a password for this connection.
Click on OK to complete the configuration.
Figure 7 - Define the MS SQL Express database connection details
Enable MS SQL Express connection
With your connection successfully created, you may now enable it.
Turn the connection on by clicking on the switch button on the left (Figure 8).
The switch turns green to indicate that it has been turned on.
Now everything is ready to use the MS SQL Express connection for sending SMS.
Figure 8 - Enable MS SQL Express connection
Insert message to the database table
Start by going into the SQL tab of MS SQL Express connection.
You need to insert the message into the database by typing this piece of code into the text editor (Figure 9).
Click on the Execute button below to run the code and insert the message into the database.
Figure 9 - Insert message to the database table
SMS message sent
After executing the SQL code, navigate to the Sent folder (Figure 10).
This folder is found inside a menu on the left.
Inside this folder you will find that the SMS message has been successfully sent.
Figure 10 - SMS message sent
Congratulation for configuring a database user! Now you should create a database layout by using SQL Express.
Receiving and sending text messages will work on separate SQL tables ('ozekimessagein' and 'ozekimessageout').
You can control these tables by using the INSERT and SELECT statements. To create a database layout, please open a windows command prompt
and run 'cmd.exe' to start the SQL Command interpreter.
sqlcmd
SQL Express will start running, so you can type your statements in the command interpreter. If the command interpreter cannot connect to SQL Express, please read
How to connect to SQL Express using the SQL command line utility.
Please type the following statements to create tables and add 'sysadmin' rights to your database user (Figure 1).
Although you can give any table name you wish.
CREATE DATABASE ozeki
GO

USE ozeki
GO

CREATE TABLE ozekimessagein (
 id int IDENTITY (1,1),
 sender varchar(255),
 receiver varchar(255),
 msg nvarchar(160),
 senttime varchar(100),
 receivedtime varchar(100),
 operator varchar(30),
 msgtype varchar(30),
 reference varchar(30),
);

CREATE TABLE ozekimessageout (
 id int IDENTITY (1,1),
 sender varchar(255),
 receiver varchar(255),
 msg nvarchar(160),
 senttime varchar(100),
 receivedtime varchar(100),
 operator varchar(100),
 msgtype varchar(30),
 reference varchar(30),
 status varchar(30),
 errormsg varchar(250)
);

GO

sp_addLogin 'ozekiuser', 'ozekipass'
GO

sp_addsrvrolemember 'ozekiuser', 'sysadmin'
GO
Figure 1 - CREATE TABLE statement. It also adds rights to 'ozekiuser'
Later on, you can use the command prompt to modify the size or data type of the SMS messages.
Now you are ready to send your first SMS message by inserting a record into 'ozekimessageout'. Use the following SQL statement example:
insert into ozekimessageout (receiver,msg,status) values ("+44111223465","Hello
 world","Send");
GO
In some systems it is harder to connect to SQL Express. If this is the case,
you can see the following error message:
ERROR 6001: Database connection error: The 'SQLNCLI' provider is not
registered on the local machine..
SQLNCLI should be installed with SQL Express. This error shows that it is not installed on your machine.
Please try to change the provider to 'sqloledb', so you can use OLE DB.
By changing the provider the connections string changes as well:
If you wish to test SMS functionality without actually connecting to the
mobile network, you have two options: You can use the
built in sms tester connection or you can setup two sms gateways
to have a more realistic testing environment. The first option is an excellent
choice for performance testing. The second option is better because it allows
you to test all aspects of mobile messaging.
If you setup two sms gateways, you need to configure the first SMS gateway
as an SMPP simulator. This SMS gateway will
provide SMPP server service to the second SMS gateway.
It will operate the same way the SMSC of a mobile network operator would operate.
The second SMS gateway will connect
to the first using an SMPP client connection, and
it will provide SQL to SMS service to your applications.
Summary
Thank you for sticking with us by the end of this article.
Hopefully this tutorial was helpful and informative in bringing you closer to using Ozeki SMS Gateway and MS SQL.
To learn more, check out our other tutorials, videos and guides on various other topics.
Ozeki SMS Gateway offers many more solutions to different tasks and processes.
How to send SMS from MS SQL with Ozeki SMS Gateway
Use MS SQL Express with Ozeki SMS Gateway's easy connectivity to improve business
communications. Automate SMS processes for quick, reliable notifications across a
variety of platforms. Set up Ozeki SMS Gateway on your server without any inconvenience
and save important SMS data in a MS SQL Express database. With custom searches and
SQL triggers, simplify your processes by connecting SMS messages with users and
clients. Take advantage of this effective SMS solution to up your business communication
game immediately.
How to send SMS from MS SQL with Ozeki SMS Gateway (easy steps)
To send SMS from MS SQL with Ozeki SMS Gateway:
Download Microsoft SQL Server Express
Run the installer and complete the installation
Create a database schema with CommandPrompt - sqlcmd
Connect Ozeki SMS Gateway to MS SQL Express
Send a test message from MS SQL Express using Ozeki SMS Gateway
Install MS SQL Express
Microsoft SQL Server Express is a lightweight, free version of SQL Server designed
for small-scale applications and learning purposes. To install it, download the
appropriate version from Microsoft's website and run the installer.
The following video will guide you through the essential steps of installing Microsoft
SQL Express on your computer. Complete the process with ease by following the
given instructions in the video. Once the installation is complete, you can start
using SQL Server Express in collaboration with Ozeki SMS Gateway for SMS sending,
database management, application development, and more.
Create database schema
In this short, easy-to-follow video you can learn, how to create a database schema
using CommandPrompt - sqlcmd. CommandPrompt - sqlcmd is a command-line tool in
Microsoft SQL Server that enables users to interface with databases by executing T-SQL
commands from the command prompt or script files. Direct connection to SQL Server,
query execution, and administration operations are all possible using the command-line
interface.
Connect SMS Gateway to MS SQL Express
To connect an SMS gateway to MS SQL Express, follow the instructions provided by
this video. It will walk you through setting up the Ozeki SMS gateway, obtaining the
essential API keys, or configuring the connection parameters necessary for a
successful integration. We'll demonstrate the process of developing custom
integration code to make it easier for the Ozeki SMS gateway and your Microsoft
SQL Express database to communicate smoothly, ensure efficient SMS management.
Send test message
Most business applications are database-driven, so it makes sense to use the
database for SMS as well. SMS messages stored in the SMS database can be easily linked
to users, customers, and other business data, allowing you to use custom queries
and take advantage of SQL triggers and stored procedures to maximize the efficiency
of your SMS communication. In this video, we'll guide you through the process of
sending test messages with MS SQL Express using the Ozeki SMS Gateway.
This page gives you the steps you need to take to download, install and configure Microsoft SQL Server (Express edition).
Microsoft SQL Server is a database server by Microsoft. It is a software product
that primarily aims to store and retrieve data requested by other applications.
Microsoft SQL Server and Microsoft SQL Express are basically the same products,
so the steps to get them up and running are pretty much the same.
Please jump to the video or if you scroll down
you can find screenshots that describe the installation details of MSSQL from
the downloading and installing the package,
through instance creation until creating the administrator account's password.
The first step is to visit the SQL Server 2019 official download page. You can
do this by following this link.
Here, please click the download link. Your computer will start to download the required data. After you have all the necessary files, you can proceed to the next step.
You can see the download page on Figure 1.
Figure 1 - Download SQL Express from Microsoft's webpage
Now you have to find the downloaded SQLServer2019-SSEI-Expr.exe file. By default,
this will be on your Downloads folder. (Figure 2) Find it and run the .exe file to start
the installation procedure.
Figure 2 - Start the installation
The first step of the installation process is defining the type of installation
you want to execute. You have 2 options. If you are installing the SQL Server 2019
to your computer the first time, please choose the first option which is the
installation. The second option lets you add featured to an existing copy of the
software. You can see a more detailed explanation of both options on Figure 3.
Figure 3 - Select an installation type
To legally own a copy of the SQL Server 2019, you need to accept
Microsoft’s Software License Terms. To proceed, please click the Accept
button. You can find it on Figure 4.
Figure 4 - Accept license terms
Now you have the chance to define the installation location of the program. By
clicking the browse button, You can navigate to the folder you want the
program’s necessary files to be located in and click Ok. Make sure that there
are enough free space on the drive you are choosing. You can see the minimum
space the software required on the right side of the window, as you can see on
Figure 5. Click “Install” if you have found a suitable install destination.
Figure 5 - Click the 'Install' button
Now the installer will guide you through the process. First, it will download the
install package to your computer. This should not take long but could depend on
your internet speed. You don’t have anything to do on this window,
just wait until it jumps to the next window. You can see the downloading process
on “Figure 6”.
Figure 6 - Wait until the installation is finished
Now if the installation is finished, you will be presented with the summary panel.
You can see that the setup was successfully done. You can see that under the details, it notifies you that the installation was successful.
If you want to see the summary log file, you can see the location of it down in a form of an access path. To proceed, press the Close button.
You can see the summary window on Figure 7.
Figure 7 - Installation has been completed
If you close the installer, you will be presented with the SQL Server Installer. Press the customize button to proceed to the next step,
where you can search for an update and set the installation preferences. You can see the button on Figure 8.
Figure 8 - Click the 'Customize' button
Now the program will guide you through a setup guide. The first step is to check
for updates and install them. If your program is up to date, it should not take
long before you can proceed to the next setup step. You can see the scan result
on Figure 9.
Figure 9 - Install setup files
You have the opportunity to choose which type of installation you wish to do here.
The first one is the new installation which installs every necessary instance with the program.
The other option is suitable if you already have a working SQL Server on your computer
but wishes to add some other features to it.
Please choose the first option. You can get more information about both of the options on Figure 10.
Figure 10 - Select an installation type
On the Feature Selection window, you can select which components should the program
install. We advise you to install every possible feature, because that way your program will
be more versatile. You can see all the options on Figure 11.
Figure 11 - Select instance features
Here you can configure your Instance. You can name it and give it an ID.
If you decided a good name for it, please click the Next button. You can see all
the configuration possibility on Figure 12.
Figure 12 - Specify the name for the instance
In this window, you could specify the service accounts for your SQL Server
services.
Service accounts are non-human accounts which has more access to server
resources than a normal user account. We recommend selecting different service
accounts for your different SQL services. (Figure 13)
Figure 13 - Specify the service accounts
On Figure 14, you can see the Database Engine configuration panel. It provides
the information for the server authentication. Please type in the Administrator
account’s password for that computer. If you have it filled in, click the
Next button.
Figure 14 - Specify the authentication mode and the password for the administrator account
Now you have everything set up, you can start the installation procedure. The
computer will do everything for you. You just need to wait out the installation.
On Figure 15, you can see how the PC will inform you about the progress.
Figure 15 - Wait until the installation is completed
After the installation is finished, you will see the Complete window, as you can on
Figure 16. As you can see, both the Database Engine Server and the SQL Server
Replication is installed successfully. You are finished with the installation.
Figure 16 - Installation has been completed
Now as the last step of the installation, Click the connect now button which
will open you a command prompt, as you can see on Figure 17.
Figure 17 - Click to Connect
Now you should type in the code seen on Figure 18, but make sure to
modify it with you own computers credentials after the DESKTOP part.
Pres enter and it will do everything for you. Now you are finished with the
installation and have a working MS SQL Server.
Figure 18 - Connect details
Create database layout
Figure 19 - Create database and user
create database ozekidb
GO

use ozekidb
GO

sp_addLogin 'ozekiuser', 'ozekipass'
GO

sp_addsrvrolemember 'ozekiuser', 'sysadmin'
GO
Figure 20 - Login with the created user
sqlcmd -U ozekiuser -P ozekipass
Figure 21 - Create database tables
use ozekidb
GO

CREATE TABLE ozekimessagein (
 id int IDENTITY (1,1),
 sender varchar(255),
 receiver varchar(255),
 msg nvarchar(160),
 senttime varchar(100),
 receivedtime varchar(100),
 operator varchar(30),
 msgtype varchar(30),
 reference varchar(30),
);

CREATE TABLE ozekimessageout (
 id int IDENTITY (1,1),
 sender varchar(255),
 receiver varchar(255),
 msg nvarchar(160),
 senttime varchar(100),
 receivedtime varchar(100),
 operator varchar(100),
 msgtype varchar(30),
 reference varchar(30),
 status varchar(30),
 errormsg varchar(250)
);

GO
This page gives you the database layout to use when you wish to setup an
SQL to SMS solution. You will see that two database tables need to be created.
One will be used for sending SMS messages and the other for receiving. This
guide shows you how to connect to your MS SQL server and how to create these
two database tables.
Content
1. Connect to MSSQL Express
2. Copy CREATE TABLE statement
3. Run CREATE TABLE statement
Please scroll down to copy the CREATE TABLE statements used in the video.
If you have created the database in MSSQL Express,
you can jump to the next video.
First, you need to be able to create SQL databases with a Command Prompt.
To do this, please run “cmd” on your computer, and type in “sqlcmd”.
After pressing enter, you will be able to run sql statements directly from cmd.
These statements create the database for the incoming and outgoing messages,
the login credentials and sets the required rights for the users.
You can see the result of the on Figure 1.
Figure 1 - Connect to the Microsoft SQL Express database
Now you need to login to create SQL databases with the created user.
To do this, please run “cmd” on your computer, and type in
“sqlcmd -U ozekiuser -P ozekipass”. (Figure 2) After pressing enter, you
will be able to run sql statements directly from cmd with the rights of the
created user.
Figure 2 - Login with the created user
sqlcmd -U ozekiuser -P ozekipass
After it you need to create a table which is suitable for the Ozeki SMS Gateway.
Here on Figure 3, we provide you a statement which creates the perfect SQL table for your needs.
If you are familiar with SQL, feel free to modify the code to your exact liking.
use ozekidb
GO

CREATE TABLE ozekimessagein (
 id int IDENTITY (1,1),
 sender varchar(255),
 receiver varchar(255),
 msg nvarchar(160),
 senttime varchar(100),
 receivedtime varchar(100),
 operator varchar(30),
 msgtype varchar(30),
 reference varchar(30),
);

CREATE TABLE ozekimessageout (
 id int IDENTITY (1,1),
 sender varchar(255),
 receiver varchar(255),
 msg nvarchar(160),
 senttime varchar(100),
 receivedtime varchar(100),
 operator varchar(100),
 msgtype varchar(30),
 reference varchar(30),
 status varchar(30),
 errormsg varchar(250)
);

GO
Figure 3 - CREATE TABLE statement
To make the tables, you need to give the “sqlcmd” some statements.
Copy the code from Figure 3. These statements create the tables for the
incoming and outgoing messages.
Now please paste the copied code form the previous step, into the sqlcmd which you created on Figure 1.
This way the program can understand and execute the statements.
Here in this step, you can modify the provided code, if you are familiar with the SQL language.
Press enter to run the code and create the tables.
You can see the code inside the sqlcmd on Figure 4.
Figure 4 - Run CREATE TABLE statement on the database
We hope that this guide was helpful. If you have any problem with any of the steps, feel free to contact us at info @ ozeki.hu
This guide explains, how you can create a database connection in Ozeki SMS Gateway to
your MS SQL database server. This connection will be used to SELECT your outgoing messages
from the outgoing database table, and to INSERT your incoming SMS messages into the incoming
database table. If everything goes well these steps can be completed in about 5 minutes.
Content
1. install
2. provide
3. connect
If you have created the database in MS SQL, you can jump to the next video.
Although you can precisely examine the sequence by looking through the screenshots.
First you will need to create a new SQL messaging application.
To do this, please start the Ozeki SMS Gateway.
You can find the SMS Gateway icon on the Ozeki 10 Desktop if you have it installed.
Click on it twice to launch the application. You can find the icon on Figure 1.
Figure 1 - Open the SMS Gateway application
Now add a user application. To do this, please search for the “New user application” button on the right.
You can find it with the help of Figure 2.
Click it to get to the screen where you can choose the interface of the new user application.
Figure 2 - Select 'Add new user or application'
The Ozeki SMS Gateway handles various interfaces. You can send and receive SMS
messages with a TXT file, HTTP client or an FTP server. Now please choose the SQL messaging option.
Click on the “Install” button to proceed. You can see your options on Figure 3.
Figure 3 - Install SQL Messaging User
On this step, you get to decide which SQL Management tools you wish to use.
The Ozeki SMS Gateway will establish a connection with the selected software.
You can see your options on Figure 4. Click on the “Install” button to proceed to the next step.
Figure 4 - Install MS SQL Express connection
Now you get to configure your new SQL connection. You need to provide a unique name for your connection.
This can be anything that helps you identify it later. On the fields below,
you need to provide your server’s properties. You can see our example
configurations on Figure 5. Click the “OK” button to proceed to
the final step.
Figure 5 - Define the MS SQL database connection details
You have finished the configuration of your MS SQL Server. You can see the connection properties on the left side of the window.
You can see that now the “connection” in turned off. You need to enable it by clicking on it.
If you have done it, it should look like on Figure 6. Now you have your connection properly set up.
This guide explains how you can send an SMS message from your MSSQL database server.
The procedure is simple: you need to insert a record into the outgoing database table.
The guide will give you the INSERT statement you should use. After the record is inserted,
the Ozeki SMS Gateway will update it multiple times to give you information about the
status of the message submission procedure.
Video content
1. Insert message into database
2. Send test message
Look at the upcoming screenshots to thoroughly examine the final stage, which is SMS sending.
Sending a test message is good for checking if your connection works properly.
You can use the Ozeki SMS Gateway to compose a test message and send it.
First you need to open your SQL User, which is using the MS SQL Management tools.
You can find all your connection on the “User and application” panel on the right side.
Click your SQL User to watch its details. You can find it with the help of Figure 1.
Figure 1 - Open Database user
On this next panel, you can execute new SQL statements. To run a code, type it into the filed below the “Execute” button.
You can find it with the help of “Figure 2”. We provide you an example code snippet,
which send a “HelloWorld” message to the provided number. You can find it on Figure 3. Please modify the code with an existing phone number.
You can type in the phone number in the “values” bracket.
It should be the first attribute. If you are familiar with SQL, feel free to modulate the code as you like.
Figure 2 - Insert message to the database table
If you execute this code (Figure 3), it will send the message “HelloWorld” to the number “+44111223465”.
To modify the code, find the “values” bracket, where you can rewrite the text of the message and the receiver’s phone number.
INSERT message record (example):
USE ozeki
INSERT INTO ozekimessageout (receiver,msg,status) values ("+44111223465","Helloworld","Send");
GO
Figure 3 - Copy INSERT statement
On Figure 4, you can see that the connection is working and the Ozeki SMS Gateway communicates with the SQL Database management tool you are using.
It will notify you of every event upon happening. If something is not working as intended,
you will get more information about the error here.
It is important to supervise every occurrence on the connection. If your get no error, that means that your server is working as intended, so you are capable to send messages from the Ozeki SMS Gateway.
Figure 4 - The Database User's sent folder shows that your message has been sent by Ozeki SMS Gateway
This guide is intended to give you hints, that might help you fix a broken
Microsoft SQL Server or Microsoft SQL Express connection. In general, a reinstallation
of the database server usually fixes the problem, but in most cases reinstallation
is not an option. Here are the things to check if you cannot connect to your SQL server:
1. Please use the SQL Server configuration manager to check
if both TCPIP and Named Pipes are enabled for the database server instance.
2. Make sure SQLBrowser service is up and running.
3. Check if the TCPIP and Named Pipe protocols
are enabled to be used in the SQL Client.
4. Open the error log to find the SQL database instance and make sure there
are no ERROR messages for TCPIP and Named Pipes. The logs can be found at:
C:\Program Files\Microsoft SQL Server\MSSQL.x\MSSQL\LOG
5. You should also find the port number, and check if the port number configured in the server and client are identical.
6. Please try different protocols by testing them with 'sqlcmd'. One of the following 'sqlcmd' commands should work.
This article is a detailed guide on sending SMS from/to Microsoft Access.
You can simply start to send and receive SMS messages
through Ozeki SMS Gateway's Database User by using Microsoft Access database tables.
All you have to do is insert or read data rows from the appropriate SQL table by configuring INSERT INTO and SELECT statements for the user.
This page shows how to install and prepare the Database User in the
browser GUI of Ozeki SMS Gateway.
Additionally on the next page
you can see how to use Microsoft Access with a few simple screenshots.
This example contains a database that you can download from here:
Microsoft Access is a database creation program that allows for anyone to easily maintain and edit a database.
It is suitable for anything from small projects to large businesses and is a very visual program.
This makes it great for performing data entry, as you don't need to work with tables and spreadsheets.
In this instance we can use a Microsoft Access database, along with Ozeki SMS Gateway to send and receive SMS messages.
What is Ozeki SMS Gateway?
Ozeki SMS Gateway is a powerful SMS Gateway software you can download and install on your Windows or Linux computer,
or to your Android mobile phone.
It provides an HTTP SMS API, that allows you to connect to it from local or remote programs.
The reason why companies use Ozeki SMS Gateway as their first point of access to the mobile network,
is because it provides service provider independence. When you use Ozeki, the SMS contact lists and sms data is safe,
because Ozeki is installed in their own computer (physical or virtual),
and Ozeki provides direct access to the mobile network through wireless connections.
How to send SMS from/to Microsoft Access
In this video tutorial you will learn how to send and receive SMS using Microsoft Access and Ozeki SMS Gateway.
First you need to open Ozeki SMS Gateway and create a Microsoft Access messaging connection.
Then, you need to download the example project found above, and set it as data source for the connection.
Doing this will enable you to send SMS from the SQL tab of your Microsoft Access messaging connection.
How to receive SMS with Microsoft Access database
This SMS receiving system makes it possible to receive SMS using an
MS Access Database. This system consists of an Android phone with
the Ozeki SMS Gateway running, that will be used to send messages,
a computer with Ozeki SMS Gateway installed, a database server,
and your application. You can learn how the procedure works from the following paragraph:
The phone sends the message. The computer with the
Ozeki SMS Gateway will store the message in an
MS Access Database Server. Your application could get the messages
using an SQL Query. (Figure 1)
Figure 1 - How to receive SMS with Microsoft Access database
How to send SMS from Microsoft Access database
This SMS sending system makes it possible to send SMS using an
MS Access Database Server. This system consists of a phone,
with the Ozeki SMS Gateway running on it,
that will be used to receive the messages,
a computer with Ozeki SMS Gateway installed, a database server,
and your application. The procedure works the following way:
Your application will send the message to the MS SQL Database Server.
It will store your message and the Ozeki SMS Gateway will
be able to acquire it using an SQL Query.
The message will be sent to the phone after it was acquired. (Figure 2)
Figure 2 - How to send SMS from Microsoft Access database
Basics of Microsoft Access connection
The Database User can connect to your Access database tables. Keep in mind to create two tables.
One for receiving and the other one for sending messages.
The table structure should match the one in the
MS SQL configuration, which basically consists
of an ozekimessagein and ozekimessageout table. Finally, you should write SQL statements to work with these tables.
At the bottom of the page, you can find some UPDATE statements to use on the sent message records.
Add Database User
Make sure that your Ozeki SMS Gateway is connected to your GSM modem
or IP SMS service provider.
For example SMPP,
CIMD2
or UCP/EMI are accepted service provider connections.
After you are able to manually send and receive SMS messages with SMS Gateway,
you can install (Figure 1) and configure a Database User as you can see below.
You should start by selecting 'Users and applications/Add new user or
application' from the top menu then search the SQL messaging User and
then select the MS Access user. Click the blue 'install'
button next to it as you can see on Figure 3.
Figure 3 - Start installing your SMS Gateway's Database User
Configure Database User
Database User is highly advised to connect to the most common databases.
Here you can find the list of supported databases.
After using a connection string to connect to your database, you can set which SQL statements to use
in Ozeki SMS Gateway.
Connect to your Microsoft Access database with the help of an ODBC connection string,
which points to your database through your ODBC driver.
Please type the path of the database file as seen on Figure 4.
Figure 4 - Configure the database connection settings
Set SQL templates
After setting the connection string, it is time to set the SQL templates.
These statements are required to update the outgoing message table, which is most likely called 'ozekimessageout'.
The default statements in Ozeki SMS Gateway will not work with Microsoft Access databases.
This is why you are highly suggested to check the following figures
(on Figure 5) to make some minor changes like moving the apostrophe (' ')
surrounding the $id keyword.
Figure 5 - Sending template UPDATE-s your message in ozekimessageout
Congratulation! You have properly configured Ozeki SMS Gateway to send SMS messages from your Microsoft Access database.
You are recommended to test it by INSERT-ing your first SMS message to your outgoing message table.
The SMS Gateway's Database User is capable to read these message record and update them as described above from Figure 3.
Please, visit to the Microsoft Access 365 or Microsoft Access 2013 tutorial for details.
Summary
The article above will show you how to send and receive SMS messages through Ozeki SMS Gateway's Database User
by using Microsoft Access database tables.
The Database User can connect to your Access database tables, you just have to create two tables and use
the given SQL statements to work with these tables.
Manage your messaging system using Microsoft Access is very convenient because all of the messages are
stored in a system that was designed for easy lookups.
The information you have obtained is valuable, there are further useful documents on the Ozeki website, do not stop here.
It is a good idea to read the article titled SMS from/to Oracle.
You will see detailed information on this page to show how to send and receive SMS messages
with Microsoft Access 2013 database tables. Please follow these steps and screenshots
to configure the connection to perfectly read lines from the outgoing message table and
paste lines to the incoming message table.
The default table names are 'ozekimessagein' and 'ozekimessageout'.
On the previous page, you might have
read how to connect to the Access 2013 database and set the SQL statements, but on
this page, you can see it from the aspect of your Microsoft Access database. At the bottom of
this page, you can see how to send and receive messages with simple examples.
This example contains a database that you can download from here:
Microsoft Access is a database management system that is a product of Microsoft.
It is one of the most commonly used database management system.
To send SMS in Microsoft Access 2013:
Download the database
Create two tables
Open the Database user
Remove apostrophes the statements
Execute the Insert statement
Send a message
Watch the log of received message
Run the SELECT statement
Read the incoming messages
How to connect SMS Gateway to this Access database example
After you have downloaded 'ozeki_database.accdb', please place it to a selected folder.
In this tutorial, it has been saved to the desktop (Figure 1) Although you can save it to any other location.
Just make sure that there is enough place on the destination drive,
and you can remember the access path of the file.
Please memorize the file's location. Later on, you will have to use this path in the connection string.
You can check the path from the 'File Explorer' (Figure 2).
The file is an Access 2013 database file that is recognizable by the .accdb file extension.
Open the file to start working with it in Microsoft Access 2013.
Figure 2 - Save the path to your database. This will be useful for creating the connection string.
The 'ozekimessagein' table
Just before you start configuring your database connection, please create these
two database tables: 'ozekimessagein' table. (Figure 3) This will serve
as an inbox folder. The incoming messages will be downloaded and stored here.
You will have to create two tables for the database to work.
Figure 3 - 'ozekimessagein' table in Microsoft Access database
The 'ozekimessageout' table
The other table will be the 'messages to send' table.
The 'ozekimessageout' table will be the table where you create messages.
The database user will send these messages,
to an address defined in the designated field. (Figure 4)
Figure 4 - 'ozekimessageout' table in Microsoft Access database
Provide connection settings
It is assumed that you have already created the Database User.
The Database User can be installed on your Ozeki SMS Gateway.
It will be used as a way of communication between the database and the Ozeki SMS Gateway.
It is a necessary aspect of the system we are creating now.
Keep in mind to change the 'Data Source=' parameter to the location of 'ozeki_database.accdb' (Figure 5).
Figure 5 - Paste your database connection string at the Database User's configuration panel
Remove apostrophes from all the statements
After creating the new MS Access user, you need to go to the configure tab page.
There you will find code snippets. You can get more information about the codes from the little explanation text under the code (Figure 6).
Make sure to delete the ' ' characters from the $id parts. This way all the codes will work correctly.
Figure 6 - Remove apostrophes from all of the UPDATE statements
Now it is ready to use the configuration of the connection.
Testing the configuration
When testing, you should use both tables. The one which was created for incoming messages and the one which was created for outgoing messages.
In these examples, these tables are called 'ozekimessageout' and 'ozekimessagein'.
To test the configuration, you should INSERT a message record into the outgoing messages table (Figure 7),
which is called 'ozekimessageout' in the current example. These messages can be SELECT-ed (polled) by configuring the Database User here:
'SQL for sending' tab page and 'Polling' sub-tab page. Please search these options in the SMS Gateway's browser GUI.
Figure 7 - INSERT a new row into the outgoing message table
The sent message
The 'status=' parameter of the message record will change from 'Sending' to 'Sent' to 'Delivered'.
The sent message will be visible in the Database User's Sent folder (Figure 8).
Figure 8 - The test message has been sent
Receiving messages
If an incoming message log event is displayed in the Database User's event log (Figure 9),
the message entry will be INSERT -ed in the incoming message database table. The INSERT statement can be configured in the
'SQL for receiving' tab page of this Database User's configuration panel. This is the statement which INSERT-s incoming messages.
Figure 9 - Message is received by Ozeki SMS Gateway. Your Database User will INSERT it into a table.
Run the SELECT statement
In this example, the incoming message table is called 'ozekimessagein'. This is where those SMS messages
are INSERT-ed, which are received by the Database User.
You should run a SELECT statement on it (Figure 10) to read all of the messages (Figure 11).
Figure 10 - SELECT messages from the incoming message table
Read the incoming messages
All of the incoming messages can be read after running a SELECT query on 'ozekimessagein' (Figure 11).
With this SELECT statement, you can always check your incoming messages.
Figure 11 - The SMS messages received by Ozeki SMS Gateway's Database User
To sum it up
We hope you found it easy to follow the steps.
We did our very best to make it simple and to walk you through all the details
as painlessly as possible.
If you have followed the steps closely, you should be able to save SMS in MS
Access 2013.
If you have already completed the steps, I am sure, if you let your girlfriend
(or boyfriend) know, you will be rewarded.
If you would like to get to know more about the benefits of other similar
solutions, please open ozeki-sms-gateway.com.
Installing Access 365 is really beneficial for your company or small business
because it is easier to manage and store large amounts of data than in excel or
any other spreadsheet applications.
This tutorial will guide you through the step you need to take
in order to have a working copy of the Access desktop application.
It is a step-by-step guide that should not take more than five minutes.
What is Access 365?
Access 365 is a widely used information management tool.
Its most frequent usage is information storage, report and analysis making.
How to install Access 365? (Short instructions)
To install Access 365:
Launch the browser
Visit the office download page
Download premium office apps
Run the installer
Wait for installer to finish
Close the installer
Open Access
Add a new blank database
Download Premium Office apps
The first step is to go to office.com and if you're not already signed in, select Sign in.
After signing in, select the Install Office option in the top right corner
and then choose Premium Office apps as you can see on Figure 1.
Your browser will now start the download process.
It should not take more than a couple of minutes.
Figure 1 - Download Microsoft Office form office.com
Open the installer
Now if your browser is finished downloading the Office installer, open it.
Do so by clicking the Open file button.
It is located on the OfficeSetup.exe item on the downloads bar of the browser (Figure 2).
After you click it, the installer will start downloading your apps.
Figure 2 - Open Microsoft Office installer
Wait for the download process
Now the installer is downloading and installing all the Office premium apps.
You will be able to use: Word, Excel, PowerPoint,
Outlook, OneNote, Teams and Access with this
package. (Figure 3) You have nothing to do here, just wait for the installer to
finish the installation process.
Figure 3 - Installation process
Close the installer
Your install is finished when you see the phrase, "You're all set! Office is installed now"
and an animation plays to show you where to find Office applications on your computer. Select Close Figure 4.
Now you can start using all the Office apps on your computer.
Figure 4 - Installation finished
Open Access
To open Microsoft Access app, open the Start menu and start searching for
the Access icon. The other method is to open the Start menu and start
typing 'Access'. (Figure 5) Now the Windows will search for the Access app and find it.
Click the icon to open the app and start working.
Figure 5 - Open Microsoft Access
Open a blank database
Now you have the Access app opened. You can start managing
databases and create queries with it. (Figure 6) The application
will be able to handle multiple databases and can be connected to a database
server. It also can be connected to the Ozeki SMS Gateway.
Figure 6 - Create new database
Final thoughts
Now, you can pause and catch your breath.
We did our very best to make it simple and to walk you through all the details
as painlessly as possible.
By following the above instructions, you can create the solution quickly. Now
you can use the Office 365 to manage and create databases. You have seen the
advantages it can bring.
If you have already completed the steps, I am sure, if you let your boss know,
you will be rewarded.
If you would like to get to know more interesting facts about the benefits of
other similar solutions, please open ozeki-sms-gateway.com.
I hope this guide will be useful to all the readers and especially to beginners.
Before you start to configure your database connection in Ozeki 10 SMS Gateway,
you need to create two database tables in the Microsoft Access 365: "ozekimessagein" and "ozekimessageout".
From this guide you can learn how these tables should be created. This guide is aimed at beginners.
The process will take about 10 minutes to perform.
Don’t waste any more time. Let’s create the databases now.
What is Access 365?
Access 365 is a widely used information management tool. Its most frequent usage is information storage, report and analysis making.
What is a table in Access?
A table is an object in a database. It is used to store data. A table has records (rows) and fields (columns).
How to create table structures in Access 365?
Int this video, you will learn about the process of creating tables.
It will start with a blank database and will end with two finished tables.
You will learn how to create tables and how to configure it.
The video is only a little longer than 2 minutes and very detailed.
You will have no problem following this step-by-step tutorial.
This guide is for beginners, you don't need and previous knowledge of the topic to complete the process.
Create the first table
After opening a blank database file, click the View button in the upper left corner to switch to the Design view of the table.
A window will appear where you need to enter the name of the table. In this case, it will be ‘ozekimessagein’ (Figure 1).
After this step, you will be able to design the ‘ozekimessagein’ table.
Figure 1 - Change table to design view
Enter the field names
Now, modify the new blank table. Complete the field names column as seen on Figure 2.
Make sure to complete it precisely so the Ozeki SMS Gateway can work with it.
The first row in the column should be the ID with the AutoNumber data type.
Every other datatype will be Short Text from here.
The second row should be named sender, then receiver, msg, senttime,
receivedtime, operator, msgtype and reference.
Be sure to not make any typing mistake.
Figure 2 - Create ozekimessagein table
Save the table
Now you have this table finished. All you have to do is save the settings of the table.
You can save the table settings by right-clicking on the table name as you can see in the Figure 3.
This way the table will be stored on your computer, and you can start using it with the Ozeki SMS Gateway.
Figure 3 - Save database table
Create the second table
You need a second table for the message you wish to send. This table will be used as an outgoing messages table.
Create a new table by opening the Create tab page (Figure 4). There, you will find the Table button.
Click it to open the table creator.
There you will be able to modify the new table.
Figure 4 - Create new table
Name the second table
Click the View button in the upper left corner to switch to the Design view of the table.
A window will appear where you need to enter the name of the table. In this case, it will be ozekimessageout (Figure 5).
Click the OK button if you finished. This way the table will be stored on your computer, and you can start working with it.
Figure 5 - Change new table to design view
Enter the second table field names
Here, you need to enter the Field Names similarly to the other table. ID with AutoNumber data type and
sender, receiver, msg, senttime,
receivedtime, operator, msgtype, reference with Short Text data type.
The only difference here is that you should add a new row called status with the Short Text data type (Figure 6).
This way, the table will be suitable to use as the ozekimessageout table.
Figure 6 - Create ozekimessageout table
Save the final database
Now you are finished with the database.
You can now save the database and start working with it.
To do so, open the File tab page and find the Save As button located on the left-side panel.
Click it and you will see a Save Database As button.
Click it to save the database to a custom directory.
Choose a directory and save the database.
Now you are finished with the tutorial.
Figure 7 - Save database file
Conclusion
Congratulations, you are finished with this tutorial about creating tables in
Access 365. We did our very best to make it simple and to walk you through all
the details as painlessly as possible.
Now you are capable of creating tables with the correct data type.
Worth noting, that if you wish to use the database for messaging, the best
solution is to use it with the Ozeki Sms Gateway,
which is a very powerful gateway software capable of sending up to 1000 SMS
per second.
You can also track your SMS traffic and the cost of it.
If you wish to know more about the Ozeki SMS Gateway application,
visit the ozeki-sms-gateway.com
page where you can learn about the full potential of the gateway.
I hope this guide will be useful to all the readers and especially to
beginners.
You will see detailed information on this page to show how to send and receive SMS messages with Microsoft Access 365 database tables.
Please follow these steps and screenshots to configure the connection to perfectly read lines from the outgoing message table and
paste lines to the incoming message table. The default table names are 'ozekimessagein' and 'ozekimessageout'.
On the previous page you might have
read how to connect to the Access 365 database and set the SQL statements, but on
this page you can see it from the aspect of your Microsoft Access database. At the bottom of
this page, you can see how to send and receive messages with simple examples.
This example contains a database which you can download from here:
ozeki_database.accdb
What is Access 365?
Access 365 is a widely used information management tool. Its most frequent
usage is information storage, report and analysis making.
How to send SMS from Microsoft Access 365 (Video tutorial)
In this video, you will learn about the process of sending SMS messages from Access 365.
It will start with opening the previously created database and will take you all the way to reading your incoming messages.
You will learn how to configure the connection settings and how to test your solution.
This video is only 2:27 long but it contains all the information you need to finish the project.
We are using the Ozeki SMS Gateway application in this tutorial which offers a very intuitive user interface,
so you will have no problem with completing the tutorial.
How to connect SMS Gateway to Access database
After you have downloaded 'ozeki_database.accdb', please place it to a selected folder.
In this tutorial it has been saved to the C:\Ozeki\ folder (Figure 1) Although you can save it to any other location.
Please memorize the file's location. Later on, you will have to use this path in the connection string.
You can check the path from the 'File Explorer' (Figure 1). The file is an Access 365 database file.
Figure 1 - Database file in the file system
'ozekimessagein' table
Just before you start configuring your database connection, please make sure that the 'ozekimessagein' table is created
on your computer. On the previous tutorial page,
we discussed the process of creating the 'ozekimessagein' and the 'ozekimessagout' table.
Make sure to check it if you have yet to create the tables.(Figure 2).
Figure 2 - Ozekimessagein table structure
'ozekimessageout' table
On figure 3, you can see the 'ozekimessageout' table.
Make sure that this table is also created on your computer.
Without the two tables, the system will not work.
These tables are responsible for storing your incoming and outgoing messages.
Figure 3 - Ozekimessageout table structure
Configure the connection settings
It is assumed that you have already created the Database User.
The Database User can be installed on your Ozeki SMS Gateway.
Keep in mind to change the 'Data Source=' parameter to the location of 'ozeki_database.accdb' (Figure 4).
Figure 4 - Configure database connection
If you wish to use Microsoft Access to send and receive messages, the next step is very important because, without it,
Select queries will not work.
Switch to the 'Sending' tab page and remove the apostrophes (' ') around $id (Figure 5).
Figure 5 - Modify SQL queries
Testing the configuration
When testing, you should use both tables. The one which was created for incoming messages and the one which was created for outgoing messages.
In these examples these tables are called 'ozekimessageout' and 'ozekimessagein'.
To test the configuration, you should INSERT a message record into the outgoing messages table (Figure 6),
which is called 'ozekimessageout' in the current example. These messages can be SELECT-ed (polled) by configuring the Database User here:
'SQL for sending' tab page and 'Polling' sub-tab page. Please search these
options in the SMS Gateway's browser GUI.
Figure 6 - Insert message into ozekimessageout table
Check the sent folder
The 'status=' parameter of the message record will change from 'Sending' to 'Sent' to 'Delivered'.
The sent message will be visible in the Database User's Sent folder (Figure 7), with all the previously sent messages.
You can get more information about all the messages here, such as the recipient's address and the time of sending.
Figure 7 - Message sent
Review the Events tab
If an incoming message log event is displayed in the Database User's event log (Figure 8),
the message entry will be INSERT -ed in the incoming message database table. The INSERT statement can be configured in the
'SQL for receiving' tab page of this Database User's configuration panel. This is the statement which INSERT-s incoming messages.
Figure 8 - Incoming message
Execute the select query
In this example the incoming message table is called 'ozekimessagein'. This is where those SMS messages
are INSERT-ed, which are received by the Database User.
You should run a SELECT statement on it (Figure 9) to read all of the messages (Figure 10).
Figure 9 - Select messages from ozekimessagein
The result of the query
All of the incoming messages can be read after running a SELECT query on 'ozekimessagein' (Figure 10).
You can see all the important information about the messages in the result field of the query located at the bottom of the window.
You can find out the receiver, the message, the time of sending, and the operator which sent the message.
Figure 10 - Received messages in the database
To sum it up
Congratulation, you are finished a tutorial about how to use Access 365 to send SMS messages.
By following the directions above, you can now create a solution that can be used to make your SMS sending system more efficient.
Worth noting that by using the Ozeki SMS Gateway,
you can provide an SMS service to your customers, employees, or business applications,
and it can help you control the messaging activity of these users.
If you wish to use the Ozeki SMS Gateway at its full potential, we advise you to visit
the ozeki-sms-gateway.com page, where you can read all our tutorials.
I hope this article will be helpful to all the readers and especially to beginners.
The connection between Oracle Database and Ozeki SMS Gateway is a perfect solution for SMS messaging.
Ozeki SMS Gateway's Database User makes sure that incoming SMS messages can be inserted while outgoing SMS messages can
be selected from database tables. Incoming and outgoing messages are handled in separate tables.
The solution uses the Ozeki SMS Gateway software installed on your PC. This solution is divided into 4 sections:
Oracle is a database management software product that works with the collection of data treated as units.
How to receive SMS with Oracle database
This SMS receiving system makes it possible to receive
SMS using an Oracle Database Server. This arrangement consists of a
phone that will be used to send messages, a computer with Ozeki
SMS Gateway installed, a database server, and your application.
The method works the following way: The phone sends the message.
The computer with the Ozeki SMS Gateway will save the message
in an Oracle Database Server.
Your application could get the messages using an SQL Query. (Figure 1)
Figure 1 - How to receive SMS with Oracle database
How to send SMS from Oracle database
This SMS sending system makes it possible to send SMS using
an Oracle Database Server. This system consists of a phone
that will be used to collect the messages from the database,
a computer with Ozeki SMS Gateway installed, a database server,
and your application. The procedure works the following way:
Your application will send the message to the Oracle Database Server.
It will store your message and the Ozeki SMS Gateway
will be able to acquire it using an SQL Query.
The message will be sent to the phone after it was acquired. (Figure 2)
Figure 2 - How to send SMS from Oracle database
SMS from/to Oracle (Video tutorial)
In this video, we are going to show you how you can send SMS messages from Oracle.
The video will start with logging into the Oracle system and will end with an SMS sent by Oracle listed
in the 'Sent' folder of the Ozeki SMS Gateway. You will learn how to log in to the Oracle system,
how to create the connection between Oracle and Ozeki SMS Gateway, and how to modify the connection.
The 2:13 long video is easy to understand and detailed. We are using the
Ozeki SMS Gateway in most of the video, which means you will work with an intuitive user interface.
You will have no problem with following the steps.
Create ozekidb tablespace
On Figure 1, you can see how you can create the table in Oracle,
that will work with the Ozeki SMS Gateway. Execute the 'Create Tablespace' command that you can found below,
in the 'Oracle SQL statements' section of this tutorial.
It will start the table creating process with the settings provided
in the ozekidb.dbf file.
If you see the Tablespace created text, the process was successful.
Figure 1 - Create ozekidb tablespace
Create a user
To use the connection, you need to create a new user in Oracle.
Figure 3 shows you what commands create the user.
You first need to use the 'Create user' commands that you can found below,
in the 'Oracle SQL statements' section of this tutorial.
You can create the user by giving the 'CREATE USER ozekiuser' command to Oracle.
Now that you have the user, you need to provide DBA privileges to it.
You can do so with the 'GRANT command'
If you see the Grant succeeded text, the process was successful.
Figure 3 - Create ozekiuser
Create the 'ozekimessagein' table
The next step is to create the tables that will be used to store your incoming and outgoing messages.
The first table you need to create is the 'ozekimessagein' table.
On Figure 4, you can see what command you need to provide to Oracle to create your table.
The commands you need to execute can be found in the statements section, in the 'Create Tabel' section.
If you can see the 'Trigger created' text, the process was successful.
Figure 4 - Create ozekimessagein table
Create the 'ozekimessageout' table.
On Figure 5, you can see the process of creating the 'ozekimessageout' table.
It will store all the messages you wish to send and all the sent messages as well.
You can find the SQL statement you need to provide in the second part of the 'Create table' section below.
Figure 5 - Create ozekimessageout table
Create an SQL messaging application interface
Now you need to start working in the Ozeki SMS Gateway application.
Open it and search for the 'Add new user/application..' button located on the
left side of the home page (Figure 6). Click it and it will take you to the user/application install list.
Here, you need to search for the 'SQL messaging' list item, located in the 'Application Interface' section.
Click the blue Install button next to it and start the setup process.
Figure 6 - Select SQL messaging
Click the Install button next to Oracle
In the Install user/application step, you need to choose which SQL database management
software you wish to use with the Ozeki SMS Gateway. In this case, choose the Oracle option (Figure 7).
Click the blue Install button next to the title and start the setup process.
Figure 7 - Click on Install button of Oracle connection
Provide the connection settings
In the General tab of the new Oracle application interface, you will
see a 'Connection Settings' group box (Figure 8).
Provide the IP address and the login credentials of the data source here.
It will make sure that the connection between the Ozeki SMS Gateway
and the Oracle database management system will be established.
Figure 8 - Provide details of Oracle database kapcsolat létrehozva
Turn on the Application interface
Now that you have successfully created an SQL Application interface,
it is time to turn it on, by switching the 'Connection' switch button.
If it is green and you can see a checkmark next to the icon of the application interface (Figure 9),
it means that the connection is active. You will see the initialization process in the Events tab.
Figure 9 - Enable Oracle database connection
Use the 'INSERT' statement
On Figure 10, you can see how you insert a message into the 'ozekimessageout' table.
It means that the inserted message will be sent by the Ozeki SMS Gateway application,
with any message found in the 'ozekimessageout' table.
The INSERT statement will create a database item with the properties determined in the statement.
If you are familiar with SQL, feel free to modify the properties of the statement to test your system.
Figure 10 - Use INSERT statement to send message
The Sent message
Now you have sent your first SMS message. Make sure to check the Sent folder in Ozeki SMS Gateway
to confirm that the message was sent successfully. You can get all information about the message
from the list of the sent messages. You can see the text of the message (Figure 11),
the time it was sent, the result of the process, and the addresses of the sender and the receiver.
Figure 11 - The Sent folder stores each sent message with details
You can choose from a wide variety of options to send and receive SMS messages.
You can send messages through a wireless mobile link, by using an Android mobile phone or an
SMS modem attached to your computer.
You can also send SMS messages over the Internet using in IP SMS service. In this case you will likely setup
an SMPP, CIMD2 or UCP/EMI service provider connection.
To use either of these connection methods, you need to setup a Database link on Ozeki SMS Gateway. For Oracle connections, you
need to configure this link to connect to your Oracle Database server. You will need to use a connection string to
specify the connection details.
Each Database Connection needs its own Database User.
The Database User belonging to an Oracle Database has the following connection string format:
Connection string type:
Oracle
Connection string:
Data Source=127.0.0.1; User ID=username;
Password=pwd123;
In the connection string the 127.0.0.1 IP address should be replaced
with the IP address of the machine where Oracle Database server is running
and do not forget to use the login credentials belonging to your Oracle Server's account.
By including 'Unicode=True' to the connection string, you can use unicode characters like NVARCHAR2.
Make sure that NLS_CHARACTERSET and NLS_LANGUAGE parameters are set to your language.
You can also try to set HKEY_LOCAL_MACHINE\SOFTWARE\ORACLE\HOMEID\NLS_LANG registry key to UTF8.
Now the connection should be configured between Ozeki SMS Gateway's Database User and your Oracle Server,
so it is time to create two database tables both for incoming and outgoing message by creating a proper database table structure:
CREATE USER ozekiuser
IDENTIFIED BY ozekipass
DEFAULT TABLESPACE ozekidb;

GRANT DBA TO ozekiuser;
Figure 2 - Create user 'ozekiuser' and grant access to tablespace
CREATE TABLE:
CREATE TABLE ozekimessagein (
    id int,
    sender varchar(255) default NULL,
    receiver varchar(255) default NULL,
    msg varchar(160) default NULL,
    senttime varchar(100) default NULL,
    receivedtime varchar(100) default NULL,
    operator varchar(120) default NULL,
    msgtype varchar(160) default NULL,
    reference varchar(100) default NULL
    );
CREATE index index_id1 ON ozekimessagein(id);
CREATE SEQUENCE X;
CREATE TRIGGER ozekimessagein_auto BEFORE INSERT on ozekimessagein
    for each row
    when (new.id is null)
    begin
    SELECT x.nextval INTO :new.id FROM DUAL;
    end;
    /
CREATE TABLE ozekimessageout (
    id int,
    sender varchar(255) default NULL,
    receiver varchar(255) default NULL,
    msg varchar(160) default NULL,
    senttime varchar(100) default NULL,
    receivedtime varchar(100) default NULL,
    operator varchar(120) default NULL,
    msgtype varchar(160) default NULL,
    reference varchar(100) default NULL,
    status varchar(20) default NULL,
    errormsg varchar(250) default NULL
    );
CREATE index index_id2 ON ozekimessageout(id);
CREATE SEQUENCE Y;
CREATE TRIGGER ozekimessageout_auto BEFORE INSERT on ozekimessageout
    for each row
    when (new.id is null)
    begin
    SELECT y.nextval INTO :new.id FROM DUAL;
    end;
    /
Figure 3 - Create table structure
The 'id' field should be maintained to support faster SQL updates.
The size of the message can be set higher than 160 character if it is necessary.
The 'msgtype' field can also be changed.
To sum it up
Congratulations, you have completed this task of connecting Oracle to the Ozeki SMS Gateway. Be proud of yourself!
Now you can set up a system where you can use Oracle to send SMS messages through Ozeki SMS Gateway.
This gateway software is a powerful yet, easy-to-use software mostly used by the industry because of its outstanding reliability.
If you wish to learn more about the software solutions that Ozeki offers, make sure to visit ozeki-sms-gateway.com.
Using SMS to quickly reach clients may significantly improve engagement and service
delivery. SMS, which is known for its direct and rapid impact, turns into a useful
tool for companies looking to increase engagement and deliver top-notch service.
To enable effective SMS communication, we provide clear guidance on how to easily
connect Oracle with the Ozeki SMS Gateway. With this connection, you have the
ability to fully leverage the power of SMS communication.
What is Oracle database?
Oracle Corporation created Oracle Database, a complex and effective relational
database management system. It serves as the foundation for many corporate applications
because of its ability to effectively store, handle, and retrieve structured data.
Data formats such as relational, object-relational, and XML are supported by Oracle
Database, which also offers advanced features including data integrity, security,
scalability, and high availability. It is frequently used in enterprises for purposes
ranging from data warehousing and analytics to online transaction processing.
How to send SMS from Oracle on Windows 11 (easy to follow)
To send SMS from Oracle on Windows 11
Download and install Oracle Database XE from the https://www.oracle.com/ website
Create database schema
Access your Ozeki SMS Gateway account
Configure Oracle database connection
Connect Ozeki SMS Gateway to Oracle database
Send test message
Track message status
Enjoy SMS sending from Oracle with Ozeki
Install Oracle database
In this video, we will show you how to install the Oracle database on your computer
to be able to connect to the Ozeki SMS Gateway. Installing the Oracle database
involves a series of steps that require careful attention to detail. First, download
the Oracle Database Installer. Go to the official Oracle Technology Network website,
then download the appropriate installer for the Oracle Database version you intend
to install. Locate the downloaded installer file and run it. When the installation
process is done, click on the "Finish" button.
Create database schema
Creating a database schema involves defining a logical container within your Oracle
database where you can organize and store database objects such as tables, views,
indexes, and other database-related structures. Use a SQL client tool, like SQL
Plus, to connect to your Oracle Database instance using a valid username and
password with administrative privileges. Create tablespace, alert session, create
user, grant DBA to user, disconnect, then enter username and password to connect.
Now that you're connected as a user, you can start creating database objects within
the schema. Create a table, create sequence x, and then create a trigger. As the
schema owner, you can manage and modify the objects within the schema as needed.
Connect Ozeki SMS Gateway to Oracle database
Connecting the Ozeki SMS Gateway to an Oracle database involves setting up communication
between the two systems to enable sending and receiving SMS messages through the
Ozeki SMS Gateway based on data stored in the Oracle database. Open Ozeki SMS
Gateway, then click on the "Add user or application..." link. At the list of
install links, choose the "SQL messaging" option to use a database to send or
receive SMS. Select the "Oracle database" server that allows you to message from
your database system. Configure the database connection by entering some essential
details into the fields and turning the switching button green.
Send test message
Click on the "SQL" tab in the Ozeki SMS Gateway Oracle client, then insert a query
that includes the necessary information for sending the SMS, such as recipient phone
numbers and message content, from your Oracle database. Open the "Sent" menu to see
the sent messages. After sending the message, you are able to see the status of the
message in the Ozeki SMS Gateway "Sent" interface.
FAQs
How to send SMS from Oracle to any mobile number?
Your application is designed to transmit the message to the Oracle Database Server,
where both your message and its data will be retained. The Ozeki SMS Gateway can
then retrieve this information through an SQL Query and subsequently forward the
message to the designated phone number once it has been retrieved.
How to send SMS in plsql?
To send SMS in PL/SQL, you can utilize the UTL_SMTP package to connect to an SMS
gateway service via SMTP and send SMS messages programmatically. Construct the
message content and recipient number, then use UTL_SMTP to establish a connection
to the SMS gateway and send the message. Be sure to configure the necessary SMTP
server and credentials for successful delivery.
What is Oracle SMS?
The Oracle database ecosystem has a feature or capability called Oracle SMS,
commonly referred to as Oracle Short Messaging Service, that enables the sending
and receiving of SMS (Short Message Service) messages directly from and to the
database. This technology enables SMS communication to be smoothly integrated into
Oracle database-powered applications, allowing alerts, notifications, and user
communication through text messages.
How to use SMS API?
You must first register with an SMS service provider and get API credentials,
such as an API key or authentication tokens, before you can use an SMS API. Making
HTTP calls to the API endpoints, often via POST requests, is the next step in
integrating the API into your application. When using the service provider's platform
to programmatically send SMS messages, you can provide other parameters in the
request payload in addition to the recipient's phone number and message content.
Summary
By following these steps and using the Oracle client within the Ozeki SMS Gateway,
you can effectively send test messages using data from your Oracle database and
monitor their status through the Ozeki SMS Gateway interface. With this integration,
you're equipped to use your Oracle database's capabilities, improve your communication,
and send messages easily through the Ozeki SMS Gateway.
You can use these alternative connection strings to connect to your Oracle Database.
These are useful if you have a connection problem or if you use another driver for example ODBC or OLE DB.
.NET Oracle connection providers
Standard Security:
Connection string type:
Oracle
Connection string:
Data Source=MyOracleDB; User Id=myUsername;Password=myPassword;
Trusted Connection:
OS Authenticated connection ('Id=/'):
Connection string type:
Oracle
Connection string:
Data Source=MyOracleDB;User Id=/;Password=;
OS Authenticated connection using OSAuthent:
Connection string type:
Oracle
Connection string:
Data Source=MyOracleDB;OSAuthent=1;
ODBC Driver for Oracle
Using the current ODBC driver from Microsoft:
Connection string type:
ODBC
Connection string:
Driver={Microsoft ODBC for Oracle};Server=OracleServer.world; Uid=MyUsername;Pwd=MyPassword;
Using the older ODBC driver from Microsoft:
Connection string type:
ODBC
Connection string:
Driver={Microsoft ODBC Driver for Oracle};ConnectString=OracleServer.world;Uid=myUsername;Pwd=myPassword;
OLE DB Provider for Oracle
Standard Security:
Connection string type:
OLE DB
Connection string:
Provider=OraOLEDB.Oracle;Data Source=MyOracleDB; User Id=myUsername;Password=myPassword;
Info: Please provide the 'Data Source=' a Net8 name which uses a standard naming method
like Local Naming or Oracle Names. Local Naming is the alias in the tnsnames.ora file. The Oracle Name is the Net8 Service name.
Here you can see how to send SMS text messages from Oracle Express with your Ozeki SMS Gateway,
which you have probably already downloaded and installed.
This tutorial shows you a solution on how to configure Ozeki SMS Gateway to detect and send outgoing messages from your database
to any mobile phone.
You can find a detailed configuration instruction on this page with screenshots that will help you.
Ozeki SMS Gateway is a powerful SMS gateway software that allows two-way SMS message communication
from mobile phones to PC and vice versa.
The messages can be stored on a database, such as an Oracle Server.
In this tutorial, you will create an 'ozekimessagein' and 'ozekimessageout' table,
but you could give them any name you would like. The only thing is that you need to keep in mind the table names.
Ozeki SMS gateway will use SQL queries on the 'ozekimessageout' table to send message.
You can connect Ozeki SMS Gateway to the GSM network in two way:
Here you can read how to configure Ozeki SMS Gateway with
browser GUI.
Step 1 - Configure the Oracle database
The first step of this guide is to configure an Oracle database. For that, first,
you need to install Oracle to your computer and log into the server's web interface (Figure 1).
Figure 1 - Log into Oracle
In the main menu of the Oracle Database Express application, you need to select the
SQL option the configure the Oracle database, so just click on its icon as you
can see it in Figure 2.
Figure 2 - Click on 'SQL'
Next, you need to click on the 'SQL Commands' as Figure 3 demonstrates it to be able to
execute SQL commands in your Oracle database.
Figure 3 - Click on 'SQL Commands'
Please copy-paste the following SQL statements to
create the table layouts (Figure 4-11).
CREATE TRIGGER ozekimessagein_auto
BEFORE INSERT on ozekimessagein
for each row
when (new.id is null)
begin
SELECT x.nextval INTO :new.id FROM DUAL;
end
CREATE TRIGGER ozekimessageout_auto
BEFORE INSERT on ozekimessageout
for each row
when (new.id is null)
begin
SELECT y.nextval INTO :new.id FROM DUAL;
end
Figure 11 - Copy-paste CREATE TRIGGER statement
Congratulations! You have finished creating your database structure.
Step 2 - Create the Oracle database connection
The next step of the guide is to create the Oracle database connection which can
connect to the database and handle its tables. For that, open SMS Gateway and first,
select the Apps menu from the toolbar. In this menu, you need to scroll down to the
'Application interfaces' section, and here, like in Figure 12, just click on the install button of
'SQL messaging'.
Figure 12 - Click 'Add new user or application...'
The 'SQL messaging' menu contains all types of database connections available in
SMS Gateway. Now, to be able to connect to your Oracle database and its tables, just click on the
Install button of the Oracle database connection as you can see it in Figure 13.
Figure 13 - Click on the 'install' button next to 'Database' user
Next, you need to provide some details to be able to connect to the database
successfully. First, just give a name to the connection. After that, as in
Figure 14, provide the details of the Oracle database. The 'Data source' id the
IP address of the place where you installed the database. If it is on the same computer,
you can type '127.0.0.1' in this field. The 'User id' and 'Password' fields should
represent your Oracle database user account. If you finished, you could just click OK.
Figure 14 - Provide a name for your Database User
Step 3 - Send a test SMS
To test the database connection and the database itself, just open the created
Oracle database connection. Here, you can see the SQL tab (Figure 15) where you
can write the SQL commands that you want to execute. So, just copy-paste the
SQL command below, write a valid phone number as a value and click 'Execute'
to test the connection.
INSERT INTO ozekimessageout
(receiver, msg, status)
VALUES
('+36205460691','Hello','send')
Figure 15 - Execute the INSERT statement to create a new message record
The Oracle database connection is capable of reading the rows of the create tables,
and if it detects a new message, it sends the message to the phone number that you
provided as a value. Then, the message stored in the Sent folder of the connection
as you can see it in Figure 16.
Figure 16 - Message have been placed into the 'Sent' folder
You can check every message in the 'ozekimessageout' table by executing the SQL
query below. This command lists every message with all its details like the phone
number of the recipient, the message and the status of the message as Figure 17
demonstrates it.
Oracle is a database management product, which is used not only to store data, but effectively manage,
and provide it to other industry-standard software. It works great with the Ozeki SMS Gateway software,
but you will need to install it on your computer.
This guide will help you with that. It is a very easy process, it should not take
more than 15 minutes, depending on your internet connection.
Please jump to the next video or if you scroll down
you can find screenshots that describe how to download and install
Oracle Database 18c Express and how to set the port numbers and SYSTEM password.
The first thing you want to do, is to install the Oracle 18c Express Edition on your computer.
Please head over to oracle.com/downloads, and search for the Database 18c Express Edition download link.
If you have found it, proceed to the next step. You can see the download page on Figure 1.
You are now on the download page of the Oracle Database Express Edition.
The software is capable of running on Windows, and Linux,
so it has two version. Make sure to download the Windows x64 edition.
To see where to click, please look at Figure 2.
To have a copy of the software on your computer, you need to accept the Oracle License Agreement.
Without it, you will not be able to download the required files.
Tick in the box for accepting the License Agreement and click the Download OracleXe184_Win64.zip button.
You can see the tick box and the button on Figure 3.
In order to download the files, you need to sign in to your Oracle account.
To do that, please provide your username and your password into the appropriate field.
If you do not have an Oracle Account, you can create on for free with
the Create Account button down below. You can find these on Figure 4.
Press the sign in button to proceed.
Now, your browser should start the process of downloading all the required files.
You can watch the download status on the bottom of your browser window, as you can see on Figure 5.
Figure 5 - Downloading
Now you need to find the files, your browser downloaded for you. The default
location for the chrome downloaded files is C:\Users\username\Downloads.
You can get to the downloads folder using chrome’s downloads tab.
You can see the files you need to search for in Figure 6. The files are in a compressed format, you need to extract them.
To do that, please right-click the downloaded folder, and from the options, select the Extract all option.
Figure 6 - Extract the downloaded file
Now that you have the files extracted, search for the installer file. It is
the Oracle Database 18c Express Edition executable file.
Click on it twice to start the installer. Now we will guide you through the
setup process in the following steps.
You can see the file you are looking for on Figure 7.
Figure 7 - Open the installer
Now you have started the Installation. Click the Next button the proceed to the next step. You can see the first page of the installation on Figure 8.
Figure 8 - Installation
To have an official copy of the software, you need to accept the license agreement of the Oracle database.
Simply pick the “I accept” option and click “Next”.
You can print of a copy of the license agreement if you want with the “Print” button. You can see the license agreement on Figure 9.
Figure 9 - Accept license agreement
Now you can choose where to install the Oracle Database software. You could choose any destination you wish,
just make sure that you have enough free space in the destination.
You can change the place using the Change… button. You can see the window on Figure 10.
Figure 10 - Choose destination folder
Now you can choose a strong password for the main accounts. Make sure to choose a
Database password that you will remember and type it in the first and the second textbox.
The second textbox is making sure you have no misspell in the password.
Make sure that only those know the password who should have access to the databases.
Click Next if you have a good password. You can see the textboxes on Figure 11.
Figure 11 - Specify SYSTEM database account's password
Now you have everything ready, you can start the installation progress.
Please click the “Install” button to start the installation itself.
The installer will start to set everything up. You can see the button on Figure 12.
Figure 12 - Click the 'Install' button
Now all you need to do is wait for the installer to finish the process of installation.
As you can see on Figure 13, you get a process indicator bar,
which can be used to check the installation progress. If it is filled with green,
it means that you have a working copy of the software. You can see the progress indicator bar on Figure 12.
Figure 13 - Wait until the installation is finished
If you see the window you can see on Figure 14,
it means that you have a working Oracle Database software. Please click on Finish button. It will close the installer. You can now open the software.
Figure 14 - Oracle 18c Express's installation has been finished
In this video series you can see how to connect Ozeki SMS Gateway and Oracle
SQL database server for SMS messaging.
This video shows how to create the proper database table structure by using
Oracle SQL through its command line.
Video content
1. Connect to Oracle
2. Copy CREATE TABLE statement
Please scroll down to copy the SQL statements Figure 2-4 used in the video. If you have created the database in Oracle 11g Express,
you can jump to the next video.
If you have the Oracle SQL, you need to connect it to the Ozeki SMS Gateway.
To do that, you will need to have some tables, which you now will create.
First, please run an SQL Command Line. Type in “connect”.
Now you will need to provide the user-name and the password, which you choose during the installation procedure.
If you are connected, please proceed to the next step.
Figure 1 - Connect to the Oracle database and create ozekidb database
Oracle SQL statements to copy:
This code snippet will create a suitable tablespace for your SQL database. Copy the code, paste it into the SQL Command Line and hit enter.
This code snippet will create a user, which will have access to the database and permission to modify it.
Copy the code and paste it into the SQL Command Line just as you did before
CREATE USER:
ALTER SESSION SET "_ORACLE_SCRIPT"=true;
CREATE USER ozekiuser
IDENTIFIED BY ozekipass
DEFAULT TABLESPACE ozekidb;
GRANT DBA TO ozekiuser;
Figure 4 - CREATE USER ozeki and GRANT database access TO ozeki
This code will create the table, all the data fields in it, the index, the sequence,
and the trigger needed for the database table to function. Copy the code and run it in the SQL Command Line.
CREATE TABLE:
CREATE TABLE ozekimessagein (
id int,
sender varchar(255) default NULL,
receiver varchar(255) default NULL,
msg varchar(160) default NULL,
senttime varchar(100) default NULL,
receivedtime varchar(100) default NULL,
operator varchar(120) default NULL,
msgtype varchar(160) default NULL,
reference varchar(100) default NULL
);
CREATE index index_id1 ON ozekimessagein(id);
CREATE SEQUENCE X;
CREATE TRIGGER ozekimessagein_auto
BEFORE INSERT on ozekimessagein
for each row
when (new.id is null)
begin
  SELECT x.nextval INTO :new.id FROM DUAL;
end;
/
CREATE TABLE ozekimessageout (
id int,
sender varchar(255) default NULL,
receiver varchar(255) default NULL,
msg varchar(160) default NULL,
senttime varchar(100) default NULL,
receivedtime varchar(100) default NULL,
operator varchar(120) default NULL,
msgtype varchar(160) default NULL,
reference varchar(100) default NULL,
status varchar(20) default NULL,
errormsg varchar(250) default NULL
);
CREATE index index_id2 ON ozekimessageout(id);
CREATE SEQUENCE Y;
CREATE TRIGGER ozekimessageout_auto
BEFORE INSERT on ozekimessageout
for each row
when (new.id is null)
begin
  SELECT y.nextval INTO :new.id FROM DUAL;
end;
/
Figure 5 - CREATE TABLE ozekimessagein and ozekimessageout
All you need to do, is to copy all the code snippets from above and paste it in order of the tutorial.
You can do it, by highlighting the whole code part,
and press “CTRL+C”, then paste it into the SQL Command Line by hitting “CTRL+V”. You can see the procedure on Figure 6.
Figure 6 - Copy SQL statements
Run all of them and you will have a working database table, which can communicate with the Ozeki SMS Gateway.
You can see all the codes pasted and executed on Figure 7 and 8.
Figure 7 - Paste the statements and run them to create ozekimessagein table structure
Figure 8 - Paste the statements and run them to create ozekimessageout table structure
In this video series you can see how to connect Ozeki SMS Gateway and Oracle
SQL database server for SMS messaging.
This video shows how to install an Oracle database connection on Ozeki SMS Gateway.
Video content
1. Open SMS Gateway
2. Create Oracle connection
3. Configure Oracle connection
If you have created the database in Oracle 19c Express,
you can jump to the next video. Although you can
precisely examine the sequence by looking through the screenshots.
The first step of configuring the Ozeki SMS Gateway to work with Oracle,
to login to Ozeki 10. You can do this by providing your username and password,
and click the “OK” button. You can see the login window on Figure 1.
Figure 1 - Login to Ozeki 10
Next, you have to configure the SMS Gateway. To do that, please launch the application by clicking the icon on the desktop,
called “SMS Gateway”. You can find it with the help of Figure 2.
Figure 2 - Open the SMS Gateway application from Ozeki 10's desktop screen
Here you will find your connection options. Ozeki 10 can handle most application interfaces you can send SMS with. You can build a TXT file, an HTTP client or even an FTP serve to handle your incoming and outgoing SMS traffic.
In this case, please select the SQL messaging, by clicking the “Install” button. You can find your options on Figure 3.
Figure 3 - Select SQL messaging
Here, you can select your SQL Management tool. Ozeki 10 can work with MS Access, MySQL, PostgreSQL. In this case, you need to choose “Oracle”.
Click on the blue “Install” button to start the installation procedure.
You can find more information about the Oracle SQL Management tool on Figure 4.
Figure 4 - Click on Install button of Oracle connection
In this step, you need to name your connection. This name can be anything you like, which will help you identify the connection.
On Figure 5, you can see our example name. Above it, the connection settings will contain the specifications of your connection.
The first field is the data source. It is a factory for connections to any physical data source.
It uses a URL along with some credentials to establish a database connection.
After you have completed the connection settings part, please click the “OK” button to proceed.
Figure 5 - Provide details of Oracle database
Now you are finished with the configuration. All you have to do is switch the connection status option to “On”.
It should be green when it is activated. If you have done that, you are finished. You can find the switch on Figure 6.
This is the last video in this video series which shows how to connect Ozeki SMS Gateway and Oracle SQL database server for SMS messaging.
See how to insert a simple row into the proper table, so Ozeki SMS Gateway can automatically send SMS messages to mobile phones.
Video content
1. Execute SQL command
2. Check sent message
Look at the upcoming screenshots to thoroughly examine the final stage, which is SMS sending.
To test your system, you could send a test message directly from the Ozeki SMS Gateway.
The first step is to look at Figure 1. There you can see a code snippet copied into the field,
where you can execute SQL Statements from. We provide you a copiable code for you, which you
need to paste into the field and execute it. You could modify the code by typing a different
phone number into the VALUE statement, or even a different message.
It will send it to your chosen phone number.
INSERT INTO ozekimessageout (receiver, msg, status) VALUES ('+447951234567', 'test','send')
Figure 1 - Use INSERT statement to send message
After you executed the statement, you could check your outgoing messages. You will see the test message there.
You can see our example test message is sent, on Figure 2. You can see the phone number of the receiver, the creation time of the message and the sender’s address here.
Figure 2 - The Sent folder stores each sent message with details
In SMS communication, it is really important to be able to customize and personalize
your SMS messages. This article will show you how to set up Sender ID in SQL SMS
in Ozeki SMS Gateway. Following this step-by-step guide will allow you to leave
a lasting impression on your audience.
What is a Sender ID?
When an SMS message is received on a mobile phone, the mobile phone displays the
message text and the telephone number of the phone that sent the message. This
telephone number is called the sender address, or sender ID. In some setups the
SMS technology makes it possible for the sender of the message to freely specify
the sender address. When freely specified, the sender's address can be a phone number
or an alphanumeric string.
Sender ID restrictions
Valid characters:
A-Z a-z 0-9;
Length of a numeric Sender ID:
Maximum length of 16 digits
Length of an alpha-numeric Sender ID:
Maximum length of 11 characters.
When can I specify a sender address?
The sender address for an SMS message can only be manipulated if you use an IP
SMS connection, such as CIMD2, SMPP, or UCP to send your SMS messages. Some HTTP
SMS service provider connections also make this possible. If you attach a GSM
phone or GSM modem to your computer, it is not possible to modify the sender
address for outgoing messages. This is not a limitation of the Ozeki SMS software.
It is a limitation of the GSM technology. There is no way to specify the sender
address for messages that are sent from a mobile phone or modem because these
messages are MO (Mobile Originated) SMS messages. For MO messages the sender address
is assigned to the message by the SMSC not the mobile phone.
Discover SMS SQL templates to customize the SQL commands
The SMS gateway uses two database tables, one for receiving messages and the
other for sending them. Messages are inserted into the ozekimessagein table and
ozekimessageout using SQL commands. The following linked page helps you to get to
know about SQL templates for high-capacity SMS sending:
SMS SQL templates to customize the SQL commands.
How to set up Sender ID in SQL SMS (Quick steps)
To set up Sender ID in SQL SMS
Access Ozeki Gateway account
Choose SMPP_client_1
Set an overridable telephone number in the service provider connection
Open SQL connection
Insert message with Sender ID
Send a message with a custom Sender ID
Insert message with alphanumeric Sender ID
Send a message with an alphanumeric Sender ID
Setup process of Sender ID in SQL SMS (Video tutorial)
In this short video, we will guide you on how to set up Sender ID in SQL
SMS in Ozeki SMS Gateway. It is really important to know about Sender
ID, because it allows you to easily engage your audience and leave a lasting
impression on them. To customize your Sender ID, you need to follow the given instructions.
By the end of the video, you will be a master of setting up Sender ID in SQL SMS.
Access Ozeki Gateway account
To begin the process, load your Ozeki SMS Gateway account and log in with your
user details. If you do not have an account yet, download the Ozeki SMS Gateway
from the ozeki-sms-gateway.com website, then create one.
Enter a username and a password that can be used as your login credentials.
After logging in, open the Home page of the Ozeki SMS Gateway. There, choose the
"SMPP_client_1" from the left-handed Connections panel. Click on the "Configure"
tab on the panel, then set the overridable telephone number in service provider connection.
Mark with an "X" symbol the "Overridable" option. After that, click on the "Ok" button
at the bottom.
Figure 1 - Set overridable telephone number in service provider connection
Open SQL connection
You will receive a notification message that your configuration has been successfully
updated. Click on "Ok" to continue. Back off to the Management panel, after
configuration. Find the "mySQL_1" option under the Users and applications.
This will show up the mySQL_1 details page, where you can get information from the
connection.
Figure 2 - Open SQL connection
Insert message with Sender ID
Choose the "SQL" tab on the details page, then opt for the "INSERT INTO ozekimessageout..."
from the drop-down list of options. Insert message with Sender ID to the appropriate
parts of SQL query. After that, click on the "Execute" button.
Figure 3 - Insert message with Sender ID
Send message with custom Sender ID
On the "Events" panel, you will see that your submission has been accepted and the
message status turned "sent". If you open the "Sent" folder, you will see the
details about the message that has been sent previously. You can see the Seder ID,
the recipient's address, the message itself and the date. You can also get information
about the status of the progress.
Figure 4 - Message sent with custom Sender ID
Insert message with alphanumeric Sender ID
To send a message with an alphanumeric Sender ID, open the Management panel again.
Find the "mySQL_1" option under the Users and applications. Choose the "SQL" tab
on the details page, then opt for the "INSERT INTO ozekimessageout..." from the
drop-down list of SQL query options. Insert the message with alphanumeric Sender
ID, then click on the "Execute" button.
Figure 5 - Insert message with alphanumeric Sender ID
Send message with alphanumeric Sender ID
As same as before, on the "Events" panel, you will see that your submission has
been accepted and the message status turned "sent". Opening the "Sent" folder
will show up the details of the message, and you can see that your Sender ID has
changed to an alphanumeric Sender ID.
Figure 6 - Message sent with alphanumeric Sender ID
Summary
If you have followed the given instructions in order, then you have the skills
to set up Sender ID in SQL SMS in Ozeki SMS Gateway. You can now, set up, and modify
both numeric and alphanumeric Sender ID's. Setting up a Sender ID can make
your messages more personal and can impress your customers, by giving them a
long-lasting memory of your SMS messages.
FAQs
How to send SMS through SQL?
Sending SMS through SQL is achievable by integrating your SQL database with an
SMS gateway like Ozeki SMS Gateway. You can use SQL queries to insert SMS messages
directly into the gateway, allowing you to send messages programmatically based
on your database data. This efficient integration streamlines communication and
enables you to automate SMS notifications, alerts, and personalized messages from
your SQL database.
What are SQL templates, and how are they used?
SQL templates are pre-written SQL queries that can be customized and reused for
different purposes. They allow for efficient management of SMS database operations,
including inserting, selecting, and updating messages. In the context of Ozeki
SMS Gateway, SQL templates are used to define the SQL commands for accessing SMS
database tables.
What Are the Benefits of Using Sender ID in SMS Communication?
Sender ID customization in SMS communication offers several advantages.
Sender ID enhances brand recognition, builds trust, and leaves a lasting impression
on recipients, thereby increasing the effectiveness of marketing and communication
efforts. It allows you to personalize your messages by displaying your chosen
sender's name or number.
In this tutorial, you can see how to install and configure the MYSQL database connection and how to
create the recommended database structure.
You can combine Ozeki SMS Gateway with a MySQL database to send, receive and store SMS messages.
The Ozeki SMS Gateway is a powerful SMS gateway software that is capable of
sending 1000 SMS / second, while still managing to run on your computer offering security for your messages and contact.
This article is aimed at users who are familiar with MySQL.
The process itself should not take more than 20 minutes to perform,
with the help of this detailed tutorial. You will learn how to set up a MySQL database, user and give permissions to it.
You will also create a user in Ozeki SMS Gateway. Don't waste any more time. Start sending SMS now!
MySQL is a relational database management system that is based on SQL.
It is widely used due to being open-source and free, but very reliable and fast.
The solution uses Ozeki SMS Gateway installed on your PC.
The Database User of SMS Gateway can easily communicate with your MySQL database
user.
How to receive SMS with MySQL database
This SMS receiving system makes it possible to receive SMS
using a MySQL Database Server. This
arrangement consists of a phone that will be used to send messages,
a computer with Ozeki SMS Gateway installed,
a database server, and your application.
The method works the following way: The phone sends the message.
The computer with the Ozeki SMS Gateway will save the message in a MySQL Database Server.
Your application could get the messages using an SQL Query.
Figure 1 - How to receive SMS with MySQL database
How to send SMS from MySQL database
This SMS sending system makes it possible to send SMS using a MySQL Database Server.
This system consists of a phone that will
be used to collect the messages from the database, a computer with
Ozeki SMS Gateway installed, a database server, and your application.
The procedure works the following way: Your application will send the
message to the MySQL Database Server. It will store your message and
the Ozeki SMS Gateway will be able to acquire it using an SQL Query.
The message will be sent to the phone after it was acquired.
Figure 2 - How to send SMS from MySQL database
SMS from/to MySQL (Video tutorial)
In this video, you will see the process of connecting MySQL to the Ozeki SMS Gateway.
It will start with launching a MySQL Command Line Client and will
take you to send your first message to test your system. In the process,
you will learn how to set up a MySQL database that will be usable and how to
create a new application interface for MySQL in Ozeki SMS Gateway.
The process is easy to do, and the video is very detailed.
Plus, the Ozeki SMS Gateway offers a very intuitive interface,
so you will have no hard time following the tutorial.
Create the database
The first step of the process is setting up a new database.
You can see on Figure 3, the statement that will create the
'ozekidb' database is the following: 'CREATE DATABASE ozekidb;'.
This will create a database that is usable by the Ozeki SMS Gateway.
Figure 3 - Create ozekidb database
Create a user
In the next step, you need to create a user for the 'ozekidb' database.
You can do so with the 'CREATE USER' statement visible on Figure 4.
The next statement will grant privileges to the user and the flush statement
will reload the database and activate the privileges.
Figure 4 - Create ozeki user for database
Create the 'ozekimessagein' table
Now that you have a database, let's create tables in them.
You need two tables to work with the Ozeki SMS Gateway.
The first table you will create is the 'ozekimessagein' table.
It will store all your incoming messages.
It checks periodically for them and stores them in a record in the database.
You can create this table (Figure 5) by simply copy-pasting the MySQL create table script from this tutorial.
You can find the code at the end of the tutorial.
Figure 5 - Create ozekimessagein table
Create the 'ozekimessageout' table
The second table is the 'ozekimessageout' table. It is responsible for storing your sent messages.
If you send a message from the database, this table will store it in a record with all the
information about it. (Figure 6)
You can create both tables by simply copy-pasting the MySQL create
table script from this tutorial.
You can find the code at the end of the tutorial.
Figure 6 - Create ozekimessageout table
Install an SQL messaging user
Now you will start working in Ozeki SMS Gateway. The first thing you need to do is creating
an SQL messaging user. You can do this by opening the Ozeki SMS Gateway application and
searching for the 'Add new user/application...' button (Figure 7). By clicking this button,
you will open the 'Add user or application' install list. Search for the SQL messaging
install list that is located in the 'Application Interfaces' section.
Click the Install button next to it and you will start the installation process.
Figure 7 - Install SQL Messaging User
Choose the MySQL option
In the next install list, you will see all the database management software that
the Ozeki SMS Gateway supports (Figure 8).
In this case, choose the MySQL option, by clicking the Install button next to the title.
It will start the setup process.
Figure 8 - Install MySQL Connection
Provide the connection settings
In the next step, you need to provide the connection settings of the MySQL application interface.
This will make sure that the connection between the Ozeki SMS Gateway and the MySQL client can be established.
Search for the 'Connection settings' group box and provide a hostname, a port number,
the name of the database, and the login credentials for it (Figure 9).
If you have successfully completed the group box, click the 'OK' button.
Figure 9 - Define the MySQL database connection details
Turn on the application interface
Now that you have successfully created a MySQL Application interface,
it is time to turn it on, by switching the 'Connection' switch button.
If it is green and you can see a checkmark next to the icon of the application interface (Figure 10),
it means that the connection is active. You will see the initialization process in the Events tab.
Figure 10 - Enable MySQL connection
Use the INSERT statement
Now you have a working connection between the Ozeki SMS Gateway and MySQL.
You can test your system by sending a test SMS with the help of the INSERT statement.
This will insert messages into the ozekimessageout table,
so the Ozeki SMS Gateway will send the message to the predefined destination (Figure 11).
If you are familiar with SQL, feel free to modify the statement to your liking.
Figure 11 - Insert message to the database table
The sent folder
Make sure to check the Sent folder after the test SMS,
to confirm that the message was sent (Figure 12).
If you see the record of the sent message in the Sent folder,
it means that the system is working as intended.
You can get more information about the test SMS here.
Figure 12 - The Database User's sent folder shows that your message has been sent by Ozeki SMS Gateway
After the connection details are set, it is very important to create the database table structure.
The example database in this tutorial consists of
two tables 'ozekimessageout' and 'ozekimessagein'. You can choose any table name, although you should keep them in mind.
You are recommended to use the following table layout:
Please maintain the 'id' field in your database to support faster SQL updates.
If you modify database tables. For example, if you add additional columns,
please review the SQL templates used by Ozeki SMS Gateway.
Please make sure that they are compatible with the customized database table layout.
Conclusion
Congratulations, you have completed this task of connecting MySQL to the Ozeki SMS Gateway. Good Job!
You can use this knowledge to create a system where the Ozeki SMS Gateway and the
MySQL database service is connected and can work together. This solution combines the
performance and reliability of the Ozeki SMS Gateway and the cost-effectiveness of MySQL.
If you wish to learn more about the software solutions that Ozeki offers, make sure to visit ozeki-sms-gateway.com.
The following commands can be used to setup a MySQL server on an Ubuntu Linux
distribution to be used with Ozeki 10. These commands should be executed
in a root command shell. To get a root shell on the Ubuntu desktop, open
the terminal app and type "sudo bash".
What is MySQL?
An open-source relational database management system called MySQL is used to store
and manage structured data. It uses SQL for data processing and retrieval, and it
stores records in tables with rows and columns. MySQL is a well-liked alternative
for many applications, from web development to data warehousing, because of its
performance, scalability, and broad acceptance.
Install the MySQL server
# apt-get install mysql-server
The first step is to install the MySQL server on your Ubuntu system using the
apt-get package manager. This is a command-line tool used to handle packages on
Debian-based Linux distributions like Ubuntu. It's used to install, upgrade, or
remove software packages. For managing packages on Debian-based Linux distributions
like Ubuntu, use the command-line program 'apt-get'. Software products can be
installed, upgraded, or removed using it. 'install': This is the action you're asking
apt-get to perform. It tells apt-get that you want to install a package. This is
the name of the package you wish to install: 'mysql-server'. That is the MySQL
server package in this instance. Combining everything, the apt-get install MySQL-server
program will download and install the MySQL server package along with any dependencies.
Figure 1 - Install MySQL
Login to the MySQL server
# mysql -u root
Log in to the MySQL server using the mysql command with the -u flag to specify
the username. Here's how the command works: The command-line program used to
communicate with MySQL databases is called 'mysql'. The command's '-u root' option
provides the login username you wish to use. In this instance, you are making use
of MySQL's standard superuser account, "root". Putting it all together, when you
run the command mysql -u root, you're instructing the MySQL client to connect to
the MySQL server using the "root" user account.
Figure 2 - Login to MySQL server
Create the Ozeki database
mysql> create database ozekidb;
Create a database named "ozekidb" in the MySQL server. You may communicate with
the MySQL server directly by typing "mysql>" at the command prompt for MySQL.
'create database ozekidb;': The "ozekidb" database is created with this command.
Putting it all together, when you run the command create database ozekidb; within
the MySQL command prompt, you are instructing MySQL to create a new database named
"ozekidb."
Figure 3 - Create database
Create the Ozeki user with the password abc123
mysql> create user Ozeki user identified by 'ozekipass';
Once you're in the MySQL command prompt, create the "ozekiuser" user with the
password "ozekipass". This command is used to create a new user named "ozekiuser"
and sets the user's password to "ozekipass."
Figure 4 - Create user
Let the Ozeki user access to Ozeki database
mysql> grant all privileges on ozekidb.* to 'ozekiuser';
'mysql>': This is the MySQL command prompt that indicates you are interacting directly
with the MySQL server. 'grant all privileges on ozekidb.* to 'ozekiuser';': This command grants all privileges
on the "ozekidb" database to the user "ozekiuser". Within the MySQL command prompt,
you are instructing MySQL to grant all privileges on the "ozekidb" database to the
user "ozekiuser."
Figure 5 - Grant access to ozeki database
Configure remote access for MySQL
# nano /etc/mysql/mysql.conf.d/mysqld.conf
change the bind address to 0.0.0.0
Configure remote access for MySQL on Ubuntu by modifying the 'mysqld.conf
configuration file. nano /etc/mysql/mysql.conf.d/mysqld.conf': This command opens
the 'mysqld.conf' file using the nano text editor. The file is located in the
'/etc/mysql/mysql.conf.d/' directory and contains MySQL server configuration settings.
Locate the bind-address parameter in the 'mysqld.conf' file and changing its value
to 0.0.0.0. This change allows the MySQL server to listen on all available network
interfaces, which enables remote access.
Figure 6 - Configure remote access
Restart MySQL
# systemctl restart mysql
This command tells systemd to restart the MySQL service. The "mysql" here is the
service name for MySQL as recognized by systemd. When you run the command 'systemctl
restart mysql', the MySQL service will be stopped and then started again.
If you see that the service is active and running, the restart was successful.
Figure 7 - Restart MySQL server
Check if MySQL listens on port 3306
# netstat -tulnp | grep mysql
Check if MySQL is listening on port 3306 by using the netstat command with the
grep filter. 'netstat -tulnp': This command displays active network connections
and listening ports. '|': This symbol is used to pipe the output of the netstat
command to another command. 'grep mysql': This command searches for the string
"mysql" in the output of the netstat command. If MySQL is indeed listening on port
3306, you should see an output line similar to this: '127.0.0.1:3306 0.0.0.0:* LISTEN'.
Figure 8 - Check MySQL port
Allow port 3306 in your firewall
# ufw allow 3306/tcp
The provided command uses ufw (Uncomplicated Firewall) to allow incoming connections
on port 3306 for TCP traffic. 'ufw allow 3306/tcp': This command adds a rule to the
firewall to allow incoming TCP traffic on port 3306. In this case, the command 'ufw
allow 3306/tcp' specifically allows incoming TCP traffic on port 3306. After executing
this command, the firewall will permit incoming connections on port 3306, which
is the default port used by MySQL for communication.
Figure 9 - Allow port in firewall
Find out the IP address of your Linux box
# ifconfig
The provided command, ifconfig, is used to display network interface information,
including IP addresses, on Linux systems. Find out the IP address of your Linux box.
In that section, you will see a line that starts with "inet" followed by an IP
address. This is your Linux box's IP address on that interface, like this: 'inet 10.0.2.15 netmask 255.255.255.0 broadcast 10.0.2.255'
Figure 10 - Find your IP address
FAQs
What is MySQL used for?
A popular relational database management system (RDBMS) for storing, controlling,
and retrieving structured data is called MySQL. It is frequently used to power
backend databases, e-commerce platforms, content management systems, and other
components in online applications. MySQL is a foundational technology for dynamic
and data-driven applications because it makes efficient data storage, retrieval,
and manipulation possible.
Is MySQL different from SQL?
Yes, MySQL and SQL are different but related concepts. Structured Query Language,
or SQL for short, is a standardized language used to interact with and query databases.
The relational database management system (RDBMS) known as MySQL, on the other hand,
uses SQL as its query language.
Is MySQL a coding?
MySQL is a relational database management system, not a programming language (RDBMS).
Nevertheless, MySQL utilizes the SQL (Structured Query Language) programming language
specifically for querying and interacting with its databases. Although MySQL is the
software system that handles the databases, SQL is used to create, change, and retrieve
data from the MySQL databases.
Summary
This guide provides a comprehensive setup process of MySQL server on an Ubuntu
Linux distribution for use with Ozeki SMS Gateway. It explains the process step
by step, from installing MySQL to configuring remote access and ensuring the MySQL
server is functioning correctly. The goal of the guide is to enable users to set
up a functional MySQL server for use with the Ozeki SMS Gateway software.
In this article, we will be showing you how to set up a MySQL connection to
Ozeki SMS Gateway in Windows 11. You will see information about the installation
of a MySQL server, how to build the database schema for compatibility with Ozeki
SMS Gateway, how to set up a Database connection with Ozeki SMS Gateway
and how you can send messages with it. It should only take about 7 minutes to
watch the provided videos and about 20 minutes to do them on your own computer
depending on your network speed and computer performance.
Install MySQL database (video tutorial)
In the following video guide, you will see how to install MySQL on Windows 11.
The video starts from the official MySQL website and at the end, you will have
a MySQL shell access.
Create database schema (video tutorial)
The next video guide will help you set up your database to be compatible with
Ozeki SMS Services. First, you will have to connect to the MySQL server root
user at localhost:3306 (Your own MySQL server) and create a database called
ozekidb, then create a new user that you grant all privileges to with the
name ozekiuser and a password, we used ozekipass in this video.
We will create two tables for incoming and outgoing messages as well and by the
end, you will have a fully setup Database Schema.
Connect SMS Gateway to MySQL database (video tutorial)
In this guide, we will use the Ozeki SMS Gateway to add a new SQL messaging
connection with a MySQL instance. We will have to enter the details of the MySQL
server we set up in the previous steps and in the end, we will have a working
connection to our MySQL server.
Send test message (video tutorial)
In this short video guide, we show you how to send SMS messages from the MySQL
connection we set up previously.
MySQL is a Database management system which is used in an industrial environment. It is based on the Structured Query Language (SQL).
The most common use for my SQL however, is for the purpose of a web database, for example an inventory of an online store.
It can work together well with the Ozeki SMS Gateway, but you need to connect this two software.
The first step for it to install this software to your computer.
Please jump to the next video or if you scroll down
you can find screenshots that describe how to download and install MySQL database server.
First, you need to acquire the files you need for the installation. To do that,
please head over to the download page of MySQL ,
and search for the MySQL Community version. Click the link and it will
take you to the community download version selector page.
You can see the download page on Figure 1.
Now you are on the download version selection page of MySQL. It is important to make
sure that you download a Community edition of the software, because it is free of
charge to use it, with some locked functions, but you get everything you need to connect the Ozeki Gateway to MySQL.
You need to look for a link
titled “MySQL Installer for Windows”. You can find it with the help of Figure 2.
Click it and you will be presented with the download page.
Figure 2 - Select Windows installer
Now on this page, you get to choose your preferences. First of all, you can choose
whether you use Windows or other as your operating system. In our case, we use Windows.
Now below that, you can see multiple Installers.
The smaller downloadable file is a web version of MySQL, make sure to download the
bigger one, as you can see on Figure 3. Click the "Download" button to start the process.
Figure 3 - Download the installer
To take full advantage of MySQL, we advise you to create a new account on this step.
It is a simple process which should not take more than 10 minutes.
If you wish to skip the account creating procedure, you could click the
No thanks, just start my download. button,
and your browser should start downloading the files you need. (Figure 4)
Figure 4 - Start Download
As you can see on Figure 5, your browser downloads the required files.
It should not take long,
but it depends on your internet speed. If it is finished, please click it.
Figure 5 - Open the Installer
Now your computer should launch the MySQL Installer.
This will guide you through the steps of setting up your new SQL Server.
Here you should choose the Server Only option.
This will install the application in a way that you can use a MySQL Server,
but you don’t need to develop SQL tables.
Click Next if you have the option chosen. You can see the selection on Figure 6.
Figure 6 - Select install Server only
In this step, you will see the products, you are installing.
If you chose the Server Only option on the last step,
your list should look like ours on Figure 7.
Click Execute if you wish to install those applications.
Figure 7 - Execute installation
In this step, you will configure your database server to your preferences.
You can choose a config type, then pair a port to your server.
Make sure to tick in the Open Windows Firewall ports for network access box,
so your firewall will not disturb the dataflow on the port of your server.
If you have everything matched with your preferences,
please click Next. You can see our preferences on Figure 8.
Figure 8 - Configure Type and Network settings
Now you can get to choose the authentication method of the server.
It is a very important step, because you need to have a secure server which
only could be modified by the person with the right permission.
On this step, you have two options. The first on is a more secure password
encryption system, the other one is an older Legacy Authentication method.
Make sure to choose the newer and more secure Strong Password Encryption
for Authentication method. You can see your options on Figure 9.
Click the Next button to proceed.
Figure 9 - Select Authentication method
If you choose the more secure method in the last step, you will be presented with
the root account password creating window. Please type in a password that is hard
to guess, but you will remember easily. Make sure that only you now
this password, in order to have a secure server.
You can see the password creating process on Figure 10.
Figure 10 - Define Root password
Now you need to name your server. It is an important step, because in the Windows service,
you will see your server with this name. Make sure that the Start the
MySQL Server at System Startup option is ticked in, so your server
will start as soon as windows. This way, your database
server will always be ready to use. You can see your options on Figure 11.
Figure 11 - Configure Mysql service
On the final step of the installation, you get a summary of all the customization
you have done on your SQL Server. To finalize your decision,
please click the Execute button as you can see on Figure 12.
Your installer will start setting up all the necessary things
you need to have in order to start using the MySQL Server.
Figure 12 - Apply configuration
After the installer finished the process, all list members should have a
check mark before it. In this case, you have a working copy of MySQL Server.
If you wish to exit the installer, click the Finish button. (Figure 13)
Figure 13 - Finish installation
Create ozeki database schema
Figure 14 - Create ozekidb database
CREATE DATABASE ozekidb;
Figure 15 - Create ozekiuser
CREATE USER 'ozekiuser'@'localhost' IDENTIFIED BY 'ozekipass';
GRANT ALL PRIVILEGES ON ozekidb.* TO 'ozekiuser'@'localhost';
FLUSH PRIVILEGES;
CREATE TABLE ozekimessageout (
  id int(11) NOT NULL auto_increment,
  sender varchar(255) default NULL,
  receiver varchar(255) default NULL,
  msg text default NULL,
  senttime varchar(100) default NULL,
  receivedtime varchar(100) default NULL,
  reference varchar(100) default NULL,
  status varchar(20) default NULL,
  msgtype varchar(160) default NULL,
  operator varchar(100) default NULL,
  errormsg varchar(250) default NULL,
  PRIMARY KEY (id)) charset=utf8;
  ALTER TABLE ozekimessageout ADD INDEX (id);
Conclusion
In this first part of our four-part series, we have covered the essential steps
to install and configure MySQL for SMS integration with Ozeki SMS Gateway.
Starting from downloading the MySQL Community edition, we walked through the
installation process, including server configuration, authentication setup, and
root password creation. We also demonstrated how to create the necessary database
schema, user permissions, and tables (ozekimessagein and ozekimessageout)
to store SMS messages efficiently. By following these steps, you now have a
functional MySQL database ready to connect with Ozeki SMS Gateway. In the next
part of this series, we will explore how to establish this connection and automate
SMS workflows. Stay tuned for further guidance on leveraging MySQL for seamless
SMS communication.
Send SMS from MySQL (part 2/4) Create Database Tables
In this video series you can see how to connect Ozeki SMS Gateway and MySQL database server for SMS messaging.
This video shows how to create the proper database table structure by using the command line of MySQL.
Video content
1. Connect to MySQL
2. Copy CREATE TABLE statement
Please scroll down to copy the SQL statements (Figure 1) used in the video. If you have created the database in MySQL,
you can jump to the next video.
The first step is to open MySQL Shell. To do that, please search for the icon you see on Figure 1. Click on it to run the program.
Figure 1 - Start Mysql shell
Now if you have the program opened, please copy the code, you can see on Figure 3. You can see that we have pasted the code, and it has created our database, on Figure 2.
Now if you have the database created, you have to create two tables. One for inbox and one for outbox mails. Please copy the code you see on Figure 4.
It will make all the necessary data fields. Highlight the code and press "CTRL + C" to copy it to your clipboard.
Now if you have the code on your clipboard, please paste it. If you have pasted it
into the MySQL Command Line, press enter, and the application will build the tables for you.
Feel free to modify the code to your liking, if you are familiar with the SQL language.
Figure 4 - Paste ozekimessagein CREATE TABLE statements and run it on the MySQL database server
Now you need to do the last 2 steps you have done, but with the “ozekimessageout” table (Figure 5).
You can copy it with “CTRL + C”, just as you did on Figure 3.
Now you just need to paste in the last copied code into the MySQL Command Line.
Press "CTRL + V" to paste the code from your clipboard. If you have the code,
please press Enter. now the Command Line will build
your second table. Now you have all the required tables for Ozeki SMS Gateway.
(Fiugre 6)
Figure 6 - Paste ozekimessageout CREATE TABLE statements and run it on the MySQL database server
How to create a MySQL user
The following SQL commands (Figure 7) can be used to create a user called 'ozekiuser', with
a password of 'ozekipass'. This is a MySQL user account. You can use this user account
to connecto to the ozeki database, because the GRANT command has given access
to this database.
Figure 7 - Create ozekiuser for database
CREATE USER 'ozekiuser'@'localhost' IDENTIFIED BY 'ozekipass';
GRANT ALL PRIVILEGES ON ozeki.* TO 'ozekiuser'@'localhost';
FLUSH PRIVILEGES;
Send SMS from MySQL (part 3/4) Configure Database User
In this video series you can see how to connect Ozeki SMS Gateway and MySQL database server for SMS messaging.
This video shows how to install and configure a Database User on Ozeki SMS Gateway.
Video content
1. Install database user
2. Connect to database
First, you need to open the SMS Gateway on the computer you wish to use as a database user.
To do this, search for the icon you can find on Figure 1. Click it twice to run the program.
Figure 1 - Open the SMS Gateway application on Ozeki 10's desktop screen
Now that you are in the Ozeki SMS Gateway. please add a new user application.
You can do that with the dedicated button on the right side of the panel.
Search for the “Add new user application” button.
You can find it with the help of Figure 2. Click on it to start the process.
Figure 2 - Click 'Add new user or application' on the right-side panel
Now you have to select the application interface you wish to use.
The Ozeki SMS Gateway can handle many interfaces.
You can see your options on Figure 3. In this case, you need to choose the SQL messaging option.
Click the “install” button to start the procedure.
Figure 3 - Install SQL Messaging User
Here you need to select the SQL Management software you want to use.
In this scenario, you need to choose MySQL. Click the blue “install” button to proceed. You can find the button on Figure 4.
Figure 4 - Install MYSQL Connection
You need to configure your connection now. On the “connection settings” panel,
you could make all your important customization in order for your database user to work.
You can find an example configuration on Figure 5.
Figure 5 - Define the MYSQL database connection details
Now you have a working connection, you just need to turn it on. You can do that by
finding the “Connection” switch on the left of the page. Click on it and it will
turn green. You can find the switch on Figure 6.
This is the last video in this video series which shows how to connect Ozeki SMS Gateway and MySQL database server for SMS messaging.
See how to insert a simple row into the proper table, so Ozeki SMS Gateway can automatically send SMS messages to mobile phones.
Video content
1. Insert message into database
2. Send test message
Look at the upcoming screenshots to thoroughly examine the final stage, which is SMS sending.
You can start the whole process by INSERT-ing the SMS into the database.
Figure 1 - Open Database user
Figure 2 - Insert message to the database table
INSERT message record (example):
USE ozeki
INSERT INTO ozekimessageout (receiver,msg,status) values ("+44111223465","Hello world","Send");
GO
Figure 3 - Copy INSERT statement
Figure 4 - The Database User's sent folder shows that your message has been sent by Ozeki SMS Gateway
This chapter gives you great opportunity to see how to send and receive SMS messages
through pre-created PostgreSQL database tables. You just need to connect to
them with a Database User of Ozeki SMS Gateway.
Do not forget to provide the ODBC driver connection string for the user.
Using the Ozeki SMS Gateway in this system is beneficial because it can reach up
to a 1000 SMS/second speed. We assume you have already used the PostgreSQL and
can perform basic operations with it.
You will be provided some useful information and detailed step by step instructions.
We hope you will find this example easy to understand.
Begin now!
What is PostgreSQL?
PostgreSQL is an open-source database system that is used as
the primary data store for many web or mobile applications
Please install two important programs. A simple
PostgreSQL database server and an
Ozeki SMS Gateway, which is capable to create a Database User and connect to the
PostgreSQL database using the connection string. Check how to install a SMS Database User.
Do not forget to create a separate table for the outgoing and incoming messages. These tables are called 'ozekimessagein'
and 'ozekimessageout' in the current example.
Send and receive SMS messages by using simple SELECT and INSERT SQL statements on the tables.
How to receive SMS with PostgreSQL database
This system will make it possible to receive SMS messages and store them in a PostgreSQL Database Server.
The system consists of your application, a PostgreSQL Database Server, a computer with the Ozeki SMS Gateway installed and an Android phone with the Ozeki SMS gateway running.
Your phone will send the SMS message, which will be forwarded to the Database server by the Ozeki SMS Gateway.
Then your application will download the messages from the PostgreSQL database server. (Figure 1)
Figure 1 - How to receive SMS with PostgreSQL database
How to send SMS from PostgreSQL database
This system enables you to send SMS messages from a Postgre SQL Database Server.
This system consists of an application, a PostgreSQL Database Server, a computer with Ozeki SMS Gateway installed, and an android phone with the Ozeki SMS Gateway app.
Your application will send the message with some information to the PostgreSQL Database Server to store it.
The Ozeki SMS Gateway software on the PC will check the Database Server periodically and send the message to the predefined address.
Then the phone will receive the message. (Figure 2)
Figure 2 - How to send SMS from PostgreSQL database
SMS from/to PostgreSQL (Video tutorial)
In this video, you will see the process of connecting PostgreSQL
to the Ozeki SMS Gateway.
It will start with launching the pgAdmin tool and will end with the
sent folder that contains
the test message. You will learn how to create a database in pgAdmin
and how to create a user application.
The process is easy to do and the video is very detailed.
Plus the Ozeki SMS Gateway offers a very intuitive interface,
so you will have no hard time following the tutorial.
Create a new user
On Figure 3, you can see the statement that you need to provide in pgAdmin to create a user
that can be used to connect to the Ozeki SMS Gateway.
This statement will create a user with all the privileges already set and ready to use.
Next, you need to create a database that can be used by the user.
Figure 3 - Create ozekiuser user
Create the database
Now that you have the user created, you just need a database to work with.
You can see the statement you need to provide on Figure 4.
This will create a database that is owned by the previously created user with the correct 'UTF8' encoding.
This database can easily be connected to the Ozeki SMS Gateway.
Figure 4 - Create ozekidb database
Create the 'ozekimessagein' table
To store your incoming messages, you need to create the 'ozekimessagin' table.
You can see the code you need to provide on Figure 5.
This code will create a perfect table that can be used to store the incoming messages.
You can find the statement below the tutorial. You can copy it and just paste it into pgAdmin.
Figure 5 - Create ozekimessagein table
You need to create another table titled 'ozekimessageout'.
This table will be used to store the message that the user sends.
The SMS gateway will periodically check the table and send all the messages that are yet to send.
You can see the statement that you need to send on Figure 6.
See the whole code below the tutorial, where you can copy-paste it to pgAdmin.
Figure 6 - Create ozekimessageout table
Install an SQL messaging application interface
Now you need to start working in the Ozeki SMS Gateway.
The first thing you need to do is to search for the 'Add new user/application' button.
Press it to get to the new user or application install list.
There you need to find the Application interfaces section.
Search for the SQL messaging option in the section.
Click the Install button next to it to start the installation process. (Figure 7)
Figure 7 - Install SQL messaging User
Choose the PostgreSQL option
In this install list, you can see all the SQL tools that the Ozeki SMS Gateway can work with.
In this case, please choose the PostgreSQL option.
Find it and click the Install button next to it, as you can see on Figure 8.
It will start the new application interface installer.
Figure 8 - Install PostgreSQL User
Provide connection details
To have a working connection between the Ozeki SMS Gateway and PostgreSQL,
you need to provide connection details to the gateway. Open the General tab of the application
interface and search for the 'Connection settings' group box.
There you will find 5 textboxes to be completed.
You need to provide a server address, a port number,
a database name, and login credentials for the database, like on Figure 9.
If you are finished, click the 'Ok' button and you are finished with the setup of the application.
Figure 9 - Provide the connection details for the PostgreSQL server
Enable the PostgreSQL connection
Now you have a working application interface. All you need to do is turn it on.
You can do this with the 'connection' switch button.
If it is green and you can see a green tick next to the PostgreSQL logo,
it means that the connection is active and working (Figure 10).
You can see the details of the connecting process in the Events tab.
Figure 10 - Enable PostgreSQL connection
Run an INSERT statement
Now you have a working connection between the Ozeki SMS Gateway and PostgreSQL.
This means that now you can send and receive SMS messages.
To test the system, you need to try the INSERT statement visible on Figure 11.
Copy the statement into the SQL tab of the application interface and 'Execute' it.
You can find the code at the end of the tutorial with the table creating commands.
This command will create a field in the 'ozekimessageout' table.
The gateway will scan the table and send the message to the destination.
Figure 11 - Paste INSERT statement to PostgreSQL's database table
The sent folder
Don't forget to check the Sent folder (Figure 12).
The message inserted into the 'ozekimessageout' table should be visible in the folder.
You can get more information about the message here, like the text of the message, the time of sending,
and the result of the sending process.
Figure 12 - The Database User's sent folder shows that your message has been sent by Ozeki SMS Gateway
Use Ozeki SMS Gateway's browser GUI to
install a Database User and
provide a connection details similarly as you would do it for other databases
(e.g. MSSQL, Oracle, MySQL etc.)
It works if you modify the variables by using the information of your PostgreSQL database server (Figure 3).
INSERT statement
You can see how to use this code on Figure 11.
The CREATE TABLE script in PostgreSQL:
INSERT INTO ozekimessageout (receive, msg, status) VALUES ('+36209355418', 'test', 'send');
CREATE tables in PostgreSQL
PostgreSQL accepts simple SQL statements.
You can see how to CREATE two separate tables for incoming and outgoing
messages in Figure 13.
Figure 14 - These statements CREATE two tables in your PostgreSQL database
You can always increase the size of the 'msg' field above 160 characters.
You can also change it's data type as well.
It is strongly suggested to maintain the 'id' attribute in
all tables. 'id' is basically the index of each record.
Conclusion
Congratulations, you have completed this task of connecting PostgreSQL to the O
zeki SMS Gateway. You can be proud of yourself!
Now you can create this connection anytime you want. This solution is great because you can enjoy the speed and reliability of the Ozeki SMS Gateway and the cost efficiency of PostgreSQL.
If you wish to learn more about the software solutions that Ozeki offers, make sure to visit ozeki-sms-gateway.com.
Send SMS from PostgreSQL (part 1/4) PostgreSQL Installation
In this tutorial, you will learn how to send SMS form a PostgreSQL database server.
PostgreSQL is used as the primary data store or data warehouse for many web, mobile and analytics applications.
PostgreSQL can store structured and unstructured data.
By reading this article, you will know how to combine the resources of PostgreSQL and the versatility of the Ozeki SMS Gateway.
You will learn how to install PostgreSQL, how to create and configure a database and how to test it.
We assume that you are familiar with the PostgreSQL and the SMS communication technology.
In this page, the installation step is presented in detail. This step will only
take about 10 minutes to perform.
What is PostgreSQL?
PostgreSQL is an open-source database system that uses and extends the SQL language supplemented with many features that safely
store and scale the most complicated data workloads
The first step is to head over to the download page of PostgreSQL. Here you need to choose which PostgreSQL you wish to download and what OS you are currently using.
Provide that information and click the download now button, as you can see on Figure 1. This will start the downloading process.
If your browser is finished downloading the installer, click it to start the installing section (Figure 2).
You can find the downloaded .exe file at the bottom of your browser window or at the downloads folder on your pc by default.
Figure 2 - Start installation from web browser
Provide installation directory
Now you need to provide a folder where the installer will copy the necessary files.
Make sure that there is enough space on the drive that you are installing PostgreSQL on.
If you have your destination selected, click the Next button to proceed to the next step (Figure 3).
Figure 3 - Choose installation directory for the database server
Select components
In this section, you need to choose which components of PostgreSQL you wish to install.
To have the most versatile software possible,
please check all the checkboxes and click the next button located on the bottom-left corner of the window (Figure 4).
Figure 4 - Select components to install
Select data directory
Now you need to choose a folder which will be used to store all your data.
The folder you are choosing now will be filled with all your user data as well as the data used by PostgreSQL (Figure 5).
Make sure that you have plenty of free space on the drive you are choosing to use here.
Figure 5 - Choose data directory for the PostgreSQL server
Provide a password
In this step, you need to provide a password in both fields visible on this page (Figure 6).
Having a password protected database means that only people with permission will be able to access the database.
Choose a password that is hard to guess but easy to remember.
Figure 6 - Specify password for PostgreSQL's superuser
Type in the Port number
In the Port field, you need to type in the port number that the server should listen on.
In this case the correct number is 5432. This means that the port 5432 will be only used for your porstgreSQL.
If you have your port number provided, click the Next button to proceed (Figure 7).
Figure 7 - Specify PostgreSQL's port number
Choose the default locale
In the Locale drop-down menu, you get to choose the locale which specifies the language,
territory, and code set that the database server needs to use.
To use the default local, which is POSIX, leave the drop-down menu on default locale option (Figure 8).
In the pre installation summary page, you will be able to check all the settings you made in the previous steps.
You can confirm the installation directory, the data directory, and the port you will use.
If you find everything correct, click the Next button to proceed (Figure 9).
Figure 9 - Read pre installation summary
Wait for the installation to finish
In the next step, all you need to do is wait for the installation process to finish.
If you can see the green progression bar moving, it means that the PostgreSQL in installing (Figure 10).
Figure 10 - Wait until the installation is finished
Finish the installation and open Stack Builder
If the progression bar is filled, it means that your software is installed.
The base PostgreSQL system is a good database management tool, but to use it at full potential, you need modules.
To install modules, install the stack builder for PostgreSQL which simplifies the process of downloading and
installing modules. It provides a graphical interface where you can choose the modules to install.
Check in the checkbox for stack builder and click the finish button located on the bottom of the window (Figure 11).
Figure 11 - PostgreSQL database server's installation has been finished
Choose the installed PostgreSQL version
In this step, from the drop-down menu, you need to choose which version of the PostgreSQL is installed on your computer,
and which port it uses. In this case, choose the PostgreSQL 10 on port 5432.
This way the Stack Builder will install modules for the correct version and port.
Click the next button if you are finished (Figure 12).
Figure 12 - Install PostgreSQL's ODBC Driver
Choose the psqlODBC option
From the application install list, choose the Database Drivers option.
Now you can see the 4 possible application you can install.
Check the checkbox for the psqlODBC (64bit) option and click the Next button to start the download
and installation process (Figure 13).
Figure 13 - Select 'psqlODBC' driver
Start the package downloading process
In this step, you get to choose the download directory for the packages.
Make sure to have enough free space on the drive you are downloading the packages to.
Click the Next button and the Stack Builder will start downloading the required files (Figure 14).
You can see on Figure 15, that the main page of the psqlODBC is now opened.
Click the Next button to start the installation process.
Figure 15 - Start the installer of the 'psqlODBC' driver
Choose an installation directory
In the Installation Directory textbox, choose the installation directory where the installer should move the required files.
Make sure that there is enough free space on the drive you are installing the packages to.
Click the Next button to proceed to the next step. (Figure 16).
Figure 16 - Choose installation directory for the driver
Start the installation process
If you see this page, it means that you are finished with the settings.
Click the Next button to start the installation procedure (Figure 17).
Figure 17 - Start 'psqlODBC' driver installation
Wait for the installation process to finish
Now the installer will move the required files to the folder you chose.
Wait for the progression bar to fill, so your software is installed (Figure 18).
After it, you will have a working copy of the software.
Figure 18 - Wait until the driver's installation is finished
Close the installer window
If you see the screen visible on Figure 19, it means that the PostgreSQL and the psqlODBC module is installed correctly.
Close the installer page with the Finish button located on the bottom of the window.
Figure 19 - psqlODBC driver's installation has been finished
Create Database Tables
On Figure 20, you can see the icon you need to look for called pgadmin.
Click it to launch the app where you can start setting up the database structure and
start connecting to the PostgreSQL server.
Figure 20 - Connect to the PostgreSQL server by using the PgAdmin software
Create Ozeki user and database
The following SQL commands can be used to create a user called 'ozekiuser', with a password of 'ozekipass'.
This is a PostgreSQL user account. You can use this user account to connect to the ozeki database.
(Figure 21)
Figure 21 - Create ozekiuser user
CREATE ROLE ozekiuser WITH
	LOGIN
	SUPERUSER
	CREATEDB
	CREATEROLE
	INHERIT
	NOREPLICATION
	CONNECTION LIMIT -1
	PASSWORD 'ozekipass';
Figure 22 - Copy CREATE ROLE statements
Now please copy the code, you can see on Figure 5. You can see that we have pasted the code, and it has created our database, on Figure 23.
On Figure 25, you can see that how you can copy the provided code.
This code will build the database so the Ozeki SMS Gateway could work with it.
Right-click the highlighted code and choose the copy option.
Figure 25 - Copy CREATE TABLE statements from Figure 2
Paste the code
To build your database, you need to paste the copied code into the query editor section of pgadmin.
Paste it and run the code.
It will build a usable database that you can work with. You can see the pasted code on Figure 26.
Figure 26 - Paste CREATE TABLE statements and run them on the PostgreSQL database server
Send SMS from PostgreSQL (part 2/4) Create Database Tables
To create a solution to send text messages from PostgreSQL we will need 13
minutes. This article provides directions and the necessary information to help
you complete this procedure efficiently.
Maybe the greatest benefit of this PostgreSQL solution is that all you have to do is perform some basic configuration and you will be ready to send sms in a short time.
This solution is based on Ozeki SMS Gateway, so you can take advantage of that fact that it offers excellent logging capabilities, which means you can track down errors quickly.
We assume you are familiar with the basics of how mobile text messaging works.
You will be presented some valuable information and well-structured step-by-step instructions.
We hope you will enjoy reading it.
Video content
1. Connect to PostgreSQL
2. Create User in PostgreSQL
3. Copy CREATE TABLE statements
How to create the proper database table (Video tutorial)
In this vide, you will learn how to create a correctly working database table using the PostgreSQL GUI called pgadmin.
The video will start with opening pgadmin and will end with the working database table.
You will learn how to configure the table during creation and how to setup the permissions in pgadmin.
The video is only a little longer then 2 minutes and it features all the steps you need to take in a detailed form.
You will have no problem following the tutorial.
Please scroll down to copy the SQL statements (Figure 2-3) used in the video. If you have created the database in PostgreSQL,
you can jump to the next video.
Launch pgadmin
On Figure 1, you can see the icon you need to look for called pgadmin.
Click it to launch the app where you can start setting up the database structure and
start connecting to the PostgreSQL server.
Figure 1 - Connect to the PostgreSQL server by using the PgAdmin software
Create Ozeki user and database
The following SQL commands can be used to create a user called 'ozekiuser', with a password of 'ozekipass'.
This is a PostgreSQL user account. You can use this user account to connect to the ozeki database.
Figure 2 - Create ozekiuser user
CREATE ROLE ozekiuser WITH
	LOGIN
	SUPERUSER
	CREATEDB
	CREATEROLE
	INHERIT
	NOREPLICATION
	CONNECTION LIMIT -1
	PASSWORD 'ozekipass';
Figure 3 - Copy CREATE ROLE statements
Now please copy the code, you can see on Figure 5. You can see that we have pasted the code, and it has created our database, on Figure 4.
On Figure 7, you can see that how you can copy the provided code.
This code will build the database so the Ozeki SMS Gateway could work with it.
Right-click the highlighted code and choose the copy option.
Figure 7 - Copy CREATE TABLE statements from Figure 2
Paste the code
To build your database, you need to paste the copied code into the query editor section of pgadmin.
Paste it and run the code.
It will build a usable database that you can work with. You can see the pasted code on Figure 8.
Figure 8 - Paste CREATE TABLE statements and run them on the PostgreSQL database server
Send SMS from PostgreSQL (part 3/4) Configure Database User
In this video series you can see how to connect Ozeki SMS Gateway to your PostgreSQL database server for SMS messaging.
This video shows how to install and configure a Database User on Ozeki SMS Gateway. This database user is used to communicate with the database.
You will also learn how to provide a connection string that is necessary to connect the user to the database.
Video content
1. Install Database User
2. Provide connection String
3. Connect to Database
How to configure a Database User (Video tutorial)
In this video, you will learn how to configure a new database user in Ozeki SMS Gateway.
It will start with the home page of the Ozeki SMS Gateway and will take you all the way to a working user.
You will see how to name your PostgreSQL user, how to provide connection settings and how to provide the connection string.
The video is only 37 seconds long and very easy to understand.
You will have no problem following the steps.
Please scroll down> to copy the PostgreSQL connection string used in the video. If you have created the database in PostgreSQL,
you can jump to the next video. Although you can precisely examine the sequence by looking through these screenshots.
Open the SMS Gateway
The first step of creating a Database User is to open the Ozeki SMS Gateway application.
You can find the icon of the application on the Desktop of Ozeki 10 (Figure 1).
In this application you can create or modify existing ones,
manage connections and constantly check the events on your connection with the log feature.
Figure 1 - Open the SMS Gateway application on Ozeki 10's desktop screen
Add new user/application
The next step is to search for the blue Add new user / application button.
It is located in the Users and application panel on the right-side of the window (Figure 2).
Clicking the button will take you to the user or application install list.
There you can see all the users or application that you can install.
Figure 2 - Click 'Add new user or application' on the right-side panel
Install an SQL messaging application interface
From the Application Interfaces install list, choose the SQL messaging option (Figure 3).
This will create an interface which can be used to communicate with any database service, for example MySQL or Oracle.
You will need to provide the connection string in this interface.
Figure 3 - Install SQL messaging User
Choose the PostgreSQL option
To communicate with a PostgreSQL database, you will need to choose the PostgreSQL option (Figure 4).
This will setup a table which can be used to receive messages and another one used to send SMS messages.
This way you can communicate using a PostgreSQL database system
Figure 4 - Install Postgre SQL User
Configure the connection settings
Configure the connection settings in the General tab of the PostgreSQL user.
You need to provide a server address and a port number for the server.
You need to provide the name of the Database, a user ID, and a password for login.
Click the OK button when you filled in the configuration form. (Figure 5).
Figure 5 - Provide the connection details for the Postgre SQL server
Turn on the connection
To start using the created PostgreSQL user, you need to turn it on.
As you can see on Figure 6, you can flip the switch button and start the user.
You can see every step of the startup and details of all the events happening on the server.
If you see a green tick under the icon of the PostgreSQL database user, it means that you have a working user.
Send SMS from PostgreSQL (part 4/4) Send Test Message
This is the last video in this video series which shows how to connect Ozeki SMS Gateway to a PostgreSQL database server for SMS messaging.
See how to insert a simple row into the proper table, so Ozeki SMS Gateway can automatically send SMS messages to mobile phones.
Video content
1. Insert message into database
2. Send Test message
Look at the upcoming screenshots to thoroughly examine the final stage (Figure 1), which is SMS sending.
You can start the whole process by INSERT-ing the SMS into the database (Figure 2).
Figure 1 - Open Database user
INSERT message record (example):
INSERT INTO ozekimessageout (receiver,msg,status) values ('+36201234567','Hello World','Send');
Figure 2 - Copy INSERT statement
Figure 3 - Paste INSERT statement to PostgreSQL's database table
Figure 4 - The Database User's sent folder shows that your message has been sent by Ozeki SMS Gateway
See how to send and receive SMS messages through an SAP SQL Anywhere server with the Database User of Ozeki SMS Gateway.
Here you can find a connection string and short CREATE TABLE statements to get started.
You can send messages by inserting new message records.
We assume you have already used the SAP SQL Anywhere and can perform basic operations with it.
You will be provided some useful information and detailed step-by-step instructions.
We hope you will find this example easy to understand.
Begin now!
What is SAP SQL Anywhere?
SAP SQL Anywhere is a package that provides data management tools.
It is intended to run on PCs, mobile devices, or anywhere where there is no traditional data centre
You should have two important programs. The first one is an
SAP SQL Anywhere server, while the second one is
Ozeki SMS Gateway, which must have a
Database User installed, so it can connect to the
SAP SQL Database Server using a connection string.
Please create a table for the incoming messages and another table for the outgoing messages.
You should call these tables as 'ozekimessagein' and 'ozekimessageout', which is used in the current example.
You can see your received SMS messages by using a simple SELECT and you can send
SMS message with a simple INSERT SQL statement.
The browser GUI of Ozeki SMS Gateway
can be used for installing a Database User.
Please provide the ODBC connection string for your SAP SQL Anywhere database.
The Database User can be configured from the browser GUI. Keep in mind to select 'Odbc' and type the connection string (Figure 4).
How to receive SMS with SAP SQL Anywhere database
The following SMS receiving system enables you to receive and store
SMS messages using an SAP SQL Anywhere Database Server.
The system consists of a phone, a computer running the
Ozeki SMS Gateway software, a Database Server, and your application.
The message sent from the phone will be received by the computer.
It will send it to the Database server to store it.
Your application will be then able to get the messages from the
Database Server. (Figure 1)
Figure 1 - How to receive SMS with SAP SQL Anywhere database
How to send SMS from SAP SQL Anywhere database
This SMS sending system will be able to send messages and store those using an SQP SQL Anywhere Database Server.
The system consists of an application that you will use to send SMS. An SAP SQL Database Server, a computer running Ozeki SMS Gateway Software, and a phone to receive the messages with.
The system works the following way: Your application will store the messages to send in an SAP SQL Anywhere Database Server. It will store the message, so the Ozeki SMS Gateway can check it periodically for messages to send. If it finds any,
it will forward those messages to the predefined address. (Figure 2)
Figure 2 - How to send SMS from SAP SQL Anywhere database
SMS from/to SAP SQL Anywhere (Video tutorial)
In this video, we are going to show you the process of connecting an SAP SQL Anywhere
database and the Ozeki SMS Gateway. You are going to learn how you can create a database
in SAP SQL Anywhere. The video will start with opening the SQL central application
and will take you to confirm your sent message. In the video, you will learn how you can create a
database with two tables in SQL central, and how to set up an application interface in Ozeki SMS Gateway.
In this 3:56 long video, we explain to you every detail about the process,
so you will have no problem with following the steps.
Choose a database file
In the 'Create a Database Wizard', the first step will be choosing a file name for the database file.
This could be anything, but we advise you to choose the 'ozekidb' as the file name for easier identification.
If you are satisfied with the name,
click the 'Next' button located at the bottom of the window to proceed to the next step (Figure 3).
Figure 3 - Specify database name and directory
Specify the login credentials
In the next step (Figure 4), you can create a new database user. There are 3 textboxes.
The first one is the name of the user and the remaining two are the login password and
the confirmation textbox for the password.
Make sure to fill out all the textboxes to have a safe DBA user.
Figure 4 - Specify database username
Create a table for incoming messages
Now you can start executing SQL statements.
The first thing you want to do is to create the 'ozekimessagein' table.
This table (that you can see on Figure 5) will serve as storage for your incoming messages.
All the incoming messages will be stored here as a record with all the details about them.
You can find the code that you need to execute at the end of this tutorial.
Figure 5 - Create ozekimessagein table
Create a table for outgoing messages
Now that you have a table for incoming messages, all you need is a table to store outgoing messages.
This will be the 'ozekimessageout' table. You can find the code that created the table at
the end of this tutorial. Copy-paste it into SQL central and execute it.
It will create a perfect table to use as storage for outgoing messages (Figure 6).
Figure 6 - Create ozekimessageout table
Choose the SQL messaging option
Open the Ozeki SMS Gateway and search for the 'Add new user/application' button on the left side
of the window. Click it to open the 'Add new user or application' install list.
There you need to search for the 'Application interfaces' section and choose the SQL messaging option.
Click the blue Install button to proceed to the next step (Figure 7).
Figure 7 - Install SQL messaging user
Choose the SQL Anywhere option
In the next install list, you can see all the SQL database managing software that can work with the Ozeki SMS Gateway.
In this case, you need to choose the 'SQLAnywhere'. This will work great with the two tables you just set up.
You can see the install list and the item you need to choose on Figure 8.
Figure 8 - Install SQL Anywhere user
Provide connection settings
To establish a connection between the Ozeki SMS Gateway and SQL Anywhere,
you need to provide connection details.
To do so, open the general tab of the SQL Anywhere application interface and search for the Connection settings group box.
There, you need to select the version of the SQL Anywhere you are using, into the Driver textbox.
You need to type in the host address, server name, port number, database name, and login credentials of the SQL database (Figure 9).
If you are done with it, click the 'Ok' button.
Figure 9 - Define the SQL Anywhere database connection details
If you followed the steps correctly, you now have a working connection between the Ozeki SMS Gateway and SQL Anywhere.
To start using it, you need to turn it on. To do so, click the 'Connection' switch button.
If it is green and you can see a checkmark next to the SQL Anywhere, your connection is up a running (Figure 10).
Figure 10 - Enable SQL Anywhere connection
Execute the INSERT command
To test your connection, you need to insert some messages into the 'ozekimessageout' table.
To do so, execute the INSERT INTO statement.
It will place a test SMS into the table and start the sending process. You can see the code in Figure 11.
Figure 11 - Insert message to the database table
The sent folder
Now to confirm that the message was sent successfully, open the Sent folder of the Ozeki SMS Gateway.
This will open a list of all the messages sent from the gateway.
You can get more information about the message like the time of sending, the text of the message, and the result of the sending process.
You can see the example SMS message on Figure 12.
Figure 12 - The Database User's sent folder shows that your message has been sent by Ozeki SMS Gateway
SAP SQL Anywhere CREATE TABLE script
Please create the 'ozekimessageout' and 'ozekimessagein' tables on your SAP SQL Anywhere database server.
CREATE TABLE "ozekimessagein"
(
"id" integer NOT NULL DEFAULT autoincrement ,
"sender" varchar(255) NULL ,
"receiver" varchar(255) NULL ,
"msg" varchar(160) NULL ,
"senttime" varchar(100) NULL ,
"receivedtime" varchar(100) NULL ,
"operator" varchar(100) NULL ,
"msgtype" varchar(160) NULL ,
"reference" varchar(100) NULL ,
 PRIMARY KEY ("id"),
)
go
commit work
go

CREATE INDEX "ozekimessageinindex" ON "ozekimessagein"
(
"id" ASC
)
go
commit work
go

CREATE TABLE "ozekimessageout"
(
"id" integer NOT NULL DEFAULT autoincrement ,
"sender" varchar(255) NULL ,
"receiver" varchar(255) NULL ,
"msg" varchar(160) NULL ,
"senttime" varchar(100) NULL ,
"receivedtime" varchar(100) NULL ,
"operator" varchar(100) NULL ,
"status" varchar(20) NULL ,
"msgtype" varchar(160) NULL ,
"reference" varchar(100) NULL ,
"errormsg" varchar(250) NULL ,
 PRIMARY KEY ("id"),
)
go
commit work
go

CREATE INDEX "ozekimessageoutindex" ON "ozekimessageout"
(
"id" ASC
)
go
commit work
go
The size of the 'msg' field can be always increased above 160 characters.
You can also change its data type as well.
The index of each record is the 'id' attribute.
Please maintain the 'id' in all tables.
FAQs
Can I create reports and statistics from the data of sent messages?
Enable Extensive Data Logging with SQL Integration: Ozeki SMS Gateway offers SQL
logging functionality. By activating this feature, you can store all message data
within a database table. This opens the door to utilizing SQL queries for
creating detailed statistics and reports.
Can I maintain a log of all sent and received messages in an SQL Server?
Absolutely! Extensive Data Logging with Flexible Database Options
The Ozeki SMS Gateway offers impressive flexibility when it comes to message
logging. You can configure it to connect to virtually any database server that
supports either OleDb or ODBC drivers. This opens the door to popular choices
like:
Microsoft SQL Server (MSSQL)
Oracle
MySQL
PostgreSQL
Microsoft Access
Every time the gateway receives or sends a message, a detailed record is
automatically added to your chosen database. This record typically includes:
Sender phone number
Recipient phone number
Message text
Timestamp
The beauty of SQL logging is its customizability. You have the power to expand
the stored information beyond the basics. For example, you could include:
Sending user ID
Message type
By leveraging SQL queries, you can extract valuable insights from this rich data.
This empowers you to:
Generate comprehensive reports on message traffic
Analyse trends and patterns in communication
Gain a deeper understanding of your communication needs
The dedicated SQL logging page provides in-depth information on setup and
configuration: SQL logging page
This approach provides a clear explanation, highlights the benefits of using a
database, and encourages users to explore the dedicated information page for
further details.
Does the software provide a way that limits the maximum number of messages a
user
can send?
Ozeki SMS Gateway provides granular control over message sending costs through
user-based accounting. Here's how it works:
Enable Accounting: Activate accounting on individual user or application
configuration forms.
Set Credit Limits: Define daily, weekly, monthly, and yearly limits to
restrict the number of messages a user can send. This helps prevent unexpected
charges and keeps your messaging budget in check.
Track Usage: The accounting feature automatically generates monthly reports
detailing the number of messages sent by each user. This allows you to monitor
usage trends and identify areas for potential optimization.
Benefits:
Cost Management: Set spending limits to avoid exceeding your budget.
User Accountability: Track individual message usage for better cost
allocation or billing purposes.
Transparency: Monthly reports provide clear insights into message activity.
In essence, user-based accounting empowers you to manage message sending costs
effectively, ensuring budget adherence and informed decision-making.
Can I set credit limits for each client / each user?
Ozeki SMS Gateway (version 2.1.0 and above) empowers you with the Credit Limit
Handling feature for precise control over message costs.
Managing User Spending:
Individual User Configuration: Each user has a dedicated configuration form
where you can enable accounting and set credit limits.
Flexible Limits: Define limits for different timeframes (daily, weekly,
monthly, yearly, or all-time) to fit your specific needs.
Detailed Cost Control: Go beyond simple limits! You can even specify costs
for individual message routes. For example, messages sent through Vodafone
might deduct 1.2 credits, while T-Mobile messages might deduct 1 credit.
Gaining Visibility:
Usage Reports: Easily generate user-specific reports summarizing message
traffic history. These reports, containing usage summary and details, can
be used for accurate invoicing.
Informed Decision-Making: Track user activity and identify potential areas
for cost optimization.
Benefits:
Prevent Overspending: Set limits to ensure users stay within your budget.
Cost Transparency: Gain clear insights into message costs with detailed
reports.
Simplified Invoicing: Generate accurate invoices based on user-specific
usage reports.
Granular Control: Manage costs with flexibility, adjusting limits and routing
costs as needed.
In summary, the Credit Limit Handling feature empowers you to establish a robust
system for responsible and cost-effective message transmission within Ozeki SMS
Gateway.
Final thoughts
Congratulation! You have finished with the setup of connection between the Ozeki SMS Gateway and the SQL Anywhere. Feel proud of yourself!
Now, you can pause and catch your breath.
We hope you didn’t get lost in the explanations.
We did our very best to make it simple and to walk you through all the details as painlessly as possible.
Now you can create this connection anytime and start sending SMS messages from an SQL database.
This solution takes advantage of all the speed and reliability of the Ozeki SMS Gateway and the portability of SQL Anywhere.
If you wish to learn more about the software solutions that Ozeki offers, make sure to visit ozeki-sms-gateway.com.
Send SMS from SQL Anywhere (part 1/4) SQL Anywhere Installation
In this video series you can see how to connect Ozeki SMS Gateway
to an SAP SQL Anywhere database server for SMS messaging.
The first video shows how to install SQL Anywhere.
Please download it from the following page.
Video content
1. Install SQL Anywhere
What is SAP SQL Anywhere?
SAP SQL Anywhere is an embedded relational database management system (RDBMS)
that is designed to make it possible for database applications to run outside of traditional data centres.
It is intended to run on PCs in satellite offices, mobile devices,
and servers in smaller businesses such as restaurants and retail stores.
How to install SQL Anywhere (video tutorial)
This tutorial will show you how to install SAP SQL Anywhere on your Windows device.
We are simply going to run the installer and complete each required step to install the software.
Follow along the steps presented in this video to complete this task successfully.
Start installation
Launch the SQL Anywhere installer (Figure 1).
Click Next to continue.
Figure 1 - Start installation
Select language
Select your preferred language from the combo box.
In this case, we have selected English.
Click on OK to select the language (Figure 2).
Figure 2 - Select language
Click 'Next
Click Next on the welcome screen, as you can see on Figure 3.
Figure 3 - Click 'Next'
Accept license terms
Click on the checkbox next to "I accept the terms of this agreement" (Figure 4).
Click Next accept the license agreement and continue.
Figure 4 - Accept license terms
Select installation type
Select Install SQL Anywhere Developer Edition, by clicking on the checkbox next to it (Figure 5).
Click Next again to proceed.
Figure 5 - Select installation type
Accept this other license agreement
Here you have to accept another license agreement (Figure 6).
Click on the checkbox next to "I accept the terms of this agreement" (Figure 4).
Click Next accept the license agreement and continue.
Figure 6 - Accept this other license agreement
Select setup type
On this page you have to select the setup type (Figure 7).
We recommend Typical, since this will install every component of the program.
Click Next again to continue.
Figure 7 - Select setup type
Click 'Install' button
Click on the Install button to begin the installation process (Figure 8).
Figure 8 - Click 'Install' button
Installation is in progress
Wait for the installation process to complete (Figure 9).
The progress bar indicates how much progress the installation has made.
Figure 9 - Installation is in progress
Installation has been finished
Click Finish to complete the installation process (Figure 10).
SQL Anywhere has now successfully installed on your device.
Figure 10 - Installation has been finished
Summary
This is the end of this tutorial.
We hope you found the article helpful and the instructions easy to follow.
For more information on SQL and sending calls from SQL, check out our various other guides.
Send SMS from SQL Anywhere (part 2/4) Create Database Tables
In this video series you can see how to connect Ozeki SMS Gateway to an SQL Anywhere database server for SMS messaging.
This video shows how to create the proper database table structure by using the GUI of your SQL Anywhere database server.
The article also contains screenshots, which show you step by step how to successfully complete this task.
Now let's get started!
What is SQL Anywhere?
SAP SQL Anywhere is an embedded relational database management system (RDBMS)
that is designed to make it possible for database applications to run outside of traditional data centres.
It is intended to run on PCs in satellite offices, mobile devices,
and servers in smaller businesses such as restaurants and retail stores.
What are database tables?
A table is a collection of related data held in a table format within a database. It consists of columns and rows.
In relational databases, and flat file databases,
a table is a set of data elements (values) using a model of vertical columns (identifiable by name) and horizontal rows,
the cell being the unit where a row and column intersect.
A table has a specified number of columns, but can have any number of rows.
Each row is identified by one or more values appearing in a particular column subset.
A specific choice of columns which uniquely identify rows is called the primary key.
Video content
1. Start SQL Central
2. Create Database
3. Connect to Database
4. Run CREATE TABLE statements
How to create database tables (video tutorial)
In this quick video tutorial, you will learn how to create database tables.
This process consists of 4 steps. First you need to open SQL Central and create a database.
After creating it, you need to connect to the database. Then, you can create tables by running SQL commands.
In the video we create two tables. One for incoming, and one for outgoing messages.
Please scroll down to copy the SQL statements (Figure 1) used in the video. If you have created the database in SQL Anywhere,
you can jump to the next video.
Create SQL Anywhere database
Before you can start creating tables, you need to create a database in SQL Anywhere.
First you need to launch SQL Central.
Then, click on 'Create database...' inside the menu on the left (Figure 1).
This will open the Create Database Wizard in a new window, where you can configure your database.
Here you need to select where to store the database.
This is done by clicking on the checkbox next to the option you want to select.
We have selected 'Create a database on this computer' (Figure 3).
Click Next to continue.
Figure 3 - Select the machine where to store the database
Specify the database's location in the filesystem
In this page you need to specify the database's directory in the files.
Click on the Browse... button, to open up the explorer (Figure 4).
Here you are able to specify the path for the database in the filesystem.
When you have selected the location, click Next again to proceed.
Figure 4 - Specify the database's location in the filesystem
Select where to use the transaction log on your filesystem
You can choose to have the database maintain a transaction log file (Figure 5).
Click on the checkbox if you wish to enable this option (we recommend you do).
Click on the Browse... button again to specify a directory for the log file.
Finally, click Next to continue.
Figure 5 - Select where to use the transaction log on your filesystem
Create a database user
After creating the database, you also need to create a database user (Figure 6).
This user will have rights to the database.
Write your username into the first textbox.
Then, write your password into the second textbox.
Confirm your password by also typing it into the third textbox.
Click Next to continue.
Figure 6 - Create a DBA user. This user will have rights to the database
Select the type of encryption
In this page you have the option to enable encryption (Figure 7).
You can also select the type of encryption you wish to use.
We have decided not to use encryption in this tutorial.
Click Next to continue.
Figure 7 - Select the type of encryption you prefer
Specify the size of the database
Here you need to select the page size your database is going to use.
We have selected 4096 bytes, as this will fit our example project well (Figure 8).
Select the size by clicking on the checkbox next to it.
Click Next again to continue.
Figure 8 - Specify the size of the database you wish to create
Choose additional database settings
In this page you can select additional database settings (Figure 9).
We have selected Create SYSCOLUMNS and SYSINDEXES views
and Include checksum with each database page.
You may select these options by clicking on the checkboxes next to them.
Click Next to proceed.
Figure 9 - Choose additional database settings
Specify the collation sequence
Here you have to select the collation sequence.
We have opted for the default setting (Figure 10).
After you have selected it, Click Next to continue.
Figure 10 - Specify the collation sequence to perform alphanumeric sorting operations in the database
Choose the security model
Next you must choose the security model for the system procedures (Figure 11).
Select Execute the system procedures as the invoker.
Click on Next again to continue.
Figure 11 - Choose the security model for the system procedures
Connect to database
The database configuration process is complete.
Now you just need to connect to the database (Figure 12).
Click the checkbox next to Connect to the new database.
Then, enter a Server name and a Database name into the respective textboxes below.
Click Next one more time to continue to the last page.
Figure 12 - Connect to database by using the server and database name
Run CREATE DATABASE SQL statement
In this page you can finalize your database.
You can see which commands will be executed immediately according to your selected options (Figure 13).
Click Finish to finalize and create your database.
Figure 13 - Run CREATE DATABASE SQL statement
Open interactive SQL
After successfully creating the database, you will be brought back to the main page of SQL Central.
Click on Open interactive SQL inside the menu on the left (Figure 14).
Figure 14 - Open interactive SQL in the freshly opened SQL Central
Connect to your database
In this window you can connect to your database.
Enter your username and password previously specified by you earlier in the installation (Figure 15).
Click on the Connect button to connect to your database.
Figure 15 - Connect to your database with the DBA user credentials you have previously set
SQL Anywhere CREATE TABLE statements to copy:
CREATE TABLE "ozekimessagein"
(
"id" integer NOT NULL DEFAULT autoincrement ,
"sender" varchar(255) NULL ,
"receiver" varchar(255) NULL ,
"msg" varchar(160) NULL ,
"senttime" varchar(100) NULL ,
"receivedtime" varchar(100) NULL ,
"operator" varchar(100) NULL ,
"msgtype" varchar(160) NULL ,
"reference" varchar(100) NULL ,
 PRIMARY KEY ("id"),
)
go
commit work
go

CREATE TABLE "ozekimessageout"
(
"id" integer NOT NULL DEFAULT autoincrement ,
"sender" varchar(255) NULL ,
"receiver" varchar(255) NULL ,
"msg" varchar(160) NULL ,
"senttime" varchar(100) NULL ,
"receivedtime" varchar(100) NULL ,
"operator" varchar(100) NULL ,
"status" varchar(20) NULL ,
"msgtype" varchar(160) NULL ,
"reference" varchar(100) NULL ,
"errormsg" varchar(250) NULL ,
 PRIMARY KEY ("id"),
)
go
commit work
go

CREATE INDEX "ozekimessageinindex" ON "ozekimessagein"
(
"id" ASC
)
go
commit work
go

CREATE INDEX "ozekimessageoutindex" ON "ozekimessageout"
(
"id" ASC
)
go
commit work
go
Code 1 - CREATE TABLE statements to copy
Copy CREATE TABLE statements>
Copy the SQL code from Code 1.
Select the entire code and right click, then copy (Figure 16).
Figure 16 - Copy CREATE TABLE statements from Code 1
Run CREATE TABLE statements
Paste the code from Code 1 into the text editor in Interactive SQL (Figure 17).
Run the code by clicking on the black play button in the toolbar on the top.
Running this piece of code will create the ozekimessagein and ozekimessageout tables,
which contain incoming and outgoing messages.
Figure 17 - Paste CREATE TABLE statements and run them on the SQL Anywhere database server
Summary
This is the end of this tutorial. If you have reached this point, you have
completed this process successfully.
For more information on implementing this solution, check out the next part of this tutorial.
Send SMS from SQL Anywhere (part 3/4) Configure Database User
In this video series you can see how to connect Ozeki SMS Gateway to an SQL Anywhere database server for SMS messaging.
This video shows how to install and configure a Database User on Ozeki SMS Gateway. It is necessary to provide the connection string.
Video content
1. Start SQL Anywhere server
2. Install Database User
3. Provide connection string
4. Connect to Database
What is SQL Anywhere?
SAP SQL Anywhere is an embedded relational database management system (RDBMS)
that is designed to make it possible for database applications to run outside of traditional data centres.
It is intended to run on PCs in satellite offices,
mobile devices, and servers in smaller businesses such as restaurants and retail stores.
What is Ozeki SMS Gateway?
Ozeki 10 SMS gateway is a very reliable, high performance SMS gateway software for Windows and Linux.
It can send or receive a massive amount of SMS messages in short time.
With it you will get the highest performance, availability and security to run your most demanding SMS applications.
It enables you to use your computer to send and receive SMS messages to and from mobile devices.
It allows SMS messaging in two ways: directly connecting to the SMS Centre of a GSM service provider over the Internet
or connecting to it using a GSM modem attached to the PC with a phone-to-PC data cable.
How to configure database user (video tutorial)
In this video tutorial you will learn how to configure a database user.
This is done through Ozeki SMS Gateway.
We are going to create and configure an SQL Anywhere messaging connection.
Follow along the steps presented in this video to successfully implement the solution.
Open Ozeki SMS Gateway
Click on Ozeki SMS Gateway in the Ozeki desktop to open the application (Figure 1).
Figure 1 - Open the SMS Gateway application on Ozeki 10's desktop screen
Add new user
Click on Add new user or application on the right side of the window to add a new user (Figure 2).
Figure 2 - Click 'Add new user or application' on the right-side panel
Install SQL Messaging User
Scroll down and find SQL messaging under Application Interfaces (Figure 3).
Click on Install highlighted in blue next to it.
This will open up more options to search from SQL messaging connection.
Figure 3 - Install SQL Messaging User
Install SQL Anywhere Connection
Scroll down and find SQL Anywhere (Figure 4).
Click on Install highlighted in blue next to it.
This will bring you to a configuration screen where you can set up your SQL Messaging user.
Figure 4 - Install SQL Anywhere Connection
Define the SQL Anywhere database connection details
On this page you have to provide details for your SQL Anywhere connection (Figure 5).
You need to enter the following details in the respective textboxes:
Driver
Host
Server
Port
Database
User ID
Password
Then click on OK to save your settings and create the connection.
Figure 5 - Define the SQL Anywhere database connection details
Enable SQL Anywhere connection
The final step is to enable the connection (Figure 6).
Click on the switch button. The switch will turn green to indicate that the connection is active.
Figure 6 - Enable SQL Anywhere connection
Summary
You have now completed this tutorial!
We hope the information presented above has helped you implement this solution
successfully and efficiently.
For more information on Ozeki SMS Gateway and our other systems and solution,
make sure to check out our various other guides and tutorials.
Send SMS from SQL Anywhere (part 4/4) Send Test Message
In this video series you can see how to connect Ozeki SMS Gateway to an SQL
Anywhere database server for SMS messaging.
See how to insert a simple row into the proper table, so Ozeki SMS Gateway can
automatically send SMS messages to mobile phones.
Video content
1. INSERT message into database
2. Send Test message
What is SQL Anywhere?
SAP SQL Anywhere is an embedded relational database management system (RDBMS)
that is designed to make it possible for database applications to run outside of traditional data centres.
It is intended to run on PCs in satellite offices,
mobile devices, and servers in smaller businesses such as restaurants and retail stores.
What is Ozeki SMS Gateway?
Ozeki 10 SMS gateway is a very reliable, high performance SMS gateway software for Windows and Linux.
It can send or receive a massive amount of SMS messages in short time.
With it you will get the highest performance, availability and security to run your most demanding SMS applications.
It enables you to use your computer to send and receive SMS messages to and from mobile devices.
It allows SMS messaging in two ways: directly connecting to the SMS Centre of a GSM service provider over the Internet
or connecting to it using a GSM modem attached to the PC with a phone-to-PC data cable.
How to send a test message from SQL Anywhere (video tutorial)
Look at the upcoming screenshots to thoroughly examine the final stage, which is SMS sending.
You can start the whole process by INSERT-ing the SMS into the database.
Open Database user
Your users are located in the right-side menu in Ozeki SMS Gateway.
Open you database user by clicking on it (Figure 1).
Figure 1 - Open Database user
Insert message to the database table
Access the SQL editor by clicking in the SQL tab of your connection.
Copy the code found below in Code 1 and paste it into the text editor (Figure 2).
Click on the blue Execute button to run the code and insert the message into the database.
Figure 2 - Insert message to the database table
INSERT message record (example):
USE ozeki
INSERT INTO ozekimessageout (receiver,msg,status) values ("+44111223465","Hello world","Send");
GO
Code 1 - Copy INSERT statement
Your message has been sent by Ozeki SMS Gateway
Now open the Sent folder located in the bottom left.
Here you can see that the message has appeared in the folder, confirming it has been sent (Figure 3).
Additionally, you can view more information about this in the Messaging details section on the bottom.
Figure 3 - The Database User's sent folder shows that your message has been sent by Ozeki SMS Gateway
Summary
This is the final part of this tutorial.
Everything is now set up for you to send messages in SQL Anywhere using Ozeki SMS Gateway.
We hope you were able to follow this guide and implement this solution successfully.
Ozeki has a large number of different guides on various topic.
For more information, check out more of our other guides too.
This guide is a detailed explanation that will show you how to send SMS from ODBC.
Sending SMS using ODBC is incredibly useful for sending SMS in bulk.
The article below contains all the necessary steps to complete this procedure with ease.
Sending SMS from ODBC only requires Ozeki SMS Gateway and an SMS service provider.
ODBC uses the SQL language and a database to send text messages,
therefore it requires basic knowledge of SQL and SMS technology.
We hope you find this tutorial helpful and let's get started!
What is ODBC
An ODBC driver uses the Open Database Connectivity (ODBC) interface by Microsoft
that allows applications to access data in database management systems (DBMS)
using SQL as a standard for accessing the data.
ODBC permits maximum interoperability, which means a single application can
access different DBMS.
What is Ozeki SMS Gateway
Ozeki SMS Gateway is a communication software that routes messages between real world entities.
It allows you to build up simple communication between shared hardware and software resources of your system.
It offers real time information, and provides various configuration options to route messages.
How to send SMS from ODBC (Quick steps)
To send SMS from ODBC:
Launch the Ozeki SMS Gateway app
Add new SQL messaging application
Install ODBC connection
Configure Connection settings
Enable logging for ODBC
Switch ODBC connection on
Go to the Events tab page
Inspect the SQL tab page to see the SMS
Send SMS message from the database
Check the SMS message sent from ODBC
How to receive SMS with ODBC database
This database system makes it possible to receive SMS messages using an ODBC database.
The solutions consist of a phone, a computer with Ozeki SMS Gateway installed, an ODBC Database Server and your application.
The phone can be used to send SMS messages to the Ozeki SMS Gateway.
It will then store it in an ODBC Database Server and then your application could download it from the database server.
It is that simple!
Figure 1 - How to receive SMS with ODBC database
How to send SMS from ODBC database
This database system on the other hand is capable of sending messages from an ODBC Database server.
This setup consists of a phone, a computer running the Ozeki SMS Gateway, an ODBC Database server,
and your application. Your application will send the message to store to the ODBC Database Server.
From there, the Ozeki SMS Gateway can download it and send it to the predefined address. It is that simple!
Figure 2 - How to send SMS from ODBC database
How to send SMS from ODBC (video tutorial)
This video tutorial shows you the steps on how to send SMS from ODBC.
We are first going to create and install a new SQL messaging connection in Ozeki SMS Gateway.
This connection uses the ODBC interface and can be used to send text messages.
Then we enable this connection and send SMS through the database using SQL code.
Install SQL messaging connection
Start by opening Ozeki SMS Gateway.
Under "Users and applications" click on Add new connection (Figure 3).
Locate SQL messaging under Application interfaces.
Click on Install highlighted in blue next to it.
This will take you to a new screen where you can select the type of SQL messaging connection you wish to create.
Figure 3 - Install SQL messaging connection
Create ODBC connection
Find OBCD in the SQL messaging section (Figure 4).
Click on Install next to it highlighted in blue.
You will then be taken to a configuration screen where you are able to set up your new ODBC connection.
Figure 4 - Create ODBC connection
Configure ODBC connection
Next you need to fill in a configuration form.
Under connection settings you must provide the details for all items listed (Figure 5).
Select your driver, then enter the IP address of your server.
Then proceed to set the database, then enter your username and password.
Figure 5 - Configure ODBC connection
Enable logging
The next step is to enable logging. This is useful for monitoring your SMS traffic.
Click on the advanced tab, then enable every single option under Log level (Figure 6).
This is done by clicking on the checkboxes next to them.
Click on the OK button to continue.
Logging is now enabled for all types of traffic.
Figure 6 - Enable logging
Datbase connection established
Turn your connection on by clicking on the switch button (Figure 7).
The button turns green to indicate that it has been enable.
You also get notified in forms of log messages, that the database connection has been established.
These messages can be viewed in the Events tab.
Figure 7 - Datbase connection established
Message received
You can see that a log message indicates that an SMS message has been recieved (Figure 8).
This log information is always accessible in the Events tab.
Figure 8 - Message received
Message inserted into database
Using an ODBC connection, you can view if the message has been inserted into the database.
First, click on the SQL tab (Figure 9).
Here you can a piece of SQL code.
This code in particular is a query that returns all the messages from the inbox.
In this case we can see that the message was returned as the result of the query.
Figure 9 - Message inserted into database
Send message from the database
You can send messages from the SQL tab via SQL code.
Type the code found in Figure 8 into the text editor (Figure 10).
When you click on the Execute button, the message will be sent fron the database.
Figure 10 - Send message from the database
SMS message sent
To make sure that the message was sent successfully on the database,
we need to open the Sent folder in the left side menu (Figure 11).
Inside this folder, already sent messages should always appear.
Figure 11 - SMS message sent
Summary
Now everything is set up for you to send SMS using ODBC using Ozeki SMS Gateway.
We hope you found this article informative and the steps listed above were sufficient.
For more information, make sure to check out our other articles on Ozeki SMS Gateway.
This article provides all necessary information for you to send SMS using OleDB.
Sending SMS using OleDB is incredibly useful for sending SMS in bulk.
The article below contains all the necessary steps to complete this procedure with ease.
Sending SMS from OleDB only requires Ozeki SMS Gateway and an SMS service provider.
OleDB uses the SQL language and a database to send text messages,
therefore it requires basic knowledge of SQL and SMS technology.
We hope you find this tutorial helpful and let's get started!
What is OleDB
OLE DB (Object Linking and Embedding, Database, sometimes written as OLEDB or OLE-DB), an API designed by Microsoft,
allows accessing data from a variety of sources in a uniform manner.
The API provides a set of interfaces implemented using the Component Object Model (COM) it is otherwise unrelated to OLE.
Microsoft originally intended OLE DB as a higher-level replacement for, and successor to, ODBC,
extending its feature set to support a wider variety of non-relational databases,
such as object databases and spreadsheets that do not necessarily implement.
What is Ozeki SMS Gateway
Ozeki SMS Gateway is a communication software that routes messages between real world entities.
It allows you to build up simple communication between shared hardware and software resources of your system.
It offers real time information and provides various configuration options to route messages.
How to send SMS from OLEDB (Quick steps)
To send SMS from OLEDB:
Launch Ozeki SMS Gateway
Add new SQL messaging app
Install OLEDB connection
Configure connection settings
Enable logging for OLEDB
Switch OLEDB connection on
Read the logs on Events tab page
See the inserted SMS on SQL tab page
Send SMS from the database
Check the SMS sent from OLEDB
How to receive SMS with OleDB database
This database system lets you receive messages with your application.
It consists of an OleDB Database Server, a computer with Ozeki SMS Gateway running on it,
and a phone that will be used to send messages. To understand how this system works,
take a look at the diagram (Figure 1).
The phone will send a message to the address of the Ozeki SMS Gateway running on the PC.
It will store the message on the OleDB Database Server.
From there, your application could download it. It is that simple.
Figure 1 - How to receive SMS with OleDB database
How to send SMS from OleDB database
This other database system will make it possible to send SMS messages from your application using an OleDB Database Server.
The system consists of an OleDB Database Server, a computer with Ozeki SMS Gateway running on it, and a phone.
To understand how this system works, take a look at the diagram (Figure 2).
Your application will send a message to the OleDB Database Server which will store it.
The Ozeki SMS Gateway will then download the message and forward it to the predefined phone number.
It is a really simple system.
Figure 2 - How to send SMS from OleDB database
How to send SMS from OleDB (video tutorial)
Install SQL messaging connection
Start by opening Ozeki SMS Gateway.
Under "Users and applications" click on Add new connection (Figure 3).
Locate SQL messaging under Application interfaces.
Click on Install highlighted in blue next to it.
This will take you to a new screen where you can select the type of SQL messaging connection you wish to create.
Figure 3 - Install SQL messaging connection
Create OLEDB connection
Find OLEDB in the SQL messaging section (Figure 4).
Click on Install next to it highlighted in blue.
You will then be taken to a configuration screen where you are able to set up your new OLEDB connection.
Figure 4 - Create OLEDB connection
Configure OLEDB connection
Next you need to fill in a configuration form.
Under connection settings you must provide the details for all items listed (Figure 5).
First type in your password and User ID.
You must also enter the service provider, data source and database as well.
Figure 5 - Configure OLEDB connection
Enable logging
The next step is to enable logging. This is useful for monitoring your SMS traffic.
Click on the advanced tab, then enable every single option under Log level (Figure 6).
This is done by clicking on the checkboxes next to them.
Click on the OK button to continue.
Logging is now enabled for all types of traffic.
Figure 6 - Enable logging
Database connection established
Turn your connection on by clicking on the switch button (Figure 7).
The button turns green to indicate that it has been enable.
You also get notified in forms of log messages, that the database connection has been established.
These messages can be viewed in the Events tab.
Figure 7 - Database connection established
Message received
You can see that a log message indicates that an SMS message has been received (Figure 8).
This log information is always accessible in the Events tab.
Figure 8 - Message received
Message inserted into database
Using an OleDB connection, you can view if the message has been inserted into the database.
First, click on the SQL tab (Figure 9).
Here you can a piece of SQL code.
This code in particular is a query that returns all the messages from the inbox.
In this case we can see that the message was returned as the result of the query.
Figure 9 - Message inserted into database
Send message from the database
You can send messages from the SQL tab via SQL code.
Type the code found in Figure 10 into the text editor (Figure 10).
When you click on the Execute button, the message will be sent from the database.
Figure 10 - Send message from the database
SMS message sent
To make sure that the message was sent successfully on the database,
we need to open the Sent folder in the left side menu (Figure 11).
Inside this folder, already sent messages should always appear.
Figure 11 - SMS message sent
Summary
Now everything is set up for you to send SMS using OleDB using Ozeki SMS Gateway.
We hope you found this article informative, and the steps listed above were sufficient.
For more information, make sure to check out our other articles on Ozeki SMS Gateway.
This article is a detailed guide on how to set up an environment for sending SMS from SQLite.
The process itself requires the SQLite ODBC driver and Ozeki SMS Gateway installed on your device.
Sending and storing text messages in databases is incredibly useful for mass SMS Sending.
This way you can send, receive and monitor a large number of messages at once.
The tutorial below lists all the required steps for you to get started with sending SMS from SQLite.
Let's get into it!
What is SQLite
SQLite is an in-process library that implements a self-contained, serverless, zero-configuration,
transactional SQL database engine.
The code for SQLite is in the public domain and is thus free for use for any purpose, commercial or private.
SQLite is the most widely deployed database in the world with more applications than we can count, including several high-profile projects.
What is Ozeki SMS Gateway
Ozeki SMS Gateway is a communication software that routes messages between real world entities.
It allows you to build up simple communication between shared hardware and software resources of your system.
It offers real time information and provides various configuration options to route messages.
How to send SMS from SQLite (Quick steps)
To send SMS from SQLite:
Setup SQLite ODBC driver
Add new SQL messaging app
Install ODBC connection
Configure connection settings
Custom ODBC connection string
Enable logging for ODBC
Create tables
Construct SMPP client connection
Send SMS from the database
Check the SMS sent from SQLite
How to receive SMS with SQLite database
This system will make it possible to receive SMS messages using an SQLite Database Server.
The system consists of the following components.
A phone, a computer running the Ozeki SMS Gateway, an SQLite Database Server, and your application.
The phone will send a message to the address of the Ozeki SMS Gateway running on the computer,
which will then store it on an SQLite Database Server.
Then your application can easily download all the messages from the server.
(Figure 1) It is that simple!
Figure 1 - How to receive SMS with SQLite database
How to send SMS from SQLite database
This database system will make it possible to receive messages using an SQLite database.
The system consists of a phone, a computer running the Ozeki SMS Gateway application, an SQLite Database Server,
and your application. Your application will send a message to the SQLite Database Server, which will store it.
The Ozeki SMS Gateway will then download the message from the server and
forward it to the predefined phone number. (Figure 2)
Figure 2 - How to send SMS from SQLite database
How to send SMS from SQLite (video tutorial)
In this video tutorial you will learn how to send SMS from SQLite.
We are first going to create a new ODBC and SMPP client connection in Ozeki SMS Gateway.
Then we create tables inside the database to store messages.
Finally, we can send SMS using SQL code in our database.
Install SQLite ODBC driver
Before you can start using SQLite, you must first install the SQLite ODBC driver.
Open the installer and complete the installation process (Figure 3).
After the driver has been successfully installed, SQLite is now ready to use.
Figure 3 - Install SQLite ODBC driver
Install SQL messaging user
To get started with sending SMS in SQLite, you need to install an SQL messaging connection first.
Start by opening Ozeki SMS Gateway.
Click on Add new user/application in the left side menu (Figure 4).
Under Application interfaces, find SQL messaging.
Click Install to be taken to the configuration screen.
Figure 4 - Install SQL messaging user
Add ODBC connection
Find OBCD in the SQL messaging section (Figure 5).
Click on Install next to it highlighted in blue.
You will then be taken to a configuration screen where you are able to set up your new ODBC connection.
Figure 5 - Add ODBC connection
Set ODBC connection name
First you need to assign a name to your new connection (Figure 6).
Type your desired name next to Name:.
Now head over to the Advanced tab, where you need to provide the custom connection string.
Figure 6 - Set ODBC connection name
Provide the custom Connection string
Open the custom connection string option inside the Advanced tab (Figure 7).
Click on the checkbox next to "Use custom connection string" to enable this option.
Paste your custom connection string into the textbox below.
Your custom connection string must contain the file path to the database on your computer (Figure 8).
Figure 8 - Provide database file location
Enable logging
The next step is to enable logging. This is useful for monitoring your SMS traffic.
Click on the advanced tab, then enable every single option under Log level (Figure 9).
This is done by clicking on the checkboxes next to them.
Click on the OK button to continue.
Logging is now enabled for all types of traffic.
Figure 9 - Enable logging
Database connection established
Turn your connection on by clicking on the switch button (Figure 10).
The button turns green to indicate that it has been enable.
You also get notified in forms of log messages, that the database connection has been established.
These messages can be viewed in the Events tab.
Figure 10 - Database connection established
Create ozekimessagein table
With the connection established, you may now proceed to create the tables that contain the messages inside the database.
Switch over to the SQL tab of your connection and paste the following code in the text editor (Figure 11).
Click Execute to run this piece of SQL code.
This creates the "ozekimessagein" table. This acts like an inbox and contains incoming messages.
In the SQL tab, clear the text editor.
Now paste the code below into it (Figure 12).
Click Execute again to run the SQL code.
This creates the "ozekimessageout" table. This acts like an outbox and contains outgoing messages.
Now that the tables have been created, we need to install a new SMPP connection to test if SMS Messages get inserted into the database.
Click on Add new user/application in the left side menu (Figure 13).
Under IP SMS Connections, find SMPP client.
Click Install to be taken to the configuration screen.
Figure 13 - Create SMPP client connection
Configure SMPP client connection
Next you must provide the details for your new connection (Figure 14).
First, enter the IP address and Port of your connection.
Then, type your username and password into the respective textboxes.
Click on the OK button to continue.
Figure 14 - Configure SMPP client connection
SMS message received
Head over to the details page of your SMPP client connection.
Click on the Events tab to view SMS traffic logs.
Here you can see that the message has been received (Figure 15).
Figure 15 - SMS message received
Message inserted into database
By opening the details of your ODBC connection, you can make sure that the message has been inserted into the database.
Click on the Events tab to view the logs.
Here you can see that the insert command has been executed for the message (Figure 16).
This action has placed the message into a table in the database.
Figure 16 - Message inserted into database
Check message in database
You are also able to view the contents of the database as well.
Do this by opening the SQL tab of your ODBC connection.
Enter the code shown in Figure 17 and click Execute.
This will return everything the table contains.
You can see that the message is in the result of the query.
Figure 17 - Check message in database
Send SMS from the database
The SQL tab may also be used to send SMS messages through the use of SQL code.
Enter the code found in Figure 18 into the text editor.
Click on Execute to run this code and send the text message from the database.
Figure 18 - Send SMS from the database
Message sent from the database
To view your SMS message sent via SQL, you need to open the Sent folder found in the left side menu.
Here you can see that the message was placed inside of this folder, indicating that it has been successfully sent (Figure 19).
Figure 19 - Message sent from the database
Summary
Now you are able to set up an ODBC and SMPP client connection, as well as send SMS using SQL.
For more information on Ozeki SMS Gateway, make sure to check out our other articles.
We hope you found this tutorial helpful and informative.
In 2025 it is not easy to find the best C# SMS API. You may have
different needs depending on the project, and it is important to pick the
option that best fits your needs. This document gives information about
the options you can choose form and highlights the drawbacks and benefits
of each option.
C# SMS API client
The C# SMS API client is best if you develop a desktop or mobile client application, that runs over a
considerable amount of time. This solution creates a connection to the SMS gateway, and
keeps this connection option, to make sure you receive SMS messages in real time. It is
also great, because no connection overhead happens when you try to send an SMS, plus
you get instant notification about SMS delivery events, such as SMS submit reports
and SMS delivery reports.
Learn more: C# SMS API client with full source code
Simple C# SMS script
If you want to send a reply SMS through a C# SMS API, it means that
you are developing an autoresponder application. You C# app will
create some kind of logic to answer each incoming SMS message. If the
logic is simple, your best option could be not to develop a fully featured SMS solution and host it
at a webserver or in windows service. It might be a great choice
to simply write your logic in C# and let Ozeki SMS gateway do the execution.
When you use this approach, you simple copy paste your script into the SMS gateway.
Learn more: C# SMS script to reply SMS messages
C# SMS messaging using HTTP requests
The C# HTTP api is a good option for ASP.Net and other website backend
solutions. It sends an SMS messages using a fire and forget HTTP request.
This is beneficial when serving websites, because server-side scripts
tend to live only for a short time while the served webpage is constructed.
This short period does not tolerate a long time wait for SMS submit reports
and sms delivery reports to be returned. Issuing HTTP requests is
a natural way to interact with the Ozeki SMS gateway in these systems.
Learn more: How to send SMS from C# using an SQL database
C# SMS messaging using MS SQL
If you write a business application, that works with data stored in a database server, or
you work with several thousand (or million) SMS messages, your best option is to
send and receive SMS from C# SMS using an SQL database. In this case you would setup
two database tables: one for sending SMS and another for receiving SMS messages. Your
C# application would put the SMS messages you wish to send into to outbox table, and
the SMS gateway will pick it up from there and deliver them. Incoming messages will
be inserted by the SMS gateway in the inbox table. The great thing about this solution
is that the SMS gateway will update delivery timestamps and messages status information,
so you will know whether and when your SMS was sent and received by the recipient without
writing any code.
Learn more: How to send SMS from C# using an SQL database
If you are looking for a powerful tool for C#.Net developers to
add SMS sending and receiving capability to C#.Net applications, the C#
SMS API provided by Ozeki SMS Gateway is the best option. This is the best C# SMS API in 2025.
It is excellent, because it is very resource efficient, and it offers
information about your submitted messages in the form of submit reports and
delivery reports much faster than other SMS APIs. This C# sms API also allows you
to schedule SMS for future delivery, and you can use it for both sending and receiving
SMS from mobile phones without delays. Read this article to learn about this amazing C# SMS solution,
and to find out how you can take advantage of it in your environment.
What is the C# SMS API?
The Ozeki C# SMS API is a software interface provided by Ozeki SMS Gateway that allows
you to send and receive SMS from C#.Net code. This interface can be used with
the C# SMS API client library from multiple computers simultaneously. (Figure 1)
You may download the C# SMS API client library from this webpage.
Figure 1 - C# SMS API
C# SMS API client library download
You may download the C# SMS client (source code) from the following link. The ZIP
file contains a Visual Studio project with full source code. You may freely modify,
use and redistribute this code or derivatives.
With the Ozeki C# SMS API you can send SMS messages, receive SMS messages much
more efficiently than using traditional HTTP or REST SMP API solutions. You can
do this because, the Ozeki C# SMS API creates and maintains a permanent
TCP/IP link to the SMS gateway and communicates over a highly optimized SMS
protocol called OZX. This communication method requires fewer resources
in terms of CPU, memory and network bandwidth than other SMS protocols. For
example, submitting an SMS message in a HTTP REST API request takes at least
10x as much data as an OZX submit request.
The most important advantage comes from the permanent TCP/IP link. Thanks
to this permanent link, your C# SMS application will receive instant submit
reports and delivery reports in the form of C# events. You will also receive
incoming SMS messages without any delays. Without such a link, you would
either have to poll the SMS gateway to get delivery reports or to download
incoming SMS, or you would have to set up a TCP/IP listener or web service
and you would need to open a firewall port for your messages to come in.
This TCP/IP link can be encrypted using SSL/TLS and you can easily add client
and server certificate validation to make this C# SMS API link extremely secure.
To get a quick idea of how to set up your SMS gateway to accept C# SMS API connections
and how to send your first SMS from your C# application, check out the following video.
This video is only 2 minutes and 21 seconds long, and it worth the time. The video shows
how an OZX user can be created in the SMS gateway to accept C# SMS API clients,
and how you can start and run the downloaded C# sms API client library in Visual
Studio. The final part shows you how you can send a test SMS.
Why is Ozeki C# SMS API better?
The Ozeki C# SMS API is great because the amount of data needed to send
an SMS is smaller, and the Protocol Data Unit (PDU) encoding and decoding carries significantly less CPU overhead.
If you use it, your solution will consume less resources in all three major areas: memory, CPU,
and network bandwidth. As a result of this your applications will act faster and
will become more responsive.
How can I use the C# SMS API?
The Ozeki C# SMS API is a set of C# classes, that enable you to send and receive SMS messages.
You can use it by opening the downloaded project in Visual Studio. Once
you open the project you will see that the full code is written in C#.Net. Message sending is
done using C# method calls, and incoming messages arrive in the form of C# events.
Your SMS application, that you build based on the SMS API will be able to send
SMS messages directly to the mobile network using an Android mobile phone
or using a PC with an IP SMS connection. The connection to the mobile network
will be provided by Ozeki SMS gateway, that you need to install on your Android mobile phone
or on your Windows or Linux computer.
(Figure 2)
Figure 2 - How does the C# SMS API work
How much does the C# SMS API cost?
The API is a library, that is provided to you free of charge, with an MIT license. You can
freely modify it and distribute it as you wish. When you download the API, the package
contains an example console application and the full source code of the Ozeki.Libs.OZX dll.
The only cost you have to pay is the license fee for the Ozeki SMS Gateway software.
A single SMS gateway can be used to serve several hundred C# SMS clients over the network. You can install
the SMS gateway on multiple computers to increase the capacity or to take advantage of SMS offerings by local networks.
Regarding SMS costs, if you send text messages through a mobile phone attached to your PC, the cost
depends on the SMS tariffs of the SIM card in your phone. In most countries, you
can send SMS messages for free if you take this option. There is a limitation however: a single
mobile phone cannot send more than 12000 SMS per day. You can only increase this capacity
by attaching multiple mobile phones to your computer. When you send an SMS through your mobile phone (Figure 2), you need to install the
Ozeki Android SMS gateway software on your
mobile and you need to connect to it through Wifi.
If you need
a high performance on premises SMS gateway system, where
several thousand (or million) messages can be sent and received, you need to
connect to an on-line SMS service provider. In this case the SMS tariffs are set by
the SMS service you subscribe to. Note that it is always a good idea to connect to
two or more on-line SMS services to be fault tolerant, and to be able to take advantage of
least cost routing options. It is also a good idea to setup
a backup wireless link.
How do I connect to the SMS gateway?
When you develop your C# SMS application, you will likely use your laptop. Visual
Studio will be installed on your laptop. This laptop will connect to your office
Local Area Network (LAN) either through Wi-fi or through an Ethernet
connection. Your Android mobile or your Windows SMS Gateway system (Figure 3) will
also connect to the office LAN. When you connect to the SMS gateway, you will
use the LAN IP address of the SMS Gateway computer.
Figure 3 - Ozeki SMS Gateway installed on a server
To connect your C# application to the SMS gateway, you will need to know the IP address
and the port number of the SMS gateway, and you will need a username and password.
The IP address of the SMS gateway will be its LAN IP address. Since most of the
time the SMS gateway software will be installed on a different computer from your development
laptop, this IP address will be different from the IP address of your laptop. The port number is
easy. Usually, it is the default port number, which is 9580. The get a username and password,
you need to create an OZX user (Figure 4).
When you create the OZX user, you can specify any username or password you like.
Once you have found out the IP address, the port number and you have
created the username and password, you need to enter these details
into the connect method of your C# SMS application.
Figure 4 - Create OZX user for C# SMS API
If you don't want to use two computers, you can install the SMS gateway
on your laptop (the same computer where you develop your C# application).
In this case, you would supply "127.0.0.1" as the IP address and port "9580" in the connect method. (Yes, you
can also use IPv6 addresses or hostnames, such as 'localhost")
Benefits of using your own SMS Gateway
Free testing: It is very beneficial to operate your own SMS gateway, because you may test your
SMS application free of charge. You may simulate incoming SMS messages, you may
send test messages to the SMS gateway's test connection, and you may simulate
SMS delivery reports indicating successful and failed delivery. It is a good
idea to read the SMPP simulator guide to get more information on testing.
Unlimited performance testing: Once you have developed your SMS solution in
C# it is likely that you want to do some performance testing. With Ozeki SMS
gateway it is very easy to test your system with a high volume of SMS messages. In
most cases, you will only send a few thousand SMS, but if asked by a client you
can even do a test with several million messages. Check out the SMS performance test
results we have conducted with Ozeki SMS Gateway with 1 000 000 SMS.
Easily switch providers: If you develop your C# code that works
with Ozeki SMS Gateway, you will not have to worry about being locked
into one SMS network or to one SMS service provider. You can use the
same C# code and simply switch to another SMS service provider if you
get a better deal by configuring the new provider's connection in the SMS
gateway.
What is OZX?
OZX stands for OZeki eXchange. It is a highly optimized SMS protocol
used to communicate between your C# SMS application and the Ozeki SMS Gateway. It is
a TCP/IP-based protocol that is significantly more efficient than traditional SMS protocols,
such as C# HTTP SMS API protocols, C# REST SMS API protocols
or the SMPP SMS protocol.
The efficiency comes from two major facts: no unnecessary data is transmitted (note that
there is huge data overhead in both http and smpp), and an easier more efficient protocol
processing is possible due to the protocol PDU structure.
What is in the C# SMS API zip?
The zip file contains two projects (like on Figure 5): a console application that is a very easy to
understand code to show you how to use the C# SMS API, and it contains the source
code of the C# SMS API itself.
C# SMS API Package contents:
Example code (full source code)
Ozeki client library (full source code)
Figure 5 - C# SMS API package contents
How do I open the C# SMS API .sln solution?
To open the Ozeki SMS API you need to locate the OzekiConsole.sln file after
unzipping the OzekiConsole.zip package, and you need to open this file in
Visual Studio. (Figure 6) You may double-click on the solution file (.sln), or you
may navigate to it in Visual Studio.
Figure 6 - Open the OzekiConsole.sln
Once you have opened the .sln, you will see two projects in your solution. The
OzekiConsole project contains the example code that shows you how you can
use the C# SMS API client library to connect to the SMS Gateway.
(Figure 7)
The other project is the Ozeki.Libs.OZX dll project. This project contains
the full source code of the C# SMS API client library.
Figure 7 - C# SMS solution
How to login to the SMS gateway with the C# SMS API
To send SMS from C# you need to add the ozekisms.dll as a reference to your
Visual Studio Solution. You may decide to add the binary dll or you may add
the project containing the source code. If you add the binary dll, your project
will compile quicker, if you add the source code you will have better debug
capabilities. (Figure 9)
Figure 9 - How to send a text message from C#
How to send SMS from C#:
Download the Ozeki C# SMS library (zip file)
Extract the zip file
Open Microsoft Visual Studio
Create a new console application
In the solution explorer click "Add..."
Select "Existing project"
Browser for the OzekiSMSLibrary.csproj
Click Open
Add the "Ozeki" namespace to your console app
Copy and paste the example
Send your first SMS using the SendMessage function
How to receive SMS in C#
To receive SMS from C# you need to set up your project the same way you would
set it up for sending an SMS message. In short, download the ozekisms.dll
as a binary or as source and add it to your project as a reference library.
After this, you can create an instance of C# class and you may subscribe for
the event that is called when an SMS is received. (Figure 10)
Figure 10 - How to receive an SMS using C#
How to receive SMS in C#:
Download the Ozeki C# SMS library (zip file)
Open Microsoft Visual Studio
Create a new console app or open one of your existing projects
If your SMS application cannot connect to the SMS gateway, it is possible
that you have entered the wrong IP address or port number into the SMS
client. It might also be possible, that the firewall on the SMS gateway is
blocking the connection.
To check that you use the correct IP address and port, open
the SMS gateway user interface. In the toolbar of the
SMS Gateway app, click on the Advanced button. This will bring up the services
page of the SMS gateway. You need to find the OZX service in the list
and click on "Details" (Figure 11)
Figure 11 - OZX service details
After the page has opened, you can find the IP address in the window title bar (Figure 12), and the
port number on the left-hand side of the configuration form. (Note, that you may
change this port number by opening the configuration form of the OZX service.)
Figure 12 - Find the C# SMS API host and port
After you have found the IP address and port, you should make sure that you use
these details in your C# SMS application. For example, if the IP address was 192.168.93.192, and the port was
9580, you should put these parameters into the connect function. (Figure 13)
Figure 13 - C# sms client IP and port
You may write these details directly into your C# code. For example, you can
use the following function to setup a connection to the SMS gateway at
192.168.93.192:9580 with an OZX username of tester and test pass:
To sum it up the C# SMS API allows you to connect to your SMS Gateway using
the OZX protocol. This SMS protocol offers excellent performance and two-way
SMS communication. The fact that the free-to-use C# SMS API library provided by Ozeki allows you to
send SMS messages with simple method calls, and to receive SMS submission and delivery reports in the
form of C# events makes this option the possible option if you wish to build a C# SMS application in 2025.
To send sms from C#.Net you have several options. You can use the C# SMS API
library of Ozeki, or you can use HTTP requests. To send a text message in C#.Net
the best option depends on the C# project type you use. If you write code
to serve web requests, such as C# on an ASP webpage, you should go for the
HTTP requests. If you create a desktop application, a windows service or a mobile
application for Android or iPhone, it is best to use the C# SMS API library.
This guide (Figure 1) is concentrating on SMS sending only. If you need to do both
sending and receiving, you may start by reading
The best C# SMS API in 2025 guide first.
Figure 1 - How to send SMS from C#.Net
Download the C# sms api library (free source code)
A fully working example of the C# sms api can be downloaded from the following URL. This
code is provided free of charge, and can be freely modified and redistributed by you.
To send a text message from a desktop app (or a console app or Windows service) has different
requirements to sending an sms from a website. A desktop app runs for a signification amount
of time (many minutes, days or even weeks). In this case it is beneficial to maintain
a permanent connection to the SMS gateway. Using one time fire and forget web requests
is not a good choice for these apps. The biggest benefit of maintaining a permanent
connection is that you get information about message delivery events, such as submission
reports, delivery reports and sms delivery failures.
To send sms from a C# desktop app use the provided example first (as you can
see on Figure 2):
Connect to ozeki sms gateway using the ozx username and password you have created
in the sms gateway user interface. To connect use the "connect hostname:port username password" command.
Send your text message. This can be dony by typing "send phonenumber message text" if you use the example console application for sending.
Wait for sms submit reports and sms delivery reports. You might notice that these reports are printed on the screen, and they contain the same
message ID that was returned when you have sent the sms.
Example console application written in C#.Net. The source code of this console application
is available on the C# SMS API with source code page.
Figure 2 - How to send an SMS from C# sms api
The above example shows you the required steps. You can see that first a permanent
connection is established to the SMS gateway, and after this, the message is sent.
Finally, you see the message accept report and the messages submit report.
To send sms from C#, use the following source code:
Client.Send(new OzxMessage() {ToAddress="+36111111",Text="This is the text to send text from C#"});
When you set the Client.Autoconnect property to true, it makes sure, that the
client will reconnect to the SMS gateway even if the
network connection is lost temporarily or the sms gateway is restarted.
To receive sms delivery reports in C#, you need to sign up for the events:
These events will be fired when the SMS gateway sends the appropriate reports over
the permanent connection we have created using connect. This is the biggest benefit
of using a permanent connection. You get instant notifications about these
sms delivery related events. Such notifications are hard to get if you use
an HTTP SMS api. On the other hand, this information is crucial for any business,
and you must process them to build a good SMS software.
What kind of SMS delivery reports are provided by the C# sms api?
The C# SMS api returns five kind of SMS delivery reports. These are presented
as C# events. They are SMS accept event, SMS not accepted event,
SMS submit success event, sms submit failed event, sms delivery
success event, sms delivery failed event.
SMS accept event:
The SMS accepted event is raised when the Ozeki SMS gateway accepts the SMS for
delivery and puts into the outbox of the user account.
SMS not accepted event:
The SMS not accepted event is raised if the Ozeki SMS gateway does not accept the
SMS for delivery. This can happen for example if the user runs out of SMS credits,
or the disk is full or some other error happens in the sms gateway.
SMS submit successful event:
The SMS submit successful event is triggered when the SMS is delivered to the
mobile network successfully. The mobile network returns an SMS submit report,
and this report is forwarded to the C# SMS API client through the established
connection. The SMS submit successful event is raised for example when the
SMS is submitted by the SMPP client that connects
the system to the mobile network over the Internet. If you send SMS messages
through an android sms gateway, this event happens when the sms is submitted
by the sms modem built into the android phone. If you send SMS through a standard
sms modem or a gsm modem pool that is connected to
your server with a data cable, the event is fired when the modem returns the 1 byte submit successful
reference code to the AT+CMGS modem command.
sms submit failed event:
The SMS submit failed event happens if the SMS could not be submitted for
any reason to the mobile network by the Ozeki SMS Gateway. For example if the Internet link
used by the SMPP client mobile network connection is offline or
if the SMPP Server returns an SMPP error message when the SMS is sent.
If you send your SMS messages through the android sms gateway,
and the android mobile phone's plan runs out of credits, or the phone is not registered to
the mobile network you also receive this event. It might also be possible, that the
SMS routing table is not configured properly. SMS submit error
can also happen if you use a gsm modem for sms delivery and the
data cable between the modem and the pc is disconnected or broken. In all of these cases
you will have an error message in the Event Args attached to this event to give you
an idea what could be the reason for SMS submission failure.
sms delivery success event:
The sms delivery success event is called when the SMS is successfully delivered
to the recipient handset. In this case an SMS delivery report is returned by
the mobile network to the SMS gateway. The SMS delivery report contains the
timestamp of the delivery and the successful status code of the delivery.
The SMS gateway forwards this information to the C# SMS API. When you receive
an SMS delivery report event in C#, you can be sure, that your SMS was received
by the recipient.
sms delivery failed event:
The sms delivery report in C# can be handled with the sms delivery failed event
if the delivery report contains an unsuccessful delivery status code. This can
happen for example if the mobile phone where the SMS was sent to is never switched on.
This event happens rarely, because most mobile network do not return negative delivery
reports.
Send sms from C# SMS API (free to use source code)
To send SMS from C# use the following source code. This source code can be freely modified
and redistributed. Note that you can also freely modify and redistribute the
source of the C# SMS API library in the Ozeki.Libs.Ozx project.
To test sms sending in the C# sms api you have two options: You can use the
built in sms tester connection or you can setup two sms gateways
to have a more realistic testing environment.
If you setup two sms gateways, first you need to configure the first SMS gateway
as an SMPP simulator. This SMS gateway will
provide SMPP server service to the second SMS gateway.
It will operate the same way the SMSC of a mobile network operator would operate.
The second SMS gateway will connect
to the first using an SMPP client connection, and
it will provide C# SMS API service to your C# sms application.
FAQs
The delivery report (onMessageDeliveryFailed) is retrieved for every failed
attempt or is just retrieved when the max number of tries is reached?
The message remains in a pending state until the maximum number of delivery attempts is exhausted.
Is it possible to store the incoming SMS delivery reports into SQL?
To receive delivery reports for your SMS messages, navigate to the "Edit" menu
and select "Server preferences." Within the "Advanced" tab, locate the checkbox
labelled "Copy delivery reports for users" and ensure it's checked.
If you have configured an SQL to SMS gateway, incoming delivery reports will be
automatically stored within the database as standard incoming messages. Here's
how delivery status updates are reflected:
ozekimessageout Table and Status Updates: Provided you send messages from the "ozekimessageout" table, the "status" field
automatically tracks the delivery state of each message. This field dynamically
updates to reflect the following outcomes:
deliveredtonetwork: Message successfully submitted to the network.
deliveredtohandset: Message delivered to the recipient's phone.
deliveryerror: An error occurred during delivery.
This functionality provides a convenient way to monitor delivery status within
the database itself.
This article gives information about how
to receive sms in C# with the Ozeki C# SMS API.
It provides some example code you can use and outlines the steps you need to take.
To complete the steps, you need about 5 minutes. In a nutshell, to receive an
SMS with the C# SMS API you need to sign up to
the OnMessages received event, and write the event handler method that will
process the incoming SMS sent by the Ozeki SMS gateway.
Read on to learn more about this procedure!
Why do you want to receive sms in C#?
To receive sms in C# there are various reasons. You might want to collect
data from sensor or mobile users, you may create sms services that send
a reply with information, or you can simply ask your users to confirm that
they have received an SMS.
The C# sms code sample below outlines the most important steps to take to
create an SMS receiving service. The Ozeki C# sms api comes free of charge.
You can modify the api library, the examples that come with it, and you can use
it in your project and freely redistribute it or its derivatives.
The following example shows you how to subscribe to the OnMessageReceived
C# event, and how to handle this event. The example prints the incoming
SMS message to the console.
The e.Item parameter is a full OzxMessage. This means, that you have all
the details of the SMS messages in your C# sms api event. These details include
the SMS sender ID, the phone number where the SMS was sent to, the SMS text, and
the corresponding timestamps.
One of the biggest advantages to using the Ozeki C# SMS API is that you get incoming
SMS messages instantly. As soon as they hit the SMS gateway, they are forwarded to
your C# SMS client through the established TCP/IP link. This means you will not
experience any delays.
If you C# sms api client is not connected to the
SMS gateway when the SMS is received, the SMS is stored in the inbox folder
of the SMS gateway. This means your incoming messages will not get lost event
if the sms software you have written using the C# sms api is offline. This
is due to the fact that Ozeki SMS Gateway is actually
an SMS server.
Step 1 - Download the Ozeki C# sms library
Navigate to https://ozeki-sms-gateway.com/attachments/5755/OzekiConsole.zip and
download the zip file with your browser. The zip file will end up in your
Download directory (Figure 2). You can open the download directly in Windows Explorer.
The downloaded zip package will contain the example code you can use to receive sms in C#.
Figure 2 - Ozeki SMS library downloaded
Step 2 - Extract the C# sms library
Extract the C# sms library by clicking on the OzekiConsole.zip file with
the right mouse button (Figure 2). This will bring up the context menu.
In the Context menu select "Extract All...". This will show the
"Extract dialog window", where you have to click Extract.
Click the "Extract" button in the "Extract All" dialog window (Figure 3).
Figure 3 - Extract the SMS C# receive example
Step 3 - Open the project in Visual studio
Open the OzekiConsole folder. This folder will appear, after you have extracted the
OzekiConsol.zip package. In the OzekiConsole folder double click on the OzekiConsole.sln
file. This will show the "How do you want to open this file?" dialog box. In this dialog
box select "Visual Studio". After Visual Studio has been selected, click OK to open
the C# sample project. (Figure 4)
Figure 4 - Open the C# SMS receive example in Visual studio
Step 4 - Click Program.cs
Open Program.cs by clicking on the file in the solution explorer in the left hand
side of the screen. This is the main code of this example C# project. This code contains
examples on how to send sms from c# and on how to receive sms in C#.
The code is not too long, it is about 300 lines. It demonstrates the full functionality of the C# SMS API.
(Figure 5)
Figure 5 - Load Program.cs into the editor
Step 5 - Set a break point in the SMS receiver code
Find the OnMessageReceived event handler and set a breakpoint on the begin line of
the procedure. This breakpoint will give you a chance to capture the OnMessageReceived
event. The OnMessageReceived event is triggered, when your C# SMS client receives the
SMS message from the SMS gateway. (Figure 6)
Figure 6 - set a breakpoint in the on message received event
Step 6 - Create an OZX user account for the SMS api
To let the C# sms api example connect to the SMS gateway, you need to create
an OZX user account in the sms gateway. To do this navigate to the SMS
gateway management console by opening the https://127.0.0.1:9515 url and
click on the "Add new user/application" link in the right hand side of the
screen. (Figure 7)
Figure 7 - Create sms user account to receive text messages in C#
The "Add new user/application" link will bring up a list of installable user types. You need
to find the OZX user account in the list. The OZX user account uses a highly optimizes SMS
protocol, that lets your C# sms application communicate with the SMS gateway over the network.
Because the SMS gateway and the C# sms client communicates over the network, you can receive
a text message in your C# project even if project runs on a different computer.
(Figure 8)
Figure 8 - Click install to install the C# sms api user account (OZX user)
Provide a username and password. In our example we use testuser as the username and
testpass ass the password. The C# sms client will use these credentials to connect
to the sms gateway. If you would like more than one C# sms api connection, you can
create multiple OZX user accounts. Each user account will host its own C# sms api client.
To decide which C# sms client will receive an incoming SMS, you need to create inbound
routes in the Ozeki sms routing table. (Figure 9)
Figure 9 - Set testuser as the C# sms api username
Enable the logging options for the C# sms api account to get communication logs. I
recommend that you tick all the logging checkboxes first, so you get detailed
information about what happens to a message. If you receive a text, you will
see it appear in the log before it is forwarded to your C# sms client. (Figure 10)
Figure 10 - Enable logging to see received sms before it gets to the C# sms client
Step 6 - Add new route to simulate incoming SMS
Create a new SMS route to allow the admin user to send test SMS message to the
C# sms api client. One of the best things about using Ozeki SMS Gateway is that
it allows you to manage your SMS messages with a routing table. You can
setup various mobile network connections and you can decide which sms will go where.
In our example we want to route sms messages coming from the admin account to the
C# sms api client. In a real life system you will not route sms from the admin account,
instead you will route sms messages received on
mobile network connections to your C# sms api client.
To create a new sms route, click on Add new route in the Ozeki SMS Gateway dashboard (Figure 11).
Figure 11 - Add new sms route
To receive a text while you write your c# sms code, you will use the SMS gateway's compose
form, and you will send the SMS in as the admin user. The sms route you we are going to
create will route the sms messages coming from admin to the testuser account. The testuser
account will forward the sms to the C# sms client (Figure 12).
Figure 12 - SMS from admin to c# client
Select testuser as the destination for your incoming sms messages in the routing
details form. This route will send sms messages from the admin user to the testuser.
The testuser will forward the received sms messages to the C# api client (Figure 13).
Figure 13 - Create sms route for simulating incoming texts
Step 7 - Start the C# sms example project
To start your C# sms project, you need to click on the Start button in the Visual
Studio toolbar. After you click this button, Visual Studio will compile the code,
and will run it in the development environment. Program execution will be stopped
when the algorithm hits a break point. Since our example is a console application
you will see the black console window appear once the execution is started.
(Figure 14)
Figure 14 - Start the C# sms api project
Type in help in the console window. The help text will list the available
commands available for you in this example project. The first command you
will use is the connect command. Type in "connect 127.0.0.1:9580 testuser testpass"
into the console window to connect your C# sms code to the SMS Gateway. Note
that 127.0.0.1 means that the SMS gateway is running on the same PC where your
C# sms code is running. 9580 is the TCP/IP port used by the SMS gateway to accept
C# sms clients (OZX users), and the testuser and testpass credentials are the ones
we have defined when we have created the OZX user account in step 6 of this
sms tutorial. (Figure 15)
Figure 15 - Launch the C# sms console app
Once you have connected to the SMS gateway you are ready to send your first SMS
to your C# api client.
Step 8 - Send a test sms
Send a test SMS message by clicking on the "New" toolbar button in the Ozeki toolbar
in the SMS Gateway management console. When you send your test sms, you will have
to define a recipient address and the messages text. In the Advanced tab page you
may also define a sender ID, such as an SMS short code
or an alphanumeric server ID for your SMS. (Figure 16)
Figure 16 - Compose the test sms about to be received
Click OK to submit the test sms. Your sms gateway will provide you with the events
related to SMS submission, and you will be presented with a Message ID. You may notice
the GUID string in the last line of Figure 17.
Figure 17 - SMS message ID to be used in the C# sms api
After the sms is sent by the admin user, it is received by the OZX user account
called testuser. This user account forward the SMS to the C# sms client over the network.
The C# sms client receives the text over the TCP/IP link established by the connect method.
If you have set the break point in the OnMessageReceived event, this is when your breakpoint
will pause program execution.
Step 9 - Receive SMS in the C# console
Read the message received line in the C# console. You will see that the SMS was sent by admin@localhost
to the phone number +361111111. The C# sms api client received the text 'Hello c sharp client' (Figure 18). The text
message was presented to the C# client in the form of a C# event. The OnMessageReceived event
handler is called when this event is raised, and the messages was put into the OzMessageReceived event
handler method's input parameter.
Figure 18 - receive sms in C# console
The next thing you want to do is take a look at the log in the SMS gateway.
Step 10 - View the logs in the SMS Gateway
Open the details page of the testuser by clicking on the testuser link in the Ozeki SMS Gateway dashboard.
This will take us to the event log of the testuser account. In this event log we expect to see
the communication that takes place between the C# sms client and the SMS Gateway. We also expect
to see the received sms message in the communication log. (Figure 19)
Figure 19 - Open the testuser details page
Locate the "Received." line in the testuser events tab. You will see the sms received by the C# sms client
in this line. You can see the date and time of the event, and you can see the message details. Below the
human readable log entry, you will see the OZX protocol communication log. This log allows your to debug
the communication in case any problem comes up. (Figure 20)
Figure 20 - check the incoming sms in the user account associated with the C# sms api
Receive a text message from the mobile network
In the steps above we have simulated an incoming message. The admin user sent a message that was
forwarded to the C# sms example. The next step is to connect the system to the mobile network.
For this you have various options. You can connect to an Internet based SMS service provider
using an SMPP client connection, or you can install ozeki 10 sms
gateway on your Android phone and use the built in sms connection of the
android sms gateway. (Figure 21)
Figure 21 - Receive sms with an Android phone
To make the above solution work with an Android phone, all you have to do is
create an inbound route in the Ozeki SMS Routing table. You need to
create this route between the mobile network connection and the C# sms api user (testuser).
To find the best mobile network connection method for your project consult our
how to connect your sms gateway to the mobile network guide.
(Figure 22)
Figure 22 - Receive sms routing table
To sum it up
This was a long and very detailed instruction list to help you get started with developing a C# SMS
project, that can receive SMS messages. If you start to use this solution, you will find out quickly
that this solution is very good if you wish to receive sms messages promptly over various mobile
network connections. This solution works
whether you want to receive SMS over an Android Mobile phone or through an IP SMS link, such
as an SMPP client connection.
The C# SMS API uses the
OZX sms protocol to send and receive SMS messages through the Ozeki 10 SMS Gateway.
Thanks to this protocol it is the best SMS API available in C#.Net. The C# SMS
api has a method called connect, that can be used to establish a permanent connection
to the SMS gateaway.
Figure 1 - C# SMS API connect method
For the C#/.Net SMS api to connect to the SMS Gateway use
To disconnect the C# SMS API
from the SMS Gateway, you need to call the
Client.Disconnect() method. This will tear down the previously established
link you have created with C# SMS client connect method.
Figure 1 - C# sms api disconnect call
The C#/.Net SMS api disconnect method
To disconnect the the C# SMS api client from the SMS gateway
you need to call the Disconnect method of the sms client(). If you call this
method on a link that is not open, nothing will happen. If you call it on
an open link, the C# sms api will tear down the IP sms link between your application
and the SMS gateway.
C# sms api disconnect example:
Console.WriteLine("Disconnecting the C# SMS client");
Client.Disconnect();
Note, the disconnect method will stop your C# sms client to send keepalive
requests to the server. While the client is disconnected, the SMS gateway
will store your incoming messages in the inbox folder. (This is why
Ozeki 10 SMS gateway is actually an SMS Server).
To keepalive the IP SMS link between the C# SMS API
and the sms gateway you need to establish a permanent connection
with the C# SMS API's connect method. The system will automatically send
keepalive requests.
Figure 1 - C# sms api keepalive
The C#/.Net SMS api keepalive procedure
To send keepalive requests from the C#/.Net SMS
api simply keep the connection open
Step 1: Create connection
Step 2: 30 seconds of inactivity
Step 3: Send keepalive to keep the TCP/IP link open
C# sms api keepalive example:
Client.Connect(host,port,user,pass);
...
Keepalive packets are sent automatically if there is no traffic
...
Client.Send(msg);
Keepalive packets are necessary because firewall rules, vpn connections or dynamically allocated
IP SMS routes on the Internet could be disconnected after a period of inactivity. By sending
keepalive packets both the C# SMS API client and
the SMS gateway can be certain, that the
connection is still open.
Keepalive packets are only sent if no other SMS traffic is moving on the link.
To send an SMS with the C# SMS API
first you need to connect to the sms gateway. Once the C# sms api is connected,
you need to compose an OzxMessage and pass it to the Client.Send() method.
Step 1: Create a new SMS message, specify the recipient address and the message text
Step 2: Record the SMS message ID for later
Step 3: Send the sms from the C#/Net sms client by calling the send method
C# sms api send sms example:
var msg = new OzxMessage();
msg.ToAddress = recipient;
msg.Text = message;

Console.WriteLine("Sending message. ID: "+msg.ID);
Client.Send(msg);
Note, that when you create the SMS message by using the "var msg = new OzxMessage();" call
a message ID is automatically assigned to the SMS. This messages ID is used in
sms submit reports, sms failed reports and sms delivery reports to identify the message.
When you send an SMS with the C# SMS API
the first step you take is pass it to the Ozeki SMS gateway for
delivery. The sms gateway will immediately decide whether your SMS is accepted or not. If
your SMS text messages is accepted for delivery it will be added to the outbox folder
of the C# sms api user.
Figure 1 - C# sms api - message accepted for delivery
The C#/.Net SMS api message accepted event
When an sms is sent by the C# SMS api the following
procedure occurs: The sms is sent, it is accepted by the sms gateway and stored
in the outbox folder, that acts as an SMS message queue. Next it is sent to the
mobile network. The first information you receive for the sent SMS is the
OnMessageAcceptedForDelivery event. This event is returned by the SMS gateway to
the C# SMS API client application immediately after the SMS is sent.
To handle the OnMessageAcceptedForDelivery event in the C# SMS API use these steps:
Write the C# event handler for the OnMessageAcceptedForDelivery event
Send an SMS in your C# sms api host application, and record the sms message ID
Process the incoming OnMessageAcceptedForDelivery event using the sms messages ID in your C# sms api code
The OnMessageAcceptedForDelivery is returned by the SMS gateway in an OZX pdu, to
notify the C# sms client about the fact, that the SMS was successfully added to the
SMS outbox folder of the C# SMS API user.
The OnMessageAcceptedForDelivery event happens before the SMS is sent to the mobile network.
If for any reason the SMS is not accepted, the OnMessageAcceptedForDelivery event
is triggered. Such event can happen for example if the C# sms api user runs out of
sms credits, or if the disk becomes full on the SMS gateway. Note that the Ozeki SMS
gateway is also an SMS Server, which means, that it does SMS store and forward.
You can read more about the difference between an SMS gateway and an SMS server at ozeki.hu.
SMS messages sent from the C#/.Net SMS API
might not be accepted for delivery for example if the C# sms api user runs out of sms credits
on the Ozeki SMS gateway. To handle the sms not accepted
event you need to write an event handler in your C# sms api application.
Figure 1 - C# sms api - sms not accepted
The C# SMS api / sms not accepted for delivery
When you send an sms from the C# SMS api the
SMS gateway first checks if the you have enough credits to send the SMS.
If it finds that you don't, it will reject the SMS with the
OnMessageNotAcceptedForDelivery call.
To handle the OnMessageNotAcceptedForDelivery C# sms api event follow these steps:
Create the C# event handler for the OnMessageNotAcceptedForDelivery event
Handle the incoming OnMessageNotAcceptedForDelivery event in the C# sms api code
Use the error message returned by Ozeki SMS Gateway in the event args
C# sms api "Not Accepted For Delivery" event example:
The OnMessageNotAcceptedForDelivery event can happen because of multiple reasons.
For example, if the SMS routing table is not setup properly, the SMS will be stored
for delivery. If there are no SMS network connections in the system, there is also
no chance for delivery. If such errors occur, the C# SMS API is notified immediately
with this event. If there is a chance for the SMS to be delivered the OnMessageAcceptedForDelivery
event is called, and the SMS is stored in the outbox messages queue of the SMS Server.
SMS submitted successfully in the C# SMS API
means that the SMS messages was successfully sent to the mobile
network by the Ozeki SMS gateway. This SMS submit successful event
occurs if the SMS gateway receives an SMS submit report from the network.
Figure 1 - C# sms api successful sms submit
The C#/.Net SMS api sms submitted successfully event
If an sms is sent by the C# SMS api the confirmation
that the SMS was delivered to the mobile network is indicated in the form of
the SMS submit successful event. Your C#/.Net sms client will receive this event
without any delay after the mobile network return an SMS submit successful report.
To handle the OnMessageSubmitSuccess event in your C# SMS API class use these steps:
Write the C# event handler for the OnMessageAcceptedForDelivery event
Send an SMS in your C# sms api host application, and record the sms message ID
Process the incoming OnMessageAcceptedForDelivery event using the sms messages ID in your C# sms api code
If you use an SMPP client to send the SMS messages to the mobile network, the SMS submit
success event happens, when the SMPP server returns an SUBMIT_SM_RESP pdu. The event handler
you write when you sign up to this event in the C# sms api, will receive the SMS messages ID
and the SMS submit time stamp.
If you use the C# SMS API with an Android SMS Gateway, you
will receive this event when the SMS messages leaves the SMS Server running on
the Android phone. In other words, your C# sms api will be notified when the SMS is accepted
by the GSM base station.
The SMS submit failed event is triggered in the C# SMS API
when the Ozeki SMS gateway receives a negative submit report from
the SMS service provider. This SMS submit error can also happen, if the SMS cannot be submitted do to
the mobile network, for example if an SMPP client connection cannot connect,
or if the mobile phone plan runs out of money and you use the Android SMS gateway.
Figure 1 - C# SMS API - submit failed
The C#/.Net SMS api sms submit failed event
The sms submit failed event in the C# SMS api is fired
when the sms cannot be delivered from the SMS outbox message queue of the SMS gateway
to the mobile network, or when the mobile network return a submit failed SMS submit
report.
To handle the OnMessageAcceptedForDelivery event in the C# SMS API use these steps:
Sign up for the OnMessageSubmitFailed event in the C# SMS api
Write the event handler, that will process the event when the SMS submission
failure is reported by the Ozeki SMS Gateway
Use the sms messages ID to identify the SMS that this error report belongs to
The SMS Server will call this SMS Submit failed event
after it called the SMS accepted for delivery event.
Both of these events are triggered by an OZX pdu sent to the C# SMS API after
the SMS was submitted by calling the C# SMS API send sms method.
The event handler will receive the SMS message ID, and the error messages returned
by the mobile network.
SMS delivery reports are reported as C# events in the C# SMS API.
In the mobile network when a mobile phone (Terminal) receives the SMS, the network
returns a so-called SMS delivery report to the sender. This indicates that the SMS
has successfully arrived at the destination handset. Ozeki SMS gateway
will process these reports and will match them to the originally sent SMS. Once
the original SMS is identified, Ozeki SMS gateway wil call an SMS delivery successful event.
Figure 1 - C# SMS API - sms delivery report
The C#/.Net SMS api sms delivery successfully event
The sms delivery reports in the C# SMS api arrive
in the form of SMS delivery successful events. As soon as the delivery report
reaches the SMS gateway, your C# app will receive an event with the
SMS messages ID, and with the delivery date.
To handle the SMS delivery report in your C# SMS API follow these steps:
Subscribe for the OnMessageDeliverySuccess event in your C# SMS API class
Write the C# event handler to process the SMS delivery report
Send an SMS, and record the sms message ID.
Process the incoming SMS delivery report in your C# sms api code
If you read the above code example you will see, that a string and a date time
is returned to the C#/.NET sms api. The string parameter
is the messages id, and the date time is the date of successful delivery.
If you use an Android SMS Gateway, you receive
this event, when the android phone receives the delivery report. If your
SMS Server runs on a PC, this SMS delivery success
event will be triggered if the SMS delivery report corresponding to the
originally sent SMS message arrives either through the connected GSM SMS modem,
or through an IP sms connection, such as an SMPP sms client connection.
SMS delivery reports for failed SMS messages are handled
the same way in the C# SMS API as
SMS delivery reports for successful SMS delivery.
The only difference is that the Ozeki SMS gateway
raises the OnMessageDeliveryFailed event, and it attaches an error message
to the report if the mobile network returns a delivery report with a failed
status.
Figure 1 - C# SMS API - sms delivery failed
The C#/.Net SMS api sms delivery failed event
The sms delivery failed event in the C# SMS api arrives
when the mobile network considers an SMS message undeliverable. This can happen if
the destination mobile phone is never switched on or is roaming in an inaccessible
network. Some SMS service providers do not send SMS delivery reports with failed status codes.
To handle the SMS delivery failed report in your C# SMS API follow these steps:
Subscribe for the OnMessageDeliveryFailed event in your C# SMS API class
Write the C# code to process the SMS delivery failed report
Send an SMS, and save the sms message ID.
Process the incoming SMS delivery failed report in your C# sms api class
The C#/.NET sms api receives the date of failure
and the error code in addition to the SMS messages ID of the originally sent
SMS message.
For Android SMS Gateway setups, you receive
this event, when the android phone receives the delivery failed report. If your
SMS Server runs on a PC, this SMS delivery failed
event will be triggered when the delivery failed report is received on the
configure mobile network connection.
An alphanumeric SMS sender ID is the text displayed as a sender number on the
top of your phone's screen when you receive an SMS. This text is displayed
instead of a mobile phone number in an SMS message. Brand names and company
names are often used as alphanumeric sender IDs.
To set an alphanumeric SMS sender ID in the C# SMS API,
you need to specified the FromAddress field in the SMS message class
before you send the sms using the client.send command.
Figure 1 - Alphanumeric SMS sender ID
When can I use an alphanumeric sender ID in an SMS?
Android phones can receive SMS with alphanumeric sender IDs, but you cannot
send SMS messages from them with an alphanumeric sender ID. Even if you
have an Android SMS Gateway installed, alphanumeric
sender IDs will not be supported.
Can I reply to an SMS if the sender ID is alphanumeric?
If the SMS from address field contains an alphanumeric sender ID, meaning
the sender ID has letters, the recipient cannot send a reply to this message.
For example in the UK, when you receive a marketing messages from Domino's pizza,
you cannot send "STOP" to unsubscribe from their service. You need to send
the stop message to a different number, because they have used an alphanumeric
sender ID when they sent the SMS from the C# sms api.
How to send an SMS with an alphanumeric sender ID in C# sms api
To send an SMS with alphanumeric sender ID from the C# sms api of Ozeki SMS Gateway follow these steps
Step 1: Create a new SMS message class instance in your C#/Net api class
Step 2: Set the from address field of the SMS message to the alphanumeric sender ID
Step 3: Send the sms by calling the client.send method
C# sms api alphanumeric sender ID example:
var msg = new OzxMessage();
msg.FromAddress = "MyBrand";
msg.ToAddress = "Hello, I would like to let you know, that the product is great";
msg.Text = "+36201234567";

Console.WriteLine("Sending message. ID: "+msg.ID);
Client.Send(msg);
What is the maximum length for an SMS alphanumeric sender ID?
The maximum number length for an alphanumeric sender is 11 characters.
This is less than the 15 digits allowed for numeric sender IDs
Alphanumeric sender ID (Letters): Maximum 11 characters Numeric Sender ID (Digits): Maximum 15 digits
What characters are allowed in the sender ID?
The alphanumeric sender ID can contain the following characters:
a-z A-Z 0-9. Sender IDs must contain at least one letter.
Upper case letter: A - Z Lower case letters: a - z Digits: 0 - 9 Space: " "
(Alphanumeric Sender IDs maximum length is 11 characters.)
Figure 2 - Example alphanumeric sms sender ID
What characters are not allowed in the sender ID?
The alphanumeric sender ID cannot contain special
characters. Only small and capital letters and digits and spaces are allowed.
No dashes, hyphens, dots, comas or any other characters are allowed. This
limitation comes from the SMS protocol definition, so there is no
way to override this limitation in the C#/.Net SMS api.
The C# SMS API can be used to send SMS messages with a short code sender ID.
You can specify the short code in the FromAddress property of the SMS message.
If an SMS is sent using a short code, the SMS Gateway
will encode the number as a local digit-only number.
How to send an SMS with a short code sender ID in C# sms api
To send an SMS using a short code sender ID from the C# sms api follow these instructions:
Create a new instance of the SMS message class (provided by the C# sms api)
Set the from address field to the short code
Send the sms by calling the client.send method
C# sms api short code example:
var msg = new OzxMessage();
msg.FromAddress = "1234";
msg.ToAddress = "This is an SMS from a short code";
msg.Text = "+3620111111111";

Client.Send(msg);
The sms messages class in the C# sms api is responsible for carrying a message
between the C# sms api application and the Ozeki SMS Gateway. This
is the class you pass to the Client.Send() method when you wish to send an SMS through the C#/Net SMS API.
C# sms api / SMS message ID
ID: The message ID is used to identify the SMS. This ID is returned for
sms submit reports and sms delivery reports.
C# sms api / SMS sender ID
FromConnection: The name of the SMS mobile network connection where the
SMS came into the Ozeki SMS Gateway. For example if you connect to the mobile network
using an SMPP client connection the will be "SMPPClient1" when
an SMS comes in on that connection. If you use an Android SMS gateway,
this would be "Vodafone UK" if the SMS came in through the SIM card serving the vodafone network
FromAddress: The sender ID of the SMS message. If the SMS was sent from a mobile phone with the
number +44123467 this property will hold the value +44123467. If you want to specify a custom
sender ID from an SMS you wish to send this is the property you should set. You can put a
phone number into this field, an SMS shortcode associated with C# SMS API,
or an alphanumeric sender id identifying the C# SMS API.
FromStation: This is the ID of the SMS gateway computer that the received the SMS. Every Ozeki
SMS Gateway has a unique global id (GUID). If your C# API connects to multiple SMS Gateway this
ID is useful to identify where the SMS message comes from.
C# sms api / SMS recipient
ToConnection: Use this field if you wish to override the SMS routing table in the
SMS Gateway. You can specify the name of the SMS mobile network connection to use
for SMS delivery in this field.
ToAddress: The phone number where the SMS should be sent to. If you want
to send a text message to the mobile phone +3620123456, put +3620123456 into this field.
This field is mandatory for outgoing SMS messages.
ToStation: This field can be used if you want to forward your SMS through
a particular SMS gateway. This field is only relevant if you work with multiple SMS
Gateways. It is safe to leave it empty.
C# sms api / SMS text
Text: This field where you should put the message text. This field can
contain messages up to 65 536 characters. If the message length is longer than
160 characters, your SMS will be sent as a multi part SMS message. This field is
mandatory for every SMS message.
C# sms api / Dates
CreateDate: This timestamp is automatically set to Datetime. Now when
an instance of the messages class is created.
ValidUntil: Set this time in you C# SMS api implementation, to specify
an expiry date for the SMS. If your SMS is expired, it will be removed from
the outbox folder. This date is also used in setting the validity period
for the SMS before it is sent to the mobile network
TimeToSend: To schedule an SMS from future delivery in your C# SMS API, set
this date to a future point in time. Your SMS message will stay in the SMS Gateway
out box until the time comes to send it. (Note that the Ozeki SMS Gateway is an
SMS server which means it is able to store and
forward your SMS messages).
C# sms api / Delivery report request
IsSubmitReportRequested: Set this to true if you wish to receive a SubmitAccepted report
in your C# SMS api implementation.
IsDeliveryReportRequested: Set this to true if you wish to receive a Delivery report
in your C# SMS api implementation.
IsViewReportRequested: Set this to true if you wish to receive a view report
in your C# SMS api implementation. Note the view reports for SMS messages are not
returned by the mobile network. The view report is used if you send your messages
to chat recipient, and the recipient view your messages in the chat app.
C# sms api / Tags
Tags: Message tags are optional fields. You can specify fields in the name/value
format. This list of additional parameters can be used to specify custom values used
in SMS transmission, such as raw PDU, data coding scheme, SMS port numbers and other
similar values, that can be used for encoding.
C# sms api message class source
using System;
using System.Collections.Generic;
using System.Linq;
using System.Text;
using System.Threading.Tasks;

namespace OZX
{
    public class OzxMessage : IOzxMessage
    {
        public string ID { get; set; }

        public string FromConnection { get; set; }
        public string FromAddress { get; set; }
        public string FromStation { get; set; }

        public string ToConnection { get; set; }
        public string ToAddress { get; set; }
        public string ToStation { get; set; }

        public string Text { get; set; }

        public DateTime CreateDate { get; set; }
        public DateTime ValidUntil { get; set; }
        public DateTime TimeToSend { get; set; }

        public bool IsSubmitReportRequested { get; set; }
        public bool IsDeliveryReportRequested { get; set; }
        public bool IsViewReportRequested { get; set; }

        //**********************************************
        // Optional tags
        //**********************************************

        static Dictionary<string, string> _tags;
        static Dictionary<string, string> Tags
        {
            get { return _tags ?? (_tags = new Dictionary<string,string>()); }
        }

        public Dictionary<string, string> GetTags()
        {
            lock (Tags)
            {
                return Tags.ToDictionary(entry => entry.Key, entry => entry.Value);
            }
        }

        public void AddTag(string key, string value)
        {
            lock (Tags)
            {
                if (Tags.ContainsKey(key))
                    Tags[key] = value;
                else
                    Tags.Add(key, value);
            }
        }

        //**********************************************
        // Construction
        //**********************************************

        public OzxMessage()
        {
            ID = Guid.NewGuid().ToString();
            CreateDate = DateTime.Now;
            TimeToSend = DateTime.MinValue;
            ValidUntil = DateTime.Now.AddDays(7);
            IsSubmitReportRequested = true;
            IsDeliveryReportRequested = true;
            IsViewReportRequested = true;
        }


        //**********************************************
        // To string
        //**********************************************
        public override string ToString()
        {
            var sb = new StringBuilder();
            if (!string.IsNullOrEmpty(FromAddress))
                sb.Append(FromAddress.ToString());
            else
                sb.Append(FromConnection);

            sb.Append("->");

            if (!string.IsNullOrEmpty(ToAddress))
                sb.Append(ToAddress.ToString());
            else
                sb.Append(ToConnection);

            if (Text != null)
            {
                sb.Append(" '");
                sb.Append(Text);
                sb.Append("'");
            }
            return sb.ToString();
        }

    }
}
In the Ozeki SMS Gateway you can write a script, that allows you to run C# .NET code when an SMS message arrives.
This script can implement any logic to do various tasks with the incoming messages, and optionally send response SMS messages.
Step 1 - Add new user/application...
You can simply install the C# script User on the Management console by clicking Add new user/application... in the Users/Applications panel (Figure 1).
Figure 1 - Add new user/application...
Step 2 - Add C# script
An interface will open consisting of two panels. The left side panel contains
the already installed users and applications.
The right-side panel contains the users and applications you can install with
a brief description next to them.
Search the C# script User and click the blue 'install' button next to it
(Figure 2).
Figure 2 - Add C# script
Step 3 - Provide the script
The 'Configuration' panel has a 'General' tab which contains the basic settings.
First please provide a unique Name. In the Script section of tab page contains
the source of the script you wish to execute (Figure 3).
Figure 3 - Provide the script
Step 4 - Enable user
Please enable to user with the Connection switch and in the Events tab view
that the Script is compiled, and the user is initialized successfully (Figure 4).
Figure 4 - Enable user
Step 5 - Message received
Finally, you can see if a message is received by this user the script will
run and as this example works the response SMS message is sent to the Original
sender (Figure 5).
Figure 5 - Message received
ASP C# programming guide
Create a class named 'Program' in the 'Ozeki' namespace. You may also include the necessary using directives.
using System;
namespace Ozeki
{
public class Program
{
}
}
Implement the 'Receive' function inside the 'Program' class.
This function will be called when your connection receives a message.
The parameter of the 'Receive' function will be an object with the type of 'Message'.
using System;
namespace Ozeki
{
public class Program
{
public void Receive(Message msg)
{
}
}
}
Send a reply message
When receiving a message, you may send a reply to notify your sender of successful delivery.
To achieve this, you may use the built-in 'Reply' function.
using System;
namespace Ozeki
{
public class Program
{
public void Receive(Message msg)
{
Reply(msg, "Thank you for the message!");
}
}
}
Message forwarding
You may also forward your received message to another connection by using the 'Send' function.
using System;
namespace Ozeki
{
public class Program
{
public void Receive(Message msg)
{
Send("admin@localhost", msg.Text);
}
}
}
Compose your message
Composing a message is easier, than you think. You just need to use the built-in 'Message' type to create a new message object.
In the following example, when a message was received, we will create and send a new message to the admin connection.
using System;
namespace Ozeki
{
public class Program
{
public void Receive(Message msg)
{
var message = new Message();
message.Text = "Hello World!";
message.ToAddress = "+4412345678910";
message.ToConnection = "admin@localhost";
message.FromAddress = "+448888999910";
Send(message);
}
}
}
Logging
Using log messages will make debugging your script much easier. By calling the 'Log' function you may implement proper logging in your script if needed.
using System;
namespace Ozeki
{
public class Program
{
public void Receive(Message msg)
{
Log("Message received: " + msg.Text);
}
}
}
Summary
In the article above, you have learned important thing about running a C# .NET
code using the Ozeki SMS Gateway. Combining the power of the Ozeki SMS Gateway
and a C#.NET script will result in a useful and versatile messaging system.
If you can run a C#.NET code when an SMS message arrives, you can implement
logics to do perform any task. For example, a good task would be to send a
scripted response to the incoming message. Another good example is to send
notification messages inside your organization in case of an incoming message.
To find out more information about the C# SMS API, follow the link to the article
about this topic on the Ozeki Webpage : C# SMS API. Ozeki has other articles
about this topic. For example, C# HTTP SMS.
You can easily build a C# console application that allows you to send
a HTTP request to the Ozeki 10 SMS gateway. When you run this attached application,
first, it will print a HTTP request on the console and after that send it out. If
everything goes well the Ozeki 10 SMS gateway receives this request and sends back a response.
Our C# application receives this response and displaying on the console.
From this response we can find out if the delivery was successful.
What is a C# SMS API?
The C# SMS API is a great tool to be able to send SMS message from any kind of
C# based project or application by initiating HTTP requests and forwarding them
to the SMS Gateway.
If you wish to send SMS from C#, you can use the HTTP SMS API of Ozeki SMS Gateway.
To send sms from C#:
Open https://localhost:9515 in your browser and log in
Create a new HTTP API user
Check the port number of the HTTP API service
Start Visual Studio
Create a new C# console project
Send sms from C# by typing in the source code bellow
Run the Console App project
View the SMS sent from your C# project on your mobile
How to Send SMS from C# video
C# SMS source code example
The following example C# source code is free to use, you can simply implement it into
your project, or you can modify the source code to use it for other projects or applications. If you
would like to run this example code, you just need to copy-paste it into your Console App project
and run the project.
using System;
using System.Net.Http;
using System.Text;
using System.Web;
namespace HttpApiTester
{
    class Program
    {
        static async System.Threading.Tasks.Task Main(string[] args)
        {
            var username = "john";
            var password = "Xc3ffs";
            var messagetype = "SMS:TEXT";
            var httpUrl = "https://127.0.0.1:9508/";
            var recipient = HttpUtility.UrlEncode("+36201324567", Encoding.UTF8);
            var messagedata = HttpUtility.UrlEncode("TestMessage", Encoding.UTF8);

            var sendString = $"{httpUrl}api?action=sendmessage&username=" +
                             $"{username}&password={password}" +
                             $"&recipient={recipient}&messagetype=" +
                             $"{messagetype}&messagedata={messagedata}";

            Console.WriteLine("Sending request: " + sendString);

            var handler = new HttpClientHandler();
            handler.ServerCertificateCustomValidationCallback =
                (sender, cert, chain, sslPolicyErrors) => { return true; };

            using var client = new HttpClient(handler);

            try
            {
                var response = await client.GetStringAsync(sendString);
                Console.WriteLine("Http response received: ");
                Console.WriteLine(response);

            } catch(Exception e)
            {
                Console.WriteLine(e.Message);
            }
        }
    }
}
Step 1 - Open Visual Studio
The first step to create the application that can send SMS message is to open
the Visual Studio. If you haven't downloaded Visual Studio yet, just follow the link
in the Prerequisites section above to download the latest version. If you have the
installed Visual Studio on your computer, all you need to do is to click on its
icon (Figure 1) on the desktop to open Visual Studio.
Figure 1 - Open Visual Studio 2019
Step 2 - Create a new project
After you opened Visual Studio, the opening window will show up for you as
you can see it in Figure 2. Here you can see your solutions, you can open an existing one,
clone a repository or open a local folder. Now, to follow the guide, you need to
click on the 'Create a new project' button to create the project for SMS sending.
Figure 2 - Creating new project
Step 3 - Select Console App
The next window lists all the available types of projects that can be created
in Visual Studio. This example requires you to create a simple Console App as Figure 3
demonstrates it, but you can use the SMS sending service in many other types
of projects. So, all you have to do here is to click on the Console App option
from the list of available types of projects.
Figure 3 - Choosing Console Application
Step 4 - Configure the project
Before crating the project, the final step is to configure it by specifying
some details of the project. Here, you can give a name to the project and also
set the location folder as well as you can see it in Figure 4. If you finished with the
configuration, you could just click on 'Create' to create the Console App project.
Figure 4 - Setup Visual Studio project
Step 5 - Copy the example code
After you created the Console App project, now you need to set up the example code
that you need to execute. For that, scroll up on this page to find the example code
section and mark out the whole source code as Figure 5 shows that. Then just press
Ctrl+C on your keyboard to copy the source code.
Figure 5 - Copy code from website
Step 6 - Paste the source code into your project
In the Visual Studio, the created project contains an initial Program.cs source file.
At this point, this is the file that you have to use to execute the example program.
Here, first, mark out the code in that file and delete it. After that, you Figure 6
demonstrates it, press Ctrl+V on your keyboard to paste the example code into
your Program.cs file. Now, the project is ready to use.
Figure 6 - Paste code into Visual Studio
Step 7 - Execute the example project
The final step of this guide is to execute the example program. In Visual Studio,
it is quite simple to run the project, you just need to click on the Run button
as you can see it in Figure 7. After starting the program, it shows up a console
window, that prints the HTTP request that the program sent to the SMS Gateway. It
also prints the response from the SMS Gateway that shows if the delivery of the
SMS was successful.
Figure 7 - Build and run your code in Visual Studio
Step 8 - Check the send result in the Ozeki log
In Ozeki 10 SMS Gateway, you can check easily what messages sent by your application,
since the HTTP API service logs every event that occurred during the time it is enabled.
So, if you open the SMS Gateway, and select details of the HTTP API service, you will be
able to see the events. As you can see it in Figure 8, the service logged an event,
when the C# example program sent the HTTP request to the service.
Figure 8 - Check the logs of the HTTP API Service
The process of the message sending can be also viewed back by the events. For that,
open the HTTP API User connection, that you had to configure before. Figure 9
demonstrates that how the connection handles the HTTP request and send the message
to the recipient that you specified in your C# program.
Figure 9 - Check the logs of the HTTP API User
Conclusion
This guide provided all the necessary information on how to send an SMS to any recipient from your computer.
This solution uses the combination of C# and the Ozeki SMS Gateway,
which works in any country and can send and receive SMS through various mobile connections.
This will make the communication with your co-workers and your clients of your organization much easier.
The Ozeki SMS Gateway is a tool that can be controlled using HTTP requests.
To learn more about those, feel free to visit the article about receiving SMS using the C# HTTP SMS API,
or get info about other supported languages, like PHP.
All you need to do is to download the Ozeki SMS Gateway and start building your solution now!
If you want to test some elements of your communication system, sometimes you will need to simulate incoming messages, to see if your system works correctly.
We are providing you a step-by-step tutorial to set up a web page which you can send messages to the Ozeki SMS Gateway. This is a simple process,
you don’t need any developer knowledge to follow the guide.
Step 1 - Setting up an HTTP server
To be able to send messages to your own system, you will need to have a working HTTP server. To do that, click the connect button on the main page of the Ozeki SMS Gateway.
Here you will be presented with some options of connections. Now you need to click the “HTTP Server” as you can see in Figure 1.
Figure 1 - Install HTTP server
At Figure 2, you will see how the HTTP server should be configured. The “Base URL” specifies the URL which the HTTP Server should listen on.
The “Telephone number” assigns the number you provide to the connection. When you typed in the correct information, please click the “OK” button to proceed.
Figure 2 - Configure HTTP server
If you managed to set up your HTTP Server, you need to allow the connection. You can do this by switching the “Connection” switch, on the left side of the screen.
As it is presented on Figure 3.
Figure 3 - Enable HTTP server
Step 2 - Adding a new route
Now, you want the SMS Gateway to communicate with your HTTP server. You need a new route for it. You can set up a new route on the “Routes” panel, by clicking “Create new Route”.
A “Route details” tab will pop-up. Here you can specify the route of the message as it can be seen on Figure 4.
Figure 4 - Add new route
Step 3 - Test your HTTP Server
Now you have your HTTP Server, and you can communicate with it.
To start sending test messages, open the HTTP server page by clicking on the
provided URL on the left side panel as you can see on Figure 5.
Figure 5 - Open HTTP server page
If you clicked on the URL link, a webpage will be presented to you. You can use it to send messages to your own system.
The “Recipient” field will be the name of the sender, the “MessageData” will be the message itself. To send the text,
just simply click the “Submit” button. You can find it with the help of Figure 6.
Figure 6 - Generate incoming message
On Figure 7, you can see how your test message will appear in the inbox of the Ozeki SMS Gateway. To open your inbox, click on “Inbox” under the “Folders” section.
Figure 7 - Message in user inbox
Summary
This article showed you how to set up a simulated incoming message for testing purposes.
This will make troubleshooting and error handling much easier.
If you want more insight into your system, use the Ozeki SMS Gateway.
It offers excellent logging capabilities, which means you can track down errors quickly.
It is a good idea to check out the articles on the Ozeki website, so you can know more about the communication system that Ozeki offers.
To learn more about how you can utilize the Ozeki SMS Gateway,
feel free to explore the articles on the website such as: “How to receive SMS messages with C#” and “How to send SMS messages with C#”.
To create your first high performance SMS gateway system, now is the best time to download Ozeki SMS Gateway!
The following guide is going to demonstrate how you can get the messages received
by your SMS Gateway with a C# application. This C# example uses HTTP requests to ask
for the messages from your inbox folder in SMS Gateway. The SMS Gateway collects all these
received messages and sends them to the C# application as a response to the HTTP request.
The guide also shows, how you can use the HTTP server connection to simulate incoming messages.
It does take not more than five minutes to complete this guide, so let's start right now.
What is a C# SMS API?
The C# SMS API is a great tool to be able to send SMS message from any kind of
C# based project or application by initiating HTTP requests and forwarding them
to the SMS Gateway.
Send test messages using the HTTP Server connection
Run your C# application to get all incoming messages
The example C# code below is capable of collecting all incoming messages using
HTTP requests. This example code is free to use, you can modify and implement it into your
own project application. If you wish to just test the solution, you need to follow the
step-by-step instructions below or watch the video above which demonstrates
how you can use this example C# code.
using System;
using System.Net.Http;
using System.Xml;
using System.Threading.Tasks;

namespace ReceiveSMS
{
    class Program
    {
        static async Task Main(string[] args)
        {
            var username = "john";
            var password = "Xc3ffs";
            var httpUrl = "https://127.0.0.1:9508/";
            var folder = "inbox";
            var limit = "3";

            var sendString = $"{httpUrl}api?action=receivemessage&username=" +
                 $"{username}&password={password}&folder={folder}&limit=" +
                 $"{limit}&afterdownload=delete";

            Console.WriteLine("Sending request: " + sendString + "\n");

            var handler = new HttpClientHandler();
            handler.ServerCertificateCustomValidationCallback =
                (sender, cert, chain, sslPolicyErrors) => { return true; };

            using var client = new HttpClient(handler);

            try
            {
                var response = await client.GetStringAsync(sendString);
                Console.WriteLine("Http response received: ");
                DisplayMessages(response);
            }
            catch (Exception e)
            {
                Console.WriteLine(e.Message);
            }
        }
        static void DisplayMessages(string response)
        {
            var xmlDoc = new XmlDocument();
            xmlDoc.LoadXml(response);
            var nodes = xmlDoc.SelectNodes("response/data/message");

            foreach (XmlNode node in nodes)
            {
                try
                {
                    var sender = node.SelectSingleNode("originator").InnerText;
                    var text = node.SelectSingleNode("messagedata").InnerText;
                    DisplayMessage(sender, text);
                }
                catch (System.NullReferenceException e)
                {
                    Console.WriteLine("The inbox is empty!");
                }
            }
        }
        static void DisplayMessage(string sender, string text)
        {
            Console.WriteLine($"{sender}: {text}");
        }

    }
}
Step 1 - Open Visual Studio
The first step of the guide, to create a C# application where you can place the
example code from this page. The best tool to create a C# application is the
Visual Studio. You can download it from the Prerequisites section if you haven't
got it yet. If Visual Studio is already installed on your computer, you just need to
open it from your desktop as you can see it in Figure 1.
Figure 1 - Open Visual Studio 2019
Step 2 - Create a new project
After you opened the Visual Studio, the welcome window is going to show up.
You can open a recent project or create a completely new one from this window.
As Figure 2 demonstrates, now you need to create a new project, so you just need
to select this option from that window.
Figure 2 - Create new project in Visual Studio
Step 3 - Select Console App
After you decided to create a new project, the next window lists all the available
options that you can select from if you wish to create a new C# application. To follow
this guide, you just need to create a simple Console App, so as Figure 3 shows that,
just select that option and click on 'Next'.
Figure 3 - Select console App
Step 4 - Configure your project
Before finally creating the Console App project, you need to do some configurations
on the project. These are very simple configurations; you just need to give a name to
your project as you can see it in Figure 4. At this window, you can also specify the
location of the project files. If you finished with all the configurations, just
click on 'Create' to create the Console App project.
Figure 4 - Configure project name
Step 5 - Place the example code into the project
The created project contains one C# file, which is Program.cs. This is the file, where
you need to place the example code. For that, just scroll up to the example code, mark out
the whole code, and press Ctrl+C on your keyboard. This operation just copied the code
to your clipboard. After that, go to the Program.cs file, delete the code that you can find here,
and like in Figure 5, press Ctrl+V to paste the code into that file.
Figure 5 - Replace code in Visual Studio
Step 6 - Simulate some incoming messages
The next thing that you need to do, is to wait for some incoming messages in your
SMS Gateway. This can take some time, so you can choose the option to simulate some messages
using the HTTP Server connection. So, as Figure 6 demonstrates that, just open the
HTML form of the HTTP Server connection. This form provides the opportunity to create
some messages. You just need to type 'Ozeki' as a recipient and write some text
into the 'MessageData' field. To send the test message, just click on 'Submit'.
Figure 6 - Simulate some incoming SMS in Ozeki 10
Step 7 - Run the example C# code
The last step that you need to perform is to run the C# code and get the received
messages. to do that, just click on the 'Run' button in the Visual Studio as you
can see it in Figure 7. By doing this, a console window shows up which prints the
HTTP request that your application sent. It also prints the response message from
SMS Gateway, which is a list of all messages that can be found in your inbox folder.
Figure 7 - Run the C# code to receive SMS
Conclusion
This tutorial gave you all the necessary information about how you can receive
SMS messages in C#.
Receiving messages in C# means that you can implement a message receiving
functionality in any of your C# project.
This will result in a versatile and widely used project. This solution revolves
around the Ozeki SMS Gateway,
meaning that you can track messages when going through the system and can
detect errors easily thanks to the low-level logging capability of the Ozeki SMS
Gateway.
Make sure to not stop here in the learning process. Feel free to check out other
articles on the Ozeki website.
For example start with sending SMS messages using C#.
Another good article to learn is how to simulate
incoming messages for test purposes.
See how to send SMS by inserting rows into a Microsoft SQL database through a C#.NET application.
This technology is intended for developers with basic knowledge in C#.NET and SQL.
The downloadable source code helps you get started.
In the following chapters you can find the required prerequisites
and a detailed explanation on how to use the code.
A helpful workflow diagram shows you the basic connection between
the C# application's user and the recipient's phone.
The code is useful if who would like to
include SMS functionality to your C# application.
integrate automated SMS notification.
secure your products by adding SMS login.
Prerequisites
The software requirements of the system is listed on the following table.
Please download SMS Gateway
and install SMS Gateway software with .NET framework 4.5
and a Microsoft Visual Studio to run your code.
Operating System:
Windows 11, Windows 10, Windows 8, Windows 7, Windows Server 2019, Windows Server 2016, Windows Server 2012 R2, Windows Server 2008 R2, Windows Vista
Then you should install a C#.NET environment. Your C# application can connect to your MSSQL database and
insert SMS messages to the SQL table of outgoing messages.
See the workflow of the C# through MSSQL connection on Figure 1.
Figure 1 - Message flow from a cell phone to your C# application and vice versa
So basically, the Microsoft SQL Server can be reached from both your C#
application and Ozeki SMS Gateway.
All incoming and outgoing messages are stored on the MSSQL Server for further usage.
By adding the appropriate codes to your C# application, you can connect it to
your SQL database
to make it able to INSERT new rows into the outgoing message table
and read incoming messages.
Ozeki SMS Gateway's Database User is capable to read the outgoing message table
to send SMS messages and INSERT new rows
into the incoming message table for other users to read. For example, the C#
application user can read it.
How to set up your MSSQL Server
Step 1:Install Microsoft SQL Server 2016 Express Edition Step 2: Start Microsoft SQL Server 2016 Express Edition and log in. Step 3: Turn on server authentication, so it would always require database user and password pair. (Short help tutorial) Step 4: Create database and grant select, insert, update, delete permissions to a user. (Short help tutorial)
Add a Database User to Ozeki SMS Gateway
Step 1: Start Ozeki 10 browser GUI (Picture help) Step 2: Start Ozeki SMS Gateway from Ozeki 10's desktop. Step 3: Install a Database User and set the connection string.
(Short help tutorial)
Use the downloaded C# code
Step 1:Download the zip file and unpack it. Step 2: Set SQL database connection data in 'DatabaseHandling.cs'.
(Short help tutorial) Step 3: Start Ozeki 10 service if it is not running. (Short help tutorial) Step 4: Build and run the project in Microsoft Visual Studio Step 5: A window will pop up. Click the Compose message button. Fill the recipient and message text fields
and click 'Send'. (Short help tutorial)
How does the example code work
The downloadable code on the top of the page can insert messages in the 'ozekimessageout'
table. Ozeki SMS Gateway's Database User periodically checks 'ozekimessageout' to find new
message rows and send them to the recipient's phone. Each message row has a status attribute. After sending the SMS message, the status will change from
'Send' to 'Sent'.
Do not forget to check if your Microsoft SQL server is up and running and modify the server connection details in 'DatabaseHandling.cs',
which you can find in the example project.
C# classes of the example code
MainForm.cs (Figure 2):
This class contains the first window that opens up.
As you can see on Figure 2, it can show the content of two tables.
This content is read by a SELECT statement from 'ozekimessageout' and 'ozekimessagein'.
It also contains two 'Refresh'
buttons and a 'Compose message' button as well. Press it to use the next class, 'ComposeMessageForm.cs'.
Figure 2 - The GUI generated from 'MainForm.cs'
ComposeMessageForm.cs (Figure 3):
This is the next page where you can fill the necessary data fields to create a new message.
Figure 3 - The GUI generated from 'ComposeMessageForm.cs'
DatabaseHandling.cs:
This is where you can set the database connection (Figure 4)
and refresh the tables of 'MainForm.cs'.
Figure 4 - Database connection settings in 'DatabaseHandling.cs'
How does the message sending code work
In 'ComposeMessageForm.cs' you can fill the two fields with the
recipient's address and message text.
By pressing 'Send', you can start the following code:
ComposeMessageForm.cs
...
private void buttonSend_Click(object sender, EventArgs e)
{
    CheckAndSendMessage();
}

private void CheckAndSendMessage()
{
    if (textBoxRecipient.Text == "")
    {
        MessageBox.Show("Recipient field mustn't be empty!",
                    "Incorrect field value");
        return;
    }

    string errorMsg = "";
    DatabaseHandling.insertMessage(textBoxRecipient.Text,
                textBoxMessageText.Text, out errorMsg);

    MessageBox.Show(errorMsg, "Result of inserting message");
}
...
Figure 5 - Checks if the recipient's field is empty
The CheckAndSendMessage() method is
called by 'buttonSend_Click(...)'.
The method starts by checking the recipient's field and
runs insertMessage(...) from 'DatabaseHandling.cs' if the recipient's
field is NOT empty (Figure 5). insertMessage(...) can insert a new row to the
'ozekimessageout' table (Figure 6) (The default value of the msgtype attribute is SMS:TEXT).
Ozeki SMS Gateway will read the rows from the SQL server as you can see on the workflow diagram above.
Figure 7 - Message type changed from 'SMS:TEXT' to 'SMS:WAPPUSH'
Frequently asked questions
Question:
Can this C# example run on a different computer than
Ozeki SMS Gateway's or MSSQL server's machine? Answer: Yes, it can. Please modify the IP address in 'DatabaseHandling.cs' to your MSSQL server's IP address.
Question:
Can I change the sender's phone number? Answer:
Yes. Please INSERT the sender's number into the message row as well (Figure 8).
It only works if you have an IP SMS connection.
Figure 8 - Modified INSERT INTO statement with an additional 'sender' attribute
Summary
This article explained how to send SMS from C# using an SQL Server.
This means that you can send an SMS by inserting a row into a Microsoft SQL database.
This system uses a C#.NET application. Sending an SMS from an SQL Server means
that you can use the SQL language to search for a message or manage SMS messages.
It will greatly improve the efficiency of communication inside of your organization
and will make the flow of information faster.
If you would like to know more about the technology that Ozeki provides, visit the
Ozeki website. We advise you to start with the C# SMS API. You will learn more
about the Ozeki C# SMS API in this article. Next up, if you would like to send
the SMS using HTTP SMS API, visit this article: HTTP SMS
API.
Open the downloaded
project and provide the MS SQL server connection details to 'DatabaseHandling.cs'.
These details contain the server's name, username, password and database name.
These 4 fields on Figure 1 are included in the connection string.
Figure 1 - Setting connection information in 'DatabaseHandling.cs'
The MS SQL connection string is built up from the provided connection details (Figure 2).
The 'serverName' is the domain name or IP address in most cases.
Keep in mind that the database user must have rights to use the database.
Figure 2 - Shows how the connection string is built up in 'DatabaseHandling.cs'
Summary
This article explained to your how you can connect to your Microsoft SQL server.
Connecting to your Microsoft SQL Server means that you can use the SQL language to control the Ozeki SMS Gateway.
This means that all your data will be safely stored, and you can easily find any piece of information you are looking for using SQL language.
This will make billing or customer complaint handling easier.
Make sure that you don’t stop learning here.
Visit the Ozeki website where you can find more information about the system.
For example, start with the article about using C# SQL to SMS. The next step is to run an example project.
You can use Microsoft Visual Studio to start the C#.NET application.
The downloaded
example project is called 'Sending SMS through MS SQL Server'. Please run it.
On the opening window, see the outgoing and incoming messages and click
'Compose message' (Figure 1), so you can write your own message.
The outgoing and incoming messages can be refreshed from the database.
Figure 1 - Run project and click 'Compose message'
Write message and click 'Send'. Do not forget to provide the recipient (Figure 2).
Figure 2 - Write message and click 'Send'
Summary
By reading this article, you have learned how to use the Microsoft Visual Studio to start the C#.NET application.
This C#.NET can be used to receive and send messages using an SQL database.
This application is communicating with the Ozeki SMS Gateway.
This way you will have full control of the outgoing and incoming messages in the SMS Gateway app.
To understand the system more, feel free to visit the article about setting up the MS SQL connection string.
If you would like to know more about solutions that are using different programming languages,
feel free to explore the Ozeki website. You can find articles about using C# HTTP API, or the C# SMS API
If you need SMS forwarding and you have not already done so, Download Ozeki SMS Gateway now and create this setup!
The HTTP SMS API implemented by Ozeki 10 SMS Gateway provides a great, easy to use interface, that allows software developers
to send and receive SMS messages. The following pages give you information on how
to use this technology, with several free to use / free to customize examples.
Send SMS
To send an SMS message using the HTTP API you need to issue an HTTP request (Figure 1).
You can use the HTTP GET or the HTTP POST method, when you send this request to Ozeki 10 SMS
Gateway. After the request is sent, you will receive a response.
Figure 1 - Send an SMS messages through the built in webserver
To send an SMS messages you need to follow a few simple steps. First you need to
create an HTTP API user, then you need to write an HTTP request, then you need
to submit your request to the SMS Gateway.
When an SMS message arrives to the Ozeki SMS gateway, it is stored in
a message folder, called inbox. If you want to check incoming SMS messages one
of your options is to download the contents of the inbox folder using HTTP.
The following URL gives more information about how to download the contents
of a message folder:
If you want to process incoming SMS messages as soon as they arrive to your
system, you may want to setup an HTTP Client user in Ozeki SMS Gateway. This
HTTP Client user can forward incoming messages to your web application(s) as
HTTP GET or HTTP POST requests (Figure 2).
Figure 2 - HTTP Post on incoming SMS
The following webpage gives information on how to configure your SMS gateway to forward
your SMS messages to an external web application:
Your web application can also return a response SMS message in the HTTP response.
This response SMS messages will be forwarded back to the recipient handset. The
following URL has information about the proper response format your web
application can use:
This article provides information about the Ozeki HTTP SMS API. The API offers an interface for the software developers to manage SMS messages.
The API makes implementing SMS communication to project easy. This means that any software your organization develops, can have access to the SMS traffic.
This will result in versatile and useful software in the field of communication.
Make sure you don’t finish the work here. Visit the Ozeki website to learn more about SMS technology.
It is a good idea to visit the article about our C# SMS API or our SQL SMS API.
You will find key information about the API in these articles.
To use these API’s, you need to start using the Ozeki SMS Gateway. Download the gateway software and start developing now!
In order to use the HTTP API, you need to create an HTTP API user. During this procedure
you will be able to specify a username and a password. You can use this username and
password to connect to the HTTP API service of Ozeki SMS Gateway to submit your messages,
or to download the incoming messages. This guide gives you the steps to take to setup
an HTTP API user.
You can simply install the HTTP API User on the Management console by clicking Add new user/application... in the Users/Applications panel (Figure 1).
Figure 1 - Add new user/application...
Step 2 - Add HTTP API User
An interface will open consisting of two panels.
The left-side panel contains the already installed users and applications.
The right-side panel contains the users and applications you can install with a
brief description next to them. Find the HTTP API User and click the blue 'install' button next to it (Figure 2).
Figure 2 - Add HTTP API User
Step 3 - Configure username and password
On the Name section provide the unique name for the HTTP User and provide the username and password for the authentication (Figure 3).
Figure 3 - Configure username and password
Step 4 - HTTP API User details page
After you click on the OK the details page of the HTTP User will appear (Figure 4).
Figure 4 - HTTP API User details page
Step 5 - HTTP API Service
In the advanced menu you can find the HTTP API service for the user. Open the details page of the service as you can see on the Figure 5.
Figure 5 - HTTP API Service
Step 6 - HTTP Service events
The HTTP service Events tab shows the logs for the HTTP API and here you can see the port where the service is listening for the requests (Figure 6).
Figure 6 - HTTP Service events
Step 7 - Send an HTTP request form your application
The HTTP API service is capable of receiving HTTP requests from your application.
This can be done by using the SMS API, that can initiate HTTP requests and send them
to the HTTP API service that can process the HTTP requests and sends the SMS message.
The link below contains example codes of how you can send SMS messages from applications
written in different programming languages.
If a message is received by the HTTP API service, you can see it in the logs
(Figure 7).
Figure 7 - Message received
Step 9 - HTTP API User sent folder
Also, you can find the message in the HTTP API user Sent folder (Figure 8).
Figure 8 - HTTP API User sent folder
FAQs
What is an HTTP connection?
The development of the World Wide Web (WWW) was driven by the Hypertext Transfer
Protocol (HTTP). This application-level protocol facilitates communication between
distributed, collaborative hypermedia information systems, essentially web
browsers and servers.
What is an API?
An API (Application Programming Interface) is a collection of tools and rules
that software programs can use to communicate with each other. These tools can
include functions, data formats, and communication protocols. APIs are provided
by libraries or operating systems, and they save developers time and effort by
allowing them to reuse existing code instead of writing everything from scratch.
What APIs do you provide?
This software empowers developers with a diverse range of APIs (Application
Programming Interfaces) to integrate its functionalities into their applications.
These APIs cater to various programming languages, including popular choices
like SQL, HTTP, Email, and File.
For added convenience, the software provides extensive code examples in C#, C++,
ASP VB, PHP, Java, and Delphi. This allows developers to jump-start their
integration process by leveraging pre-written code snippets that showcase how to
interact with the software's features through the available APIs.
Summary
This article is about creating an HTTP API user. Having an HTTP API user means that you can use the HTTP API with your software.
This article will show you how to specify a username and a password to have better security.
The HTTP API will make implementing an SMS function to your software easy to satisfy customer needs.
If you would like to find out more information about the Ozeki SMS Gateway,
make sure to visit the Ozeki webpage. We advise you to start with the page about the HTTP SMS API
Also, you can get more information about sending SMS with the HTTP SMS API.
Now your next thing to do is to download Ozeki SMS Gateway and configure this solution immediately!
Everything is there to get it up and running in less than 10 minutes.
If your system is implemented for Ozeki NG SMS Gateway, and you would like to
use it with Ozeki 10 SMS Gateway, you can enable compatibility mode by performing
the configuration steps according to the following video. This tutorial is
only relevant if you have upgraded your system from Ozeki NG SMS Gateway to Ozeki 10.
The HTTP API allows you to send and receive SMS messages through your Ozeki SMS Gateway
with the help of HTTP requests. Requests can be done using both the GET and POST HTTP
methods and you can use http or https, depending on your configuration.
For each HTTP request, you must include a set of mandatory parameters. These are:
action, username and password. The action defines the command you wish to execute,
and the username and password identify you. To How to
create an HTTP API user guide
gives you information about how to create a username and password.
You are advised to try this example with the HTTP API Tester which is a GUI interface for Ozeki SMS Gateway API testing.
You can find the HTTP API Tester tutorial here.
Specifies the username.
The username and password parameters are used to
authenticate the user. When you send a message it will
be sent in the name of the authenticated user. The value
must be URL encoded.
string value
username=admin
M
password
Specifies the password.
The username and password parameters are used to
authenticate the user. When you send a message it will
be sent in the name of the authenticated user.
The value
must be URL encoded.
string value, minimum length: 6 characters
password=abc123
M
* M = Mandatory parameter, O = Optional parameter
To sum it up
In the article above, we provided some information about the HTTP API.
Using an HTTP API means that you can manage your SMS messages with HTTP requests.
The Ozeki SMS Gateway is a crucial element of this system. Using HTTP requests to
send and receive SMS messages means that you can build a system that can send and receive SMS messages using a web browser.
This will make information flow much faster in your organization.
If you want to learn more about this system, you can visit our webpage where you can find articles about using the HTTP SMS API to send or to receive messages.
The first step of developing a solution that can send and receive messages using a web page, is to download the Ozeki SMS Gateway.
This http api command can be used to send an SMS message via the SMS Gateway. The command
can be used to send text SMS messages or other
message types, such as binary SMS messages, operator logos, ringtones, WAP PUSH, etc...
When you use this command, you must use an http api
username and password, you must specify the recipient phone number, and the
message text.
127.0.0.1 is a local IP, so please replace it to the IP address or host name of the computer
with the installed Ozeki SMS Gateway. (Note: 127.0.0.1 is a local
loopback address that can be used when you are connecting to the SMS Gateway
from the same computer.) 9508 is the default port of Ozeki SMS
Gateway's HTTP API. This port number can be viewed and edited in Ozeki 10 SMS Gateway-s
user interface, by clicking on the Advanced button in the toolbar.
Substitute "NNNNN" to the phone number you wish to send the SMS message to.
You can use the local phone number format as well as international phone
number formats (telephone numbers formatted according to the international number
format always start with a '+' sign). If the international phone number format is used,
note that you must substitute '%2B' for the '+' character, because of URL
encoding rules.
Please substitute "MMMMM" for the message type. "SMS:TEXT" message type should be used for
text messages.
The message data contains the message you would like to send. Place the message data instead of "DDDDD". The message data should be
using UTF-8 characters and should be
URL encoded.
Other parameters can also be added to the request. For a complete list of available parameters please take a look at the 'Request parameters' table below:
HTTP/1.1 200 OK
Content-Type: application/xml
Content-Length: 246

<?xml version="1.0" encoding="UTF-8"?>
<!DOCTYPE smsapi PUBLIC "-//OZEKI//DTD XML 1.0//EN" "http://www.ozekisms.com/DTD/smsapi.xml">
<response>
   <action>sendmessage</action>
   <data>
      <acceptreport>
         <statuscode>0</statuscode>
         <statusmessage>Message accepted for delivery</statusmessage>
         <messageid>ERFAV23D</messageid>
         <recipient>06203105366</recipient>
      </acceptreport>
   </data>
</response>
HTTP request parameters
Parameter
Description
Possible values
Example
M/O*
action
Specifies the HTTP API command
sendmessage
action=sendmessage
M
username
Specifies the username.
The username and password parameters are used to
authenticate the user. When you send a message it will
be sent in the name of the authenticated user. The value
must be url-encoded.
string value, maximum length is 16 characters
username=admin
M
password
Specifies the password.
The username and password parameters are used to
authenticate the user. When you send a message it will
be sent in the name of the authenticated user.
The value
must be url-encoded.
string value, maximum length is 16 characters
password=abc123
M
originator
Specifies the sender address. This information will be displayed
on the mobile phone, that receives the message. This is the sender
address. This can be a telephone number, a short code or an alphanumeric
sender address. The telephone number must can be formatted in local
number format (e.g.06201234567) or in international number format
(e.g.+36201234567).
If you use an alphanumeric sender address (e.g.ozeki), the characters
must be encoded in UTF8 and the value must be
url-encoded.
string value, maximum length is 16 characters
originator=%2B36201112222
O
recipient
Specifies the recipient phone number.
The message will be sent to this telephone number. The telephone number
can be specified in local number format (e.g.06201234567), or in
international number format (e.g.+36201234567).
More than one recipient addresses can be separated by a colon (e.g.:
+36201234567,+36202222222) or semi-colon.
The value must be url-encoded.
string value, maximum length is 16 characters
recipient=%2B36201234567
M
messagetype
Specifies the message type.
The type of the SMS message data based on the
Mobile Message Type Specification.
For text messages the message data will be plain text, for other message
types it will be an XML document.
Specifies the text or the data of the SMS message.
The value must be encoded in UTF8 and must be url-encoded.
string value, maximum length is 32768 characters
messagedata=Hello+World
M
_charset_
Specifies the charset of the encoded data (if not specified utf-8
will be assumed).
Newer browsers should set the value of _charset_ automatically. If your
browser doesn't support this feature, you can set is manually to:
Specifies the name of the GSM Modem or IP SMS service provider
connection to use to send the message.
More information about service provider connection selection is
available in
the HTTP SMS API - SMS routing
guide.
The value must match the string specified on the configuration
form of the service provider connection.
string value, maximum length is 16 characters
serviceprovider=Vodafone
O
sendondate
Specifies the date and time, when the message should be sent.
The value must use the following date format: YYYY-MM-DD hh:mm:ss. The
value must be url-encoded
date value in YYYY-MM-DD hh:mm:ss format
sendondate=2018-12-12+10%3A07%3A05
O
responseformat
After the gateway submits the SMS message, the gateway will return a
web page indicating that the message was submitted successfully. The
content
of the webpage is formatted according to the responseformat
parameter. You can have html text response to make it easy for humans
to read it or you can have xml format to make it easy for software to
process the response.
xml (default)
html
urlencoded
responseformat=xml
O
continueurl
After the gateway submits the SMS message, the gateway will return a
web page indicating that the message was submitted successfully. The
content
of the webpage is formatted according to the responseformat
parameter. If the responseformat parameter is set to html, the webpage
can contain a "Continue" link. If you specify the URL in this parameter,
the continue link will be displayed and it will point to the specified
URL. The value of the URL must be url-encoded.
The URL you specify can contain keywords that will be replaced to state
information corresponding to the submitted message. More information about
possible keywords can be found in the
"Submit URL keywords" guide.
Note: the second example contains an
urlencoded URL.
O
redirecturl
After the gateway submits the SMS message, by default the gateway
will return a web page indicating that the message was submitted
successfully. Optionally you can ask the gateway to automatically
redirect the browser to an URL you specify. If you specify an URL in
the redirect parameter, the HTTP response returned
by the SMS gateway will contain a redirect URL in the HTTP header. This
will instruct the web browser to follow the link you have specified. The
value of the URL must be
url-encoded.
The URL you specify can contain keywords that will be replaced to state
information corresponding to the submitted message. More information
about possible keywords can be found in the
"Submit URL keywords" guide.
Note: the second example contains an urlencoded URL.
O
reporturl
You can setup a webpage to process information about "delivered
to network" and "delivered to handset" events. If you
specify an URL in the reporturl parameter, your webpage will be
called when these events happen. The value of the URL you specify in
the reporturl parameter must be
URL encoded.
The URL you specify can contain keywords that will be replaced to state
information corresponding to the submitted message.
Note: this is the urlencoded version of the following URL.
Before this
URL is called by the SMS gateway, the $reporttype and $messageid
parameters will be replaced to the
appropriate values:
will be called as:
http://192.168.1.23/proc.php?reporttype=deliveredtonetwork& messageid=ERFAV23D
The list of keywords you can use in the reporturl are:
$reporttype
$messageid
$statuscode
$statusmessage
$fromstation
$fromconnection
$fromaddress
$tostation
$toconnection
$toaddress
$text
$createdate
$submitdate
$receiveddate
O
messagecount
It specifies the exact number of messages you would like to send.
If set, indexing is needed for the 'recipient', 'messagetype' and 'messagedata' parameters.
The detailed 'messagecount' tutorial can be found here.
number
(default value: 1)
messagecount=6
O
maxresponse
This number specifies the maximum of messages about which you
will receive feedback. If you exceed this number, your messages will
be sent out, but you won't receive feedback about them. By default,
this parameter is set to 500 messages.
Contains the response for the submit request for a single recipient
address. If many recipients were specified, an acceptreport will be
included in the response for
each recipient. The order of acceptreports will match the order of the
recipient
addresses.
<acceptreport>
   <statuscode>0</statuscode>
   <statusmessage>Message accepted
   for delivery</statusmessage>
   <messageid>ERFAV23D</messageid>
   <recipient>06203105366</recipient>
</acceptreport>
acceptreport.statuscode
Contains an integer value to indicate success or failure. If
the value is 0, it means the message was accepted for delivery. If
the value is greater than 0 it means there was an error, the message
was not accepted for delivery.
Integer value, greater than or equal to 0. Less the 32768.
<statuscode>0</statuscode>
acceptreport.statusmessage
Contains a textual representation of the status code. If
the message was accepted the value will be "Message accepted for
delivery". If
the message was not accepted for delivery, you can find the error message
in this field.
string value, maximum length is 1024 characters
<statusmessage>Message accepted for delivery</statusmessage>
acceptreport.messageid
Contains a message reference that can be used to track the
message in the SMS gateway. This message reference is also used
to identify delivered to network and delivered to handset reports or
to query information about the message.
string value, maximum length is 16 characters
<messageid>ERFAV23D</messageid>
acceptreport.recipient
Contains the recipient address.
string value, maximum length is 16 characters
<recipient>06203105366</recipient>
Summary
This article was about the HTTP API ‘sendmessage’ action. With this action, you
can send text SMS messages and many other message types to any recipients through
the Ozeki SMS Gateway. You have seen example responses and some more http requests
with description, possible values and examples.
If you would like to know more about the delivery status of your messages, feel free to click the page about SMS delivery statuses.
If you would like to get a URL template, visit the page for it.
The message is still in the Ozeki outbox queue. It was not submitted to the network.
1
Submitted
The message was submitted to the network and received a submit reference.
2
PartiallySubmitted
Part of the message was submitted to the network with a submit reference. This is used for multipart messages, if all parts are submitted the message will move to submitted state.
3
Delivered
The message was delivered to the recipient terminal.
4
PartiallyDelivered
Part of the messages was delivered to the recipient terminal. This is used for multipart messages only, if all parts are delivered the message will move to delivered state.
5
Viewed
The message was viewed by the receiver. This state is triggered for chat messages only, SMS does not have such a state.
6
SubmitFailed
The message submission failed. Check the status message for the reason.
7
DeliveryFailed
The message was submitted to the network, but the network could not deliver it to the recipient terminal. Check the status message for the reason.
This guide gives you instructions on how to create an URL template to be
used in the redirecturl, the continueurl and the reporturl parameters of the
HTTP API sendmessage method.
Introduction
If the redirecturl or the continueurl
parameters are included in your sendmessage HTTP request, the SMS server will
return a response containing the URL. If the URL specified contains
certain keywords. The keywords will be replaced to the appropriate values
corresponding to the submitted message. In other words, an URL template is
an URL that will be processed by the SMS gateway before it is used in the
HTTP response. Processing means, that certain keywords will be replaced in
the URL.
For example, if you specify the following URL in the continueurl parameter:
Note that the keywords $messageid and $statusmessage have been replaced. The
message id of the submitted messages is substituted for the $messageid
keyword in the URL and the status message of the submission is is substituted
for the $statusmessage keyword.
Ozeki 10 SMS Gateway replaces the keywords specified in the table bellow.
How to use?
To pass an URL template in the redirecturl, the continueurl or in the reporturl
parameter, the URL template must be urlencoded. This is necessary, because
otherwise the HTTP syntax of the sendmessage method would break.
To urlencode your URL template you can use the online url encoding tool
(available at http://www.ozeki.hu/index.php?owpn=5679) or
you can do the encoding manually.
The URL template we used in the example above looks like this before the encoding:
If the delivery fails, the statuscode and statusmessage parameters contain
the errorcode and the errormessage returned by the service provider
reporturl
If more than one messages are submitted with a single HTTP request, the URL
template
will contain the values corresponding to the last message in the list.
To get better performance it is a good practice to send several messages with
a single HTTP request. You can do this by adding the messagecount parameter
to your request and by attaching a sequence number to the end of each HTTP
api parameter that relates to the submitted messages.
This page explains briefly how you can specify the validity period
for your messages. Please find the necessary parameter below this page.
Ozeki NG SMS Gateway allows you to send SMS messages from various
applications. If you use HTTP API for sending
messages, you can set the validity period for your messages.
For specifying the validity period, please use the following parameter:
&vp=2021.07.26.+10%3A07%3A58
Please note that 2021.07.26.+10%3A07%3A58 is the URL-encoded form of 2021.07.26. 10:07:58.
With the use of this parameter, you can send validity information to the service provider.
Therefore, the service provider can set messages to be valid for the specified period.
Please check the following example on how to use the above parameter:
How to send a scheduled SMS message using the HTTP API
This guide helps you to understand how you can send scheduled SMS messages using
HTTP API. With this solution, you can set the exact date when you would like to
send the message. The document contains a video tutorial and a step-by-step guide
where each step consists of a short description of the current step and a screenshot
to demonstrate what you need to do. To complete this guide, you don't need to have
any specific knowledge and it does not need more than ten minutes to complete.
So, let's start right now!
Video tutorial
Step 1 - Create HTTP user
In the first step, you need to create the HTTP user connection. For that, open the
Apps menu from the toolbar, and here, in the Network users' section, click on the
Install button of the HTTP user.
To start configuring a HTTP user please provide a username and a password for the
HTTP API user as you can see in the Figure 1. This information can be used to access the system through the HTTP API.
Figure 1 - Create Ozeki SMS Gateway HTTP user
Step 2 - HTTP request for send message
After you created the HTTP user connection, just open the connection to see the
Details page of the connection. Here, you need to navigate to the Test tab, where
you can send HTTP request to send a SMS message across the Ozeki SMS Gateway.
To the request, add the sendondate parameter where you can define that when will
be the message sent by the Ozeki SMS Gateway as Figure 2 demonstrates it. To initiate the
HTTP request, just click on the Submit button.
You can find this command here:
After you clicked on the Submit button and you initiated the HTTP request,
you will be able to see the response message from the Ozeki SMS Gateway as the Figure 3 shows below.
This response message contains the status code and the status message as well.
This message should tell that the message was accepted for delivery.
If the message is accepted it will be placed in the outbox folder.
Figure 3 - Message accepted
Step 4 - Message in the outbox folder
The accepted message stored in the Outbox folder of the HTTP user connection. Before
the date of the sending, it can be found in the list of the Postponed tab as you
can see it in Figure 4. At this point, it waits to reach the sending date and
be delivered.
Figure 4 - Message in outbox folder
Step 5 - Message tags
In that list of postponed messages, you can click on the selected message to see
the details of it. Here, you can select the Tags tab as Figure 5 shows that. This
tab provides you the main tags that describes the details of the message. Here, you
can see the sendondate tag, that shows the date when the message is about to be sent
by the SMS Gateway.
Figure 5 - Message tags
Step 6 - Message sent on the selected date
As soon as the sending date arrives, the HTTP user connection sends the message to
the specified recipient. If you would like to see if the delivery was successful,
you can check the Events menu of the HTTP user connection. For that, select the Events
menu like in Figure 6, and here, you will be able to see the events of the message.
Every event contains a timestamp and a simple description about the event itself.
This action can be used to receive SMS messages from the SMS Gateway using
HTTP polling. HTTP polling means that you download SMS messages from the inbox
folder of the gateway like you would download a webpage. In this section you
can get information about how you can use the receivemessage action, what
are the parameters, and you will be presented with an example HTTP request to
download incoming messages.
Description
To download incoming text messages, use the following URL format:
For 127.0.0.1, you should substitute the host name or the IP address of the
computer your SMS gateway is installed on. The port number 9508 is the default
HTTP port number of the Ozeki SMS gateway. Its port number can be configured in
the user interface of Ozeki 10 SMS Gateway, by clicking on the Advanced button
in the toolbar.
The username and the password should be substituted for "UUUUU" and "PPPPP". The
username and password identifies the user you have
created in the SMS gateway. When you invoke the receivemessage
action by
calling the URL, you will download messages from the inbox of the user specified
in the query with the username and the password.
The folder parameter of the message should be set to inbox.
The limit parameter specifies the number of messages that will be downloaded. It
is recommended to download less than 1000 messages in a single request. You can
download the remaining messages in subsequent requests.
The afterdownload parameter can be used to remove messages from the SMS gateway
once they have been successfully downloaded.
Specifies the username.
The username and password parameters are used to
authenticate the user. Once the user is authenticated
messages will be downloaded from his inbox. The value
must be url-encoded.
string value, maximum length is 16 characters
username=admin
M
password
Specifies the password.
The username and password parameters are used to
authenticate the user. Once the user is authenticated
messages will be downloaded from his inbox.
The value
must be url-encoded.
string value, maximum length is 16 characters
password=abc123
M
folder
Specifies the name of the folder. By default, messages will
be downloaded from the inbox folder. You can use the receivemessage
action to download messages from other folders as well.
Specifies the maximum number of messages to be downloaded from
the server within the request. You can download the remaining messages
with subsequent requests.
integer value, the default limit is 1000
limit=10
O
afterdownload
Specifies the way messages should be handled after a successful
download. Messages can be deleted from the SMS gateway; they can
be marked as downloaded and they can be left untouched. If they
are left untouched, the next time you initiate a download request they
will be downloaded again.
delete (default)
mark
untouch
afterdownload=delete
O
responseformat
You can specify the format of the user's incoming messages.
xml, html, url-encoded
responseformat=xml
O
* M = Mandatory parameter, O = Optional parameter
Response parameters
(xml response format)
Parameter
Description
Possible values
Example
message
Contains a single message. The data section can contain many messages.
The number of messages in the message data can is less than or equal to
the value of the limit parameter
Contains a message reference that can be used to track the
message in the SMS gateway. This message reference is also used
to identify delivered to network and delivered to handset reports or
to query information about the message.
string value, maximum length is 16 characters
<messageid>ERFAV23D</messageid>
message.originator
Contains the sender telephone number. This is the telephone number of
the cell phone the sent the message.
string value, maximum length is 16 characters
<recipient>06301234567</recipient>
message.recipient
Contains the recipient address. This is the telephone number that
was used to send the message to.
Contains the message data. For text messages this is the text of the
SMS messages. For other message types this is an XML structure specified in
the
Mobile Message Type Specification.
The message data is encoded as UTF8.
string value
<messagedata>Hello world</messagedata>
message.senttime
Contains the timestamp that tells when the message was submitted
from the sender phone.
Date time value in the following format: YYYY-MM-DD hh:mm:ss
<senttime>2028-01-16 10:04:00</senttime>
message.receivedtime
Contains the timestamp that tells when the message was received
by the SMS gateway.
Date time value in the following format: YYYY-MM-DD hh:mm:ss
<senttime>2028-01-18 20:58:04</senttime>
Summary
In this article, you found all the information necessary to use the ‘receivemessage’ action with our HTTP SMS API.
With this solution, you can utilize the benefits of http polling to receive the incoming text messages.
We did our very best to make it simple and to walk you through all the details as painlessly as possible.
If you have already completed the steps, you have seen the benefits of using our HTTP SMS API.
If you yet to start working on completing your SMS system using API, do not waste any time. Start now!
If you would like to get to know more useful insights about the advantages of other similar SMS solutions,
please open the page about sending messages with the same system.
I hope this page will be useful to all the readers and especially to beginners.
In order to pass parameters in URL-s, you have to replace certain characters
to keep the syntax. This is called URL escaping or URL encoding. For example,
the space must be replaced to the + sign. The following table lists
some of the characters that should be replaced.
space
+
!
%21
"
%22
#
%23
%
%25
&
%26
'
%27
*
%2A
+
%2B
,
%2C
/
%2F
:
%3A
<
%3C
=
%3D
>
%3E
?
%3F
Euro (€)
%E2%82%AC
On-line URL encoding
If you would like to use UTF8 URL encoding, please use the following tool:
This tool allows you to convert any text to url-encoded version using the utf8 charset.
Please enter your text into the form bellow, then click Encode.
This tool allows you to convert any text to url-encoded version using the
Windows 1250 charset.
Please enter your text into the form bellow, then click Encode.
The HTTP API of the SMS Gateway allows you to send SMS messages to mobile phones
from programming languages. The following list contains programming languages for
which we provide example code. Open the programming language you are interested
in and send your first SMS in a matter of minutes.
Send SMS form the browser
Learn about how you can use your browser to send SMS messages. With the
browser, you are capable of composing an API command. This command will be
processed by SMS Gateway and it sends the SMS message that you set up in the API command. Learn about how to send SMS from your browser
Send SMS form C#
C# is a widely used programming language, mostly to develop desktop applications,
web applications or web services. The following guide shows how you can
build your own console application which allows you to send SMS messages to SMS Gateway
by using HTTP requests. View the C# SMS example code
Send SMS form Java
Java is a general-purpose programming language that is class-based and object-oriented.
The program written in Java works on different platforms like Windows, Max, Linux,
Raspberry Pi, etc. This is a superb reason to see and learn how you can create a Java
program that can send SMS messages with HTTP requests over Ozeki SMS Gateway. View the Java SMS example code
Send SMS form PHP
PHP is a general-purpose scripting language that is especially suited to web development.
The code written in PHP is usually processed on a web server. This simple PHP
example demonstrates how you can send SMS from PHP using HTTP requests. View the PHP SMS example code
Send SMS form Perl
Perl is a general-purpose programming language originally developed for
text manipulation and now used for a wide range of tasks including
system administration, web development, network programming. This guide contains
a simple example written in Perl which shows the way how you can send SMS
messages. View the Perl SMS example code
Send SMS form Python
Python is a general purpose and high-level programming language. You
can use Python for developing desktop GUI applications, websites and web applications.
The following Python program example demonstrate how you can establish
HTTP requests and send SMS messages using them. View the Python SMS example code
Send SMS form Ruby
Ruby is a dynamic, open-source programming language with a focus
on simplicity and productivity. Let's see an example which is capable of
using HTTP requests to send SMS message via Ozeki SMS Gateway. View the Ruby SMS example code
After reading this lecture you will be able to send SMS messages to pre-setup
HTTP API users using Ozeki 10 SMS Gateway. You will see how to compose the API
command and how it works. Lastly you will see what message the browser returns if
the request was successful and the error message.
5.) If you use ethernet then go to the line with IPv4 Address and there you will find your IP.
If you use Wifi then go to the Wireless LAN adapter Wi-Fisection and on the IPv4 Address you will find your IP.
Replace the API commands parameters to your case
Replace the IP highlighted in red to your computers IP address
Now that you have fully filled in the parameters this is how your URL textbox should look.
Figure 8 - URL textbox
Now press enter.
Outcome
This is how your browser should look like now.
Figure 9 - Browser
The line highlighted in blue tells you what happened to the message.
The line highlighted in red tells you who have you sent it to.
Message should also arrive at the phone.
Error message
Another scenario is when you did not fill in the parameters as required. Then this is how browser should appear.
The line in Red is what tells you what went wrong.
Now let's look into how the command works
The first key part is when we write api:
https://IP:PORT/api?action=sendmessage&username=USER&password=PASS
recipient=NUMBER&messagetype=SMS:TEXT&messagedata=MESSAGE Description:
This is when we address the API.
After this we addressed some values where the first one was the action:
https://IP:PORT/api?action=sendmessage&username=USER&password=PASS
recipient=NUMBER&messagetype=SMS:TEXT&messagedata=MESSAGE Description:
The action value describes the action we want to make but at the
current moment has
only one value which is sendmessage.
The next value was the username:
https://IP:PORT/api?action=sendmessage&username=USER&password=PASS
recipient=NUMBER&messagetype=SMS:TEXT&messagedata=MESSAGE Description:
The username value tells what user to use to send the message and
needs to be URL encoded.
The max length is 16 characters.
After that came the password:
https://IP:PORT/api?action=sendmessage&username=USER&password=PASS
recipient=NUMBER&messagetype=SMS:TEXT&messagedata=MESSAGE Description:
The password value tells what password to use when using the user and
needs to be URL encoded.
The max length is 16 characters.
The next was the recipient:
https://IP:PORT/api?action=sendmessage&username=USER&password=PASS
recipient=NUMBER&messagetype=SMS:TEXT&messagedata=MESSAGE Description:
The recipient value describes the name of the device we are sending
to and needs to be URL encoded.
The max length is 16 characters.
The next value was the messagetype:
https://IP:PORT/api?action=sendmessage&username=USER&password=PASS
recipient=NUMBER&messagetype=SMS:TEXT&messagedata=MESSAGE Description:
The messagetype contains the type of message we want to send and
needs to be URL encoded.
To see the possible values the mobile message type specification lists the supported message types by Ozeki 10 SMS Gateway.
The next value was the messagedata:
https://IP:PORT/api?action=sendmessage&username=USER&password=PASS
recipient=NUMBER&messagetype=SMS:TEXT&messagedata=MESSAGE Description:
The messagedatathis contains the data we need to send, must be
encoded in UTF8 and needs to be URL encoded.
The max length is 32768.
This article explained how to send an SMS message directly from your browser.
Sending SMS from your browser using the Ozeki SMS Gateway will make the flow of information easier and faster.
This service can be put into use and can make your organization more efficient because it allows the information to be delivered to mobile phones.
Now your next thing to do is to download Ozeki SMS Gateway and configure this solution immediately!
Everything is there to get it up and running in less than 10 minutes.
The following example console application written in Java programming language
is going to show you the way you can send HTTP requests to the SMS Gateway and get
the response message as well. These HTTP requests can be used for sending SMS messages
and you can easily configure the details of the SMS message by modifying
the variables which contain all information regarding the SMS message.
What is a Java SMS API?
The Java SMS API enables you to implement SMS services into your Java Application.
The API communicates with the SMS Gateway using HTTP requests which sends the message
and returns with a response message.
The following example source code written in Java programming language is free to use,
you can simply implement it into your project, or you can modify the source code to use it for other projects
or applications. If you would like to run this example code, you just need to create
a new Java application with a single Java class and run the project as you can see it
in the step instructions and the video above.
The first step is to create a Java application that can send SMS messages is to
open Apache NetBeans IDE on your computer. Apache NetBeans provides editors,
wizards, and templates to help you create applications in Java, PHP and many other languages.
If you haven't downloaded Apache NetBeans yet, you can download it from the
Prerequisites section. After you installed it, you just have to open it from your desktop
like in Figure 1.
Figure 1 - Open Apache NetBeans IDE
Step 2 - Create a new Java project
After you opened Apache NetBeans IDE, it opens up with the main window. Here, you
can create the Java Application that needed to send SMS messages. For that, as
you can see it in Figure 2, click on 'File' on the toolbar, and here, select the
'New project...' option.
Figure 2 - Create new Java Project
Step 3 - Select Java Application
Next, a new window pops up, that contains all types of projects that can be created
in Apache NetBeans. Here, you can create the simple Java Application, or you can
select from more advanced types of projects. For this example you can use the
simple Java Application, so select it from the list, and like in Figure 3 click Next.
Figure 3 - Select java application project type
Step 4 - Configure the Java Application
In the next step, you need to do some basic configuration for the Java Application.
As you can see it in Figure 4, you can give a name for the project. You can also set
the location of the project and lastly you can specify a name for the package as well.
If you finished with the configuration, just click on Finish.
Figure 4 - Choose Project Name and Package
Step 5 - Create a new Java Class
The create Java Application project is empty, so it does not contain any file with
source code, so you need to create one. For that, select the package of your project,
and click with the right button on your mouse. From the pop-up window, as Figure 5
shows that, select New, and after that, click on 'Java class...' to create a new
Java class in your application.
Figure 5 - Create new Class
Step 6 - Configure the Java class
Before finishing the creation of the Java class, you need to specify a name for the
class. That can be easily done as Figure 6 shows that. After you gave the right name
for the Java class, just click on the Finish button to successfully create the Java class.
Figure 6 - Give the new class a name
Step 7 - Paste the source code
The next thing, that you need to do is to place the example code into your Java
Application. For that, just scroll up to the example code copy the whole source code
to your clipboard and place it into your newly created Java class. At this point,
you can run the Java Application, so just click on the Run button on the toolbar.
In the first run, as Figure 7 demonstrates that, you need to select the Main class
for execution. So, just select the HttpApiTester class, and click on 'Select Main class'.
Figure 7 - Paste Code from website, then select Main class
Step 8 - See the result of the application
If you have done everything right till this point, the application starts, and you
will be able to see the result in the console window as Figure 8 shows that. This
window prints the HTTP request that was initiated and sent to the SMS Gateway, and
it also prints the response from the SMS Gateway which indicates that the delivery of
the SMS message was successful or not.
Figure 8 - The program starts and the result is displayed
Step 9 - Check the send result in the Ozeki log
In Ozeki 10 SMS Gateway, you can follow what messages sent by your application,
since the HTTP API service logs every event that occurred during the time it is enabled.
So, after you opened the SMS Gateway, and selected the details of the HTTP API service, you will be
able to see the events. As Figure 9 shows that, the service logged an event,
when the example Java Application sent the HTTP request to the service.
Figure 9 - Check the logs of the HTTP API Service
The way that SMS Gateway processes the messages can be also viewed back by the events. For that,
open the HTTP API User connection, that you had to configure before. Figure 10
demonstrates that how the connection handles the HTTP request and send the message
to the recipient that you specified in your Java Application.
Figure 10 - Check the logs of the HTTP API User
Summary
You have learned how to send SMS from Java from this article.
This means that you can implement SMS services into your Java applications.
The foundation of this solution is the Ozeki SMS Gateway. It means that you will
have no performance issues or any latency in SMS sending. This way your Java solutions
can satisfy more customer needs and it will be versatile.
It also will be able to make information flow way faster and easier.
To have a better understanding of the whole system, feel free to check the
Ozeki tutorial pages about receiving SMS in Java,
or try implementing SMS services in other projects. For example,
use the HTTP SMS API with PHP.
The guide on this page is about to give you a brief introduction to how you can
get the received messages from SMS Gateway to your Java application. This operation is
demonstrated by a simple Java code that uses HTTP requests to collect the incoming messages
from SMS Gateway. If you follow this guide, you are going to learn how you can create
an example Java application that gets the messages from the inbox folder and you will be
able to see how to test the solution. So, let's get started.
What is a Java SMS API?
The Java SMS API enables you to implement SMS services into your Java Application.
The API communicates with the SMS Gateway using HTTP requests which sends the message
and returns with a response message.
Type 'https://localhost:9515' in your browser to open SMS Gateway
Select HTTP Server connection and open its HTML form
Send some test messages
Run the Java application to get the messages
The Java SMS example code below which can get the incoming messages from the SMS
Gateway is free to use, you can modify it or use it in your project. If you would
like to just test the solution, you need to follow the step-by-step instructions
below or you can also watch the video above to learn how you can create the example
Java application that can get the incoming messages from the SMS Gateway.
package ozeki;
import java.io.BufferedReader;
import java.io.IOException;
import java.io.InputStreamReader;
import java.net.HttpURLConnection;
import java.net.URL;
import java.security.GeneralSecurityException;
import java.security.cert.X509Certificate;
import java.util.stream.Collectors;
import javax.net.ssl.HostnameVerifier;
import javax.net.ssl.HttpsURLConnection;
import javax.net.ssl.SSLContext;
import javax.net.ssl.SSLSession;
import javax.net.ssl.TrustManager;
import javax.net.ssl.X509TrustManager;
import javax.xml.parsers.*;
import org.xml.sax.InputSource;
import org.w3c.dom.*;
import java.io.*;
public class ReceiveSMS {
public static void main(String[] args) {
TrustManager[] trustAllCerts = new TrustManager[]{
new X509TrustManager() {
@Override
public java.security.cert.X509Certificate[] getAcceptedIssuers() {
return new X509Certificate[0];
}
@Override
public void checkClientTrusted(
java.security.cert.X509Certificate[] certs, String authType) {
}
@Override
public void checkServerTrusted(
java.security.cert.X509Certificate[] certs, String authType) {
}
}
};
try {
SSLContext sc = SSLContext.getInstance("SSL");
sc.init(null, trustAllCerts, new java.security.SecureRandom());
HttpsURLConnection.setDefaultSSLSocketFactory(sc.getSocketFactory());
HostnameVerifier allHostsValid = new HostnameVerifier() {
@Override
public boolean verify(String hostname, SSLSession session) {
return true;
}
};
HttpsURLConnection.setDefaultHostnameVerifier(allHostsValid);
} catch (GeneralSecurityException e) {
System.out.println(e.getMessage());
}
try {
StringBuilder sendString = new StringBuilder();
String username = "john";
String password = "Xc3ffs";
String httpUrl = "https://127.0.0.1:9508/";
String folder = "inbox";
String limit = "3";
sendString.append(httpUrl).append("api?action=receivemessage&username=").
append(username).append("&password=").
append(password).append("&folder=").append(folder).
append("&limit=").append(limit).append("&afterdownload=delete");
System.out.println("Sending request: " + sendString.toString());
URL url = new URL(sendString.toString());
HttpURLConnection con = (HttpURLConnection) url.openConnection();
con.setRequestMethod("GET");
BufferedReader br = null;
System.out.println("Http response received: ");
if (con.getResponseCode() == 200) {
br = new BufferedReader(new InputStreamReader(con.getInputStream()));
String response = br.lines().collect(Collectors.joining("\n"));
response = response.substring(response.indexOf('\n')+1);
response = response.substring(response.indexOf('\n')+1);
DisplayMessages(response);
} else {
br = new BufferedReader(new InputStreamReader(con.getErrorStream()));
String response = br.lines().collect(Collectors.joining("\n"));
System.out.println(response);
}
} catch (IOException ex) {
System.out.println(ex.getMessage());
}
}
static void DisplayMessages(String response) {
try{
DocumentBuilderFactory dbf =
DocumentBuilderFactory.newInstance();
DocumentBuilder db = dbf.newDocumentBuilder();
InputSource is = new InputSource();
is.setCharacterStream(new StringReader(response));
Document doc = db.parse(is);
NodeList nodes = doc.getElementsByTagName("message");
for (int i = 0; i < nodes.getLength(); i++) {
Element element = (Element) nodes.item(i);
NodeList originator = element.getElementsByTagName("originator");
Element line = (Element) originator.item(0);
String sender = getCharacterDataFromElement(line);
NodeList messagedata = element.getElementsByTagName("messagedata");
line = (Element) messagedata.item(0);
String text = getCharacterDataFromElement(line);
DisplayMessage(sender, text);
}
} catch (Exception ex) {
System.out.println("The inbox is empty");
}
}
public static void DisplayMessage(String sender, String text) {
System.out.println(sender + ": "+ text);
}
public static String getCharacterDataFromElement(Element e) {
Node child = e.getFirstChild();
if (child instanceof CharacterData) {
CharacterData cd = (CharacterData) child;
return cd.getData();
}
return "?";
}
}
Step 1 - Open Apache NetBeans IDE
To be able to create a Java application, you need to have an application which capable
of doing that. One of these applications is the Apache NetBeans IDE which can be downloaded
from the Prerequisites section above. If you already have got this IDE, you just
need to open it from your desktop as you can see it in Figure 1.
Figure 1 - Open Apache NetBeans
Step 2 - Create a new Java application
After you opened Apache NetBeans IDE, the first thing that you need to do here is to
create a Java application. For that, select the 'New project..' option from the toolbar.
By doing this action, a window shows up, which contains all the available projects
that can be created in Apache NetBeans. Here, select the Java application option like
in Figure 2, and lastly, click on 'Next'.
Figure 2 - Create new Java Application project
Step 3 - Configure the Java application
Before creating the Java application, you need to do some configurations on it.
Here in this menu, you need to specify a name for the project, you can also select
a location for the project. The name of the package can be specified here as well.
If you finished with all the configurations, just click on 'Finish' just like in Figure 3.
Figure 3 - Configure project and package name
Step 4 - Create a Java class
After you created the Java application, you have to create a Java class since at this
point it does not contain any class yet. For that, select the package with a right click,
then 'New', and as Figure 4 shows that, click on 'Java class...'. Then, you need to
specify a name for the Java class and if you finished, just click on 'Create'.
Figure 4 - Create new Java Class
Step 5 - Replace the Java code from this page
At this point, you have the Java application that you need, but it does not contain the
right code. To fix that, you need to replace the original code with the example code
from this page. So, just go to the example code, and copy it to your clipboard using the
Ctrl+C keyboard shortcut. Then, go to the created Java class, and first, delete the code
that you can be found here. After that, press Ctrl+V to paste the example code to the
Java class as you can see it in Figure 5.
Figure 5 - Replace java code from the website
Step 6 - Send some test messages
Before running the example Java application, you need to have some incoming messages
that can be collected by the application. SMS Gateway provides you the opportunity
to simulate the incoming messages so you can test your solution. For that, just open
SMS Gateway and select the HTTP Server connection. If you don't have a HTTP Server connection,
check how to create a HTTP Server connection. Here, open the
HTML form of this connection, and like in Figure 6, send some test messages.
Figure 6 - Simulate some incoming SMS
Step 7 - Run the Java application
The last step of this guide is to run the Java application. This is a simple
operation; all you need to do is to click on the 'Run' button in Apache
NetBeans like in Figure 7.
This action runs the example Java code, which prints the HTTP request that was sent to
the SMS Gateway, and then, it prints the response as well from the SMS Gateway which
contains all the incoming messages.
Figure 7 - Run the java code in NetBeans to receive SMS
To sum it up
This guide you just read gives you information about how you receive SMS messages from the SMS Gateway using a Java application.
Using our Java SMS API, you can make use of the resources of the Java language and use it to control the SMS Gateway.
The Java API combined with the Ozeki SMS Gateway will make a powerful SMS sending system capable of sending up to a 1000 SMS per second.
This page provides a simple PHP example code that allows you to send SMS messages
using HTTP requests via the SMS Gateway. The PHP code embedded into an HTML document, so to run the code,
you just need to create an HTML file, copy-paste the example code and open the file
using your browser. The browser runs the whole HTML file with the PHP code as well,
and you will be able to see the results of the SMS sending in the opened HTML page.
What is a PHP SMS API?
The PHP SMS API ensures you to send SMS messages from a web application of a website.
The API uses HTTP requests to communicate with the SMS Gateway that delivers the message
and sends a response back.
Open Sublime Text or other text editor application
Copy-Paste the PHP source code below
Save the file to the xampp/htmldocs folder
Name the file as index.php
Open a new tab in your browser
Type 'localhost' and hit Enter to run the PHP code
PHP SMS source code example
The following example PHP source code below is free to use, you can simply implement it
into your project, or you can modify any segments of the source code to use it for other projects
or applications. If you would like to run this example code itself, you just have to follow the
instructions from the steps and the video above.
The first step to run the PHP example code on your computer is to open XAMPP Control
Panel. XAMPP is a free and open-source cross-platform web server solution stack,
which contains an Apache HTTP Server, MariaDB database, and interpreters for script
written in PHP and Perl programming languages.
If you haven't downloaded this application yet, you can download it easily by
following the link in the Prerequisites section. If you installed XAMPP already,
you just have to open it by clicking on its icon on the desktop as you can see it in Figure 1.
Figure 1 - Start XAMPP Control Panel
Step 2 - Start Apache Server
After you opened XAMPP Control Panel, the main window of XAMPP shows up. Here, you
will be able to see all the services that XAMPP provides for you. At this point,
you need to start the Apache Server as Figure 2 demonstrates it. This service ensures
you to run a local webserver where you can build and develop your web application
or website. Now, this service provides the environment to run the PHP SMS source code.
Figure 2 - Starting Apache Server
Step 3 - Copy the PHP SMS example source code
The next step after starting the Apache server is to get the example source code.
Luckily, this is the right place to grab that PHP SMS source code. All you have to do here,
is to scroll up to the 'PHP SMS source code example' section, and as you can see it in Figure 3,
just mark out every line of the source code and press Ctrl+C on your keyboard to copy
the source code to the clipboard.
Figure 3 - Copy code from website
Step 4 - Paste the source code to a text file
You need to place the copied source code into a simple text file. To do that, first,
you have to open a text editor on your computer. That can be the simple Notepad application,
or you can use a more developed text editor. After you opened your text editor and created a new,
empty text file, just press Ctrl+V on your keyboard. As Figure 4 shows that, the
source code will be pasted into the text document.
Figure 4 - Open Text Editor and Paste PHP SMS Code into
Step 5 - Save the document as PHP file
At this point, you have got the document that you need, but it is not in the
correct format. To correct that, you just need to save it with .php file extension.
So, as Figure 5 shows that, save the text file into the xampp/htdocs folder. It is important
to save the file into that folder, since the Apache server will be able to read the file from that folder.
You also need to name the file as 'index.php'. That naming ensures that the file
will be read automatically in case you load the local web service.
Figure 5 - Save the document as PHP file
Step 6 - Open 'localhost' to run the example code
The last step of the guide is to open your localhost service. For that, just open your
browser, type 'localhost' like in Figure 6, and hit Enter. By performing this action,
the local web service loads the saved 'index.php' with the PHP SMS source code.
The page that the service loaded prints the HTTP request and also prints the response
message from the SMS Gateway that shows if the delivery of the SMS was successful.
Figure 6 - Open localhost address in browser
Step 7 - Check the send result in the Ozeki log
In Ozeki 10 SMS Gateway, you can check easily what messages sent by your application,
since the HTTP API service logs every event that occurred during the time it is enabled.
So, if you open the SMS Gateway, and select details of the HTTP API service, you will be
able to see the events. As you can see it in Figure 7, the service logged an event,
when your web application sent the HTTP request to the service.
Figure 7 - Check the logs of the HTTP API Service
The process of the message sending can be also viewed back by the events. To be able to see that,
open the HTTP API User connection, that you had to configure before. Figure 8
shows that how the connection handles the HTTP request and send the message
to the recipient that you specified in your PHP SMS example code.
Figure 8 - Check the logs of the HTTP API User
Summary
This tutorial explains to you how to use the provided PHP example code. The code will allow you to send SMS messages using the
Ozeki SMS Gateway. By using this code, you will send an HTTP request to the Ozeki SMS Gateway,
which will forward your message to any of the selected addresses with ease.
To know more about the flexible SMS sending system that you can build using the Ozeki SMS Gateway,
visit the Ozeki website. There are articles about all the programming languages
you can use to manage the SMS traffic, like Java or Perl.
To create your first high performance SMS gateway system, now is the best time to download Ozeki SMS Gateway!
The following document is going to show how you can receive SMS messages with a
web application or a website that uses PHP code. The PHP code initiates HTTP requests
to the SMS Gateway to get the incoming messages. The code gets these messages as a
response from the SMS Gateway, and then, you can use the messages in your web application.
What is a PHP SMS API?
The PHP SMS API ensures you to send SMS messages from a web application of a website.
The API uses HTTP requests to communicate with the SMS Gateway that delivers the message
and sends a response back.
Save the file to the xampp/htmldocs folder as index.php
Open SMS Gateway and select HTTP Server connection
Send some test messages
Type 'localhost' in your browser to run the PHP code
The PHP example code below can get the received messages from the SMS Gateway. This code
is free to use in your web application or website, and you can modify it if you want to.
The step-by-step guide below and the video on this page shows how you can use the example code,
if you would like to just run the PHP code on your computer and test the solution.
The first step of the guide is to set up an Apache server on your computer which is
capable of executing PHP codes. These localhost servers can we set up easily using
XAMPP. If you haven't got this application yet, check the Prerequisites section on this
page to download it. If you have already installed it on your computer, you just
need to open the XAMPP Control Panel as you can see it in Figure 1. Here, you need to
start the Apache service.
Figure 1 - Open XAMPP control panel, then start Apache server
Step 2 - Copy PHP code from this page
The next step of this guide is to get the code from this page to use it in your solution. For that,
just go to the example code on this page, and mark out whole source code. Then, press Ctrl+C on
your keyboard as you can see it in Figure 2 to copy the code to your clipboard.
Figure 2 - Copy php source code from the website
Step 3 - Paste the code into a text document
To run the code on your local server, you need a file that contains the PHP code.
So, open the Notepad application and create a new text file. Here, just press
Ctrl+V on your keyboard to paste the source code into that text document as
Figure 3 demonstrates it. Lastly, you need to save the file to the xampp/htdocs
folder and name the file as 'index.php' to be able to run it from your local server.
Figure 3 - Open Notepad and paste php code from the website
Step 4 - Send some test messages
Now, your example code is up and ready to run, but first, you need to have some messages
in your inbox folder. For testing purposes, you can use the HTTP Server connection
to send some test messages to yourself and test the PHP example code. So, open the SMS Gateway
and select the HTTP Server connection. Here, open the HTML form of the connection,
and like in Figure 4, send some messages to the 'Ozeki' recipient.
Figure 4 - Simulate some incoming SMS
Step 5 - Run the PHP code
The last step is to test your solution and the PHP code. To do that, open your web browser,
and type 'localhost' as an address as you can see it in Figure 5. If you press Enter,
the PHP example code executes, and you will be able to see the result in the browser.
This shows the HTTP request that was sent to the SMS Gateway and the response
message that lists all SMS received by the SMS Gateway with the phone number of the
sender and the text of the message as well.
Figure 5 - Run php code in browser
Summary
In this article, you will be learning about how you can receive SMS messages using a PHP SMS API.
Using the Ozeki SMS Gateway with the help of an API means that you can manage it gateway using PHP requests.
It is a good idea to check out the Ozeki articles, so you can know more about the communication system that Ozeki offers.
To learn more about how you can utilize the Ozeki SMS Gateway, feel free to explore the
articles on the website such as: “How to schedule messages with PHP” and “how to send SMS messages with C#”.
To create your first high performance SMS gateway system, now is the best time to download Ozeki SMS Gateway!
This guide gives information on how to send a scheduled SMS message, and how
to get reports from Ozeki SMS Gateway when the message is submitted to the mobile
network and when it is delivered to the recipient handset. (Video 1, Figure 1)
Figure 1 - Scheduled SMS from Apache webserver
Step 1 - Install HTTP API User
You can simply install the HTTP API User on the Management console by clicking
Add new user/application... in the Users/Applications panel.
An interface will open consisting of two panels. The right-side panel contains
the users and applications you can install with a
brief description next to them. Find the HTTP API User and click the blue
'install' button next to it (Figure 2).
Figure 2 - Install HTTP API user
On the Name section provide the unique name for the HTTP API User and provide the username and password for the authentication (Figure 3).
Figure 3 - Define username and password
Step 2 - Enable Log communication events
In order to able to see the HTTP communication in the HTTP API user Events tab you need to enable log communication events.
To make this. open the HTTP user Configure tab. Under it in the Advanced tab Log level section check the Log communication events option as the Figure 4 shows.
Figure 4 - Enable log communication
Step 3 - Create PHP Code for send message
The next step is to create the php files in the Apache web server www root. Go to the /var/www/html folder and create the index.php file (Figure 5).
Figure 5 - Create index.php
After you pasted the php code modify the Server connection, change the URL, username and password to your SMS Gateway IP and HTTP API user username and password.
Then modify the Report URL-s IP to the Apache webserver IP (Figure 6).
Now create the report php file in the Apache web server www root. In the /var/www/html folder create the report.php file as you can see in the Figure 7.
Figure 7 - Create report.php
In the report php file paste the below php code for the SMS report receiving.
This code saves all the received SMS report into an smsreport.txt file under the tmp folder (Figure 8).
After the PHP files are created in the Apache server you are able to send SMS using it.
In a browser open the index.php and you will see the sent http request and the SMS gateway's HTTP response (Figure 9).
Figure 9 - Send SMS message using index.php
In the Ozeki SMS Gateway events tab you can also see the http communication (Figure 10).
Figure 10 - Message received by SMS Gateway
If you open the Ozeki SMS Gateway outbox folder, you are able to see that the
message is stored in the Postponed folder because it will be send in the future (Figure 11).
Figure 11 - Message in outbox
In the message details Tags tab, you can check when will the SMS be send and the
report URL what will call the Ozeki SMS Gateway if the SMS is sent. (Figure 12)
Figure 12 - Message tags
Finally, you will see the Ozeki SMS Gateway is send the message on the send on
date time as you can see it in the Figure 13.
Figure 13 - Message sent
Step 5 - Message report received
Then the SMS report is sent back to the Apache web server and it store it in
the smsreport.txt (Figure 14).
You have learned about sending scheduled SMS messages from the article above.
Sending scheduled SMS messages can optimize your bulk SMS marketing plan, by
sending messages when the customer can truly focus on the information you wish to give them.
Also, if you have some important information that you wish to send to a recipient,
you could setup a scheduled SMS. This way you will not forget to send the message.
If you would like to find out more about the technology behind the scheduled SMS function,
visit the Ozeki webpage where you will find useful article about many topics.
First of all, you should start with receiving SMS in PHP. If you would like to
use SMS features with other programming languages, maybe start with the SMS with Java article.
The example code below is about to demonstrate how you can use HTTP requests to
send SMS messages from Perl via SMS Gateway. The Perl program first sets up all
the important variables that will be used for sending the message. Then it creates
the string for sending the message and lastly, it initiates the HTTP request. The response
message will be also printed by the program.
What is a Perl SMS API?
The Perl SMS API ensures the ability to send SMS messages from a program written
in Perl. It uses HTTP requests and SSL encrypted communication to forward the SMS sending request
to the SMS Gateway.
Navigate to the folder where you saved the Perl file
Type 'perl HttpApitester.pl' in the Command Prompt
Press Enter to run the Perl file
Perl SMS source code example
This example Perl source code below is free to use,
you can simply implement it into your project, or you can modify the source
code to use it for other projects
or applications. If you want to just run and test this example, all you have to do
is to follow the instructions above or watch the tutorial video which demonstrates
the way to create a Perl file for the source code and run it from the Command Prompt.
#!/usr/bin/perl
use strict;
use warnings;
use Encode;
require HTTP::Request;
require LWP::UserAgent;
sub main
{
my $username = "john";
my $password = "Xc3ffs";
my $messagetype = "SMS:TEXT";
my $httpUrl = "https://127.0.0.1:9508/";
my $recipient = Encode::encode("utf8", "+36201324567");
my $messagedata = Encode::encode("utf8", "TestMessage");
my $sendString = $httpUrl."api?action=sendmessage"."&username="
.$username."&password="
.$password."&recipient=".$recipient."&messagetype="
.$messagetype."&messagedata=".$messagedata;
print "Sending html request: ".$sendString."\n\n";
my $request = HTTP::Request->new(GET => $sendString);
my $ua = LWP::UserAgent->new (
ssl_opts => { verify_hostname => 0 },
);
my $response = $ua->request($request);
print "Http response received :\n";
print $response->content;
}
# Call main.
main();
Step 1 - Open a text editor application
To be able to run the example code above, first, you need to create a Perl file for that.
To perform this operation, you only need to have a text editor. You can download a
custom text editor, but the default Notepad application
installed on Windows can do the job as well. So, as Figure 1 shows that, just open
the Notepad application from your desktop.
Figure 1 - Open a text editor
Step 2 - Copy the source code
The next step is to get the source code. This is an easy task, since the code can be found
on this page, so you just need to copy that. So, as you can see it in Figure 2, just
go to the example code section on this page, mark out the whole source code and
press Ctrl+C on your keyboard to copy the source code to the clipboard.
Figure 2 - Copy Code from the website
Step 3 - Paste the code into your text file
Next, you need to place the copied source code into your empty text file. To do that,
you just need to navigate to the text file and press Ctrl+V on your keyboard. By performing
this action, the source code will be placed into your text file as Figure 3 demonstrates it.
Figure 3 - Paste the program code into the text editor
Step 4 - Save the text as a Perl file
To create the Perl file, you just need to save the text file with the file extension
of the Perl files. This extension is .pl. So, select the 'Save as' option in Notepad,
and as you can see it in Figure 4, and after you gave a name for the file, append it
with the '.pl' file extension and click on 'Save'. The operation just created the
Perl file that you need to run the Perl SMS example.
Figure 4 - Save the HttpApiTester Perl file
Step 5 - Open Command Prompt
The last main step the guide is to run the Perl file you created before. In this case,
you are going to run the example using the Command Prompt. You can easily open the
Command Prompt by opening the File Explorer, and like in Figure 5, just type 'cmd'
in the address bar and lastly, just hit Enter. If you navigate into the folder
where you saved the Perl file in the File Explorer, the Command Prompt will use this
location as default, so you can run the Perl file straightaway.
Figure 5 - Open Command Prompt
Step 6 - Run the Perl file
The last thing that you need to perform, is to initiate the command, that runs the
Perl file. This is a simple command; you just need to write 'perl *file name*.pl'
in the Command Prompt as Figure 6 shows that. After you pressed Enter, the Perl file
executes the commands within and sends the test message. The HTTP request and response
from the SMS Gateway will be printed in the Command Prompt.
Figure 6 - Run the HttpApiTester.pl script
Step 7 - Check the send result in the Ozeki log
Ozeki 10 SMS Gateway ensures that to check what messages sent by your application,
since the HTTP API service logs every event that occurred during the time it is enabled.
So, if you open the SMS Gateway, and select details of the HTTP API service, you will be
able to see the events. As you can see it in Figure 7, the service logged an event,
when the Perl program sent the HTTP request to the service.
Figure 7 - Check the logs of the HTTP API Service
The events that occurred during the sending of the message back be checked by the events as well. For that,
open the HTTP API User connection, that you had to configure before. Figure 8
demonstrates that how the connection handles the HTTP request and send the message
to the recipient that you specified in your Perl SMS example program.
Figure 8 - Check the logs of the HTTP API User
Summary
In this article, we provide you information about how to send SMS messages using Perl.
We also included an example code which you can use to start the implementation process.
Setting up a solution that can use the Perl language to send SMS will make it easier to implement the SMS sending solution to your communication system.
If you would like to implement more programming language to your communication system,
feel free to visit the articles about other programming languages compatible with the Ozeki SMS Gateway, like: PHP and Java.
Now your next thing to do is to download Ozeki SMS Gateway and configure this solution immediately!
Everything is there to get it up and running in less than 10 minutes.
On this page, you will be able to learn about how you can use your Perl application
to receive SMS messages. This example Perl source is capable of collecting the incoming
messages from the SMS Gateway and use them in the application. It performs this
operation by using HTTP request. This guide shows how easy you can create a Perl
application and run it on your computer. So, let's start right now.
What is a Perl SMS API?
The Perl SMS API ensures the ability to send SMS messages from a program written
in Perl. It uses HTTP requests and SSL encrypted communication to forward the SMS sending request
to the SMS Gateway.
Open Ozeki SMS Gateway and select HTTP Server connection
Open the HTML form of the HTTP Server connection
Send some test messages
Open Command Prompt
Type 'perl ReceiveSMS.pl' in the Command Prompt and press Enter
This example code below is free to use in your own solution or application and you can
modify it if you want to. The example code can collect the messages from the SMS Gateway
and use it in the Perl application. If you would like to test the example just follow
the step-by-step instructions below or check the video which clearly shows all steps
that you need to perform to execute the Perl SMS example.
#!/usr/bin/perl
use strict;
use warnings;
use XML::Simple;
use Data::Dumper;
require HTTP::Request;
require LWP::UserAgent;
sub main
{
my $username = "john";
my $password = "Xc3ffs";
my $httpUrl = "https://127.0.0.1:9508/";
my $folder = "inbox";
my $limit = "3";
my $sendString = $httpUrl."api?action=receivemessage&username="
.$username."&password=".$password."&folder="
.$folder."&limit=".$limit
."&messagedata=&afterdownload=delete";
print "Sending html request: ".$sendString."\n\n";
my $request = HTTP::Request->new(GET => $sendString);
my $ua = LWP::UserAgent->new (
ssl_opts => { verify_hostname => 0 },
);
my $response = $ua->request($request);
print "Http response received :\n";
DisplayMessages($response->content)
}
main();
sub DisplayMessages {
my $data = XMLin(@_);
my $sender = "";
my $text = "";
if($data->{data}->{message} eq 'No more messages.') {
print "The inbox is empty!";
return;
}
if (ref($data->{data}->{message}) eq 'ARRAY') {
foreach my $value (@{ $data->{data}->{message} }) {
$sender = $value->{originator};
$text = $value->{messagedata};
DisplayMessage($sender,$text);
}
}
else {
$sender = $data->{data}->{message}->{originator};
$text = $data->{data}->{message}->{messagedata};
DisplayMessage($sender,$text);
}
}
sub DisplayMessage {
print $_[0].": ".$_[1]."\n";
}
Step 1 - Open Notepad
The first thing that you have to perform to complete this guide is to create the Perl
file that you have to execute to see how it gets the SMS messages from the SMS Gateway.
So, at this point, you need to open the Notepad application on your computer to be able
to create the Perl file. For that, just like in Figure 1, click on its icon on the desktop.
Figure 1 - Open notepad text editor
Step 2 - Copy the Perl source code from this page
Next, you need to get the Perl source code from this page to use it on your computer.
So, just scroll up to the example code section and mark out the whole source code.
Then, as you can see it in Figure 2, you need to copy it to your clipboard. This can be
done by pressing Ctrl+C on your keyboard.
Figure 2 - Copy perl source code from the website
Step 3 - Paste the code into the text file
After you copied the Perl source code from this page, you need to place it into a text
document. To do this, just go to the Notepad application that you opened before,
and as you can see it in Figure 3, just press Ctrl+V on your keyboard to paste
the whole source code into the text document.
Figure 3 - Paste Perl SMS source code to notepad
Step 4 - Save the text as a Perl file
The source code is now placed into the text document, but it still hasn't got the
right file format. But this is now a huge problem, you can solve it easily with Notepad.
Just select the 'Save as' option, and here, after you gave a name to the file, use the
'.pl' file extension as Figure 4 demonstrates it. If you click 'Save', the file will
be saved in the right Perl file format that you need to execute later.
Figure 4 - Save file as ReceiveSMS.pl
Step 5 - Send some test messages
After you set up the Perl file, you need some message to your inbox folder. To finish the
test quickly, you can simulate incoming messages with the HTTP Server connection in
SMS Gateway. If you haven't configured this connection yet, here you can see
how to configure a HTTP Server connection. So, open SMS Gateway,
and select the HTTP Server connection. In the menu of the connection, open the HTML
form (Figure 5). Here, you can write some messages to the SMS Gateway by setting the
recipient to 'Ozeki'.
Figure 5 - Simulate some incoming SMS
Step 6 - Open Command Prompt
To run the Perl code, you need to Command Prompt since it provides a simple way to
execute the code. So, first open the File Explorer and navigate to the folder,
where you saved your Perl file. Here, as you can see it in Figure 6, type 'cmd'
into the File Explorer. If you hit Enter, and Command Prompt
opens in a new window.
Figure 6 - Open Command Prompt
Step 7 - Run the Perl SMS example
The last thing that you have to do is to execute the Perl program. For that, you just
need to execute a simple command in Command Prompt. The command is 'perl *filename*.pl'
as Figure 7 shows that. Then, just press Enter to execute the example program.
The program prints the HTTP request that was sent to the SMS Gateway, and also prints
the response message from the SMS Gateway. This contains all messages that was received
by the SMS Gateway.
Figure 7 - Run perl code in command prompt
Final Thoughts
In the article above, you have learned about receiving SMS using Pearl. Using a
Pearl script to collect incoming messages means that you can use those messages
in a PHP project. You can start automating the SMS receiving and sending with
the power of Pearl and Ozeki SMS Gateway.
Thanks to the Ozeki SMS Gateway, you will have no performance issues due to the
1000 SMS per second capability of gateway software.
This will greatly improve communication within your organization or with your
customers.
Visit our webpage if you want to learn about all the programming languages that
the Ozeki SMS Gateway can handle.
You can reach the article about managing SMS with PHP
or Python.
This page contains a simple Python script, which is going to demonstrate how easy
you can send SMS messages from that script by initiating an HTTP request and forward
it to the SMS Gateway which will further processes the request, sends the message
and returns a response message to the Python script. As the example script shows below,
all these operations only take about twenty lines of code which keeps the script simple.
What is a Python SMS API?
The Python SMS API creates the opportunity to send SMS messages from a Python script.
By using this Python SMS API, your Python script can send HTTP requests to the SMS Gateway which
sends the SMS message.
Navigate to the folder where you saved the Python file
Type 'python HttpApiTester.py' in the Command Prompt
Hit Enter to run the Python script
Python SMS source code example
The following example source code written in Python programming language is free to use,
you can simply implement it into your project, or you can modify the source code to use it for other projects
or applications. If you wish to run this example code unchanged, you just need to
create a new Python file, copy-paste the example code below and save the Python file.
Then, all you have to do is to run the Python file as the steps guide and the video
demonstrates it above.
To be able to execute the Python SMS example code above, first, you need to create a Python file
which contains the source code.
To perform this action, you only need a text editor. You can download a
custom text editor if you wish, but the default Notepad
application installed on Windows can do the job as well. So, as Figure 1 demonstrates that,
just click on the icon of Notepad to open it.
Figure 1 - Open a text editor
Step 2 - Copy the source code from this page
The next step of the guide is to get the Python source code. This can be easily done, since the code can
be found on this page, so you just need to copy that. So, as
Figure 2 shows that, just go to the example code section on this page, mark out the whole
source code and press Ctrl+C on your keyboard to copy the source code to the clipboard.
Figure 2 - Copy program code from website
Step 3 - Paste the code into the text file
After you copied the code from this page, you need to paste it into your empty text file. To do
that, you just need to navigate to the text file and just press Ctrl+V on your keyboard.
By performing this action, the Python code will be pasted into your text file as
Figure 3 shows that.
Figure 3 - Paste the program code into the text editor
Step 4 - Save the text file as Python file
To create the Python file, you just need to save the text file with the file extension
of the Python files. This extension is .py. So, select the 'Save as' option in Notepad,
and as you can see it in Figure 4, and after you gave a name for the file, append
it with the '.py' file extension and click on 'Save'. The operation just created
the Python file that you need to run the Python SMS example.
Figure 4 - Save the HttpApiTester python file
Step 5 - Open Command Prompt
The next step of this guide is to run the Python file you created before. In this case,
you are going to run the example using the Command Prompt. You can easily open the
Command Prompt by opening the File Explorer, and as you can see it in Figure 5, just type
'cmd' in the address bar and lastly, just press Enter. If you navigate into the
folder where you saved the Python code in the File Explorer, the Command Prompt
will use this location as default, so you just need to run the Python file.
Figure 5 - Open Command Prompt
Step 6 - Run the Python file
The last step that you need to do, is to initiate the command, that runs the Python script.
This is a simple command; you just need to write 'python *file name*.py' in the Command
Prompt as Figure 6 shows that. After you pressed Enter, the Python file executes the
commands within and sends the test message. The HTTP request and response from the
SMS Gateway will be printed in the Command Prompt.
Figure 6 - Run the Python SMS file in cmd
Step 7 - Check the send result in the Ozeki log
In Ozeki 10 SMS Gateway, you can check easily what messages sent by your application,
since the HTTP API service logs every event that occurred during the time it is enabled.
So, if you open the SMS Gateway, and select details of the HTTP API service, you will be
able to see the events. As you can see it in Figure 7, the service logged an event,
when the Python SMS example program sent the HTTP request to the service.
Figure 7 - Check the logs of the HTTP API Service
The process of the message sending can be also viewed back by the events. For that,
open the HTTP API User connection, that you had to configure before. In Figure 8,
you can see that how the connection handles the HTTP request and send the message
to the recipient that you specified in your Python program.
Figure 8 - Check the logs of the HTTP API User
Summary
You have learned how to send SMS from Python from this article. This tutorial enables you to implement SMS service to your Python project.
Having SMS service in your python project will make sure that you satisfy a wider range of customer needs.
The solution is mainly built around the Ozeki SMS Gateway, so it offers you a great performance of up to a 1000 SMS per second.
If you come around any error, the Ozeki SMS Gateway features great low logging capabilities. You will find errors in no time using this system.
To have a better understanding of using Python with the Ozeki SMS Gateway, feel free to visit the Ozeki webpage.
You can learn about how to receive messages using Python, or you can discover other programming languages to use like Java.
This document provides you some useful information about how you can get the messages
received by the SMS Gateway using your Python application. The Python SMS example
shows how it collects the messages from your inbox folder via HTTP Requests and
how it makes it available for further usage. The page contains a video tutorial and
a step-by-step guide which takes not more than five minutes to complete. Let's start right now!
What is a Python SMS API?
The Python SMS API creates the opportunity to send SMS messages from a Python script.
By using this Python SMS API, your Python script can send HTTP requests to the SMS Gateway which
sends the SMS message.
Open Ozeki SMS Gateway and select HTTP Server connection
Open the HTML form of the HTTP Server connection
Send some test messages
Open Command Prompt
Type 'python ReceiveSMS.py' in the Command Prompt and press Enter
This example Python SMS source code below is free to use in your projects and you can
modify it as well to fit into your solution. The code initiates a HTTP request
to get the messages from the SMS Gateway. To test the example just follow the instructions
below or watch the video tutorial which clearly demonstrates all steps that have to
be taken to run the Python SMS script on your computer.
The first step of this guide is to open Notepad on your computer. This application
is needed to create the Python file that you will execute at the end of the guide.
So, as Figure 1 demonstrates, just click on the icon of the Notepad application
on the desktop to open it.
Figure 1 - Open notepad
Step 2 - Copy the Python code
Next, you need to get the Python example script from this page. This is an easy task
to do since you need to just copy it. So, to do that, just go to the example code
on this page, mark out the whole source code, and like in Figure 2, press Ctrl+C
on your keyboard. This action copies the source code to your clipboard and makes it
ready to place it into a text file.
Figure 2 - Copy source code from the website
Step 3 - Paste the code into a text file
Next, you need to paste the Python source code into the text document that you
opened in Step 1. This action can be performed by using the Ctrl+V shortcut which
pastes the source code into the text file from the clipboard. If you have done it
correctly, the Python code will be in the text file as Figure 3 shows that.
Figure 3 - Paste source code to notepad
Step 4 - Save the text as a Python file
At this point, you have got a text file that contains the source code, but it
is not in the right file format yet. Notepad can save files in any format, so
you can solve this problem quite easily. So, select the 'Save as' option in Notepad,
and save the file with the '.py' file extension. This procedure is demonstrated
in Figure 4.
Figure 4 - Save python file as ReceiveSMS.py
Step 5 - Open Command Prompt
Now, the Python script is ready to use, but you need an environment where you can
execute the script. For that purpose, you can simply use the Command Prompt. To open it,
just navigate to the folder where you saved the Python file with the File Explorer,
and like in Figure 5, type 'cmd' into the address bar of the File Explorer. If
you press Enter, the Command Prompt shows up in a new window.
Figure 5 - Open command prompt
Step 6 - Send some test messages
After you set up the Python file, you need some message to your inbox folder. To finish the
test quickly, you can simulate incoming messages with the HTTP Server connection in
SMS Gateway. If you haven't configured this connection yet, here you can see
how to configure a HTTP Server connection. So, open the SMS Gateway,
and select the HTTP Server connection. In the menu of the connection, open the HTML
form (Figure 6). Here, you can write some messages to the SMS Gateway by setting the
recipient to 'Ozeki'.
Figure 6 - Simulate some incoming SMS
Step 7 - Run the Python script
The last thing that you need to do to complete this guide is to run the Python
script in the Command Prompt. For that, just type 'python *filename*.py' into the
Command Prompt as you can see it in Figure 7 and hit Enter. The execution of the
Python SMS example prints the HTTP request that was initiated by the Python program.
Then, you will be able to see the messages from the SMS Gateway as well.
Figure 7 - Run python code in command prompt
To sum it up
From this article, you have learned how to use a Python script to collect messages from your inbox.
You will be able to build a system that sends HTTP requests to the Ozeki
SMS Gateway and receives all the incoming messages back.
Using the Ozeki SMS Gateway to manage SMS messages comes in handy because it allows the user to
log SMS messages into a database and offers various reporting capabilities to
give more information about your SMS communication.
Let's see how you can use Ruby to send SMS messages with HTTP requests. The example
code demonstrates that you only need a couple of lines of code to be able to set up
the details of the message and send an HTTP request. Then, the SMS Gateway receives
the request and delivers the SMS to the recipient. Lastly, the SMS Gateway sends
the response back to the Ruby program which prints that response to the console.
What is the Ruby SMS API?
The Ruby SMS API (Ruby sms) allows you to send SMS messages from your Ruby program. The Ruby SMS API
initiates HTTP requests and sends them to the SMS Gateway that delivers the message
to the recipient.
Navigate to the folder where you saved the Ruby file
Type 'ruby HttpApiTester.rb' in the Command Prompt
Press Enter to execute the Ruby program
Ruby Rails send sms text messages
Ruby SMS source code example
This simple example source code below, written in Ruby programming language is free to use,
you can simply implement it into your project, or you can modify the source code to use it for other projects
or applications. To run the example code and see how to send HTTP requests from Ruby,
you just need to create a new Ruby file and place this example code into that file.
To execute the Ruby program, just run it from the Command Prompt. These operations
stated and demonstrated in the steps and the video sections.
The first step is to execute the Ruby SMS example code above is to create a
Ruby file which contains the source code. To perform this operation, you just need
a text editor. You can download a custom text editor to do this,
but the default Notepad application installed on Windows can do the job as well.
So, as you can see it in Figure 1, just click on the icon of Notepad to open it.
Figure 1 - Open a text editor
Step 2 - Copy the Ruby source code
The next step of the guide is to get the Ruby source code. This can be easily
done, since the code can be found on this page, so you just need to copy that.
So, as Figure 2 shows that, just go to the example code section,
mark out the whole source code and press Ctrl+C on your keyboard to copy the
Ruby code to the clipboard.
Figure 2 - Copy source code from the website
Step 3 - Paste the Ruby code into your text editor
After you copied the Ruby code from this page, you need to paste it into your empty
text file. To do that, you just need to navigate to the text file and just press
Ctrl+V on your keyboard. By performing this action, the Ruby code will be
pasted into your text file as Figure 3 shows that.
Figure 3 - Paste the program code into the text editor
Step 4 - Save the Ruby file
After you placed the source code into the text file, the next step that you need
to do, is to save the file using the file extension of Ruby which is '.rb'. So, just
select the 'Save as' option in Notepad, name the file and add the '.rb' file extension
as you can see it in Figure 4, and lastly, click on Save.
Figure 4 - Save the HttpApiTester Ruby file
Step 5 - Open Command Prompt
The next step is to run the created Ruby file. This task can be easily done by using
the Command Prompt. You can open this byx opening the File Explorer, navigating to
the folder, where you saved the Ruby file, and typing 'cmd' in the address bar of the
File Explorer like in Figure 5. If you press Enter at this point, the Command Prompt
is going to show up and will be ready to use.
Figure 5 - Open Command Prompt
Step 6 - Run the Ruby file
In the Command Prompt, you only need to execute one simple command to be able to
run the Ruby SMS example. The command needs to be 'ruby *file name*.rb'. After
you typed that command, just press Enter, and the command executes the Ruby program.
The example program prints the HTTP request and the response message from the
SMS Gateway to the Command Prompt. (Figure 6)
Figure 6 - Run HttpApiTester.rb file in cmd
Step 7 - Check the send result in the Ozeki log
In Ozeki 10 SMS Gateway, you can check easily what messages sent by your application,
since the HTTP API service logs every event that occurred during the time it is enabled.
So, if you open the SMS Gateway, and select details of the HTTP API service, you will be
able to see the events. As Figure 7 shows that, the service logged an event,
when the Ruby example program sent the HTTP request to the service.
Figure 7 - Check the logs of the HTTP API Service
The process of the message sending can be also viewed back by the events. For that,
open the HTTP API User connection, that you had to configure before. Figure 8
demonstrates that how the connection handles the HTTP request and send the message
to the recipient that you specified in your Ruby SMS example program.
Figure 8 - Check the logs of the HTTP API User
Summary
This article explained to you how you can send SMS messages from a project written in Ruby.
Sending messages from any Ruby object means that you can offer SMS services to your customers in any Ruby solution.
This will make your solution versatile and widely used. The solution is based on the Ozeki SMS Gateway.
This code we provided will send HTTP requests from Ruby to the Ozeki SMS Gateway and the Ozeki SMS Gateway will do as requested.
To know more about the system, feel free to check out the Ozeki website where
you can find more information about any setup you can build using the Ozeki SMS Gateway.
Start with the article about receiving SMS messages.
Or check out some other programming languages that the Ozeki SMS Gateway can
work with. For example, PHP.
The guide on this page provides you the opportunity to learn how you can use
a Ruby program to get the received SMS messages from the SMS Gateway. This can be done
by using HTTP requests that collect the received SMS messages. The guide contains
a video tutorial and a step-by-step guide which helps you to learn the way you
can receive SMS messages with Ruby.
What is the Ruby SMS API?
The Ruby Rails SMS API allows you to send SMS messages from your Ruby Rails program. The Ruby SMS API
initiates HTTP requests and sends them to the SMS Gateway that delivers the message
to the recipient.
Open Ozeki SMS Gateway and choose HTTP Server connection
Open the HTML form of the HTTP Server connection
Send some test messages
Open Command Prompt
Type 'ruby ReceiveSMS.rb' in the Command Prompt and press Enter
Ruby Rails receives sms messages
You can freely use the Ruby example SMS code in your projects, and you also allowed to
modify it as well. If you wish to just run this example code to see how it works,
just check the step-by-step guide below or the video tutorial on this page to
see that it takes to execute the Ruby SMS example code on your computer.
require 'net/http'
require 'rexml/document'
include REXML
def DisplayMessages(response)
xmldoc = Document.new(response)
xmldoc.elements.each('response/data/message') do |value|
begin
sender = value.elements['originator'].text
text = value.elements['messagedata'].text
DisplayMessage(sender,text)
rescue
puts("The inbox is empty.")
end
end
end
def DisplayMessage(sender, text)
puts("#{sender}: #{text}")
end
username = "john"
password = "Xc3ffs"
httpUrl = "https://127.0.0.1:9508/"
folder = "inbox";
limit = "3";
sendString = "#{httpUrl}api?action=receivemessage&username="\
"#{username}&password="\
"#{password}&folder=#{folder}&limit="\
"#{limit}&afterdownload=delete"
puts("Sending http request #{sendString}")
OpenSSL::SSL.send(:remove_const, :VERIFY_PEER)
OpenSSL::SSL.const_set(:VERIFY_PEER, OpenSSL::SSL::VERIFY_NONE)
url = URI(sendString)
response = Net::HTTP.get(url)
puts("Http response received:")
DisplayMessages(response)
Step 1 - Open Notepad
In this first step, you need to open a text editor application that can handle Ruby
files. For that purpose, you can use the default Notepad application that can be found
on all computers using Windows operating system. So, as Figure 1 shows that, just
open it from your desktop.
Figure 1 - Open notepad text editor
Step 2 - Copy the Ruby code
Next, you need to copy the Ruby example code from this page. To do that, just scroll up
to the example code section of this page and mark out the whole example Ruby code.
Next, as you can see it in Figure 2, press Ctrl+C on your keyboard to copy the
Ruby code to the clipboard.
Figure 2 - Copy ruby source code from the website
Step 3 - Paste the code into the text file
After you copied the Ruby source code from this page, you need to place it into a text
document. To do this, just go to the Notepad application that you opened before,
and as you can see it in Figure 3, just press Ctrl+V on your keyboard to paste
the whole Ruby source code into the text document.
Figure 3 - Paste source code to notepad
Step 4 - Save the text as a Ruby file
At this point, you have got a text file that contains the source code, but it
is not in the right, Ruby file format yet. Notepad can save files in any format, so
you can solve this problem quite easily. So, select the 'Save as' option in Notepad,
and save the file with the '.rb' file extension. This procedure is demonstrated
in Figure 4.
Figure 4 - Save ruby file as ReceiveSMS.rb
Step 5 - Send some test messages
Now, your example code is ready to run, but first, you need to have some messages
in your inbox folder. For testing purposes, you can use the HTTP Server connection
to send some test messages to yourself and test the PHP example code. So, open the SMS Gateway
and select the HTTP Server connection. Here, open the HTML form of the connection,
and like in Figure 5, send some messages to the 'Ozeki' recipient.
Figure 5 - Simulate some incoming SMS
Step 6 - Open Command Prompt
The main step of the guide is to execute the Ruby program. To do that, you need to
open the Command Prompt on your computer. So, first navigate to the folder, where
you saved the Ruby file using the File Explorer. Here, as you can see it in Figure 6,
type 'cmd' in the File Explorer, and if you press Enter, the Command Prompt opens
on your computer.
Figure 6 - Open command prompt
Step 7 - Execute the Ruby program
In the Command Prompt, you just need to perform one line of command to execute the
Ruby program. So, just type 'ruby *filename*.rb' into the Command Prompt and press
Enter. By doing this, the Ruby example will be executed, and you will be able to see
the results in the console window (Figure 7). Here, you can see the HTTP request
and the response to that request as well which contains all received messages.
This article demonstrates how to send sms from HTTP API. It will start with defining what HTTP API is and will continue with the explanation of how it can be used.
HTTP request is a great tool to send sms, it can be used in various environments.
Maybe the biggest benefit of this HTTP API solution is that all you have to do is perform some basic configuration and you will be ready to send texts in a short time.
This solution uses Ozeki SMS Gateway, so you can take advantage of that fact that it allows you to manage SMS costs and to keep track of SMS traffic.
We assume you have already used HTTP request and can perform basic operations with it.
You will be presented with some important information and well-structured
step-by-step instructions.
We hope you will find the presented instructions beneficial.
How to send SMS over HTTPS API (Step by step guidelines)
To send SMS over HTTPS API:
Launch Ozeki SMS Gateway
Install HTTP user
Open HTTP API service Details
Provide ports
Write HTTP API request
Copy HTTP API SMS request
Send SMS over HTTP API from browser
Check the Events
Upload .pfx certificate file for HTTPS
How to create a new user/application (video tutorial)
Click the Install button next to HTTP user
To install a new HTTP user, you need to open the Add user or application install list.
To do so, find the Apps button located on the toolbar of the Ozeki SMS
Gateway (Figure 1). In the list, there is a Network users' section.
There, you need to find the HTTP user list item. Click the Install
link to begin the installation procedure.
Figure 1 - Install HTTP user
Provide login information
In the HTTP user’s detail page, you will see a group box with the title of Login Information (Figure 2).
Here you need to provide a username and a password for HTTP API user. Make sure to provide both and click the Ok button.
To get more information about the login credentials, you can use the question mark icon located next to the Username textbox.
Figure 2 - Provide HTTP user login information
Open service details
The next step is to open the details panel of the HTTP API user. Click the Advanced button on the Toolbar of the Ozeki SMS Gateway (Figure 3).
It will take you to the services list. There you will see all the services that you are currently working with.
Find the HTTP API service that you just created and click the Details button. It will open a page where you could modify the properties or view the events.
Figure 3 - Open HTTP API service details
Check the Events tab
Here in the Events tab, you can see that the Ozeki SMS Gateway successfully created the HTTP API. It started a webserver and configured it for user connection.
In this log, you have the access information of the HTTP API (Figure 4). First, you will need the HTTPS port number and the IP address where the GUI is available.
We provided you a copy of the event log of our example. Highlighted with red, you can see the important information about the API.
Figure 4 - HTTPS API started on port showed in the log
2021-04-02 07:57:22.570 INFO http_API_1: Starting Http API(http_API_1) ...
2021-04-02 07:57:22.570 INFO http_API_1: Using configuration: https://+:9508
2021-04-02 07:57:22.570 INFO http_API_1: Starting webserver at: 'https://+:9508/'.
2021-04-02 07:57:22.570 INFO http_API_1: Starting webserver at: 'http://+:9509/'.
2021-04-02 07:57:22.570 INFO http_API_1: The GUI is available at 'https://192.168.93.6:9508/'.
2021-04-02 07:57:22.570 INFO http_API_1: The GUI is available at 'http://192.168.93.6:9509/'.
2021-04-02 07:57:22.570 INFO http_API_1: Successfully started Http API (http_API_1)
How to send the test SMS (video tutorial)
Open the service details
To configure the HTTP API to accept HTTP POST and HTTP GET requests, you need to provide the correct port numbers for the HTTPS and HTTP connection.
To do so, open the advanced menu with the Advanced button located on the Toolbar (Figure 5). This will open the list of your services.
Click the Details button next to the HTTP API service to open the configuration page.
Figure 5 - Open HTTP API service details
Change the port number
You can get the correct port number from the event log that you copied from the start of the API.
The number after the HTTPS:// is the correct number for the HTTPS port textbox and the number after the HTTP:// is the correct number for the HTTP port textbox.
You can find these textboxes in the Configure tab page (Figure 6).
Figure 6 - Change HTTP API port
Write the HTTP request
The next step is to write the HTTP API request. For this part, you need basic understanding of the HTTP technology.
Make sure to send the request with the password and the username you provided when you were configuring the API. On Figure 7, you can see an example HTTP code.
This code will send a message to the phone number after the recipient part. It contains the username and the password for the API.
Figure 7 - Write HTTP API request
Send the request
Paste the request to a now page of your browser. This will reach the webserver reserved for the API requests.
You will get feedback about your request in a form of an xml code. On Figure 8, you can see how the XML file looks in case of an accepted message.
This means that the gateway will now try to send your message.
Here you can see the timestamp when the message was sent and the body of the message you sent.
Figure 8 - Send HTTP API request from the browser
Check the sent message
In the Event tab of the Ozeki SMS Gateway, you can see that the API
reached the gateway and tried to send the message.
You can see here whether it was accepted or denied. To reach the Events
tab, open the Ozeki SMS Gateway and search for the user that you sent the
test message to. Click the Events tab and you will be presented with
the logs of the user. (Figure 9)
Figure 9 - Message sent
Upload the certificate
To have a secured HTTP, you need to upload a certificate. This will be
seen by the remote party and will verify you. If you do not provide any
certificate, a generated certificate will be sent.
With the certificate, you will be able to use HTTPS protocol instead of HTTP.
HTTPS is more secure and more stable than HTTP. (Figure 10)
Figure 10 - Upload certificate for HTTPS
Summary
This article explained how you can send SMS using HTTPS API.
You will learn about a HTTPS API, and we will show you how to use it.
Using a HTTPS API means that you will be able to send SMS messages using a web page.
This way you can be anywhere and still use the Ozeki SMS Gateway to send SMS messages.
This combined with the performance of the Ozeki SMS Gateway,
will result in a flexible and easy to use SMS communication solution.
Make sure to not stop here with learning. We offer you more articles about this
subject and some other subject like using the Ozeki SMS Gateway with other programming languages.
Start with learning how you can use the Ozeki SMS Gateway with PHP or Python.
The one last thing you need to do is to download the Ozeki SMS Gateway and start developing now!
FAQs
Why sometimes do I get a message from my HTTP client user that says it could
not resolve the name corresponding to the URL it is calling?
Internet Outage: The most common culprit might be a simple internet outage.
Try opening a website in your web browser. If nothing loads, it suggests a
broader issue with your internet connection. In this case, the best course
of action is to contact your internet service provider (ISP) for assistance.
They can help diagnose the problem and restore your connection.
DNS Server Issues: Another possibility is a problem with the Domain Name
System (DNS) server. The DNS acts like a phonebook for the internet,
translating website names (like "[invalid URL removed]") into numerical IP
addresses that computers can understand. If your DNS server isn't responding,
your computer might struggle to find the websites you're trying to access,
leading to connection problems.
I am using the HTTP Client user. Some SMS request messages are served by HTTP
queries which are very slow. We see that if the reply from the website takes
to long the reply is an empty message. Is there a way of increasing the time
for the http client user to wait longer for a reply from the website?
Absolutely! Ozeki allows you to customize the time it waits for a response from
a webpage after forwarding an SMS message via HTTP. Here's how to adjust this
setting:
Access the HTTP User Configuration Form: Locate the configuration form for
the specific HTTP user you want to modify within Ozeki.
Navigate to the HTTP Connection Tab: Look for a tab labelled "HTTP
Connection" or similar within the configuration form.
Modify the HTTP Timeout Value: This tab will typically contain a setting
named "HTTP Submit Response Timeout" (or similar). The default value is
usually 30 seconds, meaning Ozeki attempts to receive a response from the
webpage for 30 seconds after forwarding the SMS message.
Set Your Desired Timeout: Increase the timeout value if you need Ozeki to
wait longer for a response from the webpage. This might be useful if you
anticipate delays on the receiving end.
Remember: A longer timeout can slightly impact overall performance, so adjust
it based on your specific needs and server capabilities.
The HTTP of the SMS Gateway allows you to schedule batch SMS jobs. This
feature is great if you have a web-based solution that creates SMS sending jobs
with many phone numbers. SMS marketing campaigns, notifications about events and
emergency SMS alerts often require such an approach.
What is a batch SMS job
A batch SMS job is a list of phone numbers and text messages that needs to be sent
on a particular date and time. Such a job can be created on a webserver, and
it can be scheduled to be sent.
How to work with batch SMS jobs
The best approach to build a reliable system that is able to send batch SMS jobs
is to setup a webserver where SMS jobs are stored and managed and to setup an SMS gateway
in a different secure location, that is connected to the mobile network. Such a user interface to the users and is good at storing
The webserver is good at providing a browser-based user interface to the users of the
system. Users can access this user interface from their laptops or mobile phones
and can work on building their SMS campaigns. Such SMS job creation often includes
extensive editing of phone number lists, messages texts and custom data related to
the notifications. Often multiple users are involved in building the SMS campaigns.
This SMS campaign creation and editing is best done on a dedicated webserver system. You
can view a good example of such an SMS campaign editing system at myozeki.com.
Once an SMS campaign is finalized, it can be submitted to the SMS gateway. The best
approach to do this is to notify the SMS gateway in a short message to tell it that
a job is ready to be downloaded. The SMS gateway will register this request and
download the messages to be sent once the job is due.
This approach will take load of the SMS gateway, as it will not be responsible
for serving and managing the requests during the campaign creation and editing.
The SMS gateway will also not be responsible for storing the campaigns until they
are ready to be sent and the execution reports once the campaigns are completed.
The role of the SMS gateway is simplified to simply download and execute the
campaign by sending out the SMS messages, and to produce a report once the
messages are sent.
This approach is also great because it offers you to place the SMS gateway behind
a well-protected firewall, and it will keep your mobile network connections and
sending capabilities safe and healthy.
How does the Ozeki SMS Gateway solution work
The batch SMS sending feature of Ozeki SMS Gateway was developed for SMS service
providers and SMS marketers who work with lists of phone numbers. We call these
users SMS batch job creators. It is assumed that SMS batch job creators operate
their own webserver, where batch jobs are created/stored and managed. It is
also assumed that such jobs are often scheduled well in advance.
The procedure goes like this (Figure 1): The batch job creator creates a list of phone numbers and
text messages, and saves it on his webserver. Next his webserver issues an HTTP request
to the Ozeki SMS Gateway to schedule the job. When the time of execution arrives, the
SMS gateway downloads the job, and sends out the SMS messages. After the messages are
sent the SMS gateway returns an execution report the webserver to let the sender
now about the results of the request.
Figure 1 - How does batch SMS sending work
How to setup the SMS network entities
The most common network setup for SMS service providers is to have a webserver
on the Internet and let the SMS gateway connect to it. The SMS gateway is
usually behind a firewall and is not accessible from the Internet (Figure 2). The
SMS gateway can be connected to the mobile network through a Wireless SMS link
using and Android Mobile Phone or through an IP SMS link, such as an SMPP SMS mobile network connection or
an HTTP SMS mobile network connection. This network
architecture can be considered secure.
Ozeki SMS Gateway makes it possible for php developers to use php sms api for
text message sending and receiving on their web page to mobile phone.
How to send sms from website using php
There are two basic options to choose from if you wish to send SMS messages
from a website running on PHP. You can use HTTP requests to pass SMS
messages directly to the SMS gateway or you can save your outgoing messages
into a database and let the SMS gateway pick up the messages from there.
Both options have advantages and disadvantages. This guide helps
you get started by giving you information on which option is more
suitable for you.
How to send/receive SMS from PHP through a database ()
If your PHP website uses a database, such as MySQL, using this same database
for sending and receiving is a good option. In this setup two database tables
will be created; one called ozekimessageout will be used for sending SMS, and another
called ozekimessaging willb e used for receiving SMS.
This option has several advantages. First it will be very easy for you to
send a message by simply creating a database record in the ozekimessageout database table.
All you have to do is simply execute an SQL INSERT command. After the message is
inserted into the database table it will be picked up by Ozeki and it will be
sent to the mobile network.
The biggest advantage to this option is that Ozeki will update the status of your
outgoing SMS. This means that when the message is sent to the mobile network, or
when a delivery report comes in after the SMS reaches the recipient handset, Ozeki
will update the status field of the SMS to 'submitted to network' or 'delivered to handset'
status. It will also set the appropriate timestamp for these events. It is very
convenient to have all these information in a database table.
Incoming messages will also be easy to process, as they will be automatically inserted
into a database table by Ozeki SMS Gateway. To read new messages you simply do a SELECT
on the ozekimessagein table. You can freely add SQL columns to this database table
to store processing related information.
Disadvantages of sending SMS from a Database
If you use a database as a method of comnunication between your SMS gateway and your
PHP website, you must take into account that some delays in sending SMS messages
will occur. The SMS gateway checks the outgoing database table periodically (the default
poll interval is 5 seconds). If a message is inserted, it will take a few seconds
for it to be picked up by the SMS gateway for delivery.
Where can I find setup instructions for sending SMS from a Database?
How to send/receive SMS from PHP through the HTTP API ()
PHP gives you the option to issue HTTP requests. Since the Ozeki SMS gateway has
a great http sms api, you can send SMS messages by simply forming an URL and
calling it using one of the built in PHP http download methods. Using an HTTP request
you can both send and SMS and you can also receive SMS messages.
Figure 2 - Ozeki SMS Gateway's HTTP API + PHP SMS solution
(Two-way communication method)
Advantages of sending SMS using the HTTP SMS API
One of the biggest advantages to using the HTTP API is speed. If you send an SMS using
an HTTP request, it will immediately get to the SMS gateway without any delays. If
you use a database table, it will spend a few seconds in the database table. Note
however, that this is only true if you only send out a few messages per minute.
The HTTP request require quite a lot of resources in both network bandwidth
and processing power. This means if you send a message in bulk, it is not a good choice.
If you send a single SMS, it will get there a few seconds faster. If you wish to send
more than 10 messages, it is much better to use a database for transfer, since these
messages can be picked up by the SMS gateway with a single query. If you send out several
hundreds, thousands of hundreds of thousands the database option is the only valid choice.
Disadvantages of sending SMS using the HTTP SMS API
The biggest disadvantage of using the HTTP API is that you must be sure that the HTTP
SMS service is available when you send your SMS. If you send an SMS at a moment when
the SMS gateway is rebooted or when there is a temporary network failure, you request
will not work. Your SMS can be lost. This issue does not affect
the SQL to SMS solution.
Another disadvantage is the extra work required in keeping track of sent messages
and delivered to network or delivered to handset reports. This is hard because
these events happen later. The messages is delivered to the network a few seconds
after you issue the HTTP request for submission, and it can take significantly longer
for the SMS to reach the recipient handset (think of the recipient handset being switched
off temporarily). The Ozeki HTTP api can be asked to notifiy your PHP script about
these events, but it is more work to write the code to handle these events.
Where can I find setup instructions for sending SMS using HTTP?
The document you have read is about how to send SMS messages from a website running on PHP with the help of the Ozeki SMS Gateway.
This solution gives you the ability to decide if you want to use HTTP requests to pass SMS messages directly to the SMS gateway
or to save your outgoing messages into a database and let the SMS gateway pick up the messages from there.
If you have followed the steps above, now you can set up whichever option you choose based on the mentioned advantages and disadvantages.
You can jump into other articles on the Ozeki website, get the information we offer.
Go on and read the next guide about how to send SMS from MySQL with PHP.
Download the Ozeki SMS Gateway now and set up the system in a few minutes!
To setup a php sms through MySQL solution on Linux servers with Apache PHP and
MySQL we need 8 minutes. This document presents tutorial steps and the necessary
information to help you complete this procedure efficiently. Ozeki SMS Gateway
shall be used due to the fact that it offers several advantages. For example, it
does not require direct connection between your system and the SMS service
provider and it is easy to use for all connection types, because the same code
can be used to send SMS through an Android Mobile phone or through an IP SMS
connection, such as an SMPP link. We believe Ozeki SMS Gateway is an outstanding
product. This page requires basic knowledge of sms software technology. You will
be given some valuable information and detailed step by step instructions. We
hope you will enjoy reading it. Let's get started!
Video content
1. Download PHP File
2. Copy PHP File to webserver
3. Modify PHP File
4. Open webpage
5. Send test message
download full project (2.5kB)
If you scroll down, you can find screenshots that describe how to implement the MySQL database + PHP solution.
Keep in mind that this PHP script can SELECT messages from tables as well, so you can visualize outgoing and incoming messages
simultaneously in the same web browser. (Figure 1)
Figure 1 - Download PHP files
After you have downloaded the files, put them in the “www” folder of the webserver.
This way, the downloaded files will affect the webserver’s work. You can see the destination folder in Figure 2.
Figure 2 - Copy PHP files to the webserver's WWW directory
After you moved the files to the ”www”, you will find an “sqlsmshandling_functions.php” file in it open it to begin the modifying.
You can open the file via Notepad. Search for a line called $userName = “user”.
Rewrite it to $userName =”root”. You can find the line you are searching for easily with the help of Figure 3.
Figure 3 - Modify sqlsmshandling_functions.php
Once you have saved the changes, you can open the created webpage.
Make sure to copy the access path of the file and copy it to the browser. You can see the name access path of our example file on Figure 4.
Figure 4 - Open the created webpage
You can use this website to send messages. The “Recipient” will be the sender’s name once it is delivered, the “Message text” will be the message itself.
If you want to send the letter, please click the “Send” button. You can inspect the webpage on Figure 5.
Figure 5 - Send test message
As you can see, once you hit the “Send” button, the message will be delivered to the destination. You can view the outgoing and incoming messages of our example program on Figure 6.
Figure 6 - Message has been sent
How to test sms sending with PHP
To test sms sending from your PHP code you have two options: You can use the
built in sms tester connection or you can setup two sms gateways
to have a more realistic testing environment.
If you setup two sms gateways, the you need to configure the first SMS gateway
as an SMPP simulator. This SMS gateway will
provide SMPP server service to the second SMS gateway.
It will operate the same way the SMSC of a mobile network operator would operate.
The second SMS gateway will connect
to the first using an SMPP client connection, and
it will provide PHP SMS API service to your PHP application.
Final thoughts
We hope you didn’t get lost in the explanations. To review the procedure we can
conclude, that to send sms or receive sms with the php sms through MySQL solution
is quite easy. If you have already completed the steps, you can enjoy a
well-deserved macchiato or some other treat you have in mind. If you would like to
read more interesting facts about the advantages of other similar solutions,
please open ozeki-sms-gateway.com. I hope this page will be useful to all the
readers and especially to beginners.
You can manage databases with SQL statements. You can send SQL
statements through PHP. This makes you possible to manipulate database tables.
For example, PHP can add table records of SMS messages to send, but it also can
read records of incoming messages.
The PHP solution is intended for web developers with basic knowledge in PHP and SQL.
You can download the PHP source code,
so you can do this step-by-step tutorial containing basic instruction how to
implement the solution.
Why is SMS Gateway with a database and PHP a useful combo
This is a useful PHP solution for
adding SMS functions to your website.
adding SMS functions to your corporate intranet.
creating automated SMS notifications.
increasing website security by adding SMS login.
Requirements
You will need to host an Ozeki SMS Gateway, a webserver and a MySQL server. You
can host this function from the
same computer or from two machines as you can see in the table below:
PHP host:
Operating system: Linux or Windows
Webserver (Apache or IIS)
PHP
MySQL Server
Ozeki SMS Gateway host:
Operating system: Windows or Linux
.NET framework (if you use Windows) or Mono (if you use Linux)
Ozeki SMS Gateway
Before you start using this PHP application, you should
install Ozeki SMS Gateway and a MySQL Server on your computer.
You can use Windows or Linux. It is important to choose a hardware or software solution for SMS messaging.
As a hardware solution a mobile phone
or GSM modem
is advised and for a software solution you can use your
IP SMS service provider over the internet.
The PHP example you can find in this tutorial is capable to read records or insert new table records.
This is very useful when reading incoming messages or writing outgoing messages.
If you would like to see how the solution works, please look at Figure 1.
Figure 1 - SMS messaging between Ozeki SMS Gateway, a MySQL database and PHP
You can see the 'Internet User' in the diagram, who will actually send and receive SMS messages through a browser.
The internet user is connected to a PHP enabled web server, which is capable to manage databases
on the SQL Server and these databases belong to Ozeki SMS Gateway.
In the final step Ozeki SMS Gateway sends the message to a mobile phone through the GSM network.
The internet user can access the internet from anywhere.
The only thing that matters is if they know the IP address or the URL of the computer running the PHP server
and if they are authorized to log into the MySQL database, so they can insert the desired SMS message record
which will be selected later on by Ozeki SMS Gateway to be sent out to the recipient's cell phone by using the GSM network.
This workflow also works in the opposite direction.
Where Ozeki SMS Gateway receives the SMS message from the GSM network and saves it in the MySQL database,
so the PHP server can read it and show it on the internet user's screen.
How to create a MySQL database
CREATE DATABASE ozekisms;
USE ozekisms;
CREATE TABLE ozekimessagein
(
id int(11) NOT NULL auto_increment,
sender varchar(30) default NULL,
receiver varchar(30) default NULL,
msg varchar(1024) default NULL,
senttime varchar(100) default NULL,
receivedtime varchar(100) default NULL,
operator varchar(100),
msgtype varchar(160) default NULL,
PRIMARY KEY (id)
);
CREATE TABLE ozekimessageout
(
id int(11) NOT NULL auto_increment,
sender varchar(30) default NULL,
receiver varchar(30) default NULL,
msg varchar(1024) default NULL,
senttime varchar(100) default NULL,
receivedtime varchar(100) default NULL,
status varchar(20) default NULL,
msgtype varchar(160) default NULL,
operator varchar(100),
PRIMARY KEY (id)
);
GRANT insert,update,select,delete
on ozekisms.* to sqluser@localhost
IDENTIFIED BY 'abc123';
Figure 2 - Creating tables in the structure required by Ozeki SMS Gateway
How to create a Database User in Ozeki SMS Gateway
Step 1: Please open Ozeki 10 in a web browser Step 2: Select SMS Gateway application from Ozeki 10's integrated desktop Step 3: Create the Database User in SMS Gateway by following the instructions.
How to use the code
Please use the PHP code you have downloaded and follow these steps:
Copy sqlsmshandling.php, sqlsmshandling_inoutmessages.php and sqlsmshandling_functions.php into the web server's main directory.
Step 3:
Rewrite the SQL server's IP address, username and password in sqlsmshandling_functions.php.
Step 4:
If Ozeki SMS Gateway is not running, please start it.
Step 5:
Enter your PHP server's IP address in your web browser: http://127.0.0.1/sqlsmshandling.php
(You should change the IP of the PHP server or leave it on 127.0.0.1
if the PHP server and your web browser run on the same machine.)
Step 6:
Please fill the HTML form and press 'Send'.
Step 7:
If everything went fine, Ozeki SMS Gateway will show the message status in the Database User's log.
The PHP script
Here you can find out more details of the downloadable sample script.
The script must know the user credentials to your MySQL database.
The main role of the script is to insert the new message in your outgoing message table.
This table is called 'ozekimessageout' in the current example.
Ozeki SMS Gateway's Database User periodically checks the table
for new records and if the status of the message is 'Send', it will try to send it.
In case of success the Database User will change the message's status to 'Sent'.
This is the structure of the source code:
sqlsmshandling.php:
It contains message builder ASP elements. For example, labels, text boxes and the 'Send' button.
The 'Send' button calls the 'connectToDatabase()', 'insertMessage(...)' and 'closeConnection()' functions from sqlsmshandling_functions.php.
sqlsmshandling.php handles not just SMS messages, but exceptions as well.
For example, empty fields.
sqlsmshandling_functions.php:
This PHP file contains all the internal functions used by the 3 files.
- connectToDatabase(): Connects to a database of the MySQL server.
- closeConnection(): Closes the connection, which was created in connectToDatabase().
- insertMessage(recipient, messageType, messageText):
Runs INSERT statement on the database. This statement inserts the message record into the outgoing message table.
- showOutgoingMessagesInTable():
Selects message from the outgoing messages SQL table and builds a HTML table
from them in your web browser.
- showIncomingMessagesInTable():
Selects message from the incoming messages SQL table and builds a HTML table
from them in your web browser.
sqlsmshandling_inoutmessages.php:
It builds HTML tables.
It uses connectToDatabase(), showOutgoingMessagesInTable(),
showIncomingMessagesInTable() and closeConnection() function for re-generate tables.
These functions are available in sqlsmshandling_functions.php.
The detailed description of the process in Figure 1 above:
Step 1:Create input form
sqlsmshandling.php creates a form (Figure 3) to request SMS data from the user.
The form consists of Labels and Textboxes, plus a 'Send' button.
The internet user fills the recipient and message fields and clicks 'Send'.
If the internet user clicks 'Send' the following script runs:
...
<?php
if (isset($_POST["textAreaRecipient"]) && $_POST["textAreaRecipient"] == "")
{
echo "Recipient field mustn't be empty!";
}
else if (isset($_POST["textAreaRecipient"]) && $_POST["textAreaRecipient"] != "")
{
try
{
connectToDatabase();
if (insertMessage($_POST["textAreaRecipient"],"SMS:TEXT",$_POST["textAreaMessage"]))
{
echo "Insert was successful!";
}
closeConnection();
}
catch (Exception $exc)
{
echo "Error: " . $exc->getMessage();
}
}
?>
...
Figure 4 - It logs in and inserts the message to the database table by calling insertMessage(...) function
Step 2:Processing data in the HTML textboxes
If both textboxes are filled, the data will be processed and inserted in the SQL database's outgoing message table.
The insertMessage(…) function (Figure 5) can achieve this.
Keep in mind that the message record is going to be inserted in the MySQL database by the script which has previously logged in
(Figure 4 above).
Step 3:Creating outgoing and incoming message tables
If you press F5 or click refresh in your browser,
the outgoing and incoming tables will be updated by reading information from the MySQL database.
As an example you can see showOutgoingMessagesInTable() below (Figure 6).
Figure 6 - showOutgoingMessagesInTable() function: It generates a HTML table from outgoing messages
Frequently asked questions
Question: Can I send another type of message than 'SMS:TEXT' ?
Answer: Yes. For example, a Wap push message when calling the insertMessage(...) function (Figure 7).
On the form the following should be written in the 'Message text' textbox:
<si>
<indication href="http://target_address" action="signal-high">
text of description
</indication>
</si>
Figure 7 - SMS:TEXT changed to SMS:WAPPUSH
The 'action' parameter of the 'indication' tag can be one of the
following: signal-high, signal-medium, signal-low, signal-none, signal-delete.
Question: Can the PHP have enabled HTTP server run on a different
computer from the MySQL server and Ozeki SMS Gateway?
Answer: Yes, it can. In PHP script please set the IP address and actual login credentials to your MySQL database.
Question: Can I show the recipient the phone number of the sender?
Answer: Yes, you can. Please create textbox for the sender's phone number on modify the insertMessage(...) function (Figure 8).
Keep in mind that this only works if you have an IP SMS service provider connection.
This article is about a solution to manage SMS messaging with MySQL using the Ozeki SMS Gateway and how to set up this system.
If you implement this solution by following the step-by-step tutorial, you will be able to control your messaging system with SQL statements through your PHP application.
Besides the organized and simple SMS messaging this addition offers there is one more great advantage of it, which is the advanced website security you can reach by adding SMS login.
The Ozeki website is full of articles I recommend reading, take the chance, and visit these sites.
Let's take first the guide about how to use your website to send SMS messages.
Download the Ozeki SMS Gateway now and let us help you to achieve your goals!
You can add SMS functionality to your website.
This method presents how to use a PHP script to communicate with Ozeki SMS Gateway's HTTP API.
First you need to enable the PHP scripting support on your webserver.
The presented example (php sms sending script) shows how message sending can work from your website by clicking 'Send'.
The idea uses a HTML form. The user can fill this HTML form and click 'Send'.
The PHP script processes the two variables in the textboxes called 'Recipient' and 'Message'. It also sends the generated HTTP request URL
to the HTTP API of Ozeki SMS Gateway (Figure 1). Your webserver and Ozeki SMS Gateway can be on two different machines or on the same machine as well.
Figure 1 - How an SMS can be sent from your website
Please save sendsms.html to get started with this solution. You should save it in the 'WWW' directory of your webserver.
What does it contain? It contains the HTML form with a recipient and message textbox, plus a 'Send' button (Figure 2).
If you have successfully saved this file in your webserver's directory,
you can open it in any web browser (Figure 3). You can add any telephone
number to the recipient field
(e.g. +4407776134588) and write your message text in the next textbox.
Figure 3 - How the SMS form should look like
The form tag's action attribute points to sendsms.php. Which means that the data entered on the form
will be forwarded to sendsms.php. The data will be sent to the HTTP API if 'Send' is pressed.
How to prepare your PHP SMS script
'sendsms.php' is the target for the recipient and message fields.
This PHP script can build an URL for Ozeki SMS Gateway's HTTP API. It will
invoke the URL if 'Send' is pressed.
Do no forget to configure $ozeki_user, $ozeki_password and $ozeki_url
variables. In case Ozeki SMS Gateway and your webserver runs on the same machine,
you can leave $ozeki_url untouched. Otherwise, you should change the IP to the
IP address of Ozeki SMS Gateway's machine. The newest version of Ozeki SMS
Gateway uses
port 9505, while 9501 belongs to the older one. (Figure 4)
<?php
########################################################
# Login information for the SMS Gateway
########################################################
$ozeki_user = "admin";
$ozeki_password = "abc123";
$ozeki_url = "http://127.0.0.1:9505/api?";
########################################################
# Functions used to send the SMS message
########################################################
function httpRequest($url){
$pattern = "/http...([0-9a-zA-Z-.]*).([0-9]*).(.*)/";
preg_match($pattern,$url,$args);
$in = "";
$fp = fsockopen("$args[1]", $args[2], $errno, $errstr, 30);
if (!$fp) {
return("$errstr ($errno)");
} else {
$out = "GET /$args[3] HTTP/1.1\r\n";
$out .= "Host: $args[1]:$args[2]\r\n";
$out .= "User-agent: Ozeki PHP client\r\n";
$out .= "Accept: */*\r\n";
$out .= "Connection: Close\r\n\r\n";
fwrite($fp, $out);
while (!feof($fp)) {
$in.=fgets($fp, 128);
}
}
fclose($fp);
return($in);
}
function ozekiSend($phone, $msg, $debug=false){
global $ozeki_user,$ozeki_password,$ozeki_url;
$url= 'action=sendmessage';
$url.= '&username='.$ozeki_user;
$url.= '&password='.$ozeki_password;
$url.= '&messagetype=SMS:TEXT';
$url.= '&recipient='.urlencode($phone);
$url.= '&messagedata='.urlencode($msg);
$urltouse = $ozeki_url.$url;
if ($debug) { echo "Request: <br>$urltouse<br><br>"; }
//Open the URL to send the message
$response = httpRequest($urltouse);
if ($debug) {
echo "Response: <br><pre>".
str_replace(array("<",">"),array("<",">"),$response).
"</pre><br>"; }
return($response);
}
########################################################
# GET data from sendsms.html
########################################################
$phonenum = $_POST['recipient'];
$message = $_POST['message'];
$debug = true;
ozekiSend($phonenum,$message,$debug);
?>
Figure 4 - The source code of the *\WWW\sendsms.php script
After both sendsms.html and sendsms.php are copied and modified at *\WWW\,
an SMS message can be submitted by the gateway. After it gets accepted for delivery, the SMS Gateway will return the message reference number in the response (Figure 5).
Messages are tracked in Ozeki SMS Gateway by their reference number.
Figure 5 - Response XML from Ozeki SMS Gateway
Summary
In this article, you can see how to add SMS functionality to your website.
It uses the provided example PHP SMS script to reach the Ozeki SMS Gateway.
Using the SMS Gateway offers the ability to route SMS messages between various
endpoints and gives you the ability to control your text messages as they go through the system,
to can reach anybody in your organization easily.
If you want to build a reliable and versatile SMS communication system, find more information about it on the Ozeki website.
Feel free to check out the article about sending SMS from a website using
MySQL, or sending SMS using C#.
To create your first high performance SMS gateway system, now is the best time to download Ozeki SMS Gateway!
You will see how a random person can use their internet browser to send SMS.
The trick is that this PHP script can make 'sendmessage'
HTTP requests to Ozeki SMS Gateway's HTTP API. The 'sendmessage' request can send any SMS from SMS Gateway.
Video content
1. Download PHP File
2. Copy PHP File to webserver
3. Create HTTP Server user
4. Modify PHP File
5. Open webpage
6. Send test message
sendsms.zip
If you scroll down, you can find screenshots that describe how to implement the HTTP API + PHP solution.
Step 1 - Setting up a webserver
The first step to set up a system what you can be used to send messages from a website, is to download the files we provide to you.
You can click the download link on the top of this website as you can see on Figure 1.
After you clicked the download link, you must wait until your browser downloads your files.
Figure 1 - Download PHP/HTML files
After you have the files, you need to move them to the “www” folder of the
webserver. On Figure 2, you can see the access path of the folder which
you need to move the files in.
Figure 2 - Copy the downloaded PHP and HTML files to the webserver's WWW directory
Step 2 - Set up a new user
If you have all the files in all the right place, you could now login to
Ozeki 10. On Figure 3, we use an example user's account. You can log in
by typing in your username and password and hit the “OK” button.
Figure 3 - Login to Ozeki 10
To establish connection between an HTTP server and the Ozeki 10, you need to launch the SMS Gateway.
You can do this by searching for an “SMS Gateway” icon on the desktop of
Ozeki 10 and clicking it. You can see what to search for on Figure 4
Figure 4 - Open the SMS Gateway application
To communicate with an HTTP server, the Gateway needs a new user. You can add one with the “Add new user or application” button on the main page of the SMS Gateway, as you can see on Figure 5.
Figure 5 - Click on 'Add new user or application...'
Now you can install the HTTP server which you will use to send messages from.
Click the “Install” button next to the “HTTP server” title to start configuring your webserver. You can find it on Figure 6.
Figure 6 - Install 'HTTP server' user
Here you can create the name of the new user which will be used to communicate with the server. As you can see on Figure 7, we gave the user the name “HTTP”.
Figure 7 - Create the name of the User
Step 3 - Modify the sendsms.php file
Now you must modify the sendsms.php file, the one you downloaded and move to the www folder.
On Figure 8, you can see how the php file should look like after you done the modifications to it.
Figure 8 - Modify sendsms.php
Step 4 - Test your webpage
You are finished, you can now open the page you just created and start typing your first message.
Go to your browser and type in “localhost\sensms\sendsms.html”. Press
enter and the webpage will load in.
On Figure 9, you can see what to type.
Figure 9 - Open the created webpage
Now you can send a test message to the Ozeki 10 SMS Gateway.
The “Recipient” will be the number you send your message from, and the “Message” will be the text of the message. We used an example number on Figure 10.
Figure 10 - Send test message
If you managed to follow the tutorial carefully, you now have a working system. As you can see on Figure 11, your message is processed and sent to the recipient.
Figure 11 - Message has been sent
We hope that this guide was helpful. If you have any problem with any of the
steps, feel free to contact us at info @ ozeki.hu
Conclusion
In this guide, we presented the information about how to use our HTTP API with PHP.
With this solution, you can use your internet browser to send SMS messages.
It sends a ‘sendmessage’ HTTP request to the Ozeki SMS Gateway, which can send up to 1000 SMS per second.
This service can be put into use and can make your organization more efficient because it allows you to deliver key information,
using only a web browser.
Find out more information about this technology and Ozeki SMS Gateway,
so make sure that you don't finish your work here. To know more about the system,
visit the page where we use MySQL, or Python to send SMS messages.
Now your next thing to do is to download Ozeki SMS Gateway and configure this solution immediately!
Everything is there to get it up and running in less than 10 minutes.
Discover how to integrate One-Time Password (OTP) functionalities into
your PHP applications with our comprehensive guide. The Ozeki SMS Gateway offers
a high-performance, reliable platform that makes setting up OTP efficient.
Our step-by-step tutorial will walk you through the entire process—from logging
into your Ozeki account and configuring the HTTP API user to updating your PHP
file and verifying OTPs.
This guide is tailored for PHP developers who want to enhance their application’s
security with OTPs. It includes clear instructions, visual aids, and a helpful
video tutorial to ensure you understand each step. Whether you are new to OTP
implementation or seeking to refine your setup, this guide provides all the
necessary tools to achieve a secure and effective solution.
What is a one-time password?
A One-Time Password (OTP) is a unique, temporary code used for secure
authentication, valid for only one transaction or session. It enhances security
by ensuring that stolen or reused passwords are ineffective. OTPs are typically
sent via SMS, email, or generated by an authentication app, and expire quickly
to prevent unauthorized access.
Download PHP One-Time Password example
By downloading this ZIP file, developers can access sample PHP code and resources
needed to implement OTP features using the Ozeki SMS Gateway. This example
simplifies the setup process, enabling developers to efficiently incorporate OTP
into their applications for enhanced security.
How to set up a One-Time Password example for PHP developers (Easy guide)
To set up a One-Time Password example for PHP developers
Log into your Ozeki account
Open the Ozeki SMS Gateway main interface
Install the HTTP user application
Set a username and password for the HTTP API user
Open the PHP file and configure the OTP settings
Update and test OTP PHP file
Load the OTP management page
Generate OTP
Copy the OTP message from the Ozeki SMS Gateway
Paste the OTP code into the designated field
Verify OTP
Set a one-time password with Ozeki (Video guide)
In this video guide we will show you on how to set up a One-Time Password (OTP). This process will
be really useful especially for PHP developers, because all the essential steps will
be presented. By following this comprehensive guide, you will be an expert of creating a one-time
password, so it will not cause you any difficulties to create one in the future.
Follow the instructions, and explore the other functionalities of Ozeki SMS Gateway.
Start by entering into your Ozeki account. If you do not have an accoumt yet, create
one by downloading the Ozeki SMS Gteway software from the Ozeki's https://ozeki-sms-gateway.com/
webiste. Install and run the application, create an account by setting up a username and
password, then log into the new Ozeki account. Open the Ozeki SMS Gateway main
interface, where choose the "Add new user/ application" option from the management
panel. Install the HTTP user application. When it is installed, provide a username and
password for the HTTP API user. This information can be used to access the system
through the HTTP API. Save the settings with the "OK" button.
Figure 1 - Create http user in SMS Gateway
Next, navigate to the wamp64 folder on your local disk, and locate the PHP file
designated for OTP (One-Time Password) generation. In this PHP file, you will
configure the OTP settings and integrate them with the Ozeki SMS Gateway.
Figure 2 - Open One-time password PHP file
Once you have opened the PHP file, scroll through the document to find the section
where you need to configure the Ozeki SMS Gateway connection details.
This section is essential for ensuring that your PHP script can communicate
properly with the Ozeki SMS Gateway to send OTPs.
Navigate back to the Ozeki SMS Gateway, then find the one-time passwod PHP under the
API prefix. Copy the the URL, then paste it into the PHP file as Ozeki URL. Open a
new tab at the browser and load the opt Ozeki page, by entering
localhost/opt.php into the search bar.
Figure 4 - Open One-time password PHP example in the browser
On the OTP management page, you will need to enter your username and password
into the appropriate fields to generate a one-time password. This step is essential
for obtaining a valid OTP that will be used for verification or authentication
purposes.
Figure 5 - Send One time password message
After generating the OTP, navigate back to the Ozeki SMS Gateway interface to
locate the OTP message. Copy the generated OTP and return to the OTP management
page in your browser.
Figure 6 - One-time password message sent
Paste the OTP code into the designated field on the OTP management page. Confirm
the OTP by clicking the "Confirm OTP" button to complete the verification process.
This action will validate the OTP and ensure that it has been correctly integrated
and configured.
Figure 7 - Confirm One time password
Upon successful verification of the OTP, you will receive a notification confirming
that the process has been completed successfully. This confirmation indicates that
the OTP setup, integration, and validation processes have been executed correctly
and are functioning as expected.
Figure 8 - Successful verify
Conclusion
Setting up a One-Time Password (OTP) with the Ozeki SMS Gateway is a
straightforward process that can significantly enhance the security of your
applications, particularly for PHP developers. By following the steps outlined in
this guide, you have learned how to configure and integrate OTP functionalities,
ensuring a secure and reliable verification process for your users.
For additional guidance or troubleshooting, refer to the provided video tutorial,
which visually demonstrates the entire setup process. If you need further
assistance, feel free to explore other related guides, such as sending SMS from
MySQL with PHP or integrating SMS functionalities using different APIs.
FAQs
How do I get started with using OTP in my PHP application?
To get started with OTP in your PHP application, you need to download the example
PHP code provided, configure your Ozeki SMS Gateway account, and follow the setup
instructions in the guide to integrate OTP functionality into your application.
Can I use the OTP feature with any SMS gateway?
The OTP example provided is specifically designed for use with the Ozeki SMS
Gateway. While similar functionality may be available with other SMS gateways,
the setup instructions will differ.
How long is the OTP valid for?
An OTP is typically valid for a short period, such as a few minutes, to ensure
security. The exact validity period can be configured based on your application’s
requirements.
How often should I update my OTP setup?
You should review and update your OTP setup periodically to ensure compatibility
with software updates and to maintain security. Regular updates help address any
potential vulnerabilities and improve overall system performance.
See how to send and receive SMS messages by using your Visual Basic.NET applications.
It is a great choice to communicate with your clients or employees with simple text messages.
Choose which is the best method for your system by downloading a database and a HTTP API example.
In the 1st example the database server is between your SMS Gateway and VB.NET application.
In the 2nd example the HTTP API of Ozeki SMS Gateway can be directly reached.
Introduction
You can implement SMS functionalities into your Visual Basic.NET program,
so it can send SMS messages through Ozeki SMS Gateway.
By using a database server (MySQL, MSSQL, Oracle)
you can send or receive SMS messages
with SQL statements like INSERT or SELECT, but you can also use
'sendmessage' request
of the HTTP API to post your message to the mobile
network. These two-options guarantee speed,
reliability and safety to offer a professional and reliable solution.
In the following paragraphs you can read some possibilities of the
above-mentioned benefits.
You can find links to two detailed setup guides that include example source codes and detailed explanations.
How to send and receive SMS in Visual Basic.NET using SQL
In this example your Visual Basic.NET application and the Ozeki SMS Gateway
share a database server. To send an SMS message the Visual Basic.NET application
must insert a database record into the database using an SQL request. Ozeki
SMS gateway will read this database record and will send the SMS. Messages can be
received the similar way. If an SMS comes in, the SMS gateway will insert it
into the database. The VB application can pick it up from them through a
standard database connection (Figure 1).
Figure 1 - How to send / receive SMS from VB.NET through SQL
How to send and receive SMS in Visual Basic.NET using HTTP
This example explains how to use HTTP request in VB.NET to
submit text-messages to mobile phones. After implementing this example, your
Visual Basic.NET application will be able to deliver text messages to the
cell phones of mobile users through Ozeki SMS Gateway, by calling its HTTP
interface. Ozeki SMS Gateway will be responsible for converting these HTTP
requests to SMS messages and for delivering them to the recipient handsets
(Figure 2).
Figure 2 - How to send SMS from VB.NET using HTTP requests
To test sms sending from your visual basic code you have two options: You can use the
built in sms tester connection or you can setup two sms gateways
to have a more realistic testing environment.
If you setup two sms gateways, you need to configure the first SMS gateway
as an SMPP simulator. This SMS gateway will
provide SMPP server service to the second SMS gateway.
It will operate the same way the SMSC of a mobile network operator would operate.
The second SMS gateway will connect
to the first using an SMPP client connection, and
it will provide SMS API service to your VB application.
Benefits
By implementing the above configurations with Ozeki SMS
Gateway,
several benefits will open for you. You will have a very reliable notification
system, that can be configured to notify the intended person directly. You will
be able the react instantly to incoming SMS messages and you will be able
to track message delivery status using delivery reports. The above configurations
can be used independently of mobile network operators. You can configure Ozeki
SMS Gateway to use GSM modems or IP SMS connections to send your SMS messages.
If one provider fails, or the provided throughput is not sufficient, you can
switch to another provider. You can use HTTPS or secure database connection;
thus you can build a secure notification system. By using this next generation,
you will be able to provide a professional service for your mobile users.
Your work will be more efficient, faster and nonetheless more accurate.
In Ozeki SMS Gateway You can write a script, that allows you to run Visual Basic .NET code when an SMS message arrives.
This script can implement any logic to do various tasks with the incoming messages, and optionally send response SMS messages.
How to run .NET code when an SMS arrives (Rapid steps)
To run .NET code when an SMS arrives:
Launch Ozeki SMS Gateway
Select Add new user or application
Install Visual Basic script service
Name the connection
Provide the source of the script
Enable connection
Receive test SMS
Check the logs
Step 1 - Add new user/application...
You can simply install the Visual Basic script User on the 'Management' console by clicking 'Add new user/application...' in the 'Users/Applications' panel (Figure 1).
Figure 1 - Add new user/application...
Step 2 - Add Visual Basic script
An interface will open consisting of two panels. The left side panel contains the already installed users and applications.
The right-side panel contains the users and applications you can install with a brief description next to them.
Search the Visual Basic script User and click the blue 'install' button next to it (Figure 2).
Figure 2 - Add Visual Basic script
Step 3 - Provide the script
The 'Configuration' panel has a 'General' tab which contains the basic settings.
First please provide a unique Name. In the Script section of tab page contains the source of the script you wish to execute (Figure 3).
Figure 3 - Provide the script
Step 4 - Enable user
Please enable to user with the Connection switch and in the Events tab view
that the Script is compiled, and the user is initialized successfully (Figure 4).
Figure 4 - Enable user
Step 5 - Message received
Finally, you can see if a message is received by this user the script will run and as this example works the response SMS message is sent to the Original sender (Figure 5).
Figure 5 - Message received
Visual Basic programming guide
Create a class named 'Program' in the 'Ozeki' namespace. You may also include the necessary using directives.
Imports System
Namespace Ozeki
Public Class Program
End Class
End Namespace
Implement the 'Receive' function inside the 'Program' class.
This function will be called when your connection receives a message.
The parameter of the 'Receive' function will be an object with the type of 'Message'.
Imports System
Namespace Ozeki
Public Class Program
Public Sub Receive(ByVal msg As Message)
End Sub
End Class
End Namespace
Send a reply message
When receiving a message, you may send a reply to notify your sender of successful delivery.
To achieve this, you may use the built-in 'Reply' function.
Imports System
Namespace Ozeki
Public Class Program
Public Sub Receive(ByVal msg As Message)
Reply(msg, "Thank you for the message!")
End Sub
End Class
End Namespace
Message forwarding
You may also forward your received message to another connection by using the 'Send' function.
Imports System
Namespace Ozeki
Public Class Program
Public Sub Receive(ByVal msg As Message)
Send("admin@localhost", msg.Text)
End Sub
End Class
End Namespace
Compose your message
Composing a message is easier, than you think. You just need to use the built-in 'Message' type to create a new message object.
In the following example, when a message was received, we will create and send a new message to the admin connection.
Imports System
Namespace Ozeki
Public Class Program
Public Sub Receive(ByVal msg As Message)
Dim message = New Message()
message.Text = "Hello World!"
message.ToAddress = "+4412345678910"
message.ToConnection = "admin@localhost"
message.FromAddress = "+448888999910"
Send(message)
End Sub
End Class
End Namespace
Logging
Using log messages will make debugging your script much easier. By calling the 'Log' function you may implement proper logging in your script if needed.
Imports System
Namespace Ozeki
Public Class Program
Public Sub Receive(ByVal msg As Message)
Log("Message received: " & msg.Text)
End Sub
End Class
End Namespace
Summary
By reading this guide, you have learned how to write a script in the Ozeki SMS Gateway that allows you to run VB.NET code when an SMS message arrives.
This way you can make it do tasks with the incoming messages, organize your message storage constantly and send response SMS messages if it is needed.
If you have followed the instructions above, you have taken momentous steps in becoming a better Visual Basic software developer.
Learn more about the Visual Basic programming language and developing your messaging system on the Ozeki website.
Study the VB.NET database SMS example in the next tutorial.
Let's put into practice what you have learned. Download the Ozeki SMS Gateway now!
See how to add SMS functionality to your VB.NET application. For the solution you will need a
database server that stores sent and received messages. MS SQL, MS SQL Express, MySQL, Access, Oracle is accepted.
The source code is provided. You can download and edit it.
How to add SMS functionality to VB.NET (Rapid steps)
The solution consists of 3 different parts (Figure 1).
Ozeki SMS Gateway, the SQL database and your VB.NET application.
Check if Ozeki SMS Gateway is connected to the SQL database. You can find plenty
of connection tutorials on the SMS from SQL database page.
If it is done, please check if VB.NET can read and write database records.
Figure 1 - Send and receive SMS messages with VB.NET
The figure shows exactly what was described in the last paragraph. You can
send SMS messages by inserting a new record by using the VB.NET application.
Check the SQL table to see if new records were placed into it. These messages should be automatically sent.
Check if the VB.net application works with the database both by reading or inserting records.
Reading records are important since this is the way to read incoming messages.
Prerequisites
The main software of the operation is
Ozeki SMS Gateway which you can get to your Ozeki 10 application.
This software can connect your computer to the mobile network as it can connect
your PC to any of the following database server:
You will also need a C# or Visual Basic development IDE, such as Microsoft Visual Studio.
If you haven't done yet, please download VB sms example project.
To sum it up, here is a full list of the required software:
Use the following steps to create a working solution. In this example you will see a Microsoft SQL Express solution
with database examples ready to copy-paste.
Please download and install
Ozeki 10 before going forward with these steps. Manually sms sending test
if you can send and receive SMS message with Ozeki 10. If the test was successful, you will be able to send and receive
SMS messages from the graphical user interface of the VB.net application.
Check if it was sent by using the event logs of Ozeki 10.
If you are not using SQL Express, please copy the table creation code from one of these SQL server options.
Step 1 - Create database user and tables
Please install Microsoft SQL Express
and Microsoft Visual Studio so you can follow these steps.
Create the database tables on your Microsoft SQL Express database server by copy-pasting code 1.
create database ozeki
GO
use ozeki
GO
CREATE TABLE ozekimessagein (
id int IDENTITY (1,1),
sender varchar(30),
receiver varchar(30),
msg varchar(160),
senttime varchar(100),
receivedtime varchar(100),
operator varchar(30),
msgtype varchar(30),
reference varchar(30),
);
CREATE TABLE ozekimessageout (
id int IDENTITY (1,1),
sender varchar(30),
receiver varchar(30),
msg varchar(160),
senttime varchar(100),
receivedtime varchar(100),
operator varchar(100),
msgtype varchar(30),
reference varchar(30),
status varchar(30),
errormsg varchar(250)
);
GO
sp_addLogin 'ozekiuser', 'ozekipass'
GO
sp_addsrvrolemember 'ozekiuser', 'sysadmin'
GO
Code 1 - The code that creates the table structure
Step 2 - Connect Ozeki SMS Gateway to your database
Now it is time to create a Database user in Ozeki 10.
After the user has been created select 'SQL server' and copy-paste the following connection string (Code 2).
Do not forget to use your own Database name, user ID and password.
Code 2 - Connection string. Change parameters if necessary
Step 3 - Modify the VB.NET code to connect with Ozeki 10
Open example project in Visual Studio and edit source code if necessary.
In code 3 you should provide the same connection parameters used above in code 2.
The VB.NET parameters are added to 'myConnection' connection string (Code 3).
Dim dbUsername As String = "ozekiuser"
Dim dbPassword As String = "ozekipass"
Dim database As String = "ozeki"
Dim myConnection As _
New SqlConnection( _
"Server=.\SQLEXPRESS;User ID=" _
& dbUsername _
& ";password=" _
& dbPassword _
& ";Database=" _
& database _
& ";Persist Security Info=True")
Code 3 - Check if the connection parameters are correct
Step 4 - Insert SMS record into database
The following code inserts textbox content from the VB.NET example GUI to the database (Code 4).
Dim mySqlQuery As String = _
"INSERT INTO ozekimessageout " _
& "(receiver,msg,status) " _
& "VALUES ('" & tbReceiver.Text _
& "', '" & tbMessage.Text & "', 'send');"
Dim mySqlCommand As New _
SqlCommand(mySqlQuery, myConnection)
Code 4 - Inserts new SMS message record into the database
This code can only execute if the VB.NET application can connect to the database.
The insertable values can be provided in the application GUI (Figure 2).
After typing the recipient's number and message text, click 'Insert'
and Ozeki 10's Database User will forward the inserted message to the recipient after finding the record in the database.
Figure 2 - The user GUI of this VB.NET example
Finally, the code sequence on the bottom of the class will run (Code 5).
These 3 methods will be called. They will connect to the database and insert the message record of the SMS to send and close the connection.
The full code you can see below (Code 6) is built up from segments described above (Code 3 - 5).
You can freely use and modify the example code as you wish. The method can drop an exception if it cannot INSERT the SMS message to send.
Imports System
Imports System.Data
Imports System.Data.SqlClient
Public Class Form1
Private Sub bSend_Click( _
ByVal sender As System.Object, _
ByVal e As System.EventArgs)
Handles bSend.Click
Try
Dim dbUsername As String = "ozekiuser"
Dim dbPassword As String = "ozekipass"
Dim database As String = "ozeki"
Dim myConnection As New SqlConnection( _
"Server=.\SQLEXPRESS;User ID=" _
& dbUsername _
& ";password=" _
& dbPassword _
& ";Database=" _
& database _
& ";Persist Security Info=True")
Dim mySqlQuery As String = "INSERT INTO " _
& "ozekimessageout(receiver,msg,status) " _
& "VALUES('" & tbReceiver.Text & "', '" _
& tbMessage.Text & "', 'send');"
Dim mySqlCommand As New _
SqlCommand(mySqlQuery, myConnection)
myConnection.Open()
mySqlCommand.ExecuteNonQuery()
myConnection.Close()
Catch ex As Exception
MessageBox.Show(ex.Message)
End Try
End Sub
End Class
Code 6 - The whole VB.NET example code
With this solution you won't have to worry about queuing outgoing messages,
since the queue will be handled by Ozeki 10's SMS Gateway application.
It will also add a timestamp and modify the message status register attribute to
show successful or unsuccessful delivery towards the recipient.
Incoming messages
They will be received and stored on the database server as well.
Although the VB.NET application doesn't need to be online when receiving a message, since it
can view the 'ozekimessagein' table anytime it goes online by running a SELECT statement over the table.
Summary
This article showed you how to add SMS managing functionality to your VB.NET application with the help of the Ozeki SMS Gateway.
This solution helps you organize your messages with a database server that stores the SMS messages, and the VB.NET application that classifies these messages.
If you have followed the steps above carefully, then you are now able to set up the presented system, which will make communication more convenient for you.
The information you have obtained is valuable, there are more useful documents on the Ozeki website, so keep on reading.
Learn about the VB.NET HTTP SMS example in the next tutorial.
Do not waste your precious time, download the Ozeki SMS Gateway now!
If you are creating a VB.NET application, you can expand the functionalities
with an SMS sending option. To do that, we provide you this step-by-step tutorial,
which will guide you through the process of downloading an example project,
creating a database layout and a database user, modifying the source code and
testing out the example application. The source code is provided, feel free to edit it.
How to send SMS from VB.NET using Database (Easy directives)
To send SMS from VB.NET using Database:
Setup Microsoft Visual Studio
Install Microsoft SQL Express
Download the example project
Open OzekiSmsDBInsert.sln
Create database tables
Launch Ozeki SMS Gateway
Add Database user
Modify the Database connection tab
Edit the source code in Visual Studio
Send test SMS from VB.NET
Step 1 - Download an example project
To download a Visual Basic SQL database SMS free example project
which you can work with, please head over here,
and click the download link on the top of the page as you can see in Figure 1.
You will have to wait out, until your browser downloads all the necessary files for you.
If you successfully downloaded the files, please open the Visual Studio Solution
file, called “OzekiSmsDBInsert.sln”.
You will need Microsoft Visual Studio to open and edit the example project. You can find it easily with the help of Figure 2.
Figure 2 - Open the project file
Step 3 - Connect the database with the user in Ozeki SMS Gateway
Next up, you need to create the database tables on your Microsoft SQL Express
database server by copy-pasting the following code:
create database ozeki
GO
use ozeki
GO
CREATE TABLE ozekimessagein (
id int IDENTITY (1,1),
sender varchar(30),
receiver varchar(30),
msg varchar(160),
senttime varchar(100),
receivedtime varchar(100),
operator varchar(30),
msgtype varchar(30),
reference varchar(30),
);
CREATE TABLE ozekimessageout (
id int IDENTITY (1,1),
sender varchar(30),
receiver varchar(30),
msg varchar(160),
senttime varchar(100),
receivedtime varchar(100),
operator varchar(100),
msgtype varchar(30),
reference varchar(30),
status varchar(30),
errormsg varchar(250)
);
GO
sp_addLogin 'ozekiuser', 'ozekipass'
GO
sp_addsrvrolemember 'ozekiuser', 'sysadmin'
GO
You can see the copied code on Figure 3.
Figure 3 - Create the database layout in MSSQL Server
The next step is to create a database user in Ozeki SMS Gateway. To do that,
please use the Ozeki SMS Gateway’s “Add user or application” panel.
You need to choose the “Database” option in order to create a connection
with your MSSQL database server, as demonstrated on Figure 4.
Figure 4 - Create database user in Ozeki SMS Gateway -
To connect your database server to the user in Ozeki SMS Gateway, you need to
modify the “Database connection” tab in the Ozeki SMS Gateway.
You will need to copy-paste your own server properties to work and click
"OK". On Figure 5, we used our test server properties.
Figure 5 - Connect to the database
To modify the login credentials, you will need to edit the source code,
with Microsoft Visual Studio, as seen below on Figure 6.
Figure 6 - Modify the login credentials in the source code
Step 4 - Start the program
If you have done all the steps correctly, you have a working system.
To start the program, click the “Start” button on the top of the
Microsoft Visual Studio window as it is presented on Figure 7.
Figure 7 - Start the project
If the program started, you will be presented with the GUI of the example
project, as it is on Figure 8.
Figure 8 - Send the Test SMS
To sum it up
This article showed you how you can expand the functionalities of your VB.NET
application with an SMS sending option.
This solution provides a high-performance, easy-to-use system for message
sending with the VB.NET application and the Ozeki SMS Gateway.
If you have followed the guide through the process of downloading an example
project, creating a database user, modifying the source code, and testing out
the example application then you are able to set up this system.
There is more valuable information for you to acquire, you can find them here
on the Ozeki website.
Jump into another interesting article to learn about how to send SMS from VB.NET using HTTP API.
See how to add SMS functionality to your VB.NET application. For the solution you will only need an Ozeki 10 and a Microsoft Visual Studio.
The communication will work through the HTTP protocol. The source code is provided. You can download and edit it.
How to add SMS functionality to VB.NET (Easy to follow directives)
VB.NET applications can be flexibly developed for creating dynamic web pages and standard applications.
Developers are usually required to add mobile messaging to their applications, so users can send SMS messages to any recipient.
Usually, the most simplest and convenient way to add a SMS messaging to your system is by using a HTTP SMS gateway,
such as Ozeki 10's SMS Gateway application and post messages to this gateway using HTTP requests (Figure 1).
Figure 1 - Send and receive SMS messages with HTTP requests
Besides sending SMS messages, you can receive them too with VB.NET. You can do this in two ways.
The easiest way is to create a HTTP Client User
in Ozeki SMS Gateway, which can forward incoming messages to your VB.NET program
codes.
This works if you are able to process HTTP requests. The other way is to periodically download incoming messages.
You can download text messages with delivery reports from Ozeki SMS Gateway.
Prerequisites
There are only two prerequisites you should download. Ozeki 10's SMS Gateway application and Microsoft Visual Studio
for coding VB.NET. Both are the two ends of the HTTP communication. Besides Microsoft Visual Studio
you can use any other IDE that lets you develop in VB.NET. If you scroll bellow,
you can see the VB.NET
example codes for the HTTP application. Here you can find the software checklist
and the example program:
You can easily download and install Ozeki 10.
Check the SMS quick start guide
to easily connect it to the mobile network.
You will also need to create a HTTP Server Connection in Ozeki 10.
Click 'Add new user or application...' and look for the HTTP Server Connection in the list.
Click the blue 'Install' button next to it (Figure 2).
Figure 2 - Installing a HTTP Server Connection
You will need to provide the username and password. Do not forget these login credentials. You will need to provide them in VB.NET
by replacing the example strings in the source code.
Step 1 - Set up the connection parameters in the VB.NET example code
Open the VB.NET example project and rewrite the necessary parameters (Code 1).
Dim request As HttpWebRequest
Dim response As HttpWebResponse = Nothing
Dim url As String
Dim username As String = "admin"
Dim password As String = "abc123"
Dim host As String = "http://127.0.0.1:9501"
Dim originator As String = "06201234567"
Code 1 - HTTP parameters
The 'username' and 'password' strings are the login credentials belonging to
the HTTP Server Connection.
If Ozeki 10 and your VB.NET application is running on different machines, then
it is required to
rewrite the 'host' parameter to the IP address and port number of the Ozeki 10 machine.
The 'originator' is the phone number used as the sender.
Step 2 - Compose URL from parameters
Code 2 composes a HTTP request from the parameters provided in Code 1.
This URL will be used to post your SMS message to Ozeki 10's SMS Gateway application.
All parameters specified in the Ozeki HTTP SMS API documentation can be contained in the URL.
The values must be URL encoded, so special characters cannot break the HTTP
specification.
Code 2 - HTTP request URL created from the parameters
Step 3 - Submit URL to Ozeki 10
Code 3 contains the last three lines of this VB.NET example. It sends the HTTP request and shows the response in a pop-up window.
The WebRequest.Create("...") built in VB.NET method sends the URL to Ozeki 10, while GetResponse() method collects the response.
It will appear in a pop-up window generated with the MessageBox.Show("...") method.
Code 3 - Send HTTP request and show response in pop-up window
It is advised to walk through the HTTP API actions
and the corresponding parameters to control Ozeki 10 through the HTTP API. This way you can create request URLs for your needs.
Full VB.NET example code
The full code you can see below (Code 4) is built up from segments described above (Code 1 - 3).
You can freely use and modify the example code as you wish. An exception can be dropped if it is a problem with the HTTP communication.
Imports System
Imports System.IO
Imports System.Net
Imports System.Text
Imports System.Web
Public Class fMain
Private Sub bSend_Click(ByVal sender As System.Object,
ByVal e As System.EventArgs) Handles bSend.Click
Dim request As HttpWebRequest
Dim response As HttpWebResponse = Nothing
Dim url As String
Dim username As String
Dim password As String
Dim host As String
Dim originator As String
Try
host = "http://127.0.0.1:9501"
originator = "06201234567"
username = "admin"
password = "abc123"
url = host + "/api?action=sendmessage&" _
& "username=" & HttpUtility.UrlEncode(username) _
& "&password=" + HttpUtility.UrlEncode(password) _
& "&recipient=" + HttpUtility.UrlEncode(tbReceiver.Text) _
& "&messagetype=SMS:TEXT" _
& "&messagedata=" + HttpUtility.UrlEncode(tbMessage.Text) _
& "&originator=" + HttpUtility.UrlEncode(originator) _
& "&serviceprovider=GSMModem1" _
& "&responseformat=html"
request = DirectCast(WebRequest.Create(url), HttpWebRequest)
response = DirectCast(request.GetResponse(), HttpWebResponse)
MessageBox.Show("Response: " & response.StatusDescription)
Catch ex As Exception
MessageBox.Show(ex.Message)
End Try
End Sub
End Class
Code 4 - The full example code
Conclusion
This article was written for you to see how to add SMS functionality to your VB.NET application using the Ozeki SMS Gateway.
A VB.NET application is really beneficial to use, because it can be flexibly developed for creating dynamic web pages and standard applications equally.
If you have followed the tutorial carefully, you have learned how to create an HTTP client user in the Ozeki SMS Gateway and how to use it for message system development in your VB.NET application.
You can find more articles on the Ozeki website to read about interesting topics and impressive solutions.
Check out the next guide about how to send SMS from VB.NET using HTTP API.
Download the Ozeki SMS Gateway now, for a better performing SMS system!
Visual Basic .Net is a programming language mostly used to create dynamic web pages. It is widely used because of its flexibility in all fields.
This guide will provide you information on how to build a Visual Basic project that can handle sending SMS to any given phone number. If you run the VB.net file,
it will connect to the Ozeki SMS Gateway and handle your outgoing SMS traffic. We provide you with the required project file, you just need to modify it with you own password and username.
You can follow this step-by-step guide, so the modification requires no coding skill.
How to send SMS from VB.NET using HTTP API (Simple directives)
To send SMS from VB.NET using HTTP API:
Setup Microsoft Visual Studio
Download the pre-built VB.net project
Open OzekiSmsHttpRequest.sln
Modify the source code
Connect to the Ozeki SMS Gateway
Run the project
Type address and text message
Send test SMS
Step 1 - Download the VB.NET example code
First you will need to have a starting point to begin the work. We provide you a
pre-built VB.net project which only needs little modifications.
To download the required file, go to the main page of the VB.net solution as
you can see on Figure 1, or click the link below.
Now that you have all the required files, you need to open the code of the project to modify. You can use many developer tools to make the adjustment.
We use Visual Studio as you can see on Figure 2.
To open the project, search for a file called “OzekiSmsHttpRequest.sln”. If you found the file, please open it by clicking the filename, as you can see on Figure 2.
Figure 2 - Open the project file
After you opened the text editor of your choice, you will be presented with the code of the VB.net project.
Upon running it will try to connect to the Ozeki SMS Gateway, so it will need to fill in the login form with your username and password.
To use the required login credentials, you need to change some code line. Please find a code line which starts with “Dim username As String =”.
Here you will need to complete the snippet with your username, and the line below with your password.
This way the program will know your username and password and will successfully log in to your Ozeki account.
You can find the code lines on Figure 3.
Figure 3 - Modify the login credentials in the source code
To run the modified file, click the “Start” button on toolbar (in Visual Studio).
Your code editor will run your program and project the outcome. You can see the start button on Figure 4.
Figure 4 - Start the project
If you run the file, a window will appear with the name “SMS Client test form”. Here you can determine the destination phone number and the message itself.
If you provided all the required information, please click the “Send” button.
It will connect to the Ozeki SMS Gateway and send the message. You can see the window in Figure 5.
Start your SMS API integration with our comprehensive tutorials for software
developers. Learn how to send and receive SMS messages using popular programming l
anguages like C#, Java, Python, JavaScript, and more.
From basic "Hello World" examples to advanced features like scheduled messaging,
bulk SMS, and two-way communication, our tutorials demonstrate how to use our
API to its full potential. Find step-by-step guides, free code examples, and
resources to build robust SMS applications.
C# SMS tutorial
This tutorial helps you get started with C#. It explains what you need to write your first C# program,
from where to download the tools need, how to install these tools and how to write your first
'Hello world' program. If you have never written a C# program before this is the place to start. C# Hello world |
C# send sms |
C# send many sms |
C# schedule sms |
C# receive sms |
C# delete sms
VB SMS tutorial
This tutorial helps you get started with Visual Basic. It explains what you need to write your first Visual Basic program,
from where to download the tools need, how to install these tools and how to write your first 'Hello world' program.
If you have never written a Visual Basic program before this is the place to start. VB Hello world |
VB send sms |
VB send many sms |
VB schedule sms |
VB receive sms |
VB delete sms |
VB sms Github
R SMS tutorial
This tutorial helps you get started with R. It explains what you need to write your first R program,
from where to download the tools need, how to install these tools and how to write your first 'Hello world' program.
If you have never written a R program before this is the place to start. R Hello world |
R send sms |
R send many sms |
R schedule sms |
R receive sms |
R delete sms |
R sms Github
This tutorial helps you get started with C#. It explains what you need to
write your first C# program. It starts with the basics: you will learn where you
can find and download the tools needed, how to install these tools and it
will take you all the way to building and running your code.
If you have never written a C# program before this is the place to start.
We have created this article, so you can get started with C#, and move
on to our sms examples. If you are already familiar with C#, you can
jump directly to one of the following SMS projects.
C# is a programming language. It is similar to a natural language, like
English. It is used to talk to a computer. The major difference between
a natural language and a programming language is that programming languages
have a more rigorous structure, to help the computer understand it better.
What is Visual Studio
Visual studio is a tool to write a C# program. Visual studio allows you
to type in text using the C# language, and it makes it possible for you
to tell the computer, to read the text and execute the instructions. We
use the term "Run" to tell computer to execute the instructions.
What is a C# Hello world program
The C# hello world program is the simplest program you can write. It
simply prints out the sentence: Hello world on the computer screen.
The Hello World program is the first program developers write in any programming
language.
How to write your first program in C#
To write your first program in C#:
Setup Visual Studio Community
Create a new C# Console Application
Configure your project's name and directory
Select the .NET Core for Target Framework
Write your first 'Hello world' program in C#
Run the C# 'Hello world' program
Examine the error report
If there is an error, fix it
Prerequisites
Here is what you need to get started. To write your first computer program
in C#, you need a Windows computer, the Visual Studio programming environment
and example code presented below.
Windows 10 computer
Microsoft Visual Studio Community Edition
Ozeki Hello World example project
Download Visual Studio
Microsoft Visual Studio Community Edition
In this video tutorial you will find how to download the Visual Studio Community Edition installer (Video 1).
You may download the installer from the following URL:
https://visualstudio.microsoft.com/downloads/.
On this page you will see different version of Visual Studio available for download.
Follow the instructions in this short video to download the installer on to your computer.
Download Visual Studio installer
Start by going to the following website: https://visualstudio.microsoft.com/downloads/.
Under the Community column, click on the purple Free download button (Figure 1).
This is going to download the Microsoft Visual Studio Community Edition Installer on to your computer to the default download location specified by your browser.
Figure 1 - Download Visual Studio Community
Install Visual Studio
To write your first C# program, you need to install visual studio. The following
video (Video 2) shows you how this installation can be done.
Create your first visual studio project
After visual studio has been installed, you need to open it, and create
a console project, as you can see in Video 3. The console project is the
simplest project you can create.
Create a new project in Visual Studio
First, open Visual Studio, which you have just installed.
You will be then greeted by a welcome screen.
This screen lets you create a new project or open previous ones.
Under the "Get Started" column on the right, click on Create a new project (Figure 2).
This will forward you to the next page where you can configure the settings of your project.
Figure 2 - Create a new project in Visual Studio
Select Console Application in C#
In order to create a C# project, you will first need to filter the project to
C# and Console Application.
After you have clicked on "Create a new project" you will be brought to a configuration screen.
First, select C# from the combo box in the top middle section of the
window just below the search bar (Figure 3).
Next, select Console in the combo box farthest to the right side of the window.
As a result of your filtering an option titled Console Application will pop up.
Select Console Application by clicking on it.
Finally, click the Next button on the bottom right to continue.
Figure 3 - Select Console Application in C#
Name your application
After specifying your project as a Console Application, you will be asked to give it a name.
Under the text that reads "Project name" you will find a textbox (Figure 4).
Enter your desired name into this textbox to name your project.
Give it an easily identifiable name, so you could always recognize it.
We also recommend making sure that you place the solution and the project into the same library.
This is done by clicking on the checkbox on the bottom of the section to enable this option.
Click on the Next button on the bottom right when you are done.
Figure 4 - Give a good fitting name to your project
Select targeted framework
To finalize your project configuration, you need to select a targeted framework.
This can be done on the last configuration page.
You can select a targeted framework from the combo box by clicking on it (Figure 5).
Here we select .NET Core. This is a good choice for your project.
Click on the Create button on the bottom right to create your project.
Figure 5 - Select the .NET version for your project
Write your 'hello world' program in C#
The first program you write in any programming language is the 'Hello world'
program. The sole aim of this program is to print the term 'Hello world' to
the computer screen. In this example the program consists of two lines of code:
The first line: Console.WriteLine prints the text. The second line: Console.ReadLine
waits for the user to hit enter (Code 1).
using System;
namespace MyFistConsoleApplication
{
class Program
{
static void Main(string[] args)
{
Console.WriteLine("This is my hello world!");
}
}
}
Code 1 - Printing "This is my hello world!" to the console in C#
Write the Hello World code
This short video tutorial shows you how to write the code for the "Hello world" program in C#.
This is done through the text editor in Visual Studio (Video 4).
First, write the command Console.WriteLine() into main.
Then the text goes into the parentheses and inside of quotation marks.
The final line should look like this: Console.WriteLine("This is my hello world!").
Run the C# "hello world" program
To run the hello world program, you need to click on the green Start button in
the Visual Studio toolbar. You may also use the F5 key to run your program.
Note that when you press F5, visual studio will first save your newly written
file, then it will compile it to an executable code, and then it will run it
on your computer (Video 5).
Output of the code
After you have instructed Visual Studio to run you program a debug console will
pop up.
In this debug console you can see your program run in real time. This looks
very much like a regular Windows command prompt.
The first line you see is the output of your code: "This is my hello world!"
(Figure 6).
Then, 3 lines further down, you will see "exited with code 0". This means
your program has closed.
Figure 6 - The console output of the program
What happens if I make a mistake in C#
If you make a mistake, when you write your instructions in C#, you will get
a Syntax error. The computer will highlight the line with error in red, and
it will tell you why it didn't understand the instructions. To correct the
mistake, you need to go back to the text editor and modify the program. Programs
say they "fix the error" when they correct mistakes.
What is syntax error?
Syntax error means I don't understand. If you talk to somebody in English and
he does not understand what you say, he will reply with "I don't understand".
If you talk to a computer in C# and the computer does not understand what
you say, he will reply with "Syntax error".
How to handle a syntax error in C#?
In the video below (Video 6) we will create a syntax error intentionally by not putting a
semicolon after the Hello World line. You will see, how the computer reacts,
how we fix the error, and how we run the computer program successfully.
Error highlighting in Visual Studio
When you make a mistake in Visual Studio you are notified of the error in multiple places.
First, the text editor itself show you that you have made an error (Figure 7).
This happens even before you run the program.
On the bottom of the screen Visual Studio also display the possible causes of the error.
Here we can see there is 1, because there is a number 1 next to X on a red circle symbol.
Figure 7 - Missing comma in the end of the line
Error dialog in Visual Studio
After you ran the program and it found an error, it will display an error dialogue.
This asks you if you want to run the last successful build (That actually ran before), or not.
You should press No and look for the cause of the problem (Figure 8).
On the bottom of the screen Visual Studio also displays the possible causes of the error.
Figure 8 - The IDE alerts you, that the code has errors in it
Error report in Visual Studio
If there is an error in your code, you can click on the X on a red circle symbol on the bottom. (Figure 9).
This brings up the error report, which will list all the possible things that could have cause the problem.
Here we can see there is one possibility listed.
The report will give you a description of the problem, and on what line it
occurred on.
This way it is easier for the programmer to identify the error and fix it.
Figure 9 - Error report in Visual Studio
Summary
Now that you have completed the five simple steps above, you have made your first step
in becoming a C#.Net software developer. This program may seem simple, and it may
not do much, but this is how great things start. Every programmer starts at this point, so do not be afraid,
continue your studies and the hard work will pay off.
Learning C# is advised if you want to develop web applications,
web services and desktop applications. You can learn a lot about Object Oriented Programming and Functional
Programming while you use C#. The next step in your learning journey will be creating an HTTP request.
Continue your reading in Ozeki's website, where you can find guides about
sending and receiving SMS in C#.
The simplest way to send SMS from C# is to use the built in HTTP/Rest SMS api
of Ozeki SMS Gateway. When you use this API, you will send SMS messages by
issuing a HTTP Post request to the SMS gateway. The HTTP Post request will
contain a message formatted in json format. The SMS gateway will
send this SMS to the recipient phone, and it will return a HTTP 200 OK response
to your request. (Figure 1)
Figure 1 - How to send an SMS from C#
C# code to send sms to mobile
The C# sms code sample below demonstrates how you can send SMS using the
http rest sms api of Ozeki SMS Gateway using the C# Ozeki.Libs.Rest library.
This library is provided to you free of charge, and you may use it and modify
it in any of your projects.
SendSMS.cs
using Ozeki.Libs.Rest;
using System;
namespace SendSms
{
class Program
{
static void Main(string[] args)
{
var configuration = new Configuration()
{
Username = "http_user",
Password = "qwe123",
ApiUrl = "http://127.0.0.1:9509/api"
};
var msg = new Message()
{
ToAddress = "+36201111111",
Text = "Hello, World!"
};
var api = new MessageApi(configuration);
var result = api.Send(msg);
Console.WriteLine(result);
Console.ReadKey();
}
}
}
How to use the C# sms example:
This C# sms example can be used in any .NET or .NET core application. To use
it, you must add the Ozeki.Libs.Rest dll as a reference to your project. After
the project reference is added, you must put the using Ozeki.Libs.Rest; directive
into the header section of your C# source code. This will allow you to use the classes
provided by the Ozeki.Libs.Rest library. You can use the Message class to create the
SMS. You can use the MessageApi class to send the SMS to the SMS gateway.
The SMS gateway will forward your message to the mobile network either through a wireless
connection or through the Internet.
Download SendSMS.cs
The source code explained in this article can be downloaded and used and modified free of charge. Download:SendSms.cs.zip (33.3Kb)
What is in the SendSms.cs.zip file?
The SendSms.cs.zip file contains the Ozeki.Libs.Rest library, which gives you
all the tools necessary to send and receive SMS messages. You will also find
the SendSms project in the zip, which contains the example code to show
you how to send an SMS. This example code is listed below. (Figure 2)
Figure 2 - What is inside SendSms.cs.zip
How to send SMS from C# (Simple guidelines)
To send SMS from C#:
Install a HTTP API user
Enable Log communication events on the Advanced tab
Setup Visual Studio
Download then extract the SendSms.cs.zip file
Open the SendSms.sln file in Visual Studio
Launch Ozeki SMS Gateway app
Run Program.cs C# code in Visual Studio
Check the logs to see if the SMS sent
Install Ozeki SMS Gateway and create an HTTP API user
To be able to send SMS from C#, first you need to install Ozeki SMS Gateway.
The SMS gateway can be installed on the same computer, where you develop your C# code in Visual studio.
After installation, the next step is to connect Ozeki SMS Gateway to the mobile network.
You can send a test sms from the Ozeki GUI to verify, that your mobile
network connection works. The final step to prepare your environment is to create a HTTP sms api user.
Create a user with a username of "http_user", and with a password of "qwe123" to make
the example work without modification.
After the environment is setup, you can run your C# code.
HTTP API url to use send sms from C#
To send SMS from C#, your C# will have to issue an HTTP request to the SMS gateway.
The API url is shown below. Note that the IP address (127.0.0.1) should
be replaced to the IP address of your SMS gateway. If Ozeki SMS Gateway is
installed on the same computer where the C# sms application is running,
this can be 127.0.0.1. If it is installed on a different computer, it should
be the IP address of that computer.
http://127.0.0.1:9509/api?action=rest
HTTP authentication to use send sms from C#
To authenticate the C# sms client, you need to send the username and password in
a base64 encoded string to the server in a HTTP request. The format used is: base64(username+":"+password).
In C# you can use the following code to do this encoding:
var encoding = Encoding.GetEncoding("iso-8859-1");
var usernamePassword = username + ":" + password;
var usernamePasswordEncoded = Convert.ToBase64String(encoding.GetBytes(usernamePassword));
For example, if you encode the username 'http_user' and the password 'qwe123', you
will get the following base64 encoded string: aHR0cF91c2VyOnF3ZTEyMw==. To send
HTTP request header to send SMS from C#
To send the SMS messages, you need to include the following lines as headers in
the HTTP request. Note that we include a content type and an Authorization header.
To submit the SMS, your C# application will send an HTTP request similar
to the one below. Note, that this request contains a HTTP header part and
a http body part. The HTTP body is a JSON encoded data string. It contains
the recipient number and the messages text.
Once the SMS gateway receives this request, it will generate a HTTP response. The
HTTP response will contain a status code, to indicate whether the SMS submit
request was successful or not. It will also return a JSON encoded structure
to provide you useful details about the message's submission.
This video presents you how to setup a new HTTP API user account. It will start with the home page of the
Ozeki SMS Gateway and will end with the Events tab of the new user. The video will show you how to create and configure your new user.
The great thing about this video is that it is only 30 seconds long but contains all the information you need to create a new http api user.
How to send SMS from C# using the C# sms api (Video tutorial)
This video shows you how to download the SendSms.cs.zip file from this
page, and how to download its contents in Visual studio. If watch the
video, you will notice, that the contents of the SendSms.cs zip are placed
into the Windows desktop. You will also see that we double click on the
SendSms.sln solution file to open the solution. Visual Studio will show
some warnings because the file is coming from the web. Simply click OK to
avoid these warnings.
C# sms example: SendSms.sln
The example code below is part of the SendSms.sln Visual Studio Solution. A visual
studio solution can contain multiple projects and multiple files. In this solution
there is only one project: SendSms.csproj, and one file: Program.cs.
Figure 2 - SendSms.sln
How to check that the SMS has been accepted by the HTTP user (Video tutorial)
After the SMS has been submitted, it is a good idea to check your SMS gateway,
to see what it has received. You can check the log by opening the HTTP user's
details from the Ozeki SMS Gateway management console. The following video
shows you what to look for. The video will start with the opened code and will end with the details of the sent message.
You will learn how to launch the project, what the project looks like during running and how the log file looks after it.
The video is only 42 seconds long and easy to understand. You will have no problem following it.
How to check that the SMS has been sent to the mobile network
The final step in verifying the procedure is to take a look at the logs of
the mobile network connection. You might have to turn on logging
in the configuration of the connection before you send the message to see
the logs. If logging is enabled, you will see the phone number and the text
of the message you have sent.
Test if the request was accepted (Video tutorial)
In the following video, you will see how to check if the SMPP client was successful in sending your message.
You will learn how to open the events tab of the SMPP user and what to look for. The video is only 18 seconds long but will be very helpful.
SMS received on the phone (Video tutorial)
On the following video, you will see how an incoming message looks like that was sent from the Ozeki SMS Gateway.
It will start with the home screen of an android phone and will end with the message opened.
It is only 18 seconds long and you can see the whole process of receiving a message.
Runing the C# sms example on Windows
When you use windows to run this sms example written in C#, you will notice that
you get slightly better performance, than when you run it on Linux. To understand
why this happens, you must bring into mind that C# is using the .NET framework for
code execution. This is because the .NET implementation on Windows is optimized
for performance, while mono, the .NET implementation on Linux has some catching
up to do in this field.
Summary
The guide above explained the steps of sending SMS from C#. As it could be seen, Ozeki gives you all the tools needed in message
delivery, so if the steps were followed carefully, messaging from C# is no longer an issue. Ozeki SMS Gateway plays enormous part in
delivery, you couldn't reach the mobile users without this program. Important to note that Ozeki SMS Gateway works in any country,
so messages can be sent internationally with this solution.
The simplest way to send SMS from C# is to use the built in HTTP/Rest SMS api
of Ozeki SMS Gateway. When you use this API, you will send SMS messages by
issuing a HTTP Post request to the SMS gateway. The HTTP Post request will
contain a message formatted in json format. The SMS gateway will
send this SMS to the recipient phone, and it will return a HTTP 200 OK response
to your request.
Figure 1 - Send multiple sms from C#
C# code to send multiple sms to mobile
The C# sms code sample below demonstrates how you can send SMS using the
http rest sms api of Ozeki SMS Gateway using the C# Ozeki.Libs.Rest library.
This library is provided to you free of charge, and you may use it and modify
it in any of your projects.
SendSMS.cs
using Ozeki.Libs.Rest;
using System;
namespace SendMultipleSms
{
class Program
{
static void Main(string[] args)
{
var configuration = new Configuration()
{
Username = "http_user",
Password = "qwe123",
ApiURL = "http://127.0.0.1:9509/api"
};
var msg1 = new Message()
{
ToAddress = "+36201111111",
Text = "Hello, World 1"
};
var msg2 = new Message()
{
ToAddress = "+362222222",
Text = "Hello, World 2"
};
var msg3 = new Message()
{
ToAddress = "+363333333",
Text = "Hello, World 3"
};
var api = new MessageApi(configuration);
var result = api.Send(new Message[]{ msg1, msg2, msg3 });
Console.WriteLine(result);
Console.ReadKey();
}
}
}
How to use the C# sms example:
This C# sms example can be used in any .NET or .NET core application. To use
it, you must add the Ozeki.Libs.Rest dll as a reference to your project. After
the project reference is added, you must put the using Ozeki.Libs.Rest; directive
into the header section of your C# source code. This will allow you to use the classes
provided by the Ozeki.Libs.Rest library. You can use the Message class to create the
SMS. You can use the MessageApi class to send the SMS to the SMS gateway.
The SMS gateway will forward your message to the mobile network either through a wireless
connection or through the Internet.
Download SendSMS.cs
The source code explained in this article can be downloaded and used and modified free of charge. Download:SendMultipleSms.cs.zip (34.5Kb)
What is in the SendMultipleSms.cs file?
The SendMultipleSms.cs file contains the Ozeki.Libs.Rest library, which gives you
all the tools necessary to send and receive SMS messages. You will also find
the SendMultipleSms project in the zip, which contains the example code to show
you how to send an SMS. This example code is listed below.
Figure 2 - What is inside SendMultipleSms.cs.zip
How to send multiple sms from C# (Quick steps)
To send multiple sms from C#:
Setup Visual Studio Community
Download the Send-multiple-SMS.cs.zip file
Extract the .zip file from Downloads folder
Open the SendMultipleSms.sln file in Visual Studio
Launch Ozeki SMS Gateway
Create a HTTP API user in Ozeki
Run Program.cs C# code in Visual Studio to send test SMS messages
Check the Sent box in Ozeki SMS Gateway
Install Ozeki SMS Gateway and create an HTTP API user
To be able to send SMS from C#, first you need to install Ozeki SMS Gateway.
The SMS gateway can be installed on the same computer, where you develop your C# code in Visual studio.
After installation, the next step is to connect Ozeki SMS Gateway to the mobile network.
You can send a test sms from the Ozeki GUI to verify, that your mobile
network connection works. The final step to prepare your environment is to create a HTTP sms api user.
Create a user with a username of "http_user", and with a password of "qwe123" to make
the example work without modification.
After the environment is setup, you can run your C# code.
HTTP API url to use send sms from C#
To send SMS from C#, your C# will have to issue an HTTP request to the SMS gateway.
The API url is shown below. Note that the IP address (127.0.0.1) should
be replaced to the IP address of your SMS gateway. If Ozeki SMS Gateway is
installed on the same computer where the C# sms application is running,
this can be 127.0.0.1. If it is installed on a different computer, it should
be the IP address of that computer.
http://127.0.0.1:9509/api?action=rest
HTTP authentication to use send sms from C#
To authenticate the C# sms client, you need to send the username and password in
a base64 encoded string to the server in a HTTP request. The format used is: base64(username+":"+password).
In C# you can use the following code to do this encoding:
var encoding = Encoding.GetEncoding("iso-8859-1");
var usernamePassword = username + ":" + password;
var usernamePasswordEncoded = Convert.ToBase64String(encoding.GetBytes(usernamePassword));
For example if you encode the username 'http_user' and the password 'qwe123', you
will get the following base64 encoded string: aHR0cF91c2VyOnF3ZTEyMw==. To send
HTTP request header to send SMS from C#
To send the SMS messages, you need to include the following lines as headers in
the HTTP request. Note that we include a content type and an Authorization header.
To submit the SMS messages, your C# application will send an HTTP request similar
to the one below. Note, that this request contains a HTTP header part and
a http body part. The HTTP body is a JSON encoded data string. It contains
the recipient's number and the message's text.
Once the SMS gateway receives this request, it will generate a HTTP response. The
HTTP response will contain a status code, to indicate whether the SMS submit
request was successful or not. It will also return a JSON encoded structure
to provide you useful details about the message's submission.
How to download the SendMultipleSMS.sln project (Video tutorial)
In the following video, you will learn about how you can use the SendMultipleSMS.sln C# project.
The video will start with the download page and will take you all the way to the opened code editor panel.
You will learn how to download and open the code file.
The video is only 54 second long but it has all the necessary information you need to successfully use the example code file.
The example code below is part of the SendMultipleSms.sln Visual Studio Solution. A visual
studio solution can contain multiple projects and multiple files. In this solution
there is only one project: SendMultipleSms.csproj, and one file: Program.cs.
Figure 3 - SendMultipleSms.sln
How to use the project (Video tutorial)
In the following clip, you will see how you can launch the SendMultipleSMS.cs C# code.
The video will start with the opened code and will take you all the way to the events tab with the log of the sent message.
You will see how to launch the code and what happened if the code was executed.
The video is a little shorter than 1 minute but it contains all the information that is necessary to run the project.
Runing the C# sms example on Windows
When you use windows to run this sms example written in C#, you will notice that
you get slightly better performance, than when you run it on Linux. To understand
why this happens, you must bring into mind that C# is using the .NET framework for
code execution. This is because the .NET implementation on Windows is optimized
for performance, while mono, the .NET implementation on Linux has some catching
up to do in this field.
Conclusion
This article showed the steps of multiple SMS sending in one request from C#. With this knowledge and the provided tools,
you should be able to reach out to several customers with one single code. Ozeki SMS Gateway has an important part
in this process because this program organizes the message delivery. Ozeki SMS Gateway
works with high quality and performance, allowing you to send up to 1000 SMS per second.
Continue your learning in Ozeki's tutorial pages, where you can read about topics like SMS scheduling
and deleting in C#.
The simplest way to send SMS from C# is to use the built in HTTP/Rest SMS api
of Ozeki SMS Gateway. When you use this API, you will send SMS messages by
issuing a HTTP Post request to the SMS gateway. The HTTP Post request will
contain a message formatted in json format. The SMS gateway will
send this SMS to the recipient phone, and it will return a HTTP 200 OK response
to your request.
Figure 1 - C# schedule SMS for future delivery
C# code to send scheduled sms to mobile
The C# sms code sample below demonstrates how you can send SMS using the
http rest sms api of Ozeki SMS Gateway using the C# Ozeki.Libs.Rest library.
This library is provided to you free of charge, and you may use it and modify
it in any of your projects.
SendScheduledSms.cs
using Ozeki.Libs.Rest;
using System;
namespace SendScheduledSms
{
class Program
{
static void Main(string[] args)
{
var configuration = new Configuration()
{
Username = "http_user",
Password = "qwe123",
ApiUrl = "http://127.0.0.1:9509/api"
};
var msg = new Message()
{
ToAddress = "+36201111111",
Text = "Hello, World!",
TimeToSend = DateTime.Parse("2021-06-11 13:25:00")
};
var api = new MessageApi(configuration);
var result = api.Send(msg);
Console.WriteLine(result);
Console.ReadKey();
}
}
}
How to use the C# sms example:
This C# sms example can be used in any .NET or .NET core application. To use
it, you must add the Ozeki.Libs.Rest dll as a reference to your project. After
the project reference is added, you must put the using Ozeki.Libs.Rest; directive
into the header section of your C# source code. This will allow you to use the classes
provided by the Ozeki.Libs.Rest library. You can use the Message class to create the
SMS. You can use the MessageApi class to send the SMS to the SMS gateway.
The SMS gateway will forward your message to the mobile network either through a wireless
connection or through the Internet.
Download SendScheduledSms.cs
The source code explained in this article can be downloaded and used and modified free of charge. Download:SendScheduledSms.cs.zip (34.2Kb)
What is in the SendScheduledSms.cs file?
The SendScheduledSms.cs file contains the Ozeki.Libs.Rest library, which gives you
all the tools necessary to send and receive SMS messages. You will also find
the SendScheduleSms project in the zip, which contains the example code to show
you how to send an SMS. This example code is listed below.
Figure 2 - What is inside SendScheduledSms.cs.zip
How to send scheduled sms from C# (Simple guidelines)
To send scheduled sms from C#:
Install HTTP API user
Setup Visual Studio
Download the SendScheduledSms.cs.zip file
Extract the .zip file from the Downloads folder
Open the SendScheduledSms.sln file in Visual Studio
Add the Ozeki.Libs.Rest dll as a reference
Edit the file to schedule sms from C#
Launch Ozeki SMS Gateway
Run Program.cs in Visual Studio to send SMS from C#
Check the logs
Install Ozeki SMS Gateway and create an HTTP API user
To be able to send SMS from C#, first you need to install Ozeki SMS Gateway.
The SMS gateway can be installed on the same computer, where you develop your C# code in Visual studio.
After installation, the next step is to connect Ozeki SMS Gateway to the mobile network.
You can send a test sms from the Ozeki GUI to verify, that your mobile
network connection works. The final step to prepare your environment is to create a HTTP sms api user.
Create a user with a username of "http_user", and with a password of "qwe123" to make
the example work without modification.
After the environment is setup, you can run your C# code.
HTTP API url to use send sms from C#
To send SMS from C#, your C# will have to issue an HTTP request to the SMS gateway.
The API url is shown below. Note that the IP address (127.0.0.1) should
be replaced to the IP address of your SMS gateway. If Ozeki SMS Gateway is
installed on the same computer where the C# sms application is running,
this can be 127.0.0.1. If it is installed on a different computer, it should
be the IP address of that computer.
http://127.0.0.1:9509/api?action=rest
HTTP authentication to use send SMS from C#
To authenticate the C# sms client, you need to send the username and password in
a base64 encoded string to the server in a HTTP request. The format used is: base64(username+":"+password).
In C# you can use the following code to do this encoding:
var encoding = Encoding.GetEncoding("iso-8859-1");
var usernamePassword = username + ":" + password;
var usernamePasswordEncoded = Convert.ToBase64String(encoding.GetBytes(usernamePassword));
For example if you encode the username 'http_user' and the password 'qwe123', you
will get the following base64 encoded string: aHR0cF91c2VyOnF3ZTEyMw==. To send
HTTP request header to send SMS from C#
To send the SMS messages, you need to include the following lines as headers in
the HTTP request. Note that we include a content type and an Authorization header.
To submit the SMS, your C# application will send an HTTP request similar
to the one below. Note, that this request contains a HTTP header part and
a http body part. The HTTP body is a JSON encoded data string. It contains
the recipient's number and the message's text.
Once the SMS gateway receives this request, it will generate a HTTP response. The
HTTP response will contain a status code, to indicate whether the SMS submit
request was successful or not. It will also return a JSON encoded structure
to provide you useful details about the message's submission.
In this video, we are going to show you how to open the SendSMS.sln project and start working with it.
The video will start with the tutorial page and the download link and will take you all the way to the opened code.
You will learn how to download the project and how to open it.
The video only takes 1 minute to watch but it contains all the necessary information for you to open the SendSMS.sln project for scheduled SMS sending.
The example code below is part of the SendScheduledSms.sln Visual Studio Solution. A visual
studio solution can contain multiple projects and multiple files. In this solution
there is only one project: SendScheduledSms.csproj, and one file: Program.cs.
How to use the project (Video tutorial)
This video presents you how to use the SendSMS.sln project for scheduled SMS sending.
It will start with the opened project and will end with the log of the sent messages.
You will learn how to add the time you wish to send the message and how to run the code.
After it you will be able to check the Events tab with the log for the SMS sending.
The video takes only 80 seconds to watch, and it contains all the important steps.
You will have no problem following the tutorial.
Figure 3 - SendScheduledSms.sln
Runing the C# sms example on Windows
When you use windows to run this sms example written in C#, you will notice that
you get slightly better performance, than when you run it on Linux. To understand
why this happens, you must bring into mind that C# is using the .NET framework for
code execution. This is because the .NET implementation on Windows is optimized
for performance, while mono, the .NET implementation on Linux has some catching
up to do in this field.
Summary
The article above explained the steps of SMS scheduling from C#. Ozeki provides all the tools and instructions,
so finishing this guide means that you should be able to schedule your messages using C# and Ozeki SMS Gateway.
SMS scheduling is really useful if you want to send information to the customers and also want to make sure that
they have time to pay attention to the message. This way you can make sure that the message will not be ignored or
forgotten because their busy hours will be avoided.
Important to note that Ozeki SMS Gateway offers excellent logging capabilities, so the occurring errors can be tracked
down easily and quickly.
Continue your studies on Ozeki's tutorial pages, where you can get more information about similar topics, such as
SMS receiving and deleting in C#.
The simplest way to send SMS from C# is to use the built in HTTP/Rest SMS api
of Ozeki SMS Gateway. When you use this API, you will send SMS messages by
issuing a HTTP Post request to the SMS gateway. The HTTP Post request will
contain a message formatted in json format. The SMS gateway will
send this SMS to the recipient phone, and it will return a HTTP 200 OK response
to your request.
Figure 1 - Receive SMS in C# using Rest api
C# code to receive sms from mobile
The C# sms code sample below demonstrates how you can receive SMS using the
http rest sms api of Ozeki SMS Gateway using the C# Ozeki.Libs.Rest library.
This library is provided to you free of charge, and you may use it and modify
it in any of your projects.
Program.cs
using Ozeki.Libs.Rest;
using System;
namespace ReceiveSms
{
class Program
{
static void Main(string[] args)
{
var configuration = new Configuration()
{
Username = "http_user",
Password = "qwe123",
ApiUrl = "http://127.0.0.1:9509/api"
};
var api = new MessageApi(configuration);
var messages = api.DownloadIncoming();
Console.WriteLine(messages.Length + " messages downloaded from inbox.");
foreach(Message msg in messages)
{
Console.WriteLine(msg);
};
Console.ReadKey();
}
}
}
How to use the C# sms example:
This C# sms example can be used in any .NET or .NET core application. To use
it, you must add the Ozeki.Libs.Rest dll as a reference to your project. After
the project reference is added, you must put the using Ozeki.Libs.Rest; directive
into the header section of your C# source code. This will allow you to use the classes
provided by the Ozeki.Libs.Rest library. You can use the MessageApi class to receive the SMS from the SMS gateway.
The SMS gateway will forward the message to you either through a wireless
connection or through the Internet.
Download ReceiveSms.cs
The source code explained in this article can be downloaded and used and modified free of charge. Download:ReceiveSms.cs.zip (33.8Kb)
What is in the ReceiveSms.cs.zip file?
The ReceiveSms.cs.zip file contains the Ozeki.Libs.Rest library, which gives you
all the tools necessary to send and receive SMS messages. You will also find
the ReceiveSms project in the zip, which contains the example code to show
you how to receive an SMS. This example code is listed below.
Figure 2 - What is inside ReceiveSms.cs.zip
How to receive SMS in C# (Easy guidelines)
To receive SMS in C#:
Setup Visual Studio Community
Download the ReceiveSms.cs.zip file
Extract the .zip file from Downloads
Open the ReceiveSms.sln file in Visual Studio
Launch Ozeki SMS Gateway
Click on HTTP user in the Users and applications tab
Run Program.cs to receive SMS in C#
Check the Inbox in Ozeki SMS Gateway
Install Ozeki SMS Gateway and create an HTTP API user
To be able to send, and receive SMS from C#, first you need to install Ozeki SMS Gateway.
The SMS gateway can be installed on the same computer, where you develop your C# code in Visual studio.
After installation, the next step is to connect Ozeki SMS Gateway to the mobile network.
You can send a test sms from the Ozeki GUI to verify, that your mobile
network connection works. The final step to prepare your environment is to create a HTTP sms api user.
Create a user with a username of "http_user", and with a password of "qwe123" to make
the example work without modification.
After the environment is setup, you can run your C# code.
HTTP API url to use Receive sms from C#
To send SMS from C#, your C# will will have to issue an HTTP request to the SMS gateway.
The API url is shown below. Note that the IP address (127.0.0.1) should
be replaced to the IP address of your SMS gateway. If Ozeki SMS Gateway is
installed on the same computer where the C# sms application is running,
this can be 127.0.0.1. If it is installed on a different computer, it should
be the IP address of that computer.
http://127.0.0.1:9509/api?action=rest
HTTP authentication to use receive sms from C#
To authenticate the C# SMS client, you need to send the username and password in
a base64 encoded string to the server in a HTTP request. The format used is: base64(username+":"+password).
In C# you can use the following code to do this encoding:
var encoding = Encoding.GetEncoding("iso-8859-1");
var usernamePassword = username + ":" + password;
var usernamePasswordEncoded = Convert.ToBase64String(encoding.GetBytes(usernamePassword));
For example, if you encode the username 'http_user' and the password 'qwe123', you
will get the following base64 encoded string: aHR0cF91c2VyOnF3ZTEyMw==. To send
HTTP request to receive SMS with C#
To receive SMS, your C# application will send an HTTP request similar
to the one below. Note, that this request contains a HTTP header part and
a http body part. The HTTP body is a JSON encoded data string. It contains
the recipient's number and the message's text.
GET /api?action=receivemsg&folder=inbox HTTP/1.1
Connection: Keep-Alive
Authorization: Basic aHR0cF91c2VyOnF3ZTEyMw==
Host: 127.0.0.1:9509
HTTP request header to receive SMS from C#
To send the SMS messages, you need to include the following lines as headers in
the HTTP request. Note that we include a content type and an Authorization header.
Once the SMS gateway receives this request, it will generate a HTTP response. The
HTTP response will contain a status code, to indicate whether the SMS submit
request was successful or not. It will also return a JSON encoded structure
to provide you useful details about the message's submission.
How to receive SMS with C# using the C# sms api (Video tutorial)
This video shows you how to create a new .Net core console project in
Visual Studio, how to name it to ReceiveSms.sln. Once the
solution is created, you might notice that a Receive-SMS.csproj is added
to the solution, and by default the Program.cs file is opened. You
can rename the Program.cs to ReceiveSMS.cs if you wish. You will also
see in the Video, how the example code below can be copied into
the Program.cs file, and how it can be compiled and executed.
C# SMS example: ReceiveSms.sln
How to download and run the example project (Video tutorial)
In this video, you will learn how to download and run the ReceiveSMS.sln example
project. The video will start with the download page and will end with the opened code editor.
You will learn how to download and where to find your example project. Also,
we will show you how to open the downloaded project.
This video is only 1 minute long but it is very detailed, so you will have no
problem with following the steps.
The example code below is part of the ReceiveSms.sln Visual Studio Solution. A visual
studio solution can contain multiple projects and multiple files. In this solution
there is only one project: ReceiveSms.csproj, and one file: Program.cs.
Figure 3 - ReceiveSms.sln
How to use the code (Video tutorial)
In the next video, you will learn how to run the example code and how to check the log of the process.
It will start with launching the Ozeki SMS Gateway and will take you all the way to the events tab.
You will learn how to check the log, how to run you code and how to check the received messages.
The video is only 1 minute long but it contains all the necessary information you need to use the ReceiveSMS.sln project.
Runing the C# SMS example on Windows
When you use windows to run this sms example written in C#, you will notice that
you get slightly better performance, than when you run it on Linux. To understand
why this happens, you must bring into mind that C# is using the .NET framework for
code execution. This is because the .NET implementation on Windows is optimized
for performance, while mono, the .NET implementation on Linux has some catching
up to do in this field.
Conclusion
This article showed the necessary steps of SMS receiving in C#. With this guide and Ozeki SMS Gateway, SMS receiving in
C# cannot be an issue anymore. Study the guide carefully and you will be able to perform these steps easily. Ozeki
SMS Gateway is crucial in this procedure, it serves as a connector between the mobile users and you. The fact that
Ozeki SMS Gateway runs in an environment that you control has to be highlighted because it means that your contact list
and data is safe.
Continue reading in Ozeki's tutorial page, more guides can be found about topics like
SMS sending and scheduling from C#.
The simplest way to send SMS from C# is to use the built in HTTP/Rest SMS api
of Ozeki SMS Gateway. When you use this API, you will send SMS messages by
issuing a HTTP Post request to the SMS gateway. The HTTP Post request will
contain a message formatted in json format. The SMS gateway will
send this SMS to the recipient phone, and it will return a HTTP 200 OK response
to your request.
Figure 1 - How to delete SMS from the SMS gateway using C#
C# code to receive sms from mobile
The C# sms code sample below demonstrates how you can receive SMS using the
http rest sms api of Ozeki SMS Gateway using the C# Ozeki.Libs.Rest library.
This library is provided to you free of charge, and you may use it and modify
it in any of your projects.
Program.cs
using System;
using Ozeki.Libs.Rest;
namespace DeleteSms.cs
{
class Program
{
static void Main(string[] args)
{
var configuration = new Configuration()
{
Username = "http_user",
Password = "qwe123",
ApiUrl = "http://127.0.0.1:9509/api"
};
var msg = new Message()
{
ID = "a85d6e16-f888-4306-bd2a-8f8a119d8abf"
};
var api = new MessageApi(configuration);
var result = api.Delete(Folder.Inbox, msg);
Console.WriteLine(result);
Console.ReadKey();
}
}
}
How to use the C# sms example:
This C# sms example can be used in any .NET or .NET core application. To use
it, you must add the Ozeki.Libs.Rest dll as a reference to your project. After
the project reference is added, you must put the using Ozeki.Libs.Rest; directive
into the header section of your C# source code. This will allow you to use the classes
provided by the Ozeki.Libs.Rest library. You can use the MessageApi class to receive the SMS from the SMS gateway.
The SMS gateway will forward the message to you either through a wireless
connection or through the Internet.
Download Delete-SMS.cs
The source code explained in this article can be downloaded and used and modified free of charge. Download:DeleteSms.cs.zip (47.6Kb)
What is in the Delete-SMS.cs.zip file?
The Delete-SMS.cs.zip file contains the Ozeki.Libs.Rest library, which gives you
all the tools necessary to send, receive and delete SMS messages. You will also find
the DeleteSms project in the zip, which contains the example code to show
you how to delete an SMS. This example code is listed below.
Figure 2 - What is inside Recive-SMS.cs.zip
How to delete SMS using C# (Quick steps)
To delete SMS using C#:
Setup Visual Studio Community
Download the DeleteSms.cs.zip file
Extract the .zip file from Downloads
Open the DeleteSms.cs.sln file in Visual Studio
Launch Ozeki SMS Gateway
Select http_user in the Users and applications tab
Check the Message details in the Inbox
Insert the ID of the SMS message into Program.cs code
Run Program.cs to delete SMS with C#
Install Ozeki SMS Gateway and create an HTTP API user
To be able to send SMS from C#, first you need to install Ozeki SMS Gateway.
The SMS gateway can be installed on the same computer, where you develop your C# code in Visual studio.
After installation, the next step is to connect Ozeki SMS Gateway to the mobile network.
You can send a test sms from the Ozeki GUI to verify, that your mobile
network connection works. The final step to prepare your environment is to create a HTTP sms api user.
Create a user with a username of "http_user", and with a password of "qwe123" to make
the example work without modification.
After the environment is setup, you can run your C# code.
HTTP API url to use send sms from C#
To send SMS from C#, your C# will have to issue an HTTP request to the SMS gateway.
The API url is shown below. Note that the IP address (127.0.0.1) should
be replaced to the IP address of your SMS gateway. If Ozeki SMS Gateway is
installed on the same computer where the C# sms application is running,
this can be 127.0.0.1. If it is installed on a different computer, it should
be the IP address of that computer.
http://127.0.0.1:9509/api?action=rest
HTTP authentication to use receive sms from C#
To authenticate the C# sms client, you need to send the username and password in
a base64 encoded string to the server in a HTTP request. The format used is: base64(username+":"+password).
In C# you can use the following code to do this encoding:
var encoding = Encoding.GetEncoding("iso-8859-1");
var usernamePassword = username + ":" + password;
var usernamePasswordEncoded = Convert.ToBase64String(encoding.GetBytes(usernamePassword));
For example if you encode the username 'http_user' and the password 'qwe123', you
will get the following base64 encoded string: aHR0cF91c2VyOnF3ZTEyMw==. To send
HTTP request to delete SMS with C#
To delete SMS, your C# application will send an HTTP request similar
to the one below. Note, that this request contains a HTTP header part and
a http body part. The HTTP body is a JSON encoded data string. It contains
the recipient's number and the message's text.
To send the SMS messages, you need to include the following lines as headers in
the HTTP request. Note that we include a content type and an Authorization header.
Once the SMS gateway receives this request, it will generate a HTTP response. The
HTTP response will contain a status code, to indicate whether the SMS submit
request was successful or not. It will also return a JSON encoded structure
to provide you useful details about the message's submission.
How to delete SMS with C# using the C# sms api (Video tutorial)
This video shows you how to create a new .Net core console project in
Visual Studio, how to name it to DeleteSms.sln. Once the
solution is created, you might notice that a DeleteSms.csproj is added
to the solution, and by default the Program.cs file is opened. You
can rename the Program.cs to Program.cs if you wish. You will also
see in the Video, how the example code below can be copied into
the Program.cs file, and how it can be compiled and executed.
C# sms example: DeleteSms.sln
How to download the project file (Video tutorial)
In this video, you will learn how to download and run the DeleteSms.sln example project.
The video will start with the download page and will end with the opened code editor.
You will learn how to download and what to do with the project file. We will show you what software you need to use.
This video is only 1 minute long but it is very detailed, so you will have no problem with following the steps.
The example code below is part of the DeleteSms.sln Visual Studio Solution. A visual
studio solution can contain multiple projects and multiple files. In this solution
there are only two projects: DeleteSms.csproj, Ozeki.Libs.Rest.csproj and one file: Program.cs.
Figure 3 - DeleteSms.sln
How to use the project (Video tutorial)
In the next video, you will learn how to run the example code and how to check the log of the process. It will start with launching the Ozeki SMS Gateway and will take you all the way to the empty inbox after deleting the SMS.
You will learn how to get the message ID and how to use the code to delete a message. The video is only 1:38 long and it contains all the information you need to delete a message using this project.
Runing the C# sms example on Windows
When you use windows to run this sms example written in C#, you will notice that
you get slightly better performance, than when you run it on Linux. To understand
why this happens, you must bring into mind that C# is using the .NET framework for
code execution. This is because the .NET implementation on Windows is optimized
for performance, while mono, the .NET implementation on Linux has some catching
up to do in this field.
Summary
The guide explained the steps of SMS deleting from Ozeki SMS Gateway using C#. If the article was read carefully, deleting
messages from Ozeki SMS Gateway seems really easy with a C# code. This solution shows perfectly how simple to control and configure
Ozeki SMS Gateway with C# commands. Ozeki SMS Gateway allows you to manage SMS costs and to keep track of message traffic.
With this deleting function, you can remove unwanted messages swiftly.
This article demonstrates how you can download the latest C SMS API library from GitHub.
You will learn how to download the GitHub Desktop app and sign into it.
You will also learn how to clone a repository from the internet. We assume that you have already used GitHub and you are familiar with Visual Studio.
You will be presented with some important information and well-structured step by step instructions.
We hope you will find the presented instructions beneficial.
Figure 1 - How to download the latest C# SMS api library from Github
How to download the C# SMS API from GitHub (Quick steps)
To download the C# SMS API from GitHub:
Download GitHub Desktop
Sign into GitHub.com
Configure Git
Clone a C# SMS API from the Internet
Select c-sharp-send-sms-http-rest-ozeki library
Open Ozeki.Libs.Rest.CSharp.sln
Start the C# SMS API project
Check the sent SMS in Ozeki SMS Gateway
Download Github Desktop
In this video, you will learn how to download the GitHub Desktop application.
The video will start with opening the download page of GitHub Desktop and it
will take you all the way to having the installer on your computer.
The video is only 1 minute long, and you will learn every information you need
to complete the download procedure.
Download GitHub desktop
To access the GitHub Desktop download page, you will need to open the link.
Here you can get the latest version of the program.
Click the purple Download for Windows button (Figure 1).
This will start the downloading process.
Wait for the browser to finish the process to proceed.
Figure 1 - Download Github desktop installer
Install Github Desktop
In this video, we will show you how to start the installation process for GitHub Desktop.
It will start with launching the installer and will take you all the way to having a working software on your computer.
You will also learn how to login to the GitHub Desktop app. The video is only 1 minute long and very detailed.
You will have no problem understanding the steps.
Start the installer
If your browser finished downloading the installer, search for it in the downloads folder on your computer.
Click it to start the installation process. It will be an application type file named GitHubDesktopSetup-x64.
Figure 2 - Start Github desktop installer
Load page of installer
After you started the installation process, you will be presented with the window visible on Figure 3.
It means that the GitHub Desktop application is being installed on your computer.
The application will launch as soon as this window disappear.
Figure 3 - Installation procedure
Sign in to GitHub Desktop
The next step is to sign in to the GitHub Desktop application. This will require the login credentials of your GitHub user account.
Click the Sign in to GitHub.com button to reach the login window. If you have never used GitHub before, you can create a new user account on this page.
Click the Create free account link located above the sign in button. It will take you to the new user account creating page.
Figure 4 - Sign in to github
Provide username and password
The button will open a new browser window, where you need to log in (Figure 5). In this page, you need to use the username and password for your GitHub account.
Type in both to the correct textbox and click the Sing in button to proceed to the next step.
Figure 5 - Define Username and password
Configure the Git
The Configure Git step will define what information will be visible as a commit detail. Check the Use my GitHub account name and email address checkbox (Figure 6).
It means that the information from your GitHub will be used to identify the commits you create.
It will be visible to any other GitHub user. Click the Finish button to confirm your settings.
Figure 6 - Configure Git
Clone the Ozeki.Libs.Rest.Csharp repository
In the next video you will see how to clone a repository.
It will start with the opening page of the GitHub desktop app and will take you all the way to having the cloned repository on your computer for editing.
In the video, we provide a detailed tutorial on how to copy the URL of the repository you wish to clone and where to paste it.
The rest is up to the GitHub Desktop. The video is 54 seconds long, but it has all the steps detailed. You will have no problem following it.
Clone a repository from the Internet
To make any changes to the repository, you need to download the files to your computer.
This means that you can edit them offline. It is necessary to have your own copy of the files before editing.
In the Let’s get started page, you can choose to Create a tutorial repository if you would like to learn more about the GitHub desktop.
To edit the files of the Ozeki repository, choose the Clone a repository from the internet option (Figure 7).
It will open a new window where you need to copy the URL of the repository you wish to clone.
Figure 7 - Clone repository from Internet
Copy the URL code
Now you need to copy the URL of the repository you wish to make a clone of. To do so, please open GitHub in your browser and open the repository.
To copy the URL, you have two possible options. The first option is to search for the green Code button located above the list of files (Figure 8).
Click it and look for the URL.
If you have found it, click the copy icon on the right. The other method is simply copying the URL from the desktop. This will result in the same URL.
Figure 8 - Copy code URL
Clone the repository
Paste the URL into the clone repository form. Here you can set which repository to clone with the Repository URL textbox (Figure 9).
In the Local path, you need to provide an access path, where a new folder will be created to store the files.
Figure 9 - Paste URL and clone repository
Find the repository on your computer
Open the folder you provided for the Clone the repository. To do so, copy the
access path from the form before and past it into the File Explorers top bar (Figure 10).
Hit enter and it will start loading the folder.
Figure 10 - Repository cloned
How to use the repository
In the final video, you will learn how to use the repository you just cloned to your computer.
The video will start with the opened directory where the cloned files are located.
It will end with the successfully launched project for multiple SMS sending.
You will learn how to launch a project and how to check the log of it.
The video is only 1:38 long and it features all the steps you need to take in a detailed format.
Launch the Visual Studio Project
To launch the project where you could edit the code, look for the Ozeki.Libs.Rest.CSharp file.
Open the file and it will launch Visual Studio. You can edit the code there to your likings.
Figure 11 - Open Rest API solution
Start sending SMS messages
Click the Send Sms button located on the top of the applications GUI (Figure 12).
This will start the script and you can start sending SMS messages.
In the code editor panel, you can make changes to the code to run it customized.
Figure 12 - Start send SMS solution
Response from the project
Now you will get the response from the C# project. You will see the result
of the SMS sending process,
the recipients phone number and the body of the message. As you
can see on Figure 13, you will see it printed on a console window.
Figure 13 - Message sent
Sent SMS in Ozeki SMS Gateway
In case of a successful sending process, you can see the sent message in the
Sent folder of the Ozeki SMS Gateway.
To reach it, open the Ozeki SMS Gateway and search for the Sent folder
under the users' details panel on the left (Figure 14).
Figure 14 - SMS Sent in SMS Gateway
Final thoughts
This article was meant to explain how to get the C# SMS API from GitHub.
By following these directions, you can create the solution in a matter of minutes. Sending SMS messages is quick and simple with this
innovation using Ozeki SMS Gateway.
Important to note that Ozeki SMS Gateway allows you to log SMS messages into a database and offers various reporting capabilities
to give more information about your SMS communication, so the supervision functions are there for you.
If you would like to receive more interesting facts about the benefits of other similar
solutions, open Ozeki's tutorial page where you can read about
things like SMS scheduling and deleting in C#.
Nuget is the package manager of the .NET framework. You can use a Nuget package
in any .NET based application. If you are using Visual Studio 2019 you are
able to install a Nuget pakcage with a few clicks. In the following
videos I'll show you how to create a C# console application, and how to
use the Ozeki.Libs.Rest nuget package in that console application
written in C#.
Create a new C# console application in Visual Studio
Install the Ozeki.Libs.Rest NuGet package
Import the previously installed NuGet package with using Ozeki.Libs.Rest;
Create a new Configuration, Message and a MessageApi object using the Ozeki.Libs.Rest pakcage
Using the MessageApi object send the previously created message
What is NuGet?
NuGet is the official package-manager for NET, mad by Microsoft.
Step 1 - How to create a new C# console application
Step 2 - How to install the Ozeki.Libs.Rest NuGet package
To install a NuGet package in Visual Studio you need to right click onto the
icon of the project, then select the Manage NuGet Packages from the dropdown
menu. After that you have to search for the package you want to install, in this
case it is the Ozeki.Libs.Rest package. When you have found the Ozeki.Libs.Rest package
you have to install it by clicking on the Install button. When it is
installed, you are able to import and use the package in your project.
Manage NuGet Packages
To reach the menu where you can manage your NuGet Packages,
right-click the project title in the Solution Explorer.
It will bring up a sub-menu where you can find the 'Manage NuGet Packages...' button (Figure 1).
Click it to open the NuGet package installer.
Figure 1 - Manage NuGet Packages
Install the Ozeki.Libs.Rest package
Type in the following text in the search bar of the NuGet Packet manager: 'Ozeki.Libs.Rest'.
The search engine will show the one package you need. Choose it by clicking.
As you can see on Figure 2, on the right side of the panel,
you will find an 'Install' button. Click it and it will start the installation process.
Figure 2 - Install the Ozeki.Libs.Rest package
The installed package
Now the previously empty 'installed' packages list, contains a package.
It is the installed Ozeki.Libs.Rest. Now you can start using it. If you
would like to install more packages to Visual Studio Code,
repeat the process, but search for other packages.
Figure 3 - The installed package
Step 3 - How to use the Ozeki.Libs.Rest package in your C# application
In order to use the contents of the Ozeki.Libs.Rest package, you need to import
it by using the following line of code:
using Ozeki.Libs.Rest;
Code 1 - How to import the Ozeki.Libs.Rest nuget package into a C# application
Creating a program that uses that Ozeki.Libs.Rest
In this video, we are going to show you how to use the Ozeki.Libs.Rest NuGet package in a C# application.
The video will start with an empty code editor, and you will see the working SMS sending application at
the end of the video. You will learn how to write a code that uses the Ozeki.Libs.Rest to
send SMS messages through the Ozeki SMS Gateway.
The video is very detailed, you can see all the lines of code you need to provide in order to
have a working system.
It takes only 1:46 to watch the video, but you will understand the process by the end of it.
The source code of the project
On Figure 4, you can see the source code of the project.
As you can see, the 'username' and the 'password' variables contain the
login credentials for the HTTP user. The 'Toaddress' and the 'Text' variables
contain the address and the text of the message. If you are familiar
with the C# programming language, feel free to change the values of the
variable to send a customized message.
Figure 4 - SendSms.sln
The output of the program
If you run your program, you will see the result of it in the 'Debug Console'.
You will see the text 'Success' and some information about the message after.
It means that the message sending was successful. Press and key to close the debug console.
Figure 5 - The output of the C# program
Check the sent folder
After you have done the process, you can check the Sent folder in Ozeki SMS Gateway (Figure 6).
There you will see your test message, with any other message sent before.
You can find out more information about any message by clicking them.
Figure 6 - The message appears in the Sent folder of the http_user
Summary
This article explained how to use the Ozeki Rest SMS Api Nuget Package.
This innovation can be really helpful if you want to send text messages from C#.
The synergy between C# codes and Ozeki SMS Gateway ensures that you get the highest possible performance.
The Ozeki SMS Gateway offers excellent logging capabilities, which means you can
track down errors quickly and reduce downtime.
Make sure that you don't finish reading here, visit Ozeki's tutorial page where
more information can be found about topics like SMS sending and receiving in C#.
Now the only thing to do is to download Ozeki SMS Gateway and let the work begin!
This tutorial helps you get started with Visual Basic. It explains what you need to
write your first Visual Basic program. It starts with the basics: you will learn where you
can find and download the tools needed, how to install these tools and it
will take you all the way to building and running your code.
If you have never written a Visual Basic program before this is the place to start.
We have created this article, so you can get started with Visual Basic, and move
on to our sms examples. If you are already familiar with Visual Basic, you can
jump directly to one of the following SMS projects.
Visual Basic is a programming language. It is similar to a natural language, like
English. It is used to talk to a computer. The major difference between
a natural language and a programming language is that programming languages
have a more rigorous structure, to help the computer understand it better.
What is Visual Studio
Visual studio is a tool to write a Visual Basic program. Visual studio allows you
to type in text using the Visual Basic language, and it makes it possible for you
to tell the computer, to read the text and execute the instructions. We
use the term "Run" to tell computer to execute the instructions.
What is a Visual Basic Hello world program
The Visual Basic hello world program is the simplest program you can write. It
simply prints out the sentence: Hello world on the computer screen.
The Hello World program is the first program developers write in any programming
language.
How to write your first program in Visual Basic
To write your first program in Visual Basic:
Setup Visual Studio
Create a new Visual Studio project
Select Console Application
Name the project
Choose .NET for Target Framework
Write Hello World program in Visual Basic
Run the Hello World program
Check the output
Prerequisites
Here is what you need to get started. To write your first computer program
in Visual Basic, you need a Windows computer, the Visual Studio programming environment
and example code presented below.
Windows 10 computer
Microsoft Visual Studio Community Edition
Ozeki Hello World example project
Download Visual Studio (Video tutorial)
Microsoft Visual Studio Community Edition
In this video, we are going to show you how to download Visual Studio. It will
start with opening your browser and will take
you all the way to having the installer on your computer.
You will learn what page to visit and what button to look for if you want a free version of the software.
This video is only 40 seconds long, but it contains all the information you need to download the Microsoft Visual Studio Community Edition.
You may download the installer from the following URL:
https://visualstudio.microsoft.com/downloads/.
Install Visual Studio (Video tutorial)
In the following video, you will be presented with the process of installing Visual Studio.
The video will start with the opened downloads folder with the installer visible there.
At the end of the video, you will have a copy of Visual Studio installed on your computer.
We assume that you already downloaded the installer file.
You will learn what to do in each of the steps and how to set up the program.
This video is only 2:40 long and it is very detailed. You can get all the information you need from it.
Create your first visual studio project (Video tutorial)
From this video, you will learn how to create a new project in Visual Studio.
The video will start with opening the Visual Studio for the first time.
At the end of the video, you will have a project that you can start to work with.
You will also learn what settings you need to do to have a usable project file.
The video itself is only 41 seconds long, very detailed, and easy to follow.
You will have no problem with understanding the steps.
Create a new project
First, open Visual Studio, which you have just installed.
You will be then greeted by a welcome screen.
This screen lets you create a new project or open previous ones.
Under the "Get Started" column on the right, click on Create a new project (Figure 1).
This will forward you to the next page where you can configure the settings of your project.
Figure 1 - Create new project
Choose VB Console Application
After you have clicked on "Create a new project" you will be brought to a configuration screen.
In order to create a Visual Basic, you will first need to select the Visual Basic Console Application template (Figure 2).
Click on this option to select it.
Then, click on the Next button on the bottom left to continue.
Figure 2 - Choose VB Console Application
Name your project
After specifying your project as a Console Application, you will be asked to give it a name.
Under the text that reads "Project name" you will find a textbox (Figure 3).
Enter your desired name into this textbox to name your project.
Give it an easily identifiable and fitting name, so you could always recognize it.
Click on the Next button on the bottom right when you are done.
Figure 3 - Write the project name
Choose target framework
To finalize your project configuration, you need to select a targeted framework.
This can be done on the last configuration page.
You can select a targeted framework from the combo box by clicking on it (Figure 5).
Here we select .NET Core 3.1. This is a good choice for your project.
Click on the Create button on the bottom right to create your project.
Figure 4 - Target framework
Write your 'hello world' program in Visual Basic
The first program you write in any programming language is the 'Hello world'
program. The sole aim of this program is to print the term 'Hello world' to
the computer screen. In this example the program consists of two lines of code:
The first line: Console.WriteLine prints the text.